Edge Deployment: Computer Vision Yolov8n
Preload Libraries
Before starting, we will install some Python libraries used for this demonstration.This workshop is available from the Wallaroo Workshop GitHub Repository.
Computer Vision Yolov8n Edge Deployment and Observability in Wallaroo
The Yolov8 computer vision model is used for fast recognition of objects in images. This tutorial demonstrates how to:
- Deploy a Yolov8n pre-trained model into a Wallaroo Ops server and perform inferences on it.
- Publish the pipeline to the OCI registry configured in the Wallaroo Ops server.
- Add an edge location to the Wallaroo pipeline publish.
- Deploy the pipeline as a Wallaroo Server on an edge device through Docker, and display the inference logs submitted to the Wallaroo Ops server.
Wallaroo Ops Center provides the ability to publish Wallaroo pipelines to an Open Continer Initative (OCI) compliant registry, then deploy those pipelines on edge devices as Docker container or Kubernetes pods. See Wallaroo SDK Essentials Guide: Pipeline Edge Publication for full details.
For this tutorial, the helper module CVDemoUtils and WallarooUtils are used to transform a sample image into a pandas DataFrame. This DataFrame is then submitted to the Yolov8n model deployed in Wallaroo.
References
- Wallaroo Workspaces: Workspaces are environments were users upload models, create pipelines and other artifacts. The workspace should be considered the fundamental area where work is done. Workspaces are shared with other users to give them access to the same models, pipelines, etc.
- Wallaroo Model Upload and Registration: ML Models are uploaded to Wallaroo through the SDK or the MLOps API to a workspace. ML models include default runtimes (ONNX, Python Step, and TensorFlow) that are run directly through the Wallaroo engine, and containerized runtimes (Hugging Face, PyTorch, etc) that are run through in a container through the Wallaroo engine.
- Wallaroo Pipelines: Pipelines are used to deploy models for inferencing. Each model is a pipeline step in a pipelines, where the inputs of the previous step are fed into the next. Pipeline steps can be ML models, Python scripts, or Custom Model (these contain necessary models and artifacts for running a model).
- Wallaroo SDK Essentials Guide: Pipeline Edge Publication: Details on publishing a Wallaroo pipeline to an OCI Registry and deploying it as a Wallaroo Server instance.
Preload Libraries
Before starting, we will install some Python libraries used for this demonstration.
pip install ultralytics opencv-python onnxruntime imutils --user
Data Scientist Steps
The following details the steps a Data Scientist performs in uploading and verifying the model in a Wallaroo Ops server.
Load Libraries
The first step is loading the required libraries including the Wallaroo Python module.
# Import Wallaroo Python SDK
import wallaroo
from wallaroo.object import EntityNotFoundError
from wallaroo.framework import Framework

import sys

# setting path - only needed when running this from the `with-code` folder.
sys.path.append('../')

from CVDemoUtils import CVDemo
from WallarooUtils import Util
cvDemo = CVDemo()
util = Util()

# used to display DataFrame information without truncating
from IPython.display import display
import pandas as pd
pd.set_option('display.max_colwidth', None)
/opt/conda/lib/python3.9/site-packages/tqdm/auto.py:22: TqdmWarning: IProgress not found. Please update jupyter and ipywidgets. See https://ipywidgets.readthedocs.io/en/stable/user_install.html
  from .autonotebook import tqdm as notebook_tqdm
2023-12-21 23:27:02.202099: I tensorflow/core/util/util.cc:169] oneDNN custom operations are on. You may see slightly different numerical results due to floating-point round-off errors from different computation orders. To turn them off, set the environment variable `TF_ENABLE_ONEDNN_OPTS=0`.
2023-12-21 23:27:02.206874: W tensorflow/stream_executor/platform/default/dso_loader.cc:64] Could not load dynamic library 'libcudart.so.11.0'; dlerror: libcudart.so.11.0: cannot open shared object file: No such file or directory; LD_LIBRARY_PATH: /home/jovyan/.local/lib/python3.9/site-packages/cv2/../../lib64:
2023-12-21 23:27:02.206901: I tensorflow/stream_executor/cuda/cudart_stub.cc:29] Ignore above cudart dlerror if you do not have a GPU set up on your machine.
Connect to the Wallaroo Instance through the User Interface
The next step is to connect to Wallaroo through the Wallaroo client. The Python library is included in the Wallaroo install and available through the Jupyter Hub interface provided with your Wallaroo environment.
This is accomplished using the wallaroo.Client() command, which provides a URL to grant the SDK permission to your specific Wallaroo environment. When displayed, enter the URL into a browser and confirm permissions. Store the connection into a variable that can be referenced later.
If logging into the Wallaroo instance through the internal JupyterHub service, use wl = wallaroo.Client(). For more information on Wallaroo Client settings, see the Client Connection guide.
Connect to the Wallaroo Instance Exercise
Connect to the Wallaroo instance. If connecting through the JupyterHub service, then only the wallaroo.Client() is required. If connecting externally through the Wallaroo SDK, use the wallaroo.client(api_endpoint, auth_endpoint) method.
Sample code:
wl = wallaroo.Client()
# Connect to the Wallaroo instance here

wl = wallaroo.Client()
Create a New Workspace
We’ll use the SDK below to create our workspace , assign as our current workspace, then display all of the workspaces we have at the moment. We’ll also set up variables for our models and pipelines down the road, so we have one spot to change names to whatever fits your organization’s standards best.
To allow this tutorial to be run by multiple users in the same Wallaroo instance, update suffix with your first and last name. For example:
suffix = 'lazel-geth'
Create a New Workspace Exercise
Set the model name, file name, pipeline name, and workspace name.
Sample code:
suffix = ''

model_name = 'yolov8n'
model_filename = './models/cv-yolo/yolov8n.onnx'
pipeline_name = 'yolo8demonstration'
workspace_name = f'yolo8-edge-demonstration{suffix}'
# set helper variables here

suffix = ''

model_name = 'yolov8n'
model_filename = '../models/cv-yolo/yolov8n.onnx'
pipeline_name = 'yolo8demonstration'
workspace_name = f'yolo8-edge-demonstration{suffix}'
Set the Current Workspace
Set the current workspace where the models are uploaded to and pipelines created.
Set the Current Workspace Exercise
Setting the workspace is performed with the wallaroo.client.set_current_workspace(workspace) method.
Sample code:
workspace = get_workspace(workspace_name, wl)
wl.set_current_workspace(workspace)
def get_workspace(name, client):
    workspace = None
    for ws in client.list_workspaces():
        if ws.name() == name:
            workspace= ws
    if(workspace == None):
        workspace = client.create_workspace(name)
    return workspace

workspace = get_workspace(workspace_name, wl)
wl.set_current_workspace(workspace)
{'name': 'yolo8-edge-demonstration', 'id': 7, 'archived': False, 'created_by': 'cd8fd063-62fb-48dc-9589-1de1b29d96a7', 'created_at': '2023-12-21T17:50:23.802506+00:00', 'models': [{'name': 'yolov8n', 'versions': 2, 'owner_id': '""', 'last_update_time': datetime.datetime(2023, 12, 21, 23, 25, 23, 855377, tzinfo=tzutc()), 'created_at': datetime.datetime(2023, 12, 21, 17, 51, 40, 925252, tzinfo=tzutc())}], 'pipelines': [{'name': 'yolo8demonstration', 'create_time': datetime.datetime(2023, 12, 21, 17, 51, 41, 4898, tzinfo=tzutc()), 'definition': '[]'}]}
Upload the Model
When a model is uploaded to a Wallaroo cluster, it is optimized and packaged to make it ready to run as part of a pipeline. In many times, the Wallaroo Server can natively run a model without any Python overhead. In other cases, such as a Python script, a custom Python environment will be automatically generated. This is comparable to the process of “containerizing” a model by adding a small HTTP server and other wrapping around it.
Our pretrained model is in ONNX format, which is specified in the framework parameter. Because image size may vary from one image to the next, converting the image to a tensor array may have a different shape from one image to the next. For example, a 640x480 image produces an array of [640][480][3] for 640 rows with 480 columns each, and each pixel has 3 possible color values.
Because the tensor array size may change from image to image, the model upload sets the model’s batch configuration to batch_config="single". See the Wallaroo Data Schema Definitions for more details.
Upload the Model Exercise
The model name and file name were set in the variables above. Use them to upload the model.
Sample code:
yolov8_model = (wl.upload_model(model_name,
                               model_filename,
                               framework=Framework.ONNX)
                               .configure(tensor_fields=['images'],
                                          batch_config="single"
                                          )
                )
# Upload Retrained Yolo8 Model
yolov8_model = (wl.upload_model(model_name,
                               model_filename,
                               framework=Framework.ONNX)
                               .configure(tensor_fields=['images'],
                                          batch_config="single"
                                          )
                )
Pipeline Deployment Configuration
For our pipeline we set the deployment configuration to only use 1 cpu and 1 GiB of RAM.
Pipeline Deployment Configuration Exercise
Use the deployment configuration below.
deployment_config = wallaroo.DeploymentConfigBuilder() \
                    .replica_count(1) \
                    .cpus(1) \
                    .memory("1Gi") \
                    .build()
Build and Deploy the Pipeline
Now we build our pipeline and set our Yolo8 model as a pipeline step, then deploy the pipeline using the deployment configuration above.
Build and Deploy the Pipeline Exercise
We’ll do both commands in one step:
- Build the pipeline with
wallaroo.client.build_pipeline. - Set the model as a pipeline step with
wallaroo.pipeline.add_model_step(model)method.
Sample code:
pipeline = wl.build_pipeline(pipeline_name) \
            .add_model_step(yolov8_model)
pipeline = wl.build_pipeline(pipeline_name) \
            .add_model_step(yolov8_model)
Deploy the Pipeline
We deploy the pipeline with the wallaroo.pipeline.deploy(deployment_config) command, using the deployment configuration set up in previous steps.
Deploy the Pipeline Exercise
Deploy the pipeline.
Sample code:
pipeline.deploy(deployment_config=deployment_config)
# deploy the pipeline

pipeline.deploy(deployment_config=deployment_config)
Waiting for deployment - this will take up to 45s .......... ok
| name | yolo8demonstration |
|---|---|
| created | 2023-12-21 17:51:41.004898+00:00 |
| last_updated | 2023-12-21 23:27:04.700393+00:00 |
| deployed | True |
| arch | None |
| tags | |
| versions | ffd59e32-7eca-4d3c-8271-e359e8131af9, 05fcc215-51bf-4377-be2e-9067fb7125f8, d61551be-94c6-421d-b682-075d9d38cf55, 0e08af33-99ec-4b8d-9cd4-e2e966c7d9b4, 6f5c722a-f5e3-4da7-aad1-33a5b5f2ffdb, b404b106-6387-43f4-b0ef-ebeb1acdcec0, ed9c763f-bbd0-4d93-b359-cafd0f03639f |
| steps | yolov8n |
| published | True |
pipeline.status()
{'status': 'Running',
 'details': [],
 'engines': [{'ip': '10.244.3.239',
   'name': 'engine-786d7b8d55-gmjtd',
   'status': 'Running',
   'reason': None,
   'details': [],
   'pipeline_statuses': {'pipelines': [{'id': 'yolo8demonstration',
      'status': 'Running'}]},
   'model_statuses': {'models': [{'name': 'yolov8n',
      'version': '7c75f46d-297b-47a3-9f64-64715d57d883',
      'sha': '3ed5cd199e0e6e419bd3d474cf74f2e378aacbf586e40f24d1f8c89c2c476a08',
      'status': 'Running'}]}}],
 'engine_lbs': [{'ip': '10.244.4.234',
   'name': 'engine-lb-584f54c899-qlx7d',
   'status': 'Running',
   'reason': None,
   'details': []}],
 'sidekicks': []}
Convert Image to DataFrame
The sample image dogbike.png was converted to a DataFrame using the cvDemo helper modules. The converted DataFrame is stored as ./data/dogbike.df.json to save time.
The code sample below demonstrates how to use this module to convert the sample image to a DataFrame.
# convert the image to a tensor

width, height = 640, 640
tensor1, resizedImage1 = cvDemo.loadImageAndResize('dogbike.png', width, height)
tensor1.flatten()

# add the tensor to a DataFrame and save the DataFrame in pandas record format
df = util.convert_data(tensor1,'images')
df.to_json("data.json", orient = 'records')
Inference Request
We submit the DataFrame to the pipeline using wallaroo.pipeline.infer, and store the results in the variable inf1. A copy of the dataframe is stored in the file ./data/dogbike.df.json.
For this, we will use our cvDemo module to resize the image and retrieve the tensor values.
Inference Request Exercise
To use the cvDemo, we will:
- Convert the image to a 640x640 size to fit the model’s inputs.
- Create a pandas DataFrame from the image tensor data.
- Submit the inference request and save the data as a variable.
Sample code:
width, height = 640, 640
tensor1, resizedImage1 = cvDemo.loadImageAndResize('./data/cv-yolo/dogbike.png', width, height)

# convert tensor1 to a pandas DataFrame

# add the tensor to a DataFrame and save the DataFrame in pandas record format
df = util.convert_data(tensor1,'images')
df.to_json("./data/cv-yolo/data.df.json", orient="records")

# inf1 = pipeline.infer_from_file('./data/cv-yolo/dogbike.df.json')
inf1 = pipeline.infer(df)
# inference code here

width, height = 640, 640
tensor1, resizedImage1 = cvDemo.loadImageAndResize('../data/cv-yolo/dogbike.png', width, height)

# convert tensor1 to a pandas DataFrame

# add the tensor to a DataFrame and save the DataFrame in pandas record format
df = util.convert_data(tensor1,'images')
df.to_json("../data/cv-yolo/data.df.json", orient="records")

# inf1 = pipeline.infer_from_file('./data/cv-yolo/dogbike.df.json')
inf1 = pipeline.infer(df)
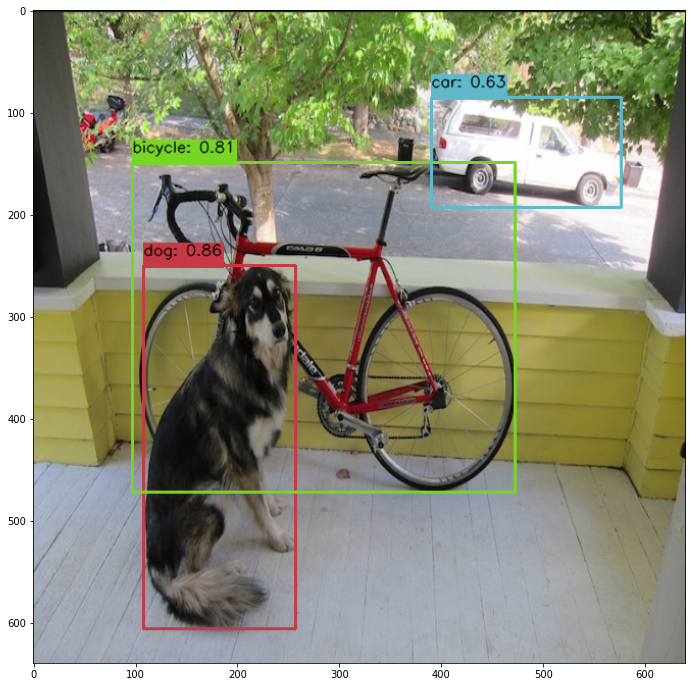
Display Bounding Boxes
Using our helper method cvDemo we’ll identify the objects detected in the photo and their bounding boxes. Only objects with a confidence threshold of 50% or more are shown.
Note that the first inputs are the inference results from the previous inference request, and the second variable is the resized image. Note that the first two arguments are the inference results obtained from the inference request, and the resized image.
Display Bounding Boxes Exercise
Use the following code, modified based on the name of your inference results and resized image variables.
confidence_thres = 0.50
iou_thres = 0.25

cvDemo.drawYolo8Boxes(inf1, resizedImage1, width, height, confidence_thres, iou_thres, draw=True)
# draw the bounding boxes from the inference results

confidence_thres = 0.50
iou_thres = 0.25

cvDemo.drawYolo8Boxes(inf1, resizedImage1, width, height, confidence_thres, iou_thres, draw=True)
  Score: 86.47% | Class: Dog | Bounding Box: [108, 250, 149, 356]
  Score: 81.13% | Class: Bicycle | Bounding Box: [97, 149, 375, 323]
  Score: 63.16% | Class: Car | Bounding Box: [390, 85, 186, 108]
array([[[ 34,  34,  34],
        [ 35,  35,  35],
        [ 33,  33,  33],
        ...,
        [ 33,  33,  33],
        [ 33,  33,  33],
        [ 35,  35,  35]],

       [[ 33,  33,  33],
        [ 34,  34,  34],
        [ 34,  34,  34],
        ...,
        [ 34,  34,  34],
        [ 33,  33,  33],
        [ 34,  34,  34]],

       [[ 53,  54,  48],
        [ 54,  55,  49],
        [ 54,  55,  49],
        ...,
        [153, 178, 111],
        [151, 183, 108],
        [159, 176,  99]],

       ...,

       [[159, 167, 178],
        [159, 165, 177],
        [158, 163, 175],
        ...,
        [126, 127, 121],
        [127, 125, 120],
        [128, 120, 117]],

       [[160, 168, 179],
        [156, 162, 174],
        [152, 157, 169],
        ...,
        [126, 127, 121],
        [129, 127, 122],
        [127, 118, 116]],

       [[155, 163, 174],
        [155, 162, 174],
        [152, 158, 170],
        ...,
        [127, 127, 121],
        [130, 126, 122],
        [128, 119, 116]]], dtype=uint8)
Inference Through Pipeline API
Another method of performing an inference using the pipeline’s deployment url.
Performing an inference through an API requires the following:
- The authentication token to authorize the connection to the pipeline.
- The pipeline’s inference URL.
- Inference data to sent to the pipeline - in JSON, DataFrame records format, or Apache Arrow.
Full details are available through the Wallaroo API Connection Guide on how retrieve an authorization token and perform inferences through the pipeline’s API.
For this demonstration we’ll submit the pandas record, request a pandas record as the return, and set the authorization header. The results will be stored in the file curl_response.df.
Inference Through Pipeline API Exercise
We’ll use the pipeline deployment URL to submit the inference request as an API call. The following is sample code for adding the authentication token and setting the Content-Type to pandas dataFrame.
!curl -X POST {pipeline._deployment._url()} \
    -H "Authorization:{wl.auth.auth_header()['Authorization']}" \
    -H "Content-Type:application/json; format=pandas-records" \
    --data @./data/cv-yolo/data.df.json > curl_response.df
# inference request here.

!curl -X POST {pipeline._deployment._url()} \
    -H "Authorization:{wl.auth.auth_header()['Authorization']}" \
    -H "Content-Type:application/json; format=pandas-records" \
    --data @../data/cv-yolo/data.df.json > curl_response.df
  % Total    % Received % Xferd  Average Speed   Time    Time     Time  Current
                                 Dload  Upload   Total   Spent    Left  Speed
100 38.0M  100 22.9M  100 15.0M  39.8M  26.2M --:--:-- --:--:-- --:--:-- 66.0M
Undeploy the Pipeline
Undeploy the pipeline and return the resources back to the Wallaroo cluster.
Undeploy the Pipeline Exercise
Sample code:
pipeline.undeploy()
# undeploy the pipeline

pipeline.undeploy()
Waiting for undeployment - this will take up to 45s .................................... ok
| name | yolo8demonstration |
|---|---|
| created | 2023-12-21 17:51:41.004898+00:00 |
| last_updated | 2023-12-21 23:27:04.700393+00:00 |
| deployed | False |
| arch | None |
| tags | |
| versions | ffd59e32-7eca-4d3c-8271-e359e8131af9, 05fcc215-51bf-4377-be2e-9067fb7125f8, d61551be-94c6-421d-b682-075d9d38cf55, 0e08af33-99ec-4b8d-9cd4-e2e966c7d9b4, 6f5c722a-f5e3-4da7-aad1-33a5b5f2ffdb, b404b106-6387-43f4-b0ef-ebeb1acdcec0, ed9c763f-bbd0-4d93-b359-cafd0f03639f |
| steps | yolov8n |
| published | True |
Publish the Pipeline for Edge Deployment
It worked! For a demo, we’ll take working once as “tested”. So now that we’ve tested our pipeline, we are ready to publish it for edge deployment.
Publishing it means assembling all of the configuration files and model assets and pushing them to an Open Container Initiative (OCI) repository set in the Wallaroo instance as the Edge Registry service. DevOps engineers then retrieve that image and deploy it through Docker, Kubernetes, or similar deployments.
See Edge Deployment Registry Guide for details on adding an OCI Registry Service to Wallaroo as the Edge Deployment Registry.
This is done through the SDK command wallaroo.pipeline.publish(deployment_config) which has the following parameters and returns.
Publish a Pipeline Parameters
The publish method takes the following parameters. The containerized pipeline will be pushed to the Edge registry service with the model, pipeline configurations, and other artifacts needed to deploy the pipeline.
| Parameter | Type | Description |
|---|---|---|
deployment_config | wallaroo.deployment_config.DeploymentConfig (Optional) | Sets the pipeline deployment configuration. For example: For more information on pipeline deployment configuration, see the Wallaroo SDK Essentials Guide: Pipeline Deployment Configuration. |
Publish a Pipeline Returns
| Field | Type | Description |
|---|---|---|
| id | integer | Numerical Wallaroo id of the published pipeline. |
| pipeline version id | integer | Numerical Wallaroo id of the pipeline version published. |
| status | String | The status of the pipeline publication. Values include:
|
| Engine URL | String | The URL of the published pipeline engine in the edge registry. |
| Pipeline URL | String | The URL of the published pipeline in the edge registry. |
| Helm Chart URL | String | The URL of the helm chart for the published pipeline in the edge registry. |
| Helm Chart Reference | String | The help chart reference. |
| Helm Chart Version | String | The version of the Helm Chart of the published pipeline. This is also used as the Docker tag. |
| Engine Config | wallaroo.deployment_config.DeploymentConfig | The pipeline configuration included with the published pipeline. |
| Created At | DateTime | When the published pipeline was created. |
| Updated At | DateTime | When the published pipeline was updated. |
Publish Exercise
We will now publish the pipeline to our Edge Deployment Registry with the pipeline.publish(deployment_config) command. deployment_config is an optional field that specifies the pipeline deployment. This can be overridden by the DevOps engineer during deployment.
Save the publish to a variable for later use.
Sample code:
pub = pipeline.publish(deployment_config)
pub
pub = pipeline.publish(deployment_config)
pub
Waiting for pipeline publish... It may take up to 600 sec.
Pipeline is Publishing.....Published.
| ID | 3 | |
| Pipeline Version | 7ced7818-1af6-43d3-97ad-6759ae05851a | |
| Status | Published | |
| Engine URL | ghcr.io/wallaroolabs/doc-samples/engines/proxy/wallaroo/ghcr.io/wallaroolabs/standalone-mini:v2024.1.0-main-4317 | |
| Pipeline URL | ghcr.io/wallaroolabs/doc-samples/pipelines/yolo8demonstration:7ced7818-1af6-43d3-97ad-6759ae05851a | |
| Helm Chart URL | oci://ghcr.io/wallaroolabs/doc-samples/charts/yolo8demonstration | |
| Helm Chart Reference | ghcr.io/wallaroolabs/doc-samples/charts@sha256:b4304efa70bb0bea468b749f1239486a370781ea3d86b17d2dd1b7d5805bd289 | |
| Helm Chart Version | 0.0.1-7ced7818-1af6-43d3-97ad-6759ae05851a | |
| Engine Config | {'engine': {'resources': {'limits': {'cpu': 1.0, 'memory': '512Mi'}, 'requests': {'cpu': 1.0, 'memory': '512Mi'}, 'arch': 'x86', 'gpu': False}}, 'engineAux': {'images': {}}, 'enginelb': {'resources': {'limits': {'cpu': 1.0, 'memory': '512Mi'}, 'requests': {'cpu': 1.0, 'memory': '512Mi'}, 'arch': 'x86', 'gpu': False}}} | |
| User Images | [] | |
| Created By | john.hummel@wallaroo.ai | |
| Created At | 2023-12-21 23:27:57.662183+00:00 | |
| Updated At | 2023-12-21 23:27:57.662183+00:00 | |
| Docker Run Command |
Note: Please set the OCI_USERNAME, and OCI_PASSWORD environment variables. | |
| Helm Install Command |
Note: Please set the HELM_INSTALL_NAME, HELM_INSTALL_NAMESPACE,
OCI_USERNAME, and OCI_PASSWORD environment variables. |
List Published Pipeline
The method wallaroo.client.list_pipelines() shows a list of all pipelines in the Wallaroo instance, and includes the published field that indicates whether the pipeline was published to the registry (True), or has not yet been published (False).
List Published Pipeline Exercise
List the pipelines and verify which ones are published or not.
Sample code:
wl.list_pipelines()
# list pipelines

wl.list_pipelines()
| name | created | last_updated | deployed | arch | tags | versions | steps | published |
|---|---|---|---|---|---|---|---|---|
| yolo8demonstration | 2023-21-Dec 17:51:41 | 2023-21-Dec 23:27:57 | False | None | 7ced7818-1af6-43d3-97ad-6759ae05851a, ffd59e32-7eca-4d3c-8271-e359e8131af9, 05fcc215-51bf-4377-be2e-9067fb7125f8, d61551be-94c6-421d-b682-075d9d38cf55, 0e08af33-99ec-4b8d-9cd4-e2e966c7d9b4, 6f5c722a-f5e3-4da7-aad1-33a5b5f2ffdb, b404b106-6387-43f4-b0ef-ebeb1acdcec0, ed9c763f-bbd0-4d93-b359-cafd0f03639f | yolov8n | True | |
| edge-hf-summarization | 2023-21-Dec 17:51:27 | 2023-21-Dec 20:23:34 | False | None | 02131366-6ca7-418a-bb1d-e8fed0240c1f, a440e392-73eb-4f5f-a049-1b081cad68b0, d86600fa-a49b-4a4c-9278-ccbed1ce0f06, ce2c843f-f0f8-4633-bb18-021d404acbae | hf-summarization | True |
List Publishes from a Pipeline
All publishes created from a pipeline are displayed with the wallaroo.pipeline.publishes method. The pipeline_version_id is used to know what version of the pipeline was used in that specific publish. This allows for pipelines to be updated over time, and newer versions to be sent and tracked to the Edge Deployment Registry service.
List Publishes Parameters
N/A
List Publishes Returns
A List of the following fields:
| Field | Type | Description |
|---|---|---|
| id | integer | Numerical Wallaroo id of the published pipeline. |
| pipeline_version_id | integer | Numerical Wallaroo id of the pipeline version published. |
| engine_url | String | The URL of the published pipeline engine in the edge registry. |
| pipeline_url | String | The URL of the published pipeline in the edge registry. |
| created_by | String | The email address of the user that published the pipeline. |
| Created At | DateTime | When the published pipeline was created. |
| Updated At | DateTime | When the published pipeline was updated. |
List Publishes from a Pipeline Exercise
List the publishes from a pipeline.
Sample code:
pipeline.publishes()
# list the pipeline publishes

pipeline.publishes()
| id | pipeline_version_name | engine_url | pipeline_url | created_by | created_at | updated_at |
|---|---|---|---|---|---|---|
| 2 | d61551be-94c6-421d-b682-075d9d38cf55 | ghcr.io/wallaroolabs/doc-samples/engines/proxy/wallaroo/ghcr.io/wallaroolabs/standalone-mini:v2024.1.0-main-4317 | ghcr.io/wallaroolabs/doc-samples/pipelines/yolo8demonstration:d61551be-94c6-421d-b682-075d9d38cf55 | john.hummel@wallaroo.ai | 2023-21-Dec 23:26:20 | 2023-21-Dec 23:26:20 |
| 3 | 7ced7818-1af6-43d3-97ad-6759ae05851a | ghcr.io/wallaroolabs/doc-samples/engines/proxy/wallaroo/ghcr.io/wallaroolabs/standalone-mini:v2024.1.0-main-4317 | ghcr.io/wallaroolabs/doc-samples/pipelines/yolo8demonstration:7ced7818-1af6-43d3-97ad-6759ae05851a | john.hummel@wallaroo.ai | 2023-21-Dec 23:27:57 | 2023-21-Dec 23:27:57 |
Add Edge Location
With the pipeline publish created, we can add an Edge Location. This allows the edge deployment to upload its inference results back to the Wallaroo Ops location, which are then added to the pipeline the publish originated from. These are added to the pipeline logs partition metadata.
First we’ll retrieve the pipeline logs for our current pipeline, and show the current pipeline logs metadata.
Then we’ll add the edge location we’ll deploy with the wallaroo.pipeline_publish.add_edge(name: string, tags: List[string]) method.
For the edge name, set it to firstname-lastname-edge-yolo.
- References
Add Edge Location Exercise
Display the log information with the metadata.partition, then add the edge location to the publish. Note that edge names must be unique, so add your first and last name to the list.
Sample code:
logs = pipeline.logs(dataset=['time', 'out.output0', 'metadata'])
display(logs.loc[:, ['time', 'metadata.partition']])

first_last_name = '-Gale-Karlach'

edge_name = f'yolo-edge-demo{first_last_name}'

edge_publish = pub.add_edge(edge_name)
display(edge_publish)
# display log information here with partition

logs = pipeline.logs(dataset=['time', 'out.output0', 'metadata'])
display(logs.loc[:, ['time', 'metadata.partition']])
Warning: The inference log is above the allowable limit and the following columns may have been suppressed for various rows in the logs: ['in.images']. To review the dropped columns for an individual inference’s suppressed data, include dataset=["metadata"] in the log request.
Warning: Pipeline log size limit exceeded. Please request logs using export_logs
| time | metadata.partition | |
|---|---|---|
| 0 | 2023-12-21 23:27:18.836 | engine-786d7b8d55-gmjtd |
# add edge here
edge_name = 'yolo-edge-demo-jch'

edge_publish = pub.add_edge(edge_name)
display(edge_publish)
| ID | 3 | |
| Pipeline Version | 7ced7818-1af6-43d3-97ad-6759ae05851a | |
| Status | Published | |
| Engine URL | ghcr.io/wallaroolabs/doc-samples/engines/proxy/wallaroo/ghcr.io/wallaroolabs/standalone-mini:v2024.1.0-main-4317 | |
| Pipeline URL | ghcr.io/wallaroolabs/doc-samples/pipelines/yolo8demonstration:7ced7818-1af6-43d3-97ad-6759ae05851a | |
| Helm Chart URL | oci://ghcr.io/wallaroolabs/doc-samples/charts/yolo8demonstration | |
| Helm Chart Reference | ghcr.io/wallaroolabs/doc-samples/charts@sha256:b4304efa70bb0bea468b749f1239486a370781ea3d86b17d2dd1b7d5805bd289 | |
| Helm Chart Version | 0.0.1-7ced7818-1af6-43d3-97ad-6759ae05851a | |
| Engine Config | {'engine': {'resources': {'limits': {'cpu': 1.0, 'memory': '512Mi'}, 'requests': {'cpu': 1.0, 'memory': '512Mi'}, 'arch': 'x86', 'gpu': False}}, 'engineAux': {'images': {}}, 'enginelb': {'resources': {'limits': {'cpu': 1.0, 'memory': '512Mi'}, 'requests': {'cpu': 1.0, 'memory': '512Mi'}, 'arch': 'x86', 'gpu': False}}} | |
| User Images | [] | |
| Created By | john.hummel@wallaroo.ai | |
| Created At | 2023-12-21 23:27:57.662183+00:00 | |
| Updated At | 2023-12-21 23:27:57.662183+00:00 | |
| Docker Run Command |
Note: Please set the OCI_USERNAME, and OCI_PASSWORD environment variables. | |
| Helm Install Command |
Note: Please set the HELM_INSTALL_NAME, HELM_INSTALL_NAMESPACE,
OCI_USERNAME, and OCI_PASSWORD environment variables. |
DevOps - Pipeline Edge Deployment
Once a pipeline is deployed to the Edge Registry service, it can be deployed in environments such as Docker, Kubernetes, or similar container running services by a DevOps engineer.
Docker Deployment
First, the DevOps engineer must authenticate to the same OCI Registry service used for the Wallaroo Edge Deployment registry.
For more details, check with the documentation on your artifact service. The following are provided for the three major cloud services:
- Set up authentication for Docker
- Authenticate with an Azure container registry
- Authenticating Amazon ECR Repositories for Docker CLI with Credential Helper
For the deployment, the engine URL is specified with the following environmental variables:
DEBUG(true|false): Whether to include debug output.OCI_REGISTRY: The URL of the registry service.CONFIG_CPUS: The number of CPUs to use.OCI_USERNAME: The edge registry username.OCI_PASSWORD: The edge registry password or token.PIPELINE_URL: The published pipeline URL.
Docker Deployment Example
Using our sample environment, here’s sample deployment using Docker with a computer vision ML model, the same used in the Wallaroo Use Case Tutorials Computer Vision: Retail tutorials.
Note the use of the -v ./data:/persist option. This will store the one time authentication token stored in the EDGE_BUNDLE
mkdir ./data

docker run -p 8080:8080 \
    -v ./data:/persist \
    -e DEBUG=true -e OCI_REGISTRY={your registry server} \
    -e EDGE_BUNDLE={edge_publish.docker_run_variables['EDGE_BUNDLE']} \
    -e CONFIG_CPUS=4 \
    -e OCI_USERNAME=oauth2accesstoken \
    -e OCI_PASSWORD={registry token here} \
    -e PIPELINE_URL={your registry server}/pipelines/yolo8demonstration:bf70eaf7-8c11-4b46-b751-916a43b1a555 \
    {your registry server}/engine:v2023.3.0-main-3707
Docker Compose Deployment
For users who prefer to use docker compose, the following sample compose.yaml file is used to launch the Wallaroo Edge pipeline. This is the same used in the Wallaroo Use Case Tutorials Computer Vision: Retail tutorials.
The volumes settings allows for persistent volumes to store the session information. Without it, the one-time authentication token included in the EDGE_BUNDLE settings would have to be regenerated.
services:
  engine:
    image: {Your Engine URL}
    volumes:
      - ./data:/persist
    ports:
      - 8080:8080
    environment:
      EDGE_BUNDLE: abcdefg
      PIPELINE_URL: {Your Pipeline URL}
      OCI_REGISTRY: {Your Edge Registry URL}
      OCI_USERNAME:  {Your Registry Username}
      OCI_PASSWORD: {Your Token or Password}
      CONFIG_CPUS: 4
For example:
services:
  engine:
    image: sample-registry.com/engine:v2023.3.0-main-3707
    ports:
      - 8080:8080
    environment:
      PIPELINE_URL: sample-registry.com/pipelines/yolo8demonstration:bf70eaf7-8c11-4b46-b751-916a43b1a555
      OCI_REGISTRY: sample-registry.com
      OCI_USERNAME:  _json_key_base64
      OCI_PASSWORD: abc123
      CONFIG_CPUS: 4
Docker Compose Deployment Example
The deployment and undeployment is then just a simple docker compose up and docker compose down. The following shows an example of deploying the Wallaroo edge pipeline using docker compose.
docker compose up
[+] Running 1/1
 ✔ Container yolo8demonstration-engine-1  Recreated                                                                                                                                                                 0.5s
Attaching to yolo8demonstration-engine-1
yolo8demonstration-engine-1  | Wallaroo Engine - Standalone mode
yolo8demonstration-engine-1  | Login Succeeded
yolo8demonstration-engine-1  | Fetching manifest and config for pipeline: sample-registry.com/pipelines/yolo8demonstration:bf70eaf7-8c11-4b46-b751-916a43b1a555
yolo8demonstration-engine-1  | Fetching model layers
yolo8demonstration-engine-1  | digest: sha256:c6c8869645962e7711132a7e17aced2ac0f60dcdc2c7faa79b2de73847a87984
yolo8demonstration-engine-1  |   filename: c6c8869645962e7711132a7e17aced2ac0f60dcdc2c7faa79b2de73847a87984
yolo8demonstration-engine-1  |   name: yolov8n
yolo8demonstration-engine-1  |   type: model
yolo8demonstration-engine-1  |   runtime: onnx
yolo8demonstration-engine-1  |   version: 693e19b5-0dc7-4afb-9922-e3f7feefe66d
yolo8demonstration-engine-1  |
yolo8demonstration-engine-1  | Fetched
yolo8demonstration-engine-1  | Starting engine
yolo8demonstration-engine-1  | Looking for preexisting `yaml` files in //modelconfigs
yolo8demonstration-engine-1  | Looking for preexisting `yaml` files in //pipelines
Helm Deployment
Published pipelines can be deployed through the use of helm charts.
Helm deployments take up to two steps - the first step is in retrieving the required values.yaml and making updates to override.
Kubernetes provides persistent volume support, so no settings are required.
- Pull the helm charts from the published pipeline. The two fields are the Helm Chart URL and the Helm Chart version to specify the OCI . This typically takes the format of:
helm pull oci://{published.helm_chart_url} --version {published.helm_chart_version}
- Extract the
tgzfile and copy thevalues.yamland copy the values used to edit engine allocations, etc. The following are required for the deployment to run:
ociRegistry:
  registry: {your registry service}
  username:  {registry username here}
  password: {registry token here}
Store this into another file, suc as local-values.yaml.
- Create the namespace to deploy the pipeline to. For example, the namespace
wallaroo-edge-pipelinewould be:
kubectl create -n wallaroo-edge-pipeline
Deploy the
helminstallation withhelm installthrough one of the following options:Specify the
tgzfile that was downloaded and the local values file. For example:helm install --namespace {namespace} --values {local values file} {helm install name} {tgz path}Specify the expended directory from the downloaded
tgzfile.helm install --namespace {namespace} --values {local values file} {helm install name} {helm directory path}Specify the Helm Pipeline Helm Chart and the Pipeline Helm Version.
helm install --namespace {namespace} --values {local values file} {helm install name} oci://{published.helm_chart_url} --version {published.helm_chart_version}
Once deployed, the DevOps engineer will have to forward the appropriate ports to the
svc/engine-svcservice in the specific pipeline. For example, usingkubectl port-forwardto the namespaceccfraudthat would be:kubectl port-forward svc/engine-svc -n ccfraud01 8080 --address 0.0.0.0`
Docker Deployment Code Generation Exercise
The following code segment generates a docker run template based on the previously published pipeline. Replace the $REGISTRYURL, $REGISTRYUSERNAME, and $REGISTRYPASSWORD to match the OCI Registry being used.
docker_deploy = f'''
mkdir ./data
docker run -p 8080:8080 \\
    -v ./data:/persist \\
    -e DEBUG=true \\
    -e OCI_REGISTRY=$REGISTRYURL \\
    -e EDGE_BUNDLE={edge_publish.docker_run_variables['EDGE_BUNDLE']} \\
    -e CONFIG_CPUS=1 \\
    -e OCI_USERNAME=$REGISTRYUSERNAME \\
    -e OCI_PASSWORD=$REGISTRYPASSWORD \\
    -e PIPELINE_URL={edge_publish.pipeline_url} \\
    {edge_publish.engine_url}
'''

print(docker_deploy)
mkdir ./data
docker run -p 8080:8080 \
    -v ./data:/persist \
    -e DEBUG=true \
    -e OCI_REGISTRY=$REGISTRYURL \
    -e EDGE_BUNDLE=ZXhwb3J0IEJVTkRMRV9WRVJTSU9OPTEKZXhwb3J0IENPTkZJR19DUFVTPTEKZXhwb3J0IEVER0VfTkFNRT15b2xvLWVkZ2UtZGVtbwpleHBvcnQgT1BTQ0VOVEVSX0hPU1Q9ZG9jLXRlc3QuZWRnZS53YWxsYXJvb2NvbW11bml0eS5uaW5qYQpleHBvcnQgUElQRUxJTkVfVVJMPWdoY3IuaW8vd2FsbGFyb29sYWJzL2RvYy1zYW1wbGVzL3BpcGVsaW5lcy95b2xvOGRlbW9uc3RyYXRpb246N2NlZDc4MTgtMWFmNi00M2QzLTk3YWQtNjc1OWFlMDU4NTFhCmV4cG9ydCBXT1JLU1BBQ0VfSUQ9NwpleHBvcnQgSk9JTl9UT0tFTj0xNzhiMzJjNy0zODZjLTRkODMtOWVkMC1mZjJmNmZiMzg1MmU= \
    -e CONFIG_CPUS=1 \
    -e OCI_USERNAME=$REGISTRYUSERNAME \
    -e OCI_PASSWORD=$REGISTRYPASSWORD \
    -e PIPELINE_URL=ghcr.io/wallaroolabs/doc-samples/pipelines/yolo8demonstration:7ced7818-1af6-43d3-97ad-6759ae05851a \
    ghcr.io/wallaroolabs/doc-samples/engines/proxy/wallaroo/ghcr.io/wallaroolabs/standalone-mini:v2024.1.0-main-4317
Edge Deployed Pipeline API Endpoints
Once deployed, we can check the pipelines and models available. We’ll use a curl command, but any HTTP based request will work the same way.
The endpoint /pipelines returns:
- id (String): The name of the pipeline.
- status (String): The status as either
Running, orErrorif there are any issues.
curl localhost:8080/pipelines
{"pipelines":[{"id":"yolo8demonstration","status":"Running"}]}
The following example uses the host workshop-yolo8n-x86-demo.eastus.cloudapp.azure.com. Replace with your own host name of your Edge deployed pipeline.
!curl workshop-yolo8n-x86-demo.eastus.cloudapp.azure.com:8080/pipelines
# used for other deployments
!curl workshop-hf-summarizer-demo.eastus.cloudapp.azure.com:8081/pipelines
{"pipelines":[{"id":"hf-summarizer-standard","status":"Running"}]}
The endpoint /models returns a List of models with the following fields:
- name (String): The model name.
- sha (String): The sha hash value of the ML model.
- status (String): The status of either Running or Error if there are any issues.
- version (String): The model version. This matches the version designation used by Wallaroo to track model versions in UUID format.
{"models":[{"name":"yolov8n","sha":"3ed5cd199e0e6e419bd3d474cf74f2e378aacbf586e40f24d1f8c89c2c476a08","status":"Running","version":"7af40d06-d18f-4b3f-9dd3-0a15248f01c8"}]}
The following example uses the host workshop-yolo8n-x86-demo.eastus.cloudapp.azure.com. Replace with your own host name of your Edge deployed pipeline.
!curl workshop-yolo8n-x86-demo.eastus.cloudapp.azure.com:8080/models
# used for other deployments
!curl workshop-hf-summarizer-demo.eastus.cloudapp.azure.com:8081/models
{"models":[{"name":"yolov8n","version":"7c75f46d-297b-47a3-9f64-64715d57d883","sha":"3ed5cd199e0e6e419bd3d474cf74f2e378aacbf586e40f24d1f8c89c2c476a08","status":"Running"}]}
Edge Inference Endpoint
The inference endpoint takes the following pattern:
/pipelines/infer
Wallaroo inference endpoint URLs accept the following data inputs through the Content-Type header:
Content-Type: application/vnd.apache.arrow.file: For Apache Arrow tables.Content-Type: application/json; format=pandas-records: For pandas DataFrame in record format.
Once deployed, we can perform an inference through the deployment URL.
The endpoint returns Content-Type: application/json; format=pandas-records by default with the following fields:
- check_failures (List[Integer]): Whether any validation checks were triggered. For more information, see Wallaroo SDK Essentials Guide: Pipeline Management: Anomaly Testing.
- elapsed (List[Integer]): A list of time in nanoseconds for:
- [0] The time to serialize the input.
- [1…n] How long each step took.
- model_name (String): The name of the model used.
- model_version (String): The version of the model in UUID format.
- original_data: The original input data. Returns
nullif the input may be too long for a proper return. - outputs (List): The outputs of the inference result separated by data type, where each data type includes:
- data: The returned values.
- dim (List[Integer]): The dimension shape returned.
- v (Integer): The vector shape of the data.
- pipeline_name (String): The name of the pipeline.
- shadow_data: Any shadow deployed data inferences in the same format as outputs.
- time (Integer): The time since UNIX epoch.
Once deployed, we can perform an inference through the deployment URL. We’ll assume we’re running the inference request through the localhost and submitting the local file ./data/dogbike.df.json. Note that our inference endpoint is pipelines/yolo8demonstration - the same as our pipeline name.
The following example demonstrates sending an inference request to the edge deployed pipeline and storing the results in a pandas DataFrame in record format. The results can then be exported to other processes to render the detected images or other use cases.
The following example uses the host workshop-yolo8n-x86-demo.eastus.cloudapp.azure.com. Replace with your own host name of your Edge deployed pipeline.
!curl -X POST workshop-yolo8n-x86-demo.eastus.cloudapp.azure.com:8080/pipelines/yolo-v8 \
    -H "Content-Type: application/json; format=pandas-records" \
    --data @../data/cv-yolo/dogbike.df.json
import datetime

start_inference = datetime.datetime.now()
!curl -X POST workshop-hf-summarizer-demo.eastus.cloudapp.azure.com:8081/pipelines/yolo8demonstration \
    -H "Content-Type: application/json; format=pandas-records" \
    --data @../data/cv-yolo/dogbike.df.json > edge-inference-out.df.json
  % Total    % Received % Xferd  Average Speed   Time    Time     Time  Current
                                 Dload  Upload   Total   Spent    Left  Speed
100 38.0M  100 22.9M  100 15.0M  34.9M  22.9M --:--:-- --:--:-- --:--:-- 57.9M
Display Partition Logs
To view the edge deployed pipeline logs, we can use wallaroo.pipeline.export_logs method to retrieve all of the recent logs from this pipeline, and show the edge inference results were sent with the edge name in the partition metadata.
# display log information here with partition

pipeline.export_logs(directory='./logs/partition-edge-observability-yolo',
                     file_prefix='edge-logs',
                     dataset=['time', 'metadata'])

# display the partition only results

df_logs = pd.read_json('./logs/partition-edge-observability-yolo/edge-logs-1.json',
                       orient="records",
                       lines=True)
#filter out just the `metadata.partition='houseprice-edgebaseline-examples'

display(df_logs[df_logs['metadata.partition']==edge_name].loc[:, ['time', 'metadata.partition']])
# display(df_logs.loc[:, ['out.variable', 'metadata.partition']])
Warning: The inference log is above the allowable limit and the following columns may have been suppressed for various rows in the logs: ['in.images']. To review the dropped columns for an individual inference’s suppressed data, include dataset=["metadata"] in the log request.
| time | metadata.partition | |
|---|---|---|
| 0 | 1703201767421 | yolo-edge-demo-jch |
| 1 | 1703201748660 | yolo-edge-demo-jch |