Setting Private Registry Configuration in Wallaroo
Configure Via Kots
If Wallaroo was installed via kots, use the following procedure to add the private model registry information.
Launch the Wallaroo Administrative Dashboard through a terminal linked to the Kubernetes cluster. Replace the namespace with the one used in your installation.
kubectl kots admin-console --namespace wallarooLaunch the dashboard, by default at
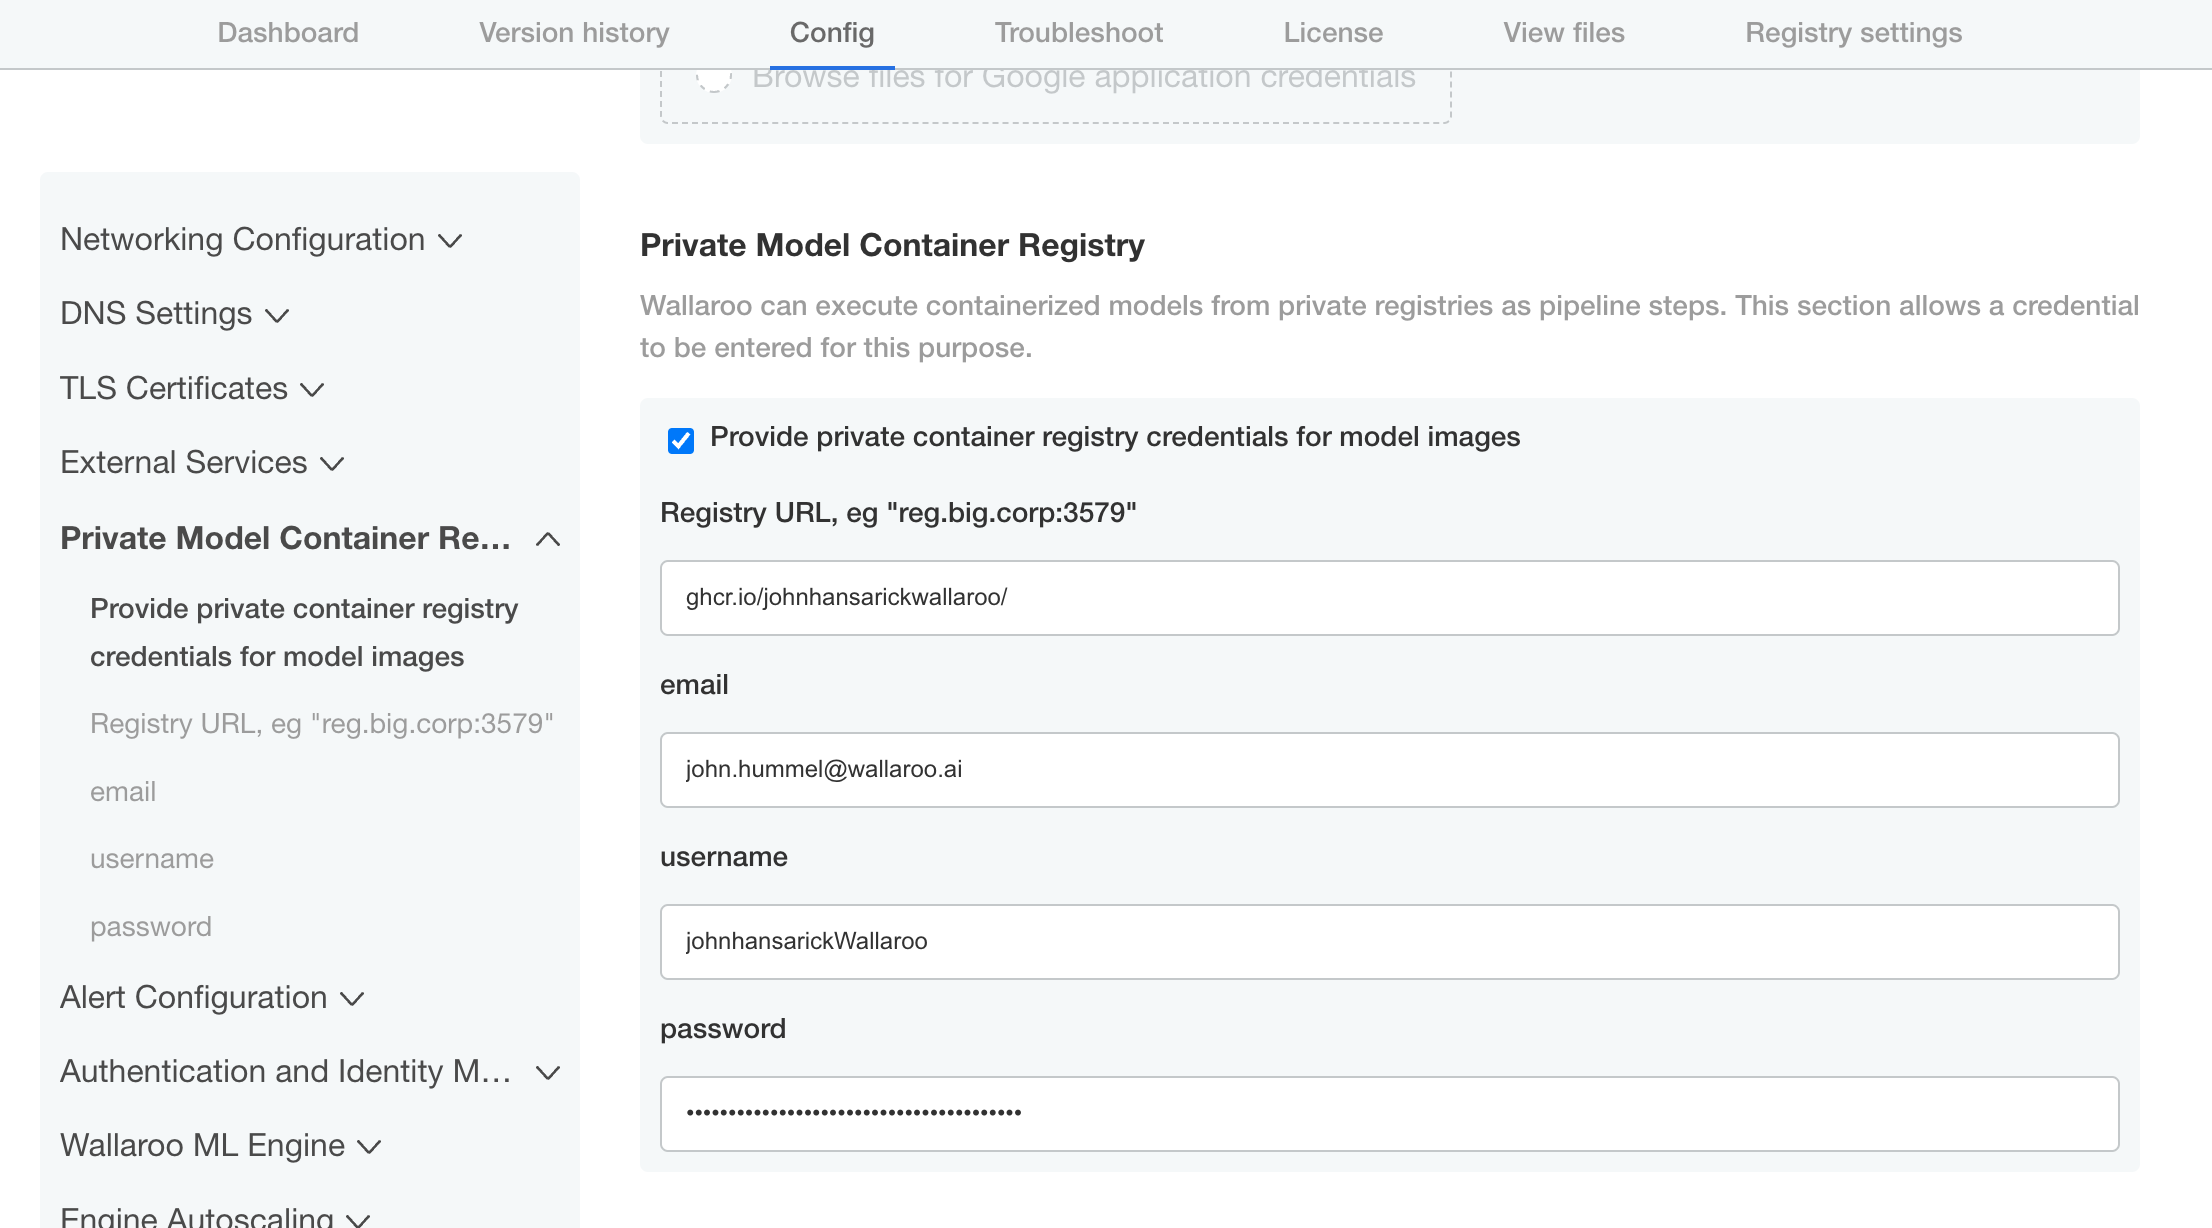
http://localhost:8800.From the admin dashboard, select Config -> Private Model Container Registry.
Enable Provide private container registry credentials for model images.
Provide the following:
- Registry URL: The URL of the Containerized Model Container Registry. Typically in the format
host:port. In this example, the registry for GitHub is used. NOTE: When setting the URL for the Containerized Model Container Registry, only the actual service address is needed. For example: with the full URL of the model asghcr.io/wallaroolabs/wallaroo_tutorials/mlflow-statsmodels-example:2022.4, the URL would beghcr.io/wallaroolabs. - email: The email address of the user authenticating to the registry service.
- username: The username of the user authentication to the registry service.
- password: The password of the user authentication or token to the registry service.
- Registry URL: The URL of the Containerized Model Container Registry. Typically in the format
Scroll down and select Save config.
Deploy the new version.
Once complete, the Wallaroo instance will be able to authenticate to the Containerized Model Container Registry and retrieve the images.
Configure via Helm
During either the installation process or updates, set the following in the
local-values.yamlfile:privateModelRegistry:enabled: truesecretName:model-registry-secretregistry: The URL of the private registry.email: The email address of the user authenticating to the registry service.username: The username of the user authentication to the registry service.password: The password of the user authentication to the registry service.
For example:
# Other settings - DNS entries, etc.

# The private registry settings
privateModelRegistry:
  enabled: true
  secretName: model-registry-secret
  registry: "YOUR REGISTRY URL:YOUR REGISTRY PORT"
  email: "YOUR EMAIL ADDRESS"
  username: "YOUR USERNAME"
  password: "Your Password here"
Install or update the Wallaroo instance via Helm as per the Wallaroo Helm Install instructions.
Once complete, the Wallaroo instance will be able to authenticate to the registry service and retrieve the images.
This tutorial and the assets can be downloaded as part of the Wallaroo Tutorials repository.
MLFlow Inference with Wallaroo Tutorial
Wallaroo users can register their trained MLFlow ML Models from a containerized model container registry into their Wallaroo instance and perform inferences with it through a Wallaroo pipeline.
As of this time, Wallaroo only supports MLFlow 1.3.0 containerized models. For information on how to containerize an MLFlow model, see the MLFlow Documentation.
This tutorial assumes that you have a Wallaroo instance, and have either your own containerized model or use the one from the reference and are running this Notebook from the Wallaroo Jupyter Hub service.
See the Wallaroo Private Containerized Model Container Registry Guide for details on how to configure a Wallaroo instance with a private model registry.
MLFlow Data Formats
When using containerized MLFlow models with Wallaroo, the inputs and outputs must be named. For example, the following output:
[-12.045839810372835]
Would need to be wrapped with the data values named:
[{"prediction": -12.045839810372835}]
A short sample code for wrapping data may be:
output_df = pd.DataFrame(prediction, columns=["prediction"])
return output_df
MLFlow Models and Wallaroo
MLFlow models are composed of two parts: the model, and the flavors. When submitting a MLFlow model to Wallaroo, both aspects must be part of the ML Model included in the container. For full information about MLFlow model structure, see the MLFlow Documentation.
Wallaroo registers the models from container registries. Organizations will either have to make their containers available in a public or through a private Containerized Model Container Registry service. For examples on setting up a private container registry service, see the Docker Documentation “Deploy a registry server”. For more details on setting up a container registry in a cloud environment, see the related documentation for your preferred cloud provider:
- Google Cloud Platform Container Registry
- Amazon Web Services Elastic Container Registry
- Microsoft Azure Container Registry
For this example, we will be using the MLFlow containers that was registered in a GitHub container registry service in MLFlow Creation Tutorial Part 03: Container Registration. The address of those containers are:
- postprocess: ghcr.io/johnhansarickwallaroo/mlflowtests/mlflow-postprocess-example . Used for format data after the statsmodel inferences.
- statsmodel: ghcr.io/johnhansarickwallaroo/mlflowtests/mlflow-statsmodels-example . The statsmodel generated in MLFlow Creation Tutorial Part 01: Model Creation.
Prerequisites
Before uploading and running an inference with a MLFlow model in Wallaroo the following will be required:
- MLFlow Input Schema: The input schema with the fields and data types for each MLFlow model type uploaded to Wallaroo. In the examples below, the data types are imported using the
pyarrowlibrary. - An installed Wallaroo instance.
- The following Python libraries installed:
oswallaroo: The Wallaroo SDK. Included with the Wallaroo JupyterHub service by default.
IMPORTANT NOTE: Wallaroo supports MLFlow 1.3.0. Please ensure the MLFlow models used in Wallaroo meet this specification.
MLFlow Inference Steps
To register a containerized MLFlow ML Model into Wallaroo, use the following general step:
- Import Libraries
- Connect to Wallaroo
- Set MLFlow Input Schemas
- Register MLFlow Model
- Create Pipeline and Add Model Steps
- Run Inference
Import Libraries
We start by importing the libraries we will need to connect to Wallaroo and use our MLFlow models. This includes the wallaroo libraries, pyarrow for data types, and the json library for handling JSON data.
import wallaroo
from wallaroo.object import EntityNotFoundError
import pyarrow as pa
import pandas as pd
Connect to the Wallaroo Instance
The first step is to connect to Wallaroo through the Wallaroo client. The Python library is included in the Wallaroo install and available through the Jupyter Hub interface provided with your Wallaroo environment.
This is accomplished using the wallaroo.Client() command, which provides a URL to grant the SDK permission to your specific Wallaroo environment. When displayed, enter the URL into a browser and confirm permissions. Store the connection into a variable that can be referenced later.
If logging into the Wallaroo instance through the internal JupyterHub service, use wl = wallaroo.Client(). For more information on Wallaroo Client settings, see the Client Connection guide.
# Login through local Wallaroo instance

wl = wallaroo.Client()
def get_workspace(name):
    workspace = None
    for ws in wl.list_workspaces():
        if ws.name() == name:
            workspace= ws
    if(workspace == None):
        workspace = wl.create_workspace(name)
    return workspace

def get_pipeline(name):
    try:
        pipeline = wl.pipelines_by_name(name)[0]
    except EntityNotFoundError:
        pipeline = wl.build_pipeline(name)
    return pipeline
prefix = 'mlflow'
workspace_name= f"{prefix}statsmodelworkspace"
pipeline_name = f"{prefix}statsmodelpipeline"

mlflowworkspace = get_workspace(workspace_name)
wl.set_current_workspace(mlflowworkspace)

pipeline = get_pipeline(pipeline_name)
Set MLFlow Input Schemas
Set the MLFlow input schemas through the pyarrow library. In the examples below, the input schemas for both the MLFlow model statsmodels-test and the statsmodels-test-postprocess model.
sm_input_schema = pa.schema([
  pa.field('temp', pa.float32()),
  pa.field('holiday', pa.uint8()),
  pa.field('workingday', pa.uint8()),
  pa.field('windspeed', pa.float32())
])

pp_input_schema = pa.schema([
    pa.field('predicted_mean', pa.float32())
])
Register MLFlow Model
Use the register_model_image method to register the Docker container containing the MLFlow models.
statsmodelUrl = "ghcr.io/wallaroolabs/wallaroo_tutorials/mlflow-statsmodels-example:2023.1"
postprocessUrl = "ghcr.io/wallaroolabs/wallaroo_tutorials/mlflow-postprocess-example:2023.1"

sm_model = wl.register_model_image(
    name=f"{prefix}statmodels",
    image=f"{statsmodelUrl}"
).configure("mlflow", input_schema=sm_input_schema, output_schema=pp_input_schema)
pp_model = wl.register_model_image(
    name=f"{prefix}postprocess",
    image=f"{postprocessUrl}"
).configure("mlflow", input_schema=pp_input_schema, output_schema=pp_input_schema)
Create Pipeline and Add Model Steps
With the models registered, we can add the MLFlow models as steps in the pipeline. Once ready, we will deploy the pipeline so it is available for submitting data for running inferences.
pipeline.add_model_step(sm_model)
pipeline.add_model_step(pp_model)
| name | mlflowstatsmodelpipeline |
|---|---|
| created | 2023-07-14 15:32:52.546581+00:00 |
| last_updated | 2023-07-14 15:32:52.546581+00:00 |
| deployed | (none) |
| tags | |
| versions | efa60e66-b2b7-4bb2-bc37-dd9ea7377467 |
| steps |
from wallaroo.deployment_config import DeploymentConfigBuilder

deployment_config = DeploymentConfigBuilder() \
    .cpus(0.25).memory('1Gi') \
    .sidekick_env(sm_model, {"GUNICORN_CMD_ARGS": "--timeout=180 --workers=1"}) \
    .sidekick_env(pp_model, {"GUNICORN_CMD_ARGS": "--timeout=180 --workers=1"}) \
    .build()

pipeline.deploy(deployment_config=deployment_config)
| name | mlflowstatsmodelpipeline |
|---|---|
| created | 2023-07-14 15:32:52.546581+00:00 |
| last_updated | 2023-07-14 15:35:09.901078+00:00 |
| deployed | True |
| tags | |
| versions | 2f8e9483-a9ad-436e-9068-7826cd8166c4, 539aae6b-4437-4f8c-8be0-db9ef11e80fb, efa60e66-b2b7-4bb2-bc37-dd9ea7377467 |
| steps | mlflowstatmodels |
pipeline.status()
{'status': 'Running',
 'details': [],
 'engines': [{'ip': '10.244.3.142',
   'name': 'engine-c55d468-qgk48',
   'status': 'Running',
   'reason': None,
   'details': [],
   'pipeline_statuses': {'pipelines': [{'id': 'mlflowstatsmodelpipeline',
      'status': 'Running'}]},
   'model_statuses': {'models': [{'name': 'mlflowpostprocess',
      'version': 'b7cd3426-825a-467d-8616-011ae8901d23',
      'sha': '825ebae48014d297134930028ab0e823bc0d9551334b9a4402c87a714e8156b2',
      'status': 'Running'},
     {'name': 'mlflowstatmodels',
      'version': '1a547bbb-36c7-4b5c-93a8-f357e3542d6f',
      'sha': '3afd13d9c5070679e284050cd099e84aa2e5cb7c08a788b21d6cb2397615d018',
      'status': 'Running'}]}}],
 'engine_lbs': [{'ip': '10.244.4.188',
   'name': 'engine-lb-584f54c899-xhdmq',
   'status': 'Running',
   'reason': None,
   'details': []}],
 'sidekicks': [{'ip': '10.244.0.72',
   'name': 'engine-sidekick-mlflowstatmodels-27-786dc6b47c-bprqb',
   'status': 'Running',
   'reason': None,
   'details': [],
   'statuses': '\n'},
  {'ip': '10.244.0.73',
   'name': 'engine-sidekick-mlflowpostprocess-28-9fff54995-2n2nn',
   'status': 'Running',
   'reason': None,
   'details': [],
   'statuses': '\n'}]}
Run Inference
Once the pipeline is running, we can submit our data to the pipeline and return our results. Once finished, we will undeploy the pipeline to return the resources back to the cluster.
# Initial container run may need extra time to finish deploying - adding 90 second timeout to compensate
results = pipeline.infer_from_file('./resources/bike_day_eval_engine.df.json', timeout=90)
display(results.loc[:,["out.predicted_mean"]])
| out.predicted_mean | |
|---|---|
| 0 | 0.281983 |
| 1 | 0.658847 |
| 2 | 0.572368 |
| 3 | 0.619873 |
| 4 | -1.217801 |
| 5 | -1.849156 |
| 6 | 0.933885 |
pipeline.undeploy()
| name | mlflowstatsmodelpipeline |
|---|---|
| created | 2023-07-14 15:32:52.546581+00:00 |
| last_updated | 2023-07-14 15:32:56.591792+00:00 |
| deployed | False |
| tags | |
| versions | 539aae6b-4437-4f8c-8be0-db9ef11e80fb, efa60e66-b2b7-4bb2-bc37-dd9ea7377467 |
| steps | mlflowstatmodels |