The following tutorials are provided by Wallaroo to demonstrate how to deploy pipelines under different architectures.
Wallaroo Pipeline Architecture
Tutorials on working with different architectures for pipeline deployments.
- 1: ARM BYOP (Bring Your Own Predict) VGG16 Demonstration
- 2: ARM Classification Cybersecurity Demonstration
- 3: ARM Financial Services Cybersecurity Demonstration
- 4: ARM Computer Vision Retail Demonstration
- 5: ARM Computer Vision Retail Yolov8 Demonstration
- 6: ARM LLM Summarization Demonstration
1 - ARM BYOP (Bring Your Own Predict) VGG16 Demonstration
A demonstration of using Bring Your Own Predict (BYOP) deployed on ARM.
This tutorial can be downloaded as part of the Wallaroo Tutorials repository.
Arbitrary Python Tutorial Deploy Model in Wallaroo Upload and Deploy
This tutorial demonstrates how to use arbitrary python as a ML Model in Wallaroo. Arbitrary Python allows organizations to use Python scripts that require specific libraries and artifacts as models in the Wallaroo engine. This allows for highly flexible use of ML models with supporting scripts.
Arbitrary Python Script Requirements
The entry point of the arbitrary python aka BYOP (Bring Your Own Predict) model is any python script that must include the following.
class ImageClustering(Inference): The default inference class. This is used to perform the actual inferences. Wallaroo uses the_predictmethod to receive the inference data and call the appropriate functions for the inference.def __init__: Used to initialize this class and load in any other classes or other required settings.def expected_model_types: Used by Wallaroo to anticipate what model types are used by the script.def model(self, model): Defines the model used for the inference. Accepts the model instance used in the inference.self._raise_error_if_model_is_wrong_type(model): Returns the error if the wrong model type is used. This verifies that only the anticipated model type is used for the inference.self._model = model: Sets the submitted model as the model for this class, provided_raise_error_if_model_is_wrong_typeis not raised.
def _predict(self, input_data: InferenceData): This is the entry point for Wallaroo to perform the inference. This will receive the inference data, then perform whatever steps and return a dictionary of numpy arrays.
class ImageClusteringBuilder(InferenceBuilder): Loads the model and prepares it for inferencing.def inference(self) -> ImageClustering: Sets the inference class being used for the inferences.def create(self, config: CustomInferenceConfig) -> ImageClustering: Creates an inference subclass, assigning the model and any attributes required for it to function.
All other methods used for the functioning of these classes are optional, as long as they meet the requirements listed above.
Tutorial Prerequisites
- A Wallaroo version 2023.2.1 or above instance.
References
Tutorial Steps
Import Libraries
The first step is to import the libraries we’ll be using. These are included by default in the Wallaroo instance’s JupyterHub service.
import numpy as np
import pandas as pd
import json
import os
import pickle
import pyarrow as pa
import tensorflow as tf
import wallaroo
from wallaroo.object import EntityNotFoundError

from sklearn.cluster import KMeans
from tensorflow.keras.datasets import cifar10
from tensorflow.keras import Model
from tensorflow.keras.layers import Flatten
from wallaroo.pipeline   import Pipeline
from wallaroo.deployment_config import DeploymentConfigBuilder
from wallaroo.framework import Framework
2023-09-18 14:57:12.681704: W tensorflow/stream_executor/platform/default/dso_loader.cc:64] Could not load dynamic library 'libcudart.so.11.0'; dlerror: libcudart.so.11.0: cannot open shared object file: No such file or directory
2023-09-18 14:57:12.681746: I tensorflow/stream_executor/cuda/cudart_stub.cc:29] Ignore above cudart dlerror if you do not have a GPU set up on your machine.
Open a Connection to Wallaroo
The next step is connect to Wallaroo through the Wallaroo client. The Python library is included in the Wallaroo install and available through the Jupyter Hub interface provided with your Wallaroo environment.
This is accomplished using the wallaroo.Client() command, which provides a URL to grant the SDK permission to your specific Wallaroo environment. When displayed, enter the URL into a browser and confirm permissions. Store the connection into a variable that can be referenced later.
If logging into the Wallaroo instance through the internal JupyterHub service, use wl = wallaroo.Client(). If logging in externally, update the wallarooPrefix and wallarooSuffix variables with the proper DNS information. For more information on Wallaroo DNS settings, see the Wallaroo DNS Integration Guide.
wl = wallaroo.Client()
Set Variables and Helper Functions
We’ll set the name of our workspace, pipeline, models and files. Workspace names must be unique across the Wallaroo workspace. For this, we’ll add in a randomly generated 4 characters to the workspace name to prevent collisions with other users’ workspaces. If running this tutorial, we recommend hard coding the workspace name so it will function in the same workspace each time it’s run.
We’ll set up some helper functions that will either use existing workspaces and pipelines, or create them if they do not already exist.
import string
import random

# make a random 4 character suffix to prevent overwriting other user's workspaces
suffix= ''.join(random.choice(string.ascii_lowercase) for i in range(4))

workspace_name = f'vgg16-clustering-workspace{suffix}'
pipeline_name = f'vgg16-clustering-pipeline'

model_name = 'arm-vgg16-clustering'
model_file_name = './models/model-auto-conversion-BYOP-vgg16-clustering_arm.zip'
def get_workspace(name):
    workspace = None
    for ws in wl.list_workspaces():
        if ws.name() == name:
            workspace= ws
    if(workspace == None):
        workspace = wl.create_workspace(name)
    return workspace

def get_pipeline(name):
    try:
        pipeline = wl.pipelines_by_name(name)[0]
    except EntityNotFoundError:
        pipeline = wl.build_pipeline(name)
    return pipeline
Create Workspace and Pipeline
We will now create the Wallaroo workspace to store our model and set it as the current workspace. Future commands will default to this workspace for pipeline creation, model uploads, etc. We’ll create our Wallaroo pipeline that is used to deploy our arbitrary Python model.
workspace = get_workspace(workspace_name)
wl.set_current_workspace(workspace)

pipeline = get_pipeline(pipeline_name)
Upload Arbitrary Python Model
Arbitrary Python models are uploaded to Wallaroo through the Wallaroo Client upload_model method.
Upload Arbitrary Python Model Parameters
The following parameters are required for Arbitrary Python models. Note that while some fields are considered as optional for the upload_model method, they are required for proper uploading of a Arbitrary Python model to Wallaroo.
| Parameter | Type | Description |
|---|---|---|
name | string (Required) | The name of the model. Model names are unique per workspace. Models that are uploaded with the same name are assigned as a new version of the model. |
path | string (Required) | The path to the model file being uploaded. |
framework | string (Upload Method Optional, Arbitrary Python model Required) | Set as Framework.CUSTOM. |
input_schema | pyarrow.lib.Schema (Upload Method Optional, Arbitrary Python model Required) | The input schema in Apache Arrow schema format. |
output_schema | pyarrow.lib.Schema (Upload Method Optional, Arbitrary Python model Required) | The output schema in Apache Arrow schema format. |
convert_wait | bool (Upload Method Optional, Arbitrary Python model Optional) (Default: True) |
|
Once the upload process starts, the model is containerized by the Wallaroo instance. This process may take up to 10 minutes.
Upload Arbitrary Python Model Return
The following is returned with a successful model upload and conversion.
| Field | Type | Description |
|---|---|---|
name | string | The name of the model. |
version | string | The model version as a unique UUID. |
file_name | string | The file name of the model as stored in Wallaroo. |
image_path | string | The image used to deploy the model in the Wallaroo engine. |
last_update_time | DateTime | When the model was last updated. |
For our example, we’ll start with setting the input_schema and output_schema that is expected by our ImageClustering._predict() method.
input_schema = pa.schema([
    pa.field('images', pa.list_(
        pa.list_(
            pa.list_(
                pa.int64(),
                list_size=3
            ),
            list_size=32
        ),
        list_size=32
    )),
])

output_schema = pa.schema([
    pa.field('predictions', pa.int64()),
])
Upload Model
Now we’ll upload our model. The framework is Framework.CUSTOM for arbitrary Python models, and we’ll specify the input and output schemas for the upload.
An important note for the ARM version of the VGG16 model is verifying that the Python modules used will operate in an ARM environment. For example, the x86 model has the following as its requirements.txt:
tensorflow==2.8.0
scikit-learn==1.2.2
The ARM version replaces the tensorflow module with the tensorflow-aarch64 that runs in the ARM archtecture. Otherwise, the model and Python script is the same.
tensorflow-aarch64==2.8.4
scikit-learn==1.2.2
from wallaroo.engine_config import Architecture

model = wl.upload_model(model_name,
                        model_file_name,
                        framework=Framework.CUSTOM,
                        input_schema=input_schema,
                        output_schema=output_schema,
                        arch=Architecture.ARM,
                        convert_wait=True)
model
Waiting for model loading - this will take up to 10.0min.
Model is pending loading to a container runtime..
Model is attempting loading to a container runtime.......................successful
Ready
| Name | arm-vgg16-clustering |
| Version | 14f9929d-cb37-4e44-aacd-2120b349ef31 |
| File Name | model-auto-conversion-BYOP-vgg16-clustering_arm.zip |
| SHA | e53d1775766567eda5fd7ecb1618ea073fc18ffd6298c75da67be3b704029f15 |
| Status | ready |
| Image Path | proxy.replicated.com/proxy/wallaroo/ghcr.io/wallaroolabs/mlflow-deploy:v2023.4.0-main-3827 |
| Updated At | 2023-18-Sep 14:59:39 |
print(model)
{'name': 'arm-vgg16-clustering', 'version': '14f9929d-cb37-4e44-aacd-2120b349ef31', 'file_name': 'model-auto-conversion-BYOP-vgg16-clustering_arm.zip', 'image_path': 'proxy.replicated.com/proxy/wallaroo/ghcr.io/wallaroolabs/mlflow-deploy:v2023.4.0-main-3827', 'last_update_time': datetime.datetime(2023, 9, 18, 14, 59, 39, 729445, tzinfo=tzutc())}
Deploy Pipeline
The model is uploaded and ready for use. We’ll add it as a step in our pipeline, then deploy the pipeline. For this example we’re allocated 0.25 cpu and 4 Gi RAM to the pipeline through the pipeline’s deployment configuration.
pipeline.add_model_step(model)
| name | vgg16-clustering-pipeline |
|---|---|
| created | 2023-09-18 14:57:31.537378+00:00 |
| last_updated | 2023-09-18 14:57:31.537378+00:00 |
| deployed | (none) |
| tags | |
| versions | d42d5272-86dd-414b-8928-6dea07c866c1 |
| steps | |
| published | False |
deployment_config = DeploymentConfigBuilder() \
    .cpus(1).memory('4Gi') \
    .build()

pipeline.deploy(deployment_config=deployment_config)
pipeline.status()
Waiting for deployment - this will take up to 90s ........................ ok
{‘status’: ‘Running’,

‘details’: [],

’engines’: [{‘ip’: ‘10.244.2.13’,

’name’: ’engine-d665b9c7d-jhr7s’,

‘status’: ‘Running’,

‘reason’: None,

‘details’: [],

‘pipeline_statuses’: {‘pipelines’: [{‘id’: ‘vgg16-clustering-pipeline’,

‘status’: ‘Running’}]},

‘model_statuses’: {‘models’: [{’name’: ‘arm-vgg16-clustering’,

‘version’: ‘14f9929d-cb37-4e44-aacd-2120b349ef31’,

‘sha’: ’e53d1775766567eda5fd7ecb1618ea073fc18ffd6298c75da67be3b704029f15’,

‘status’: ‘Running’}]}}],

’engine_lbs’: [{‘ip’: ‘10.244.3.39’,

’name’: ’engine-lb-584f54c899-ksj6c’,

‘status’: ‘Running’,

‘reason’: None,

‘details’: []}],

‘sidekicks’: [{‘ip’: ‘10.244.0.40’,

’name’: ’engine-sidekick-arm-vgg16-clustering-2-6f5975c9f6-6dgct’,

‘status’: ‘Running’,

‘reason’: None,

‘details’: [],

‘statuses’: ‘\n’}]}
Run inference
Everything is in place - we’ll now run a sample inference with some toy data. In this case we’re randomly generating some values in the data shape the model expects, then submitting an inference request through our deployed pipeline.
input_data = {
        "images": [np.random.randint(0, 256, (32, 32, 3), dtype=np.uint8)] * 2,
}
dataframe = pd.DataFrame(input_data)
dataframe
| images | |
|---|---|
| 0 | [[[142, 30, 10], [182, 46, 219], [233, 142, 22... |
| 1 | [[[142, 30, 10], [182, 46, 219], [233, 142, 22... |
pipeline.infer(dataframe, timeout=10000)
| time | in.images | out.predictions | check_failures | |
|---|---|---|---|---|
| 0 | 2023-09-18 15:00:07.019 | [142, 30, 10, 182, 46, 219, 233, 142, 223, 94,... | 1 | 0 |
| 1 | 2023-09-18 15:00:07.019 | [142, 30, 10, 182, 46, 219, 233, 142, 223, 94,... | 1 | 0 |
Undeploy Pipelines
The inference is successful, so we will undeploy the pipeline and return the resources back to the cluster.
pipeline.undeploy()
Waiting for undeployment - this will take up to 45s .................................... ok
| name | vgg16-clustering-pipeline |
|---|---|
| created | 2023-09-18 14:57:31.537378+00:00 |
| last_updated | 2023-09-18 14:59:40.816423+00:00 |
| deployed | False |
| tags | |
| versions | 65299c7d-79dd-477e-b54e-adb0239f60eb, d42d5272-86dd-414b-8928-6dea07c866c1 |
| steps | arm-vgg16-clustering |
| published | False |
2 - ARM Classification Cybersecurity Demonstration
A demonstration of a classification cybersecurity model deployed under standard and ARM pipeline deployment configurations.
This tutorial is available on the Wallaroo Tutorials repository.
Classification Cybersecurity with Arm Architecture
This tutorial demonstrates how to use the Wallaroo combined with ARM processors to perform inferences with pre-trained classification cybersecurity ML models. This demonstration assumes that:
- A Wallaroo version 2023.3 or above instance is installed.
- A nodepools with ARM architecture virtual machines are part of the Kubernetes cluster. For example, Azure supports Ampere® Altra® Arm-based processor included with the following virtual machines:
In this notebook we will walk through a simple pipeline deployment to inference on a model. For this example we will be using an open source model that uses an Aloha CNN LSTM model for classifying Domain names as being either legitimate or being used for nefarious purposes such as malware distribution.
Tutorial Goals
For our example, we will perform the following:
- Create a workspace for our work.
- Upload the Aloha model.
- Create a pipeline using the default architecture that can ingest our submitted data, submit it to the model, and export the results while tracking how long the inference took.
- Redeploy the same pipeline on the ARM architecture, then perform the same inference on the same data and model and track how long the inference took.
- Compare the inference timing through the default architecture versus the ARM architecture.
All sample data and models are available through the Wallaroo Quick Start Guide Samples repository.
Connect to the Wallaroo Instance
The first step is to connect to Wallaroo through the Wallaroo client. The Python library is included in the Wallaroo install and available through the Jupyter Hub interface provided with your Wallaroo environment.
This is accomplished using the wallaroo.Client() command, which provides a URL to grant the SDK permission to your specific Wallaroo environment. When displayed, enter the URL into a browser and confirm permissions. Store the connection into a variable that can be referenced later.
If logging into the Wallaroo instance through the internal JupyterHub service, use wl = wallaroo.Client(). If logging in externally, update the wallarooPrefix and wallarooSuffix variables with the proper DNS information. For more information on Wallaroo DNS settings, see the Wallaroo DNS Integration Guide.
import wallaroo
from wallaroo.object import EntityNotFoundError

from wallaroo.framework import Framework

# to display dataframe tables
from IPython.display import display
# used to display dataframe information without truncating
import pandas as pd
pd.set_option('display.max_colwidth', None)
import pyarrow as pa
import time
# Login through local Wallaroo instance

wl = wallaroo.Client()
Create Workspace
Now we’ll use the SDK below to create our workspace , assign as our current workspace, then display all of the workspaces we have at the moment. We’ll also set up for our models and pipelines down the road, so we have one spot to change names to whatever fits your organization’s standards best.
To allow this tutorial to be run multiple times or by multiple users in the same Wallaroo instance, a random 4 character prefix will be added to the workspace. Feel free to change this suffix variable to '' if not required.
When we create our new workspace, we’ll save it in the Python variable workspace so we can refer to it as needed.
For more information, see the Wallaroo SDK Essentials Guide: Workspace Management.
import string
import random

# make a random 4 character suffix to verify uniqueness in tutorials
suffix= ''.join(random.choice(string.ascii_lowercase) for i in range(4))

workspace_name = f'arm-classification-security{suffix}'
pipeline_name = 'alohapipeline'
model_name = 'alohamodel'
model_file_name = './models/alohacnnlstm.zip'
def get_workspace(name):
    workspace = None
    for ws in wl.list_workspaces():
        if ws.name() == name:
            workspace= ws
    if(workspace == None):
        workspace = wl.create_workspace(name)
    return workspace

def get_pipeline(name):
    try:
        pipeline = wl.pipelines_by_name(name)[0]
    except EntityNotFoundError:
        pipeline = wl.build_pipeline(name)
    return pipeline
workspace = get_workspace(workspace_name)

wl.set_current_workspace(workspace)
{'name': 'arm-classification-securityjohn', 'id': 24, 'archived': False, 'created_by': '0e5060a5-218c-47c1-9678-e83337494184', 'created_at': '2023-09-08T21:32:35.381464+00:00', 'models': [], 'pipelines': []}
We can verify the workspace is created the current default workspace with the get_current_workspace() command.
wl.get_current_workspace()
{'name': 'arm-classification-securityjohn', 'id': 24, 'archived': False, 'created_by': '0e5060a5-218c-47c1-9678-e83337494184', 'created_at': '2023-09-08T21:32:35.381464+00:00', 'models': [], 'pipelines': []}
Upload the Models
Now we will upload our models. Note that for this example we are applying the model from a .ZIP file. The Aloha model is a protobuf file that has been defined for evaluating web pages, and we will configure it to use data in the tensorflow format.
We will create two versions of the model: one that defaults to the x86 architecture, the other that will use the ARM architecture.
For more information, see the Wallaroo SDK Essentials Guide: Model Uploads and Registrations.
from wallaroo.engine_config import Architecture

x86_model = wl.upload_model(model_name,
                            model_file_name,
                            framework=Framework.TENSORFLOW).configure("tensorflow")
arm_model = wl.upload_model(model_name,
                            model_file_name,
                            framework=Framework.TENSORFLOW,
                            arch=Architecture.ARM).configure("tensorflow")
Deploy a model For x86
Now that we have a model that we want to use we will create a deployment for it. We will create a pipeline, then add the model to the pipeline as a pipeline step.
For more information, see the Wallaroo SDK Essentials Guide: Pipeline Management
aloha_pipeline = get_pipeline(pipeline_name)
aloha_pipeline

# clear the steps if used before
aloha_pipeline.clear()
aloha_pipeline.add_model_step(x86_model)
| name | alohapipeline |
|---|---|
| created | 2023-09-08 21:32:58.216028+00:00 |
| last_updated | 2023-09-08 21:32:58.216028+00:00 |
| deployed | (none) |
| tags | |
| versions | fcde3598-c68d-4310-aea6-b3e98d4a4fb7 |
| steps | |
| published | False |
Deploy Pipeline for x86
We will now deploy the pipeline. The x86 version of our model will be auto-applied in this pipeline configuration for x86 based architectures.
For more information, see the Wallaroo SDK Essentials Guide: Pipeline Deployment Configuration.
deployment_config = (wallaroo.deployment_config
                     .DeploymentConfigBuilder()
                     .cpus(4)
                     .memory('8Gi')
                     .build()
                    )
display(deployment_config)
aloha_pipeline.deploy(deployment_config=deployment_config)
{'engine': {'cpu': 4,
  'resources': {'limits': {'cpu': 4, 'memory': '8Gi'},
   'requests': {'cpu': 4, 'memory': '8Gi'}}},
 'enginelb': {},
 'engineAux': {'images': {}},
 'node_selector': {}}
Waiting for deployment - this will take up to 45s …….. ok
| name | alohapipeline |
|---|---|
| created | 2023-09-08 21:32:58.216028+00:00 |
| last_updated | 2023-09-08 21:33:00.111664+00:00 |
| deployed | True |
| tags | |
| versions | 21218bd6-8ce8-4315-9683-b5a7542a0a94, fcde3598-c68d-4310-aea6-b3e98d4a4fb7 |
| steps | alohamodel |
| published | False |
We can verify that the pipeline is running and list what models are associated with it.
aloha_pipeline.status()
{'status': 'Running',
 'details': [],
 'engines': [{'ip': '10.244.3.42',
   'name': 'engine-5bc7d8697f-6klln',
   'status': 'Running',
   'reason': None,
   'details': [],
   'pipeline_statuses': {'pipelines': [{'id': 'alohapipeline',
      'status': 'Running'}]},
   'model_statuses': {'models': [{'name': 'alohamodel',
      'version': '49530373-9ecc-4fab-8d32-918caa240101',
      'sha': 'd71d9ffc61aaac58c2b1ed70a2db13d1416fb9d3f5b891e5e4e2e97180fe22f8',
      'status': 'Running'}]}}],
 'engine_lbs': [{'ip': '10.244.3.41',
   'name': 'engine-lb-584f54c899-k7h8s',
   'status': 'Running',
   'reason': None,
   'details': []}],
 'sidekicks': []}
Inference on Standard Architecture
We will now perform an inference on 25,000 records by specifying an Apache Arrow input file, and track the time it takes to perform the inference and display the first 5 results.
For more information, see the Wallaroo SDK Essentials Guide: Inference Management
startTime = time.time()
result = aloha_pipeline.infer_from_file('./data/data_25k.arrow')
endTime = time.time()
x86_time = endTime-startTime
display(result.to_pandas().loc[:, ["time","out.main"]])
| time | out.main | |
|---|---|---|
| 0 | 2023-09-08 21:33:08.904 | [0.997564] |
| 1 | 2023-09-08 21:33:08.904 | [0.99999994] |
| 2 | 2023-09-08 21:33:08.904 | [1.0] |
| 3 | 2023-09-08 21:33:08.904 | [0.9999997] |
| 4 | 2023-09-08 21:33:08.904 | [0.9999989] |
| ... | ... | ... |
| 24949 | 2023-09-08 21:33:08.904 | [0.9996881] |
| 24950 | 2023-09-08 21:33:08.904 | [0.99981505] |
| 24951 | 2023-09-08 21:33:08.904 | [0.9999919] |
| 24952 | 2023-09-08 21:33:08.904 | [1.0] |
| 24953 | 2023-09-08 21:33:08.904 | [0.99999803] |
24954 rows × 2 columns
Deploy with ARM
We have demonstrated performing our sample inference using a standard pipeline deployment. Now we will redeploy the same pipeline with the ARM architecture version of the model.
aloha_pipeline.undeploy()
# clear the steps if used before
aloha_pipeline.clear()
aloha_pipeline.add_model_step(arm_model)
aloha_pipeline.deploy(deployment_config = deployment_config)
 ok
Waiting for deployment - this will take up to 45s .................................. ok
| name | alohapipeline |
|---|---|
| created | 2023-09-08 21:32:58.216028+00:00 |
| last_updated | 2023-09-08 21:35:11.663764+00:00 |
| deployed | True |
| tags | |
| versions | 9c61af33-2934-4552-bf45-42d03441a64b, 9c51cf24-9fcc-40c1-82ab-297972ce488d, 21218bd6-8ce8-4315-9683-b5a7542a0a94, fcde3598-c68d-4310-aea6-b3e98d4a4fb7 |
| steps | alohamodel |
| published | False |
Infer with ARM
We will now perform the same inference request, this time through the pipeline with the ARM architecture. The same data, the same model - just on ARM.
startTime = time.time()
result = aloha_pipeline.infer_from_file('./data/data_25k.arrow',timeout=2500)
endTime = time.time()
arm_time = endTime-startTime
display(result.to_pandas().loc[:, ["time","out.main"]])
| time | out.main | |
|---|---|---|
| 0 | 2023-09-08 21:36:22.500 | [0.997564] |
| 1 | 2023-09-08 21:36:22.500 | [0.99999994] |
| 2 | 2023-09-08 21:36:22.500 | [1.0] |
| 3 | 2023-09-08 21:36:22.500 | [0.9999997] |
| 4 | 2023-09-08 21:36:22.500 | [0.9999989] |
| ... | ... | ... |
| 24949 | 2023-09-08 21:36:22.500 | [0.9996881] |
| 24950 | 2023-09-08 21:36:22.500 | [0.99981505] |
| 24951 | 2023-09-08 21:36:22.500 | [0.9999919] |
| 24952 | 2023-09-08 21:36:22.500 | [1.0] |
| 24953 | 2023-09-08 21:36:22.500 | [0.99999803] |
24954 rows × 2 columns
Compare Standard against Arm
With the two inferences complete, we’ll compare the standard deployment architecture time against the ARM architecture.
display(f"Standard architecture: {x86_time}")
display(f"ARM architecture: {arm_time}")
'Standard architecture: 2.8868443965911865'
‘ARM architecture: 2.5103814601898193’
Undeploy Pipeline
When finished with our tests, we will undeploy the pipeline so we have the Kubernetes resources back for other tasks. Note that if the deployment variable is unchanged aloha_pipeline.deploy() will restart the inference engine in the same configuration as before.
aloha_pipeline.undeploy()
Waiting for undeployment - this will take up to 45s .................................... ok
| name | alohapipeline |
|---|---|
| created | 2023-09-08 21:32:58.216028+00:00 |
| last_updated | 2023-09-08 21:35:11.663764+00:00 |
| deployed | False |
| tags | |
| versions | 9c61af33-2934-4552-bf45-42d03441a64b, 9c51cf24-9fcc-40c1-82ab-297972ce488d, 21218bd6-8ce8-4315-9683-b5a7542a0a94, fcde3598-c68d-4310-aea6-b3e98d4a4fb7 |
| steps | alohamodel |
| published | False |
3 - ARM Financial Services Cybersecurity Demonstration
A demonstration of a classification financial services model deployed under standard and ARM pipeline deployment configurations.
This tutorial is available on the Wallaroo Tutorials repository.
Classification Financial Services with Arm Architecture
This tutorial demonstrates how to use the Wallaroo combined with ARM processors to perform inferences with pre-trained classification financial services ML models. This demonstration assumes that:
- A Wallaroo version 2023.3 or above instance is installed.
- A nodepools with ARM architecture virtual machines are part of the Kubernetes cluster. For example, Azure supports Ampere® Altra® Arm-based processor included with the following virtual machines:
In this notebook we will the example model and sample data from the Machine Learning Group’s demonstration on Credit Card Fraud detection.
Tutorial Goals
For our example, we will perform the following:
- Create a workspace for our work.
- Upload the CCFraud model.
- Create a pipeline using the default architecture that can ingest our submitted data, submit it to the model, and export the results while tracking how long the inference took.
- Redeploy the same pipeline on the ARM architecture, then perform the same inference on the same data and model and track how long the inference took.
- Compare the inference timing through the default architecture versus the ARM architecture.
import wallaroo
from wallaroo.object import EntityNotFoundError

import pyarrow as pa

from wallaroo.framework import Framework

# used to display dataframe information without truncating
from IPython.display import display
import pandas as pd
pd.set_option('display.max_colwidth', None)
import time
wallaroo.__version__
'2023.3.0+8a3f2fb38'
Connect to the Wallaroo Instance through the User Interface
The next step is to connect to Wallaroo through the Wallaroo client. The Python library is included in the Wallaroo install and available through the Jupyter Hub interface provided with your Wallaroo environment.
This is accomplished using the wallaroo.Client() command, which provides a URL to grant the SDK permission to your specific Wallaroo environment. When displayed, enter the URL into a browser and confirm permissions. Store the connection into a variable that can be referenced later.
If logging into the Wallaroo instance through the internal JupyterHub service, use wl = wallaroo.Client(). For more information on Wallaroo Client settings, see the Client Connection guide.
# Login through local Wallaroo instance

wl = wallaroo.Client()
Create Workspace
Now we’ll use the SDK below to create our workspace , assign as our current workspace, then display all of the workspaces we have at the moment. We’ll also set up for our models and pipelines down the road, so we have one spot to change names to whatever fits your organization’s standards best.
To allow this tutorial to be run multiple times or by multiple users in the same Wallaroo instance, a random 4 character prefix will be added to the workspace. Feel free to change this suffix variable to '' if not required.
When we create our new workspace, we’ll save it in the Python variable workspace so we can refer to it as needed.
For more information, see the Wallaroo SDK Essentials Guide: Workspace Management.
import string
import random

# make a random 4 character prefix
suffix= ''.join(random.choice(string.ascii_lowercase) for i in range(4))

suffix='john'

workspace_name = f'arm-classification-finserv{suffix}'
pipeline_name = 'arm-classification-example'
model_name = 'ccfraudmodel'
model_file_name = './models/ccfraud.onnx'
def get_workspace(name):
    workspace = None
    for ws in wl.list_workspaces():
        if ws.name() == name:
            workspace= ws
    if(workspace == None):
        workspace = wl.create_workspace(name)
    return workspace

def get_pipeline(name):
    try:
        pipeline = wl.pipelines_by_name(name)[0]
    except EntityNotFoundError:
        pipeline = wl.build_pipeline(name)
    return pipeline
workspace = get_workspace(workspace_name)

wl.set_current_workspace(workspace)
{'name': 'arm-classification-finservjohn', 'id': 25, 'archived': False, 'created_by': '0e5060a5-218c-47c1-9678-e83337494184', 'created_at': '2023-09-08T21:40:58.35659+00:00', 'models': [], 'pipelines': []}
Upload a model
Our workspace is created. Let’s upload our credit card fraud model to it. This is the file name ccfraud.onnx, and we’ll upload it as ccfraudmodel. The credit card fraud model is trained to detect credit card fraud based on a 0 to 1 model: The closer to 0 the less likely the transactions indicate fraud, while the closer to 1 the more likely the transactions indicate fraud.
We will create two versions of the model: one that defaults to the x86 architecture, the other that will use the ARM architecture.
For more information, see the Wallaroo SDK Essentials Guide: Model Uploads and Registrations.
from wallaroo.engine_config import Architecture

x86_ccfraud_model = (wl.upload_model(model_name,
                                 model_file_name,
                                 wallaroo.framework.Framework.ONNX)
                                 .configure(tensor_fields=["tensor"])
                )

arm_ccfraud_model = (wl.upload_model(model_name,
                                 model_file_name,
                                 wallaroo.framework.Framework.ONNX,
                                 arch=Architecture.ARM)
                                 .configure(tensor_fields=["tensor"])
                )
We can verify that our model was uploaded by listing the models uploaded to our Wallaroo instance with the list_models() command. Note that since we uploaded this model before, we now have different versions of it we can use for our testing.
Create a Pipeline
With our model uploaded, time to create our pipeline and deploy it so it can accept data and process it through our ccfraudmodel. We’ll call our pipeline ccfraudpipeline.
- NOTE: Pipeline names must be unique. If two pipelines are assigned the same name, the new pipeline is created as a new version of the pipeline.
For more information, see the Wallaroo SDK Essentials Guide: Pipeline Management
pipeline = get_pipeline(pipeline_name)
Deploy Pipeline for x86 Architecture
Now our pipeline is set. Let’s add a single step to it - in this case, our x86_ccfraud_model that we uploaded to our workspace to use the default x86 architecture.
# clear the steps if used before
pipeline.undeploy()
pipeline.clear()
pipeline.add_model_step(x86_ccfraud_model)
Waiting for undeployment - this will take up to 45s ..................................... ok
| name | arm-classification-example |
|---|---|
| created | 2023-09-08 21:40:58.819251+00:00 |
| last_updated | 2023-09-08 21:45:48.571799+00:00 |
| deployed | False |
| tags | |
| versions | 7800fd1c-edc1-4177-99eb-29100c2908b9, 285566fa-5596-48c9-b2e8-81ede445bc80, 24fa4009-3ed7-4887-857d-9e2617433962, 6a2beaff-2bfd-41ab-abd6-b4ccfcab0f77, 7c2b0cce-82d7-4fb7-a052-50e2b13dea55 |
| steps | ccfraudmodel |
| published | False |
Deploy Pipeline
We will now deploy the pipeline.
For more information, see the Wallaroo SDK Essentials Guide: Pipeline Deployment Configuration.
Set Standard Pipeline Deployment Architecture
Now we can set our pipeline deployment architecture with the arch(wallaroo.engine_config.Architecture) parameter. By default, the deployment configuration architecture default to wallaroo.engine_config.Architecture.X86.
For this example, we will create a pipeline deployment and leave the arch out so it will default to X86.
This deployment will be applied to the pipeline deployment.
For more information, see the Wallaroo SDK Essentials Guide: Pipeline Deployment Configuration.
Deploy Pipeline
We will now deploy the pipeline.
For more information, see the Wallaroo SDK Essentials Guide: Pipeline Deployment Configuration.
deployment_config = (wallaroo.deployment_config
                     .DeploymentConfigBuilder()
                     .cpus(1)
                     .memory('1Gi')
                     .build()
                     )
deployment_config
{'engine': {'cpu': 1,
  'resources': {'limits': {'cpu': 1, 'memory': '1Gi'},
   'requests': {'cpu': 1, 'memory': '1Gi'}}},
 'enginelb': {},
 'engineAux': {'images': {}},
 'node_selector': {}}
pipeline.deploy(deployment_config=deployment_config)
Waiting for deployment - this will take up to 45s ........ ok
| name | arm-classification-example |
|---|---|
| created | 2023-09-08 21:40:58.819251+00:00 |
| last_updated | 2023-09-08 21:47:16.136633+00:00 |
| deployed | True |
| tags | |
| versions | 1704c888-8b7a-4903-aaea-168194105baa, 7800fd1c-edc1-4177-99eb-29100c2908b9, 285566fa-5596-48c9-b2e8-81ede445bc80, 24fa4009-3ed7-4887-857d-9e2617433962, 6a2beaff-2bfd-41ab-abd6-b4ccfcab0f77, 7c2b0cce-82d7-4fb7-a052-50e2b13dea55 |
| steps | ccfraudmodel |
| published | False |
Inference on Standard Architecture
We will now perform an inference on 10,000 records by specifying an Apache Arrow input file, and track the time it takes to perform the inference and display the first 5 results.
For more information, see the Wallaroo SDK Essentials Guide: Inference Management
start_time = time.time()
result = pipeline.infer_from_file('./data/cc_data_10k.arrow')
end_time = time.time()
x86_time = end_time - start_time

outputs =  result.to_pandas()
display(outputs.head(5))
| time | in.tensor | out.dense_1 | check_failures | |
|---|---|---|---|---|
| 0 | 2023-09-08 21:48:02.799 | [-1.0603298, 2.3544967, -3.5638788, 5.138735, -1.2308457, -0.76878244, -3.5881228, 1.8880838, -3.2789674, -3.9563255, 4.099344, -5.653918, -0.8775733, -9.131571, -0.6093538, -3.7480276, -5.0309124, -0.8748149, 1.9870535, 0.7005486, 0.9204423, -0.10414918, 0.32295644, -0.74181414, 0.038412016, 1.0993439, 1.2603409, -0.14662448, -1.4463212] | [0.99300325] | 0 |
| 1 | 2023-09-08 21:48:02.799 | [-1.0603298, 2.3544967, -3.5638788, 5.138735, -1.2308457, -0.76878244, -3.5881228, 1.8880838, -3.2789674, -3.9563255, 4.099344, -5.653918, -0.8775733, -9.131571, -0.6093538, -3.7480276, -5.0309124, -0.8748149, 1.9870535, 0.7005486, 0.9204423, -0.10414918, 0.32295644, -0.74181414, 0.038412016, 1.0993439, 1.2603409, -0.14662448, -1.4463212] | [0.99300325] | 0 |
| 2 | 2023-09-08 21:48:02.799 | [-1.0603298, 2.3544967, -3.5638788, 5.138735, -1.2308457, -0.76878244, -3.5881228, 1.8880838, -3.2789674, -3.9563255, 4.099344, -5.653918, -0.8775733, -9.131571, -0.6093538, -3.7480276, -5.0309124, -0.8748149, 1.9870535, 0.7005486, 0.9204423, -0.10414918, 0.32295644, -0.74181414, 0.038412016, 1.0993439, 1.2603409, -0.14662448, -1.4463212] | [0.99300325] | 0 |
| 3 | 2023-09-08 21:48:02.799 | [-1.0603298, 2.3544967, -3.5638788, 5.138735, -1.2308457, -0.76878244, -3.5881228, 1.8880838, -3.2789674, -3.9563255, 4.099344, -5.653918, -0.8775733, -9.131571, -0.6093538, -3.7480276, -5.0309124, -0.8748149, 1.9870535, 0.7005486, 0.9204423, -0.10414918, 0.32295644, -0.74181414, 0.038412016, 1.0993439, 1.2603409, -0.14662448, -1.4463212] | [0.99300325] | 0 |
| 4 | 2023-09-08 21:48:02.799 | [0.5817662, 0.09788155, 0.15468194, 0.4754102, -0.19788623, -0.45043448, 0.016654044, -0.025607055, 0.09205616, -0.27839172, 0.059329946, -0.019658541, -0.42250833, -0.12175389, 1.5473095, 0.23916228, 0.3553975, -0.76851654, -0.7000849, -0.11900433, -0.3450517, -1.1065114, 0.25234112, 0.020944182, 0.21992674, 0.25406894, -0.04502251, 0.10867739, 0.25471792] | [0.0010916889] | 0 |
x86_time
0.0525670051574707
Set Arm Pipeline Deployment Architecture
Now we can set our pipeline deployment architecture by specifying the ARM version of the model, then deploy our pipeline again.
pipeline.undeploy()
pipeline.clear()
# clear the steps if used before
pipeline.clear()
pipeline.add_model_step(arm_ccfraud_model)
pipeline.deploy(deployment_config=deployment_config)
Waiting for undeployment - this will take up to 45s ...................................... ok
Waiting for deployment - this will take up to 45s ........ ok
| name | arm-classification-example |
|---|---|
| created | 2023-09-08 21:40:58.819251+00:00 |
| last_updated | 2023-09-08 21:48:46.549206+00:00 |
| deployed | True |
| tags | |
| versions | 32315379-fae5-44bd-84e8-78a9d7f57b30, 1704c888-8b7a-4903-aaea-168194105baa, 7800fd1c-edc1-4177-99eb-29100c2908b9, 285566fa-5596-48c9-b2e8-81ede445bc80, 24fa4009-3ed7-4887-857d-9e2617433962, 6a2beaff-2bfd-41ab-abd6-b4ccfcab0f77, 7c2b0cce-82d7-4fb7-a052-50e2b13dea55 |
| steps | ccfraudmodel |
| published | False |
Inference with ARM
We’ll do the exact same inference with the exact same file and display the same results, storing how long it takes to perform the inference under the arm processors.
start_time = time.time()
result = pipeline.infer_from_file('./data/cc_data_10k.arrow')
end_time = time.time()
arm_time = end_time - start_time

outputs =  result.to_pandas()
display(outputs.head(5))
| time | in.tensor | out.dense_1 | check_failures | |
|---|---|---|---|---|
| 0 | 2023-09-08 21:48:55.214 | [-1.0603298, 2.3544967, -3.5638788, 5.138735, -1.2308457, -0.76878244, -3.5881228, 1.8880838, -3.2789674, -3.9563255, 4.099344, -5.653918, -0.8775733, -9.131571, -0.6093538, -3.7480276, -5.0309124, -0.8748149, 1.9870535, 0.7005486, 0.9204423, -0.10414918, 0.32295644, -0.74181414, 0.038412016, 1.0993439, 1.2603409, -0.14662448, -1.4463212] | [0.99300325] | 0 |
| 1 | 2023-09-08 21:48:55.214 | [-1.0603298, 2.3544967, -3.5638788, 5.138735, -1.2308457, -0.76878244, -3.5881228, 1.8880838, -3.2789674, -3.9563255, 4.099344, -5.653918, -0.8775733, -9.131571, -0.6093538, -3.7480276, -5.0309124, -0.8748149, 1.9870535, 0.7005486, 0.9204423, -0.10414918, 0.32295644, -0.74181414, 0.038412016, 1.0993439, 1.2603409, -0.14662448, -1.4463212] | [0.99300325] | 0 |
| 2 | 2023-09-08 21:48:55.214 | [-1.0603298, 2.3544967, -3.5638788, 5.138735, -1.2308457, -0.76878244, -3.5881228, 1.8880838, -3.2789674, -3.9563255, 4.099344, -5.653918, -0.8775733, -9.131571, -0.6093538, -3.7480276, -5.0309124, -0.8748149, 1.9870535, 0.7005486, 0.9204423, -0.10414918, 0.32295644, -0.74181414, 0.038412016, 1.0993439, 1.2603409, -0.14662448, -1.4463212] | [0.99300325] | 0 |
| 3 | 2023-09-08 21:48:55.214 | [-1.0603298, 2.3544967, -3.5638788, 5.138735, -1.2308457, -0.76878244, -3.5881228, 1.8880838, -3.2789674, -3.9563255, 4.099344, -5.653918, -0.8775733, -9.131571, -0.6093538, -3.7480276, -5.0309124, -0.8748149, 1.9870535, 0.7005486, 0.9204423, -0.10414918, 0.32295644, -0.74181414, 0.038412016, 1.0993439, 1.2603409, -0.14662448, -1.4463212] | [0.99300325] | 0 |
| 4 | 2023-09-08 21:48:55.214 | [0.5817662, 0.09788155, 0.15468194, 0.4754102, -0.19788623, -0.45043448, 0.016654044, -0.025607055, 0.09205616, -0.27839172, 0.059329946, -0.019658541, -0.42250833, -0.12175389, 1.5473095, 0.23916228, 0.3553975, -0.76851654, -0.7000849, -0.11900433, -0.3450517, -1.1065114, 0.25234112, 0.020944182, 0.21992674, 0.25406894, -0.04502251, 0.10867739, 0.25471792] | [0.0010916889] | 0 |
Compare Differences
We will now compare the results on the standard architecture versus ARM. Typically, ARM delivers a 15% improvement on inference times while requireing less power and cost requirements.
display(f"Standard architecture: {x86_time}")
display(f"ARM architecture: {arm_time}")
'Standard architecture: 0.0525670051574707'
‘ARM architecture: 0.04808354377746582’
With our work in the pipeline done, we’ll undeploy it to get back our resources from the Kubernetes cluster. If we keep the same settings we can redeploy the pipeline with the same configuration in the future.
pipeline.undeploy()
Waiting for undeployment - this will take up to 45s .................................... ok
| name | arm-classification-example |
|---|---|
| created | 2023-09-08 21:40:58.819251+00:00 |
| last_updated | 2023-09-08 21:48:46.549206+00:00 |
| deployed | False |
| tags | |
| versions | 32315379-fae5-44bd-84e8-78a9d7f57b30, 1704c888-8b7a-4903-aaea-168194105baa, 7800fd1c-edc1-4177-99eb-29100c2908b9, 285566fa-5596-48c9-b2e8-81ede445bc80, 24fa4009-3ed7-4887-857d-9e2617433962, 6a2beaff-2bfd-41ab-abd6-b4ccfcab0f77, 7c2b0cce-82d7-4fb7-a052-50e2b13dea55 |
| steps | ccfraudmodel |
| published | False |
4 - ARM Computer Vision Retail Demonstration
A demonstration of a computer vision retail model deployed under standard and ARM pipeline deployment configurations.
This tutorial is available on the Wallaroo Tutorials repository.
This tutorial demonstrates how to use the Wallaroo combined with ARM processors to perform inferences with pre-trained computer vision ML models. This demonstration assumes that:
- A Wallaroo version 2023.3 or above instance is installed.
- A nodepools with ARM architecture virtual machines are part of the Kubernetes cluster. For example, Azure supports Ampere® Altra® Arm-based processor included with the following virtual machines:
Tutorial Goals
For our example, we will perform the following:
- Create a workspace for our work.
- Upload the the resnet computer vision model model.
- Create a pipeline using the default architecture that can ingest our submitted data, submit it to the model, and export the results while tracking how long the inference took.
- Redeploy the same pipeline on the ARM architecture, then perform the same inference on the same data and model and track how long the inference took.
- Compare the inference timing through the default architecture versus the ARM architecture.
Steps
Import Libraries
The first step will be to import our libraries.
import torch
import pickle
import wallaroo
from wallaroo.object import EntityNotFoundError
from wallaroo.framework import Framework

import numpy as np
import json
import requests
import time
import pandas as pd

# used to display dataframe information without truncating
from IPython.display import display
import pandas as pd
pd.set_option('display.max_colwidth', None)

# used for unique connection names

import string
import random
suffix= ''.join(random.choice(string.ascii_lowercase) for i in range(4))
/opt/conda/lib/python3.9/site-packages/tqdm/auto.py:22: TqdmWarning: IProgress not found. Please update jupyter and ipywidgets. See https://ipywidgets.readthedocs.io/en/stable/user_install.html
  from .autonotebook import tqdm as notebook_tqdm
Connect to the Wallaroo Instance
The first step is to connect to Wallaroo through the Wallaroo client. The Python library is included in the Wallaroo install and available through the Jupyter Hub interface provided with your Wallaroo environment.
This is accomplished using the wallaroo.Client() command, which provides a URL to grant the SDK permission to your specific Wallaroo environment. When displayed, enter the URL into a browser and confirm permissions. Store the connection into a variable that can be referenced later.
If logging into the Wallaroo instance through the internal JupyterHub service, use wl = wallaroo.Client(). For more information on Wallaroo Client settings, see the Client Connection guide.
# Login through local service

wl = wallaroo.Client()
Set Variables
The following variables and methods are used later to create or connect to an existing workspace, pipeline, and model.
The suffix is used to ensure unique workspace names across the Wallaroo instance. Set this to ’’ if not required.
suffix=''

workspace_name = f'cv-arm-example{suffix}'
pipeline_name = 'cv-sample'

x86_resnet_model_name = 'x86-resnet50'
resnet_model_file_name = 'models/resnet50_v1.onnx'

arm_resnet_model_name = 'arm-resnet50'
resnet_model_file_name = 'models/resnet50_v1.onnx'
def get_workspace(name):
    workspace = None
    for ws in wl.list_workspaces():
        if ws.name() == name:
            workspace= ws
    if(workspace == None):
        workspace = wl.create_workspace(name)
    return workspace

def get_pipeline(name):
    try:
        pipeline = wl.pipelines_by_name(name)[0]
    except EntityNotFoundError:
        pipeline = wl.build_pipeline(name)
    return pipeline
Create Workspace
The workspace will be created or connected to, and set as the default workspace for this session. Once that is done, then all models and pipelines will be set in that workspace.
workspace = get_workspace(workspace_name)
wl.set_current_workspace(workspace)
wl.get_current_workspace()
{'name': 'cv-arm-example', 'id': 26, 'archived': False, 'created_by': '0e5060a5-218c-47c1-9678-e83337494184', 'created_at': '2023-09-08T21:54:56.56663+00:00', 'models': [{'name': 'x86-resnet50', 'versions': 1, 'owner_id': '""', 'last_update_time': datetime.datetime(2023, 9, 8, 21, 55, 1, 675188, tzinfo=tzutc()), 'created_at': datetime.datetime(2023, 9, 8, 21, 55, 1, 675188, tzinfo=tzutc())}, {'name': 'arm-resnet50', 'versions': 1, 'owner_id': '""', 'last_update_time': datetime.datetime(2023, 9, 8, 21, 55, 6, 69116, tzinfo=tzutc()), 'created_at': datetime.datetime(2023, 9, 8, 21, 55, 6, 69116, tzinfo=tzutc())}], 'pipelines': [{'name': 'cv-sample', 'create_time': datetime.datetime(2023, 9, 8, 21, 54, 57, 62345, tzinfo=tzutc()), 'definition': '[]'}]}
Create Pipeline and Upload Model
We will now create or connect to our pipeline, then create two versions of the model: one that defaults to the x86 architecture, the other that will use the ARM architecture.
pipeline = get_pipeline(pipeline_name)

from wallaroo.engine_config import Architecture

x86_resnet_model = wl.upload_model(x86_resnet_model_name,
                                   resnet_model_file_name,
                                   framework=Framework.ONNX)
arm_resnet_model = wl.upload_model(arm_resnet_model_name,
                                   resnet_model_file_name,
                                   framework=Framework.ONNX,
                                   arch=Architecture.ARM)
Deploy Pipeline
With the model uploaded, we can add it is as a step in the pipeline, then deploy it.
For this deployment we will be using the default deployment which uses the x86 architecture.
Once deployed, resources from the Wallaroo instance will be reserved and the pipeline will be ready to use the model to perform inference requests.
deployment_config = (wallaroo.deployment_config
                            .DeploymentConfigBuilder()
                            .cpus(2)
                            .memory('2Gi')
                            .build()
                        )
# clear previous steps
pipeline.undeploy()
pipeline.clear()
pipeline.add_model_step(x86_resnet_model)

pipeline.deploy(deployment_config = deployment_config)
Waiting for deployment - this will take up to 45s .............. ok
| name | cv-sample |
|---|---|
| created | 2023-09-08 21:54:57.062345+00:00 |
| last_updated | 2023-09-08 21:55:33.858777+00:00 |
| deployed | True |
| tags | |
| versions | ccc676d6-019c-4f9a-8866-033950a5907b, 68297806-92bb-4dce-8c10-a1f1d278ab2a |
| steps | x86-resnet50 |
| published | False |
pipeline.status()
{'status': 'Running',
 'details': [],
 'engines': [{'ip': '10.244.3.60',
   'name': 'engine-7645b79695-c78gv',
   'status': 'Running',
   'reason': None,
   'details': [],
   'pipeline_statuses': {'pipelines': [{'id': 'cv-sample',
      'status': 'Running'}]},
   'model_statuses': {'models': [{'name': 'x86-resnet50',
      'version': '801b73a0-a6e3-45d7-b518-120c826fa718',
      'sha': 'c6c8869645962e7711132a7e17aced2ac0f60dcdc2c7faa79b2de73847a87984',
      'status': 'Running'}]}}],
 'engine_lbs': [{'ip': '10.244.3.59',
   'name': 'engine-lb-584f54c899-2w6j9',
   'status': 'Running',
   'reason': None,
   'details': []}],
 'sidekicks': []}
Run Inference
With that done, we can have the model detect the objects on the image by running an inference through the pipeline. For this example, we will use a prepared Apache Arrow table ./data/image_224x224.arrow
startTime = time.time()
# pass the table in
results = pipeline.infer_from_file('./data/image_224x224.arrow')
endTime = time.time()
x86_time = endTime-startTime
Deploy with ARM
We have demonstrated performing our sample inference using a standard pipeline deployment. Now we will redeploy the same pipeline with the ARM architecture version of the model.
# clear previous steps
pipeline.undeploy()
pipeline.clear()
pipeline.add_model_step(arm_resnet_model)

pipeline.deploy(deployment_config = deployment_config)
Waiting for undeployment - this will take up to 45s .................................... ok
Waiting for deployment - this will take up to 45s ............... ok
| name | cv-sample |
|---|---|
| created | 2023-09-08 21:54:57.062345+00:00 |
| last_updated | 2023-09-08 21:56:26.218871+00:00 |
| deployed | True |
| tags | |
| versions | 3aff896f-52cb-478b-9cd7-64c3212d768f, ccc676d6-019c-4f9a-8866-033950a5907b, 68297806-92bb-4dce-8c10-a1f1d278ab2a |
| steps | x86-resnet50 |
| published | False |
pipeline.status()
{'status': 'Running',
 'details': [],
 'engines': [{'ip': '10.244.3.61',
   'name': 'engine-57548b6596-qx8k8',
   'status': 'Running',
   'reason': None,
   'details': [],
   'pipeline_statuses': {'pipelines': [{'id': 'cv-sample',
      'status': 'Running'}]},
   'model_statuses': {'models': [{'name': 'arm-resnet50',
      'version': 'dec621e2-8b13-44cf-a330-4fdada1f518e',
      'sha': 'c6c8869645962e7711132a7e17aced2ac0f60dcdc2c7faa79b2de73847a87984',
      'status': 'Running'}]}}],
 'engine_lbs': [{'ip': '10.244.3.62',
   'name': 'engine-lb-584f54c899-56c8l',
   'status': 'Running',
   'reason': None,
   'details': []}],
 'sidekicks': []}
ARM Inference
We will now perform the same inference we did with the standard deployment architecture, only this time through the ARM virtual machines.
startTime = time.time()
# pass the table in
results = pipeline.infer_from_file('./data/image_224x224.arrow')
endTime = time.time()
arm_time = endTime-startTime
Compare Standard against Arm
With the two inferences complete, we’ll compare the standard deployment architecture against the ARM architecture.
display(f"Standard architecture: {x86_time}")
display(f"ARM architecture: {arm_time}")
'Standard architecture: 0.06283044815063477'
‘ARM architecture: 0.06364631652832031’
Undeploy the Pipeline
With the inference complete, we can undeploy the pipeline and return the resources back to the Wallaroo instance.
pipeline.undeploy()
Waiting for undeployment - this will take up to 45s ...................................... ok
| name | cv-sample |
|---|---|
| created | 2023-09-08 21:54:57.062345+00:00 |
| last_updated | 2023-09-08 21:56:26.218871+00:00 |
| deployed | False |
| tags | |
| versions | 3aff896f-52cb-478b-9cd7-64c3212d768f, ccc676d6-019c-4f9a-8866-033950a5907b, 68297806-92bb-4dce-8c10-a1f1d278ab2a |
| steps | x86-resnet50 |
| published | False |
5 - ARM Computer Vision Retail Yolov8 Demonstration
A demonstration of a computer vision Yolov8 model deployed under standard and ARM pipeline deployment configurations.
The following tutorial is available on the Wallaroo Github Repository.
Computer Vision Yolov8n ARM Deployment in Wallaroo
The Yolov8 computer vision model is used for fast recognition of objects in images. This tutorial demonstrates how to deploy a Yolov8n pre-trained model into a Wallaroo Ops server using the ARM architecture and perform inferences on it.
This demonstration assumes that:
- A Wallaroo version 2023.3 or above instance is installed.
- A nodepools with ARM architecture virtual machines are part of the Kubernetes cluster. For example, Azure supports Ampere® Altra® Arm-based processor included with the following virtual machines:
For this tutorial, the helper module CVDemoUtils and WallarooUtils are used to transform a sample image into a pandas DataFrame. This DataFrame is then submitted to the Yolov8n model deployed in Wallaroo.
This demonstration follows these steps:
- Upload the Yolo8 model to Wallaroo as two versions: one with the target deployment of x86, the other with the target deployment of ARM.
- Add the Yolo8 model as a Wallaroo pipeline step
- Deploy the Wallaroo pipeline and allocate cluster resources to the pipeline
- Perform sample inferences
- Undeploy and return the resources
References
- Wallaroo Workspaces: Workspaces are environments were users upload models, create pipelines and other artifacts. The workspace should be considered the fundamental area where work is done. Workspaces are shared with other users to give them access to the same models, pipelines, etc.
- Wallaroo Model Upload and Registration: ML Models are uploaded to Wallaroo through the SDK or the MLOps API to a workspace. ML models include default runtimes (ONNX, Python Step, and TensorFlow) that are run directly through the Wallaroo engine, and containerized runtimes (Hugging Face, PyTorch, etc) that are run through in a container through the Wallaroo engine.
- Wallaroo Pipelines: Pipelines are used to deploy models for inferencing. Each model is a pipeline step in a pipelines, where the inputs of the previous step are fed into the next. Pipeline steps can be ML models, Python scripts, or Arbitrary Python (these contain necessary models and artifacts for running a model).
Steps
Load Libraries
The first step is loading the required libraries including the Wallaroo Python module.
# Import Wallaroo Python SDK
import wallaroo
from wallaroo.object import EntityNotFoundError
from wallaroo.framework import Framework
from CVDemoUtils import CVDemo
from WallarooUtils import Util
cvDemo = CVDemo()
util = Util()

# used to display DataFrame information without truncating
from IPython.display import display
import pandas as pd
pd.set_option('display.max_colwidth', None)
Connect to the Wallaroo Instance through the User Interface
The next step is to connect to Wallaroo through the Wallaroo client. The Python library is included in the Wallaroo install and available through the Jupyter Hub interface provided with your Wallaroo environment.
This is accomplished using the wallaroo.Client() command, which provides a URL to grant the SDK permission to your specific Wallaroo environment. When displayed, enter the URL into a browser and confirm permissions. Store the connection into a variable that can be referenced later.
If logging into the Wallaroo instance through the internal JupyterHub service, use wl = wallaroo.Client(). For more information on Wallaroo Client settings, see the Client Connection guide.
wl = wallaroo.Client()
Create a New Workspace
We’ll use the SDK below to create our workspace , assign as our current workspace, then display all of the workspaces we have at the moment. We’ll also set up variables for our models and pipelines down the road, so we have one spot to change names to whatever fits your organization’s standards best.
To allow this tutorial to be run by multiple users in the same Wallaroo instance, a random 4 character prefix will be added to the workspace, pipeline, and model. Feel free to set suffix='' if this is not required.
# import string
# import random

# # make a random 4 character suffix to verify uniqueness in tutorials
# suffix= ''.join(random.choice(string.ascii_lowercase) for i in range(4))

suffix = ''

model_name = 'yolov8n'
model_filename = 'models/yolov8n.onnx'
pipeline_name = 'yolo8demonstration'
workspace_name = f'yolo8-arm-demonstration{suffix}'
def get_workspace(name):
    workspace = None
    for ws in wl.list_workspaces():
        if ws.name() == name:
            workspace= ws
    if(workspace == None):
        workspace = wl.create_workspace(name)
    return workspace
Upload the Model
When a model is uploaded to a Wallaroo cluster, it is optimized and packaged to make it ready to run as part of a pipeline. In many times, the Wallaroo Server can natively run a model without any Python overhead. In other cases, such as a Python script, a custom Python environment will be automatically generated. This is comparable to the process of “containerizing” a model by adding a small HTTP server and other wrapping around it.
Our pretrained model is in ONNX format, which is specified in the framework parameter. For this model, the tensor fields are set to images to match the input parameters, and the batch configuration is set to single - only one record will be submitted at a time.
To specify the target deployment, the model’s arch is modified with the wallaroo.engine_config.Architecture settings. wallaroo.engine_config.Architecture.X86 is the default, and wallaroo.engine_config.Architecture.ARM is the other option.
from wallaroo.engine_config import Architecture

# Upload Retrained Yolo8 Model
yolov8_model_x86 = (wl.upload_model(model_name,
                               model_filename,
                               framework=Framework.ONNX
                               )
                               .configure(tensor_fields=['images'],
                                          batch_config="single"
                                          )
                )

yolov8_model_arm = (wl.upload_model(model_name,
                               model_filename,
                               framework=Framework.ONNX,
                               arch=Architecture.ARM)
                               .configure(tensor_fields=['images'],
                                          batch_config="single"
                                          )
                )
Pipeline Deployment Configuration
For our pipeline we set the deployment configuration to only use 1 cpu and 1 GiB of RAM. The target pipeline architecture deployment defaults to x86.
deployment_config = wallaroo.DeploymentConfigBuilder() \
                    .replica_count(1) \
                    .cpus(1) \
                    .memory("1Gi") \
                    .build()
Build and Deploy the Pipeline
Now we build our pipeline and set our Yolo8 model as a pipeline step, then deploy the pipeline using the deployment configuration above.
# build the pipeline and clear any steps
pipeline = wl.build_pipeline(pipeline_name) \
            .clear() \
            .add_model_step(yolov8_model_x86)
pipeline.deploy(deployment_config=deployment_config)
| name | yolo8demonstration |
|---|---|
| created | 2023-10-19 19:53:57.966934+00:00 |
| last_updated | 2023-10-19 19:56:45.013145+00:00 |
| deployed | True |
| tags | |
| versions | e4b1f01c-7460-4166-a137-323cecaf6cf8, ce85f4e1-04e1-4465-95f5-5e4d17dba021, e57864c1-9b28-4dc1-897c-475f3dcde8e6, a128227d-b376-4f03-a348-05db69e73b64, 61e0b0fb-7028-4587-b9e1-23432e5df9e0, 5c7d42f7-b287-45f5-b455-a1138207264f |
| steps | yolov8n |
| published | False |
Convert Image to DataFrame
The sample image dogbike.png was converted to a DataFrame using the cvDemo helper modules. The converted DataFrame is stored as ./data/dogbike.df.json to save time.
The code sample below demonstrates how to use this module to convert the sample image to a DataFrame.
# convert the image to a tensor

width, height = 640, 640
tensor1, resizedImage1 = cvDemo.loadImageAndResize('dogbike.png', width, height)
tensor1.flatten()

# add the tensor to a DataFrame and save the DataFrame in pandas record format
df = util.convert_data(tensor1,'images')
df.to_json("dogbike.df.json", orient = 'records')
# convert the image to a tensor

width, height = 640, 640
tensor1, resizedImage1 = cvDemo.loadImageAndResize('./data/dogbike.png', width, height)

tensor1.flatten()

# add the tensor to a DataFrame and save the DataFrame in pandas record format
df = util.convert_data(tensor1,'images')
df.to_json("dogbike.df.json", orient = 'records')
Inference Request
We submit the DataFrame to the pipeline using wallaroo.pipeline.infer_from_file, and store the results in the variable inf1.
inf1 = pipeline.infer_from_file('./data/dogbike.df.json')
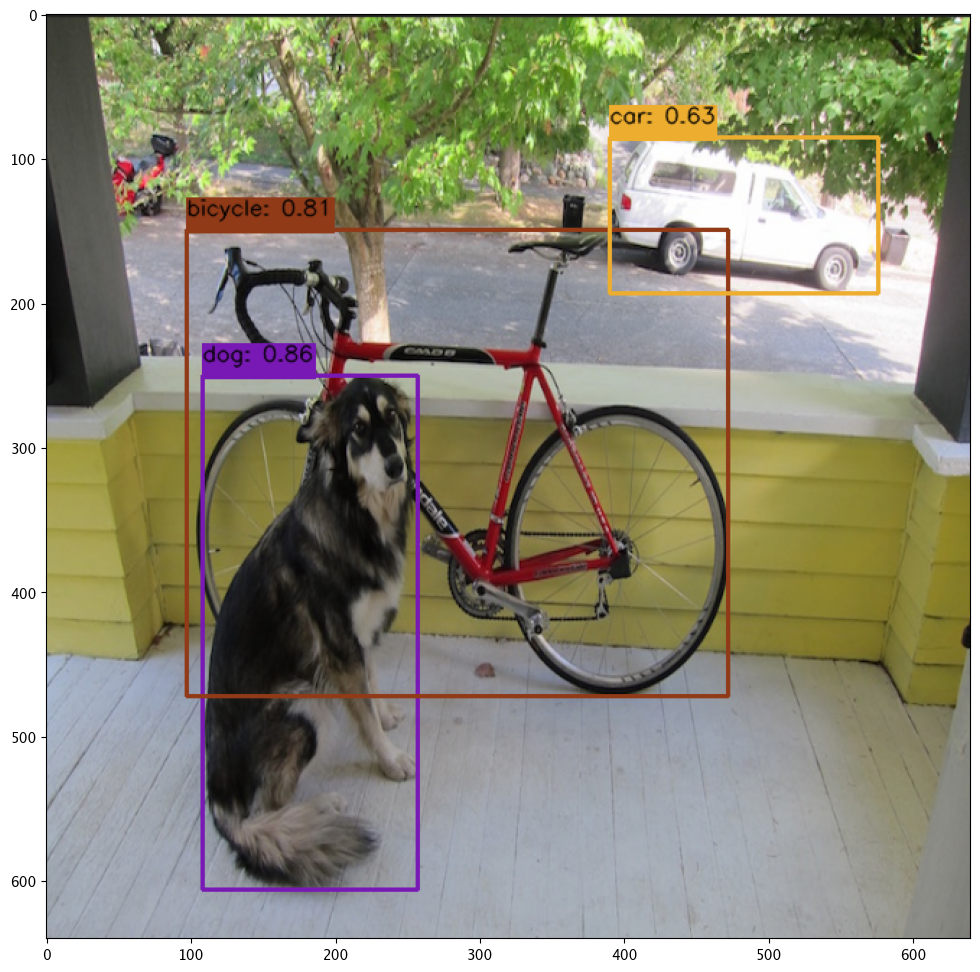
Display Bounding Boxes
Using our helper method cvDemo we’ll identify the objects detected in the photo and their bounding boxes. Only objects with a confidence threshold of 50% or more are shown.
confidence_thres = 0.50
iou_thres = 0.25

cvDemo.drawYolo8Boxes(inf1, resizedImage1, width, height, confidence_thres, iou_thres, draw=True)
  Score: 86.47% | Class: Dog | Bounding Box: [108, 250, 149, 356]
  Score: 81.13% | Class: Bicycle | Bounding Box: [97, 149, 375, 323]
  Score: 63.16% | Class: Car | Bounding Box: [390, 85, 186, 108]
array([[[ 34,  34,  34],
        [ 35,  35,  35],
        [ 33,  33,  33],
        ...,
        [ 33,  33,  33],
        [ 33,  33,  33],
        [ 35,  35,  35]],

       [[ 33,  33,  33],
        [ 34,  34,  34],
        [ 34,  34,  34],
        ...,
        [ 34,  34,  34],
        [ 33,  33,  33],
        [ 34,  34,  34]],

       [[ 53,  54,  48],
        [ 54,  55,  49],
        [ 54,  55,  49],
        ...,
        [153, 178, 111],
        [151, 183, 108],
        [159, 176,  99]],

       ...,

       [[159, 167, 178],
        [159, 165, 177],
        [158, 163, 175],
        ...,
        [126, 127, 121],
        [127, 125, 120],
        [128, 120, 117]],

       [[160, 168, 179],
        [156, 162, 174],
        [152, 157, 169],
        ...,
        [126, 127, 121],
        [129, 127, 122],
        [127, 118, 116]],

       [[155, 163, 174],
        [155, 162, 174],
        [152, 158, 170],
        ...,
        [127, 127, 121],
        [130, 126, 122],
        [128, 119, 116]]], dtype=uint8)
Redeploy as ARM
We will now undeploy the pipeline, then redeploy it with our Yolo model with the target deployment of ARM, and deploy the pipeline specifying it use the ARM architecture.
pipeline.undeploy()

# build the pipeline and clear any steps, then deploy as arm
pipeline = wl.build_pipeline(pipeline_name) \
            .clear() \
            .add_model_step(yolov8_model_arm)
deployment_config_arm = wallaroo.DeploymentConfigBuilder() \
                    .replica_count(1) \
                    .cpus(1) \
                    .memory("1Gi") \
                    .arch(Architecture.ARM) \
                    .build()

pipeline.deploy(deployment_config=deployment_config_arm)
| name | yolo8demonstration |
|---|---|
| created | 2023-10-19 19:53:57.966934+00:00 |
| last_updated | 2023-10-19 19:57:42.548101+00:00 |
| deployed | True |
| tags | |
| versions | 9ad91327-f671-4883-a00d-234f135b63b5, c13f317e-375a-4561-aa7e-e82226c4f794, e4b1f01c-7460-4166-a137-323cecaf6cf8, ce85f4e1-04e1-4465-95f5-5e4d17dba021, e57864c1-9b28-4dc1-897c-475f3dcde8e6, a128227d-b376-4f03-a348-05db69e73b64, 61e0b0fb-7028-4587-b9e1-23432e5df9e0, 5c7d42f7-b287-45f5-b455-a1138207264f |
| steps | yolov8n |
| published | False |
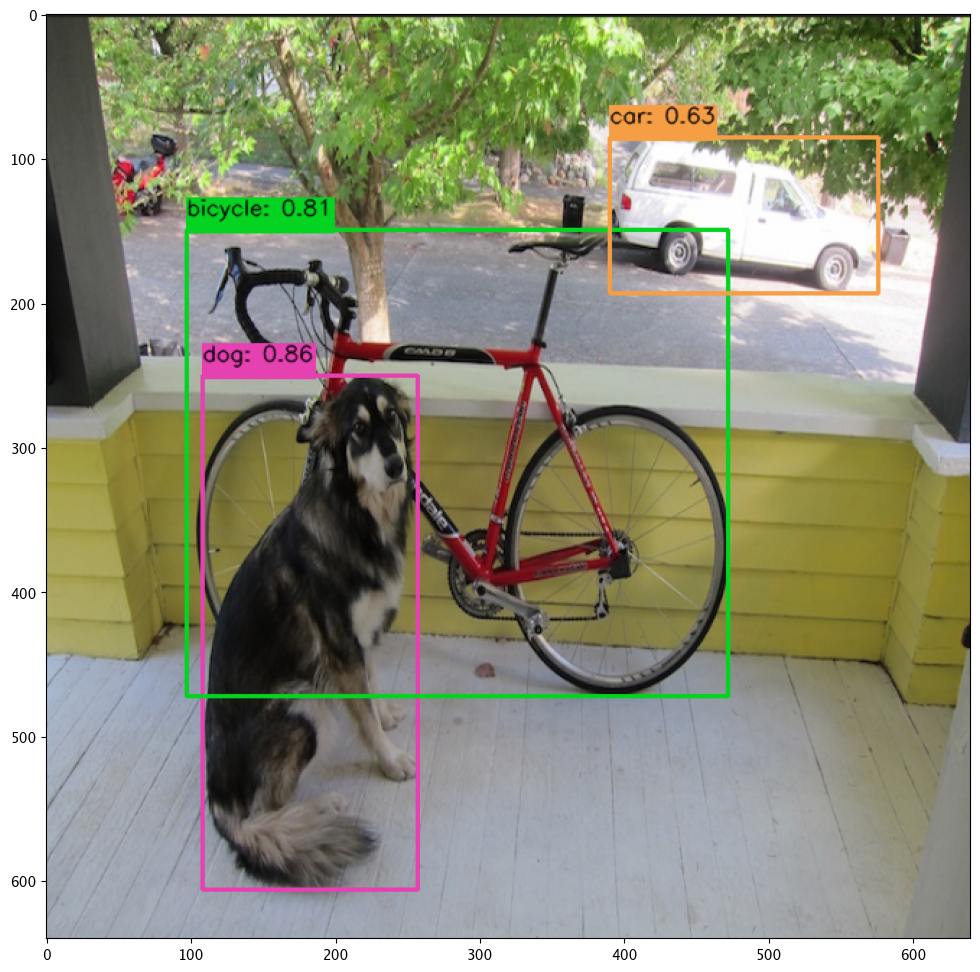
Image inference on ARM
We will perform the same inference with the same image and data input, only this time through the ARM architecture.
inf_arm = pipeline.infer_from_file('./data/dogbike.df.json')

cvDemo.drawYolo8Boxes(inf_arm, resizedImage1, width, height, confidence_thres, iou_thres, draw=True)
  Score: 86.47% | Class: Dog | Bounding Box: [108, 250, 149, 356]
  Score: 81.13% | Class: Bicycle | Bounding Box: [97, 149, 375, 323]
  Score: 63.17% | Class: Car | Bounding Box: [390, 85, 186, 108]
array([[[ 34,  34,  34],
        [ 35,  35,  35],
        [ 33,  33,  33],
        ...,
        [ 33,  33,  33],
        [ 33,  33,  33],
        [ 35,  35,  35]],

       [[ 33,  33,  33],
        [ 34,  34,  34],
        [ 34,  34,  34],
        ...,
        [ 34,  34,  34],
        [ 33,  33,  33],
        [ 34,  34,  34]],

       [[ 53,  54,  48],
        [ 54,  55,  49],
        [ 54,  55,  49],
        ...,
        [153, 178, 111],
        [151, 183, 108],
        [159, 176,  99]],

       ...,

       [[159, 167, 178],
        [159, 165, 177],
        [158, 163, 175],
        ...,
        [126, 127, 121],
        [127, 125, 120],
        [128, 120, 117]],

       [[160, 168, 179],
        [156, 162, 174],
        [152, 157, 169],
        ...,
        [126, 127, 121],
        [129, 127, 122],
        [127, 118, 116]],

       [[155, 163, 174],
        [155, 162, 174],
        [152, 158, 170],
        ...,
        [127, 127, 121],
        [130, 126, 122],
        [128, 119, 116]]], dtype=uint8)
Undeploy Pipeline
With the tutorial complete, we undeploy the pipeline and return the resources back to the cluster.
pipeline.undeploy()
| name | yolo8demonstration |
|---|---|
| created | 2023-10-19 19:53:57.966934+00:00 |
| last_updated | 2023-10-19 19:57:42.548101+00:00 |
| deployed | False |
| tags | |
| versions | 9ad91327-f671-4883-a00d-234f135b63b5, c13f317e-375a-4561-aa7e-e82226c4f794, e4b1f01c-7460-4166-a137-323cecaf6cf8, ce85f4e1-04e1-4465-95f5-5e4d17dba021, e57864c1-9b28-4dc1-897c-475f3dcde8e6, a128227d-b376-4f03-a348-05db69e73b64, 61e0b0fb-7028-4587-b9e1-23432e5df9e0, 5c7d42f7-b287-45f5-b455-a1138207264f |
| steps | yolov8n |
| published | False |
6 - ARM LLM Summarization Demonstration
A demonstration of a large language summarization model deployed under ARM pipeline deployment configurations.
This tutorial is available on the Wallaroo Tutorials repository.
This tutorial demonstrates how to use the Wallaroo combined with ARM processors to perform inferences with pre-trained computer vision ML models. This demonstration assumes that:
- A Wallaroo version 2023.3 or above instance is installed.
- A nodepools with ARM architecture virtual machines are part of the Kubernetes cluster. For example, Azure supports Ampere® Altra® Arm-based processor included with the following virtual machines:
- The model
hf-summarization-bart-large-samsun.zip(1.4 G) has been downloaded to the./modelsfolder.
Tutorial Goals
For our example, we will perform the following:
- Create a workspace for our work.
- Upload the the resnet computer vision model model.
- Create a pipeline using the default architecture that can ingest our submitted data, submit it to the model, and export the results while tracking how long the inference took.
- Redeploy the same pipeline on the ARM architecture, then perform the same inference on the same data and model and track how long the inference took.
- Compare the inference timing through the default architecture versus the ARM architecture.
Steps
Import Libraries
The first step will be to import our libraries.
import json
import os

import wallaroo
from wallaroo.pipeline   import Pipeline
from wallaroo.deployment_config import DeploymentConfigBuilder
from wallaroo.framework import Framework

import pyarrow as pa
import numpy as np
import pandas as pd
Connect to the Wallaroo Instance
The first step is to connect to Wallaroo through the Wallaroo client. The Python library is included in the Wallaroo install and available through the Jupyter Hub interface provided with your Wallaroo environment.
This is accomplished using the wallaroo.Client() command, which provides a URL to grant the SDK permission to your specific Wallaroo environment. When displayed, enter the URL into a browser and confirm permissions. Store the connection into a variable that can be referenced later.
If logging into the Wallaroo instance through the internal JupyterHub service, use wl = wallaroo.Client(). For more information on Wallaroo Client settings, see the Client Connection guide.
wl = wallaroo.Client()
Configure PyArrow Schema
You can find more info on the available inputs under TextSummarizationInputs or under the official source code from 🤗 Hugging Face.
input_schema = pa.schema([
    pa.field('inputs', pa.string()),
    pa.field('return_text', pa.bool_()),
    pa.field('return_tensors', pa.bool_()),
    pa.field('clean_up_tokenization_spaces', pa.bool_()),
    # pa.field('generate_kwargs', pa.map_(pa.string(), pa.null())), # dictionaries are not currently supported by the engine
])

output_schema = pa.schema([
    pa.field('summary_text', pa.string()),
])
Upload Model
We will now create or connect to our pipeline and upload the model. We will set the architecture of the model to ARM for its deployment.
from wallaroo.engine_config import Architecture
model = wl.upload_model('hf-summarization-yns',
                        'hf-summarisation-bart-large-samsun.zip',
                        framework=Framework.HUGGING_FACE_SUMMARIZATION,
                        input_schema=input_schema,
                        output_schema=output_schema,
                        arch=Architecture.ARM)
model
Waiting for model loading - this will take up to 10.0min.
Model is pending loading to a container runtime..
Model is attempting loading to a container runtime.......................successful
Ready
| Name | hf-summarization-yns |
| Version | 2f708f1b-0ace-448b-b4ab-a337c962e6d9 |
| File Name | hf-summarisation-bart-large-samsun.zip |
| SHA | ee71d066a83708e7ca4a3c07caf33fdc528bb000039b6ca2ef77fa2428dc6268 |
| Status | ready |
| Image Path | proxy.replicated.com/proxy/wallaroo/ghcr.io/wallaroolabs/mlflow-deploy:v2023.3.0-3798 |
| Updated At | 2023-08-Sep 13:17:33 |
Deploy Pipeline
With the model uploaded, we can add it is as a step in the pipeline, then deploy it. The model has already been set as arm so the pipeline will use that architecture.
deployment_config = DeploymentConfigBuilder() \
    .cpus(0.25).memory('1Gi') \
    .sidekick_cpus(model, 4) \
    .sidekick_memory(model, "8Gi") \
    .build()
pipeline_name = "hf-summarization-pipeline-arm"
pipeline = wl.build_pipeline(pipeline_name)
pipeline.add_model_step(model)

pipeline.deploy(deployment_config=deployment_config)
pipeline.status()
Waiting for deployment - this will take up to 90s .................................. ok
{‘status’: ‘Running’,

‘details’: [],

’engines’: [{‘ip’: ‘10.244.2.53’,

’name’: ’engine-8494968846-jdj28’,

‘status’: ‘Running’,

‘reason’: None,

‘details’: [],

‘pipeline_statuses’: {‘pipelines’: [{‘id’: ‘hf-summarization-pipeline-arm’,

‘status’: ‘Running’}]},

‘model_statuses’: {‘models’: [{’name’: ‘hf-summarization-yns’,

‘version’: ‘2f708f1b-0ace-448b-b4ab-a337c962e6d9’,

‘sha’: ’ee71d066a83708e7ca4a3c07caf33fdc528bb000039b6ca2ef77fa2428dc6268’,

‘status’: ‘Running’}]}}],

’engine_lbs’: [{‘ip’: ‘10.244.3.34’,

’name’: ’engine-lb-584f54c899-2zkz6’,

‘status’: ‘Running’,

‘reason’: None,

‘details’: []}],

‘sidekicks’: [{‘ip’: ‘10.244.2.52’,

’name’: ’engine-sidekick-hf-summarization-yns-6-6555bb7d74-27ncn’,

‘status’: ‘Running’,

‘reason’: None,

‘details’: [],

‘statuses’: ‘\n’}]}
pipeline.status()
{'status': 'Running',
 'details': [],
 'engines': [{'ip': '10.244.2.53',
   'name': 'engine-8494968846-jdj28',
   'status': 'Running',
   'reason': None,
   'details': [],
   'pipeline_statuses': {'pipelines': [{'id': 'hf-summarization-pipeline-arm',
      'status': 'Running'}]},
   'model_statuses': {'models': [{'name': 'hf-summarization-yns',
      'version': '2f708f1b-0ace-448b-b4ab-a337c962e6d9',
      'sha': 'ee71d066a83708e7ca4a3c07caf33fdc528bb000039b6ca2ef77fa2428dc6268',
      'status': 'Running'}]}}],
 'engine_lbs': [{'ip': '10.244.3.34',
   'name': 'engine-lb-584f54c899-2zkz6',
   'status': 'Running',
   'reason': None,
   'details': []}],
 'sidekicks': [{'ip': '10.244.2.52',
   'name': 'engine-sidekick-hf-summarization-yns-6-6555bb7d74-27ncn',
   'status': 'Running',
   'reason': None,
   'details': [],
   'statuses': '\n'}]}
Run inference
We can now run a sample inference using the wallaroo.pipeline.infer method and display the results.
input_data = {
        "inputs": ["LinkedIn (/lɪŋktˈɪn/) is a business and employment-focused social media platform that works through websites and mobile apps. It launched on May 5, 2003. It is now owned by Microsoft. The platform is primarily used for professional networking and career development, and allows jobseekers to post their CVs and employers to post jobs. From 2015 most of the company's revenue came from selling access to information about its members to recruiters and sales professionals. Since December 2016, it has been a wholly owned subsidiary of Microsoft. As of March 2023, LinkedIn has more than 900 million registered members from over 200 countries and territories. LinkedIn allows members (both workers and employers) to create profiles and connect with each other in an online social network which may represent real-world professional relationships. Members can invite anyone (whether an existing member or not) to become a connection. LinkedIn can also be used to organize offline events, join groups, write articles, publish job postings, post photos and videos, and more"], # required
        "return_text": [True], # optional: using the defaults, similar to not passing this parameter
        "return_tensors": [False], # optional: using the defaults, similar to not passing this parameter
        "clean_up_tokenization_spaces": [False], # optional: using the defaults, similar to not passing this parameter
}
dataframe = pd.DataFrame(input_data)
dataframe
| inputs | return_text | return_tensors | clean_up_tokenization_spaces | |
|---|---|---|---|---|
| 0 | LinkedIn (/lɪŋktˈɪn/) is a business and employ... | True | False | False |
# Adjust timeout as needed, started liberally with a 10 min timeout
out = pipeline.infer(dataframe, timeout=600)
out
| time | in.clean_up_tokenization_spaces | in.inputs | in.return_tensors | in.return_text | out.summary_text | check_failures | |
|---|---|---|---|---|---|---|---|
| 0 | 2023-09-08 13:18:58.557 | False | LinkedIn (/lɪŋktˈɪn/) is a business and employ... | False | True | LinkedIn is a business and employment-focused ... | 0 |
out["out.summary_text"][0]
'LinkedIn is a business and employment-focused social media platform that works through websites and mobile apps. It launched on May 5, 2003. LinkedIn allows members (both workers and employers) to create profiles and connect with each other in an online social network which may represent real-world professional relationships.'
Model Inferencing with Pipeline Deployment Endpoint
The other option is to use the pipeline’s inference endpoint.
pipeline.url()
'http://engine-lb.hf-summarization-pipeline-arm-3:29502/pipelines/hf-summarization-pipeline-arm'
!curl -X POST http://engine-lb.hf-summarization-pipeline-arm-3:29502/pipelines/hf-summarization-pipeline-arm \
    -H "Content-Type: application/json; format=pandas-records" \
        -d @./data/test_summarization.json
[{"time":1694179270999,"in":{"clean_up_tokenization_spaces":[false],"inputs":["LinkedIn (/lɪŋktˈɪn/) is a business and employment-focused social media platform that works through websites and mobile apps. It launched on May 5, 2003. It is now owned by Microsoft. The platform is primarily used for professional networking and career development, and allows jobseekers to post their CVs and employers to post jobs. From 2015 most of the company's revenue came from selling access to information about its members to recruiters and sales professionals. Since December 2016, it has been a wholly owned subsidiary of Microsoft. As of March 2023, LinkedIn has more than 900 million registered members from over 200 countries and territories. LinkedIn allows members (both workers and employers) to create profiles and connect with each other in an online social network which may represent real-world professional relationships. Members can invite anyone (whether an existing member or not) to become a connection. LinkedIn can also be used to organize offline events, join groups, write articles, publish job postings, post photos and videos, and more"],"return_tensors":[false],"return_text":[true]},"out":{"summary_text":"LinkedIn is a business and employment-focused social media platform that works through websites and mobile apps. It launched on May 5, 2003. LinkedIn allows members (both workers and employers) to create profiles and connect with each other in an online social network which may represent real-world professional relationships."},"check_failures":[],"metadata":{"last_model":"{\"model_name\":\"hf-summarization-yns\",\"model_sha\":\"ee71d066a83708e7ca4a3c07caf33fdc528bb000039b6ca2ef77fa2428dc6268\"}","pipeline_version":"4aeb608f-166b-4b59-bb10-c06f9e49df23","elapsed":[41800,4294967295],"dropped":[]}}]
Undeploy the Pipeline
With the demonstration complete, we can undeploy the pipeline and return the resources back to the Wallaroo instance.
pipeline.undeploy()