Upgrade Air-Gapped Cluster Installations of Wallaroo via Kots
Table of Contents
Organizations have the ability to upgrade Wallaroo to newer versions while keeping their workspaces, model uploads, ML workload orchestrations, and other artifacts intact. This process is fast and easy, allowing users to seamlessly resume their work with Wallaroo Ops without any changes.
The duration of a standard upgrade may vary from 30 to 60 minutes, depending on the size and quantity of workspaces and artifacts. Please note that services to the Wallaroo Ops instance will be temporarily interrupted during the upgrade process.
The upgrade Wallaroo follows these general steps.
- Pre-upgrade Checklist: Actions that should be performed before the upgrade process is initiated. See Upgrade Prerequisites for more details.
- Upgrade Wallaroo: Perform the upgrade process.
The following procedure details upgrading Wallaroo in an air-gapped cluster via Kots. These instructions are applicable both to cloud based installations or on-premise installations.
These procedures assume that Wallaroo was installed using the Air-Gapped Cluster Install guides.
Upgrade via Kots Procedure
Upgrade the Kots Client
This step is only required if the Kots client version is not the required version 1.124.4. The following command displays the current version:
kubectl kots version
It should return results similar to the following:
Replicated KOTS 1.124.4
To upgrade the version of kots used:
Set the following environmental variables. These pertain to the kots installation files that will be downloaded.
KOTS_CLIENT_URL="https://github.com/replicatedhq/kots/releases/download/v1.124.18/kots_linux_amd64.tar.gz"
KOTS_ADMIN_URL="https://github.com/replicatedhq/kots/releases/download/v1.124.18/kotsadm.tar.gz"
REGISTRY_HOST=YOUR REGISTRY HOST NAME
REGISTRY_NAMESPACE=YOUR INSTALLATION NAMESPACE
REGISTRY_ADDRESS=$REGISTRY_HOST/$REGISTRY_NAMESPACE
REGISTRY_USERNAME=YOUR REGISTRY USERNAME
REGISTRY_PASSWORD=YOUR REGISTRY PASSWORD
Download the files via the following commands:
- Kots CLI:
curl -LO $KOTS_CLIENT_URL. This downloads the filekots_linux_amd64.tar.gz - Kots admin bundle:
curl -LO $KOTS_ADMIN_URL. This downloads the filekotsadm.tar.gz.
- Kots CLI:
Prepare Kots client via the following commands to be used by the kots admin console:
tar zxf kots_linux_amd64.tar.gz
sudo mv kots /usr/local/bin/kubectl-kots
sudo chmod a+x /usr/local/bin/kubectl-kots
Update Registry Kots Administrative Bundle
The following procedure updates the Kots Administrative Bundle stored in the target registry.
Set the following environmental variables:
REGISTRY_HOST=YOUR REGISTRY HOST NAME
REGISTRY_NAMESPACE=YOUR INSTALLATION NAMESPACE
REGISTRY_ADDRESS=$REGISTRY_HOST/$REGISTRY_NAMESPACE
REGISTRY_USERNAME=YOUR REGISTRY USERNAME
REGISTRY_PASSWORD=YOUR REGISTRY PASSWORD
For example:
REGISTRY_HOST=registry.wallaroo.ai
REGISTRY_NAMESPACE=wallaroo
REGISTRY_ADDRESS=$REGISTRY_HOST/$REGISTRY_NAMESPACE
REGISTRY_USERNAME=someone@wallaroo.ai
REGISTRY_PASSWORD=abc123
Push the Kots administrative bundle to the private registry via the following command:
kubectl kots admin-console \
    push-images kotsadm.tar.gz \
    $REGISTRY_ADDRESS \
    --registry-username $REGISTRY_USERNAME \
    --registry-password $REGISTRY_PASSWORD
Upgrade the
kotsversion of an installed cluster to match your CLIkotsversion via the following command, replacing $NAMESPACE with the namespace the Wallaroo instance is installed in. For more details, see Update an Application: Using the KOTS CLI.kubectl kots admin-console upgrade \ --kotsadm-registry $REGISTRY_ADDRESS \ --registry-username $REGISTRY_USERNAME \ --registry-password $REGISTRY_PASSWORD \ -n $NAMESPACEFor example, if the Wallaroo installation is in the default namespace
wallaroo, the command is:kubectl kots admin-console upgrade \ --kotsadm-registry $REGISTRY_ADDRESS \ --registry-username someone@wallaroo.ai \ --registry-password abc123 \ -n wallaroo
Wallaroo Image Retrieval
For air-gapped installations, the Wallaroo installation images are downloaded and stored in a private registry through the following process.
This installation assumes the user will
sshinto the target installation system with port forwarding enabled. For example,ssh -L 8800:localhost:8800 hostname. This is so later in the process the Kots Administrative Dashboard is access through the urlhttp://localhost:8080.Set the following convenience variables. Note that the Wallaroo Bundle URL must be provided by a Wallaroo support representative.
WALLAROO_BUNDLE_URL=YOUR WALLAROO BUNDLE URLFor example:
WALLAROO_BUNDLE_URL="https://s3.amazonaws.com/airgap.replicated.com/abcdefg/2.airgap?X-Amz-Algorithm=AWS4-HMAC-SHA256&X-Amz-Credential=ASIA3UMYHRA5LHP4KTHN%2F20250708%2Fus-east-1%2Fs3%2Faws4_request&X-Amz-Date=20250708T160517Z&X-Amz-Expires=3600&X-Amz-Security-Token=abcdefg"Download the following via
curlvia the following commands:- Wallaroo Installation Bundle:
curl -Lo wallaroo.airgap $WALLAROO_BUNDLE_URL. This saves the file aswallaroo.airgap. IMPORTANT NOTE: This URL has an expiration time of around 60 minutes, and the final downloaded file is 30 GB in size.
- Wallaroo Installation Bundle:
From a terminal with access to the Kubernetes cluster hosting the Wallaroo instance and read/write access to the private model registry, use the following procedure. If using AWS ECR, following the procedures below.
AWS ECR Preparation
If using Amazon Web Services (AWS) Elastic Container Registry (ECR), use the following process to prepare the ECR for upgrading Wallaroo. This process assumes the aws CLI application is installed.
The image load script below expects ECR root level access and add the prefix wallaroo/ prefix for all the Wallaroo images. Access to the ECR must include the following permissions:
- Read
- List
- Write
Set the following convenience variables.
REGISTRY_PASSWORD=YOUR ECR PASSWORD
REGISTRY_USERNAME=YOUR ECR USER NAME
REGISTRY_HOST=YOUR REGISTRY HOST NAME
REGISTRY_NAMESPACE=YOUR INSTALLATION NAMESPACE
REGISTRY_ADDRESS=$REGISTRY_HOST/$REGISTRY_NAMESPACE
REGISTRY_NAMESPACE=YOUR WALLAROO NAMESPACE
LICENSE_ID=YOUR LICENSE ID
REGION=YOUR REGION
WALLAROO_USERNAME=YOUR WALLAROO USERNAME
For example:
REGISTRY_PASSWORD=$(aws ecr get-login-password --region us-east-2)
REGISTRY_USERNAME=AWS
REGISTRY_HOST=940762080936.dkr.ecr.us-east-2.amazonaws.com/
REGISTRY_NAMESPACE=wallaroo
REGISTRY_ADDRESS=$REGISTRY_HOST/$REGISTRY_NAMESPACE
LICENSE_ID=abc123
REGION=eu-west-1
WALLAROO_USERNAME=someone@wallaroo.ai
Add the updated install artifacts to the ECR via the following command, using the
load-images-ecrfile downloaded from the step Pre Setup Checklist for Kots:load-images-ecr --region $REGION \ --wallaroo-version 2025.2.4-6622 --wallaroo-license $LICENSE_ID \ --registry-namespace=$REGISTRY_NAMESPACE \ --wallaroo-username $WALLAROO_USERNAME --create-kots --create-wallaroo
Upgrade Wallaroo
With all previous steps completed, upgrade Wallaroo for the air-gapped cluster via the following procedure.
For generic registries, use the following procedure.
Set the following convenience variables:
REGISTRY_HOST=YOUR REGISTRY HOST NAME
REGISTRY_NAMESPACE=YOUR INSTALLATION NAMESPACE
REGISTRY_ADDRESS=$REGISTRY_HOST/$REGISTRY_NAMESPACE
REGISTRY_USERNAME=YOUR REGISTRY USERNAME
REGISTRY_PASSWORD=YOUR REGISTRY PASSWORD
For example:
REGISTRY_HOST=registry.wallaroo.ai
REGISTRY_NAMESPACE=wallaroo
REGISTRY_ADDRESS=$REGISTRY_HOST/$REGISTRY_NAMESPACE
REGISTRY_USERNAME=someone@wallaroo.ai
REGISTRY_PASSWORD=abc123
Use the following
kubectl kotscommand. Note that this command may take up to 30 minutes to complete. The status will update as each image is loaded to the registry. Replace the license file parameter with the file path to the Wallaroo license file retrieved during the Pre Setup Checklist for Kots step.kubectl kots upstream upgrade wallaroo \ --airgap-bundle wallaroo.airgap \ --kotsadm-registry $REGISTRY_ADDRESS \ --registry-username $REGISTRY_USERNAME \ --registry-password $REGISTRY_PASSWORD \ -n wallarooWhen the load finishes, a normal KOTS prompt for
http://localhost:8800will be presented. Assuming ssh or other port forwarding methods are enabled, use this URL in a browser to access the Kots Administrative Dashboard.From the Kots Administrative Dashboard:
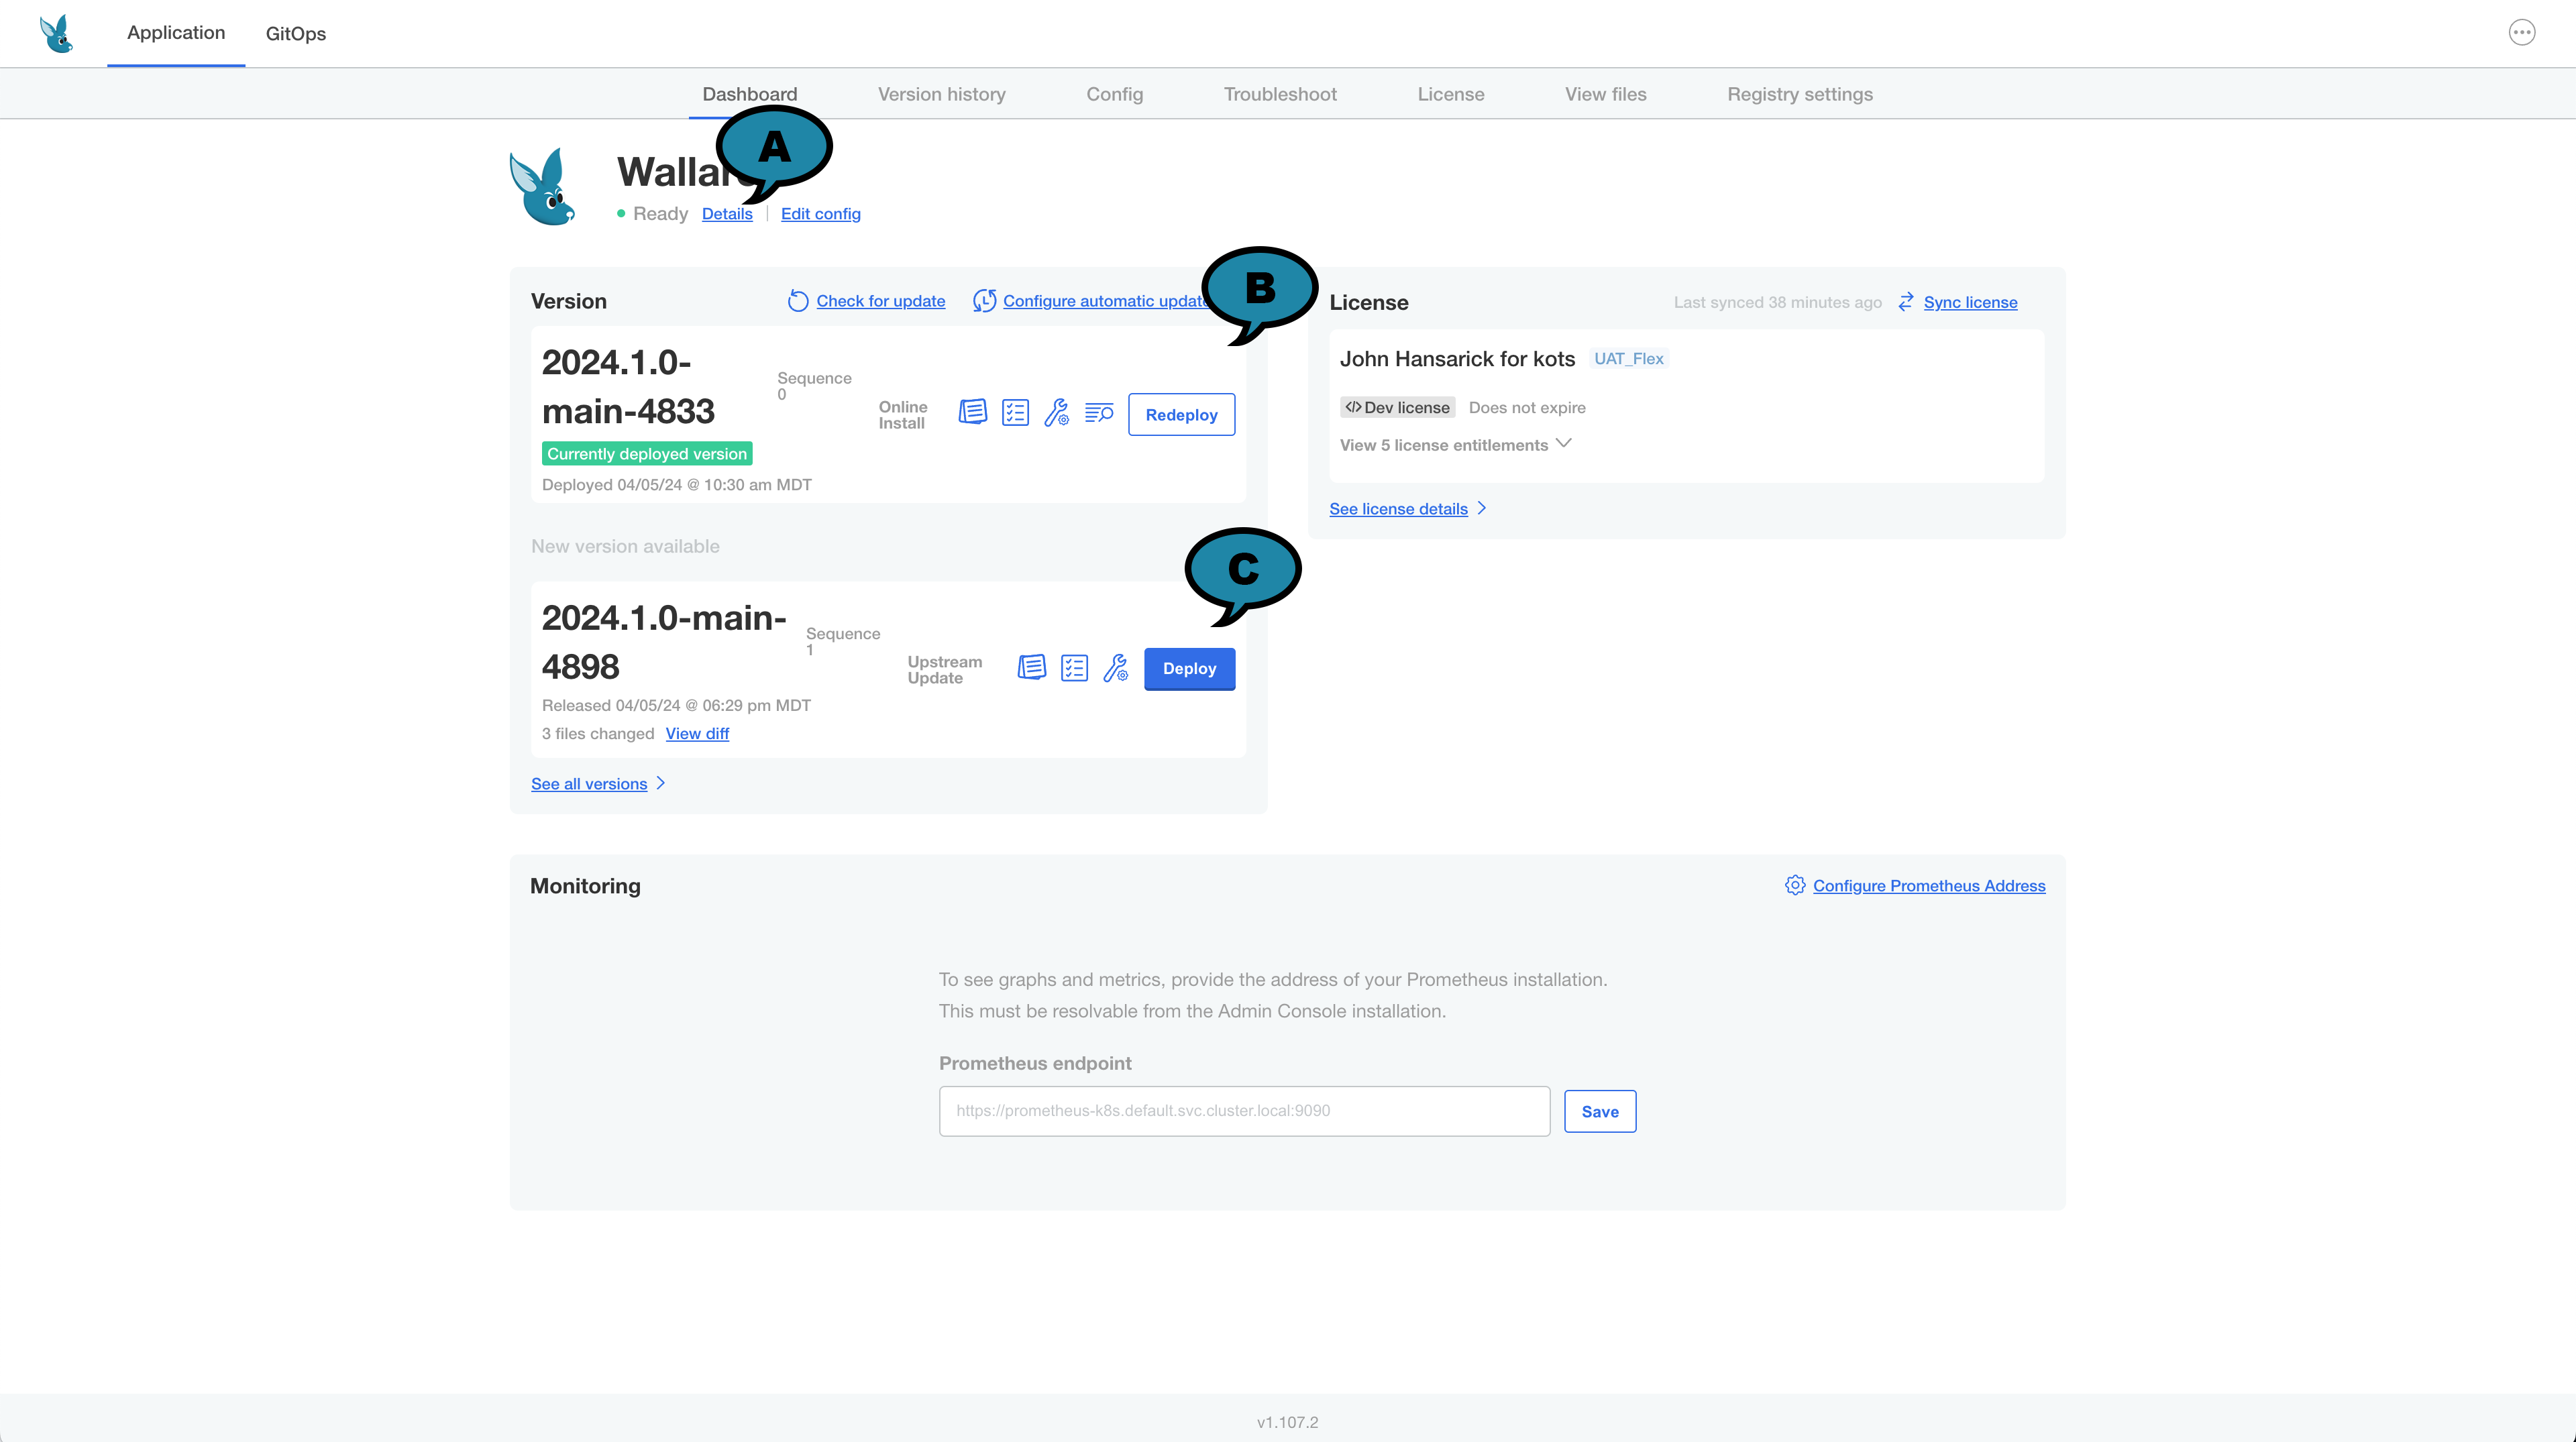
- If there is a new version of Wallaroo to install based on your Wallaroo license type, it will be displayed under the Version (B) display as New Version Available.
- Select the version to upgrade to.
- If ready to upgrade, select Deploy (C).
- Verify the upgrade process by selecting Yes, Deploy.
During the upgrade process, the status indicator (A) changes from Ready to Unavailable. Selecting Details will show which services are available or are still being upgraded.
When the upgrade process is complete, the status indicator will change to Ready. At this point, users can resume their normal operations.