Wallaroo Air-Gapped AWS EKS Install Guide
Table of Contents
The following procedure details installing Wallaroo in an air-gapped cluster hosted by Amazon Web Services’s Elastic Kubernetes Services (EKS).
Wallaroo Image Storage
Wallaroo installation images are stored in the private image repository in the following format.
registry.wallaroo.ai:1234/wallaroo/conductor-wallsvc:2025.2.5-6628
------------------------ --------  ----------------  ----------
  \                        \           \                 \
Registry Host Name         namespace    repository        tag
- Registry Host Name: The FQDN of the registry host. For example:
registry.example.ai. - Namespace: The registry namespace where all Wallaroo images are stored under.
- Repository: The specific image.
- Tag: The version of the image.
Taints and Labels Requirements
Nodepools created in Wallaroo require the following taints and labels.
These taints and labels are applied if using the the scripts provided in this guide. For custom taints and labels, see the Custom Taints and Labels Guide.| Nodepool | Taints | Labels | Description |
|---|---|---|---|
| general | N/A | wallaroo.ai/node-purpose: general | For general Wallaroo services. No taints are applied to this nodepool to allow any process not assigned with a deployment label to run in this space. |
| persistent | wallaroo.ai/persistent=true:NoSchedule | wallaroo.ai/node-purpose: persistent | For Wallaroo services with a persistentVolume settings, including JupyterHub, Minio, etc. |
| pipelines-x86 | wallaroo.ai/pipelines=true:NoSchedule | wallaroo.ai/node-purpose: pipelines | For deploying pipelines for default x86 architectures. The taints and label must be applied to any nodepool used for model deployments. |
EKSCTL Based Instructions
These commands make use of the command line tool eksctl which streamlines the process in creating Amazon Elastic Kubernetes Service clusters for our Wallaroo environment.
The following are used for the example commands below. Replace them with your specific environment settings:
- AWS Cluster Name:
wallarooAWS
Create an AWS EKS Configuration File
The following eksctl configuration file is an example of setting up the AWS environment for a Wallaroo cluster, including the static and adaptive nodepools. Note that the sample eksctl YAML file includes additional options for ARM and GPU based nodepools. Adjust these names and settings based on your organizations requirements.
Nodepool instance types that include multiple types provision each instance in the order provided. The sample lists used are set to provision each instance type by lowest cost first to provide additional savings. For example, he sample nodepool pipelines-x86 includes the following instance types:
instanceTypes:
    - c7i.2xlarge
    - c7a.2xlarge
    - c6i.2xlarge
    - c6a.2xlarge
This would provision first the c7i.2xlarge instance type, then the c7a.2xlarge if the additional resources are needed, etc.
This sample YAML file can be downloaded from here:wallaroo_enterprise_aws_install_airgap.yaml
Or copied from here:
AWS EKSCTL File
The following eksctl YAML file is an example used to install Wallaroo.
wallaroo_enterprise_aws_install_airgap.yaml
# yaml-language-server: $schema=https://raw.githubusercontent.com/weaveworks/eksctl/main/pkg/apis/eksctl.io/v1alpha5/assets/schema.json
apiVersion: eksctl.io/v1alpha5
kind: ClusterConfig

metadata:
  name: jcw-test-airgap
  region: us-east-2
  version: "1.30"


# See https://eksctl.io/usage/eks-private-cluster
privateCluster:
  enabled: true

addons:
  - name: aws-ebs-csi-driver

# create the required IAM roles and kubernetes service account for the cluster-autoscaler
iam:
  withOIDC: true
  serviceAccounts:
  - metadata:
      name: cluster-autoscaler
      namespace: kube-system
    wellKnownPolicies:
      autoScaler: true

managedNodeGroups:
  - name: general
    privateNetworking: true
    instanceSelector:
      vCPUs: 8
      memory: 16GiB
      gpus: 0
      cpuArchitecture: x86_64
    minSize: 1
    maxSize: 3
    volumeSize: 100
    desiredCapacity: 1
    labels:
      wallaroo.ai/node-purpose: general
    iam:
      withAddonPolicies:
        autoScaler: true # add iam role for cluster-autoscaler; any nodegroup that should autoscale needs this and below
    propagateASGTags: true # add the labels and taints as appropriate autoscaling groups for cluster-autoscaler
  - name: persistent
    privateNetworking: true
    instanceSelector:
      vCPUs: 8
      memory: 16GiB
      gpus: 0
      cpuArchitecture: x86_64
    desiredCapacity: 1
    minSize: 1
    maxSize: 3
    volumeSize: 100
    iam:
      withAddonPolicies:
        autoScaler: true
    propagateASGTags: true
    labels:
      wallaroo.ai/node-purpose: persistent
    taints:
      - key: wallaroo.ai/persistent
        value: "true"
        effect: NoSchedule
    availabilityZones:
      - us-east-2c

  - name: pipelines-x86
    privateNetworking: true
    instanceTypes:
    - c7i.2xlarge
    - c7a.2xlarge
    - c6i.2xlarge
    - c6a.2xlarge
    desiredCapacity: 2
    minSize: 2
    maxSize: 3
    volumeSize: 100
    iam:
      withAddonPolicies:
        autoScaler: true
    propagateASGTags: true
    labels:
      wallaroo.ai/node-purpose: pipelines
    taints:
      - key: wallaroo.ai/pipelines
        value: "true"
        effect: NoSchedule

  - name: pipelines-gpu
    instanceType: g6e.2xlarge #example
    minSize: 1
    maxSize: 1
    volumeSize: 100
    desiredCapacity: 1
    privateNetworking: true
    labels:
      lifecycle: ec2-autoscaler
      wallaroo.ai/accelerator: gpu 		# use for deployment label in deployment config
      wallaroo.ai/node-purpose: pipelines
    taints:
      - key: wallaroo.ai/pipelines
        value: "true"
        effect: NoSchedule
      - key: nvidia.com/gpu
        value: "true"
        effect: NoSchedule
    iam:
      withAddonPolicies:
        autoScaler: true
Create the Cluster
Create the cluster with the following command, which creates the environment and sets the correct Kubernetes version.
eksctl create cluster -f wallaroo_enterprise_aws_install_airgap.yaml
During the process the Kubernetes credentials will be copied into the local environment. To verify the setup is complete, use the kubectl get nodes command to display the available nodes as in the following example:
kubectl get nodes
NAME                                           STATUS   ROLES    AGE     VERSION
ip-192-168-21-253.us-east-2.compute.internal   Ready    <none>   13m     v1.23.8-eks-9017834
ip-192-168-30-36.us-east-2.compute.internal    Ready    <none>   13m     v1.23.8-eks-9017834
ip-192-168-38-31.us-east-2.compute.internal    Ready    <none>   9m46s   v1.23.8-eks-9017834
ip-192-168-55-123.us-east-2.compute.internal   Ready    <none>   12m     v1.23.8-eks-9017834
ip-192-168-79-70.us-east-2.compute.internal    Ready    <none>   13m     v1.23.8-eks-9017834
ip-192-168-37-222.us-east-2.compute.internal   Ready    <none>   13m     v1.23.8-eks-9017834
Install Wallaroo
Select from the following methods to install Wallaroo:
helmkots
Install Wallaroo via Helm
Air-Gapped Preparation for Helm
Before starting an air-gapped installation of Wallaroo, complete the following preparation steps.
The general process follows these steps:
- Pre Setup Checklist: The necessary installation files are available and values set for installation.
- Wallaroo Image Retrieval and Installation Preparation for Helm: Retrieve the installation images from Wallaroo and store them in a private container registry available from the Target Cluster.
Pre Setup Checklist
The following checklist ensures that required items are ready before starting the process.
- The installation environment meets the general Wallaroo Installation Prerequisites.
- The Domain Name for the Wallaroo instance is registered in a private DNS accessible from the air-gapped installation.
- TLS certificate and private key matching the Domain Name available for the Target Cluster. This can be registered to a private certificate service.
- Access to AWS ECR that hosts the Wallaroo install images with the following permissions:
- Read
- Write
- List
- The following Bash scripts:
-
generate-airgap-image-values.bash: Generates a Helm YAML file with the necessary information for use with the private container registry. Available here: generate-airgap-image-values.bash -
load-images-ecr.bash: Loads the Wallaroo install images into the Amazon ECR (Elastic Container Registry). Available here: load-images-ecr.bash -
install-nvidia-driver-ecr.bash(Optional): Installs Nvidia drivers for the Target Cluster. Available here: install-nvidia-driver-ecr.bash
-
- Wallaroo Image Download Details: This is provided by a Wallaroo Support Representative and are stored as the following variables environmental variables for the installation scripts:
LICENSE_CHANNEL: The registry channel used based on the version of Wallaroo being installed, currently2025-2.VERSION: The Wallaroo version to be installed. For example:2025.2.5-6628.WALLAROO_LICENSE_USERNAME: The username associated with the Wallaroo license.WALLAROO_LICENSE_PASSWORD: The password associated with the Wallaroo license.REGISTRY_NAMESPACE: The namespace used for storing the Wallaroo images; set towallarooby default.
- The following variables for connecting to the ECR with the installation scripts:
REGISTRY_HOST: The URI for the private container registry used to store the Wallaroo installation artifacts. For Amazon ECR takes the following format:REGISTRY_ID: The AWS assigned identifier.REGION: The AWS region the ECR is assigned to.REGISTRY_HOST=${REGISTRY_ID}.dkr.ecr.${REGION}.amazonaws.com: The ECR URL based on the registry ID and AWS region.REGISTRY_ADDRESS=${REGISTRY_ID}.dkr.ecr.${REGION}.amazonaws.com/${REGISTRY_NAMESPACE}: Sets the namespace used within the registry.
Note that the convenience variables are used for helm based installations of Wallaroo.
Wallaroo Image Storage
Wallaroo installation images are stored in the private image repository in the following format.
registry.wallaroo.ai:1234/wallaroo/conductor-wallsvc:2025.1-6789
------------------------ --------  ----------------  ----------
  \                        \           \                 \
Registry Host Name         namespace    repository        tag
- Registry Host Name: The FQDN of the registry host. For example:
registry.example.ai. - Namespace: The registry namespace where all Wallaroo images are stored under.
- Repository: The specific image.
- Tag: The version of the image.
Wallaroo Image Retrieval and Installation Preparation
For air-gapped installations, the Wallaroo installation images are downloaded and stored in a private registry through the following process.
The image load script below expects ECR root level access and add the prefix wallaroo/ prefix for all the Wallaroo images. Access to the ECR must include the following permissions:
- Read
- List
- Write
From a terminal with access to the Kubernetes cluster hosting the Wallaroo instance and read/write access to the private model registry, use the following procedure.
Set the following convenience variables.
REGISTRY_ID=YOUR AWS ECR REGISTRY ID
REGION=YOUR AWS ECR REGION
REGISTRY_HOST=${REGISTRY_ID}.dkr.ecr.${REGION}.amazonaws.com
REGISTRY_ADDRESS=${REGISTRY_ID}.dkr.ecr.${REGION}.amazonaws.com/${REGISTRY_NAMESPACE}
REGISTRY_NAMESPACE=YOUR INSTALL NAMESPACE (wallaroo by default)
LICENSE_CHANNEL=YOUR LICENSE CHANNEL
VERSION=YOUR VERSION
WALLAROO_LICENSE_USERNAME=YOUR WALLAROO INSTALL USER NAME
WALLAROO_LICENSE_PASSWORD=YOUR WALLAROO INSTALL USER PASSWORD
For example:
REGISTRY_ID=9876543210
REGION=us-east-2
REGISTRY_HOST=${REGISTRY_ID}.dkr.ecr.${REGION}.amazonaws.com
REGISTRY_ADDRESS=${REGISTRY_ID}.dkr.ecr.${REGION}.amazonaws.com/${REGISTRY_NAMESPACE}
REGISTRY_NAMESPACE=wallaroo
LICENSE_CHANNEL=2025-2
VERSION=2025.2.5-6628
WALLAROO_LICENSE_USERNAME=abcdefg
WALLAROO_LICENSE_PASSWORD=12345679
Load the Wallaroo install images and related public images into the specified AWS ECR via the following command. The repository names are prefixed
wallaroo/. This contains 47 images totalling 26 GiB. Depending on the speed of your connection, this process takes 50 minutes to complete.bash load-images-ecr --region $REGION --wallaroo-version $VERSION --wallaroo-license $WALLAROO_LICENSE_PASSWORD \ --wallaroo-username $WALLAROO_LICENSE_USERNAME(Optional) Load the Nvidia drivers into the AWS ECR via the following command:
bash load-images-ecr --region $REGION --wallaroo-version $VERSION --wallaroo-license $WALLAROO_LICENSE_PASSWORD \ --wallaroo-username $WALLAROO_LICENSE_USERNAME --load-image nvcr.io/nvidia/k8s-device-plugin:v0.17.0Create an image pull secret for the AWS ECR.
aws ecr get-login-password --region $REGION | docker login -u AWS --password-stdin $REGISTRY_HOST

kubectl create secret docker-registry regcred --from-file=$HOME/.docker/config.json
Wallaroo Image Preparation
Create the image values file for the
helminstallation process. When complete, this outputs the fileimage-values.yamlwith the relevant installation data.bash generate-airgap-image-values.bash --registry $REGISTRY_HOST > image-values.yaml
Save the file image-values.yaml and use it for the step Install Wallaroo.
Sample Cluster Configuration Script
This sample AWS EKS yaml file shows an installation that meets the Wallaroo hardware and cluster requirements. Note that the following settings should be changed to match the organization’s requirements:
metadata.name: Set this to the name for the cluster.metadata.region: Set this to the organization’s preferred AWS region.
The file is available from this link:
This is installed with the application eksctl version >= 0.200.0 with the command:
eksctl create cluster -f aws-airgap-eksctl.yaml.
aws-airgap-eksctl.yaml
# yaml-language-server: $schema=https://raw.githubusercontent.com/weaveworks/eksctl/main/pkg/apis/eksctl.io/v1alpha5/assets/schema.json
apiVersion: eksctl.io/v1alpha5
kind: ClusterConfig

metadata:
  name: sample-name # Replace with
  region: us-east-2 # replace with your region
  version: "1.30"


# See https://eksctl.io/usage/eks-private-cluster
privateCluster:
  enabled: true

addons:
  - name: aws-ebs-csi-driver

# create the required IAM roles and kubernetes service account for the cluster-autoscaler
iam:
  withOIDC: true
  serviceAccounts:
  - metadata:
      name: cluster-autoscaler
      namespace: kube-system
    wellKnownPolicies:
      autoScaler: true

managedNodeGroups:
  - name: general
    privateNetworking: true
    instanceSelector:
      vCPUs: 8
      memory: 16GiB
      gpus: 0
      cpuArchitecture: x86_64
    minSize: 1
    maxSize: 3
    volumeSize: 100
    desiredCapacity: 1
    labels:
      wallaroo.ai/node-purpose: general
    iam:
      withAddonPolicies:
        autoScaler: true # add iam role for cluster-autoscaler; any nodegroup that should autoscale needs this and below
    propagateASGTags: true # add the labels and taints as appropriate autoscaling groups for cluster-autoscaler
  - name: persistent
    privateNetworking: true
    instanceSelector:
      vCPUs: 8
      memory: 16GiB
      gpus: 0
      cpuArchitecture: x86_64
    desiredCapacity: 1
    minSize: 1
    maxSize: 3
    volumeSize: 100
    iam:
      withAddonPolicies:
        autoScaler: true
    propagateASGTags: true
    labels:
      wallaroo.ai/node-purpose: persistent
    taints:
      - key: wallaroo.ai/persistent
        value: "true"
        effect: NoSchedule
    availabilityZones:
      - us-east-2c

  - name: pipelines-x86
    privateNetworking: true
    instanceTypes:
    - c7i.2xlarge
    - c7a.2xlarge
    - c6i.2xlarge
    - c6a.2xlarge
    desiredCapacity: 2
    minSize: 2
    maxSize: 3
    volumeSize: 100
    iam:
      withAddonPolicies:
        autoScaler: true
    propagateASGTags: true
    labels:
      wallaroo.ai/node-purpose: pipelines
    taints:
      - key: wallaroo.ai/pipelines
        value: "true"
        effect: NoSchedule

  - name: pipelines-gpu
    instanceType: g6e.2xlarge #example
    minSize: 1
    maxSize: 1
    desiredCapacity: 1
    privateNetworking: true
    labels:
      lifecycle: ec2-autoscaler
      wallaroo.ai/accelerator: gpu 		# use for deployment label in deployment config
      wallaroo.ai/node-purpose: pipelines
    taints:
      - key: wallaroo.ai/pipelines
         value: "true"
         effect: NoSchedule
      - key: nvidia.com/gpu
        value: "true"
        effect: NoSchedule
    iam:
      withAddonPolicies:
        autoScaler: true
    volumeSize: 200
For full details, see the eksctl documentation.
From this point, process to Install Wallaroo and continue the installation process.
Install Wallaroo
Wallaroo air-gapped installations for clusters use helm.
Helm Based Installation of Wallaroo
Installation Client Helm Requirements
The following software is required for the client with administrative access to the Kubernetes cluster that will host Wallaroo via Helm.
- For Helm installs:
helm: Install Helm- Minimum supported version: Helm 3.11.2
krew: Install Krewkrew preflightandkrew support-bundle. Install with the following commands:kubectl krew install support-bundlekubectl krew install preflight
Install Wallaroo via Helm
The following details how to install Wallaroo via helm. Note that these procedures require the Air-Gapped Installation Preparation be completed.
Registration Login
The first step in the Wallaroo installation process via Helm is to connect to the Kubernetes environment that will host the Wallaroo Enterprise instance and login to the Wallaroo container registry through the command provided by the Wallaroo support staff. The command will take the following format, replacing $WALLAROO_LICENSE_USERNAME and $WALLAROO_LICENSE_PASSWORD with the respective username and password provided.
helm registry login registry.replicated.com --username $WALLAROO_LICENSE_USERNAME --password $WALLAROO_LICENSE_PASSWORD
Preflight Verification
IMPORTANT NOTE
The preflight test is not programmatically enforced during installation via Helm and should be performed manually before installation. If the Kubernetes environment does not meet the requirements the Wallaroo installation may fail or perform erratically. Please verify that all preflight test run successfully before proceeding to install Wallaroo.Preflight verification is performed with the following command format. The variables LICENSE_CHANNEL and VERSION is supplied by your Wallaroo support representative.
helm template oci://registry.replicated.com/wallaroo/$LICENSE_CHANNEL/wallaroo --version $VERSION | kubectl preflight -
For example, the LICENSE_CHANNEL=2025-2 and the VERSION=2025.2.5-6628
helm template oci://registry.replicated.com/wallaroo/2025-2/wallaroo --version 2025.2.5-6628 | kubectl preflight -
This displays the Preflight Checks report.
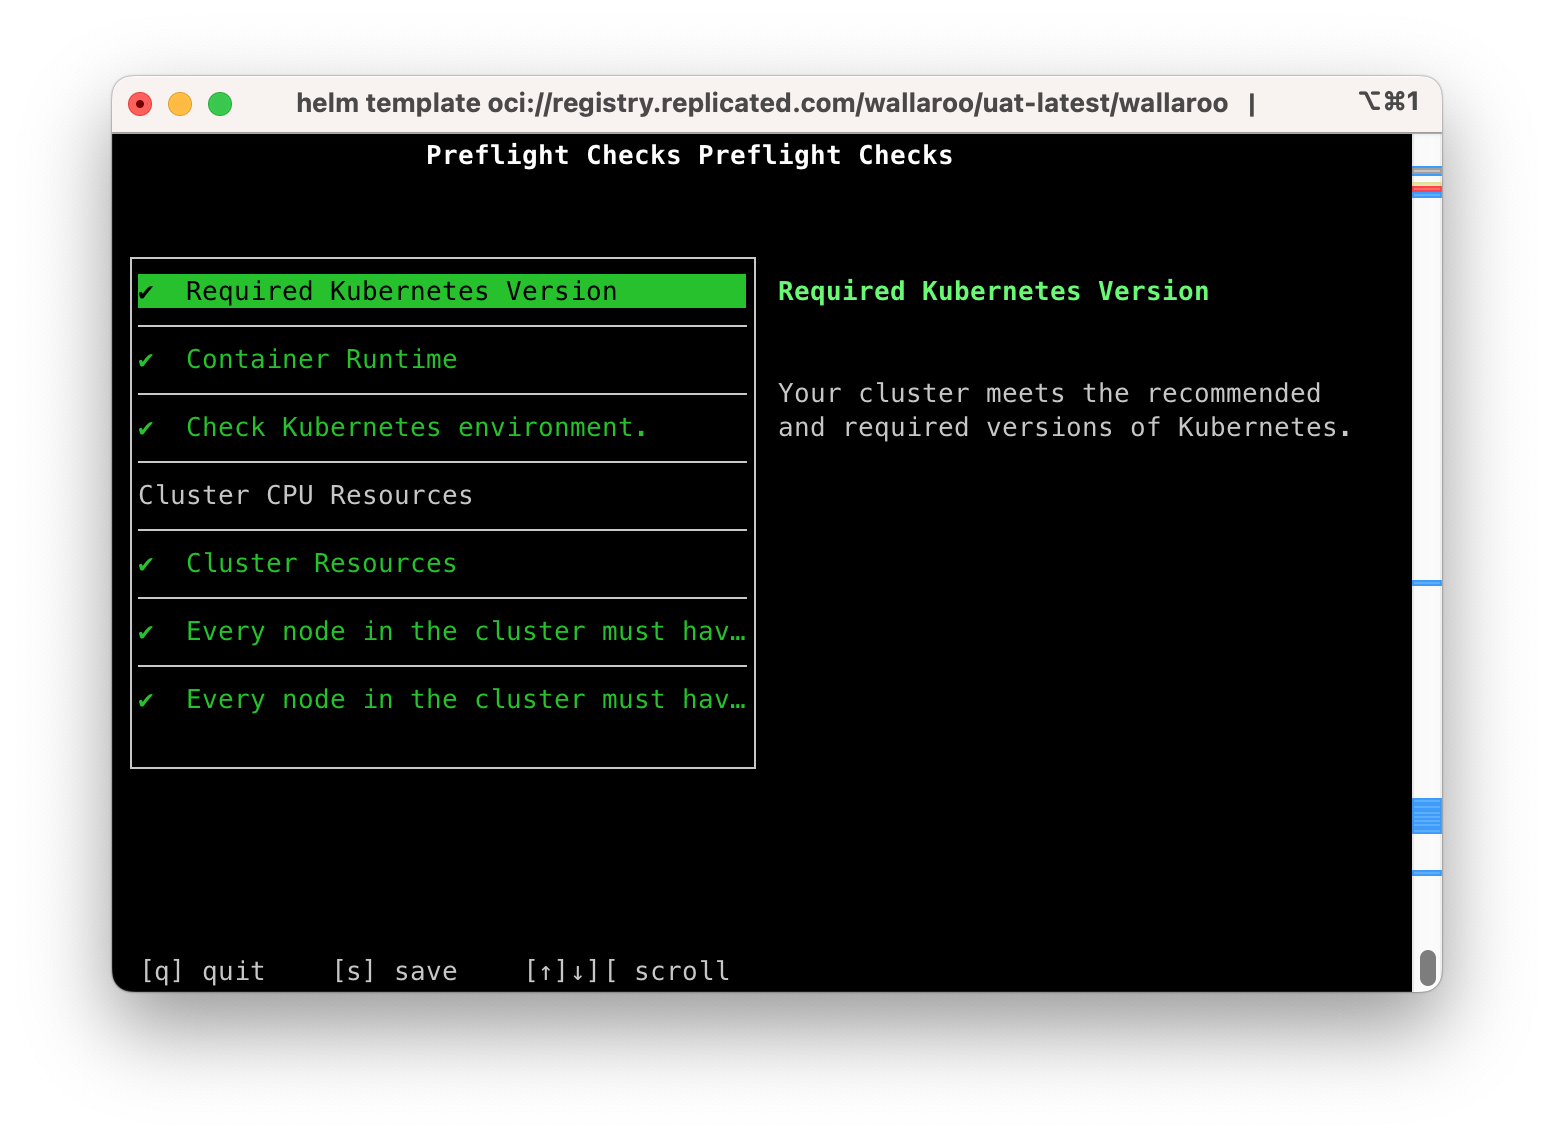
The following commands are available:
s: Save the report to a text file as the filepreflight-checks-results-DATETIME.txt. For example:preflight-checks-results-2024-03-19T13_30_41.txt.q: Exit the preflight report.Up ArroworDown Arrow: Scroll through the preflight elements and view the report details.
The following example shows a successful preflight test.
Preflight Checks Preflight Checks

Check PASS
Title: Required Kubernetes Version
Message: Your cluster meets the recommended and required versions of Kubernetes.

------------
Check PASS
Title: Container Runtime
Message: Containerd container runtime was found.

------------
Check PASS
Title: Check Kubernetes environment.
Message: GKE is a supported distribution

------------
Title: Cluster CPU Resources
Message:

------------
Check PASS
Title: Cluster Resources
Message: Cluster resources are satisfactory

------------
Check PASS
Title: Every node in the cluster must have at least 12Gi of memory
Message: All nodes have at least 12 GB of memory capacity

------------
Check PASS
Title: Every node in the cluster must have at least 8 cpus allocatable.
Message: All nodes have at least 8 CPU capacity

------------
Prepare Helm Installation
The following instructions detail how to install Wallaroo Enterprise via Helm for Kubernetes cloud environments such as Microsoft Azure, Amazon Web Service, and Google Cloud Platform.
Helm Network Configuration
apilb.serviceType settings have the following effects.
| Setting | Cloud Kubernetes | |
|---|---|---|
| Internal Only Connections | ClusterIP | |
| External Connections | LoadBalancer |
Refer to the instructions for environment host for details on IP address allocation and support.
Helm Install Preparation Steps
With the preflight checks and prerequisites met, Wallaroo can be installed via Helm through the following process:
Create namespace. By default, the namespace
wallaroois used:kubectl create namespace wallarooSet the new namespace as the current namespace:
kubectl config set-context --current --namespace wallaroo
- Set the TLS certificate secret in the Kubernetes environment:
Create the certificate and private key. It is recommended to name it after the domain name of your Wallaroo instance. For example:
wallaroo.example.com. For production environments, organizations are recommended to use certificates from their certificate authority. Note that the Wallaroo SDK will not connect from an external connection without valid certificates. For more information on using DNS settings and certificates, see the Wallaroo DNS Integration Guide.Convert the files to base64 encoded and store the results. For example:
The cert file:
base64 -i cert_file.pemThe key file:
base64 -i key_file.pemSet the base64 encoded files into the helm values file with the following settings:
deploymentStage: cust: This value must becust.custTlsCert: The base64 encoded certificate chain.custTlsKey: The base64 encoded key.
For example:
#> To provide TLS certificates, (1) set deploymentStage to "cust", then (2) provide base64 encoded secrets
#> in custTlsCert and custTlsKey.

deploymentStage: cust # Deployment stage, must be set to "cust" when deployed
custTlsCert: "abcdefg" # Customer provided certificate chain when deploymentStage is "cust".
custTlsKey: "zyxwvu" # Customer provided private key when deploymentStage is "cust".
Default Helm Installation Settings
A default Helm install of Wallaroo contains various default settings. The local values file overwrites values based on the organization needs. The following represents the minimum mandatory values for a Wallaroo installation using certificates and the default LoadBalancer for a cloud Kubernetes cluster. The configuration details below is saved as values.yaml for these examples.
Note the following required settings:
wallarooDomain: Used to set the DNS domain name for the Wallaroo instance. For more information, see the Wallaroo DNS Integration Guide.deploymentStage: cust: This value must becust.custTlsCert: The base64 encoded certificate chain.custTlsKey: The base64 encoded key.kubernetes_distribution: The cloud provider used. Each cloud provider has their own methods of handling storage classes, LoadBalancers (LB), etc. The following values are available; if your selected provider or distribution is not on the list, contact your Wallaroo Support representative for more options.aks: Microsoft Azure Kubernetes Serviceeks: Amazon Elastic Kubernetes Servicegke: Google Kubernetes Engineoke: Oracle Cloud Infrastructure Container Engine for Kubernetes
ingress_mode: How the Wallaroo instance is reached through the Kubernetes network settings. Options include:internal(Default): An internal cloud load balancer and associated resources are created. Network users outside the Kubernetes cluster – but on the same internal network – can connect directly using DNS names, and do not need to use port forward or related configurations.external: An external, Internet-facing cloud load balancer, public IP, and associated resources are created. This is highly discouraged. Public DNS is also required. This is the default for Wallaroo Community Edition.none: Services are local to the Kubernetes cluster.kubectl-port forwardor some other means is required to access them. If all work will be done in-cluster, select this option.
dashboard: The name displayed when users login to the Wallaroo Ops center Dashboard. For example, “My Company” or “Sales Division”, etc.privatePypi(Optional): Enables private Python repositories for custom libraries and sources. For more details, see Python Private Repositories.
imageRegistry: Only required for air-gapped installations or when a private container registry is used. This is required for air-gapped installations and must match the fully qualified domain name and namespace of private container registry where the Wallaroo install images are installed. For example, if the namespace the Wallaroo images uses iswallaroo, a sampleimageRegistryvalue is940762080936.dkr.ecr.us-east-2.amazonaws.com/wallaroo.
The following example shows the minimum required options with uncommented keys for the minimum required settings and additional commented optional settings. For full details on helm values for Wallaroo installations, see the Wallaroo Helm Reference Guides.
wallarooDomain: "wallaroo.example.com" # change to match the actual domain name

custTlsSecretName: cust-cert-secret

ingress_mode: internal # internal (Default), external,or none

dashboard:
  clientName: "Wallaroo Helm Example" # Insert the name displayed in the Wallaroo Dashboard

kubernetes_distribution: ""   # Required. One of: aks, eks, gke, oke, or kurl.

# enable private container repository for installation.  REQUIRED for air-gapped installs
# Must be a fully qualified domain name with the namespace specified.
imageRegistry: 940762080936.dkr.ecr.us-east-2.amazonaws.com/wallaroo

# enable Wallaroo assays.  Select **one** of the following: `v1` or `v2`, or leave commented out to disable assays.
# v2 is enabled by default.
#assays:
#  enabled: true
#  v1: false
#  v2: true

# Enable edge deployment
#ociRegistry:
#  enabled: true # true enables the Edge Server registry information, false disables it.
#  registry: ""# The registry url. For example: reg.big.corp:3579.
#  repository: ""# The repository within the registry. This may include the cloud account, or the full path where the Wallaroo published pipelines should be kept. For example: account123/wallaroo/pipelines.
#  email: "" # Optional field to track the email address of the registry credential.
#  username: "" # The username to the registry. This may vary based on the provider. For example, GCP Artifact Registry with service accounts uses the username _json_key_base64 with the p`ass`word as a base64 processed token of the credential information.
#  password: "" # The password or token for the registry service.

# Enable edge deployment observability
# edgelb:
#     enabled: true

# Private PyPI repository configuration for installing Python packages from a private index.
# When enabled, this configures access to a private PyPI repository for Python package installation in BYOP and Workload Orchestrations.
# privatePypi:
#   enabled: false                    # If true, configure access to a private PyPI repository
#   secretName: private-pypi-secret
#   url: ""                           # Private PyPI repository URL, eg "https://pypi.example.com/simple/"
#   username: ""                      # Username for private PyPI authentication
#   password: ""                      # Password for private PyPI authentication
#   privateOnly: false                # If true, only use private PyPI repository (no fallback to public PyPI)

# The nodeSelector and tolerations for all components
# This does not apply to nats, fluent-bit, or minio so needs to be applied separately
# nodeSelector:
#   wallaroo.ai/reserved: true
# tolerations:
# - key: "wallaroo.ai/reserved"
#   operator: "Exists"
#   effect: "NoSchedule"

# To change the pipeline taint or nodeSelector,
# best practice is to change engine, enginelb, and engineAux
# together unless they will be in different pools.
# engine:
#   nodeSelector:
#     wallaroo.ai/node-purpose: pipelines
#   tolerations:
#     - key: "wallaroo.ai/pipelines"
#       operator: "Exists"
#       effect: "NoSchedule"
# enginelb:
#   nodeSelector:
#     wallaroo.ai/node-purpose: pipelines
#   tolerations:
#     - key: "wallaroo.ai/pipelines"
#       operator: "Exists"
#       effect: "NoSchedule"
# engineAux:
#   nodeSelector:
#     wallaroo.ai/node-purpose: pipelines
#   tolerations:
#     - key: "wallaroo.ai/pipelines"
#       operator: "Exists"
#       effect: "NoSchedule"

# For each service below, adjust the disk size and resources as required.
# If the nodeSelector or tolerations are changed for one service,
# the other services nodeSelector and tolerations **must** be changed to match
#
#
# plateau:
#   diskSize: 100Gi
#   resources:
#     limits:
#       memory: 4Gi
#       cpu: 1000m
#     requests:
#       memory: 128Mi
#       cpu: 100m
#   nodeSelector:
#     wallaroo.ai/node-purpose: persistent
#   tolerations:
#     - key: "wallaroo.ai/persistent"
#       operator: "Exists"
#       effect: "NoSchedule"

# Jupyter has both hub and lab nodeSelectors and tolerations
# They default to the same persistent pool, but can be assigned to different ones
# jupyter:
#   nodeSelector:                 # Node placement for Hub administrative pods
#     wallaroo.ai/node-purpose: persistent
#   tolerations:
#     - key: "wallaroo.ai/persistent"
#       operator: "Exists"
#       effect: "NoSchedule"
#   labNodeSelector:              # Node placement for Hub-spawned jupyterlab pods
#     wallaroo.ai/node-purpose: persistent
#   labTolerations:
#     - key: "wallaroo.ai/persistent"
#       operator: "Exists"
#       effect: "NoSchedule"
#   memory:
#     limit: "4"                  # Each Lab - memory limit in GB
#     guarantee: "2"              # Each Lab - lemory guarantee in GB
#   cpu:
#     limit: "2.0"                # Each Lab - fractional CPU limit
#     guarantee: "1.0"            # Each Lab - fractional CPU guarantee
#   storage:
#     capacity: "50"              # Each Lab - disk storage capacity in GB
# minio:
#   persistence:
#     size: 100Gi
#   nodeSelector:
#     wallaroo.ai/node-purpose: persistent
#   tolerations:
#   - key: wallaroo.ai/persistent
#     operator: "Exists"
#     effect: "NoSchedule"
#   resources:
#     requests:
#       memory: 1Gi
# postgres:
#   diskSize: 100Gi
#   nodeSelector:
#     wallaroo.ai/node-purpose: persistent
#   tolerations:
#     - key: "wallaroo.ai/persistent"
#       operator: "Exists"
#       effect: "NoSchedule"
#   resources:
#     limits:
#       memory: 2Gi
#       cpu: 500m
#     requests:
#       memory: 512Mi
#       cpu: 100m

#> Prometheus Metrics. Data will be retained until either retention size or retention time is
#> exceeded, whichever comes first. It's a little difficult to predict which, because pipelines are
#> transient and the rate they generate metrics is variable. Scrape interval is fixed at 5s.
# prometheus:
#   server:
#     global:
#       scrape_interval: 5s # How frequently to scrape targets by default
#       evaluation_interval: 5s # How frequently to evaluate rules
#       scrape_timeout: 4s # How long until a scrape request times out
#     resources:
#       limits:
#         memory: 6Gi
#         cpu: 2000m
#       requests:
#         memory: 512Mi
#         cpu: 100m
#     retention: 90d
#     retentionSize: 80GB # This should be 80% of the persistentVolume.size.
#     nodeSelector:
#       wallaroo.ai/node-purpose: persistent
#     tolerations:
#       - key: "wallaroo.ai/persistent"
#         operator: "Exists"
#         effect: "NoSchedule"
#     persistentVolume:
#       size: 100Gi # When updating this value make sure to also update the 'retentionsSize' value above to be 80% of this value.
# nats:
#   podTemplate:
#     merge:
#       spec:
#         nodeSelector:
#           wallaroo.ai/node-purpose: persistent
#         tolerations:
#         - key: "wallaroo.ai/persistent"
#           operator: "Exists"
#           effect: NoSchedule
# wallsvc:
#   nodeSelector:
#     wallaroo.ai/node-purpose: persistent
#   tolerations:
#     - key: "wallaroo.ai/persistent"
#       operator: "Exists"
#       effect: "NoSchedule"
persistentVolume Settings
Wallaroo services that have a persistentVolume have the following default nodeSelector label and tolerations:
nodeSelector- Label:
wallaroo.ai/node-purpose - Value:
persistent
- Label:
tolerations- Key: wallaroo.ai/persistent
- Operator: “Exists”
- Effect: “NoSchedule”
For example:
nodeSelector:
  wallaroo.ai/node-purpose: persistent
tolerations:
  - key: wallaroo.ai/persistent
    operator: "Exists"
    effect: "NoSchedule"
If the nodeSelector or tolerations are changed for any service with a persistentVolume, all other services must be edited to match.
For additional information on taints and tolerations settings, see the Taints and Labels Guide.
Install Wallaroo with Helm Commands
- Install Wallaroo: The Wallaroo support representative will provide the installation command for the Helm install that will use the Wallaroo container registry. This assumes that the preflight checks were successful. This assumes some of these helper variables are set from the previous procedure Air-Gapped Installation Preparation.
$RELEASE: The name of the Helm release. By default,wallaroo.$REGISTRY_URI: The URl for the Wallaroo container registry service.$VERSION: The version of Wallaroo to install. For this example,2025.2.5-6628.$LOCALVALUES: The .yaml file containing the local values overrides. For this example,values.yaml.image-values.yamlfile generated created in the step Wallaroo Image Retrieval and Installation Preparation.
The following example shows this command.
helm install \
    wallaroo oci://registry.replicated.com/wallaroo/2025-2/wallaroo \
    --version 2025.2.5-6628 \
    --values values.yaml \
    --registry $REGISTRY_ADDRESS \
    --values image-values.yaml \
    --timeout 10m \
    --wait \
    --wait-for-jobs
Verify Installation
If any required elements are missing from the values.yaml file, an error is displayed. For example, leaving out the kubernetes_distribution field returns the following:
Warning - kubernetes_distribution must be set in user provided values.yaml
Upon successful installation, notes are published indicating the installed version, where to find documentation, etc.:
NOTES:
.

Welcome to Wallaroo 2025.1.0

1. Deployment Information:
Name:             2025.1.0
Release notes:    https://docs.wallaroo.ai/wallaroo-release-notes/wallaroo-release-202501
Version:          v2025.1.0-5187

2. Accessing Wallaroo
Documentation:    https://docs.wallaroo.ai
Dashboard:        https://sample.wallaroocommunity.ninja

3. Useful Commands:

- Helm tests are available by using: `helm test wallaroo`.

- External load balancer hostname can be found by using:

    kubectl get svc api-lb-ext  -o jsonpath='{.status.loadBalancer.ingress[0].hostname}'

- List Wallaroo namespaces, including pipeline deployments, but not including the main `wallaroo` namespace:

    kubectl get namespaces -l wallaroo-managed=true

- In order to change any helm values:

    helm upgrade --install wallaroo oci://registry.replicated.com/wallaroo/uat-latest/wallaroo --version v2025.1.0-5187 --values $LOCALVALUES_YAML --timeout 10m --wait --wait-for-jobs

4. Uninstall:

 1. To uninstall/delete the Wallaroo deployment, run:

   kubectl delete ns wallaroo && kubectl delete \
     all,secret,configmap,clusterroles,clusterrolebindings,storageclass,crd \
     --selector app.kubernetes.io/part-of=wallaroo --selector kots.io/app-slug=wallaroo

 2. To delete all pipelines, run:

   kubectl delete ns -l wallaroo-managed=true
.
Once the installation is complete, verify the installation with the
helm test $RELEASEcommand. A condensed display usesegrepto show only the test suite and phase status as follows. Replacewallaroowith the name of thehelmrelease used.helm test wallaroo | egrep 'SUITE:|Phase:'A successful result shows the following:
TEST SUITE:     wallaroo-fluent-bit-test-connection
Phase:          Succeeded
TEST SUITE:     nats-test-request-reply
Phase:          Succeeded
TEST SUITE:     wallaroo-wallaroo-test-connections-hook
Phase:          Succeeded
TEST SUITE:     wallaroo-test-objects-hook
Phase:          Succeeded
The following will show the full
helmtest output with notes.helm test wallaroowhich displays the following:
NAME: wallaroo
LAST DEPLOYED: Fri May 17 14:00:04 2024
NAMESPACE: wallaroo
STATUS: deployed
REVISION: 2
TEST SUITE:     wallaroo-fluent-bit-test-connection
Last Started:   Fri May 17 14:04:48 2024
Last Completed: Fri May 17 14:04:51 2024
Phase:          Succeeded
TEST SUITE:     nats-test-request-reply
Last Started:   Fri May 17 14:04:43 2024
Last Completed: Fri May 17 14:04:48 2024
Phase:          Succeeded
TEST SUITE:     sample-wallaroo-test-connections-hook
Last Started:   Fri May 17 14:04:24 2024
Last Completed: Fri May 17 14:04:31 2024
Phase:          Succeeded
TEST SUITE:     sample-wallaroo-test-objects-hook
Last Started:   Fri May 17 14:04:31 2024
Last Completed: Fri May 17 14:04:43 2024
Phase:          Succeeded
NOTES:
.

Welcome to Wallaroo 2025.1.0

1. Deployment Information:
  Name:             2025.1.0
  Release notes:    https://docs.wallaroo.ai/wallaroo-release-notes/wallaroo-release-202501
  Version:          v2025.1.0-5187

2. Accessing Wallaroo
  Documentation:    https://docs.wallaroo.ai
  Dashboard:        https://sample.wallaroocommunity.ninja

3. Useful Commands:

  - Helm tests are available by using: `helm test wallaroo`.

  - External load balancer hostname can be found by using:

      kubectl get svc api-lb-ext  -o jsonpath='{.status.loadBalancer.ingress[0].hostname}'

  - List Wallaroo namespaces, including pipeline deployments, but not including the main `wallaroo` namespace:

      kubectl get namespaces -l wallaroo-managed=true

  - In order to change any helm values:

      helm upgrade --install wallaroo oci://registry.replicated.com/wallaroo/2025-2/wallaroo --version 2025.2.5-6628 --values $LOCALVALUES_YAML --timeout 10m --wait --wait-for-jobs

 4. Uninstall:

  1. To uninstall/delete the Wallaroo deployment, run:

    kubectl delete ns wallaroo && kubectl delete \
      all,secret,configmap,clusterroles,clusterrolebindings,storageclass,crd \
      --selector app.kubernetes.io/part-of=wallaroo --selector kots.io/app-slug=wallaroo

  2. To delete all pipelines, run:

    kubectl delete ns -l wallaroo-managed=true
.
At this point, the installation is complete and can be accessed through the fully qualified domain names set in the installation process above.
To add the initial users if they were not set up through Helm values, see the Wallaroo Enterprise User Management guide.
Install Wallaroo via Kots
Before starting an air-gapped installation of Wallaroo using Kots, complete the following preparation steps.
The general process follows these steps:
- Pre Setup Checklist for Kots: The necessary installation files are available and values set for installation.
- Wallaroo Image Retrieval and Installation Preparation for Kots: Retrieve the installation images from Wallaroo and store them in a private container registry available from the Target Cluster.
Pre Setup Checklist for Kots
The following checklist ensures that required items are ready before starting the process.
- The installation environment meets the general Wallaroo Installation Prerequisites.
- The Domain Name for the Wallaroo instance is registered in a private DNS accessible from the air-gapped installation.
- TLS certificate and private key matching the Domain Name available for the Target Cluster. This can be registered to a private certificate service.
- Access to private image registry that hosts the Wallaroo install images with the following permissions:
- Read
- Write
- List
- The following Bash scripts:
-
install-nvidia-driver.bash(Optional): Installs Nvidia drivers for the Target Cluster. Available here: install-nvidia-driver.bash
-
- Wallaroo Image Download Details: This is provided by a Wallaroo Support Representative and are stored as the following variables environmental variables:
LICENSE_CHANNEL: The registry channel used based on the version of Wallaroo being installed, currently2025-2.VERSION: The Wallaroo version to be installed. For example:2025.2.5-6628.KOTS_CLIENT_URL: The URL for downloading the Kots client filekots_linux_amd64.tar.gzwith thekotsversion used for the Wallaroo air-gapped installation.KOTS_ADMIN_URL: The URL for downloading the Kots admin bundlekotsadm.tar.gzwith thekotsversion used for the Wallaroo air-gapped installation.WALLAROO_BUNDLE_URL: The customer specific URL for downloading the Wallaroo installation package. IMPORTANT NOTE: This URL has an expiration time of around 60 minutes, and the final downloaded file is 30 GB in size.WALLAROO_LICENSE_USERNAME: The username, typically the email address of the registered user, to authenticate for downloading the Wallaroo installation images.WALLAROO_LICENSE_PASSWORD: The password to authenticate for downloading the Wallaroo installation images.
- The following artifacts provided by the Wallaroo Support representative:
- License File: This is a
yamlfile that contains the Wallaroo license information for your organization. For this procedure, it is referred to aslicense.yaml.
- License File: This is a
- The following environmental variables for connecting to the private model registry:
REGISTRY_HOST: The registry hostname. For example, for ECR this would be in the format12345.dkr.ecr.us-east-2.amazonaws.comREGISTRY_NAMESPACE: The registry namespace, by defaultwallaroo.REGISTRY_USERNAME: Username for authentication to the registry.REGISTRY_PASSWORD: Authentication credential for private registry. Often this is either a password or a token. For ECR, this is retrieved via the command$(aws ecr get-login-password --region us-east-2)
- Administration Host Software Requirements: The administrative host that submits the installation commands to the target cluster requires the following software.
dockercurljqversion 1.7.1kubectlversion 1.31- The AWS CLI.
Wallaroo Image Retrieval and Installation Preparation for Kots
For air-gapped installations, the Wallaroo installation images are downloaded and stored in a private registry through the following process.
The image load script below expects root level access and add the prefix wallaroo/ prefix for all the Wallaroo images. Access to the registry must include the following permissions:
- Read
- List
- Write
From a terminal with access to the Kubernetes cluster hosting the Wallaroo instance and read/write access to the private model registry, use the following procedure.
This installation assumes the user will
sshinto the target installation system with port forwarding enabled. For example,ssh -L 8800:localhost:8800 hostname. This is so later in the process the Kots Administrative Dashboard is access through the urlhttp://localhost:8080.Set the following convenience variables.
REGISTRY_HOST=YOUR REGISTRY OR ECR HOST NAME
REGISTRY_NAMESPACE=YOUR NAMESPACE (default: wallaroo)
WALLAROO_LICENSE_USERNAME=YOUR WALLAROO USERNAME
WALLAROO_LICENSE_PASSWORD=YOUR WALLAROO PASSWORD
REGISTRY_ADDRESS=$REGISTRY_HOST/$REGISTRY_NAMESPACE
AWS_REGION=YOUR AWS REGION
LICENSE_CHANNEL=YOUR LICENSE CHANNEL
REGISTRY_USERNAME=YOUR REGISTRY AUTHENTICATION USER NAME
REGISTRY_PASSWORD=YOUR REGISTRY AUTHENTICATION CREDENTIAL
KOTS_CLIENT_URL=YOUR KOTS CLIENT URL
KOTS_ADMIN_URL=YOUR KOTS ADMIN URL
WALLAROO_BUNDLE_URL=YOUR WALLAROO BUNDLE URL
WALLAROO_DOWNLOAD_AUTHORIZATION=YOUR AUTHORIZATION CODE
For example:
REGISTRY_HOST=123456.dkr.ecr.us-east-2.amazonaws.com
REGISTRY_NAMESPACE=wallaroo
WALLAROO_LICENSE_USERNAME=someone@wallaroo.ai
WALLAROO_LICENSE_PASSWORD=abc123
REGISTRY_ADDRESS=registry.wallaroo.ai/wallaroo
AWS_REGION=eu-west-1
LICENSE_CHANNEL=2025-2
REGISTRY_USERNAME=AWS
REGISTRY_PASSWORD=$(aws ecr get-login-password --region us-east-2)
KOTS_CLIENT_URL="https://github.com/replicatedhq/kots/releases/download/v1.124.18/kots_linux_amd64.tar.gz"
KOTS_ADMIN_URL="https://github.com/replicatedhq/kots/releases/download/v1.124.18/kotsadm.tar.gz"
WALLAROO_BUNDLE_URL="https://s3.amazonaws.com/airgap.replicated.com/abcdefg/2.airgap?X-Amz-Algorithm=AWS4-HMAC-SHA256&X-Amz-Credential=ASIA3UMYHRA5LHP4KTHN%2F20250708%2Fus-east-1%2Fs3%2Faws4_request&X-Amz-Date=20250708T160517Z&X-Amz-Expires=3600&X-Amz-Security-Token=abcdefg"
Ensure all of the necessary AWS ECR repos have been created prior to loading images with the following command:
bash load-images-ecr --region $AWS_REGION --wallaroo-version 2025.2.5-6628  --wallaroo-license $WALLAROO_LICENSE_PASSWORD \
    --registry-namespace=$REGISTRY_NAMESPACE --wallaroo-username $WALLAROO_LICENSE_USERNAME --create-kots --create-wallaroo
For example, with the convenience variables derived, this command is:
bash load-images-ecr --region eu-west-1  --wallaroo-version 2025.2.5-6628  --wallaroo-license abc123 \
    --registry-namespace wallaroo --wallaroo-username someone@wallaroo.ai --create-kots --create-wallaroo
Download the following via
curlvia the following commands:- Kots CLI:
curl -LO $KOTS_CLIENT_URL. This downloads the filekots_linux_amd64.tar.gz. - Kots admin bundle:
curl -LO $KOTS_ADMIN_URL. This downloads the filekotsadm.tar.gz. - Wallaroo Installation Bundle:
curl -Lo wallaroo.airgap $WALLAROO_BUNDLE_URL. This saves the file aswallaroo.airgap. IMPORTANT NOTE: This URL has an expiration time of around 60 minutes, and the final downloaded file is 30 GB in size.
- Kots CLI:
Install Kots client via the following commands:
tar zxf kots_linux_amd64.tar.gz
sudo mv kots /usr/local/bin/kubectl-kots
sudo chmod a+x /usr/local/bin/kubectl-kots
Push the Kots administrative bundle to the private registry via the following command:
kubectl kots admin-console \
    push-images kotsadm.tar.gz \
    $REGISTRY_ADDRESS \
    --registry-username $REGISTRY_USERNAME \
    --registry-password $REGISTRY_PASSWORD
Install Wallaroo via the following command. This takes approximately 30 minutes, and will pause as each image is loaded. The following parameters are manually set:
--shared-password: The password to the Kots Administrative Dashboard after installation is complete. For example,--shared-password wallaroo--license-file: The file name of the license file. For example:--license-file license.yaml
kubectl kots install $LICENSE_CHANNEL \
    --namespace wallaroo --shared-password wallaroo \
    --airgap-bundle wallaroo.airgap --license-file license.yaml \
    --kotsadm-registry $REGISTRY_ADDRESS \
    --registry-username $REGISTRY_USERNAME  \
    --registry-password $REGISTRY_PASSWORD
An example with the variables replaced with their actual values would be:
kubectl kots install wallaroo/2025-2 \
    --namespace wallaroo --shared-password wallaroo \
    --airgap-bundle wallaroo.airgap --license-file license.yaml \
    --kotsadm-registry 123456.dkr.ecr.us-east-2.amazonaws.com/wallaroo \
    --registry-username AWS  \
    --registry-password abc123
Once complete, a prompt is displayed showing the Kots Administrative Dashboard is displayed. Use this URL in a browser to proceed to the next stage in the installation process.
• Deploying Admin Console
• Creating namespace ✓
• Waiting for datastore to be ready ✓
    Enter a new password to be used for the Admin Console: •••••••••••••
  • Waiting for Admin Console to be ready ✓

• Press Ctrl+C to exit
• Go to http://localhost:8800 to access the Admin Console
Initial Wallaroo Config
Once Wallaroo has been installed via kots for the first time, we can perform initial configuration.
If the Kots Administrative Console has not started, launch it with the following command:
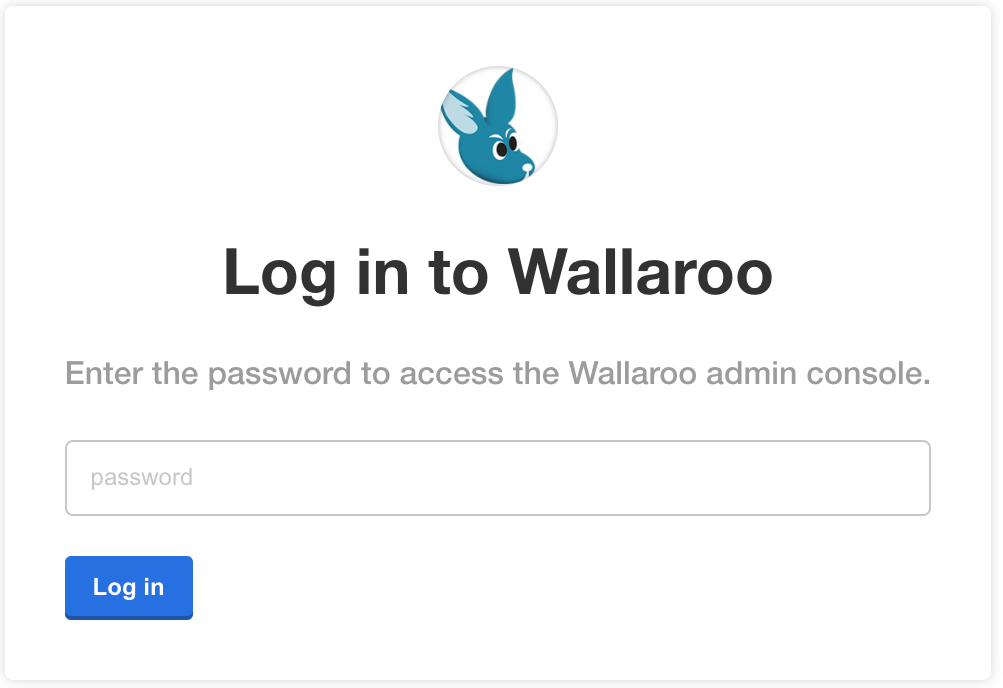
❯ kubectl kots admin-console --namespace wallaroo
  • Press Ctrl+C to exit
  • Go to http://localhost:8800 to access the Admin Console
Enter the Kots Administrative Console address into a browser. You will be prompted for the default password as set in the step above. Enter it and select Log in.
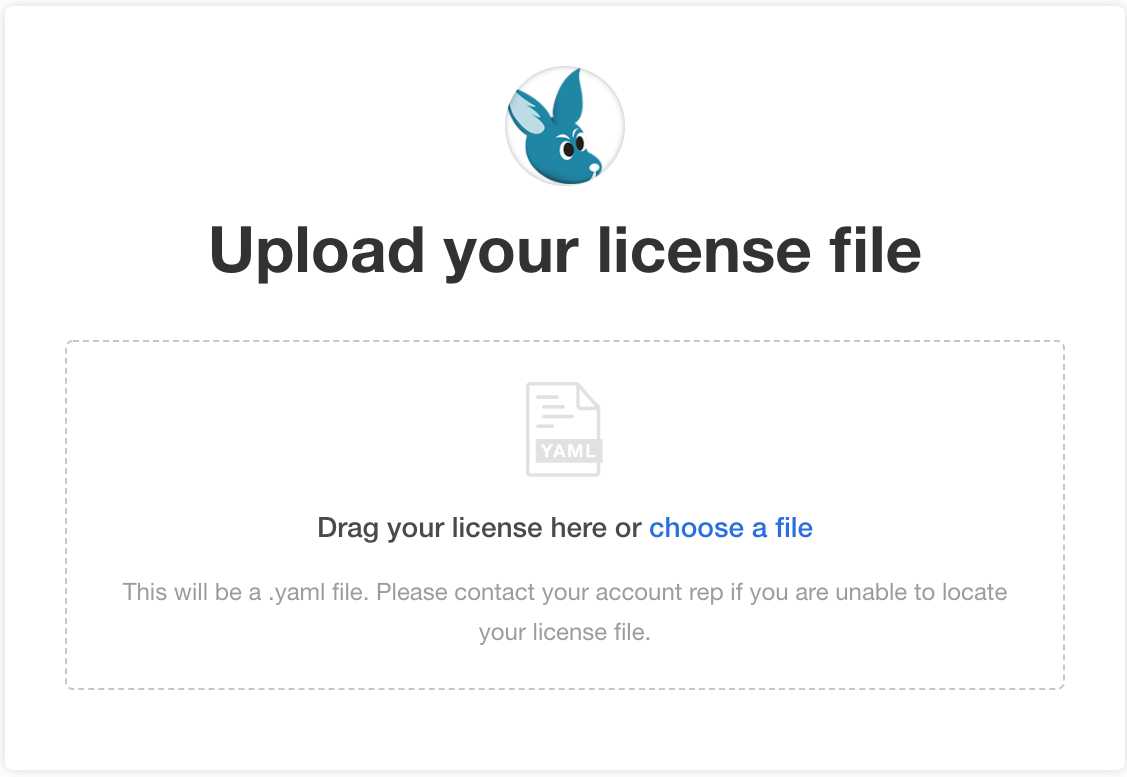
Upload your license file. If the license file was already selected from the Automated installation, this step is skipped.
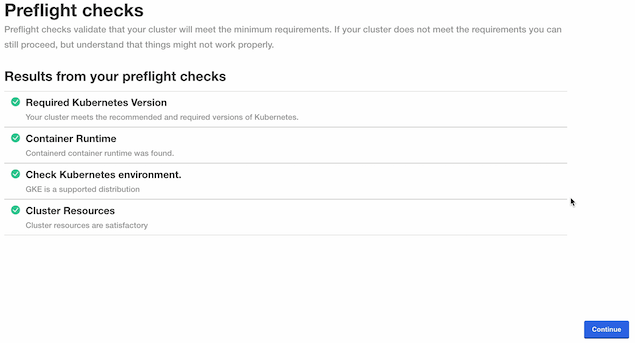
The Kots Administrative Console will run the preflight checks to verify that all of the minimum requirements are met. This may take a few minutes. If there are any issues, Wallaroo can still be launched but may not function properly. When ready, select Continue.
The Configure Wallaroo page will be displayed which allows you to customize your Wallaroo environment. The following are the minimum required settings.
Networking Configuration: Set whether the Wallaroo instance is available from outside the Kubernetes cluster, or only from within it.
- Ingress Mode for Wallaroo Endpoints: If a load balance controller is used, select External. If there is no load balance controller configured, the load balancer must be configured to point at a K8s or OpenShift service, then select None as the networking setting in configuration. For any questions or other conditions not listed, contact the Wallaroo support representative.
- None: Services are local to the Kubernetes cluster.
kubectl-port forwardor some other means is required to access them. If all work will be done in-cluster, select this option. - Internal: An internal cloud load balancer and associated resources are created. Network users outside the Kubernetes cluster – but on the same internal network – can connect directly using DNS names, and do not need to use port forward or related configurations.
- External: An external, Internet-facing cloud load balancer, public IP, and associated resources are created. This is highly discouraged. Public DNS is also required. This is the default for Wallaroo Community Edition.
- Enable external URL inference endpoints: Creates pipeline inference endpoints. For more information, see Model Endpoints Guide.
- None: Services are local to the Kubernetes cluster.
- Ingress Mode for Wallaroo Endpoints: If a load balance controller is used, select External. If there is no load balance controller configured, the load balancer must be configured to point at a K8s or OpenShift service, then select None as the networking setting in configuration. For any questions or other conditions not listed, contact the Wallaroo support representative.
From the Wallaroo Dashboard, select Config and set the following:
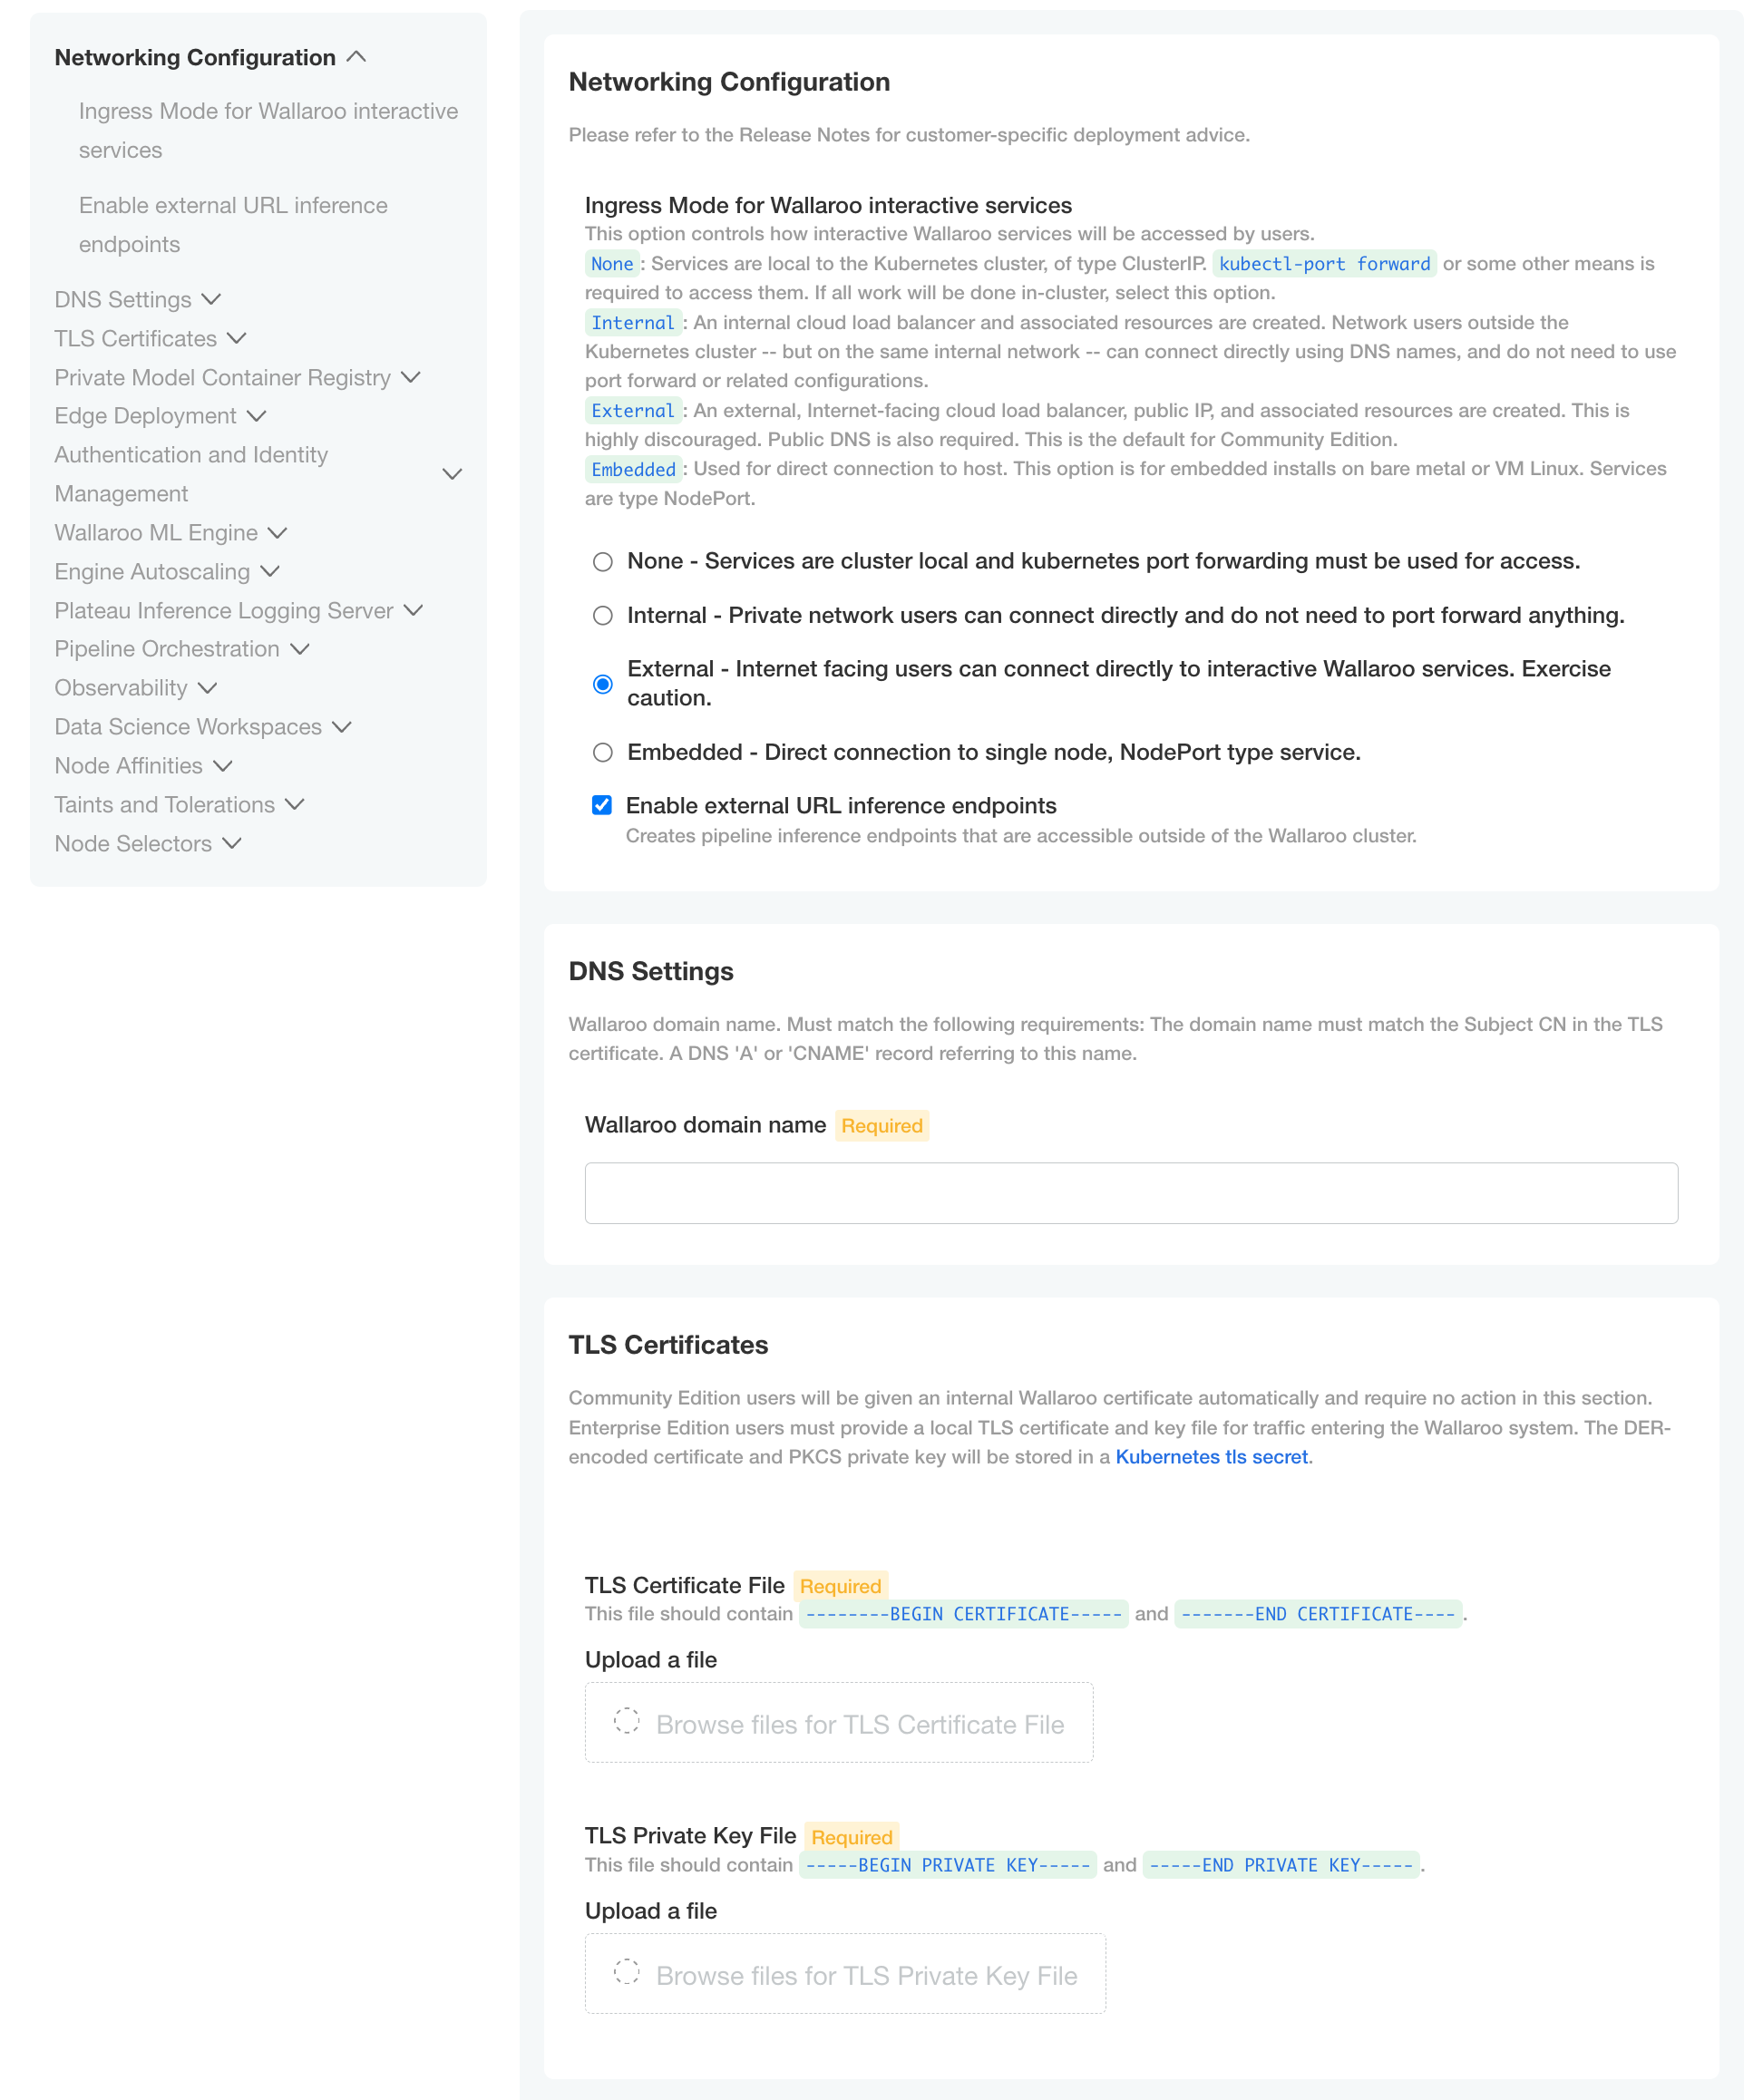
DNS Settings
- Wallaroo domain name (Required): The domain for the Wallaroo instance.
TLS Certificates
- Use custom TLS Certs: Checked
- TLS Certificate: Enter your TLS Certificate (.crt file).
- TLS Private Key: Enter your TLS private key (.key file).
Once complete, scroll to the bottom of the Config page and select Deploy.
At this point, continue to Required Installation Configurations for the required configuration settings.
Edge Deployment Configuration
The following optional configurations to enable OCI Registry integration with Wallaroo for deploying models in edge and multi-cloud environments through Wallaroo. For more details, see Inference Anywhere.
To set the Edge Registry Settings through the Kots Administrative Dashboard:
Launch the Kots Administrative Dashboard using the following command, replacing the
--namespaceparameter with the Kubernetes namespace for the Wallaroo instance:kubectl kots admin-console --namespace wallarooOpen a browser at the URL detailed in the step above and authenticate using the console password set as described in the as detailed in the Wallaroo Install Guides.
From the top menu, select Config then scroll to Edge Deployment.
Enable Provide OCI registry credentials for pipelines.
Enter the following:
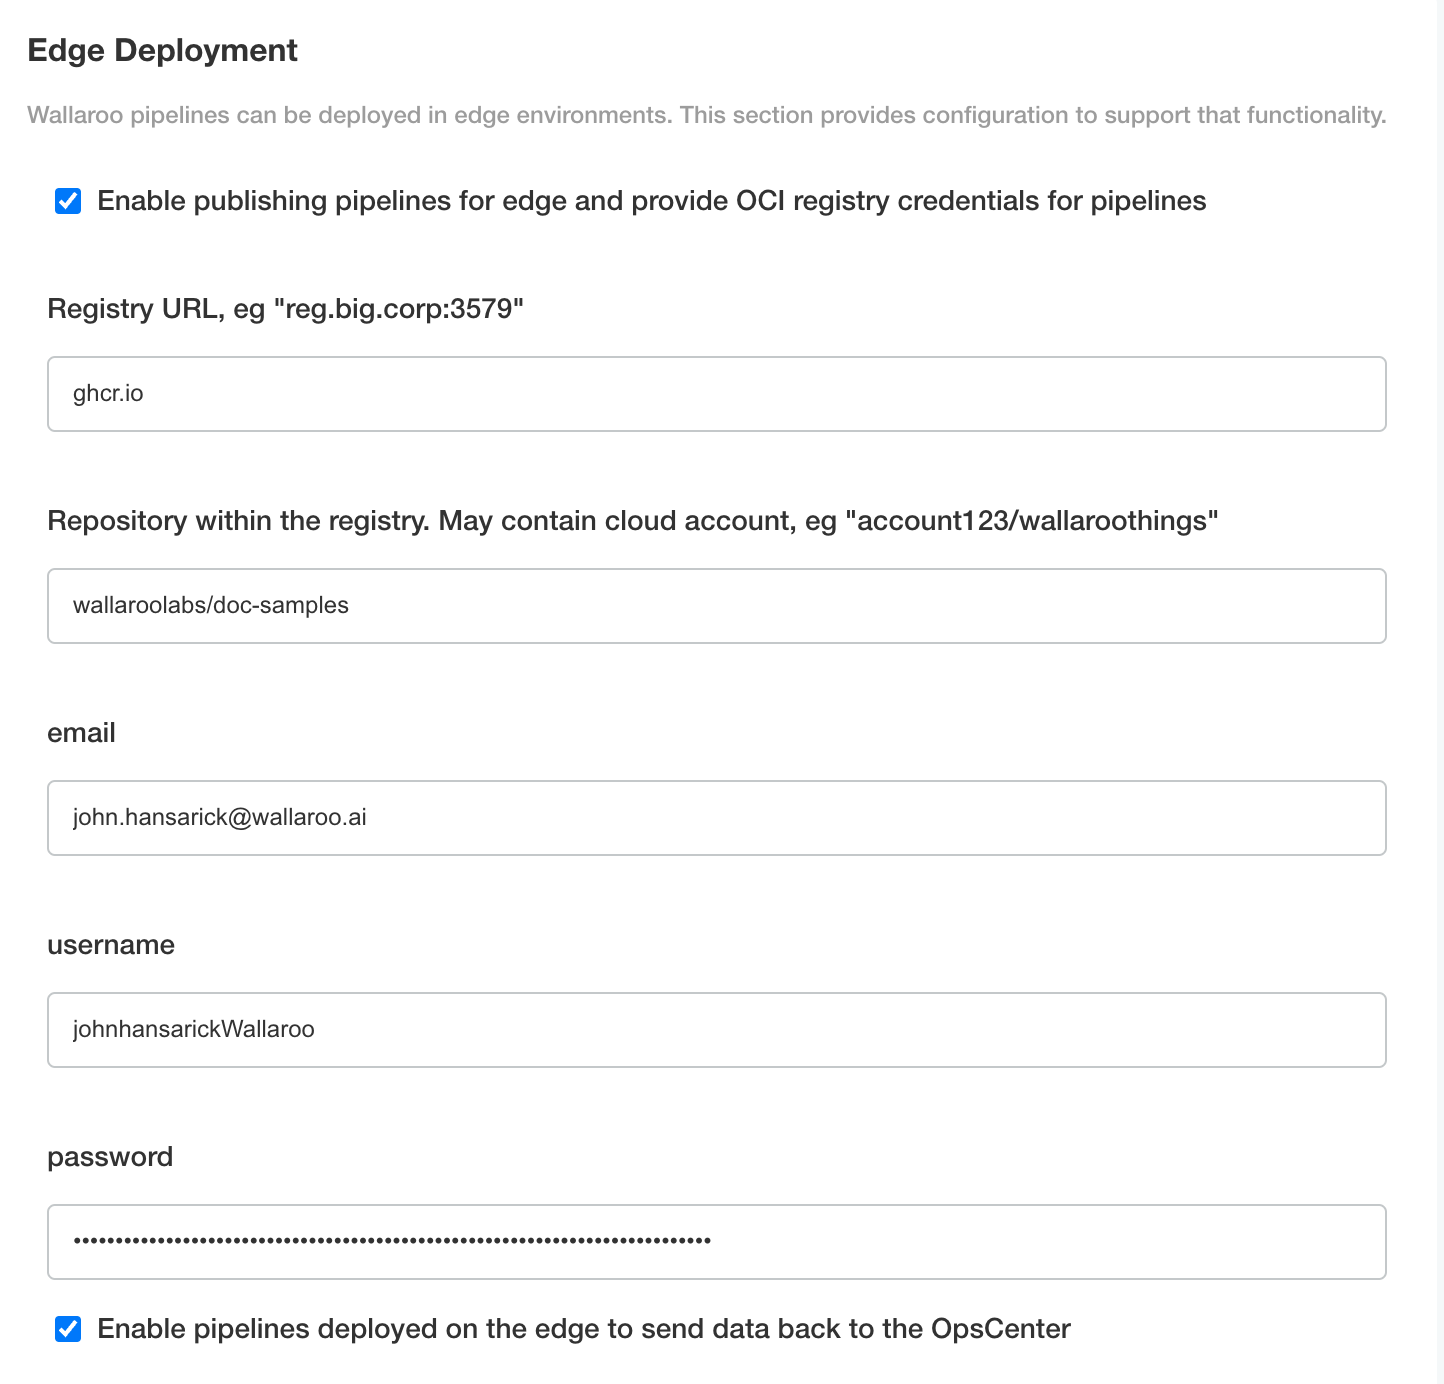
- Registry URL: The address of the registry service. For example:
us-west1-docker.pkg.dev. - email: The email address of the user account used to authenticate to the service.
- username: The account used to authenticate to the registry service.
- password: The password or token used to authenticate to the registry service.
- To enable edge observability, enable Enable pipelines deployed on the edge to send data back to the OpsCenter.
- Registry URL: The address of the registry service. For example:
Save the updated configuration, then deploy it. Once complete, the edge registry settings will be available.
Set Assay Version
To enable Wallaroo assays via kots:
From the Config page, scroll to Config -> Observability -> Enable Assays.
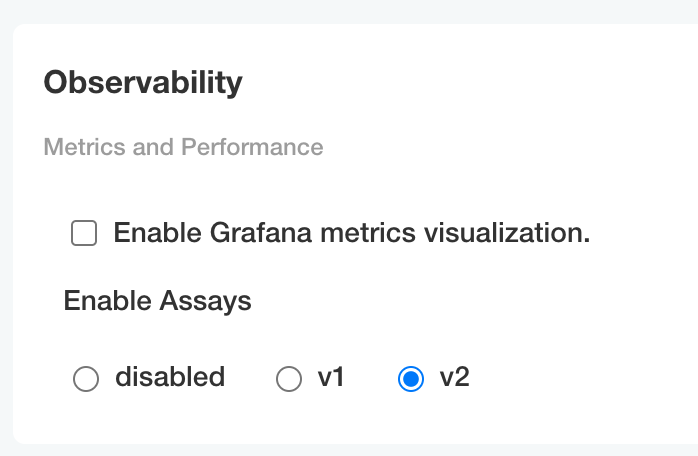
Select from one of the following options:
- Disable: Disable assays.
- v1: Enable Wallaroo Assays V1.
- v2: Enable Wallaroo Assays V2 (Default).
Complete the deployment as needed.
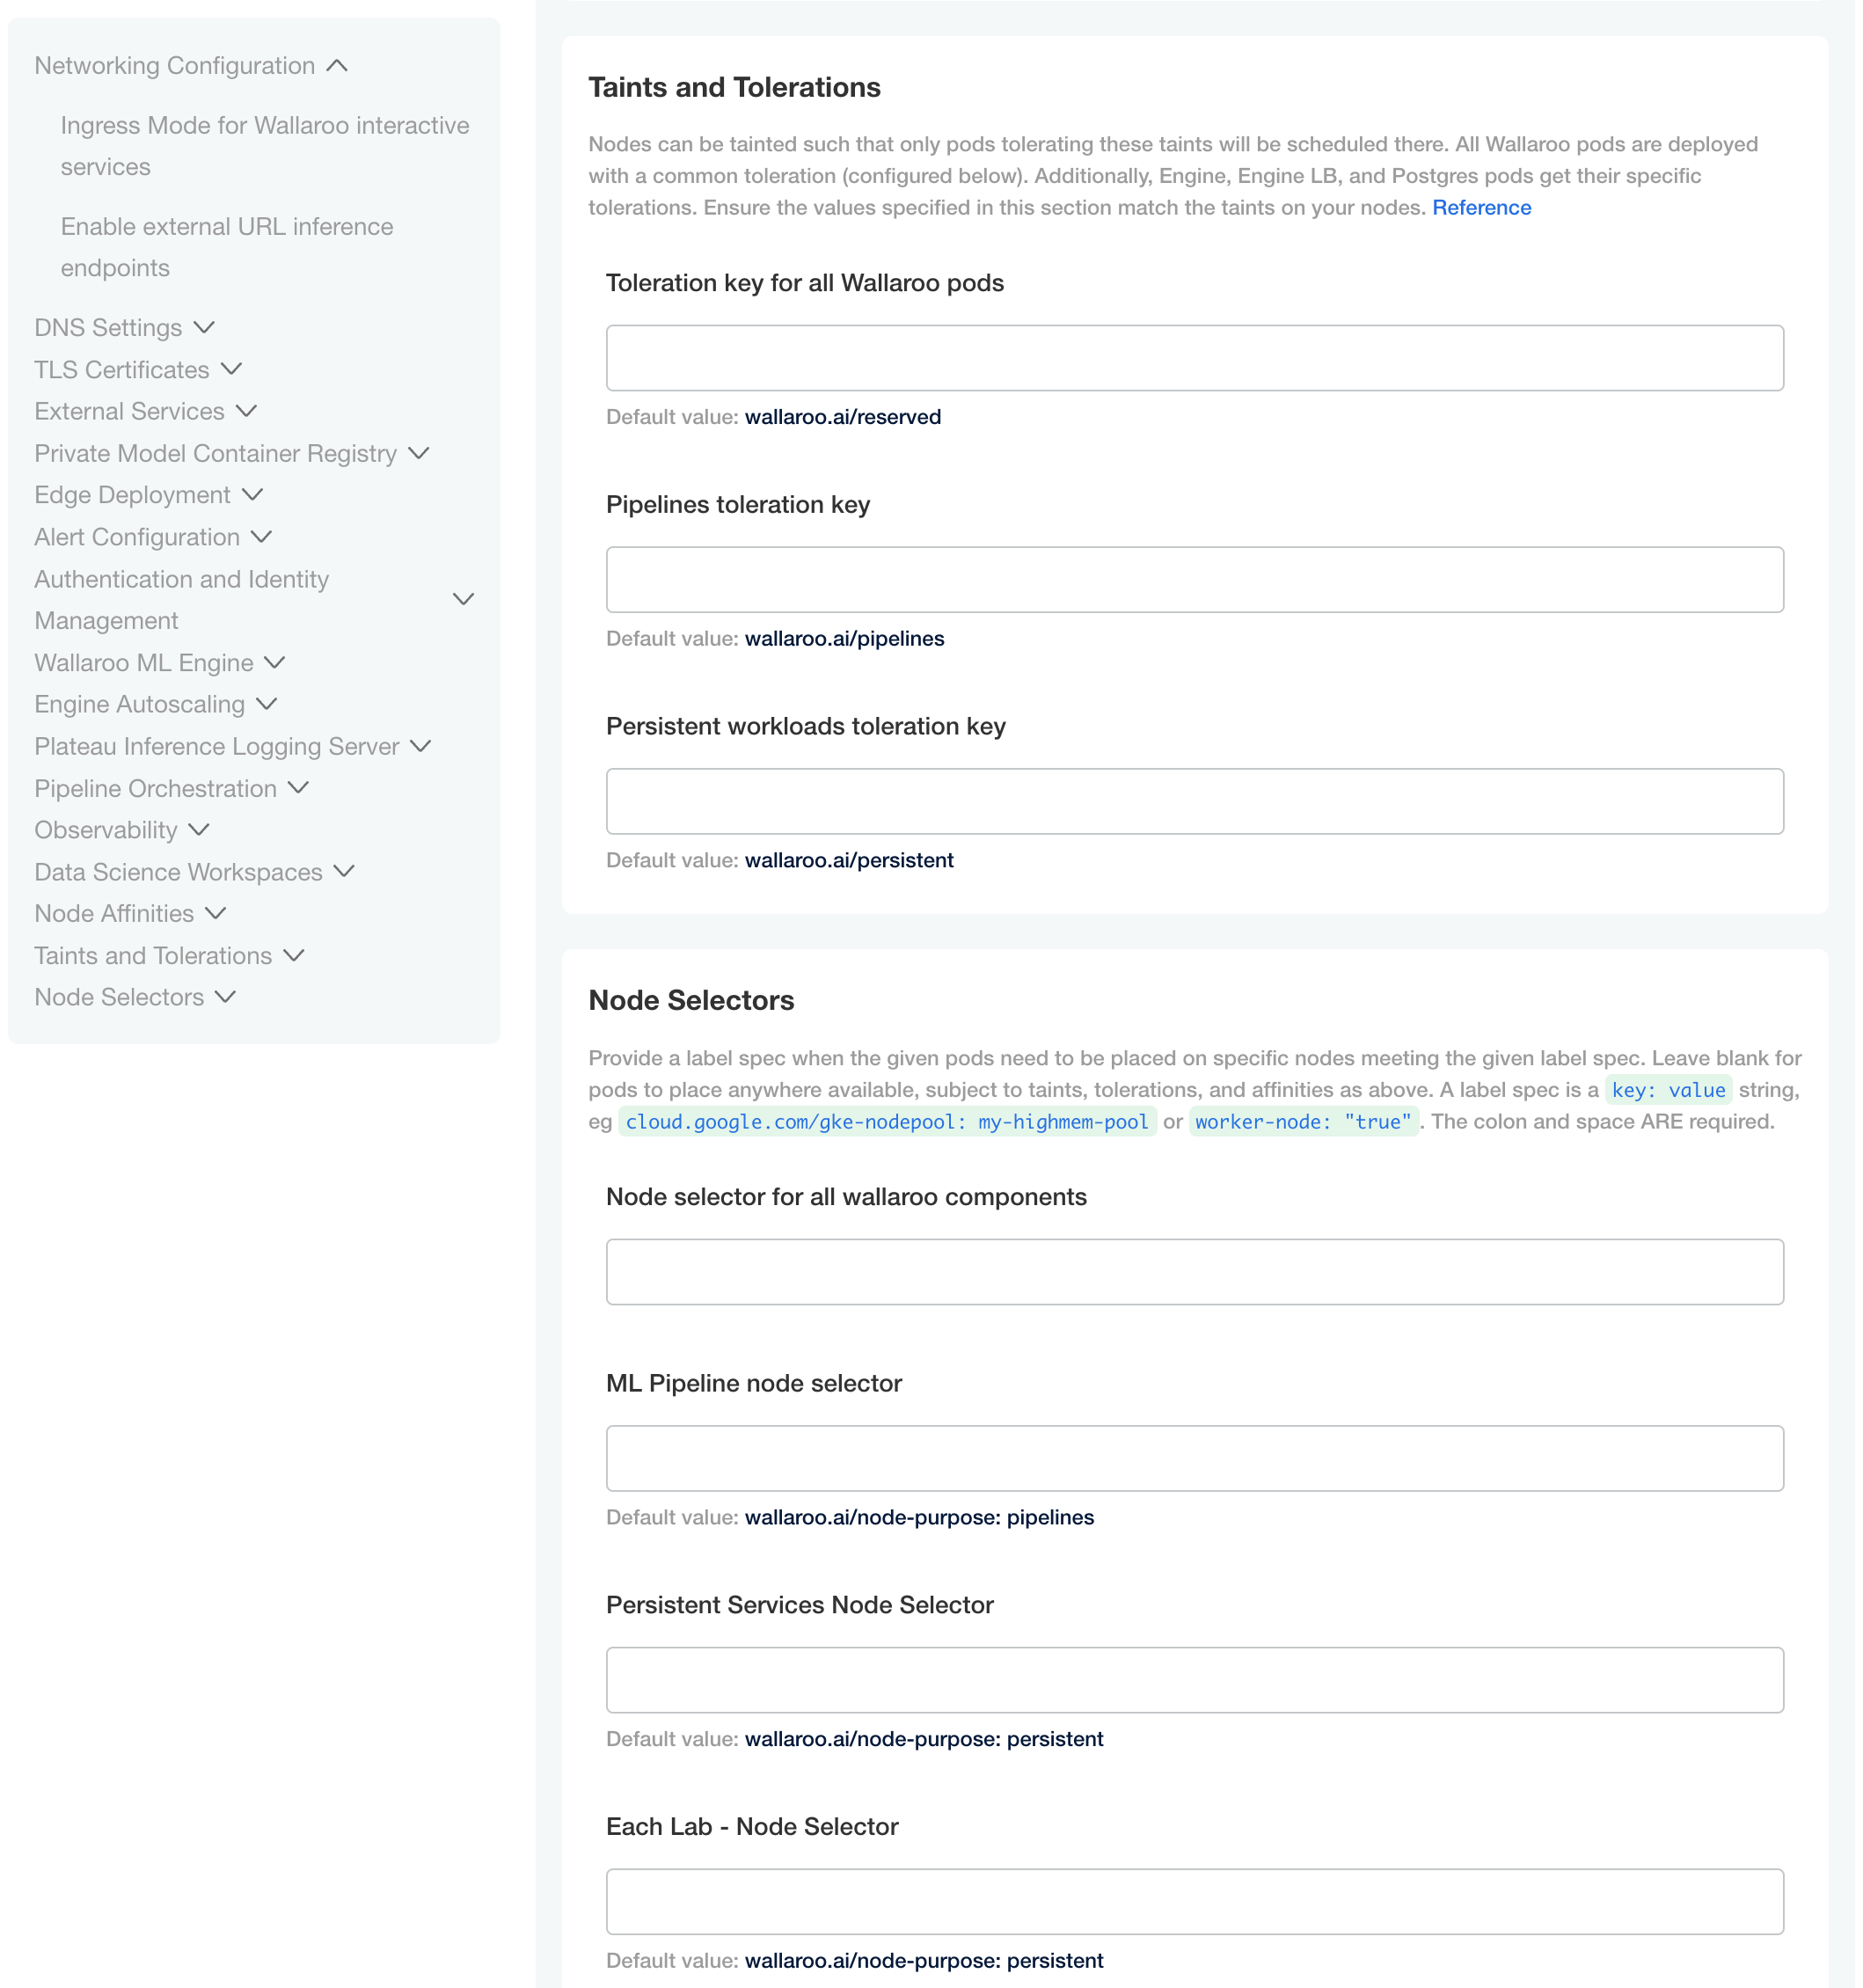
Custom Tolerations and Node Selectors Configuration
By default, the following taints and labels are applied to nodepools used for Wallaroo installations.
Nodepools created in Wallaroo require the following taints and labels.
These taints and labels are applied if using the the scripts provided in this guide.
For custom taints and labels, see the Custom Taints and Labels Guide.
| Nodepool | Taints | Labels | Description |
|---|---|---|---|
| general | N/A | wallaroo.ai/node-purpose: general | For general Wallaroo services. No taints are applied to this nodepool to allow any process not assigned with a deployment label to run in this space. |
| persistent | wallaroo.ai/persistent=true:NoSchedule | wallaroo.ai/node-purpose: persistent | For Wallaroo services with a persistentVolume settings, including JupyterHub, Minio, etc. |
| pipelines-x86 | wallaroo.ai/pipelines=true:NoSchedule | wallaroo.ai/node-purpose: pipelines | For deploying pipelines for default x86 architectures. The taints and label must be applied to any nodepool used for model deployments. |
For organizations that use custom Kubernetes taints and labels for their nodepools, the tolerations and node selectors for Wallaroo services will have to be modified to match. For full details, see the Custom Taints and Labels Guide.
To modify the tolerations and node selector labels to match the taints and labels set for the nodepools:
- From the Kots Administrative Dashboard, select Config.
- Update each of the following as needed:
Node Affinities:
Node affinity type key: Verify that the node affinity key matches the label for the nodepools.
Engine affinity value: Set the engine affinity - the affinity used for pipeline deployment - to match the label.
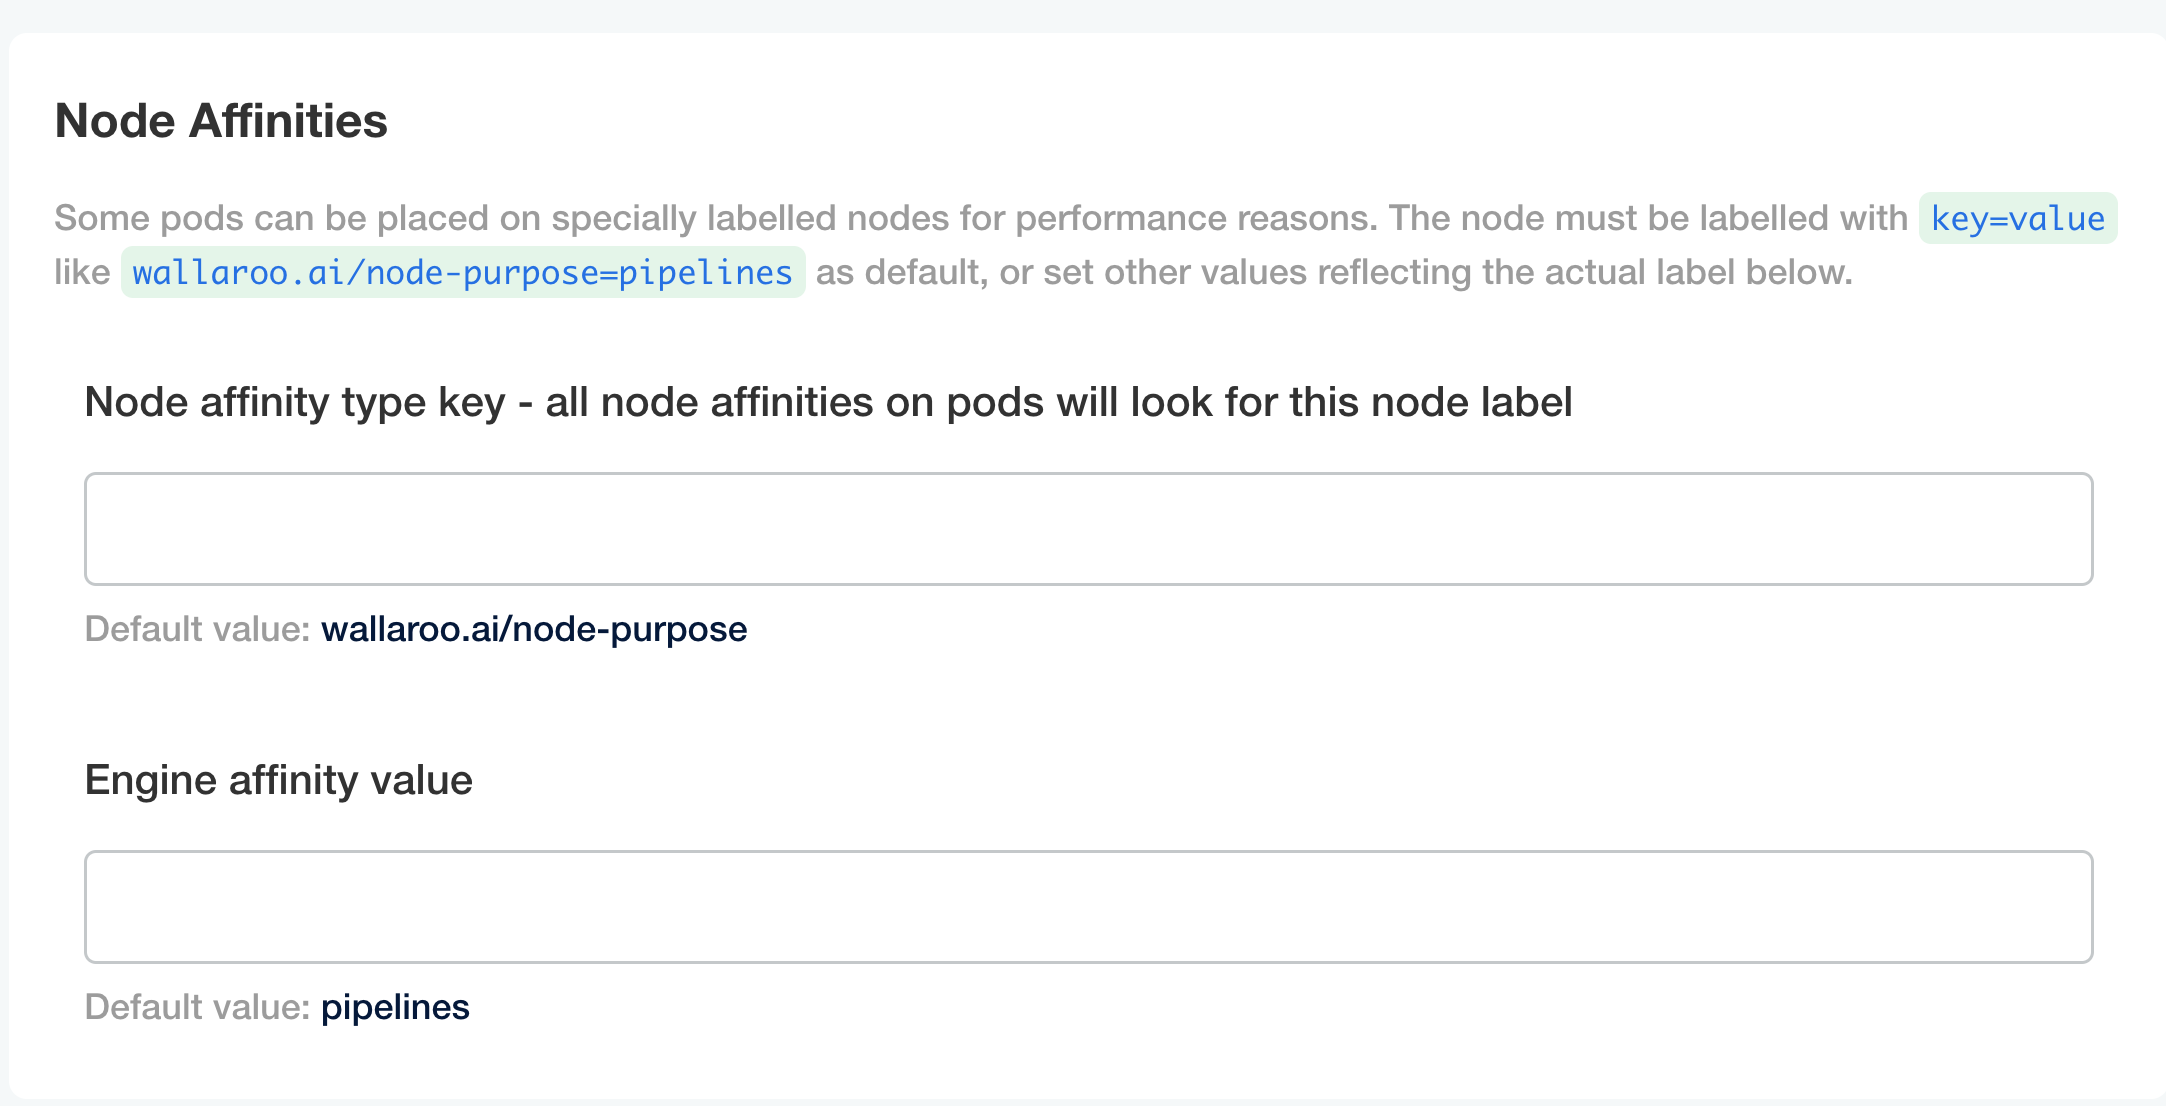
Taints and Tolerations. Set the custom tolerations to match the taints applied to the nodepools, and the node selectors to match the labels used for the nodepools.
Node Selectors: Update the node selector to match the custom nodepools labels for each service.
Private Python Repository via Kots
Administrators can configure Wallaroo with a Python private package repository (for example, Nexus, Github) into Wallaroo from within the same local network. This is useful for providing access to custom Python libraries for:
To enable Python private model registries via kots, enable the following settings:
From the Kots Administrative Dashboard, select Config.
From the section Private PyPi Repository, set the following:
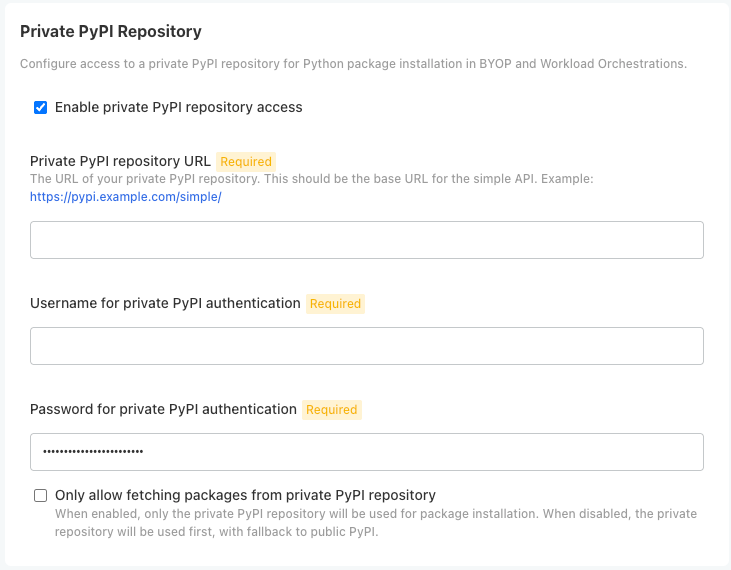
- Enable private PyPi repository access: Enables the private Python repository. If not enabled, the following settings are ignored.
- Private PyPI repository URL: The URL for the private repository in the format
https://{HOST_NAME}. - Username for private PyPI authentication: Sets the username authentication credential to the private repository.
- Password for private PyPI authentication: Sets the password authentication credential to the private repository.
- Only allow fetching packages from private PiPI repository: If enabled, only uses the defined private PyPi repository; any public PyPI links are ignored.
Optional: Load NVIDIA GPU Drivers
For organizations that use NVIDIA CUDA gpus for AI acceleration, install the images using the following commands.
- Verify the drivers are installed via the
kubectl describe nodecommand, and verify the labelnvidia.com/gpuis in the Allocatable section. If it is, then no further steps are required. - If the label is not present, install the NVIDIA drivers via the following steps.
Load the Nvidia image into the registry.
bash load-images \
  --wallaroo-version $VERSION \
  --wallaroo-license $WALLAROO_LICENSE \
  --wallaroo-username $WALLAROO_LICENSE_USERNAME \
  --registry-host $REGISTRY_HOST \
  --registry-namespace $REGISTRY_NAMESPACE \
  --load-image nvcr.io/nvidia/k8s-device-plugin:v0.17.0
Install the Nvidia driver into the kube-system namespace.
bash install-nvidia-driver.bash \
   --registry-host $REGISTRY_HOST \
   --registry-namespace $REGISTRY_NAMESPACE
Verify by running the
kubectlcommand below. If successful, the gpu should displayallocatable: 1after execution.kubectl describe pod
Required Installation Configurations
Once installed, the following actions are required to complete the setup process process.
Setup Users
User management is managed through the Wallaroo Dashboard, via the Platform Admin Dashboard page. See the Wallaroo User Management for full guides on setting up users, identity providers, and other user configuration options.
The following is an abbreviated guide on setting up new Wallaroo users.
IMPORTANT NOTE
At least one user must be created before using Wallaroo.The process includes the following steps:
- Obtain the User Admin Credentials
- Create a New User with the Admin Role
Obtain the User Admin Credentials
Obtaining the admin User Credentials
The standard Wallaroo installation creates the user admin by default and assigns them a randomly generated password. The admin user credentials are obtained which may be obtained directly from Kubernetes with the following commands, assuming the Wallaroo instance namespace is wallaroo.
Retrieve Admin Username
kubectl -n wallaroo \
get secret keycloak-admin-secret \
-o go-template='{{.data.KEYCLOAK_ADMIN_USER | base64decode }}'
Retrieve Admin Password
kubectl -n wallaroo \
get secret keycloak-admin-secret \
-o go-template='{{.data.KEYCLOAK_ADMIN_PASSWORD | base64decode }}'
Create a New User with the Admin Role
Creating users is managed through the Platform Admin Dashboard. The following steps are used to create an initial user with the role admin.
- Access the Wallaroo Dashboard through the DNS name set up in the DNS Services Integration step. For example, if the DNS name of the Wallaroo Ops center is
wallaroo.example.com, the Wallaroo Dashboard is available athttps://wallaroo.example.com. - Login with the username
adminand the password retrieved in the step Obtaining the admin User Credentials. - Select Create Users and enter the following:
- User Email: The email address for the user. This must be in the valid email address format.
- Assign Type: Select Admin.
- Password: Enter the user’s password. This user password be sent to the new user.
- Temporary or Permanent:
- Temporary: The user will be forced to change their login password upon their next login (Recommended).
- Permanent: The user will keep their password.
- Create any additional users as needed. When finished, select the Wallaroo icon drop down and select Logout.
At this point, users can log in to Wallaroo Dashboard with their provided identities. For guides on setting up Single Sign-On (SSO) and other features, see Wallaroo User Management for full guides on setting up users, identity providers, and other user configuration options.
Retrieve IP Address for Air-Gapped Installations
For air-gapped installations of Wallaroo, the IP address associated with the Kubernetes service api-lb-ext. As part of the air-gapped environment, the api-lb-ext IP address is not available on the public internet - just available to the air-gapped environment. This is retrieved through the following command:
kubectl get svc api-lb-ext -n wallaroo -o jsonpath='{.status.loadBalancer.ingress[0].ip}'
34.83.140.98
Uninstall
To uninstall Wallaroo from an air-gapped environment, see How to Uninstall Wallaroo from a Cluster.