The following shows Wallaroo users in adding other participants to their Wallaroo environment. Some user management tasks are allocated to the Workspace Management, such as adding or removing users from a specific workspace.
This guide is split into two segments: Wallaroo Community Edition and Wallaroo Enterprise Edition. The critical differences in user management between the Wallaroo Community and Wallaroo Enterprise edition are:
Wallaroo Community allows up to 5 users to be active in a single Wallaroo instance, while Enterprise has no such restrictions.
Wallaroo Community users are administrated locally while Wallaroo Enterprise allows for other administrative services including GitHub, Google Cloud Platform, and other services.
1 - Wallaroo Community User Management
How to manage new and existing users in your Wallaroo Community environment.
Wallaroo Community User Management
How to Invite a User to a Wallaroo Instance
Note: Up to two users can work together in the same Wallaroo Community instance, while the Wallaroo Enterprise version has no user restrictions.
To invite another user to your Wallaroo instance:
Login to your Wallaroo instance.
Select Invite Users from the upper right hand corner of the Wallaroo Dashboard.
Under the Invite Users module, enter the email address for each user to invite.
When finished, select Send Invitations.
Each user will be sent a link to login to your Wallaroo instance. See the General Guide for more information on the initial login process.
2 - Wallaroo Enterprise User Management
How to manage new and existing users in your Wallaroo Enterprise environment.
Wallaroo Enterprise User Management
Wallaroo uses Keycloak for user authentication, authorization, and management. Enterprise customers can manage their users in Keycloak through its web-based UI, or programmatically through Keycloak’s REST API.
In enterprise deployments customers store their Wallaroo user accounts either directly in Keycloak or utilize its User Federation feature. Integration with external/public Identity Providers (such as popular social networks) is not expected at this time.
The Keycloak instance deployed in the wallaroo Kubernetes namespace comes pre-configured with a single administrator user in the Master realm. All users must be managed within that realm.
Accessing The Wallaroo Keycloak Dashboard
Enterprise customers may access their Wallaroo Keycloak dashboard by navigating to https://<prefix>.keycloak.<suffix>, depending on their choice domain prefix and suffix supplied during installation.
Obtaining Administrator Credentials
The standard Wallaroo installation creates the user admin by default and assigns them a randomly generated password. The admin user credentials are obtained which may be obtained directly from Kubernetes with the following commands, assuming the Wallaroo instance namespace is wallaroo.
In the Keycloak Administration Console, click Manage -> Users in the left-hand side menu. Click the View all users button to see existing users.
Adding Users
To add a user through the Keycloak interface:
Click the Add user button in the top-right corner.
Enter the following:
A unique username and email address.
Ensure that the Email Verified checkbox is checked - Wallaroo does not perform email verification.
Under Required User Actions, set Update Password so the user will update their password the next time they log in.
Click Save.
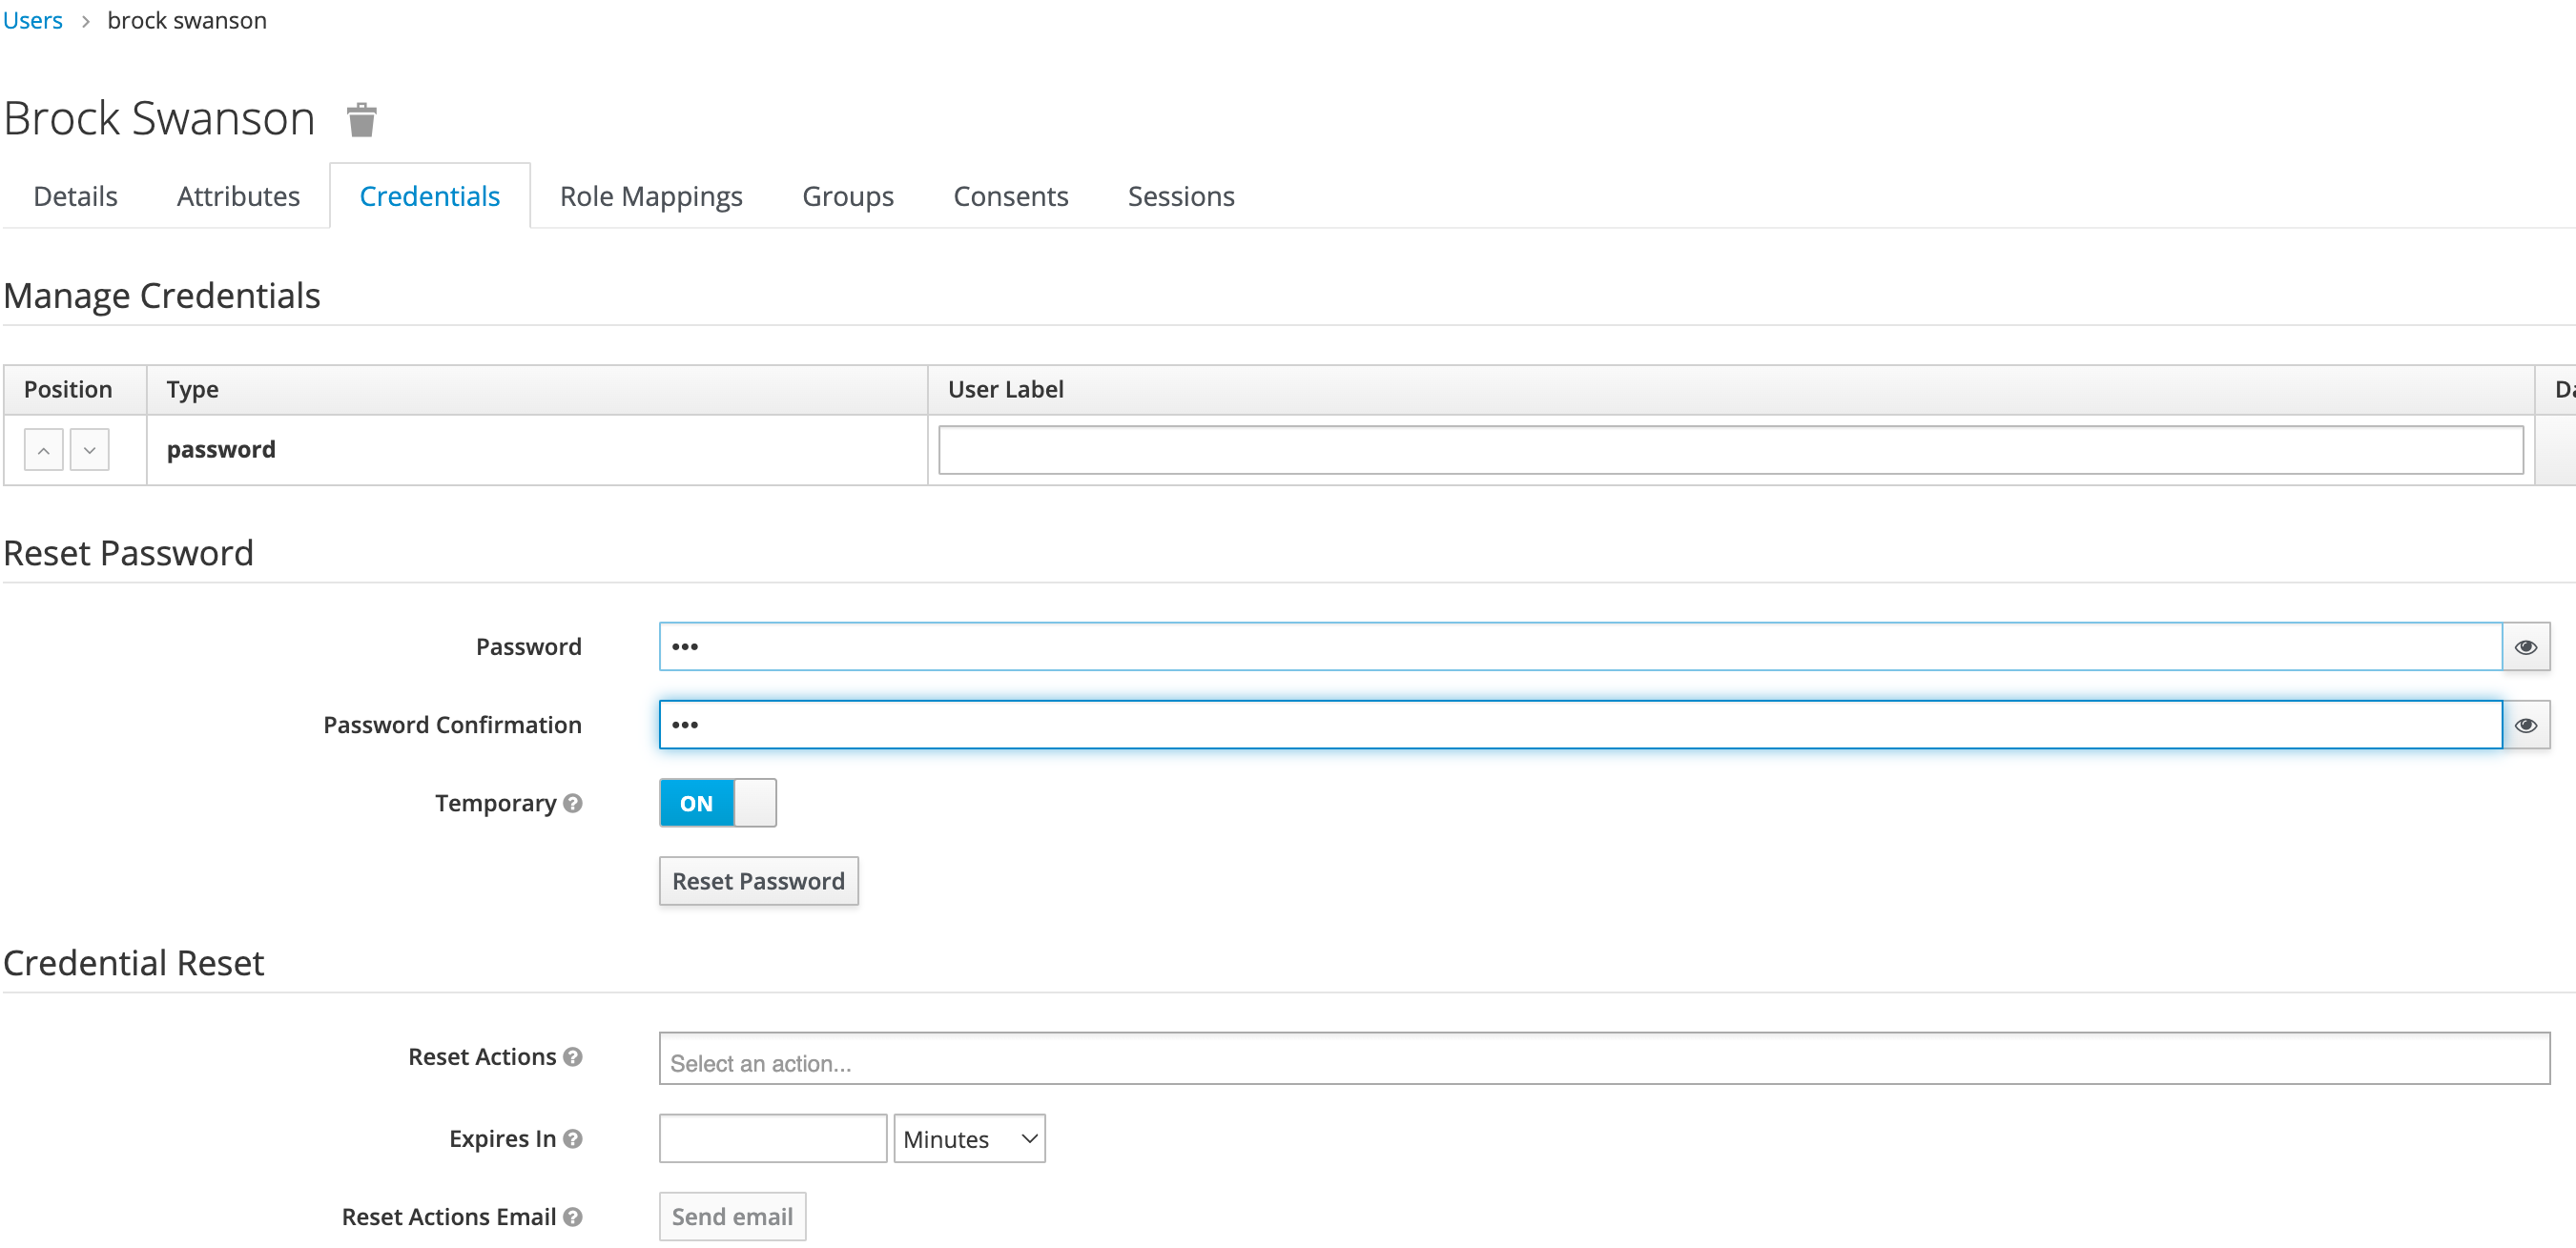
Once saved, select Credentials tab, then the Set Password section, enter the new user’s desired initial password in the Password and Password Confirmation fields.
Click Set Password. Confirm the action when prompted. This will force the user to set their own password when they log in to Wallaroo.
Log out of Keycloak as the Admin user before resuming other Wallaroo actions.
Wallaroo simplifies this task with a small Python script, which can be utilized in a Jupyter notebook running in the wallaroo namespace through the following process:
Create a new Python file: In your JupyterHub workspace, create a new Python file named keycloak.py and populate it with the following:
Obtain an authentication token: Before invoking any methods, you must obtain a fresh authentication token by calling get_token() method. This will obtain a new token, which is valid for 60 seconds, and cache it in the client.
kc.get_token()
Listing existing users
To list existing users, use the Keycloak list_users method:
resp=kc.list_users()
resp.json()
Creating new users
To create a new user, use the Keycloak create_user() and supply their unique username, password, as well as a unique email address:
If successful, the return value will be the new user’s unique identifier generated by Keycloak.
3 - Wallaroo Enterprise User Management Troubleshooting
How to manage correct common user issues.
When a new user logs in for the first time, they get an error when uploading a model or issues when they attempt to log in. How do I correct that?
When a new registered user attempts to upload a model, they may see the following error:
TransportQueryError:
{'extensions':
    {'path':
        '$.selectionSet.insert_workspace_one.args.object[0]', 'code': 'not-supported'
    },
    'message':
        'cannot proceed to insert array relations since insert to table "workspace" affects zero rows'
Or if they log into the Wallaroo Dashboard, they may see a Page not found error.
This is caused when a user has been registered without an appropriate email address. See the user guides here on inviting a user, or the Wallaroo Enterprise User Management on how to log into the Keycloak service and update users. Verify that the username and email address are both the same, and they are valid confirmed email addresses for the user.
4 - Wallaroo Authentication Configuration Guides
Enable SSO authentication to Wallaroo.
Wallaroo supports Single Sign-On (SSO) authentication through multiple providers. The following guides demonstrate how to enable SSO for different services.
4.1 - Wallaroo SSO for Amazon Web Services
Enable SSO authentication to Wallaroo from AWS
Organizations can use Amazon Web Services (AWS) as an identity provider for single sign-on (SSO) logins for users with Wallaroo Enterprise.
IMPORTANT NOTE
These instructions are for Wallaroo Enterprise edition only.
To enable AWS as an authentication provider to a Wallaroo instance:
Using AWS as a single sign-on identity provider within Wallaroo requires access to the Wallaroo instance’s Keycloak service. This process will require both the IAM Identity Center and Wallaroo Keycloak service be available at the same time to copy information between the two. When starting this process, do not close the Wallaroo Keycloak browser window or the AWS IAM Identity Center without completing all of the steps until Verify the Login.
From the Wallaroo instance, login to the Keycloak service. This will commonly be $PREFIX.keycloak.$SUFFIX. For example, playful-wombat-5555.keycloak.wallaroo.example.
Select Administration Console.
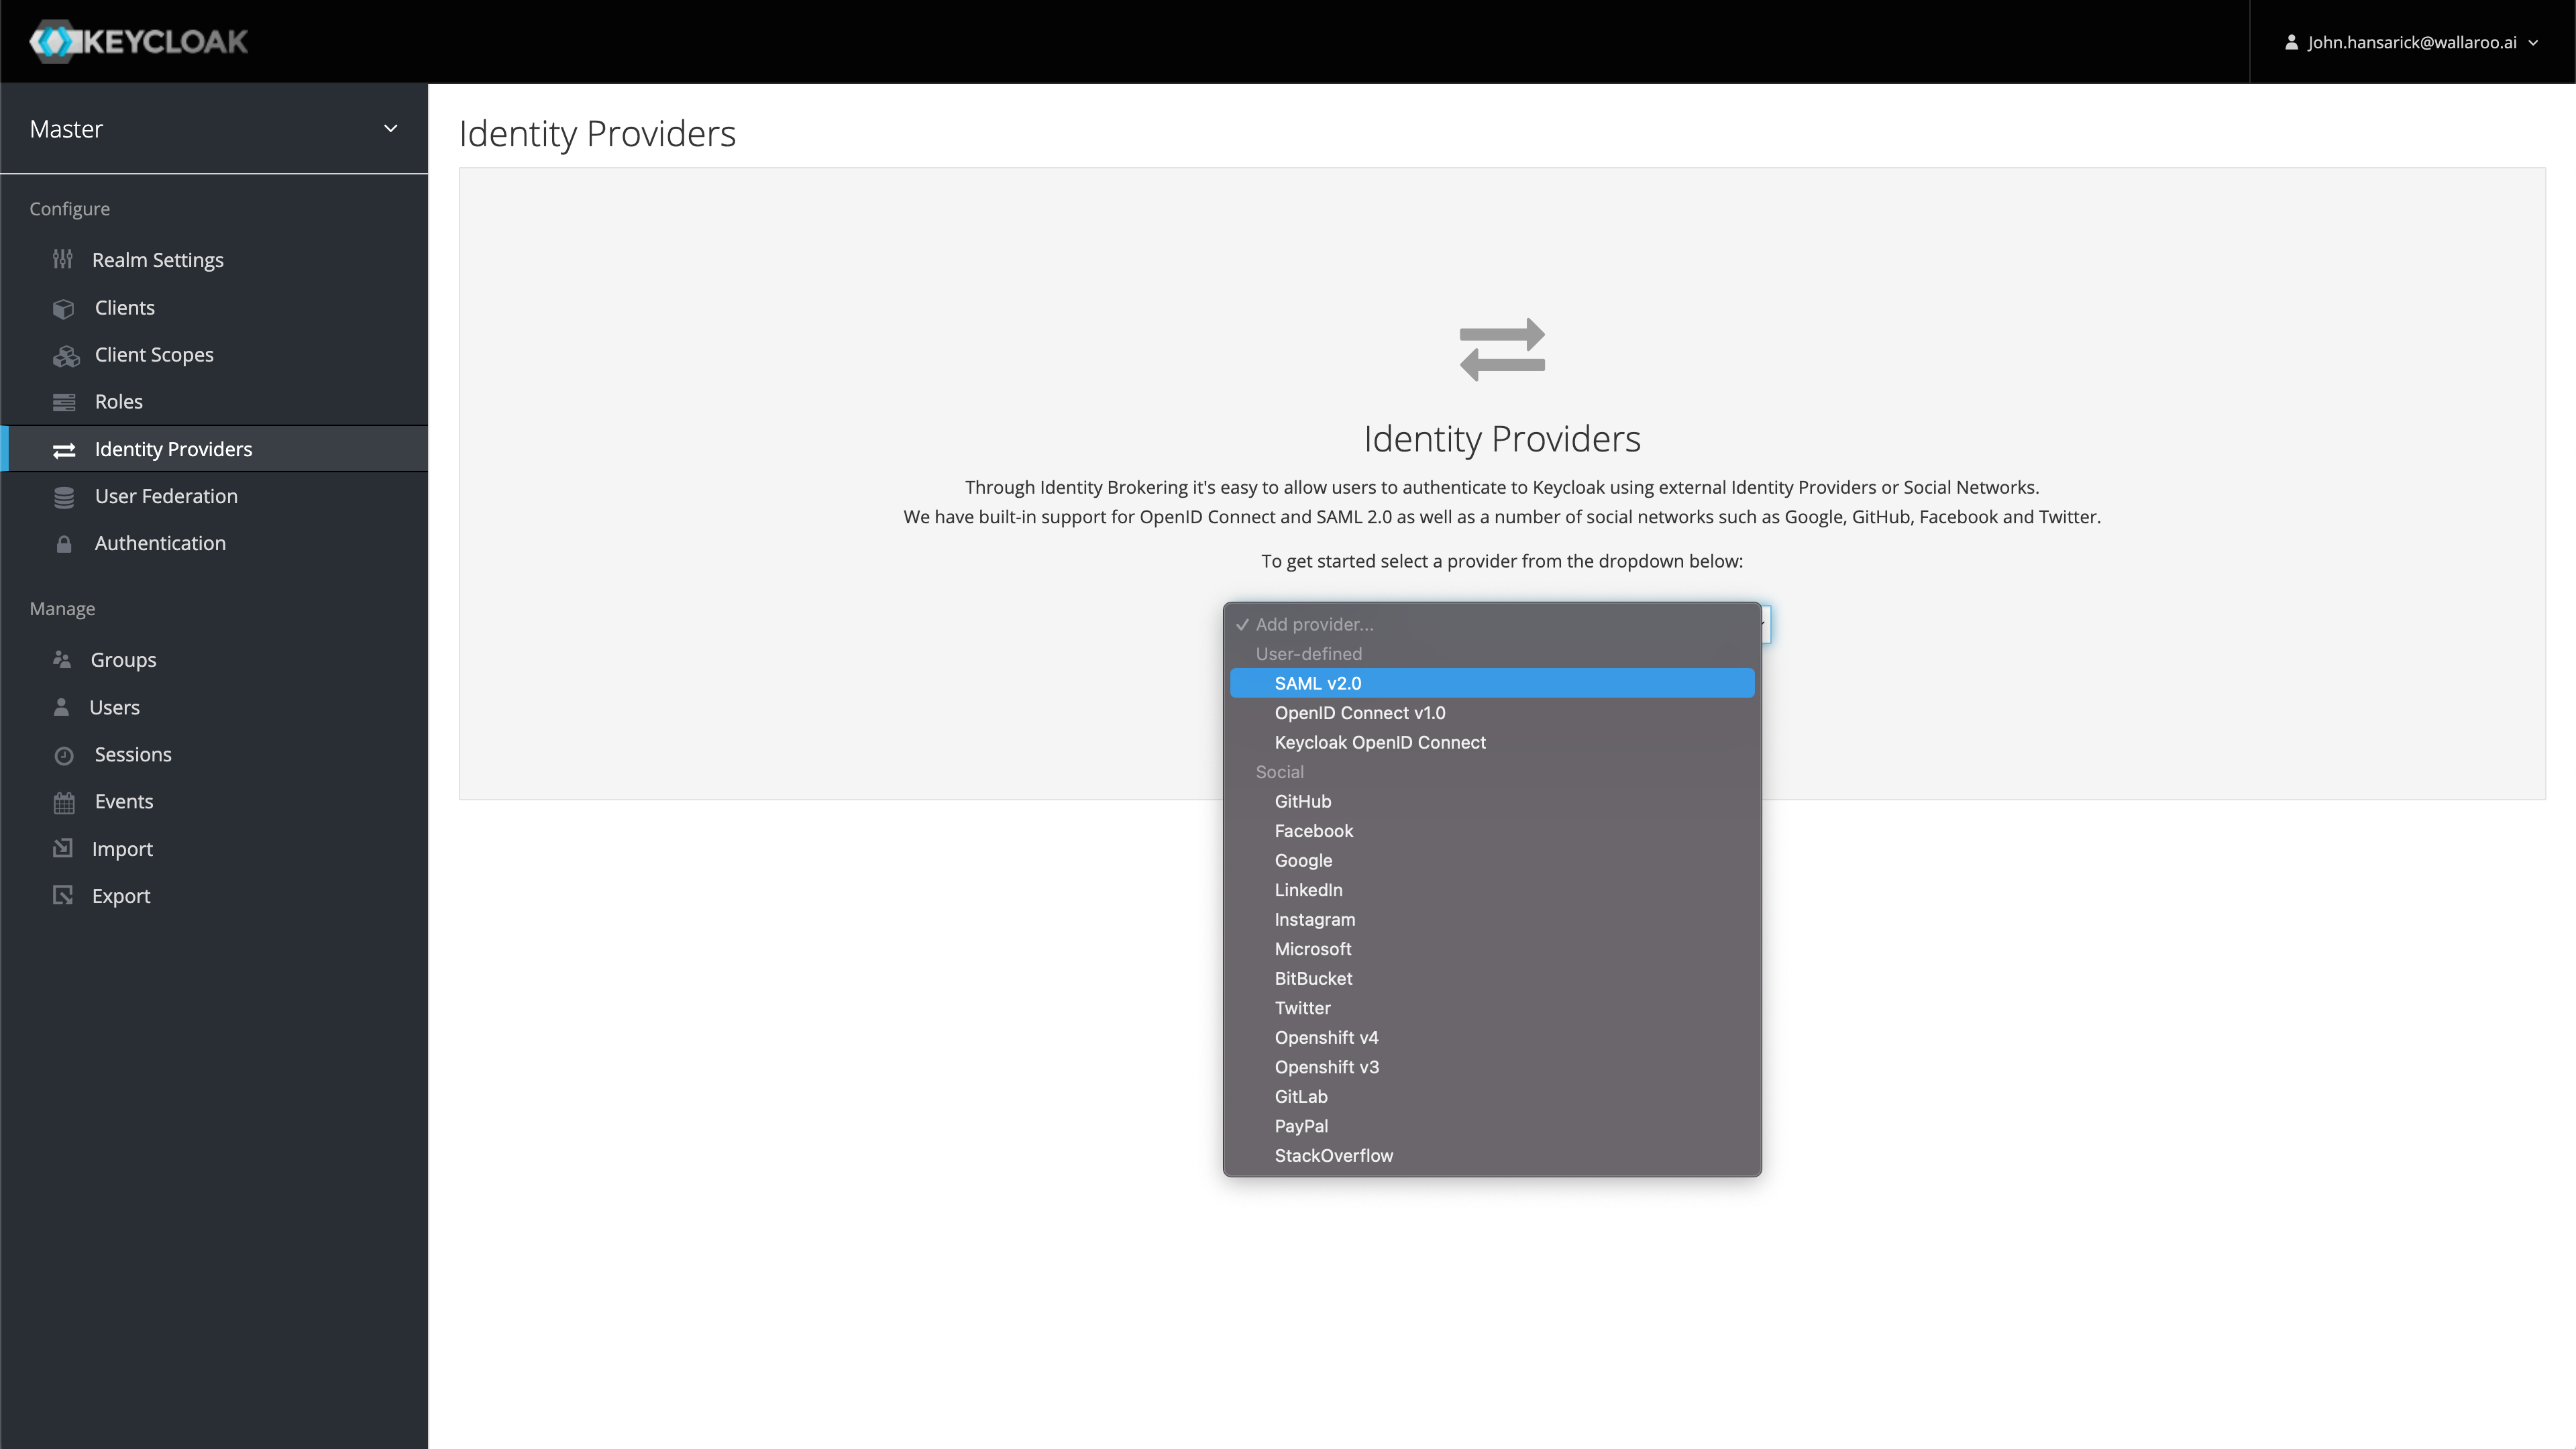
From the left navigation panel, select Identity Providers.
Select Add provider and select SAML v2.0.
Enter the following:
Alias ID: This will be the internal ID of the identity provider. It also sets the Redirect URI used in later steps.
Display Name: The name displayed for users to use in authenticating.
Save the following information:
Redirect URI: This is determined by the Wallaroo DNS Prefix, Wallaroo DNS Suffix, and the Alias ID in the format $PREFIX.keycloak.$SUFFIX/auth/realms/master/broker/$ALIASID/endpoint. For example, playful-wombat-5555.keycloak.wallaroo.example/auth/realms/master/broker/aws/endpoint.
Service Provider Entry ID: This is in the format $PREFIX.keycloak.$SUFFIX/auth/realms/master. For example: playful-wombat-5555.keycloak.wallaroo.example/auth/realms/master.
Create the AWS Credentials
The next step is creating the AWS credentials, and requires access to the organization’s Amazon IAM Identity Center.
From the AWS console, select the IAM Identity Center.
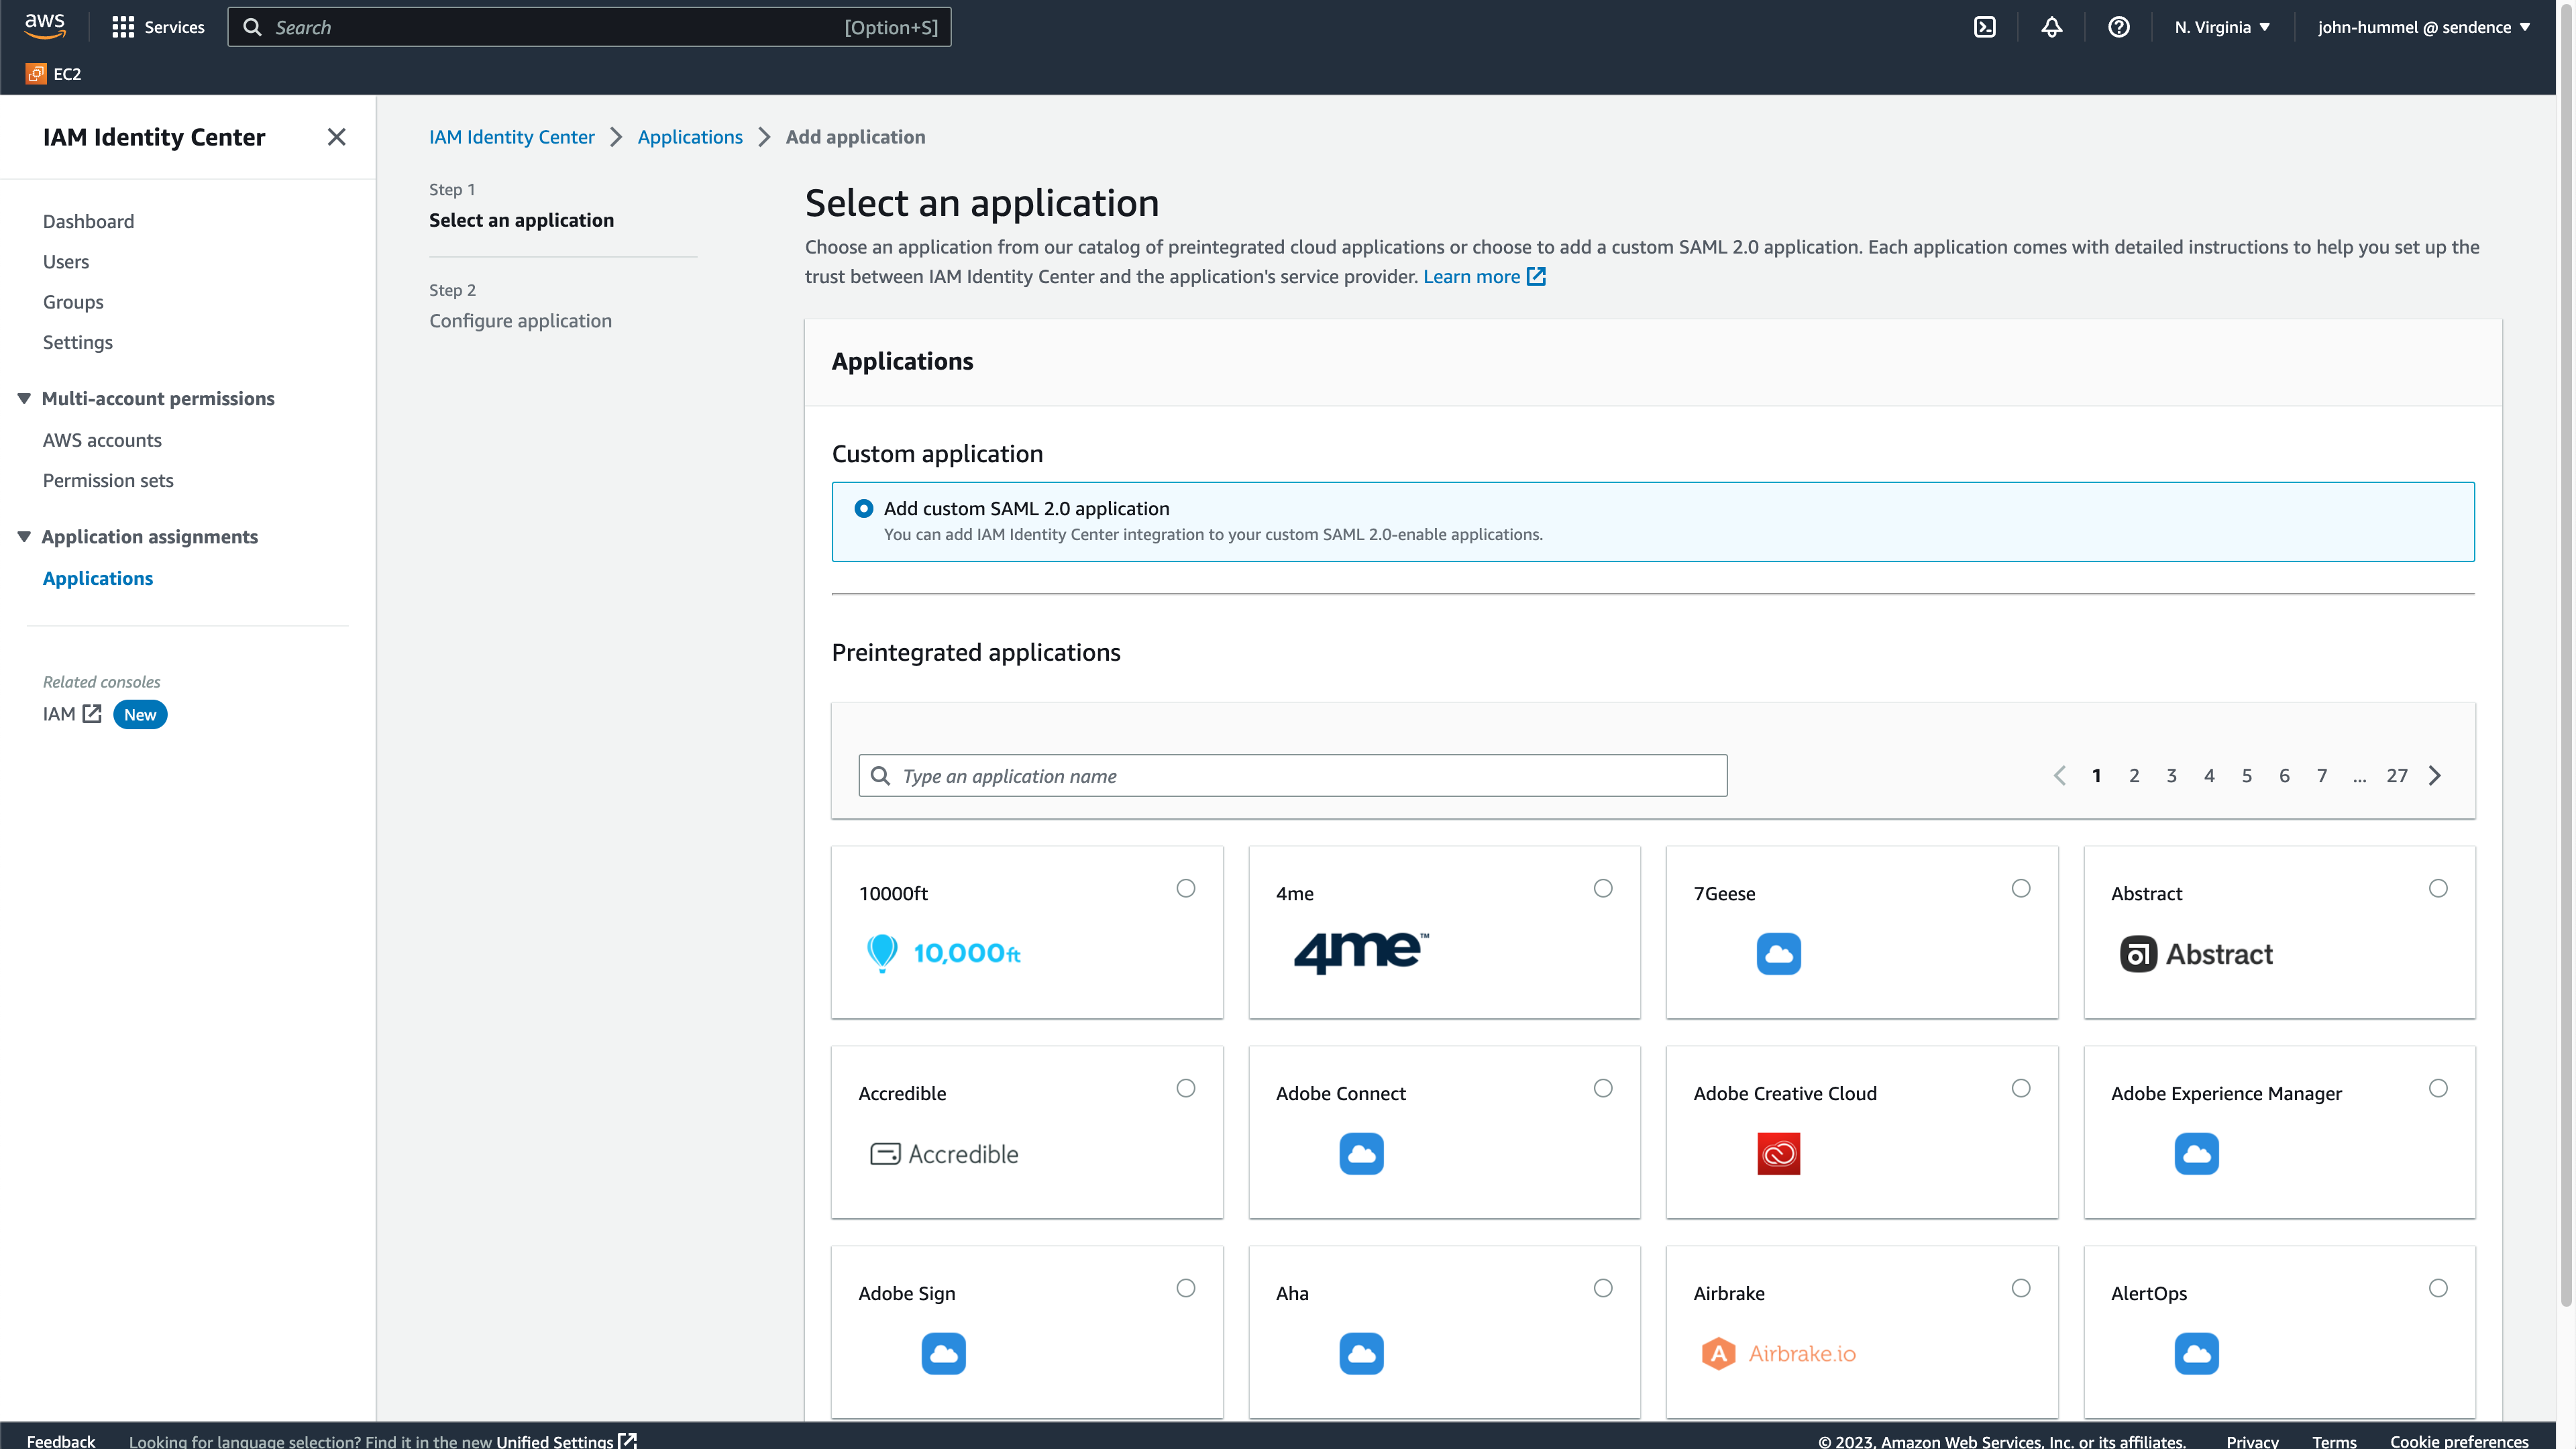
From the IAM Identity Center Dashboard, select Applications then Add application.
Select Custom application->Add custom SAML 2.0 application, then select Next.
Enter the following:
Display name: AWS or something similar depending on your organization’s requirements.
Application metadata:
Application ACS URL: Enter the Redirect URI from [Create the Wallaroo AWS SAML Identity Provider].(#create-the-wallaroo-aws-saml-identity-provider).
Application SAML audience: Enter the Service Provider Entry ID from [Create the Wallaroo AWS SAML Identity Provider].
Select the IAM Identity Center SAML metadata file and copy the URL. Store this for the step [Add AWS Credentials to Wallaroo](#add-aws-credentials-to-wallaroo(#add-aws-credentials-to-wallaroo).
Select Submit.
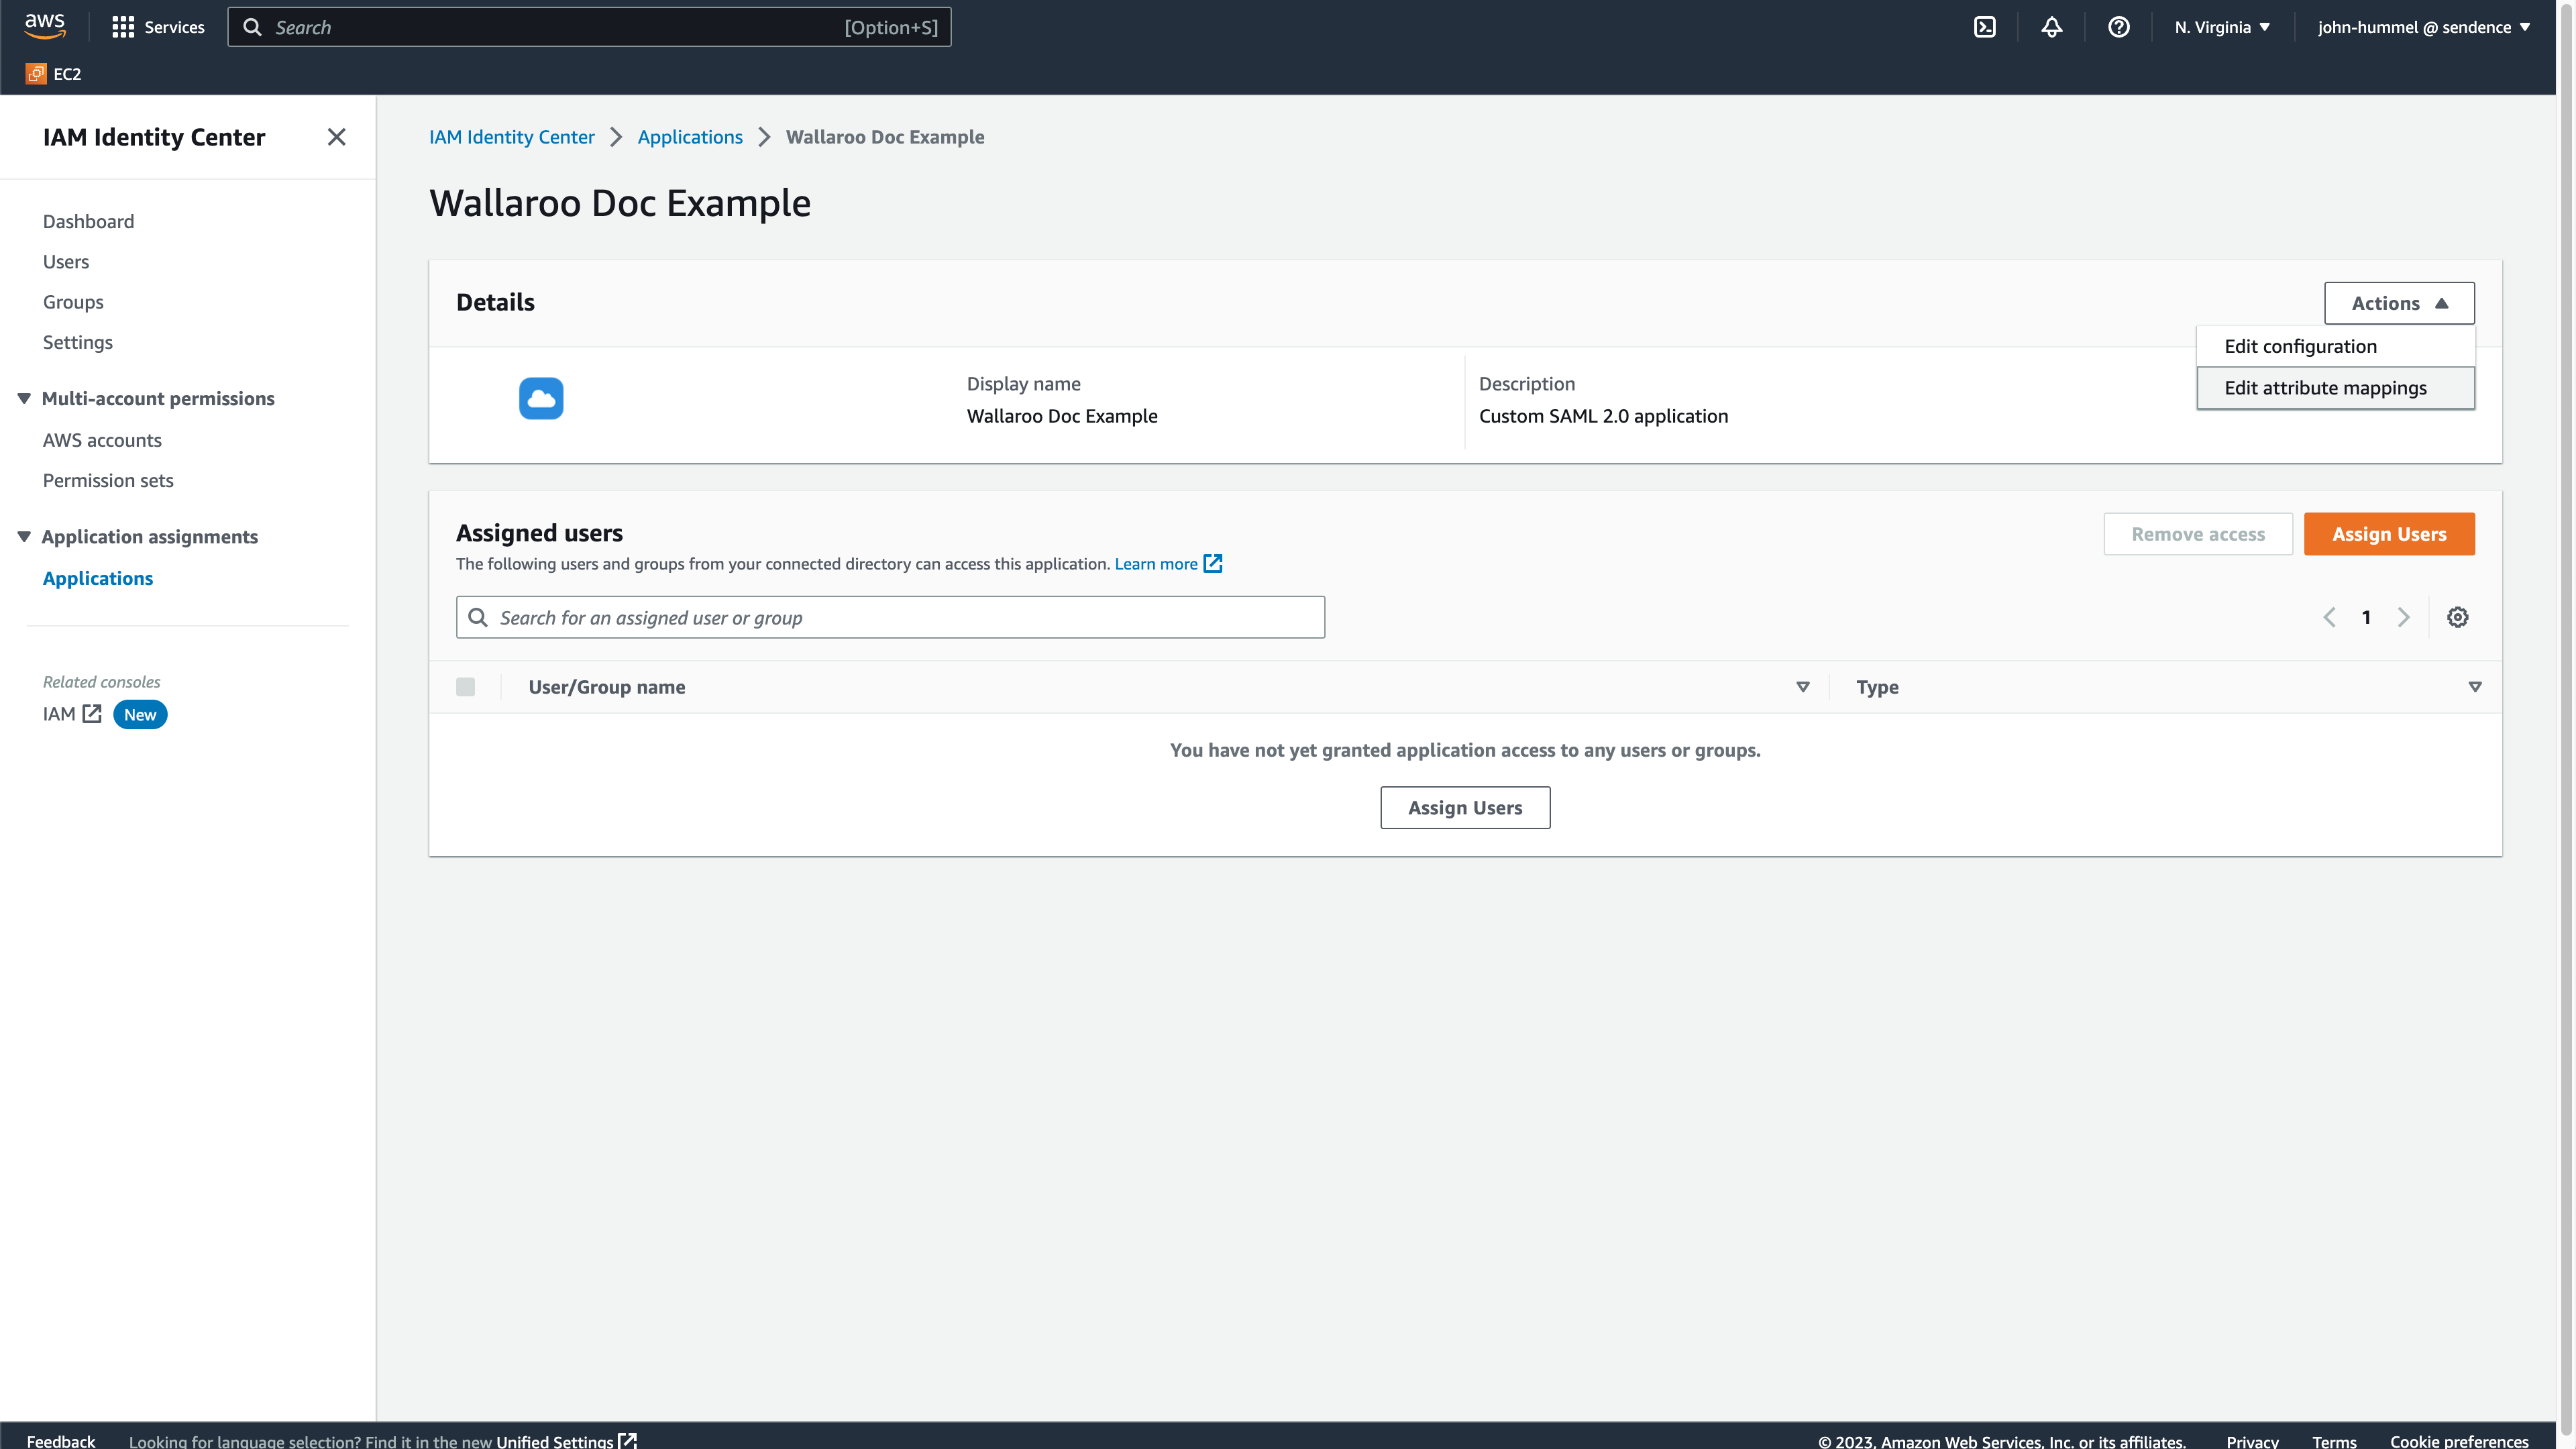
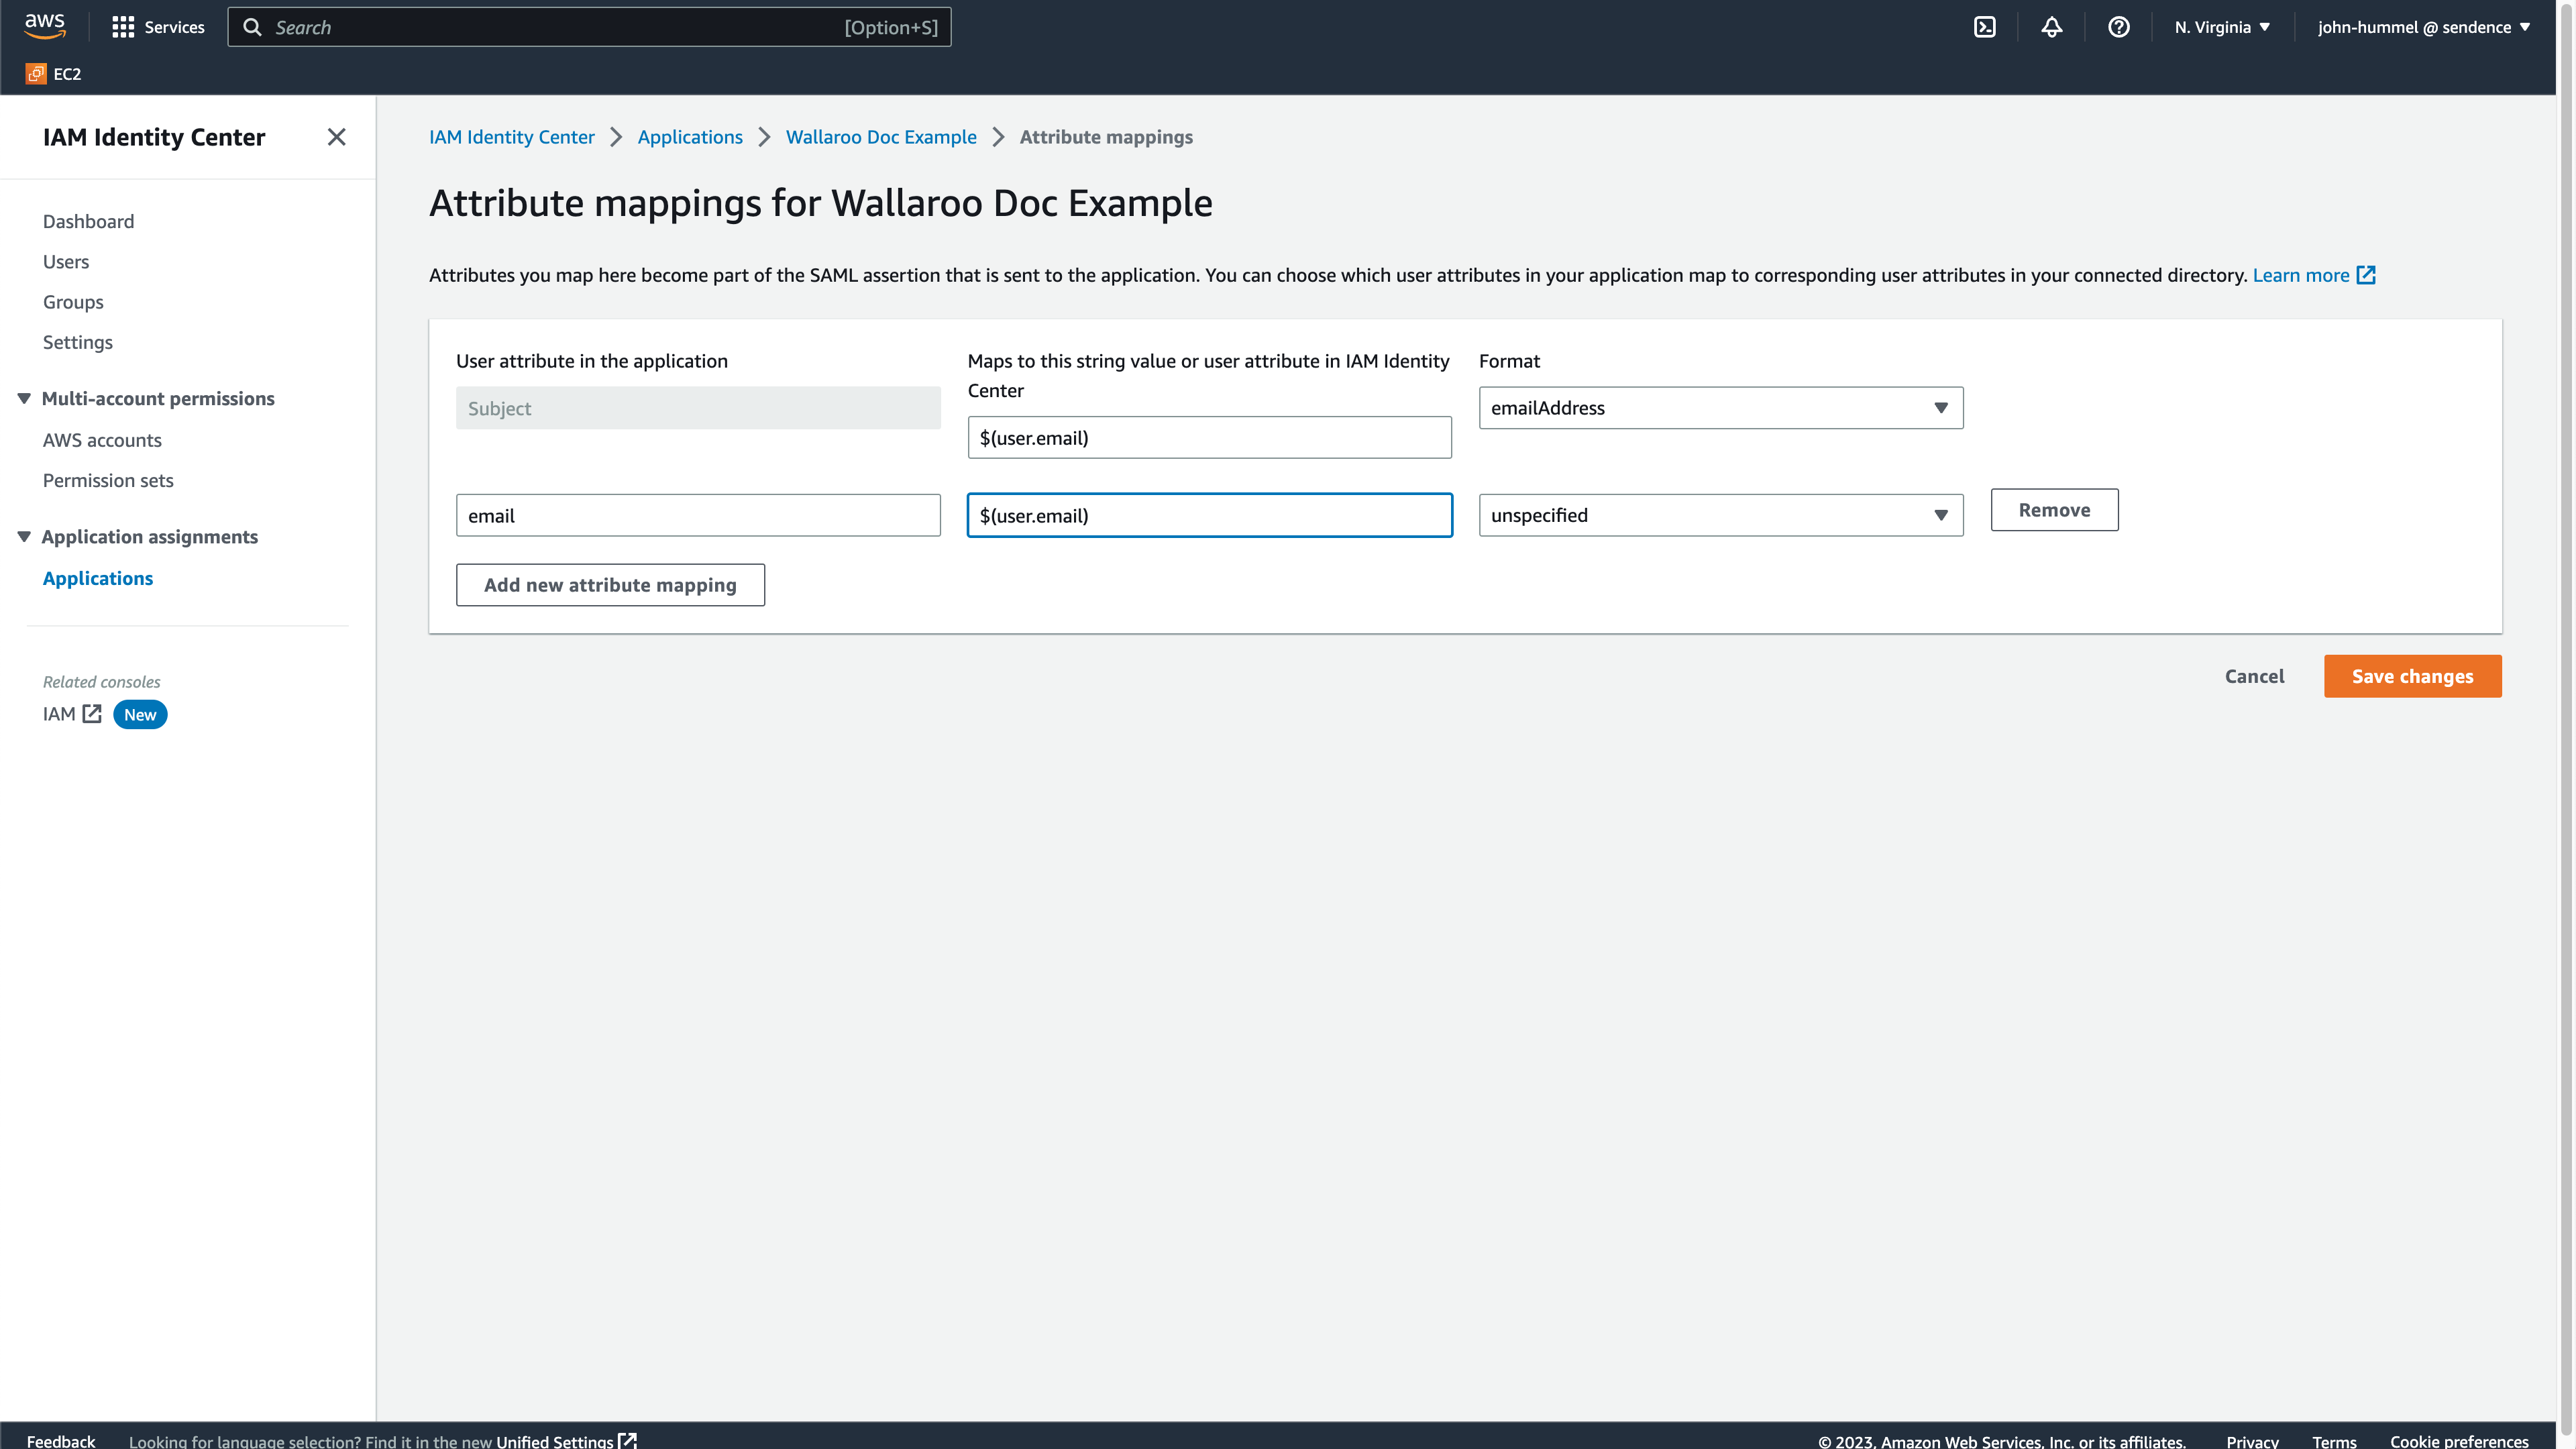
From the new application, select Actions->Edit attribute mappings.
Enter the following:
Subject (default entry): Set to ${user:email}, with the FormatemailAddress.
Select Add new attribute mapping and set it to email, mapped to ${user:email}, with the FormatemailAddress.
Select Save Changes to complete mapping the attributes.
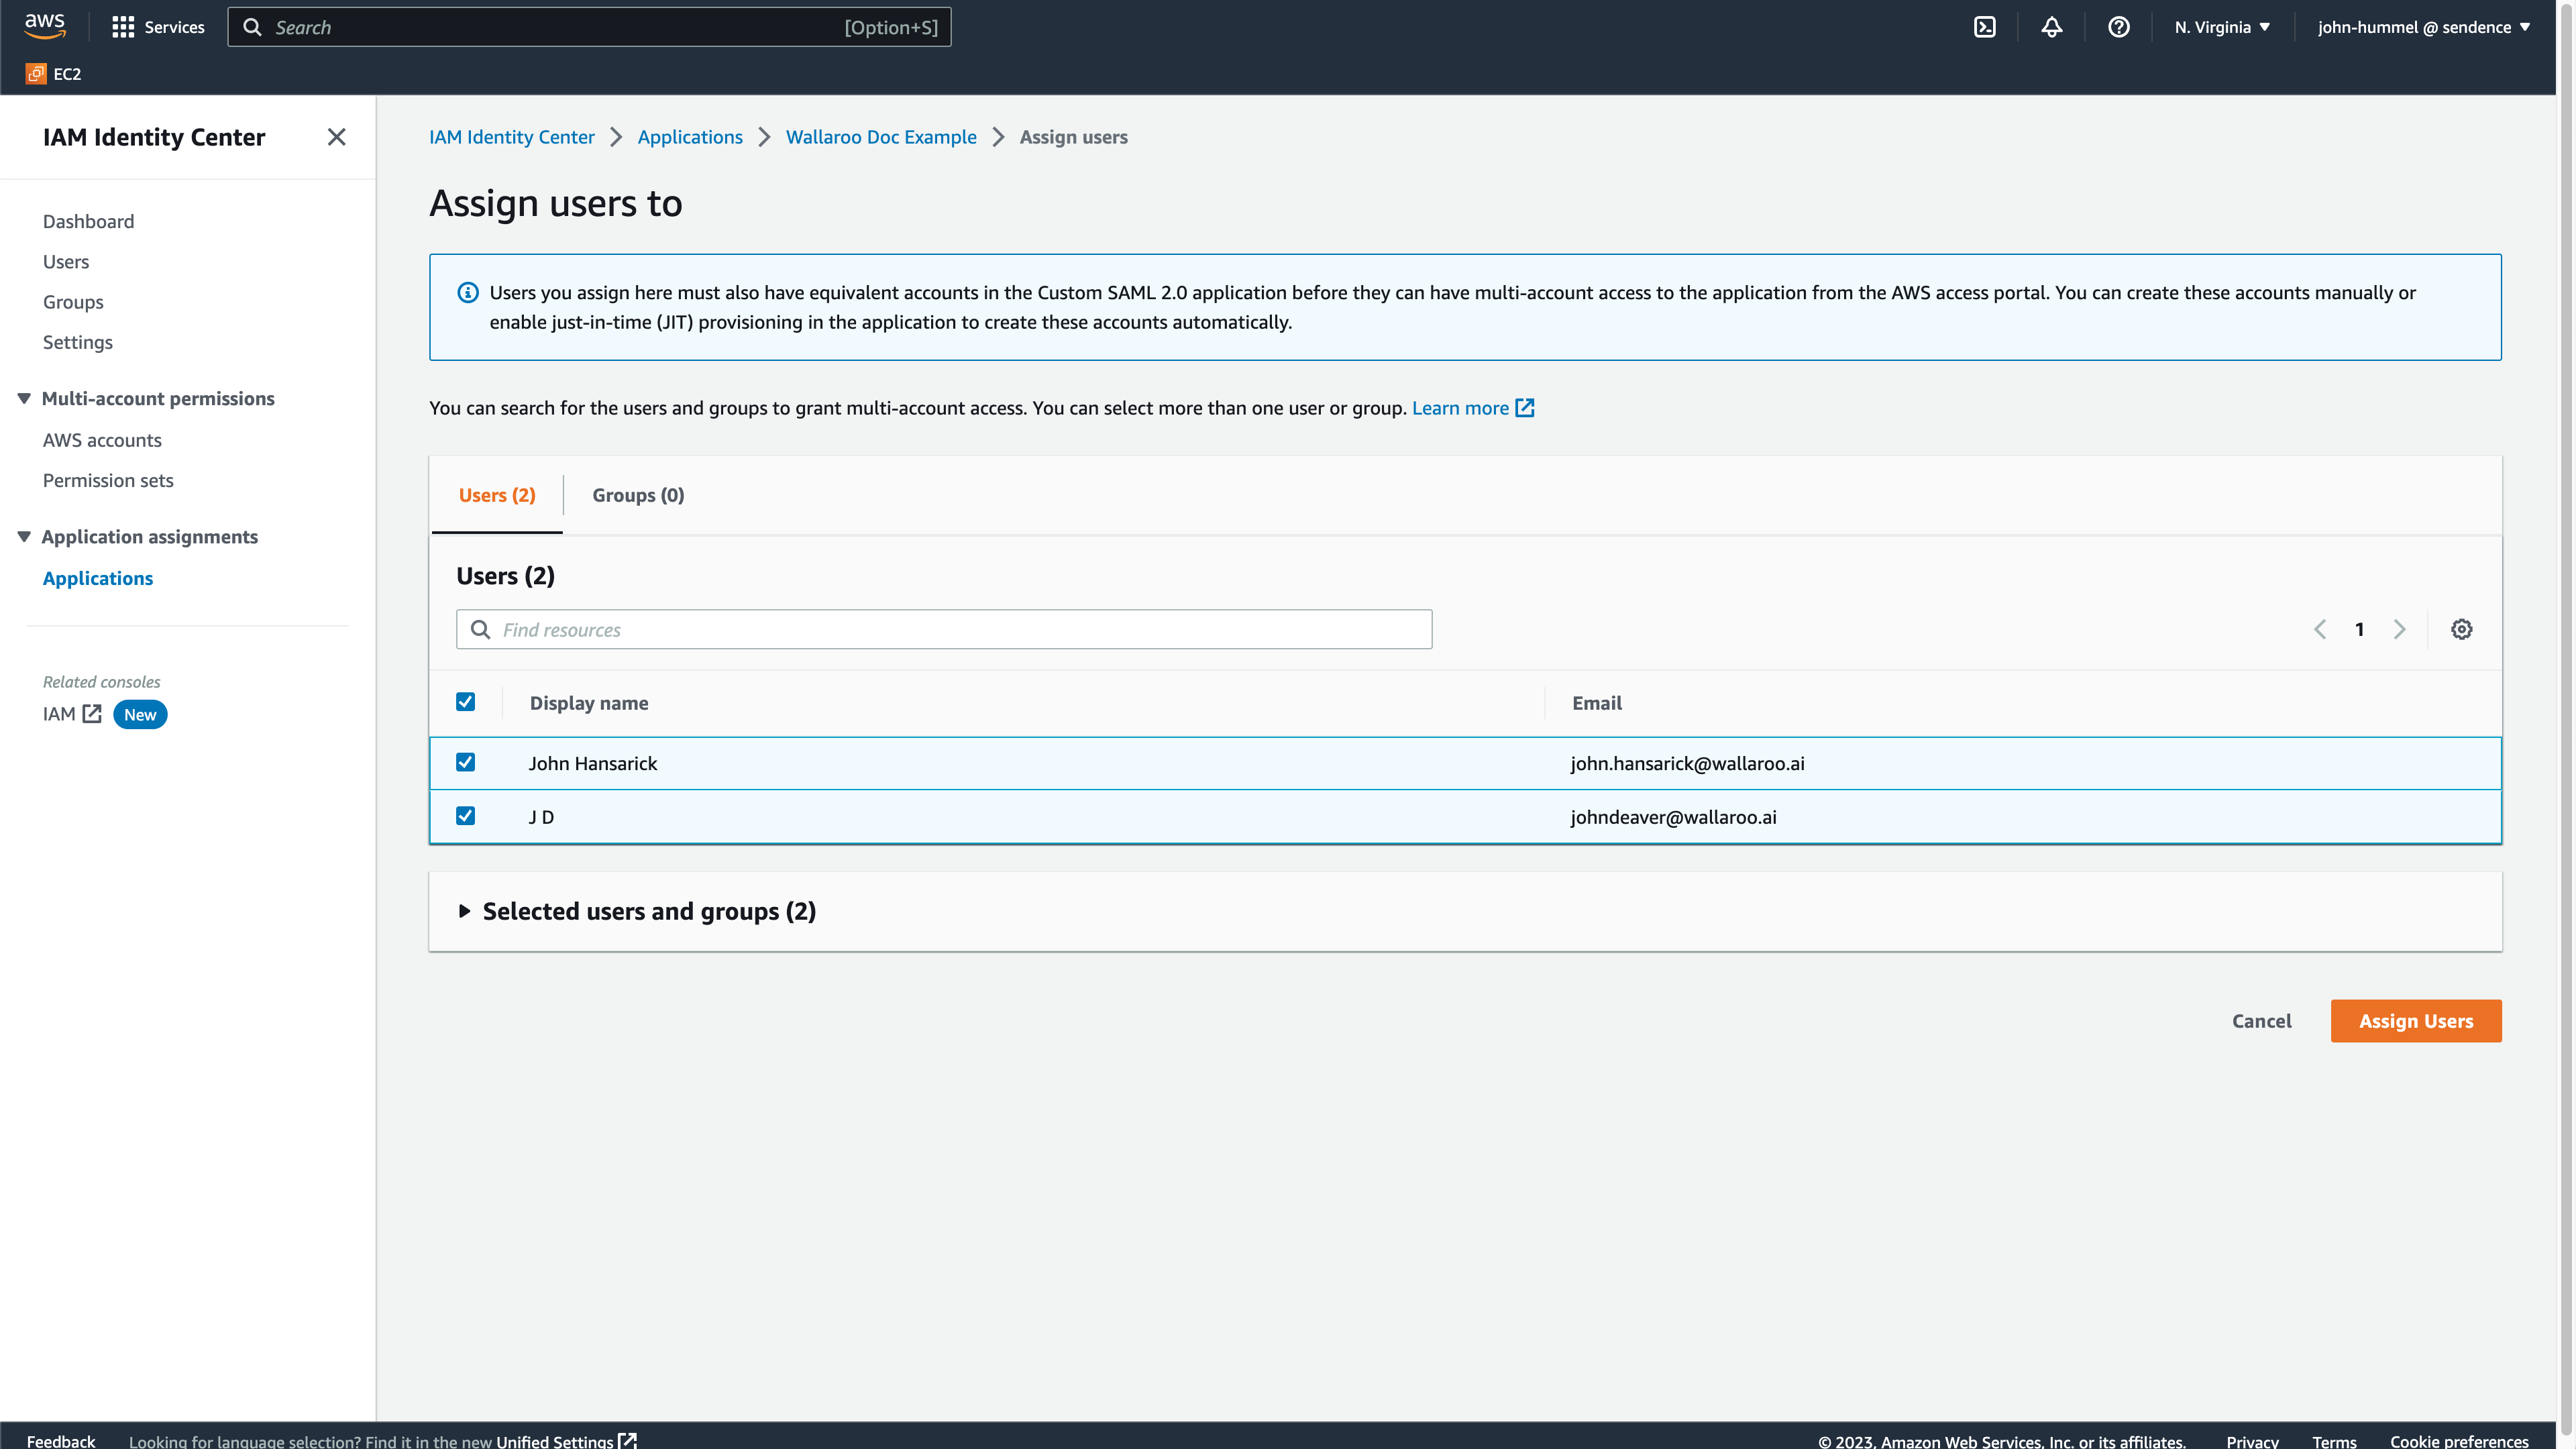
From the IAM Identity Center Dashboard, select Users. From here, add or select the users or groups that will have access to the Wallaroo instance then select Assign Users.
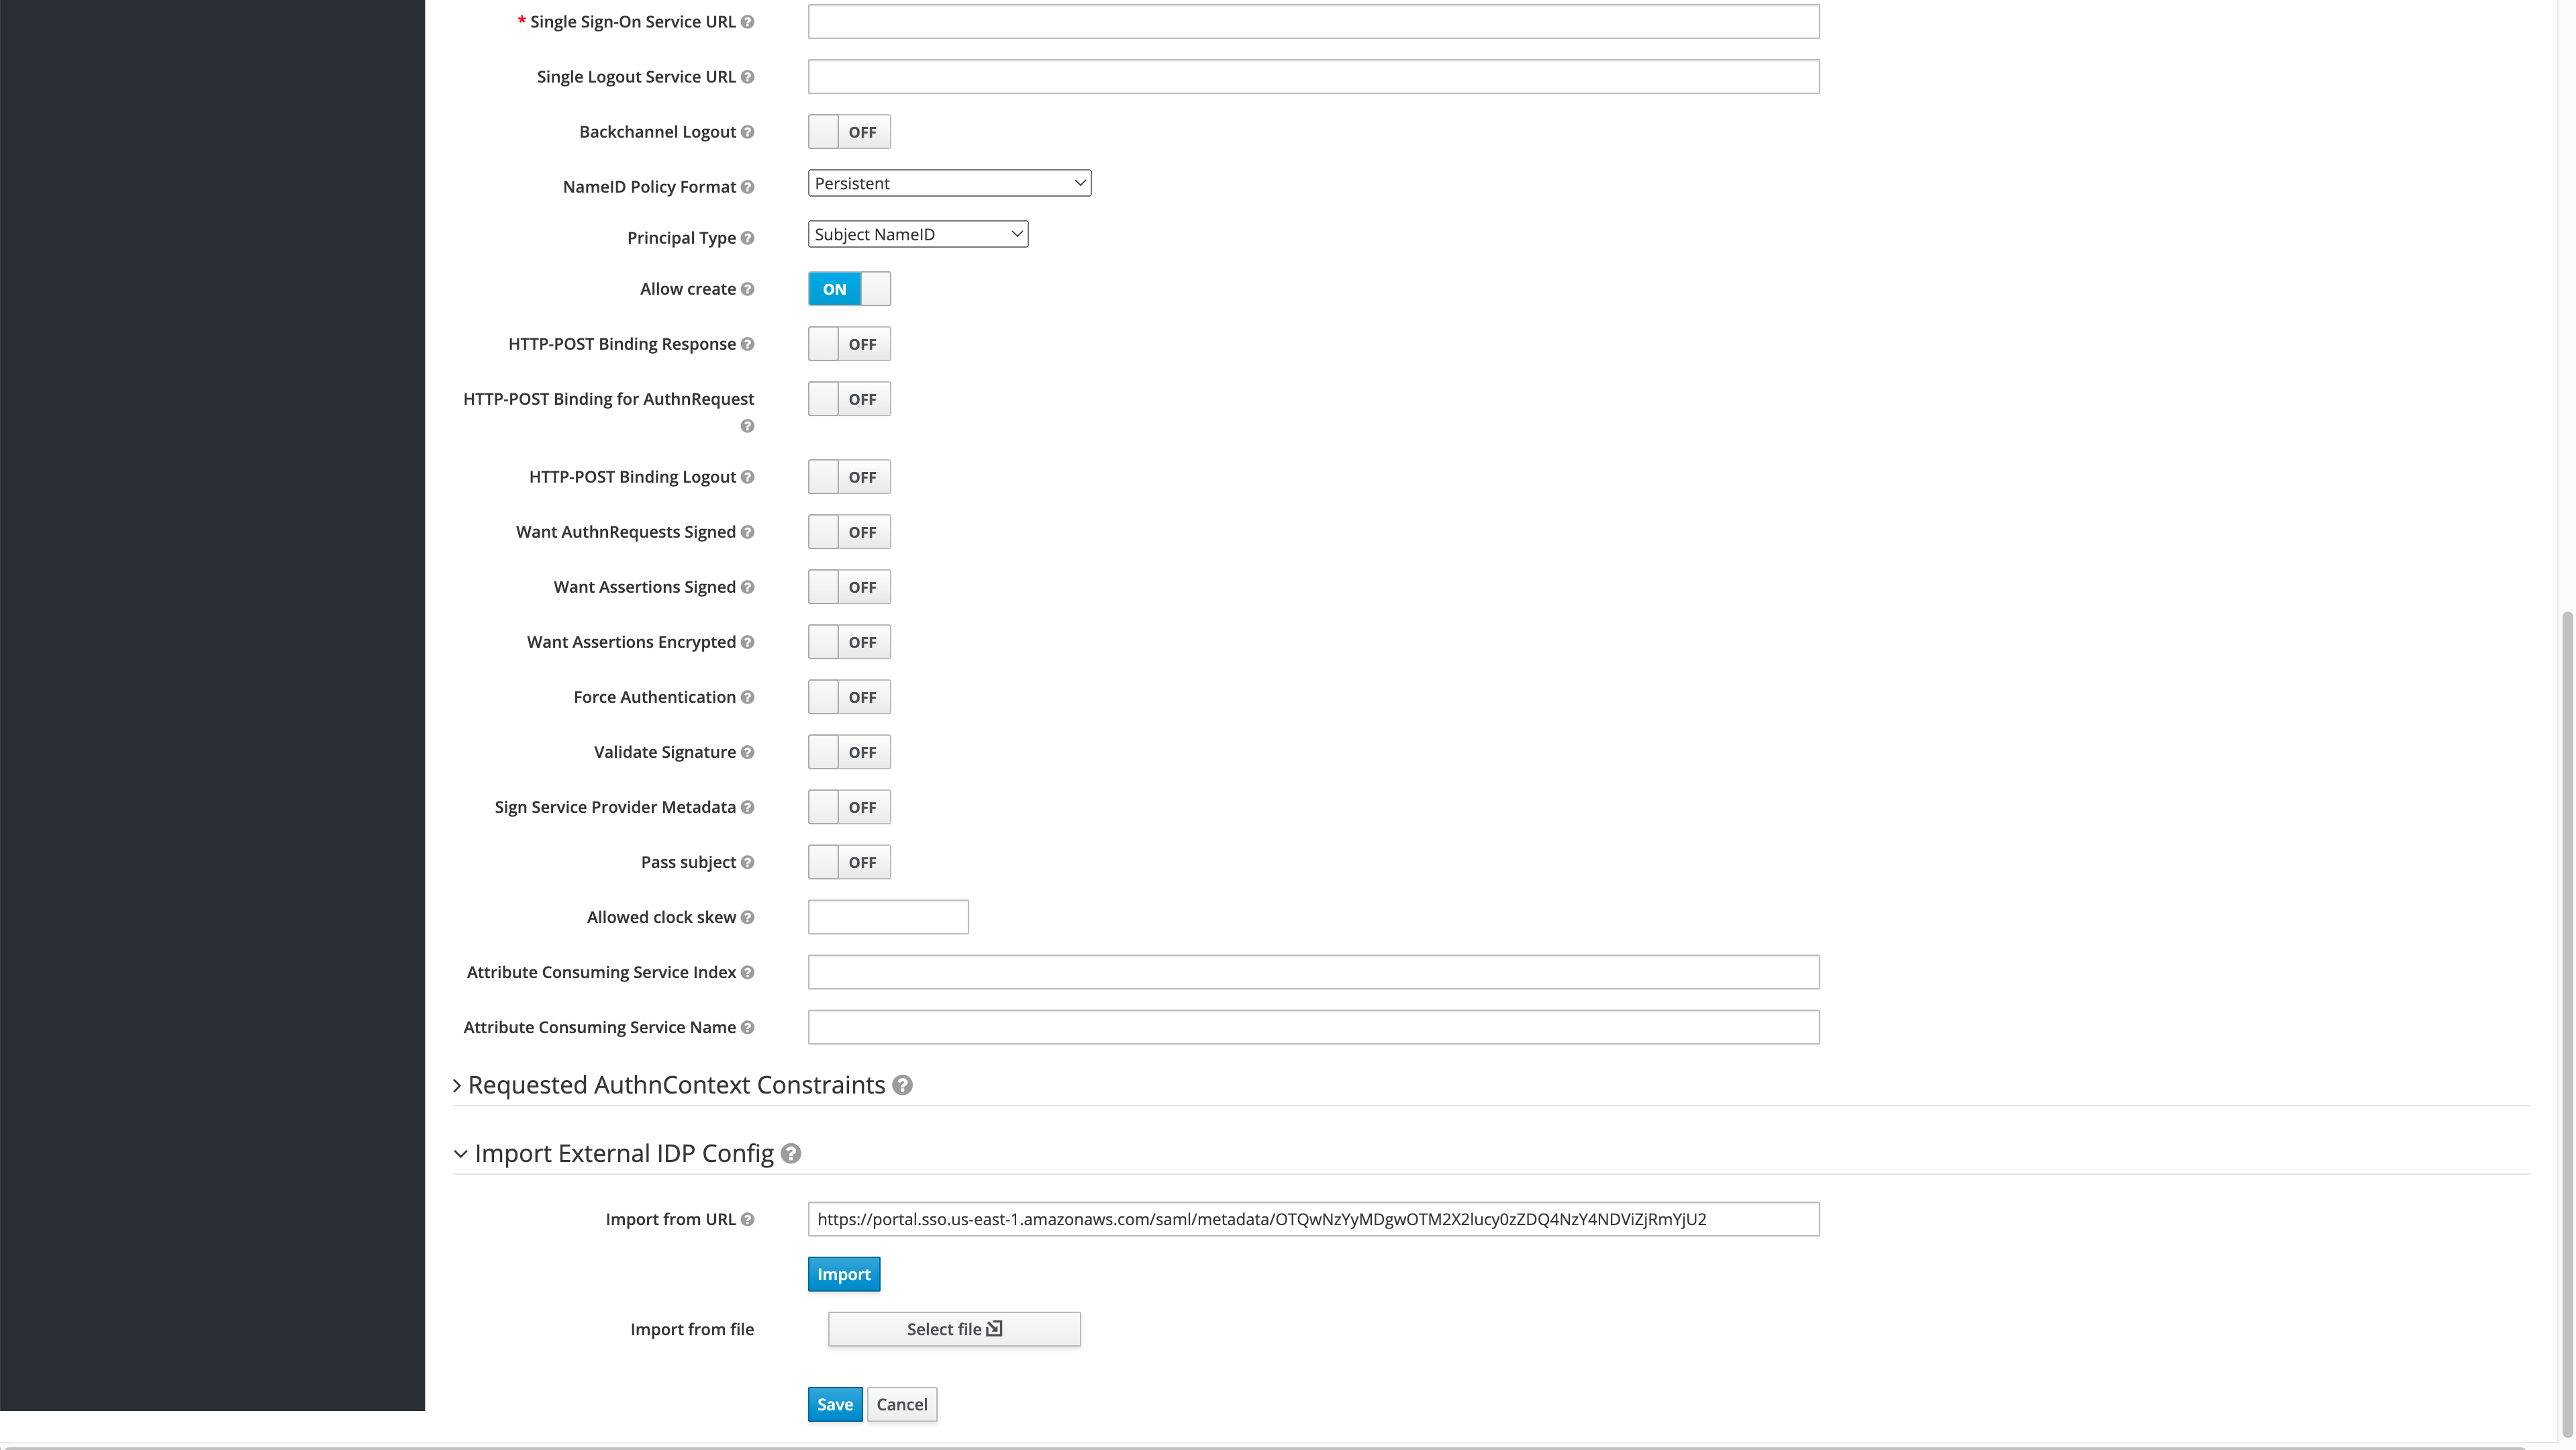
In Import External IDP Config->Import from URL, enter the IAM Identity Center SAML metadata file saved from Create the AWS Credentials in the field Service Provider Entity ID.
Select Import.
Once the AWS SAMl settings are imported, select Save to store the identity provider.
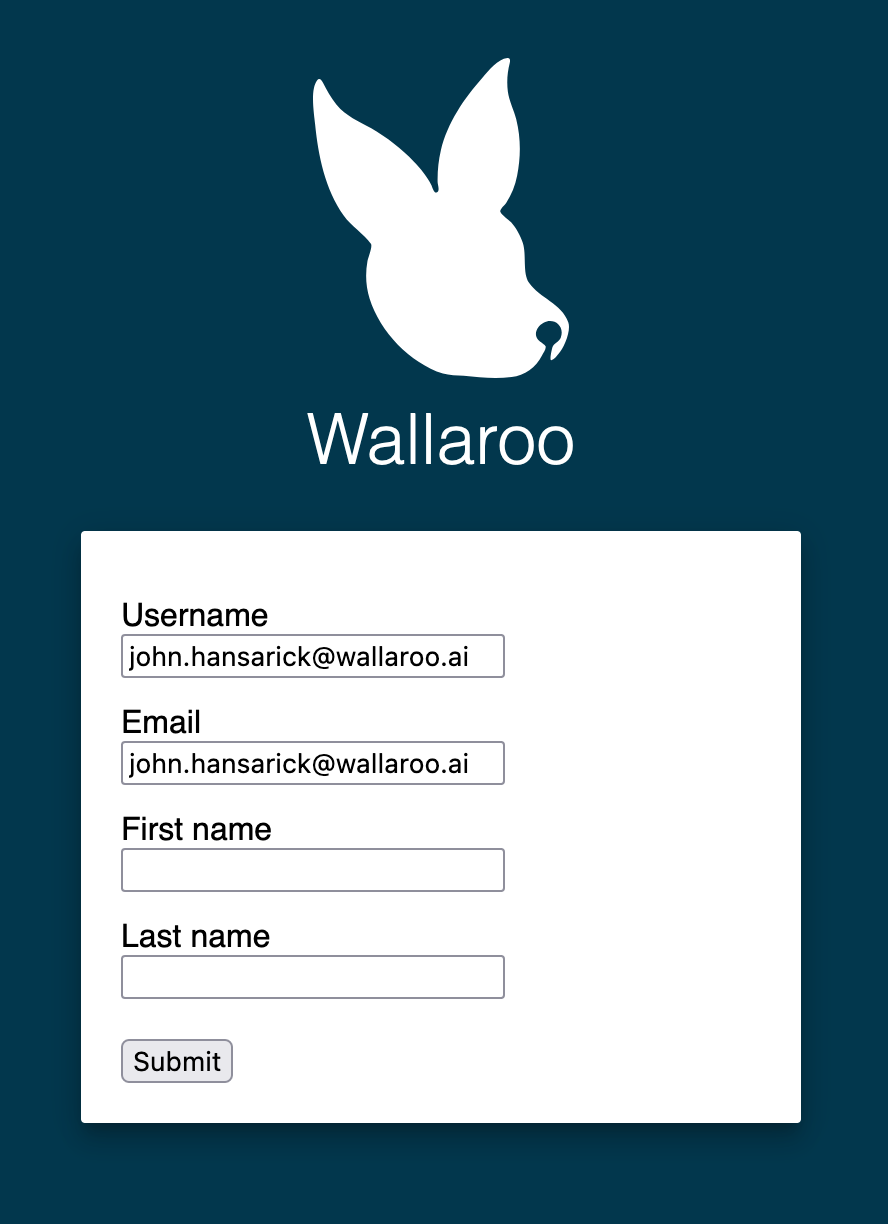
Verify the Login
Once complete, log out of the Wallaroo instance and go back into the login screen. With the usual username and password screen should also be a AWS link at the bottom or whatever name was set for the identity provider. Select that link to login.
Login to the IAM Application created in Create the AWS Credentials. The first time a user logs in they will be required to add their first and last name. After this, logins will happen as long as the user is logged into the AWS IAM application without submitting any further information.
4.2 - Wallaroo SSO for Microsoft Azure
Enable SSO authentication to Wallaroo from Microsoft Azure
Organizations can use Microsoft Azure as an identity provider for single sign-on (SSO) logins for users with Wallaroo Enterprise.
IMPORTANT NOTE
These instructions are for Wallaroo Enterprise edition only.
To enable Microsoft Azure as an authentication provider to a Wallaroo Enterprise instance:
Login into the Microsoft Azure account with an account with permissions to create application registrations.
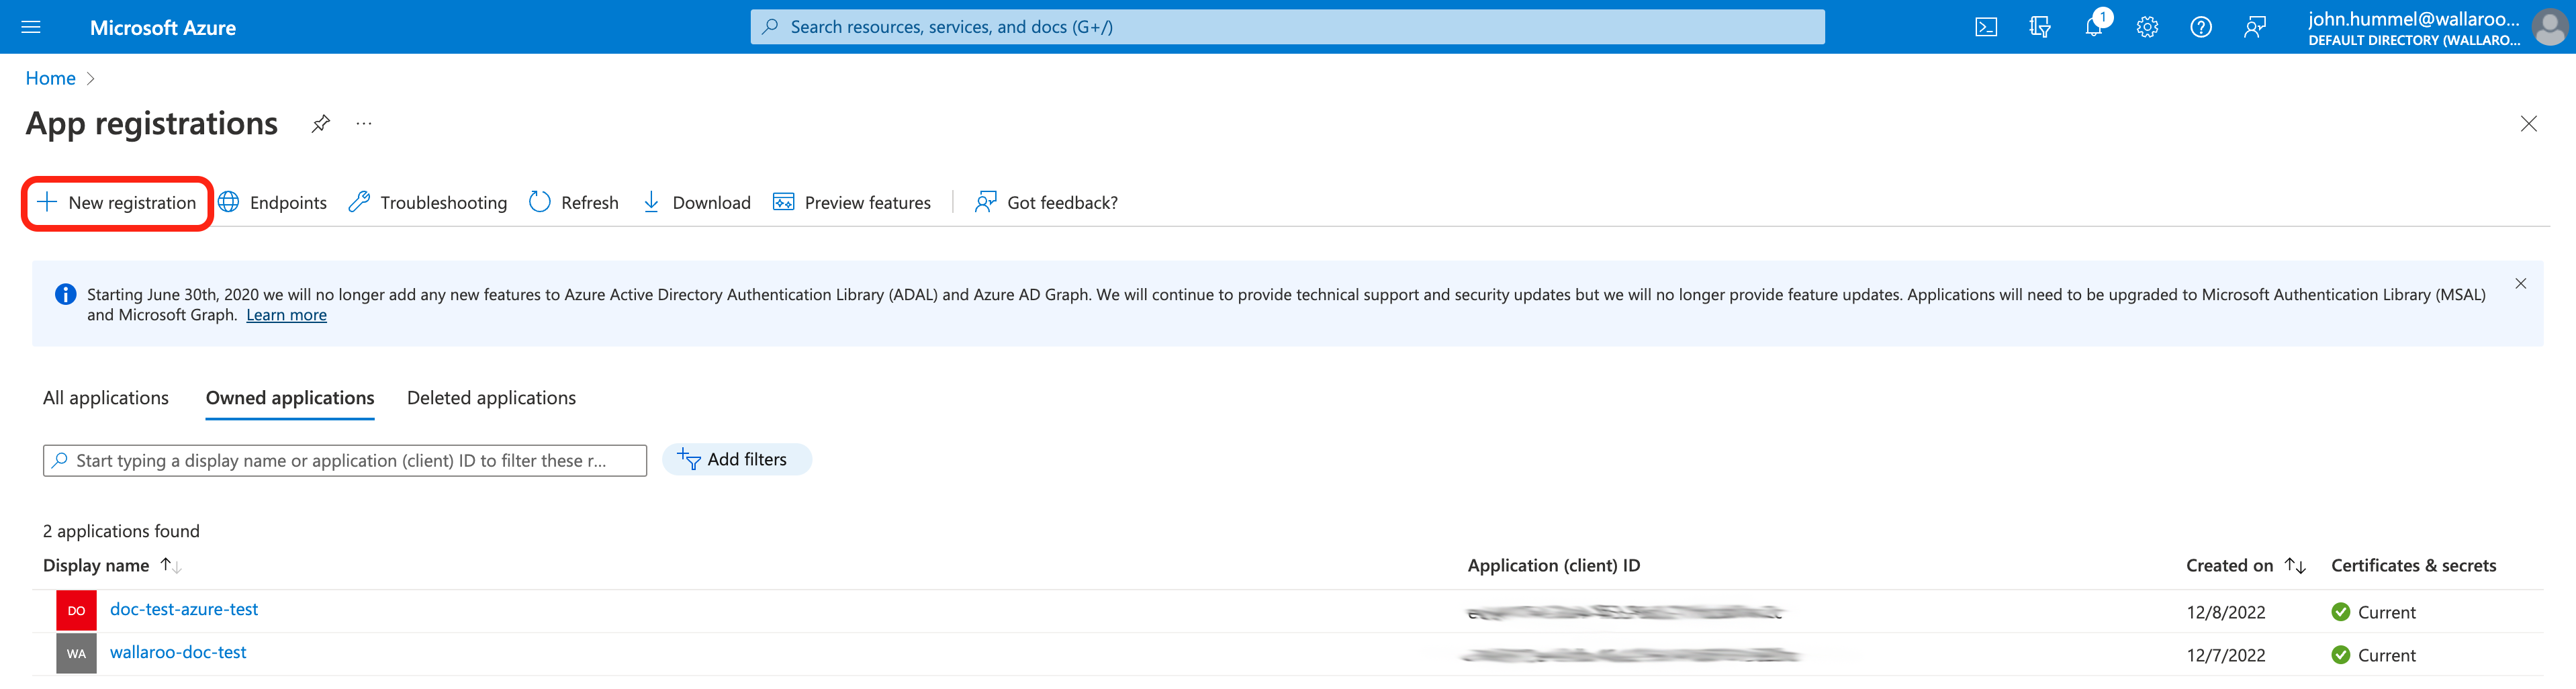
Select App registrations from the Azure Services menu, or search for App Registrations from the search bar.
From the App registrations screen, select either an existing application, or select + New registration. This example will show creating a new registration.
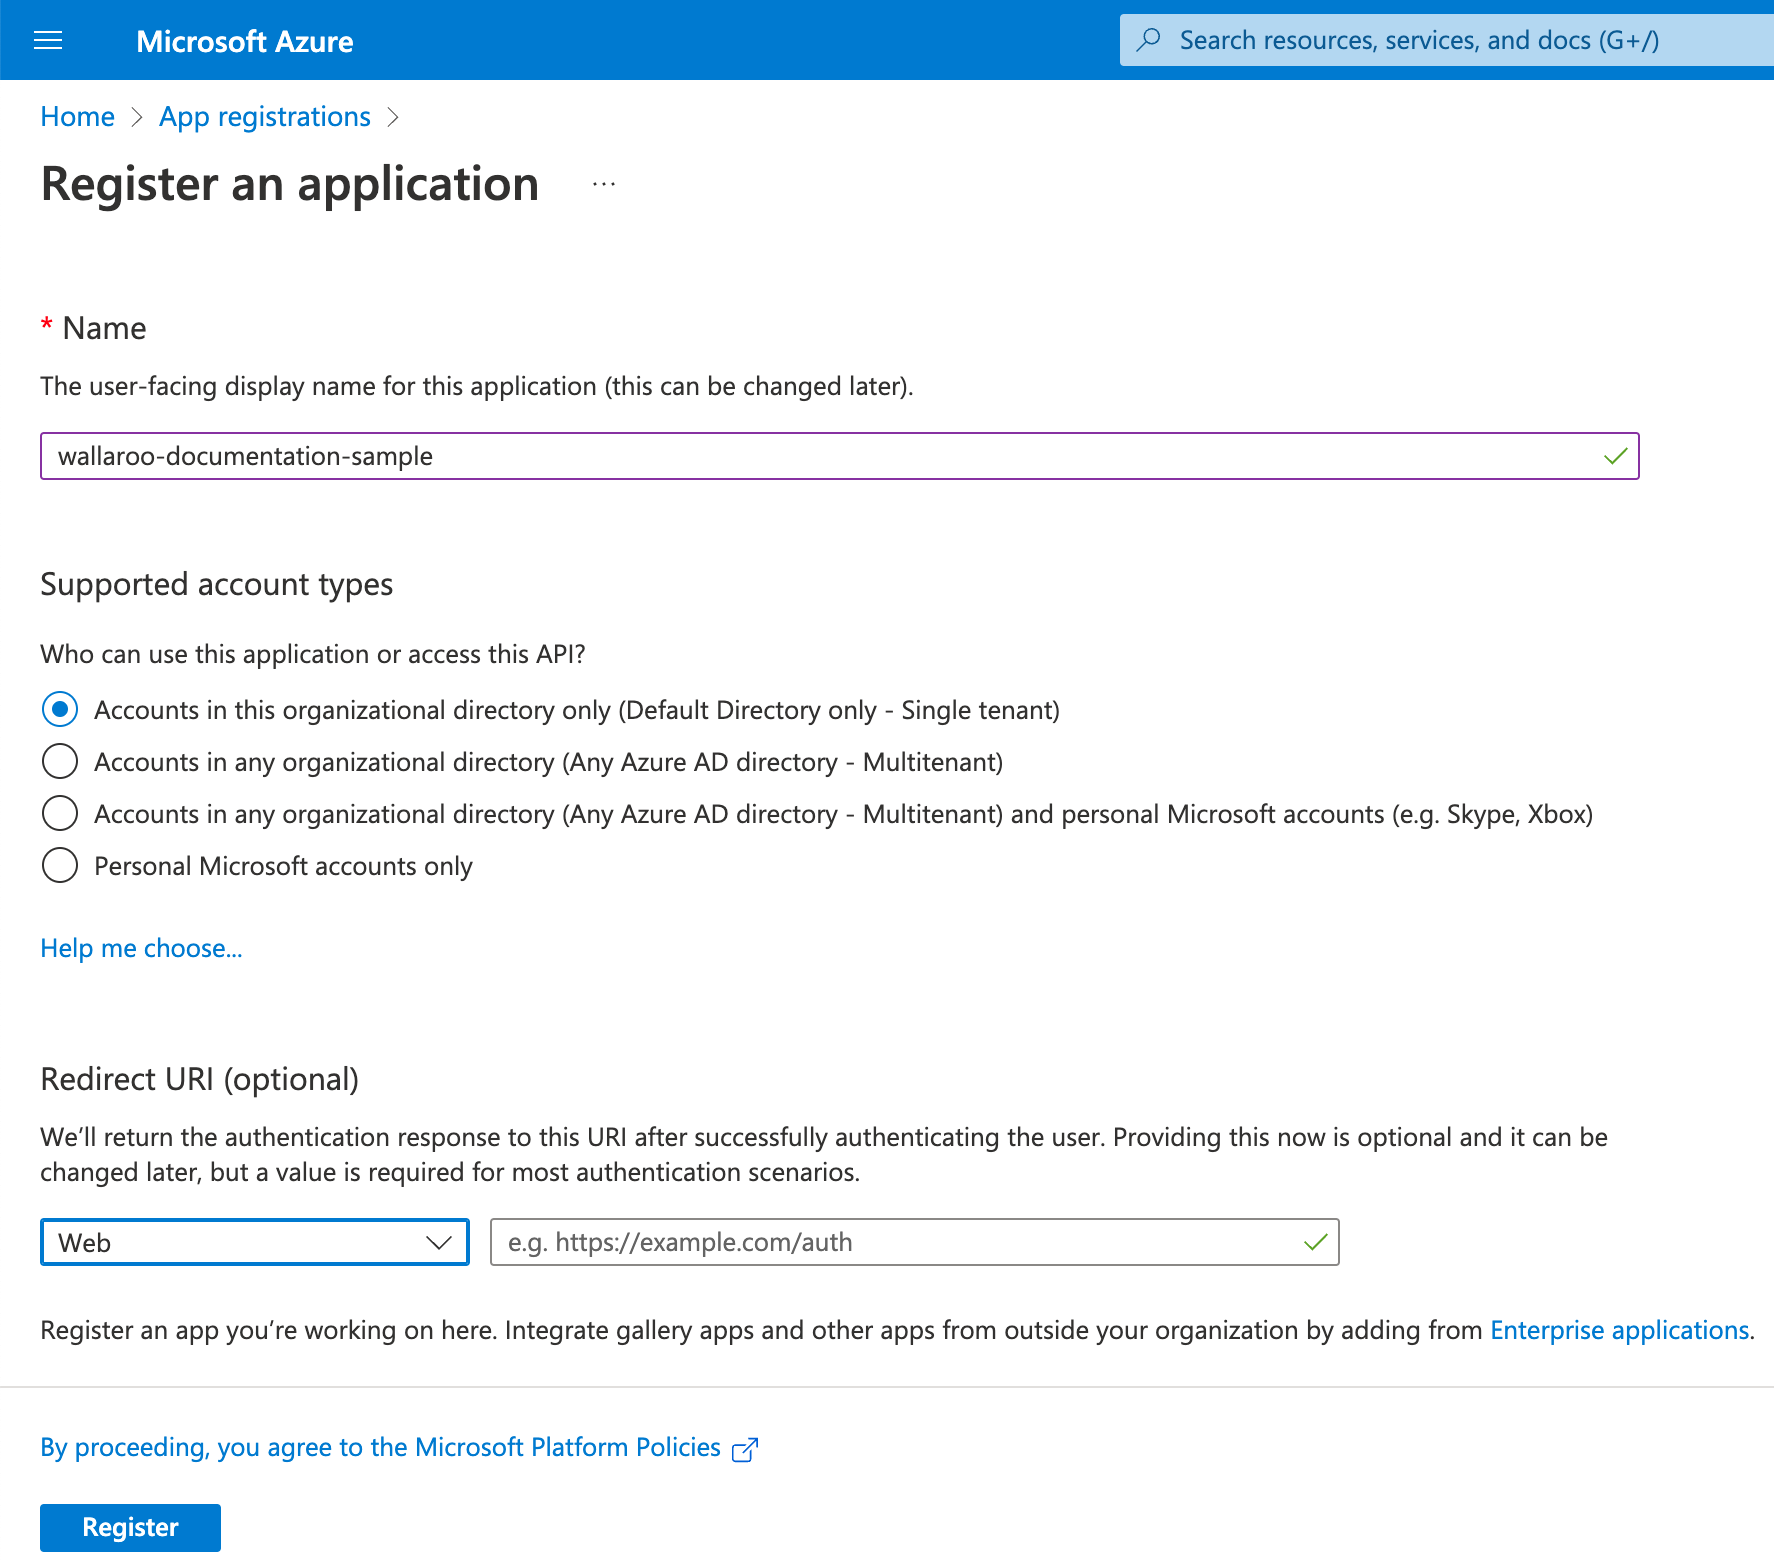
From the Register an application screen, set the following:
Name: The name of the application.
Supported account types: To restrict only to accounts in the organization directory, select Accounts in this organizational directory only.
Redirect URI: Set the type to Web and the URI. The URI will be based on the Wallaroo instance and the name of the Keycloak Identity Provider set in the step Add Azure Credentials to Wallaroo. This will be a link back to the Keycloak endpoint URL in your Wallaroo instance in the format https://$PREFIX.keycloak.$SUFFIX/auth/realms/master/broker/$IDENTITYNAME/endpoint.
For example, if the Wallaroo prefix is silky-lions-3657, the name of the Wallaroo Keycloak Identity Provider is azure, and the suffix is wallaroo.ai, then the Keycloak endpoint URL would be silky-lions-3657.keycloak.wallaroo.ai/auth/realms/master/broker/azure/endpoint. For more information see the DNS Integration Guide.
Once complete, select Register.
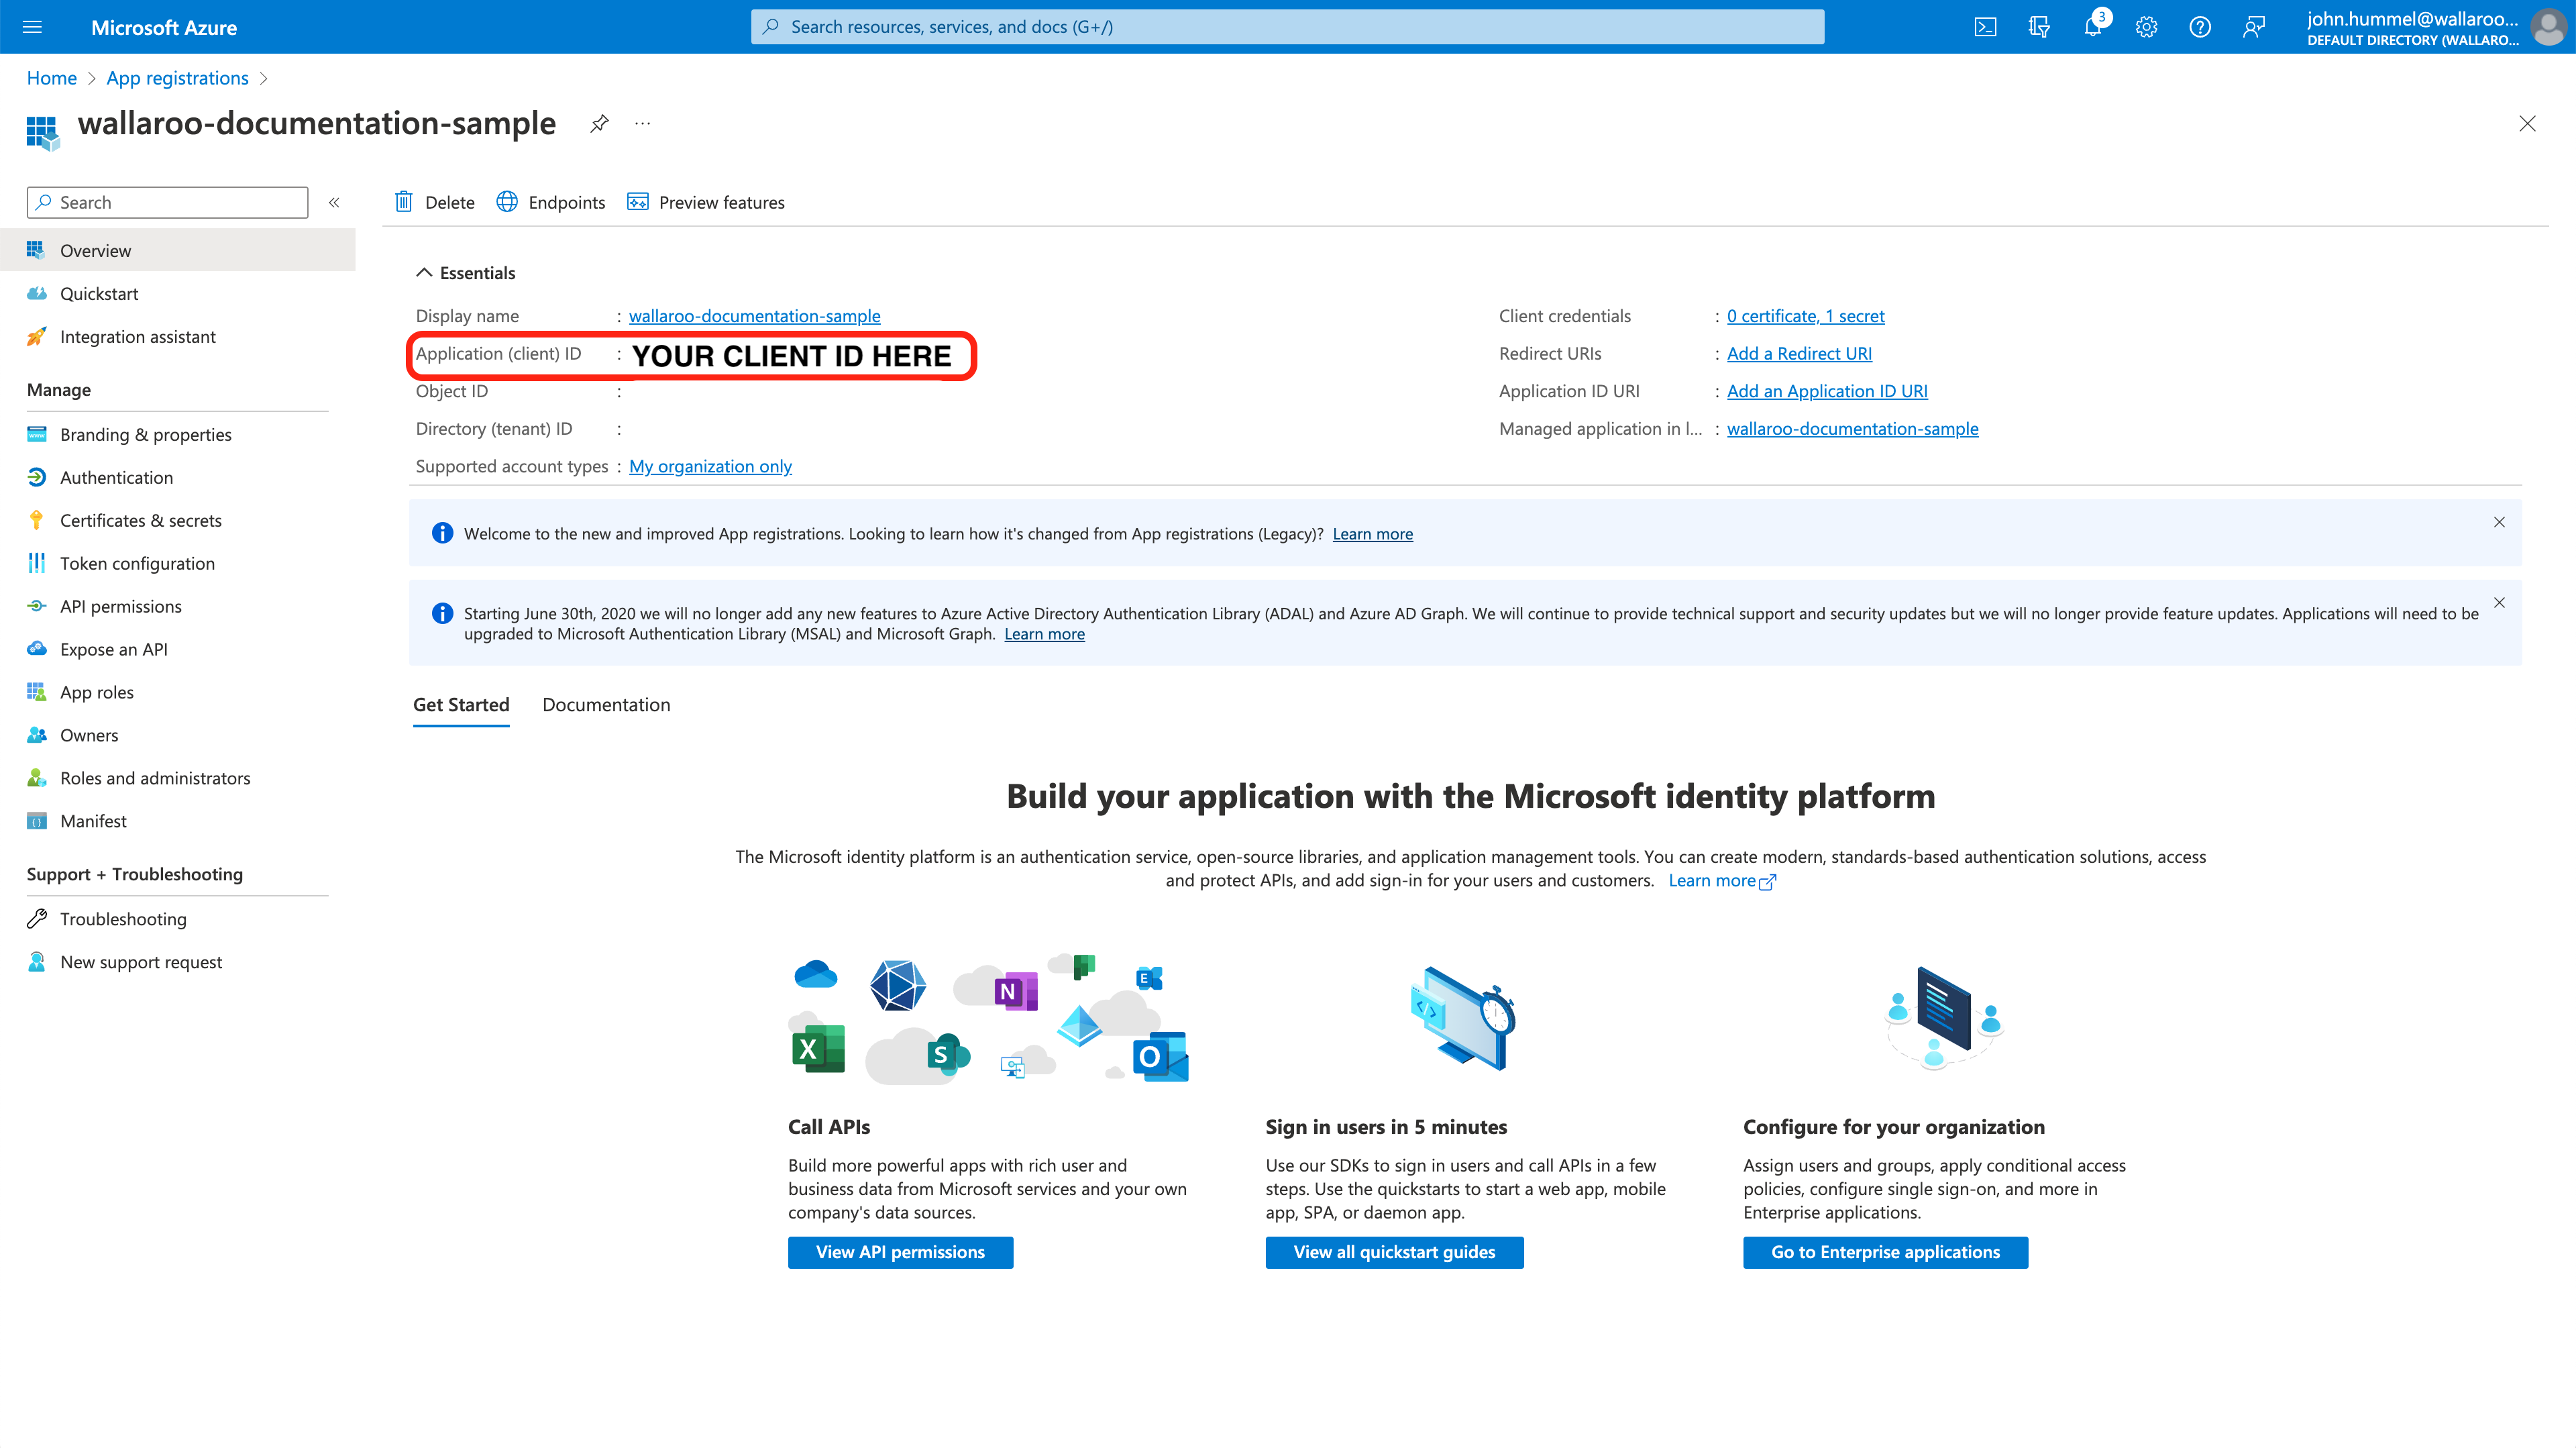
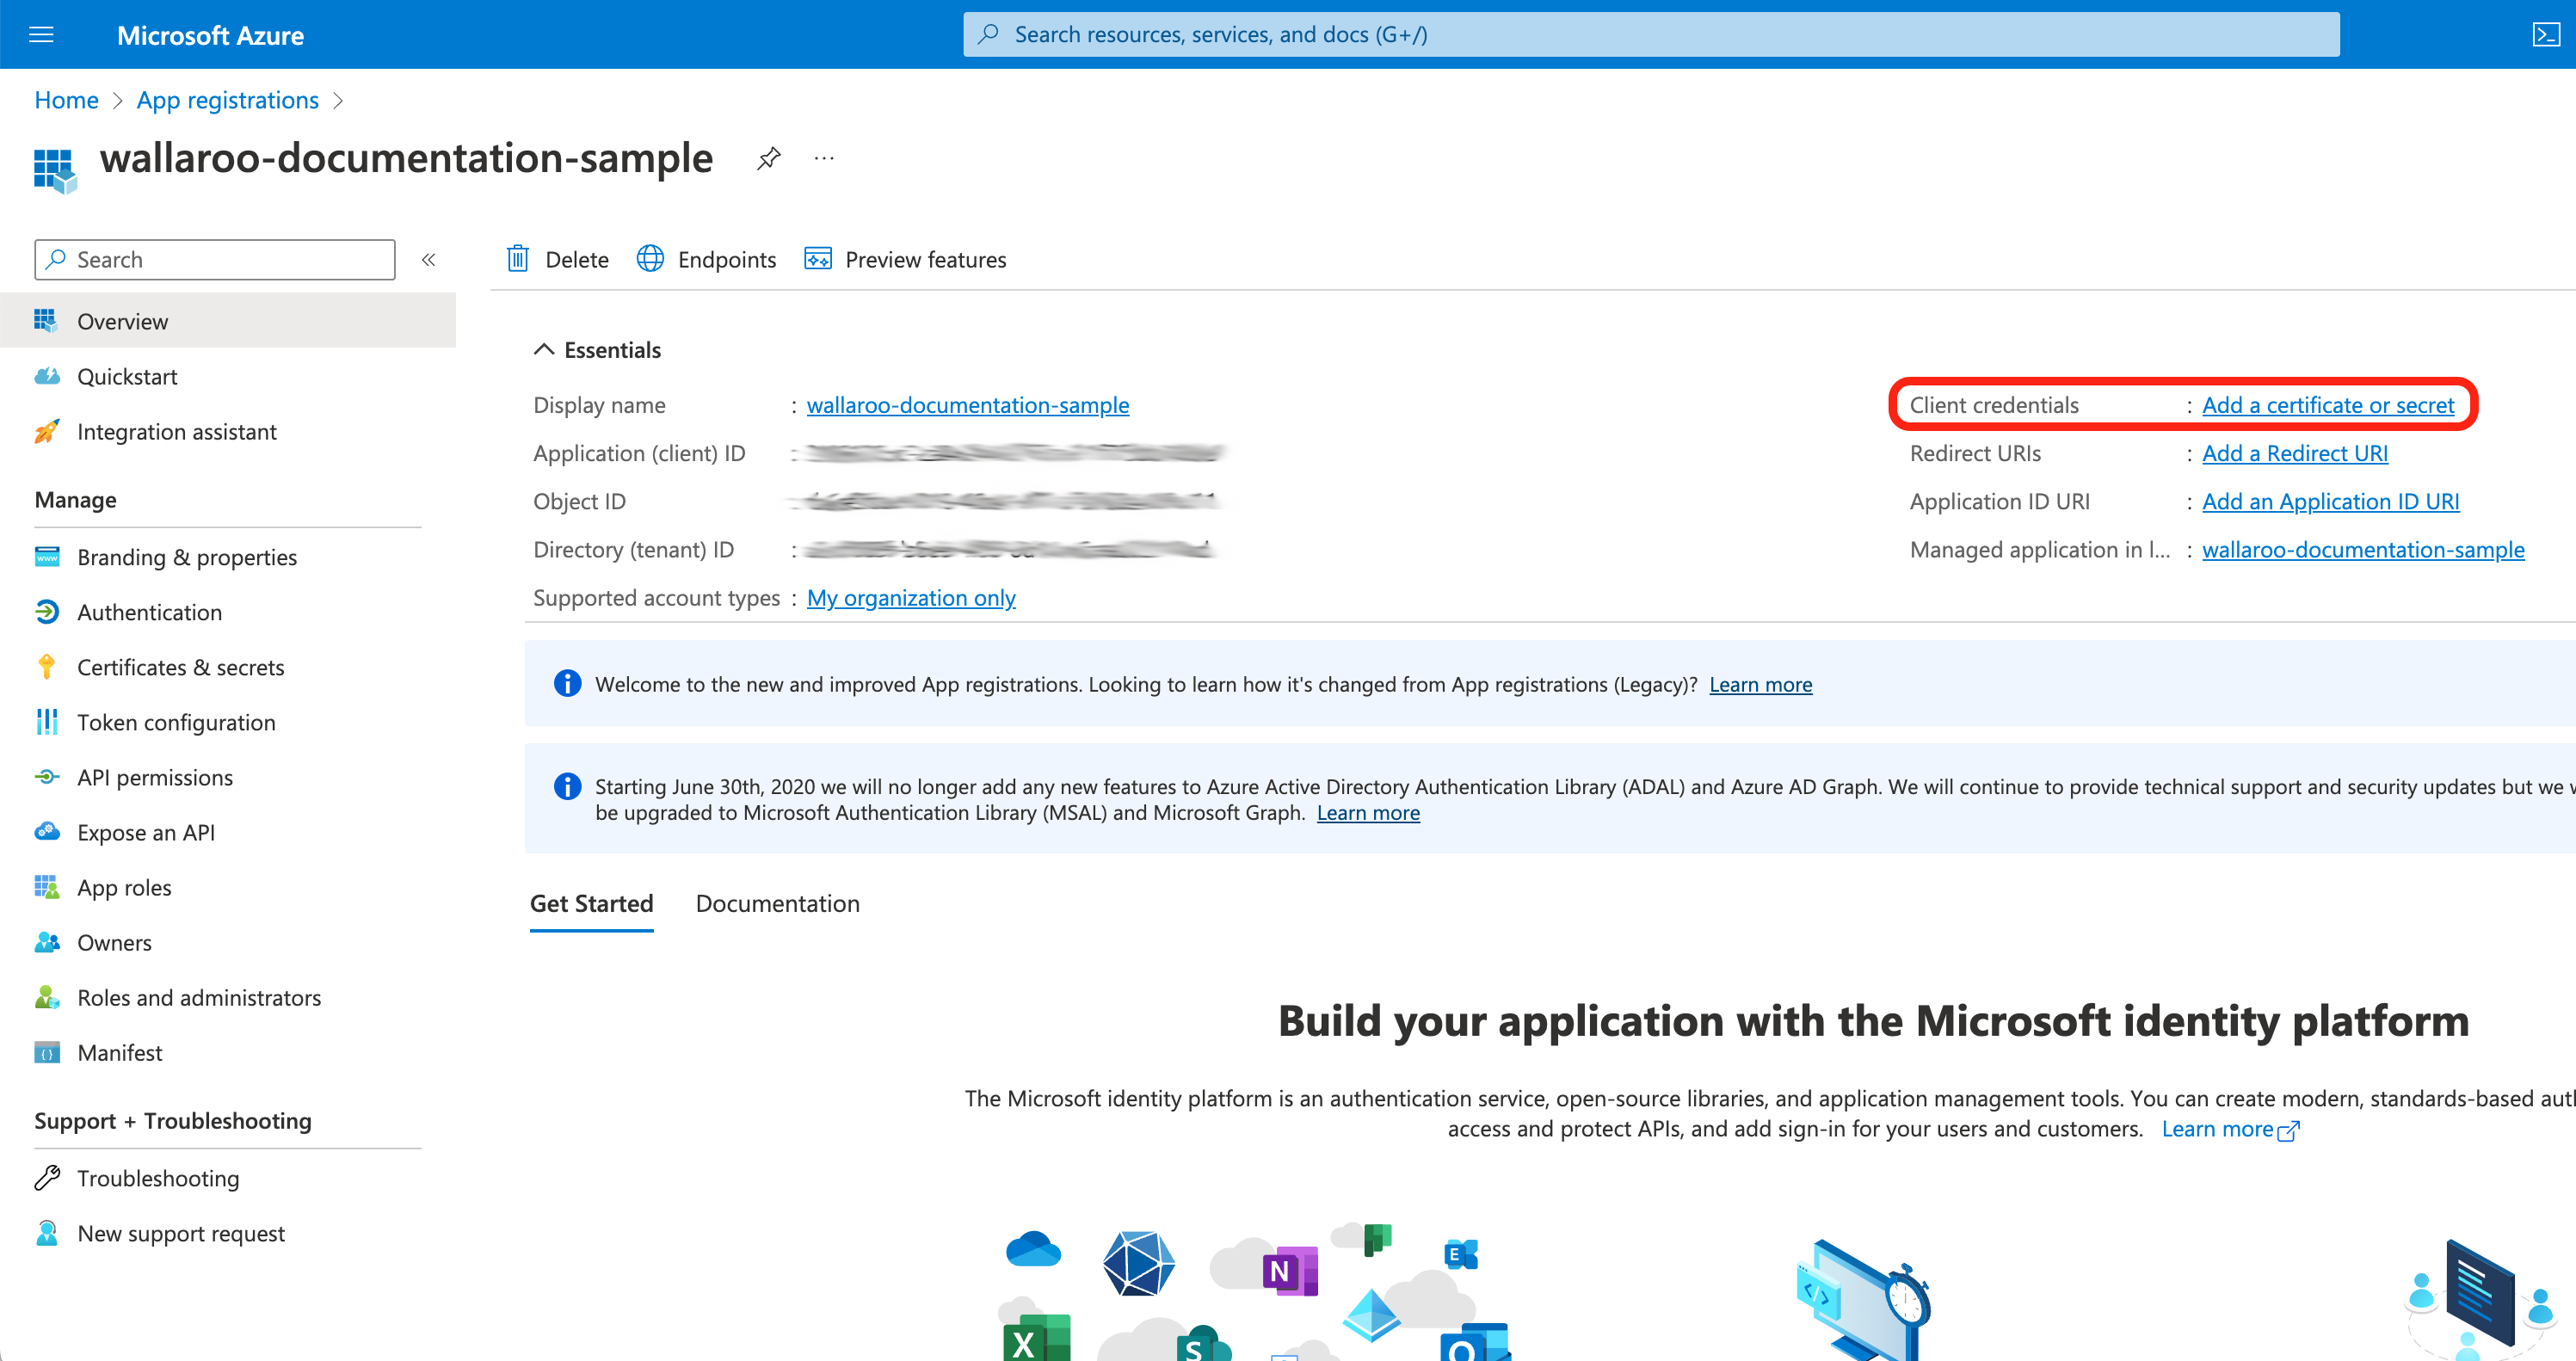
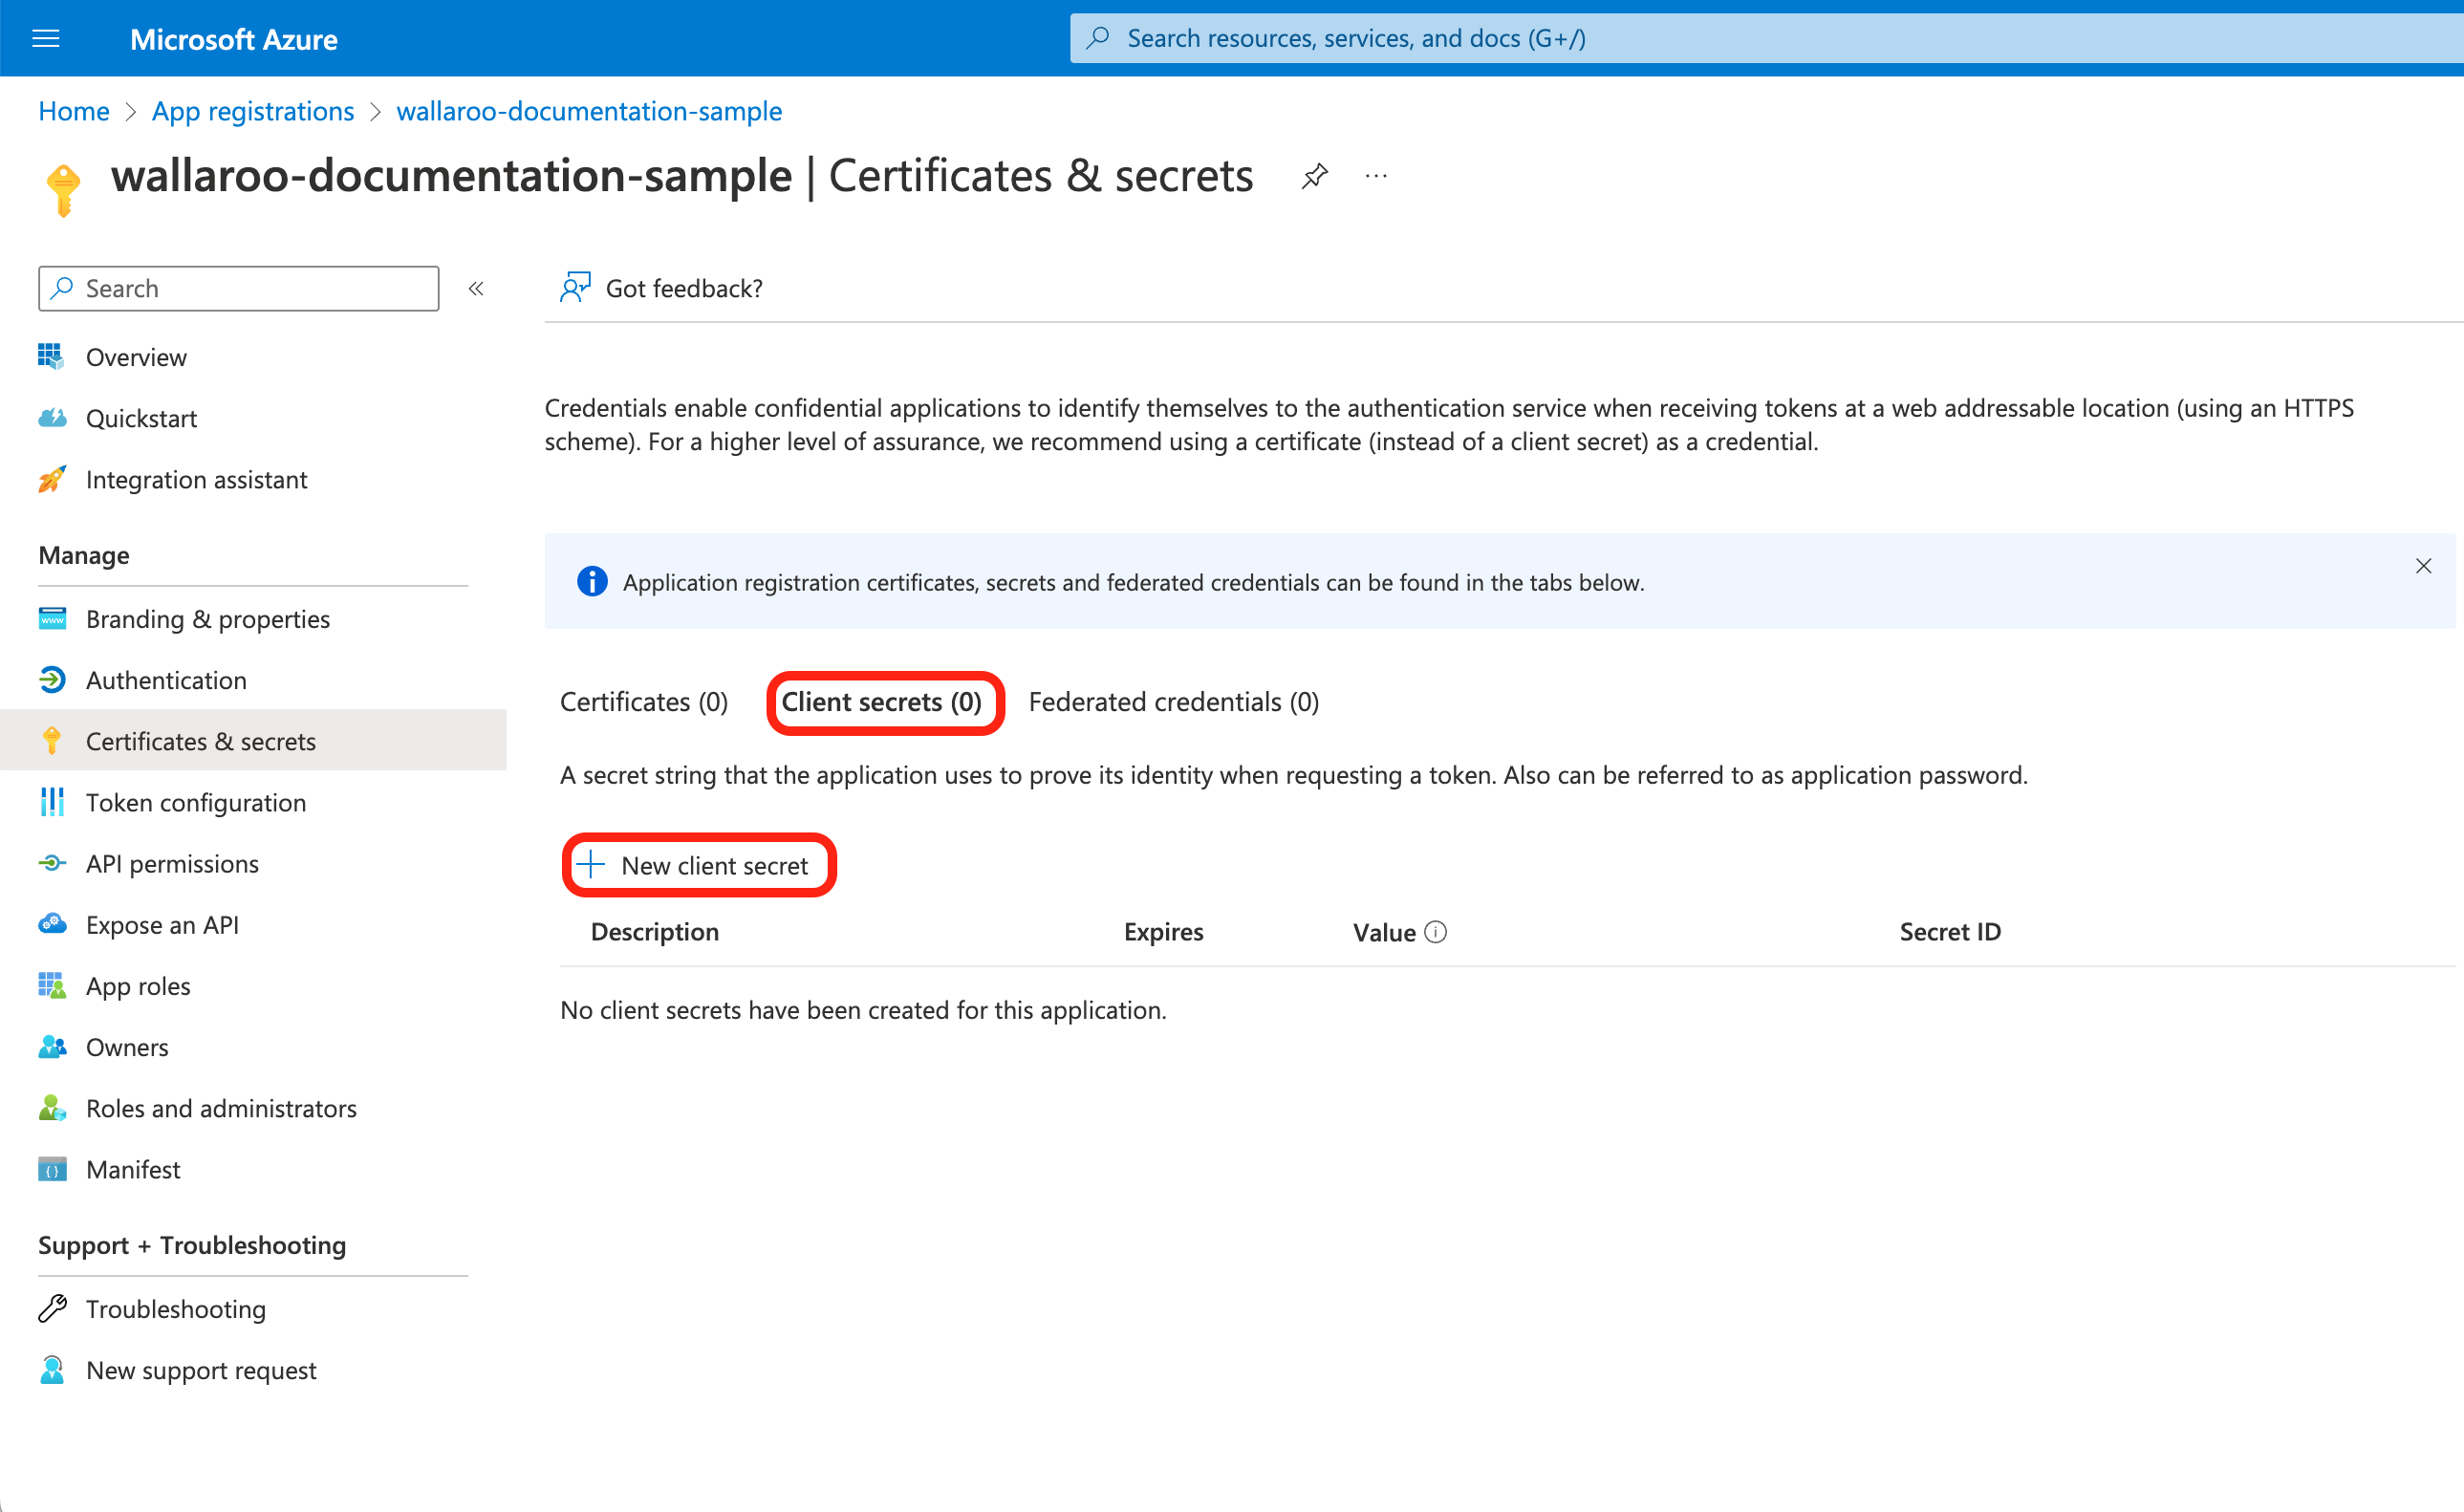
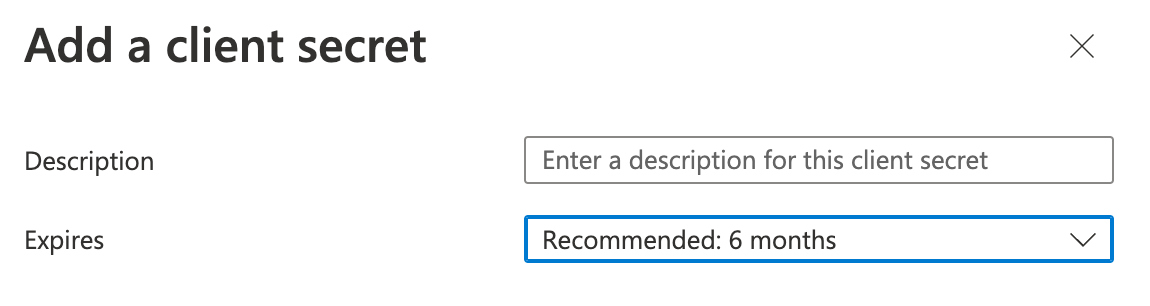
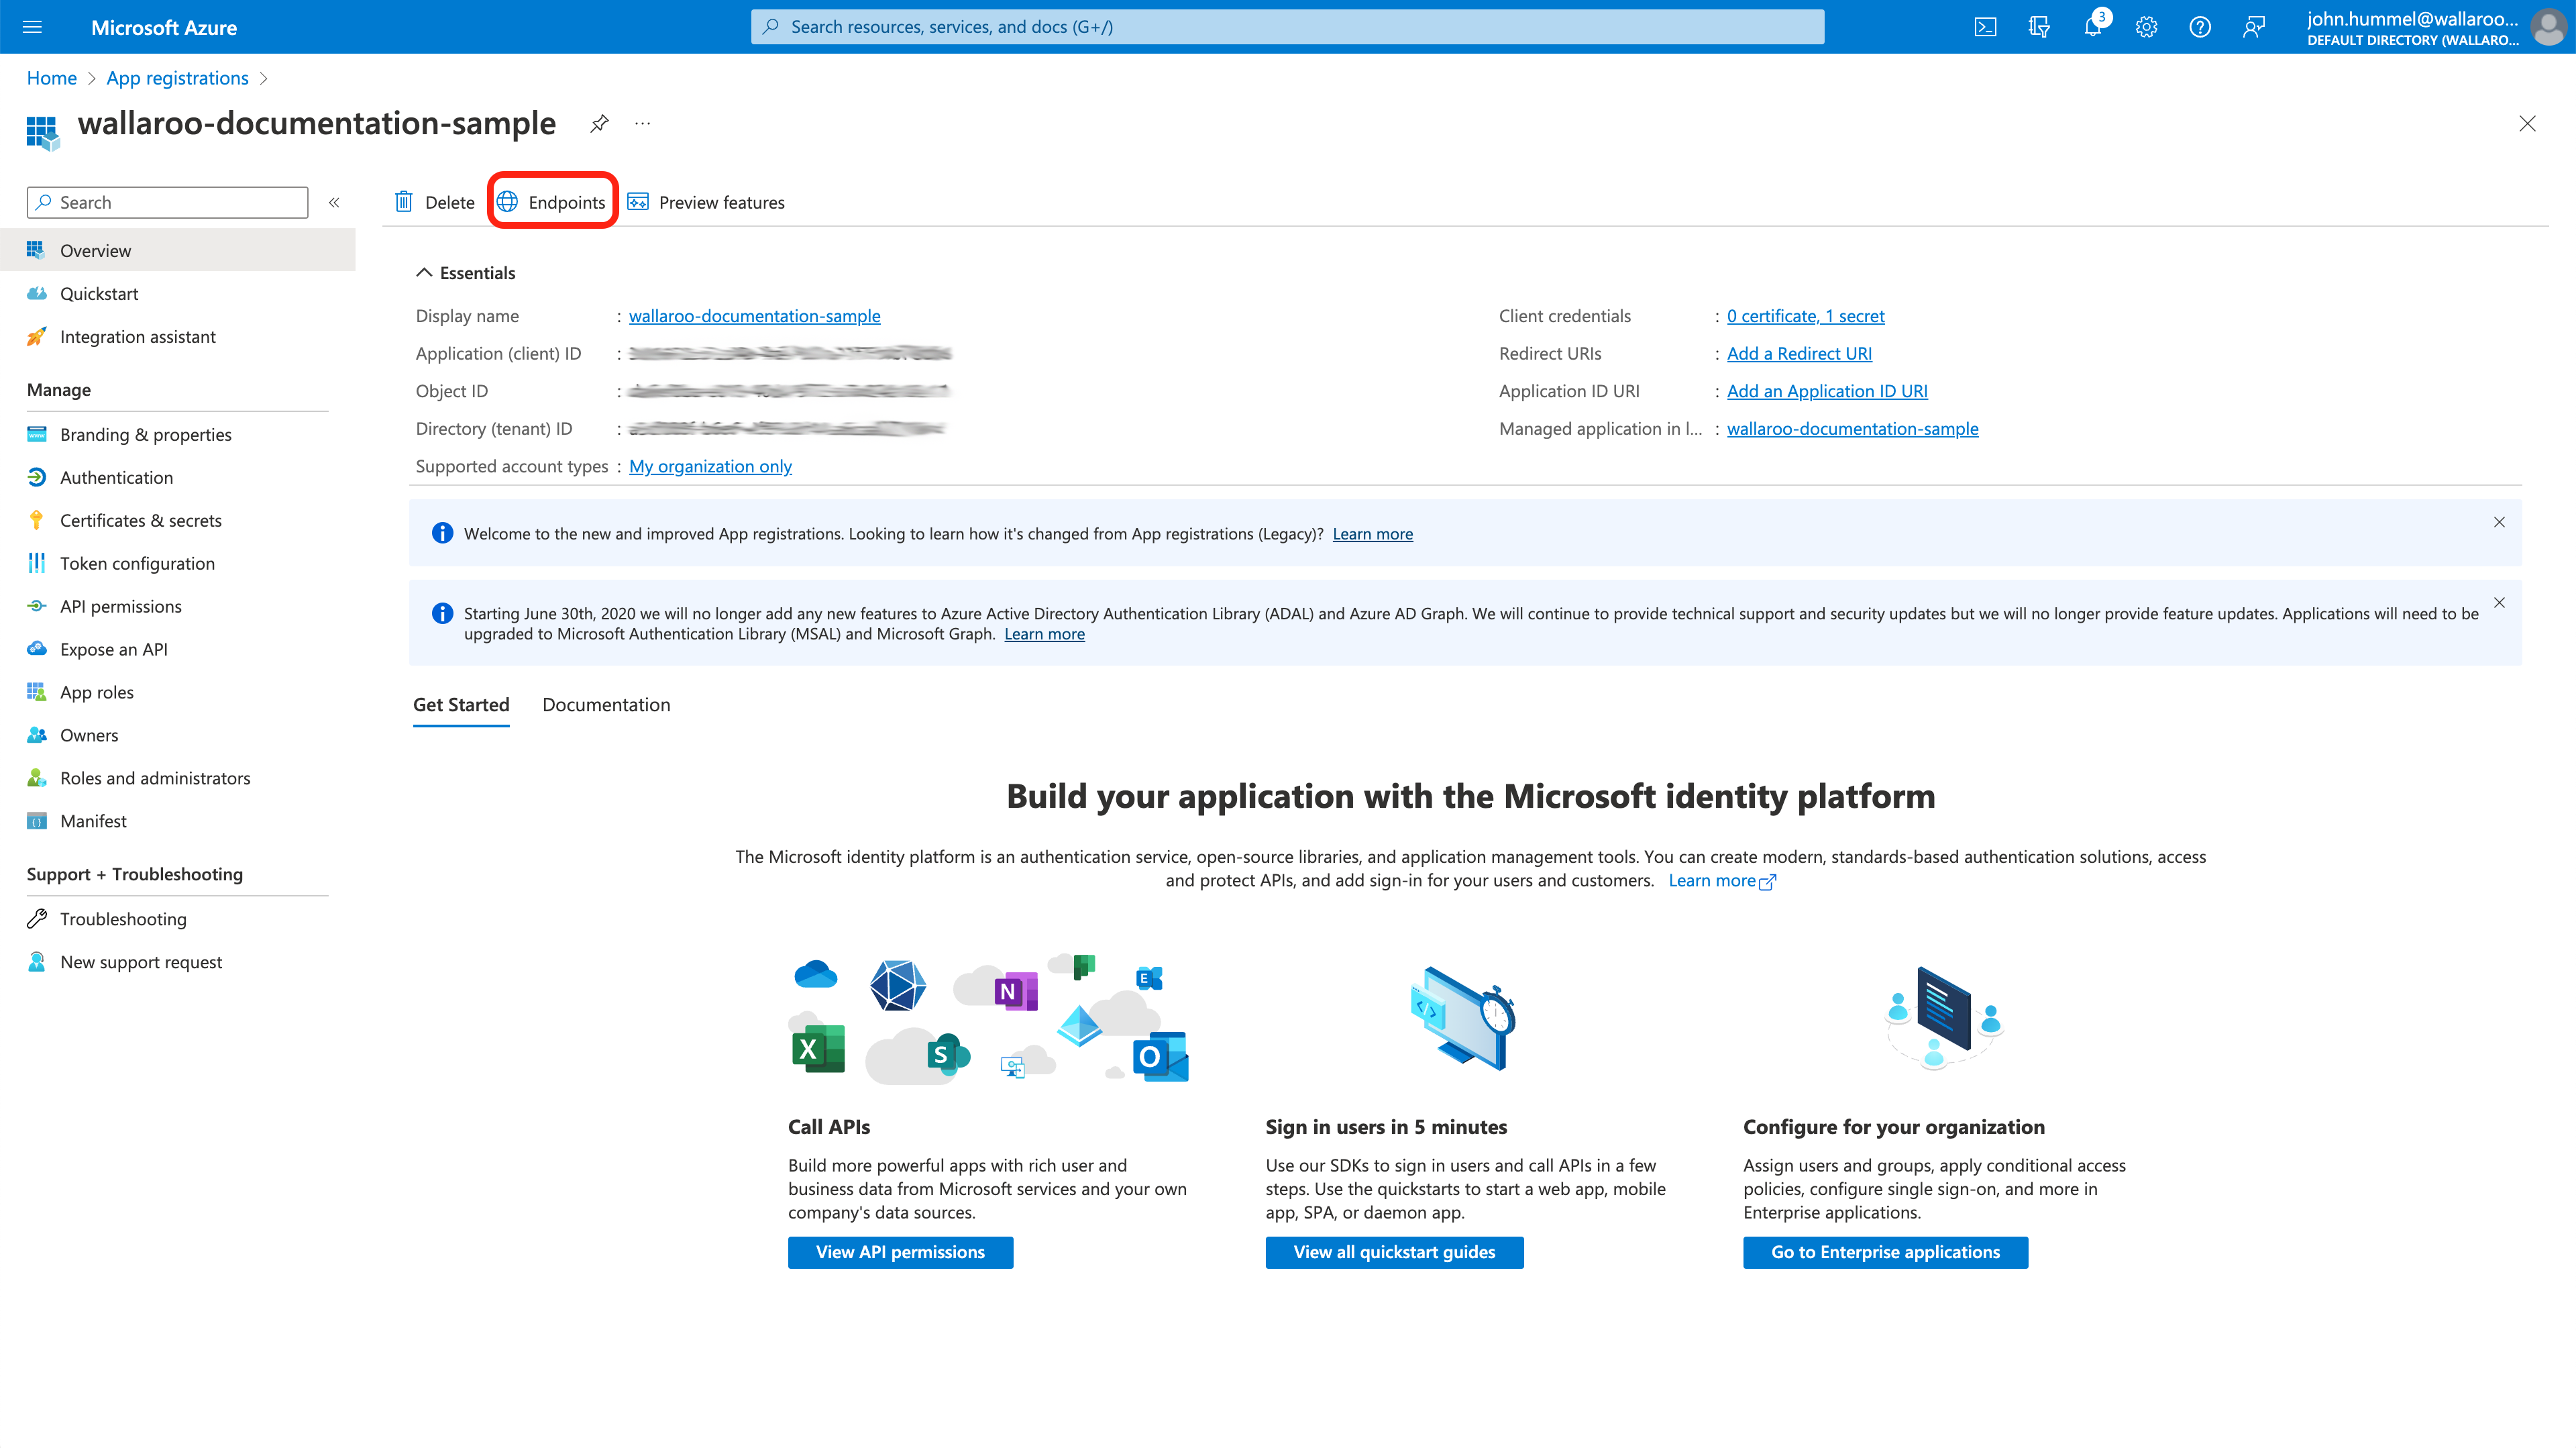
Store the Application ID
From the Overview screen, store the following in a secure location:
With the Azure credentials saved from the Create the Azure Credentials step, they can now be added into the Wallaroo Keycloak service.
Login to the Wallaroo Keycloak service with a Wallaroo admin account from the URL in the format https://$PREFIX.keycloak.$SUFFIX.
For example, if the Wallaroo prefix is silky-lions-3657, the name of the Wallaroo Keycloak Identity Provider is azure, and the suffix is wallaroo.ai, then the Keycloak endpoint URL would be silky-lions-3657.keycloak.wallaroo.ai. For more information see the DNS Integration Guide.
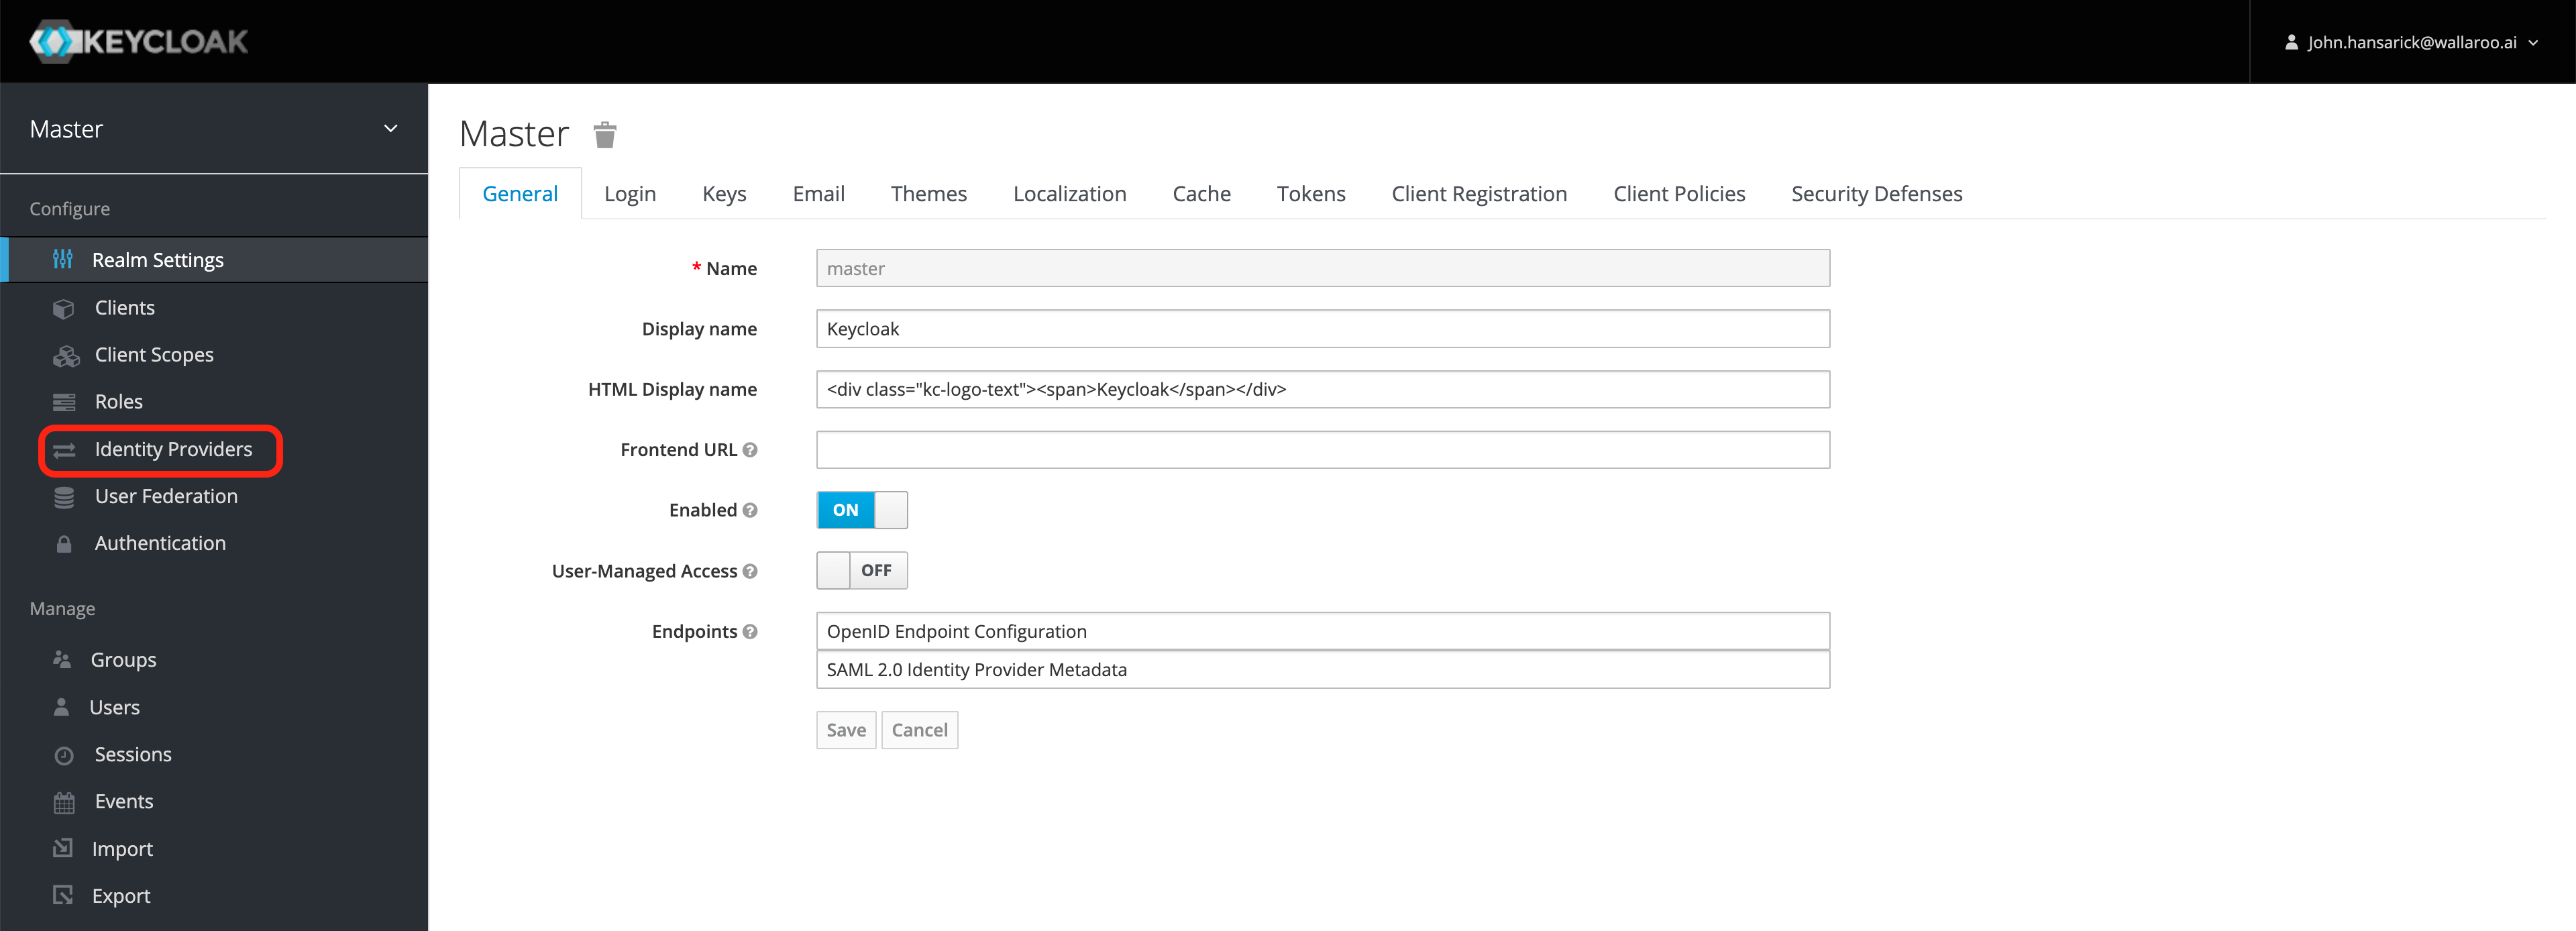
Select Administration Console, then from the left navigation panel select Identity Providers.
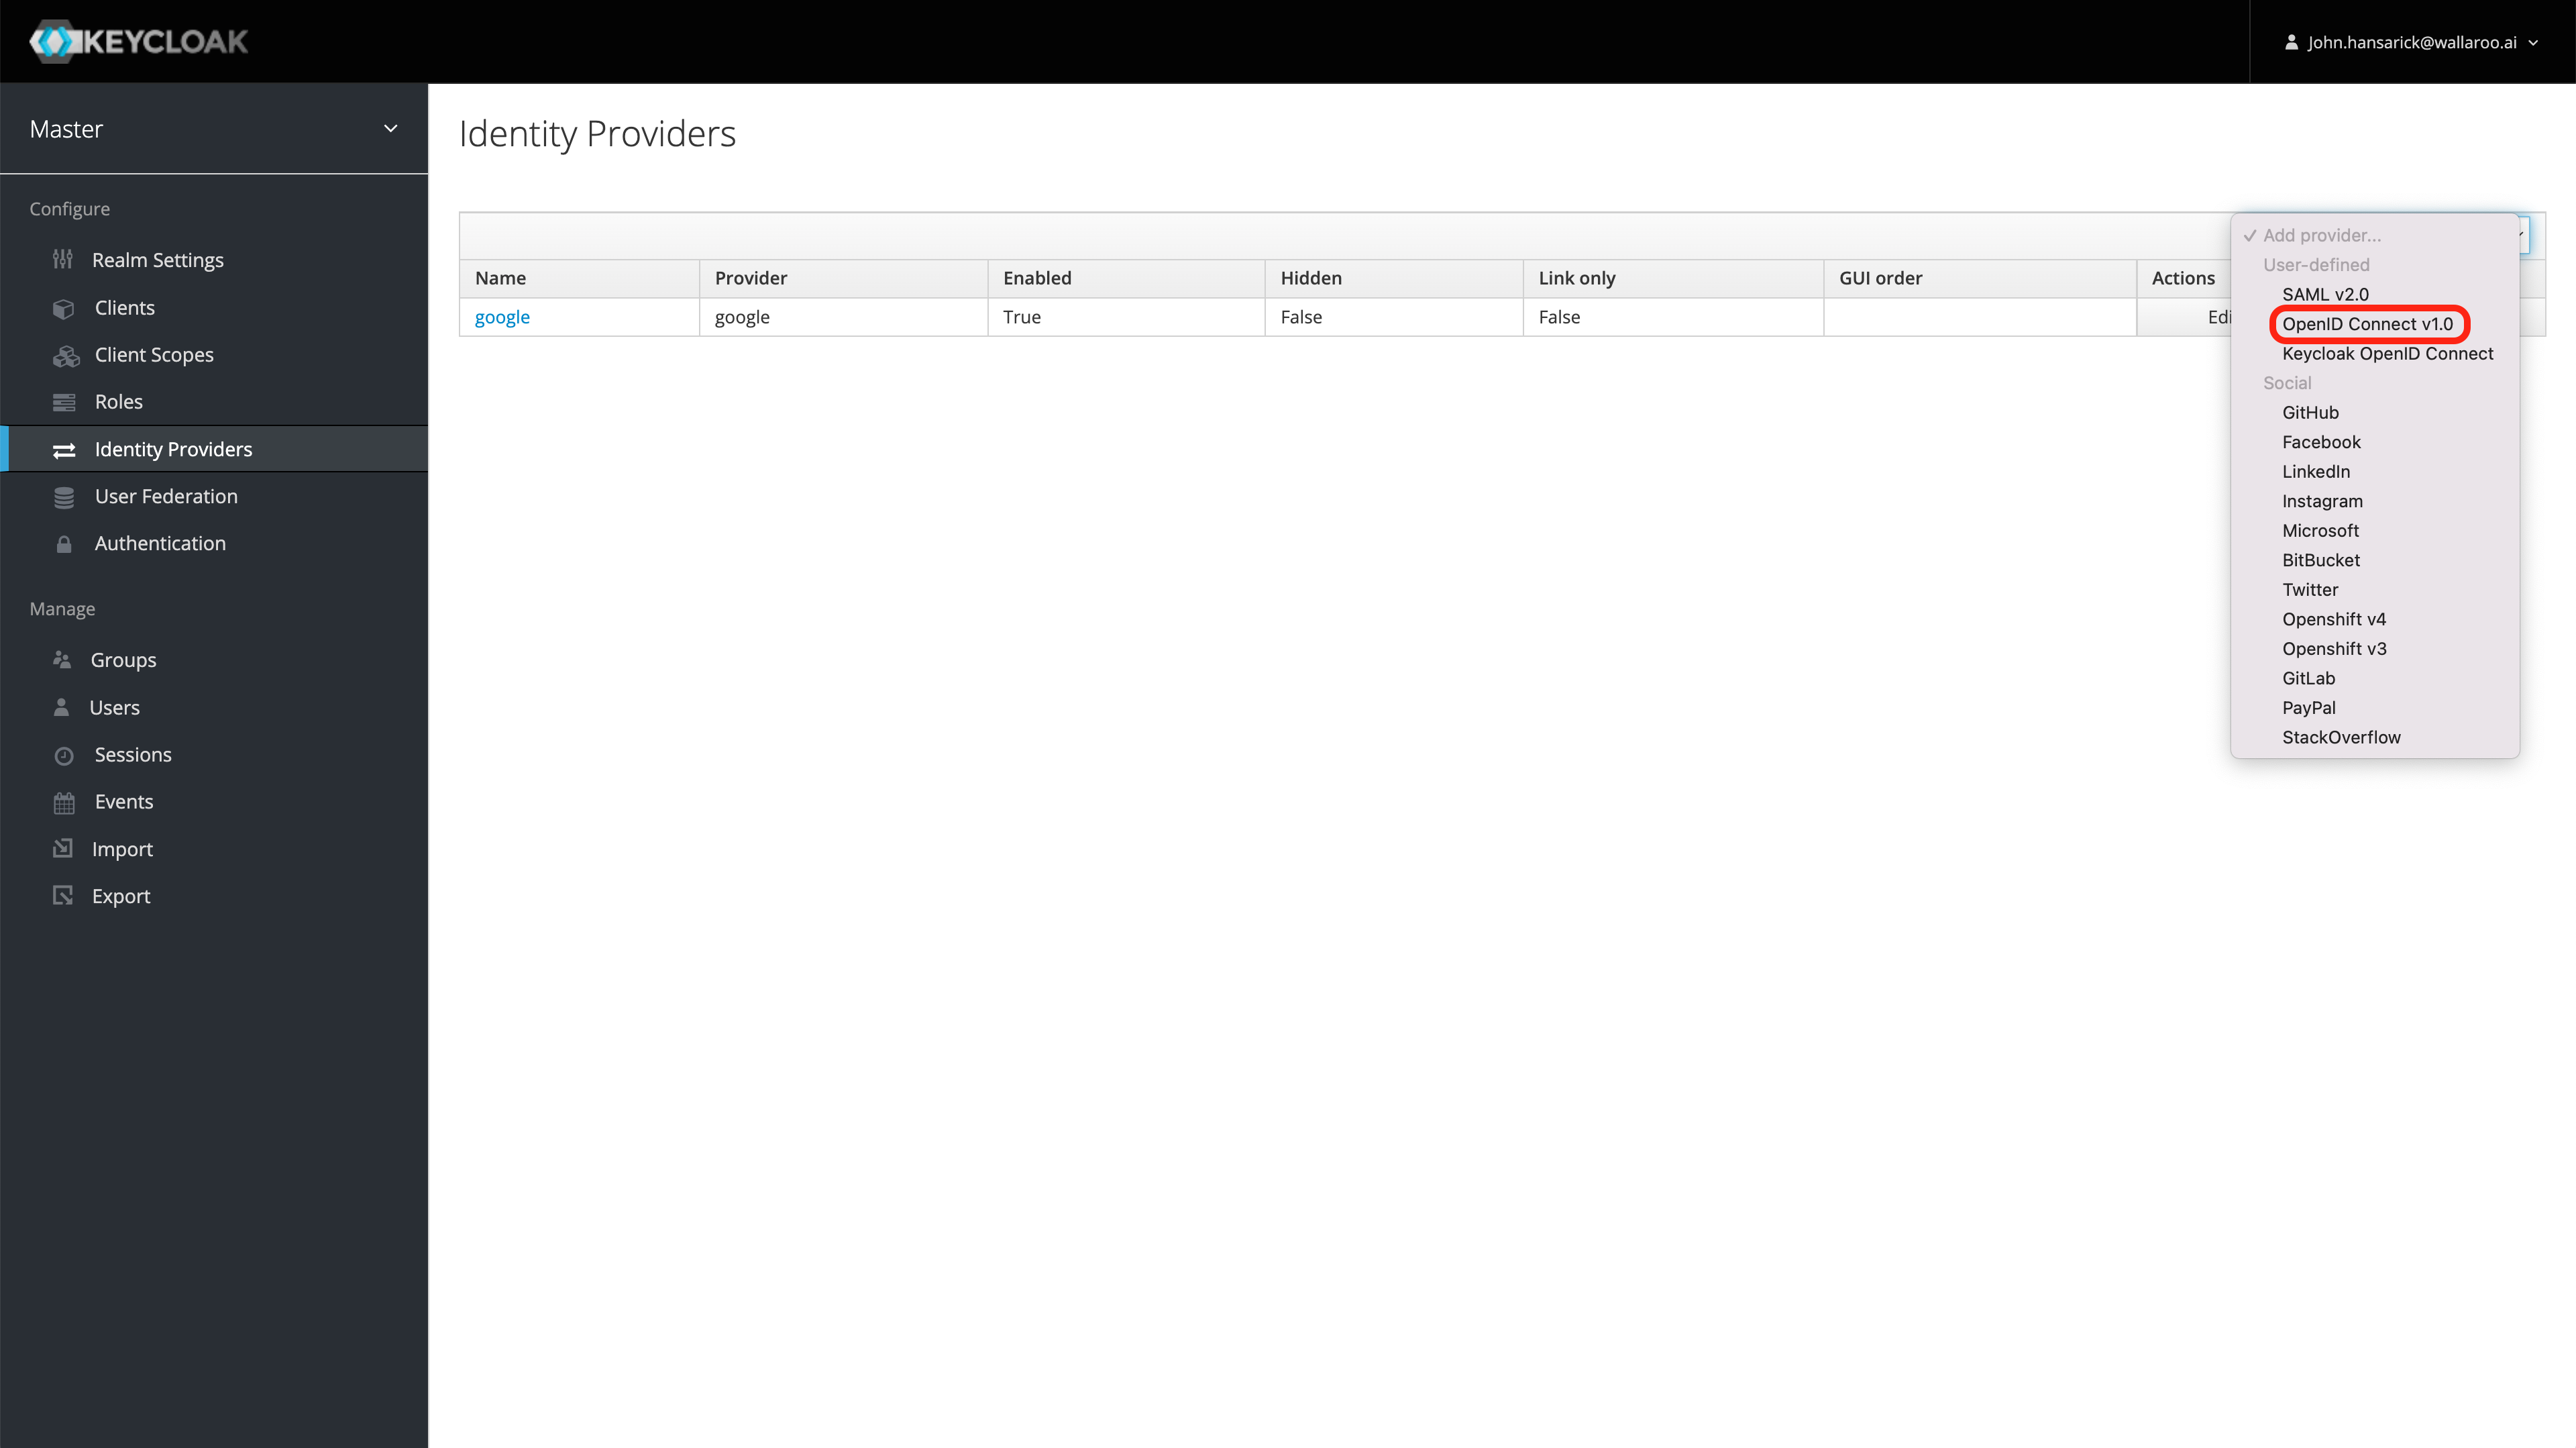
From the right Add provider… drop down menu select OpenID Connect v1.0.
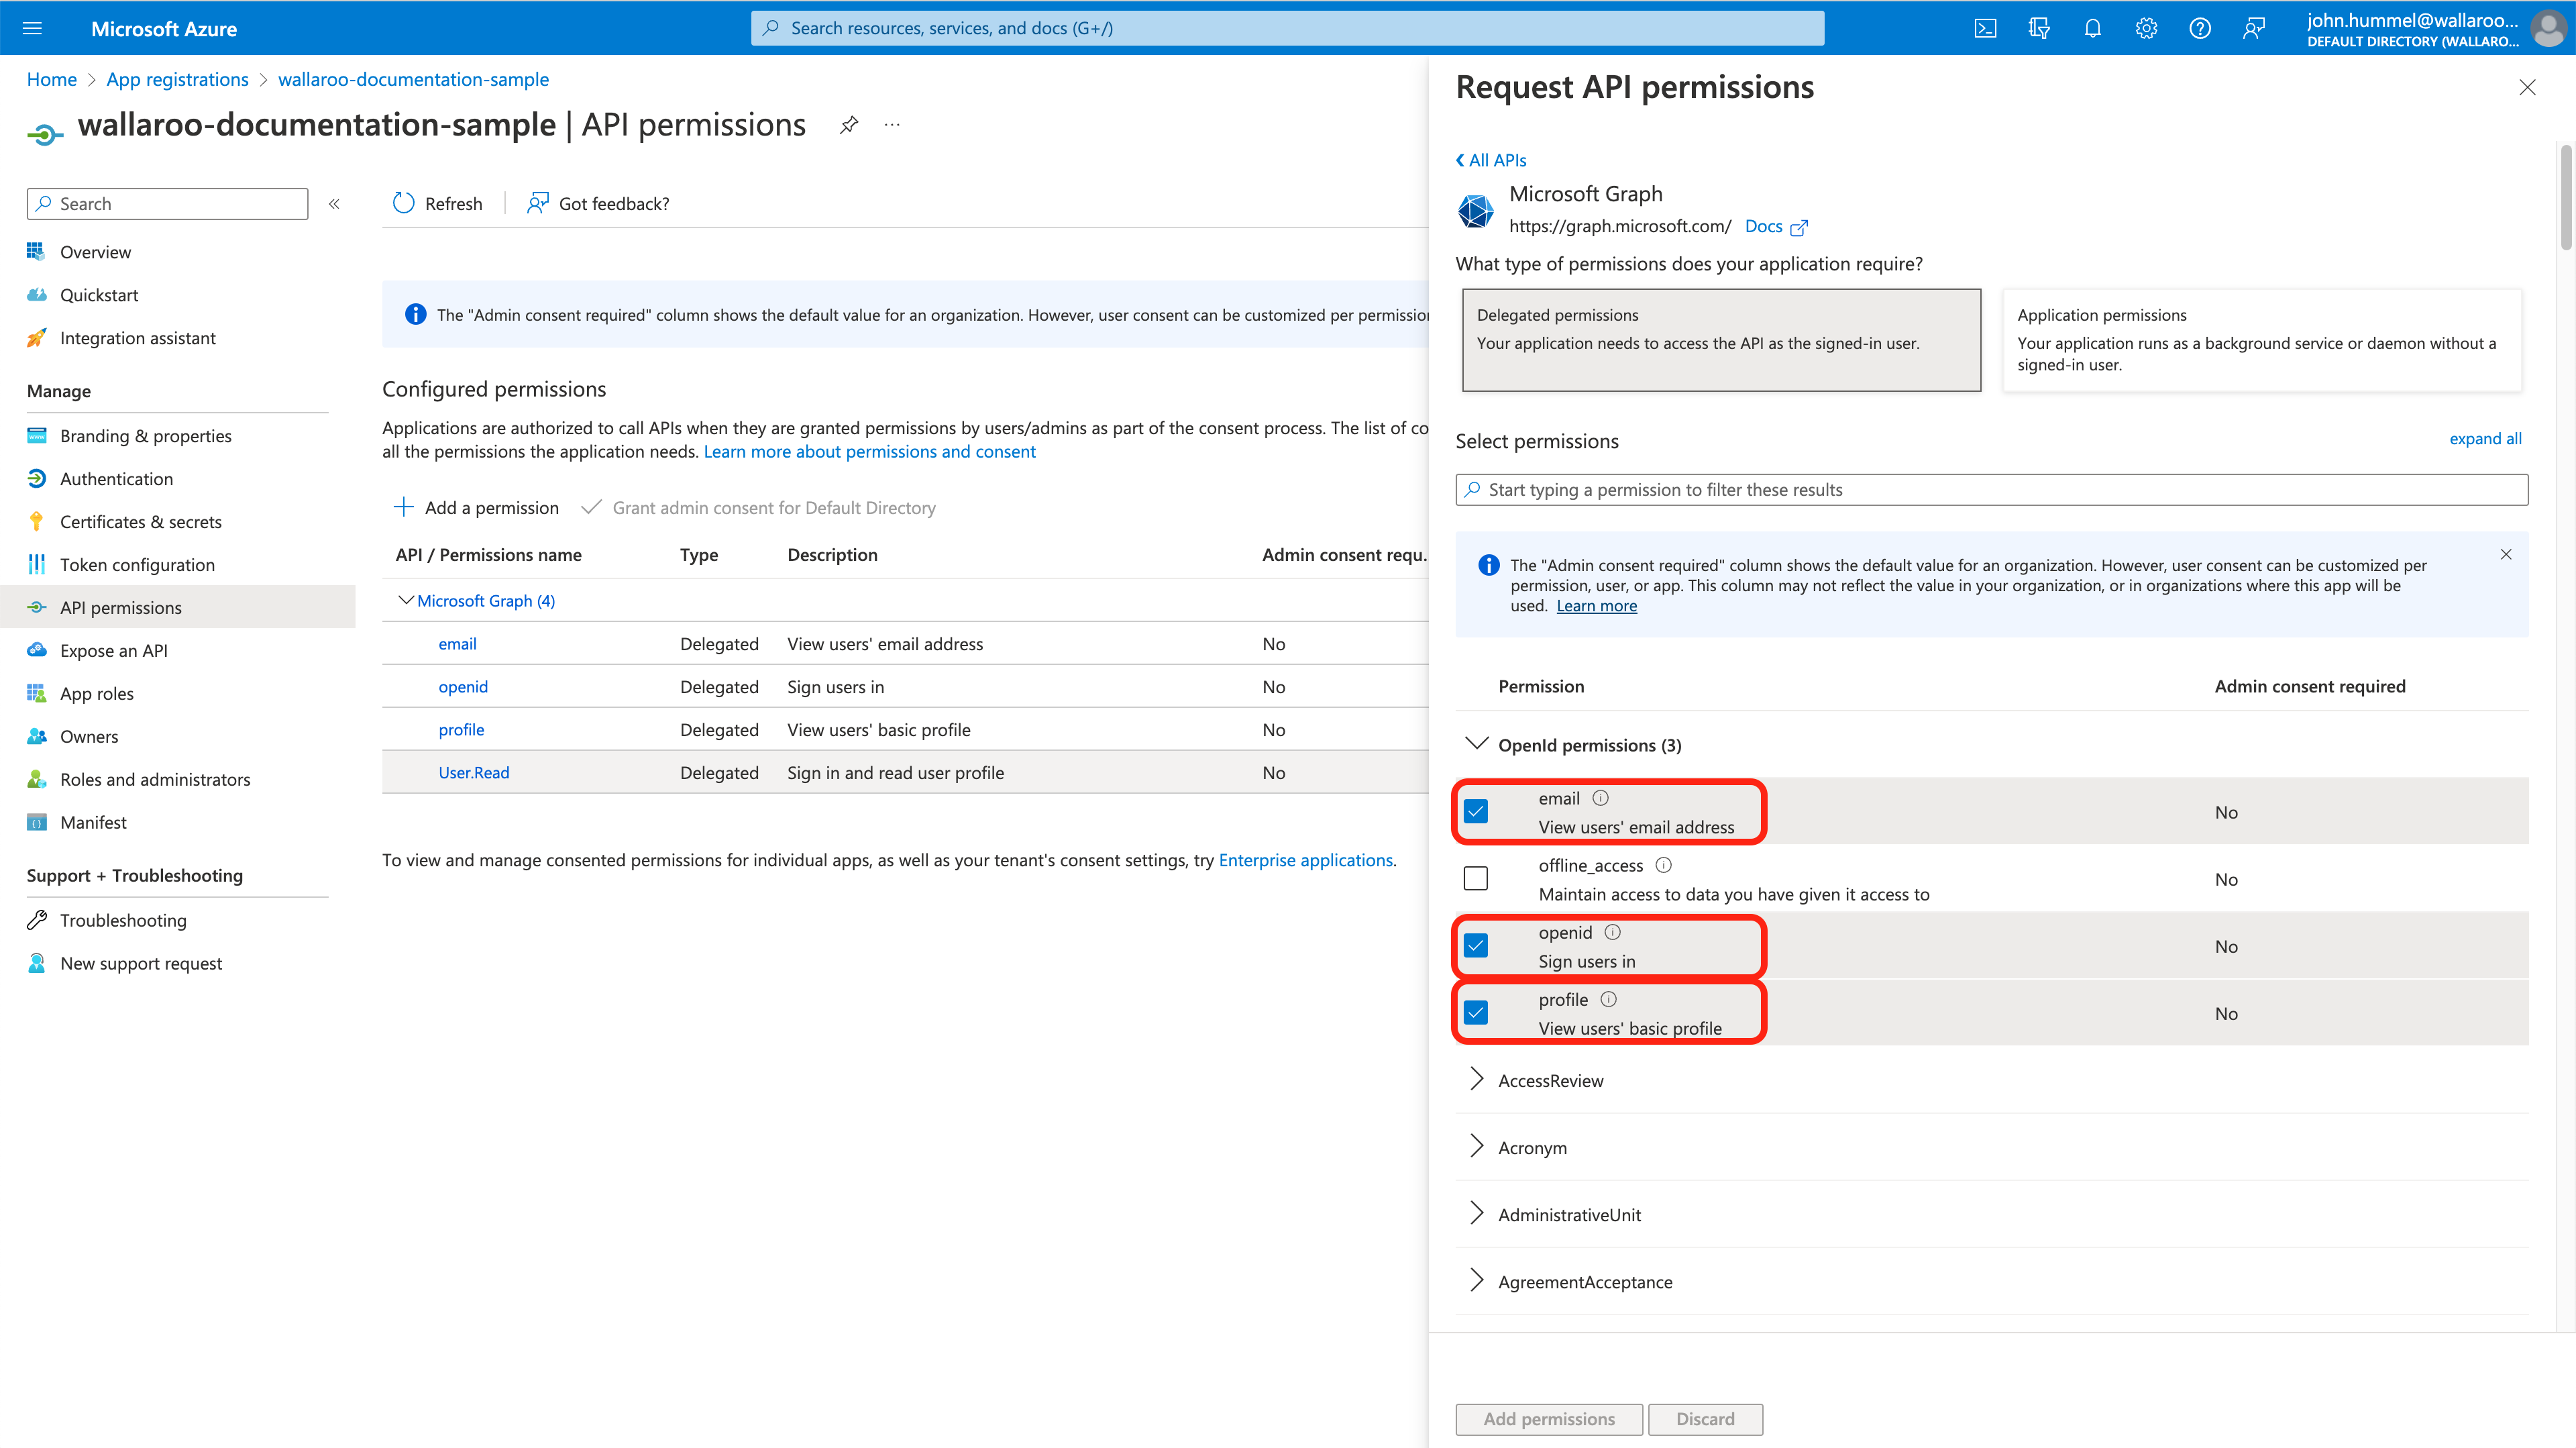
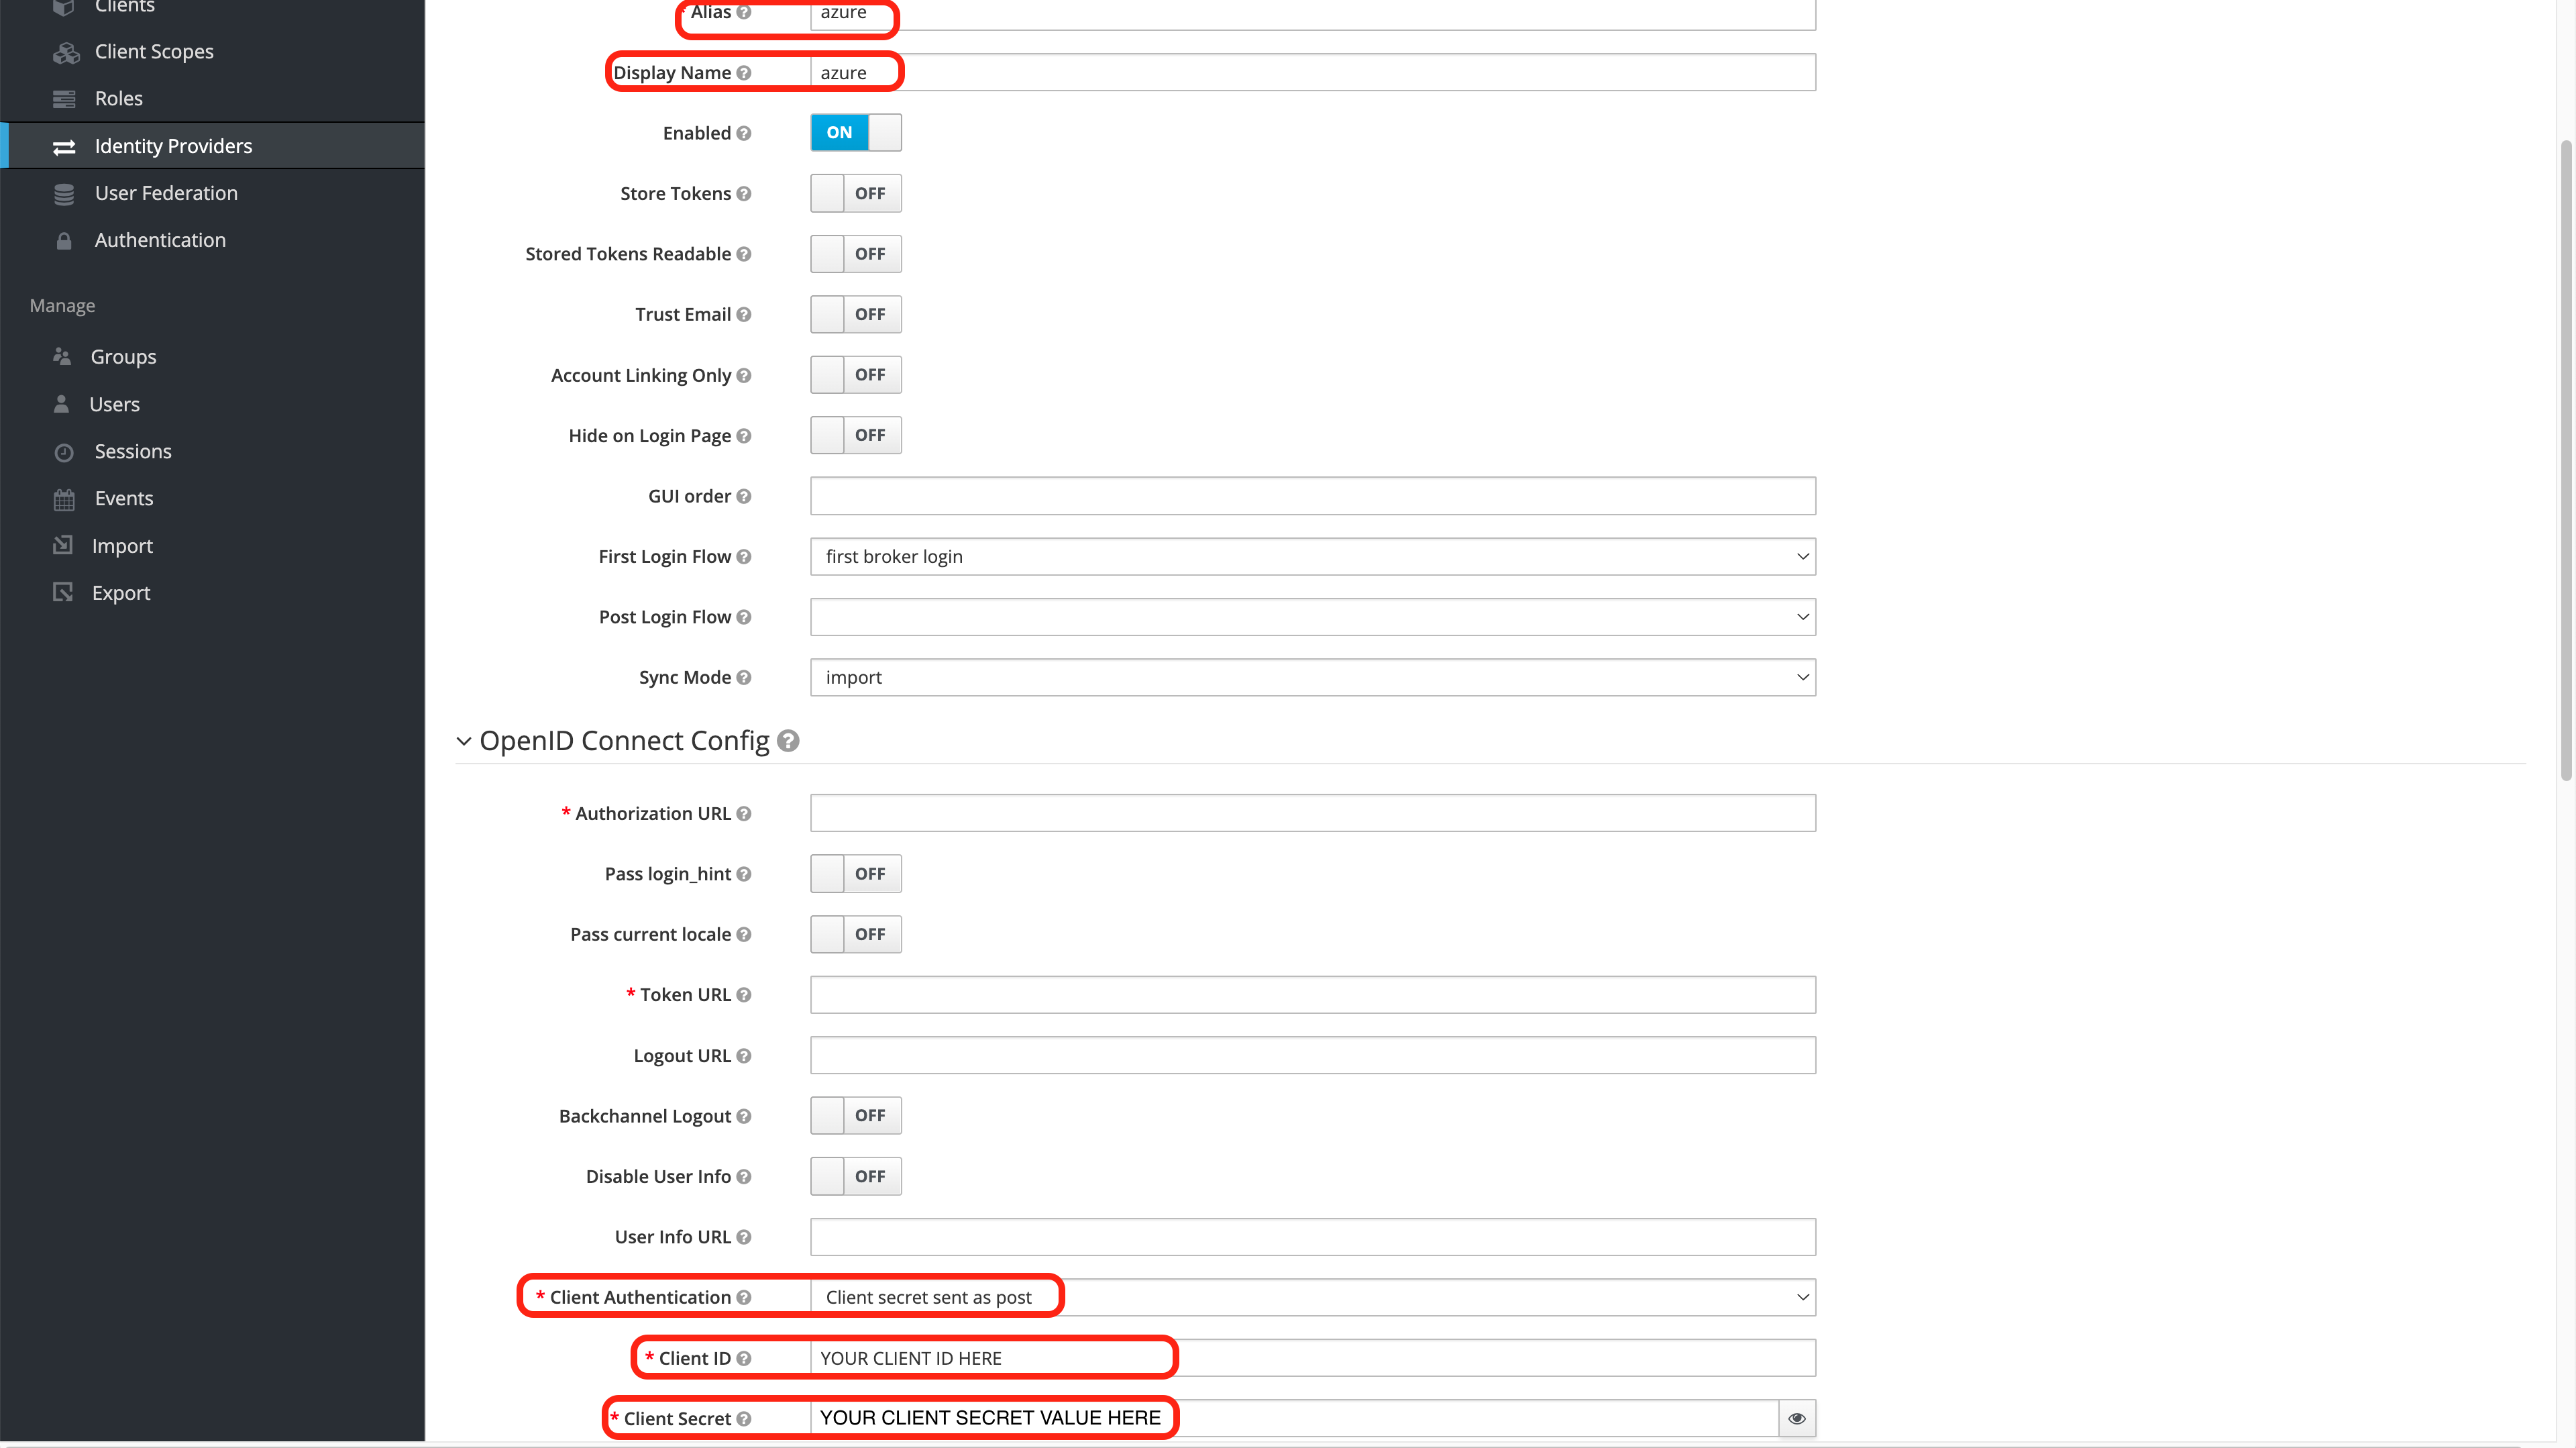
From the Add identity provider screen, add the following:
alias: The name of the the Identity Provider. IMPORTANT NOTE: This will determine the Redirect URI value that is used in the Create the Azure Credentials step. Verify that the Redirect URI in both steps are the same.
Display Name: The name that will be shown on the Wallaroo instance login screen.
Client Authentication: Set to Client secret sent as post.
Default Scopes: Set to openid email profile - one space between each word.
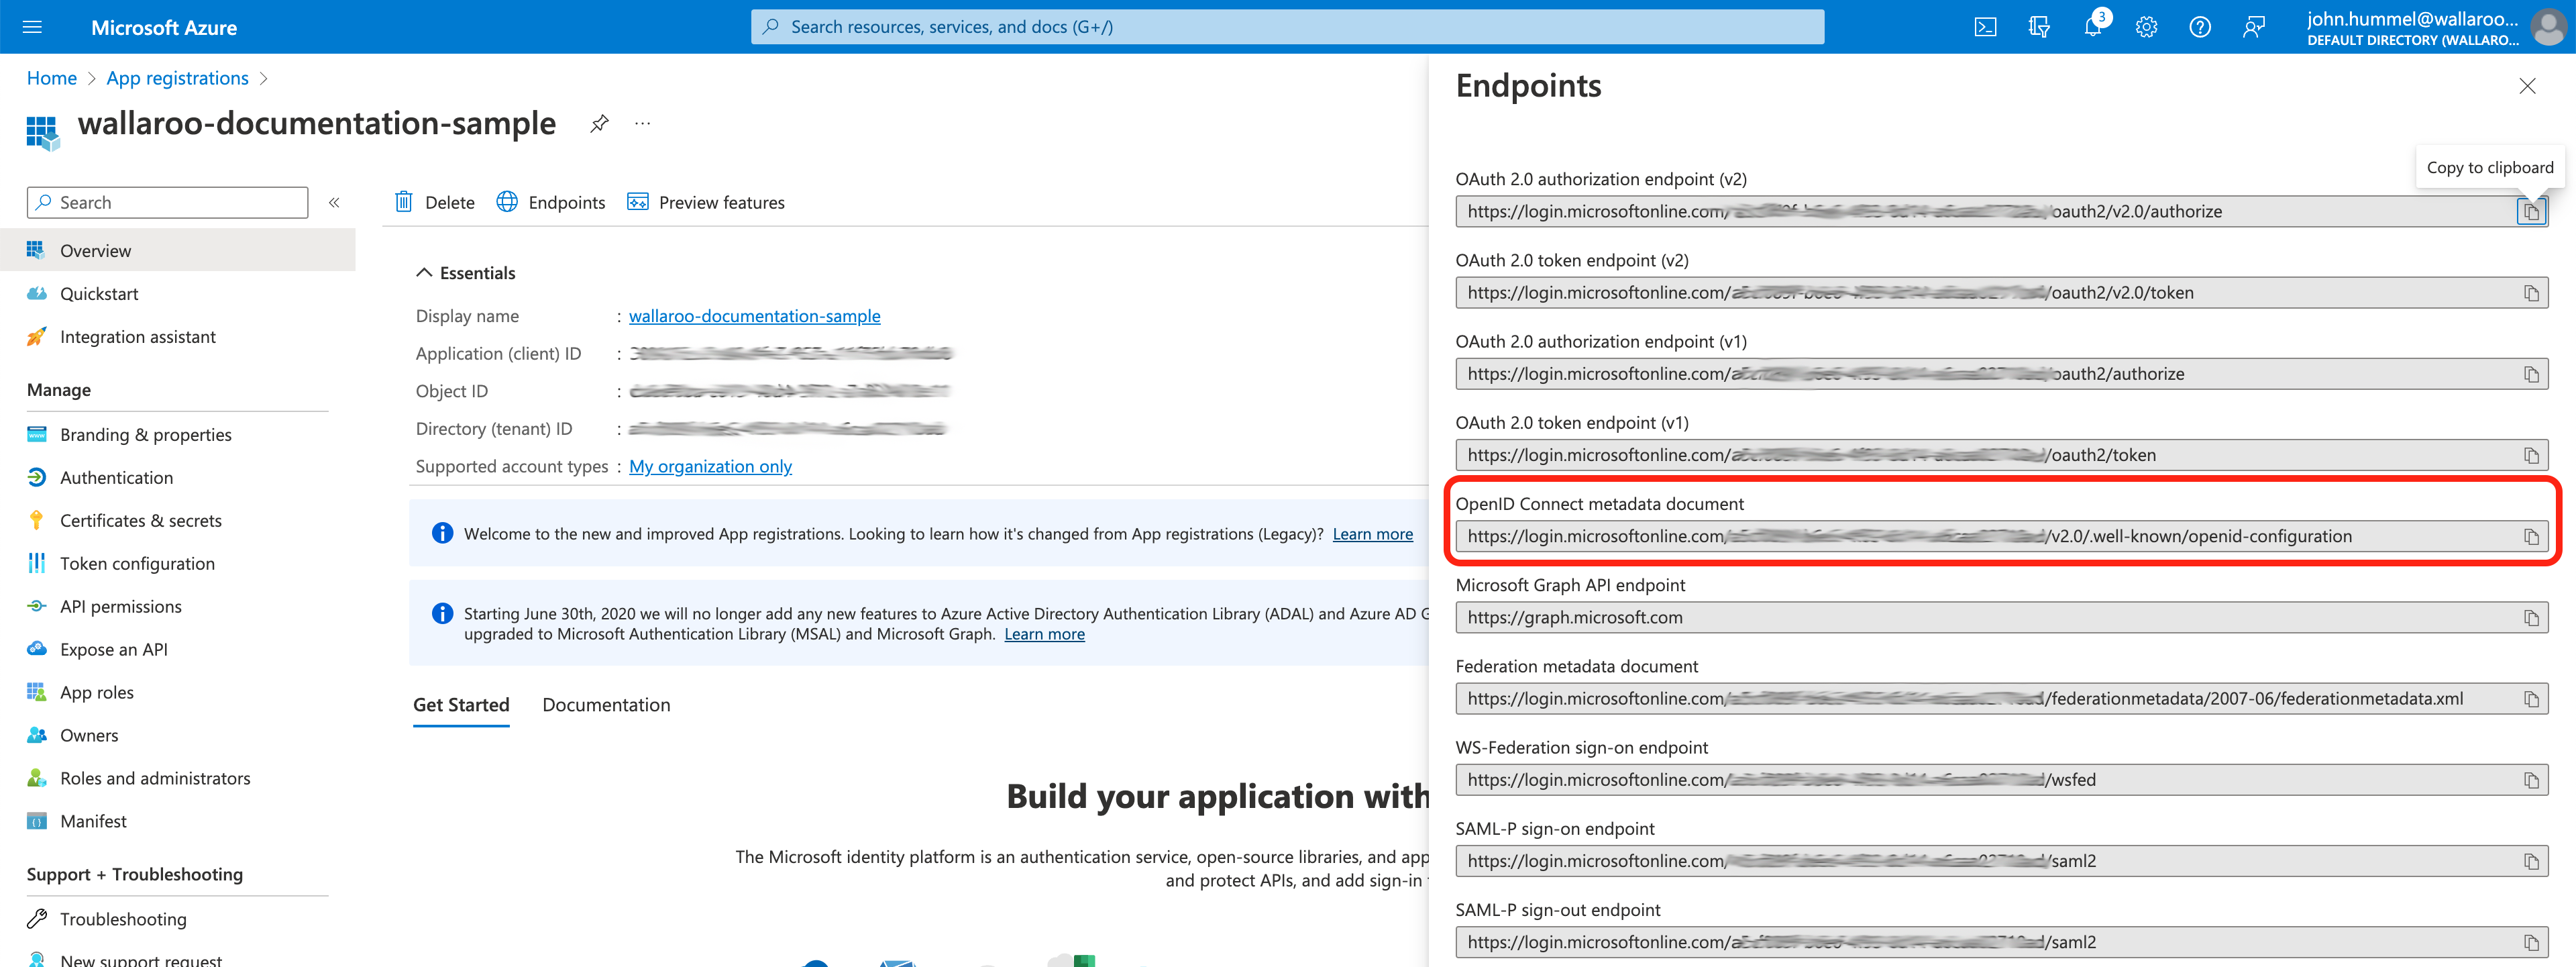
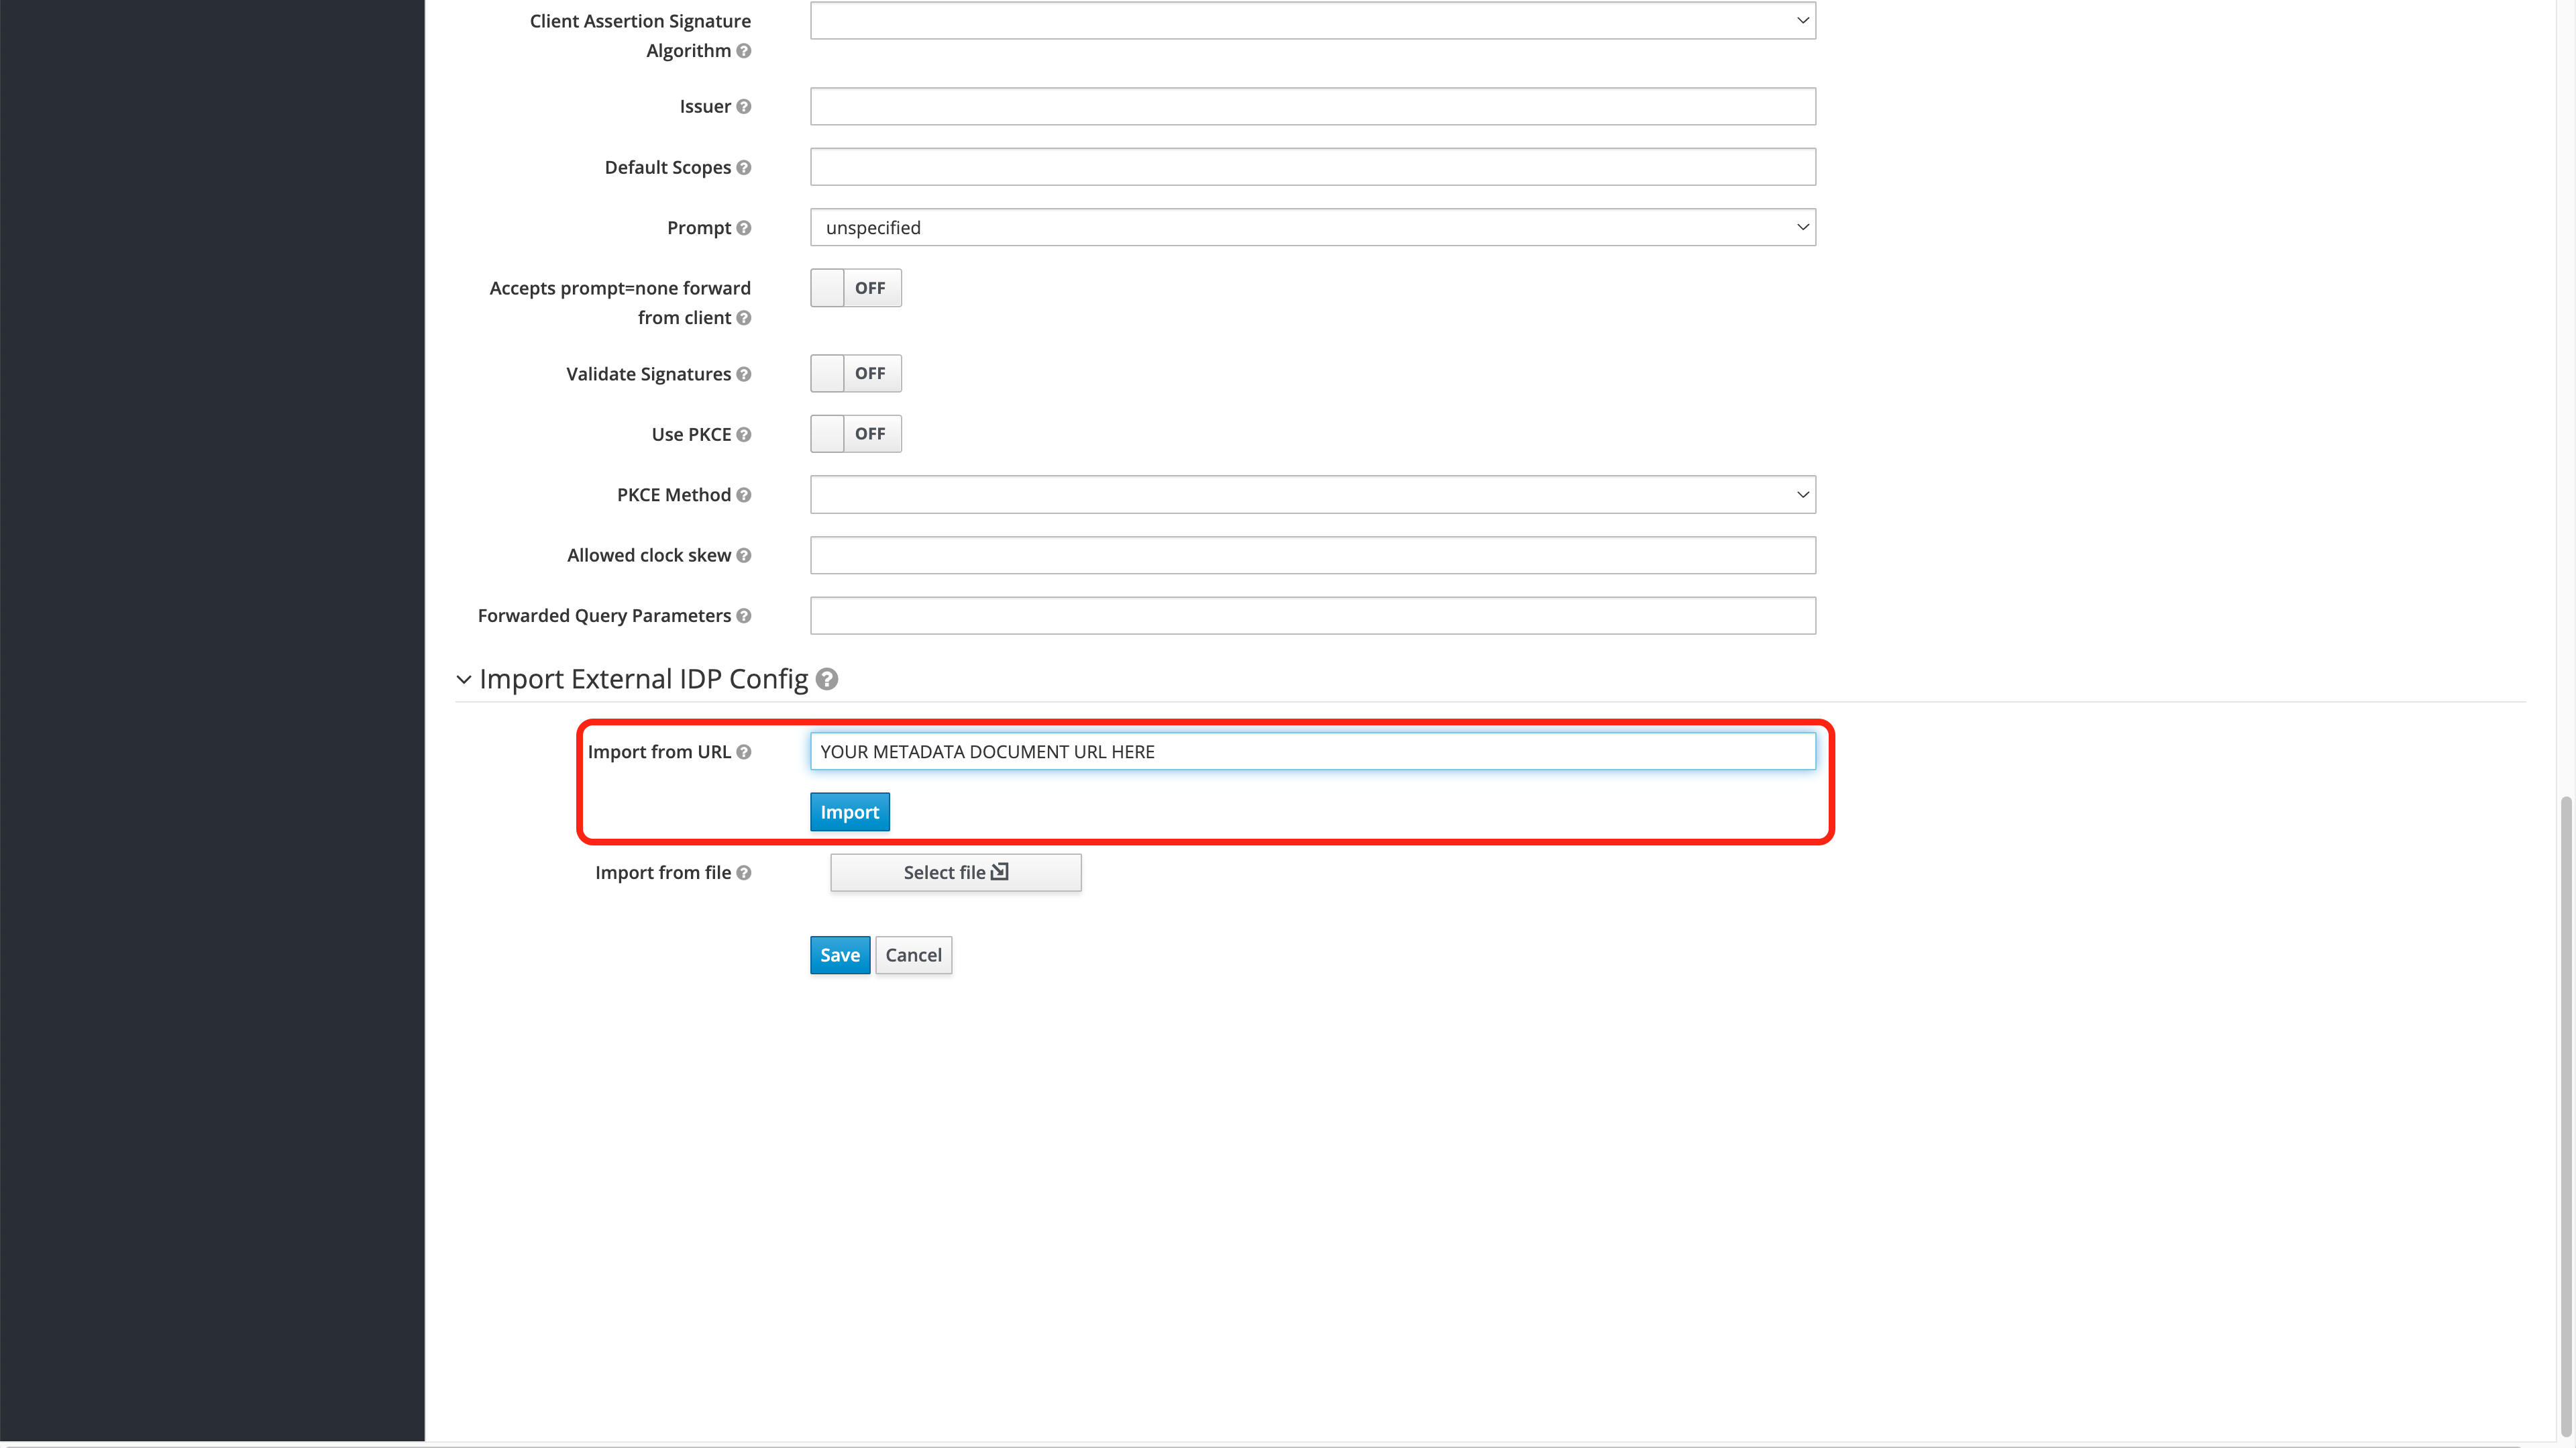
Scroll to the bottom of the page and in Import from URL, add the OpenID Connect metadata document created in the Create the Azure Credentials step. Select Import to set the Identity Provider settings.
Once complete, select Save to store the identity provider settings.
Once the Azure Identity Provider settings are complete, log out of the Keycloak service.
Verify the Login
After completing Add Azure Credentials to Wallaroo, the login can be verified through the following steps. This process will need to be completed the first time a user logs into the Wallaroo instance after the Azure Identity Provider settings are added.
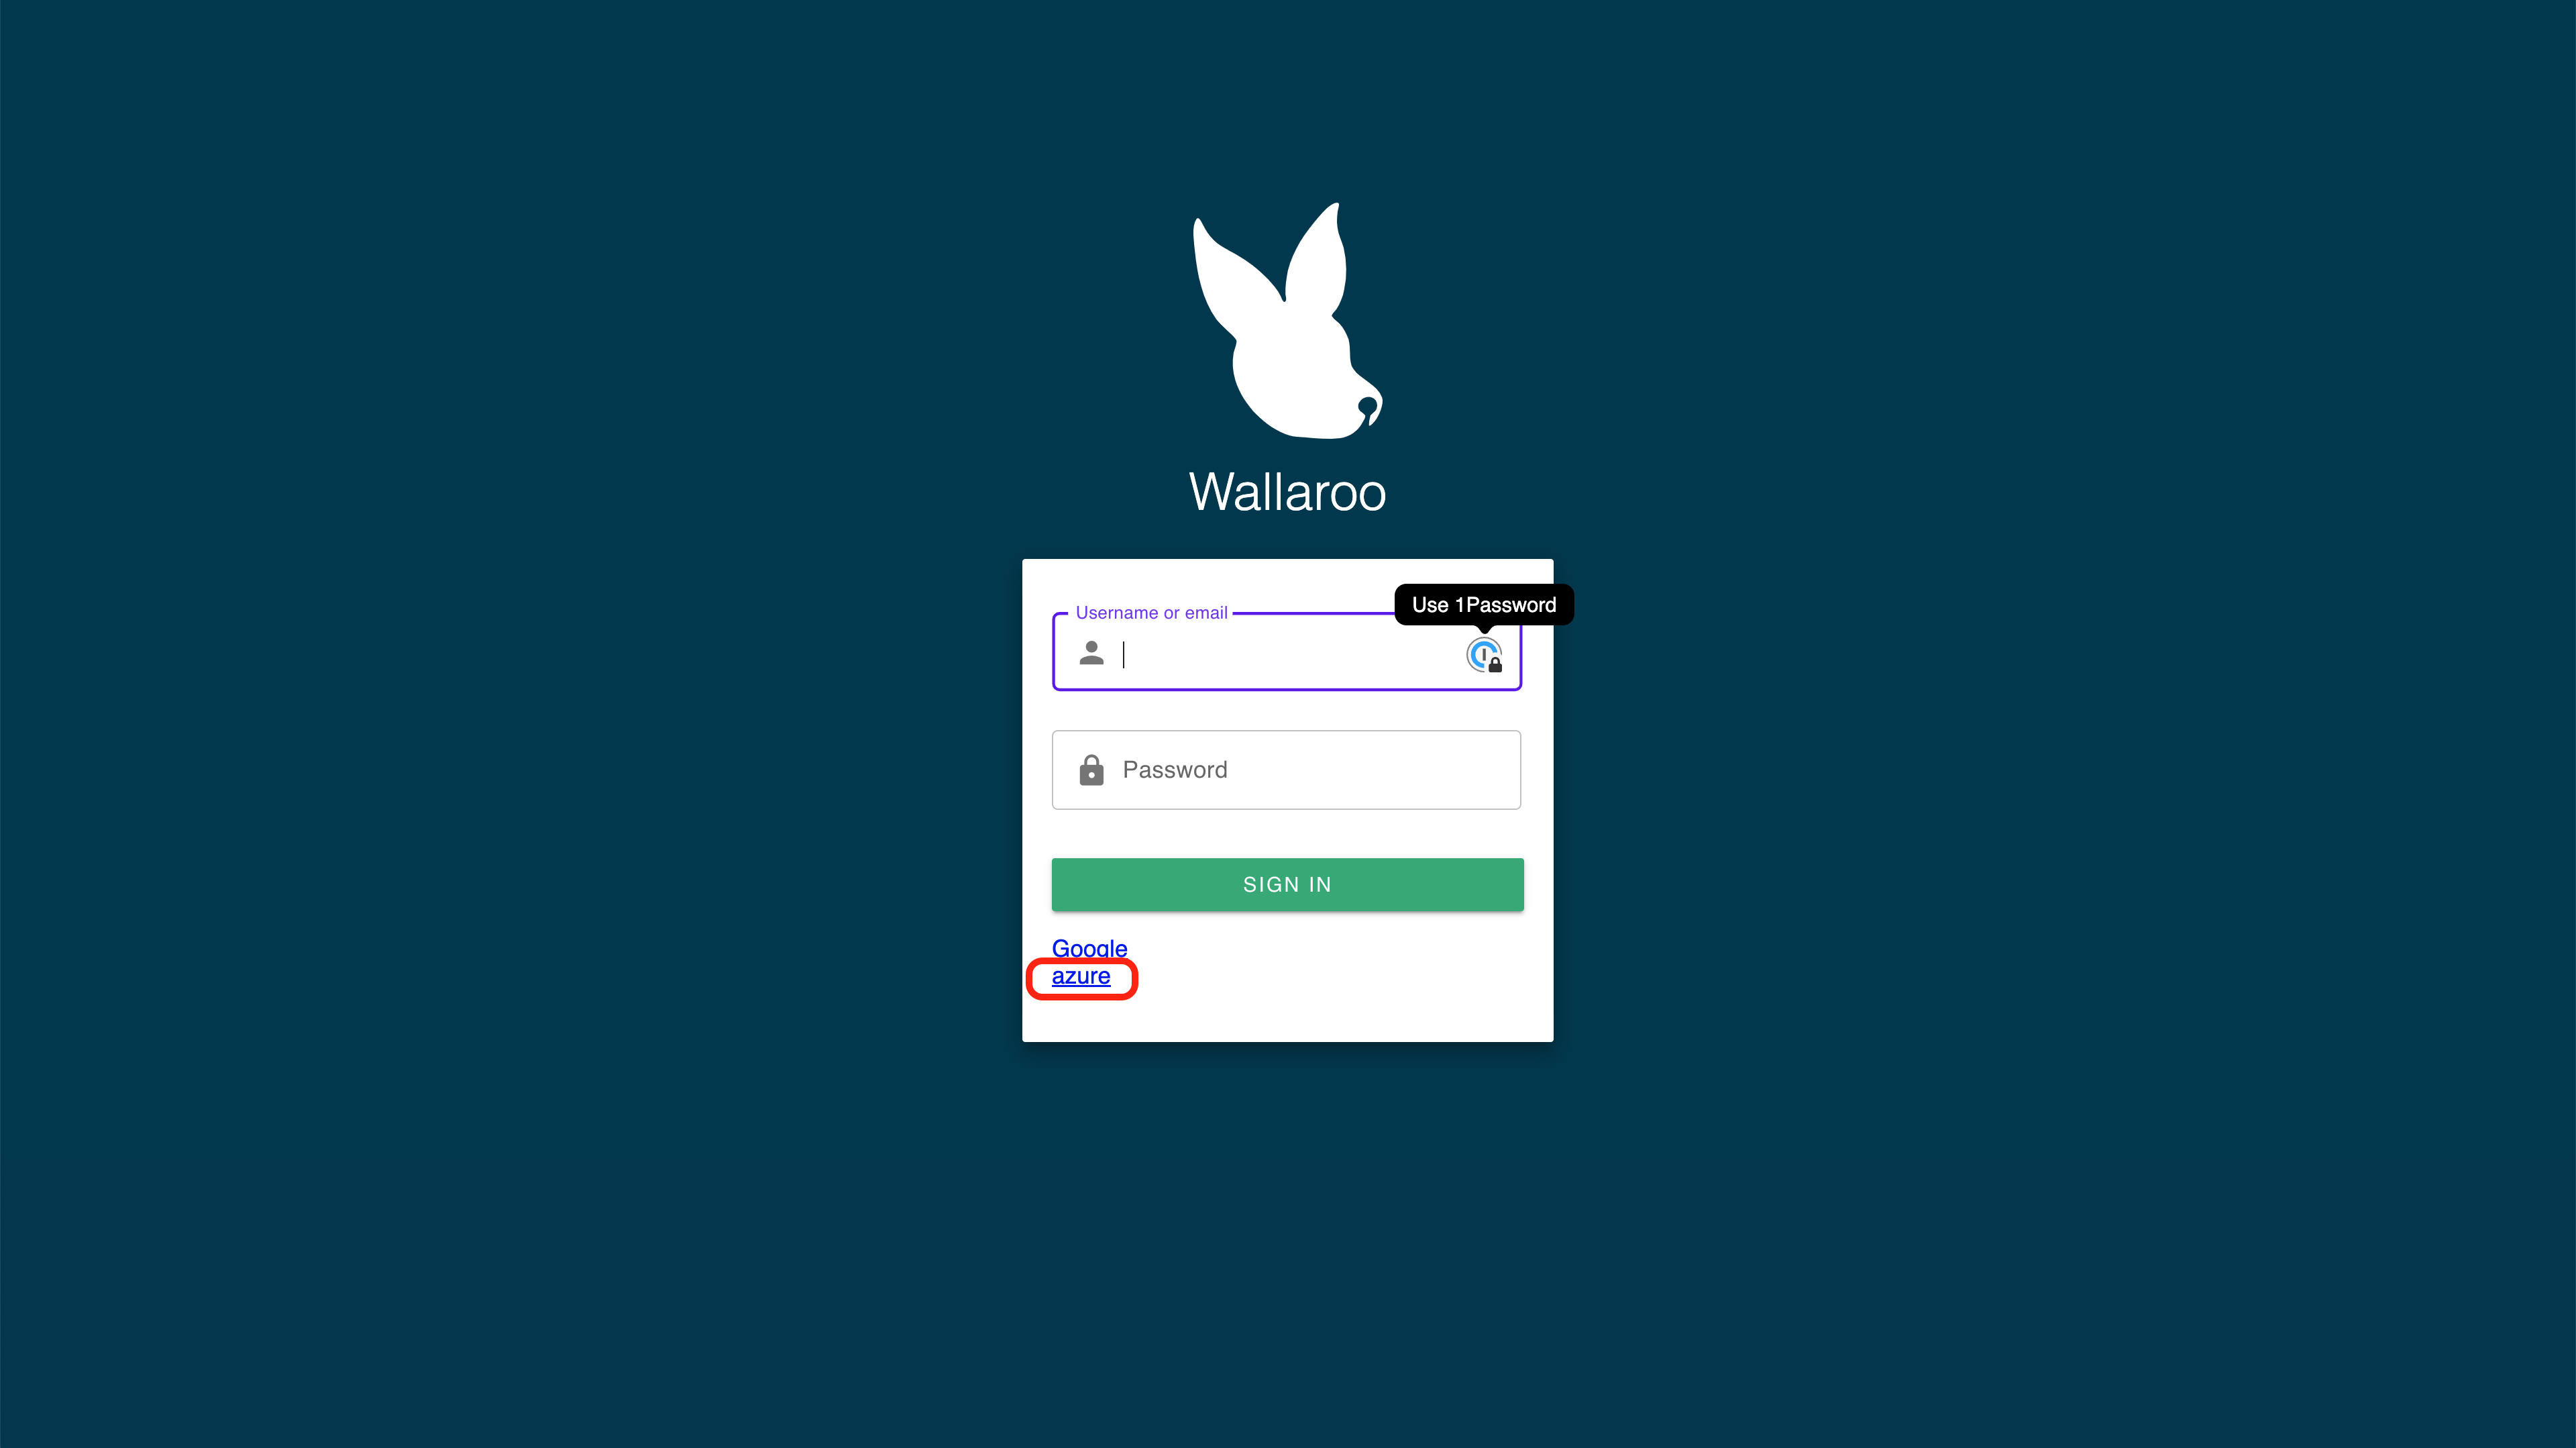
Go to the Wallaroo instance login page. The Azure Identity Provider will be displayed under the username and password request based on the Displey Name set in the Add Azure Credentials to Wallaroo step.
Select the Azure Identity Provider to login.
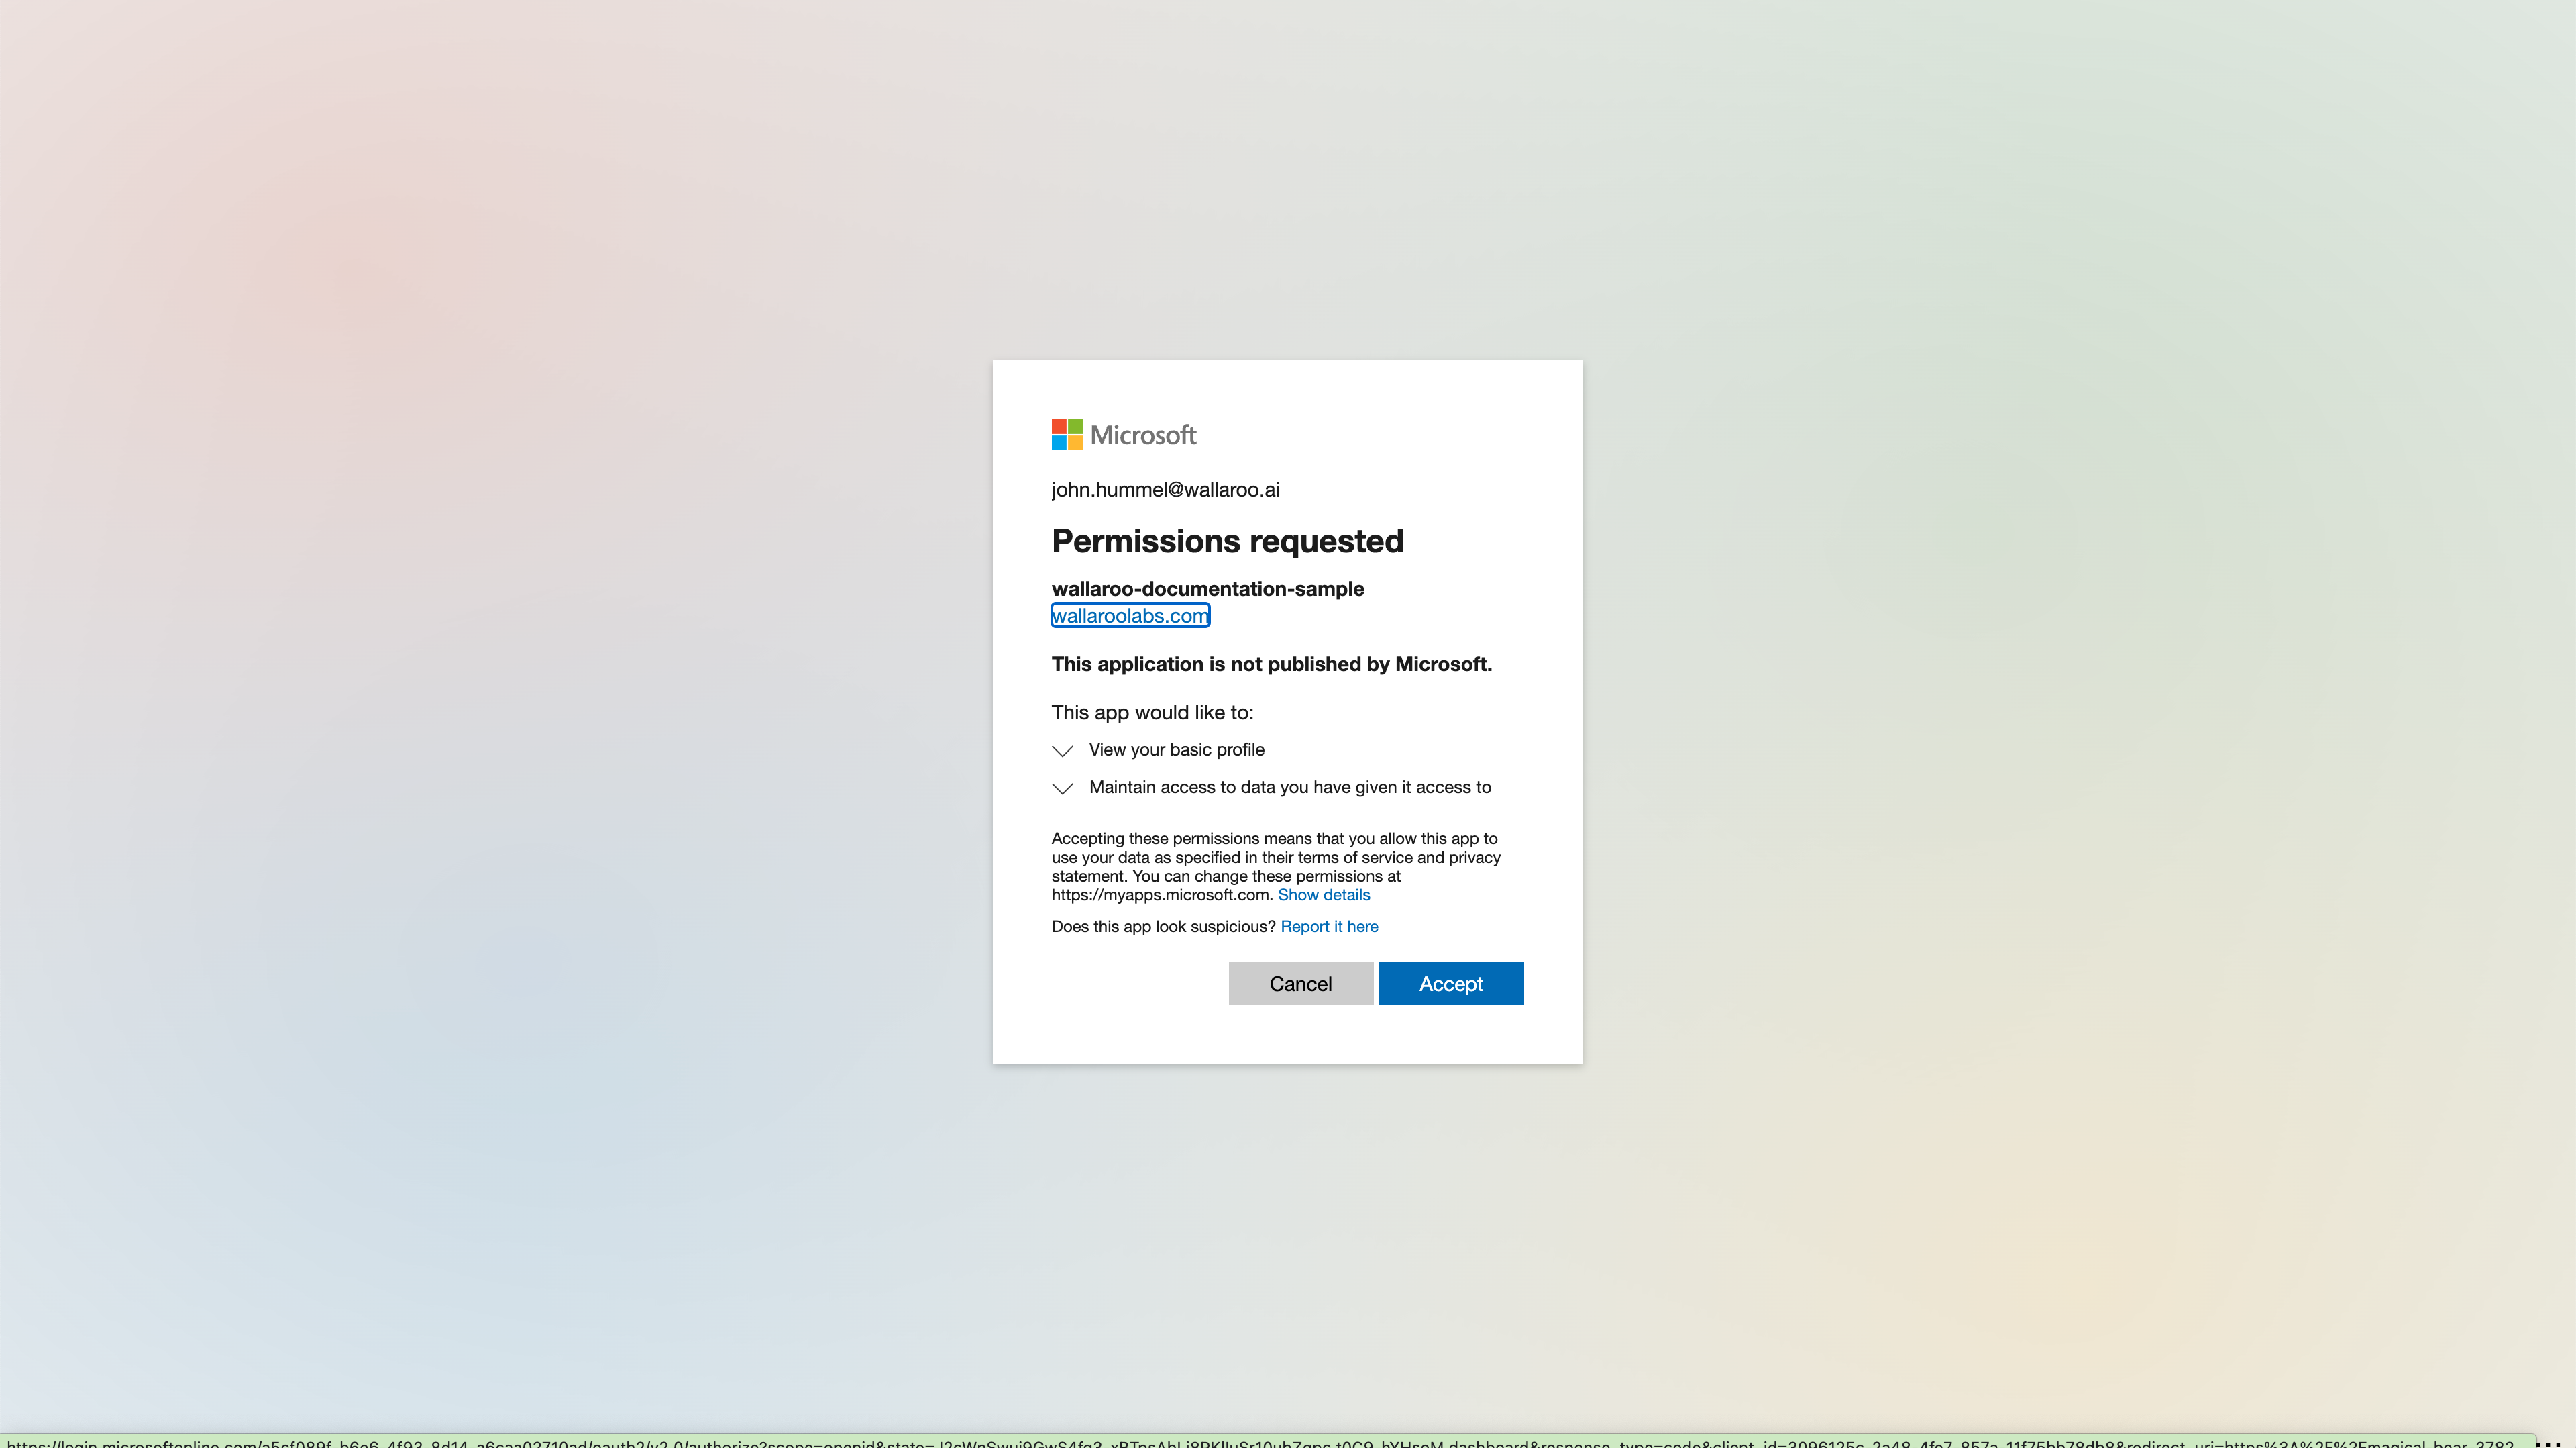
For the first login, grant permission to the application. You may be required to select which Microsoft Azure account is being used to authenticate.
Once complete, the new user will be added to the Wallaroo instance.
4.3 - Wallaroo SSO for Google Cloud Platform
Enable SSO authentication to Wallaroo from Google Cloud Platform (GCP)
Organizations can use Google Cloud Platform (GCP) as an identity provider for single sign-on (SSO) logins for users with Wallaroo Enterprise.
IMPORTANT NOTE
These instructions are for Wallaroo Enterprise edition only.
To enable Google Cloud Platform (GCP) as an authentication provider to a Wallaroo instance:
To create the GCP credentials a Wallaroo instance uses to authenticate users:
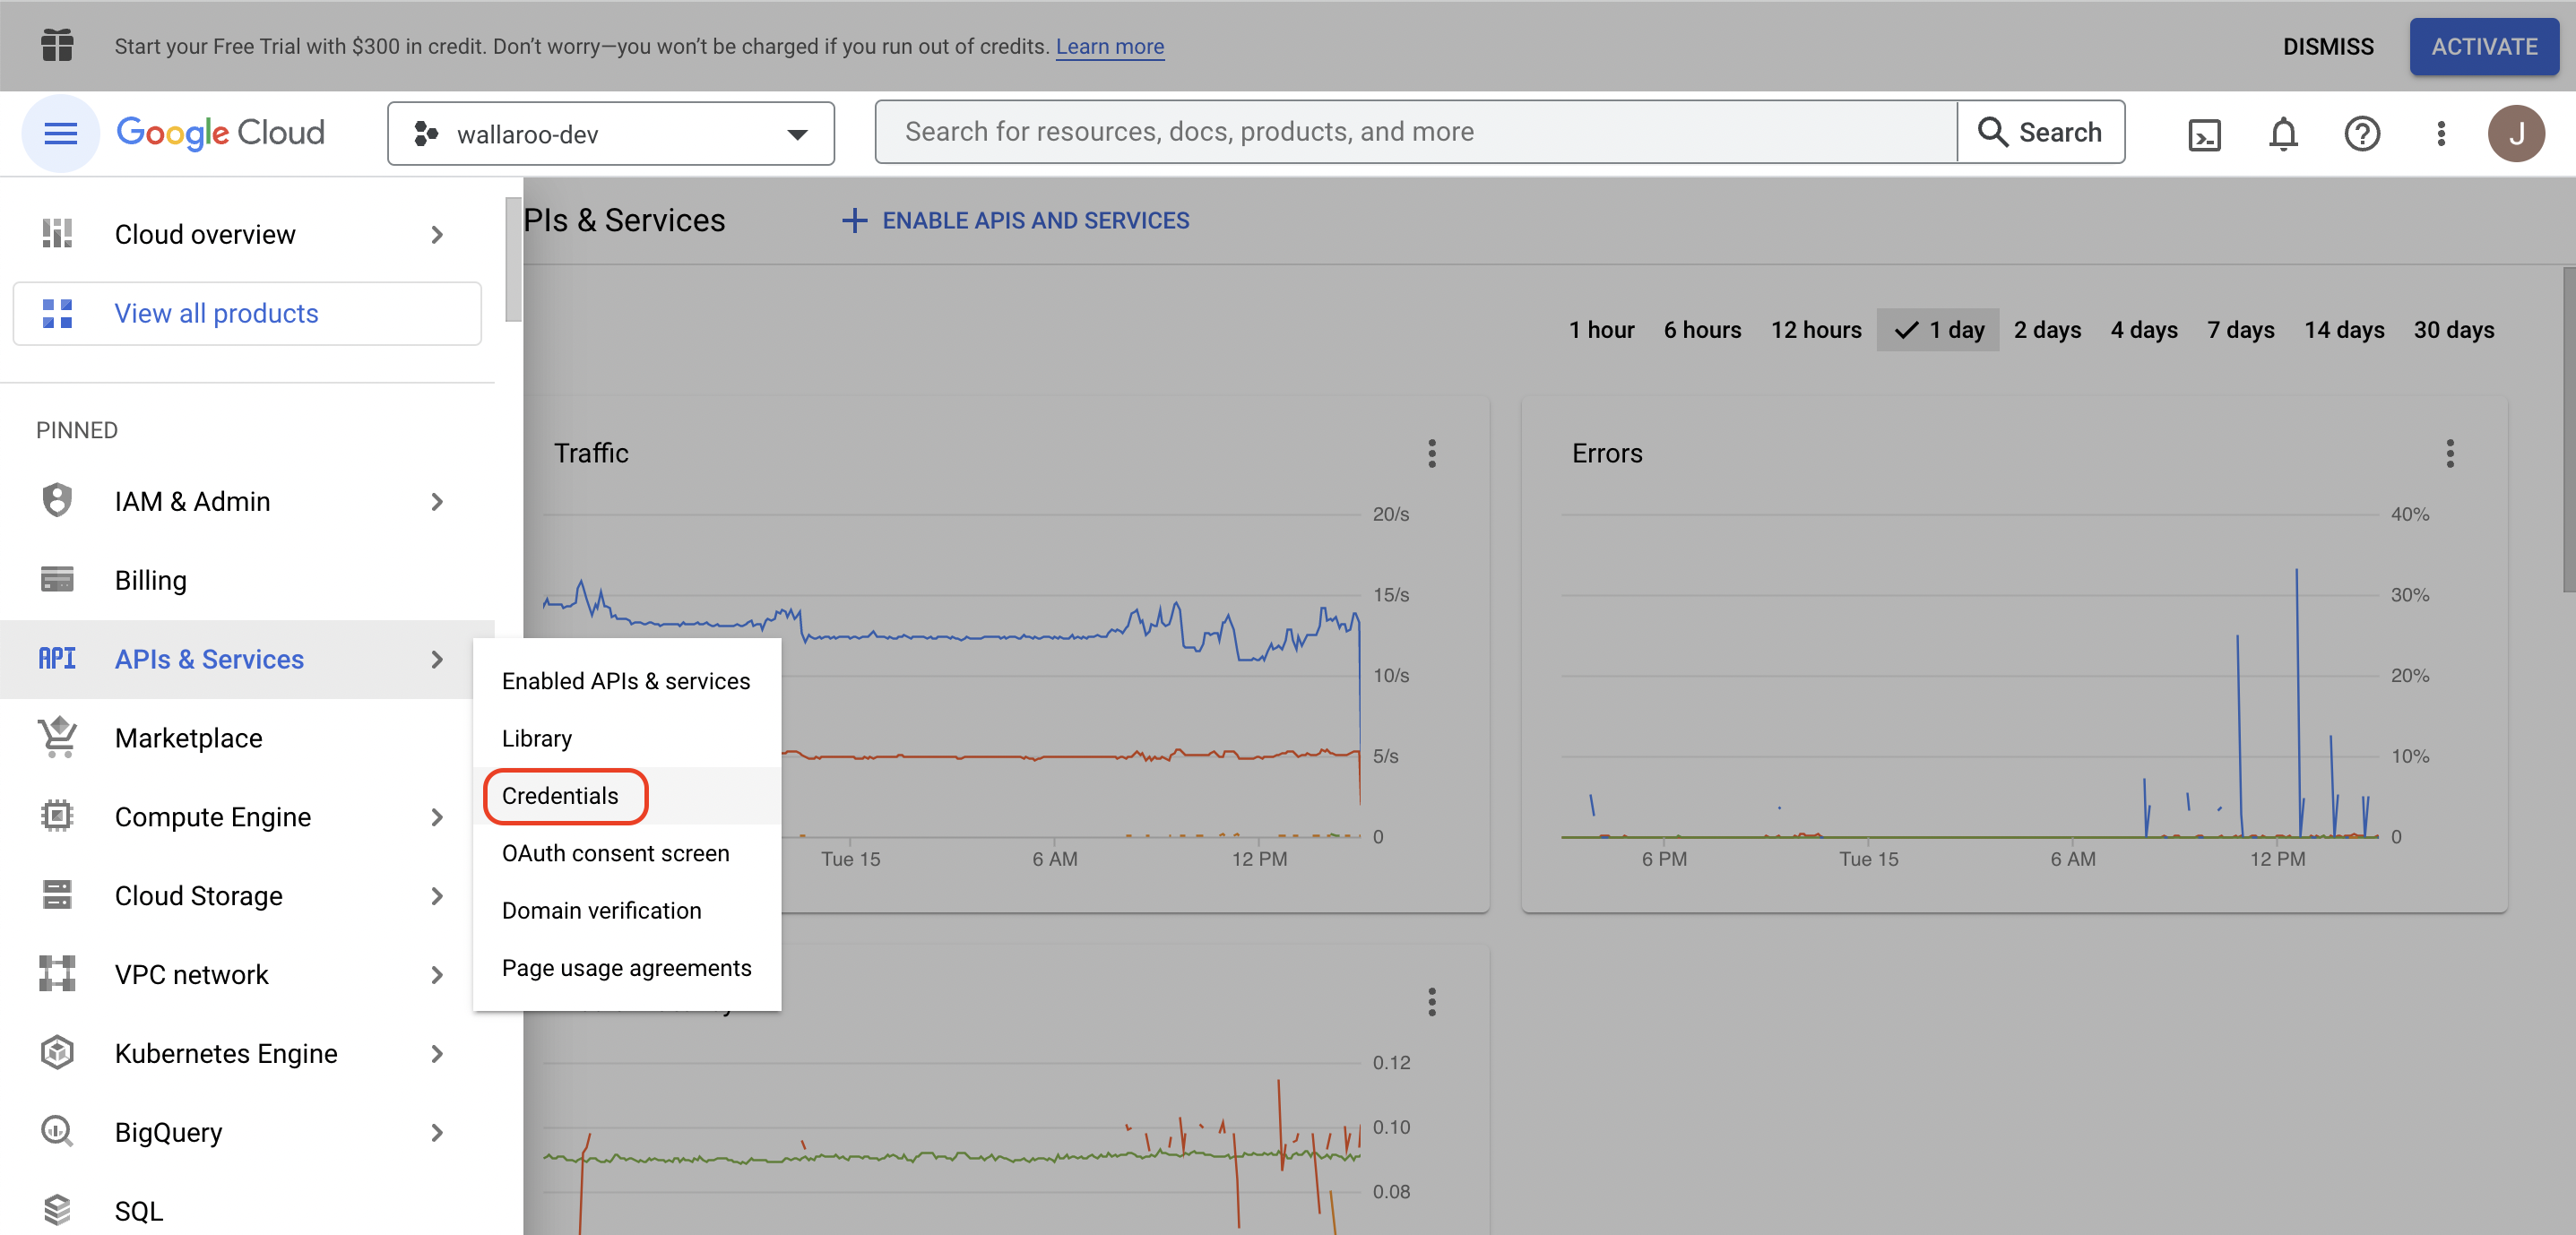
Log into Google Cloud Platform (GCP) console.
From the left side menu, select APIs and Services -> Credentials.
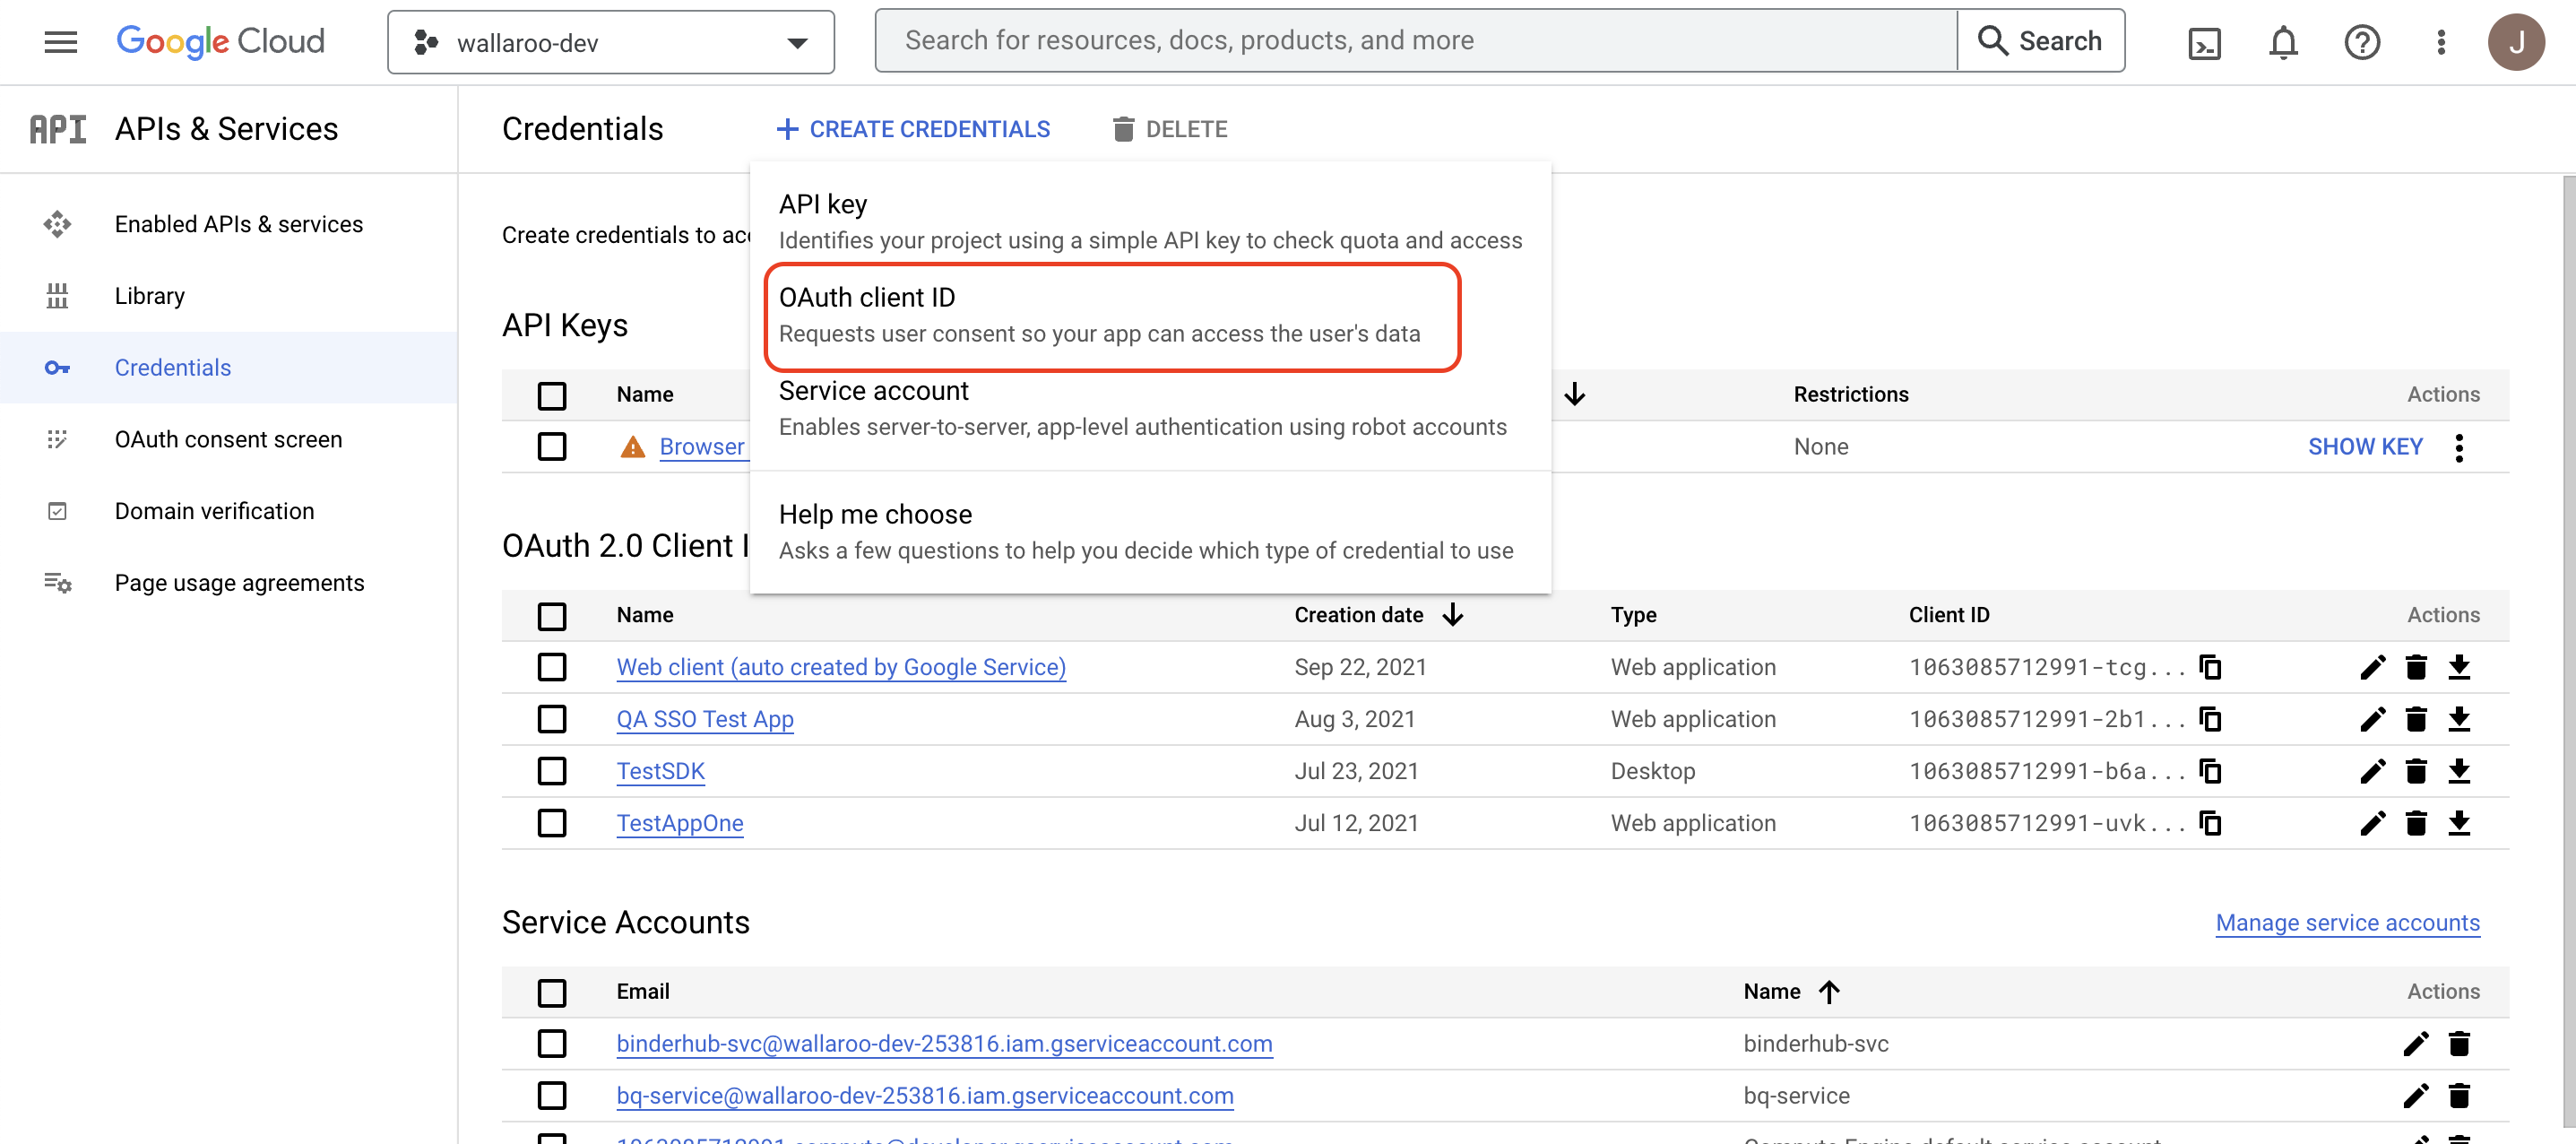
Select + CREATE CREDENTIALS->Oauth client ID.
Set Application type to Web application.
Set the following options:
Name: The name for this OAuth Client ID.
Authorized redirect URIs: This will be a link back to the Keycloak endpoint URL in your Wallaroo instance in the format https://$PREFIX.keycloak.$SUFFIX/auth/realms/master/broker/google/endpoint.
For example, if the Wallaroo prefix is silky-lions-3657 and the suffix is wallaroo.ai, then the Keycloak endpoint URL would be silky-lions-3657.keycloak.wallaroo.ai/auth/realms/master/broker/google/endpoint. For more information see the DNS Integration Guide.
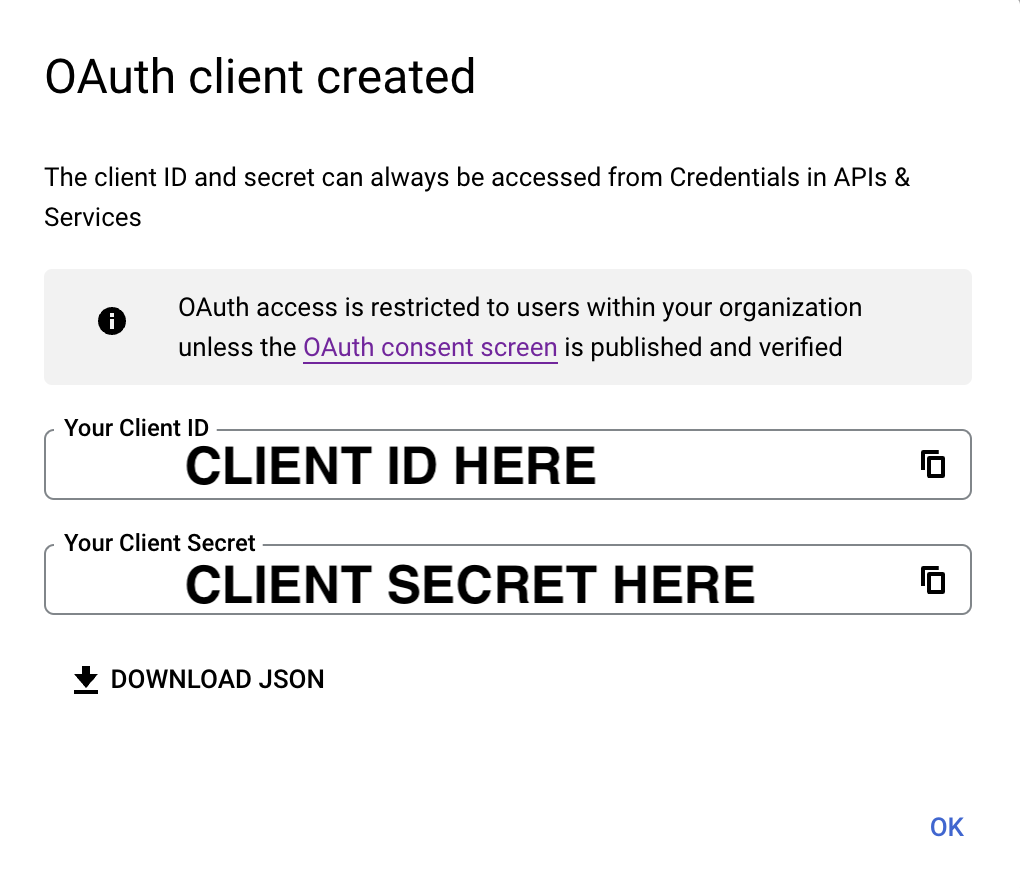
When the Oauth client is created, the Client ID and the Client Secret will be displayed. Store these for the next steps.
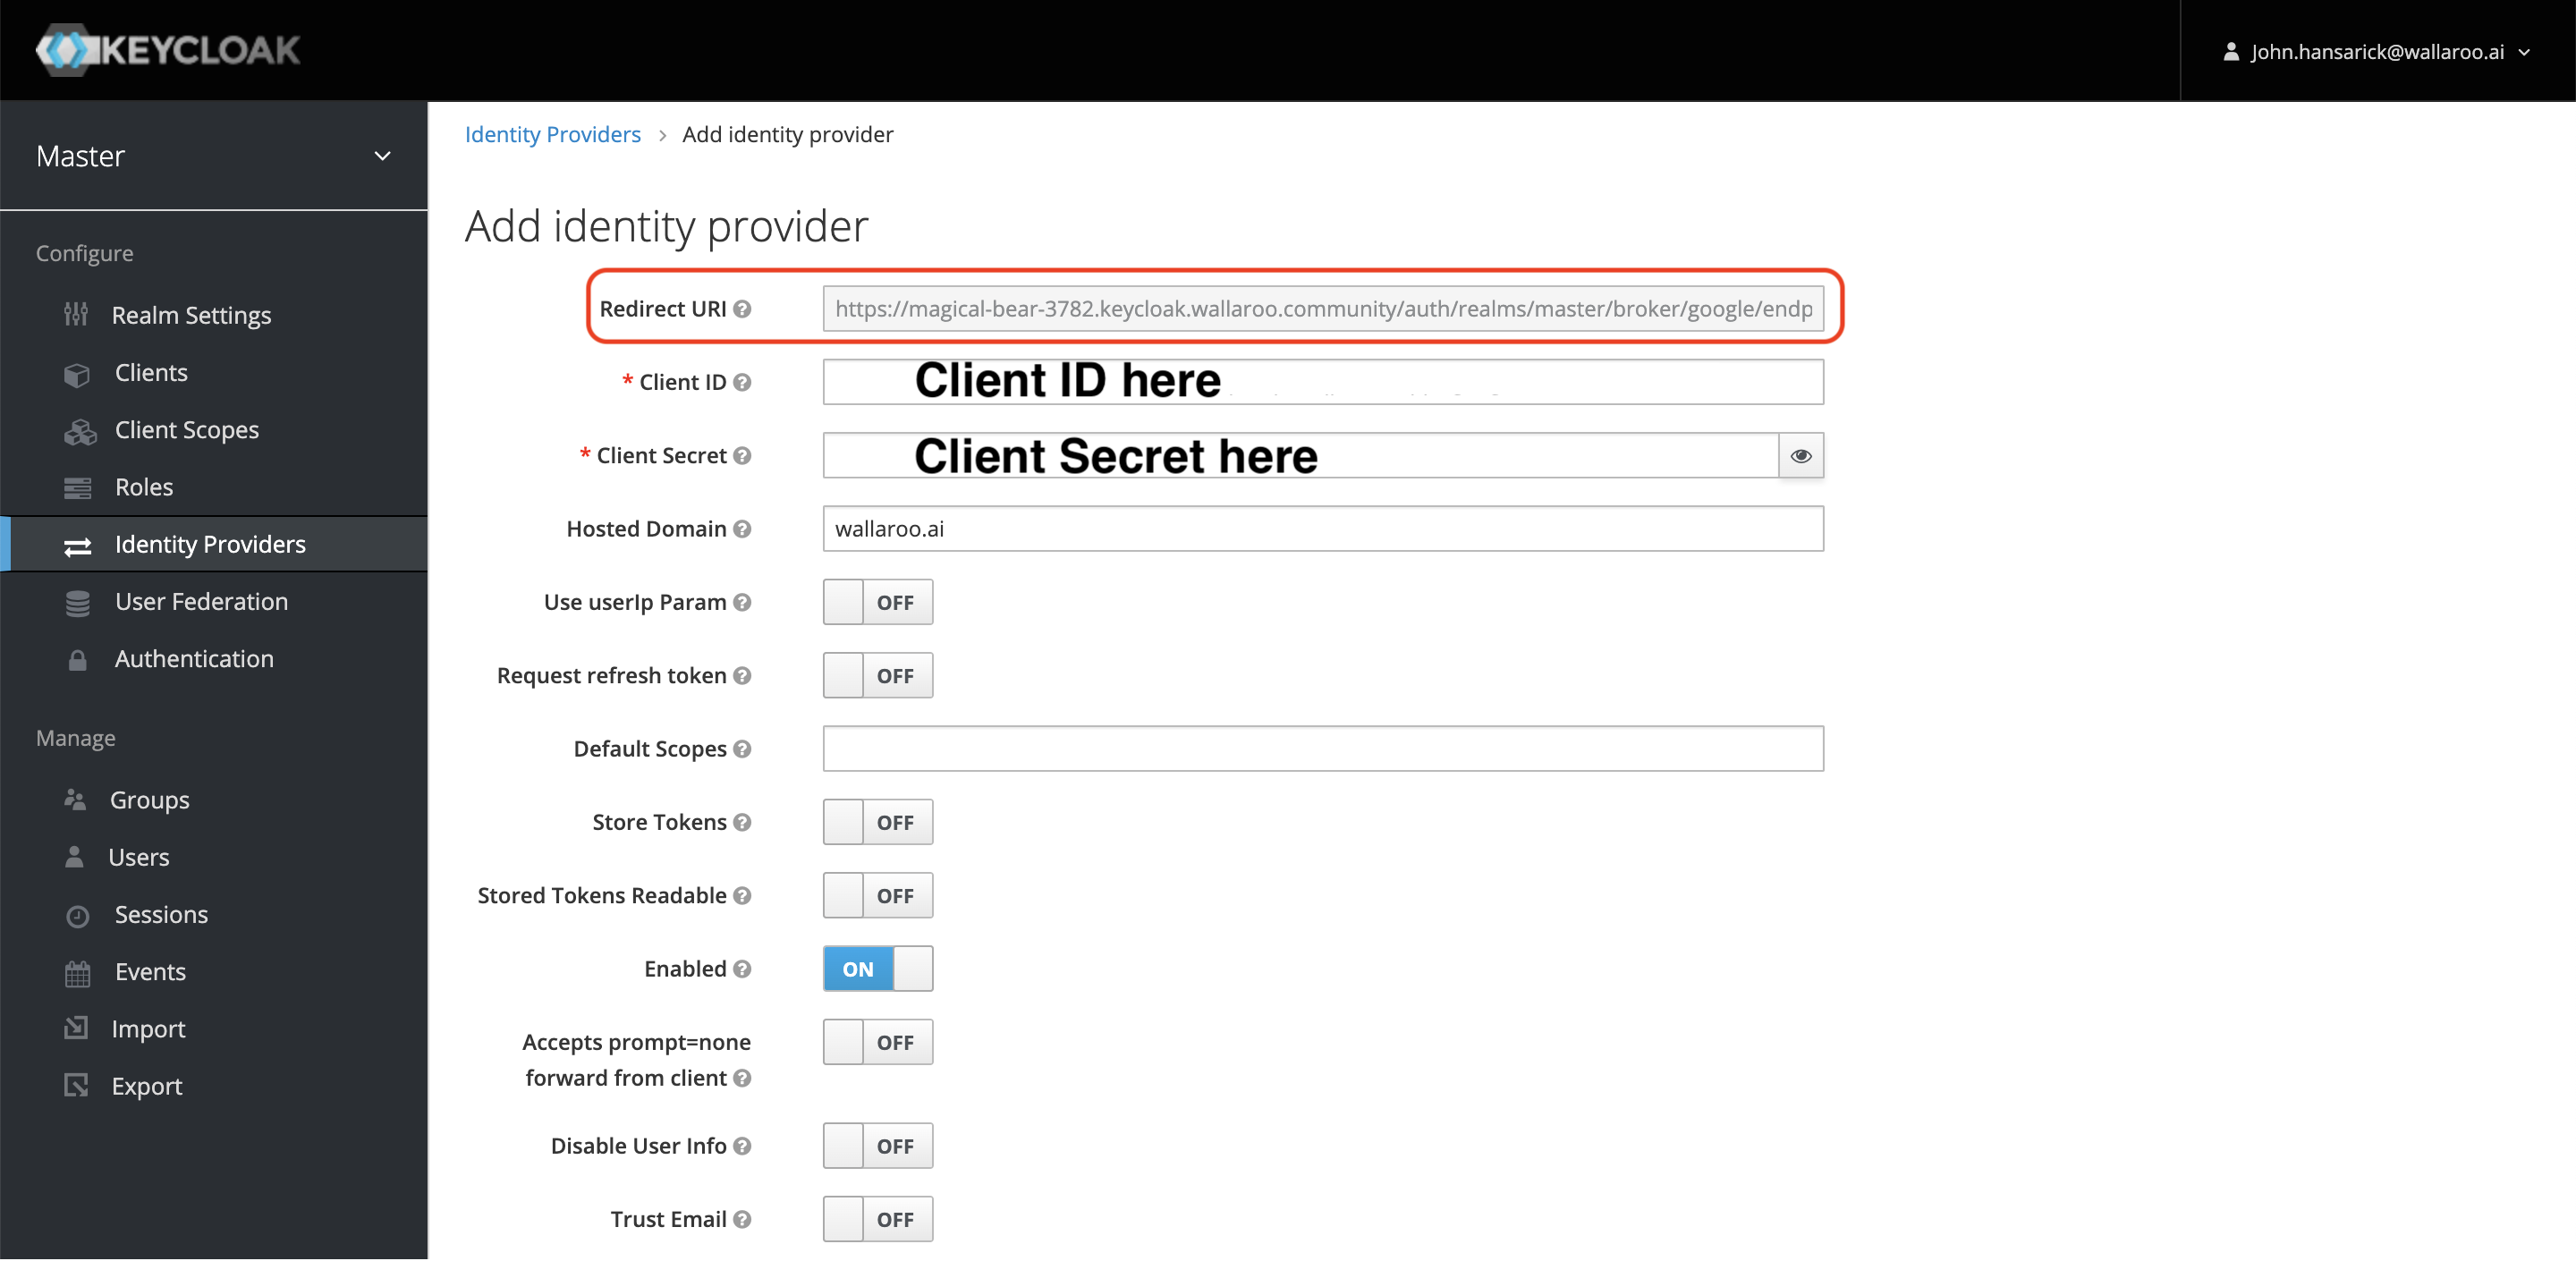
Add GCP Credentials to Wallaroo
With the Client ID and Client Secret from Google, we can now add this to the Wallaroo instance Keycloak service.
IMPORTANT NOTE
Leaving the Hosted Domain value unset will allow any valid Google user to access the system. Set the Hosted Domain to restrict access to the desired Google domain such as wallaroo.ai. This must be a domain that is managed by Google. For more information, see the Keycloak Social Identity Providers documentation.
From the Wallaroo instance, login to the Keycloak service. This will commonly be $PREFIX.keycloak.$SUFFIX. For example, playful-wombat-5555.keycloak.wallaroo.ai.
Select Administration Console.
From the left navigation panel, select Identity Providers.
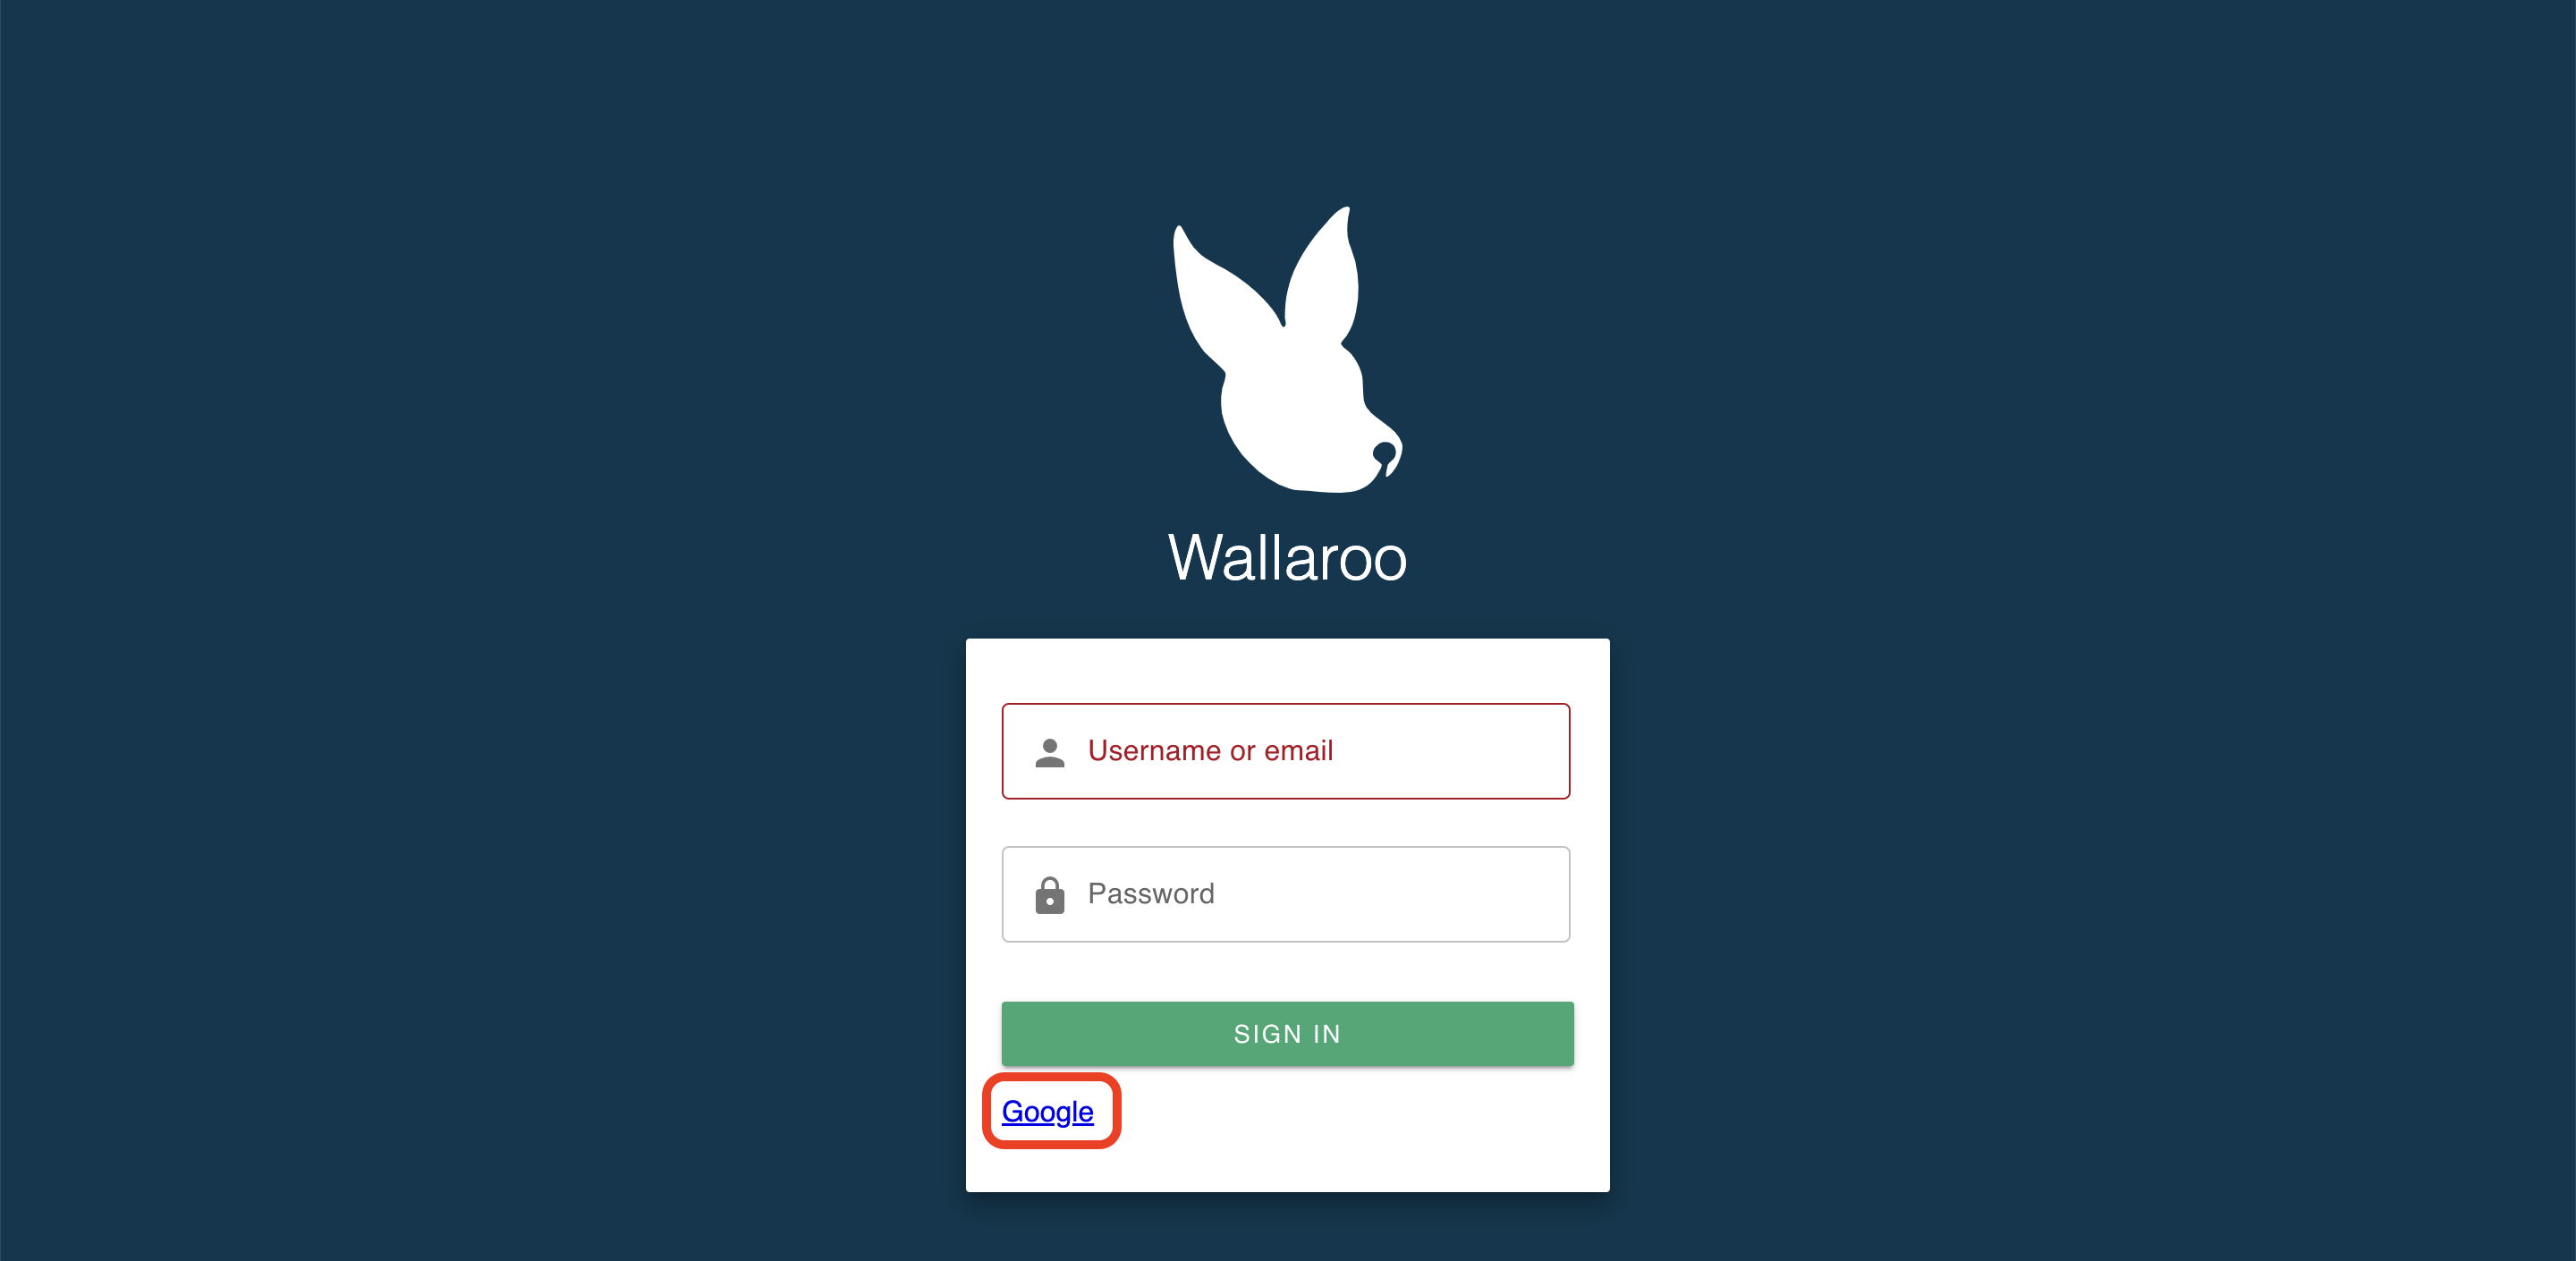
Once complete, log out of the Wallaroo instance and go back into the login screen. With the usual username and password screen should also be a google link at the bottom or whatever name was set for the identity provider.
Select it, then select which Google user account to use. As long the domain matches the one listed in Add Google Credentials to Keycloak, the login will succeed. The first time a user logs in through Google, Keycloak will create a new local user account based on the Google credentials.
Troubleshooting
I get the error “This app’s request is invalid”
Double check the Google credentials from Get GCP Credentials and verify that the Authorized redirect URIs matches the one in Keycloak. This can be verified from logging into Keycloak, selecting Identity Providers, selecting the Google identity provider and Redirect URI from the top line.
4.4 - Wallaroo SSO Configuration for Seamless Redirect
Instructions on updating the Wallaroo SSO configuration for a seamless redirect experience.
By default, when organizations add identity providers to Wallaroo users have to select which identity provider or at least provide their username and passwords to login through the default Keycloak service.
The following instructions show how to set an identity provider as the default and configure Wallaroo so users who are already authenticated through a identity provider can seamlessly login to their Wallaroo instance without having to select any other options.
These instructions assume that an identity provider has been created for the Wallaroo instance.
Set an Identity Provider as Default
To set a default identity provider for a Wallaroo instance for seamless access:
Access the Wallaroo Keycloak service through a browser as an administrator. The Keycloak service URL will be in the format $WALLAROOPREFIX.keycloak.$WALLAROOSUFFIX. For example, if the Wallaroo prefix is wallaroo and the suffix example.com, then the Keycloak service URL would be wallaroo.keycloak.example.com. See the DNS Integration Guide for more details on Wallaroo services with DNS.
Select Administration Console, then log in with an administrator account. See the Wallaroo User Management guides for more information.
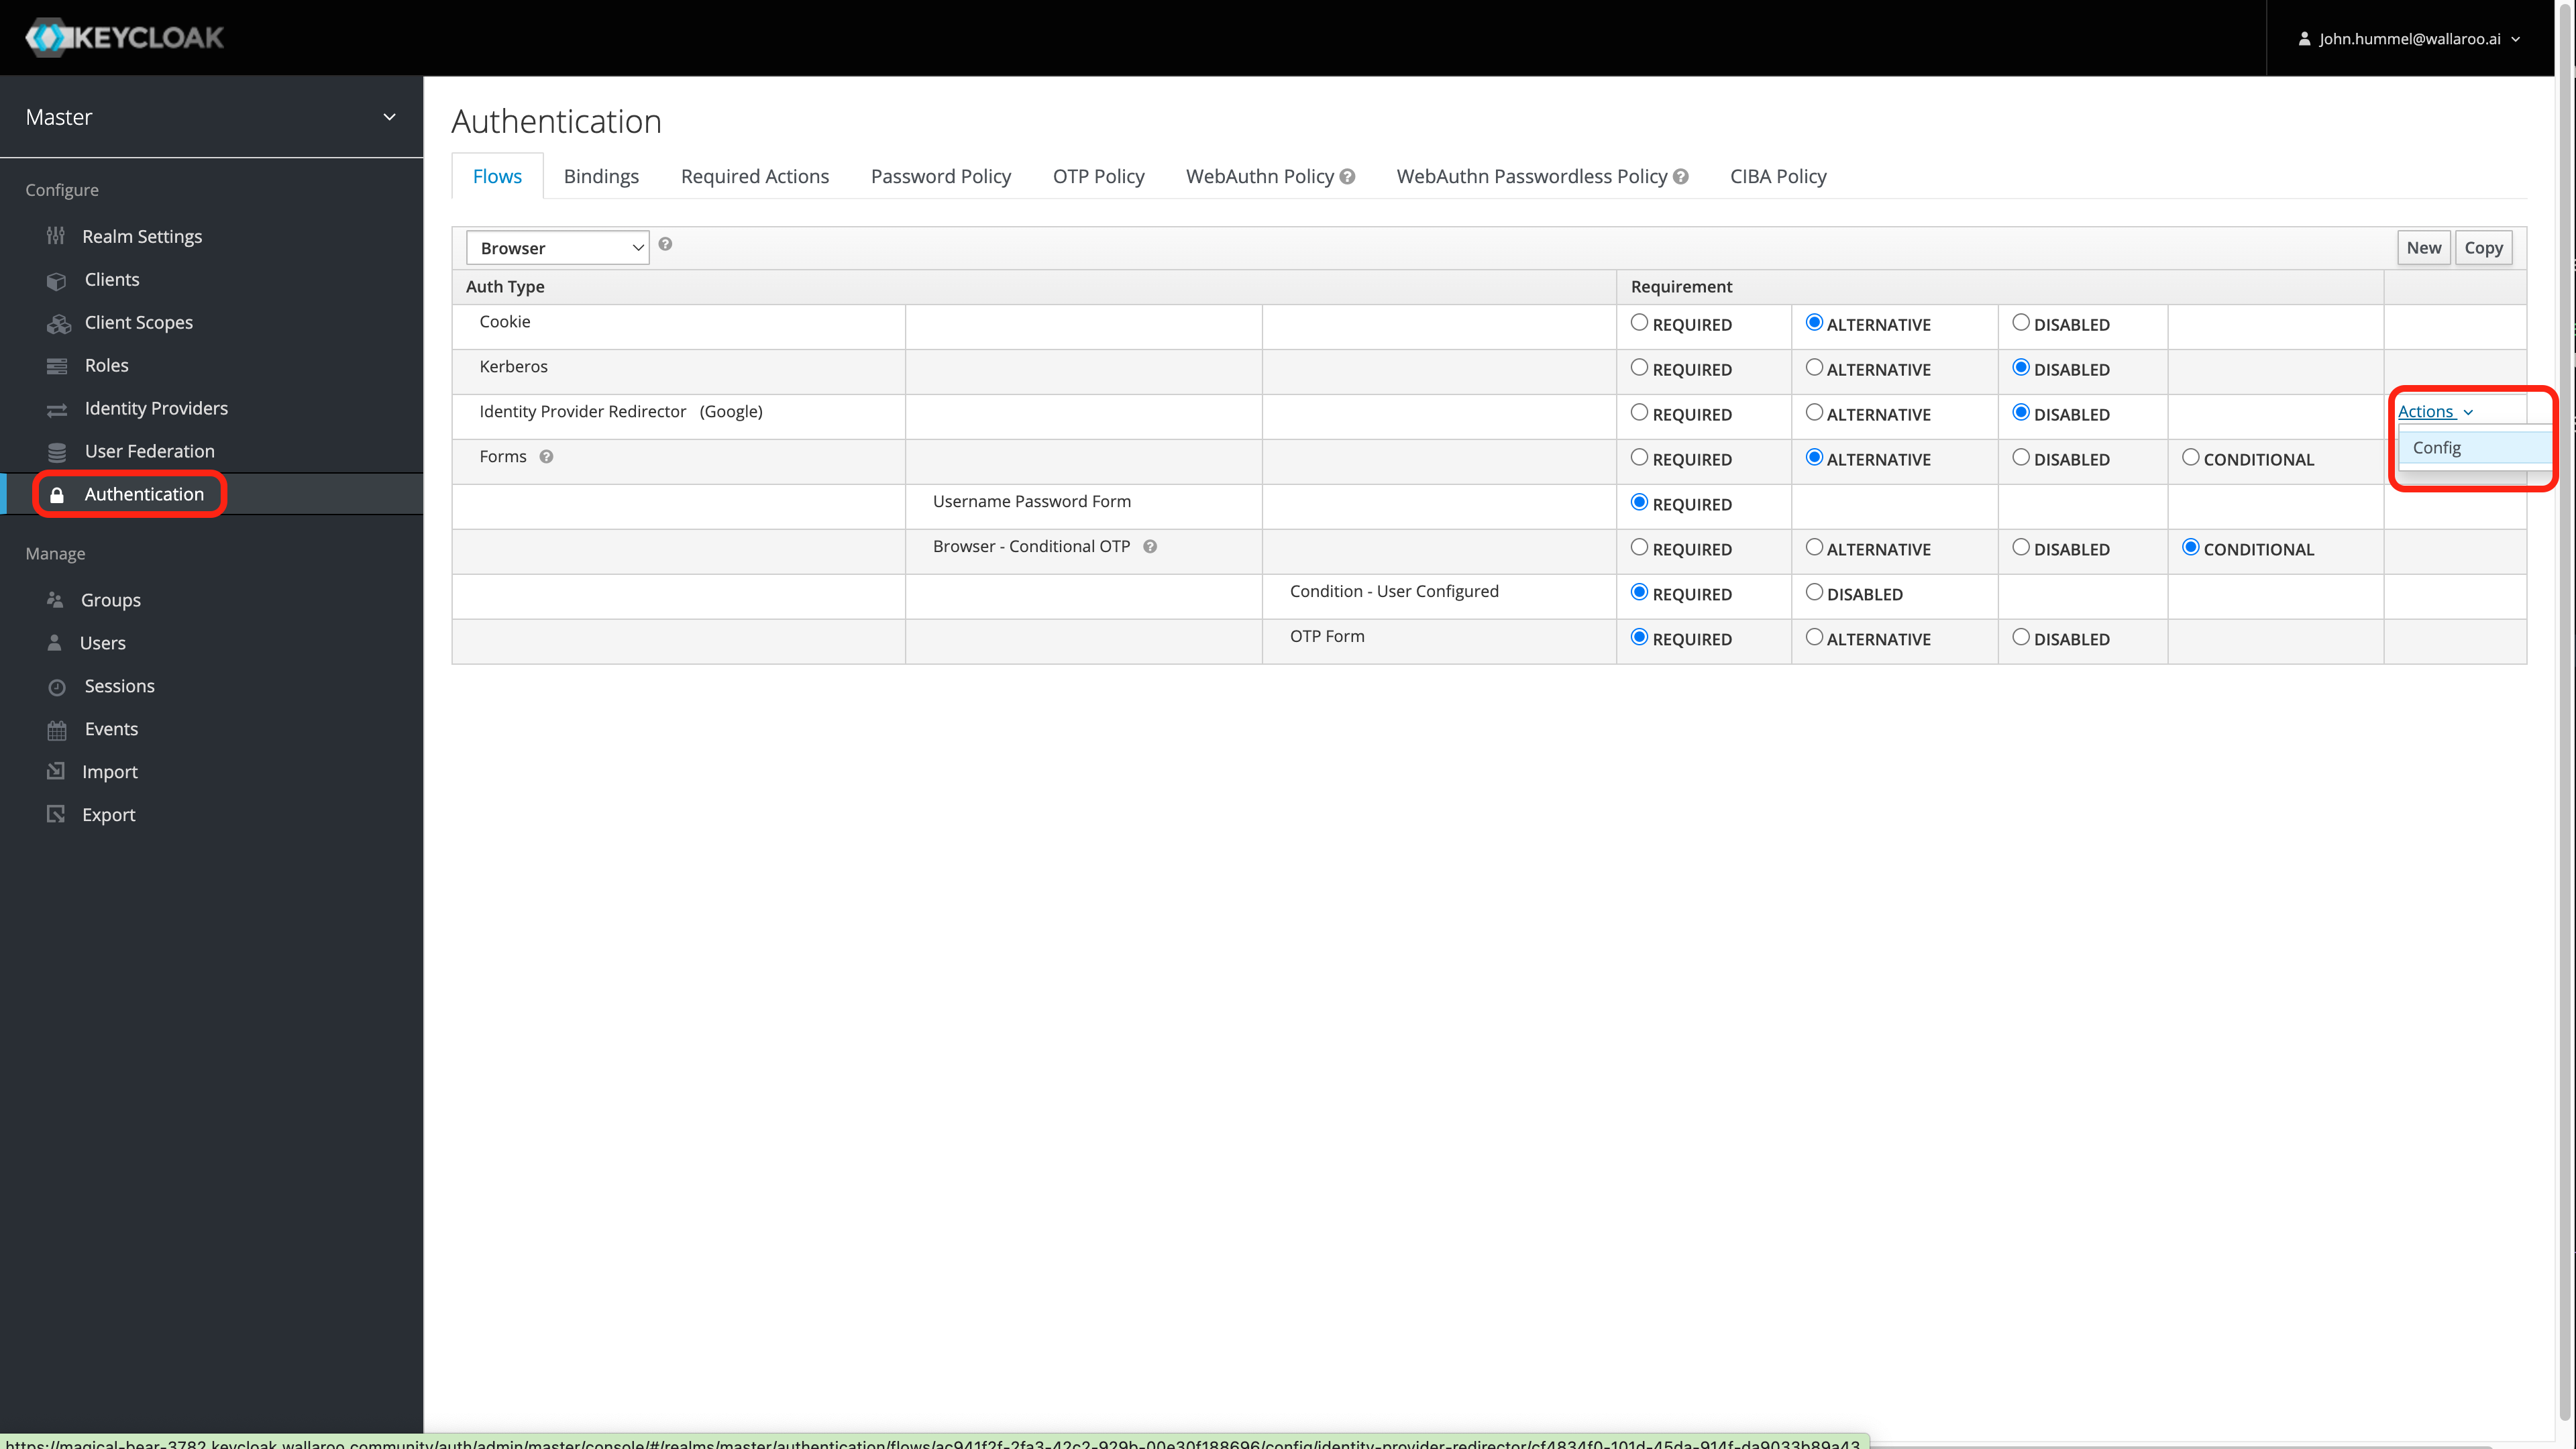
From the left navigation panel, select Authentication.
For the Auth TypeIdentity Provider Redirector row, select Actions -> Config.
Enter the following:
Alias: The name for this configuration.
Default Identity Provider: The identity provider to use by default. A list is available from Configure->Identity Providers. For this example, it is google. Verify that the name matches the name of the existing Identity Provider.
Select Save.
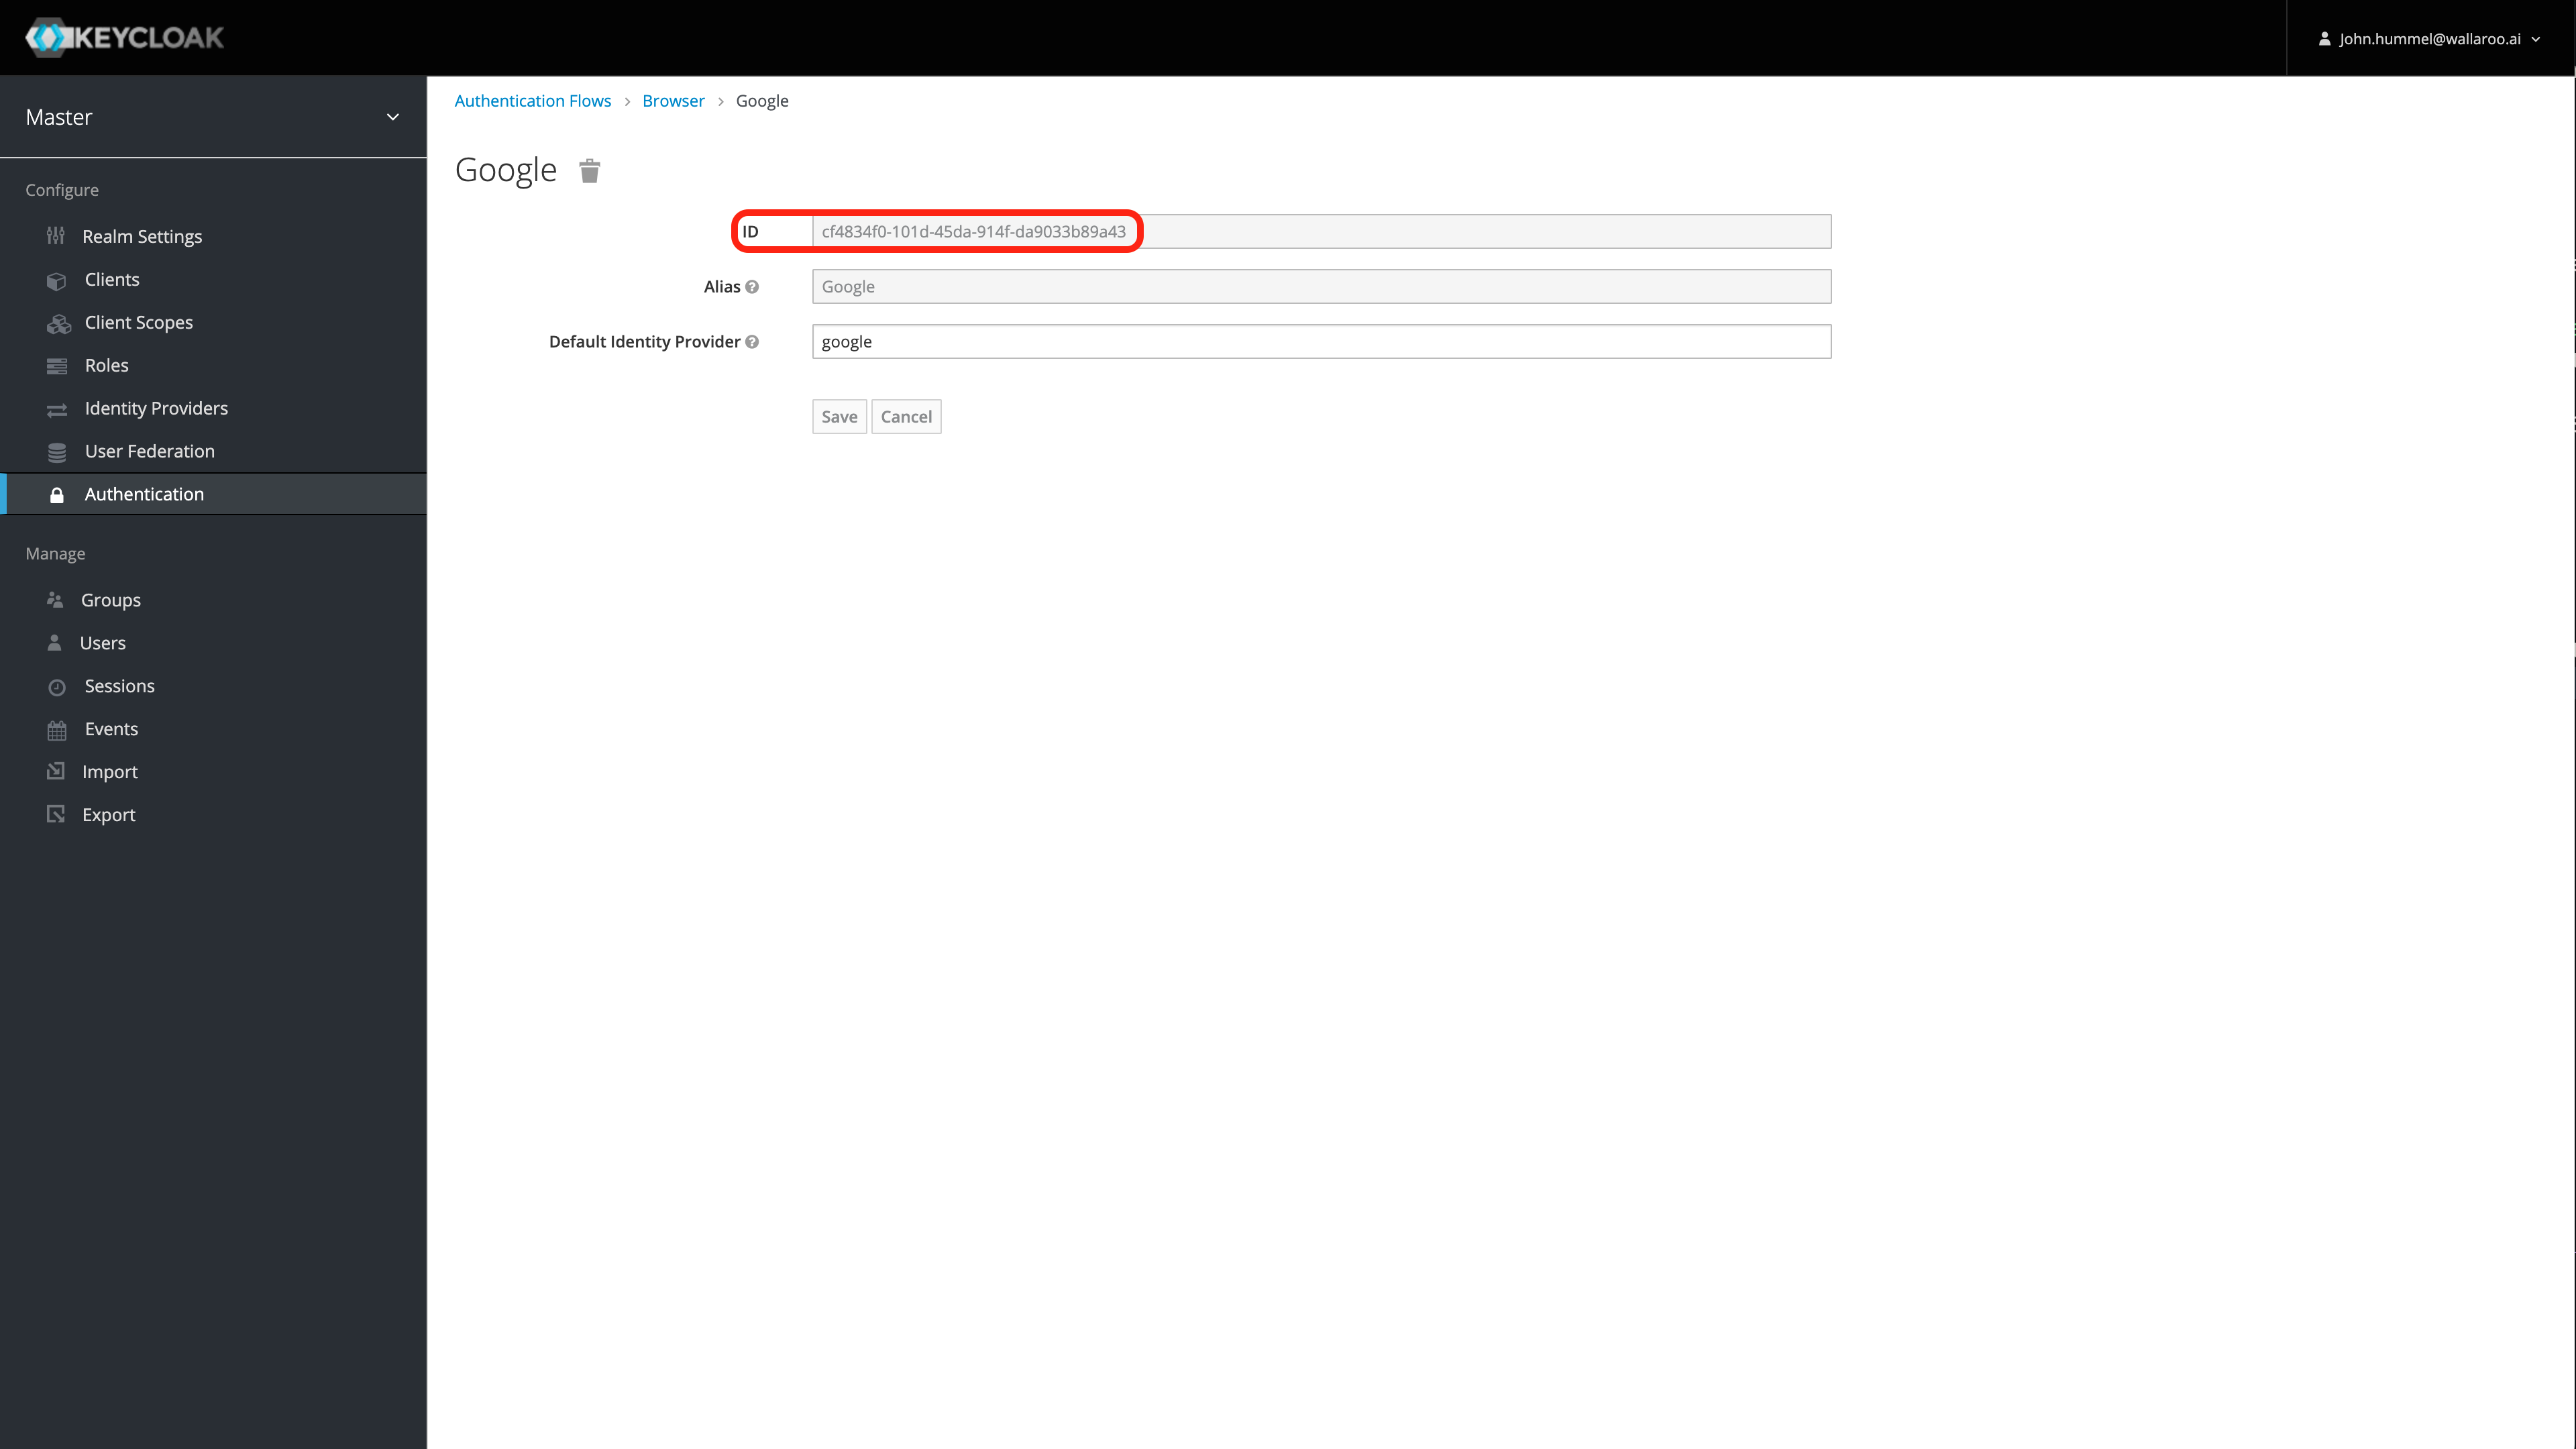
Save the ID! Save the Identity Provider Redirectory generated by Keycloak. This step is important in disabling the seamless redirect.
Set Update Profile on First Login to Off
This optional step prevents the Keycloak service from forcing the user to update an existing profile the first time they log in through a new identity provider. For more information, see the Keycloak Identity Broker First Login documentation.
To set the Identity Broker First Login to Off:
Access the Wallaroo Keycloak service through a browser as an administrator. The Keycloak service URL will be in the format $WALLAROOPREFIX.keycloak.$WALLAROOSUFFIX. For example, if the Wallaroo prefix is wallaroo and the suffix example.com, then the Keycloak service URL would be wallaroo.keycloak.example.com. See the DNS Integration Guide for more details on Wallaroo services with DNS.
Select Administration Console, then log in with an administrator account. See the Wallaroo User Management guides for more information.
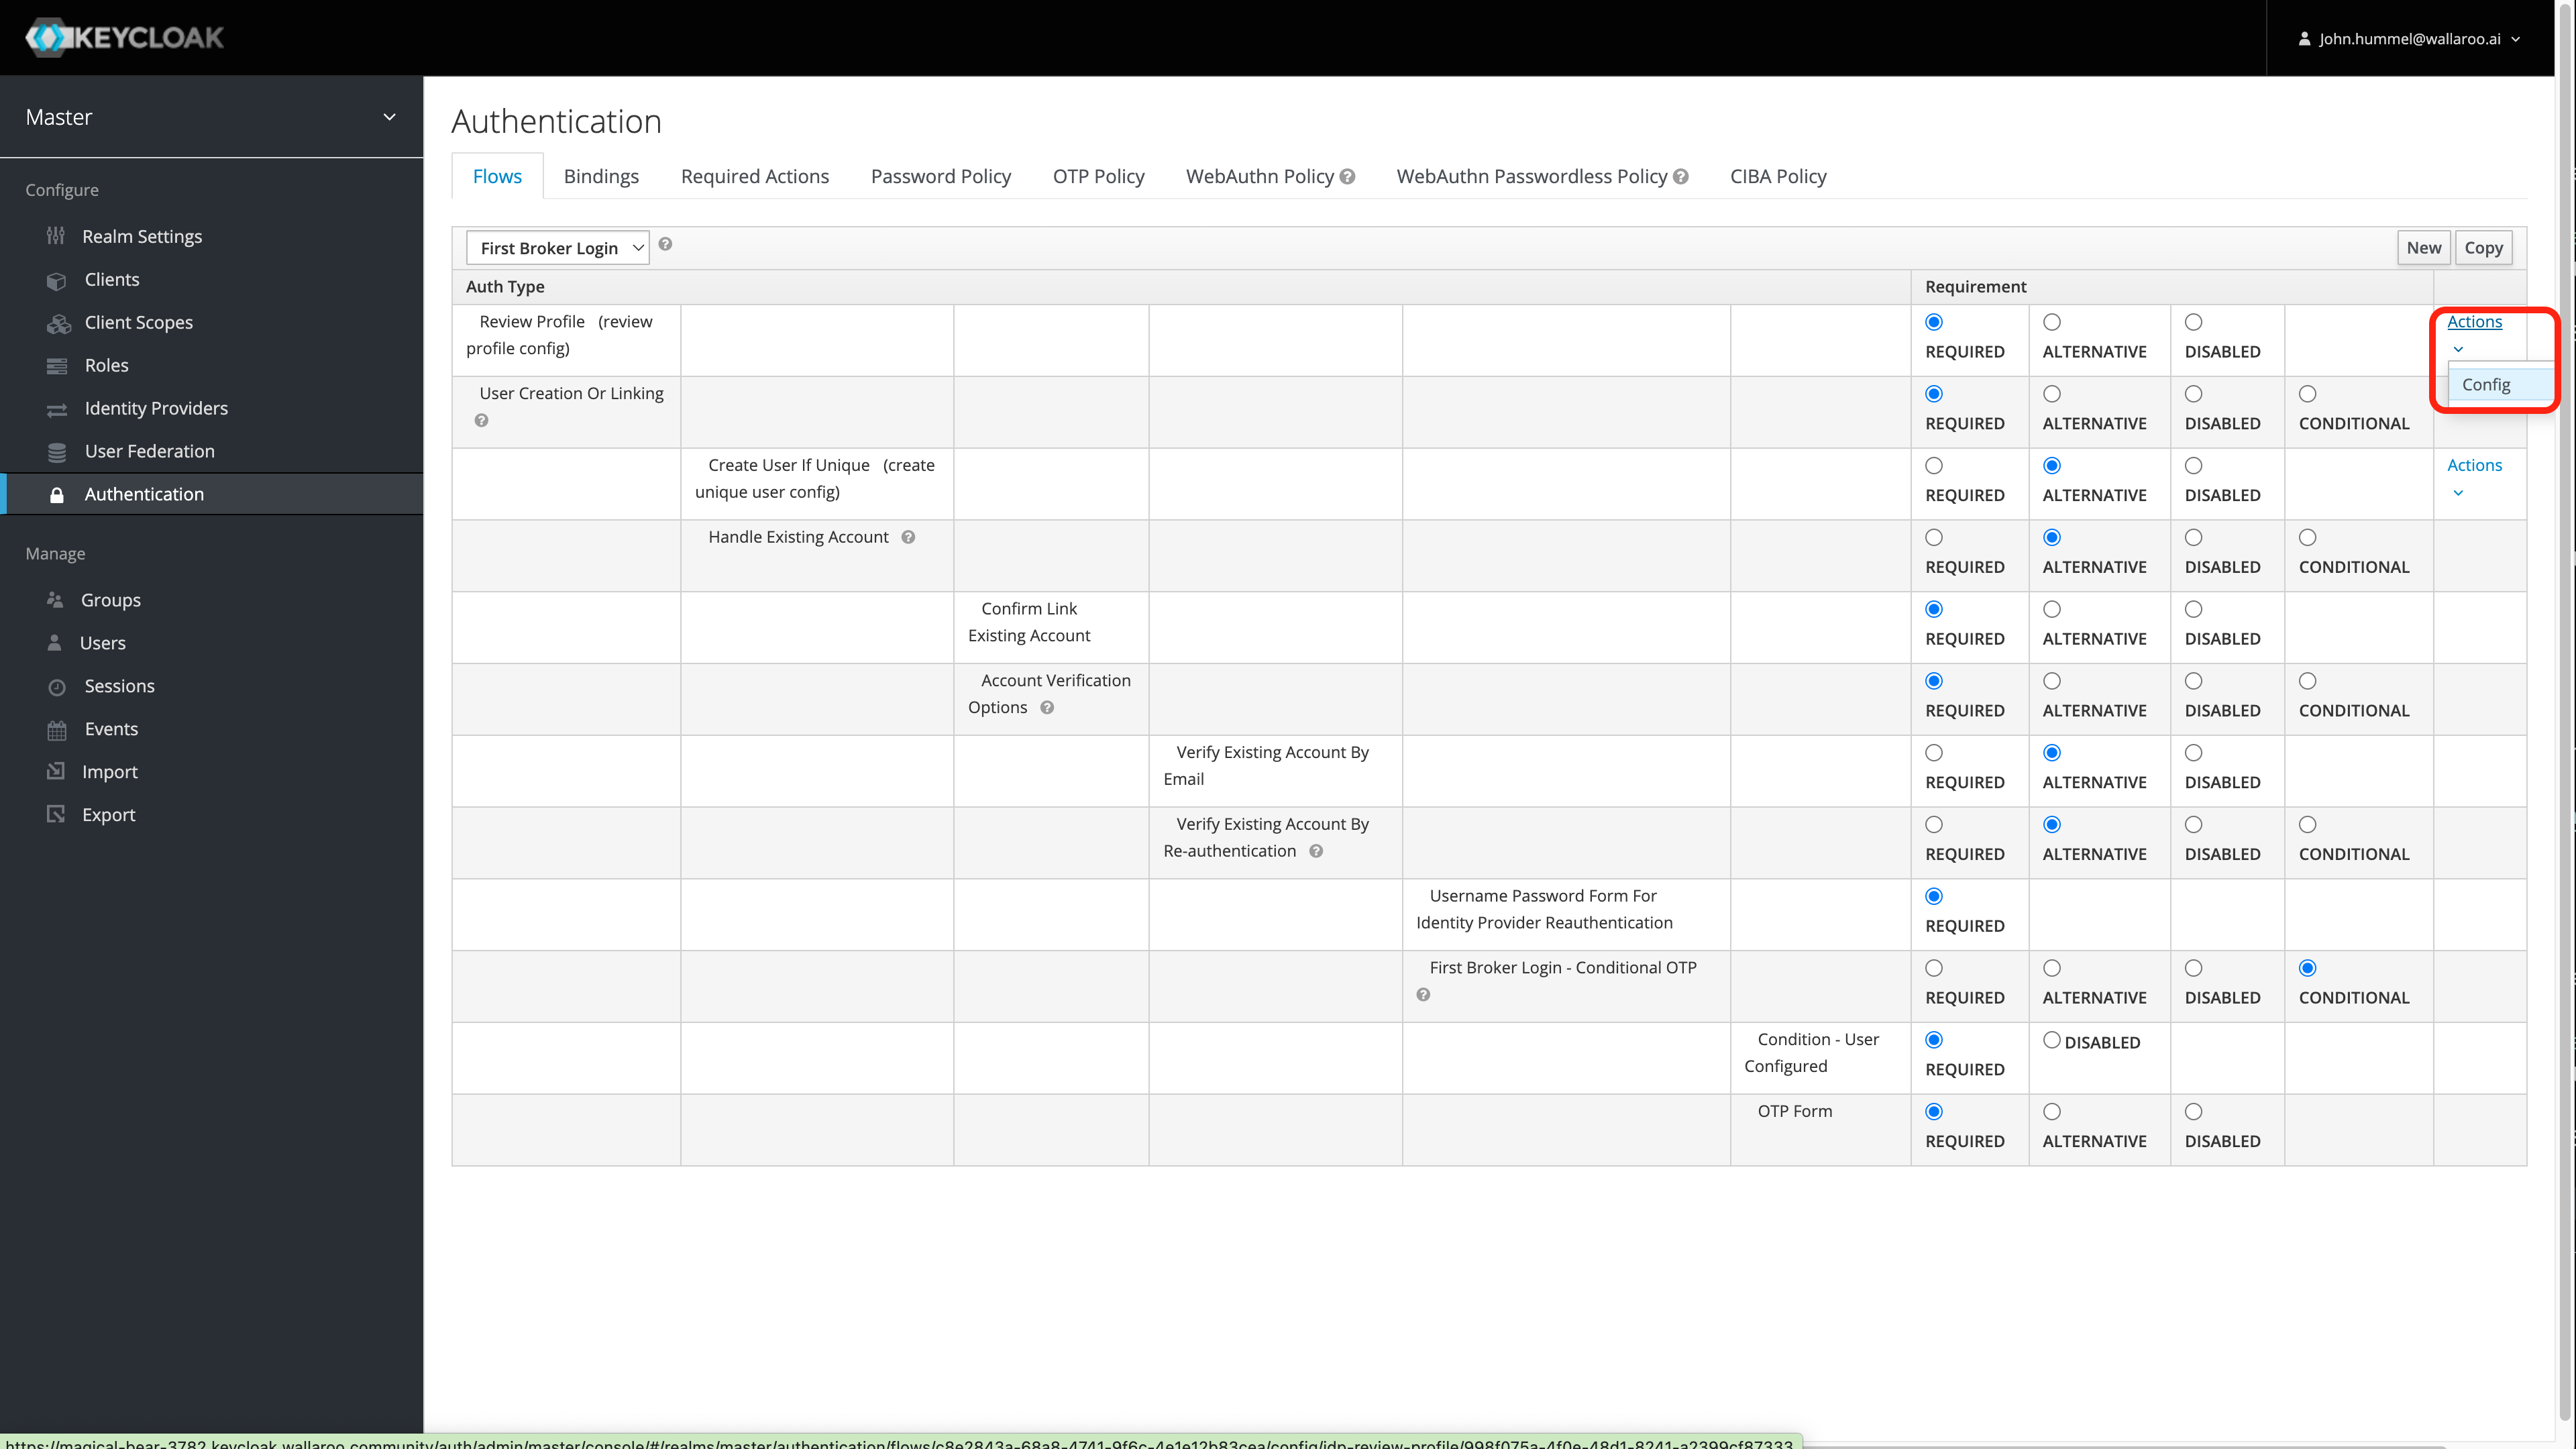
From the left navigation panel, select Authentication.
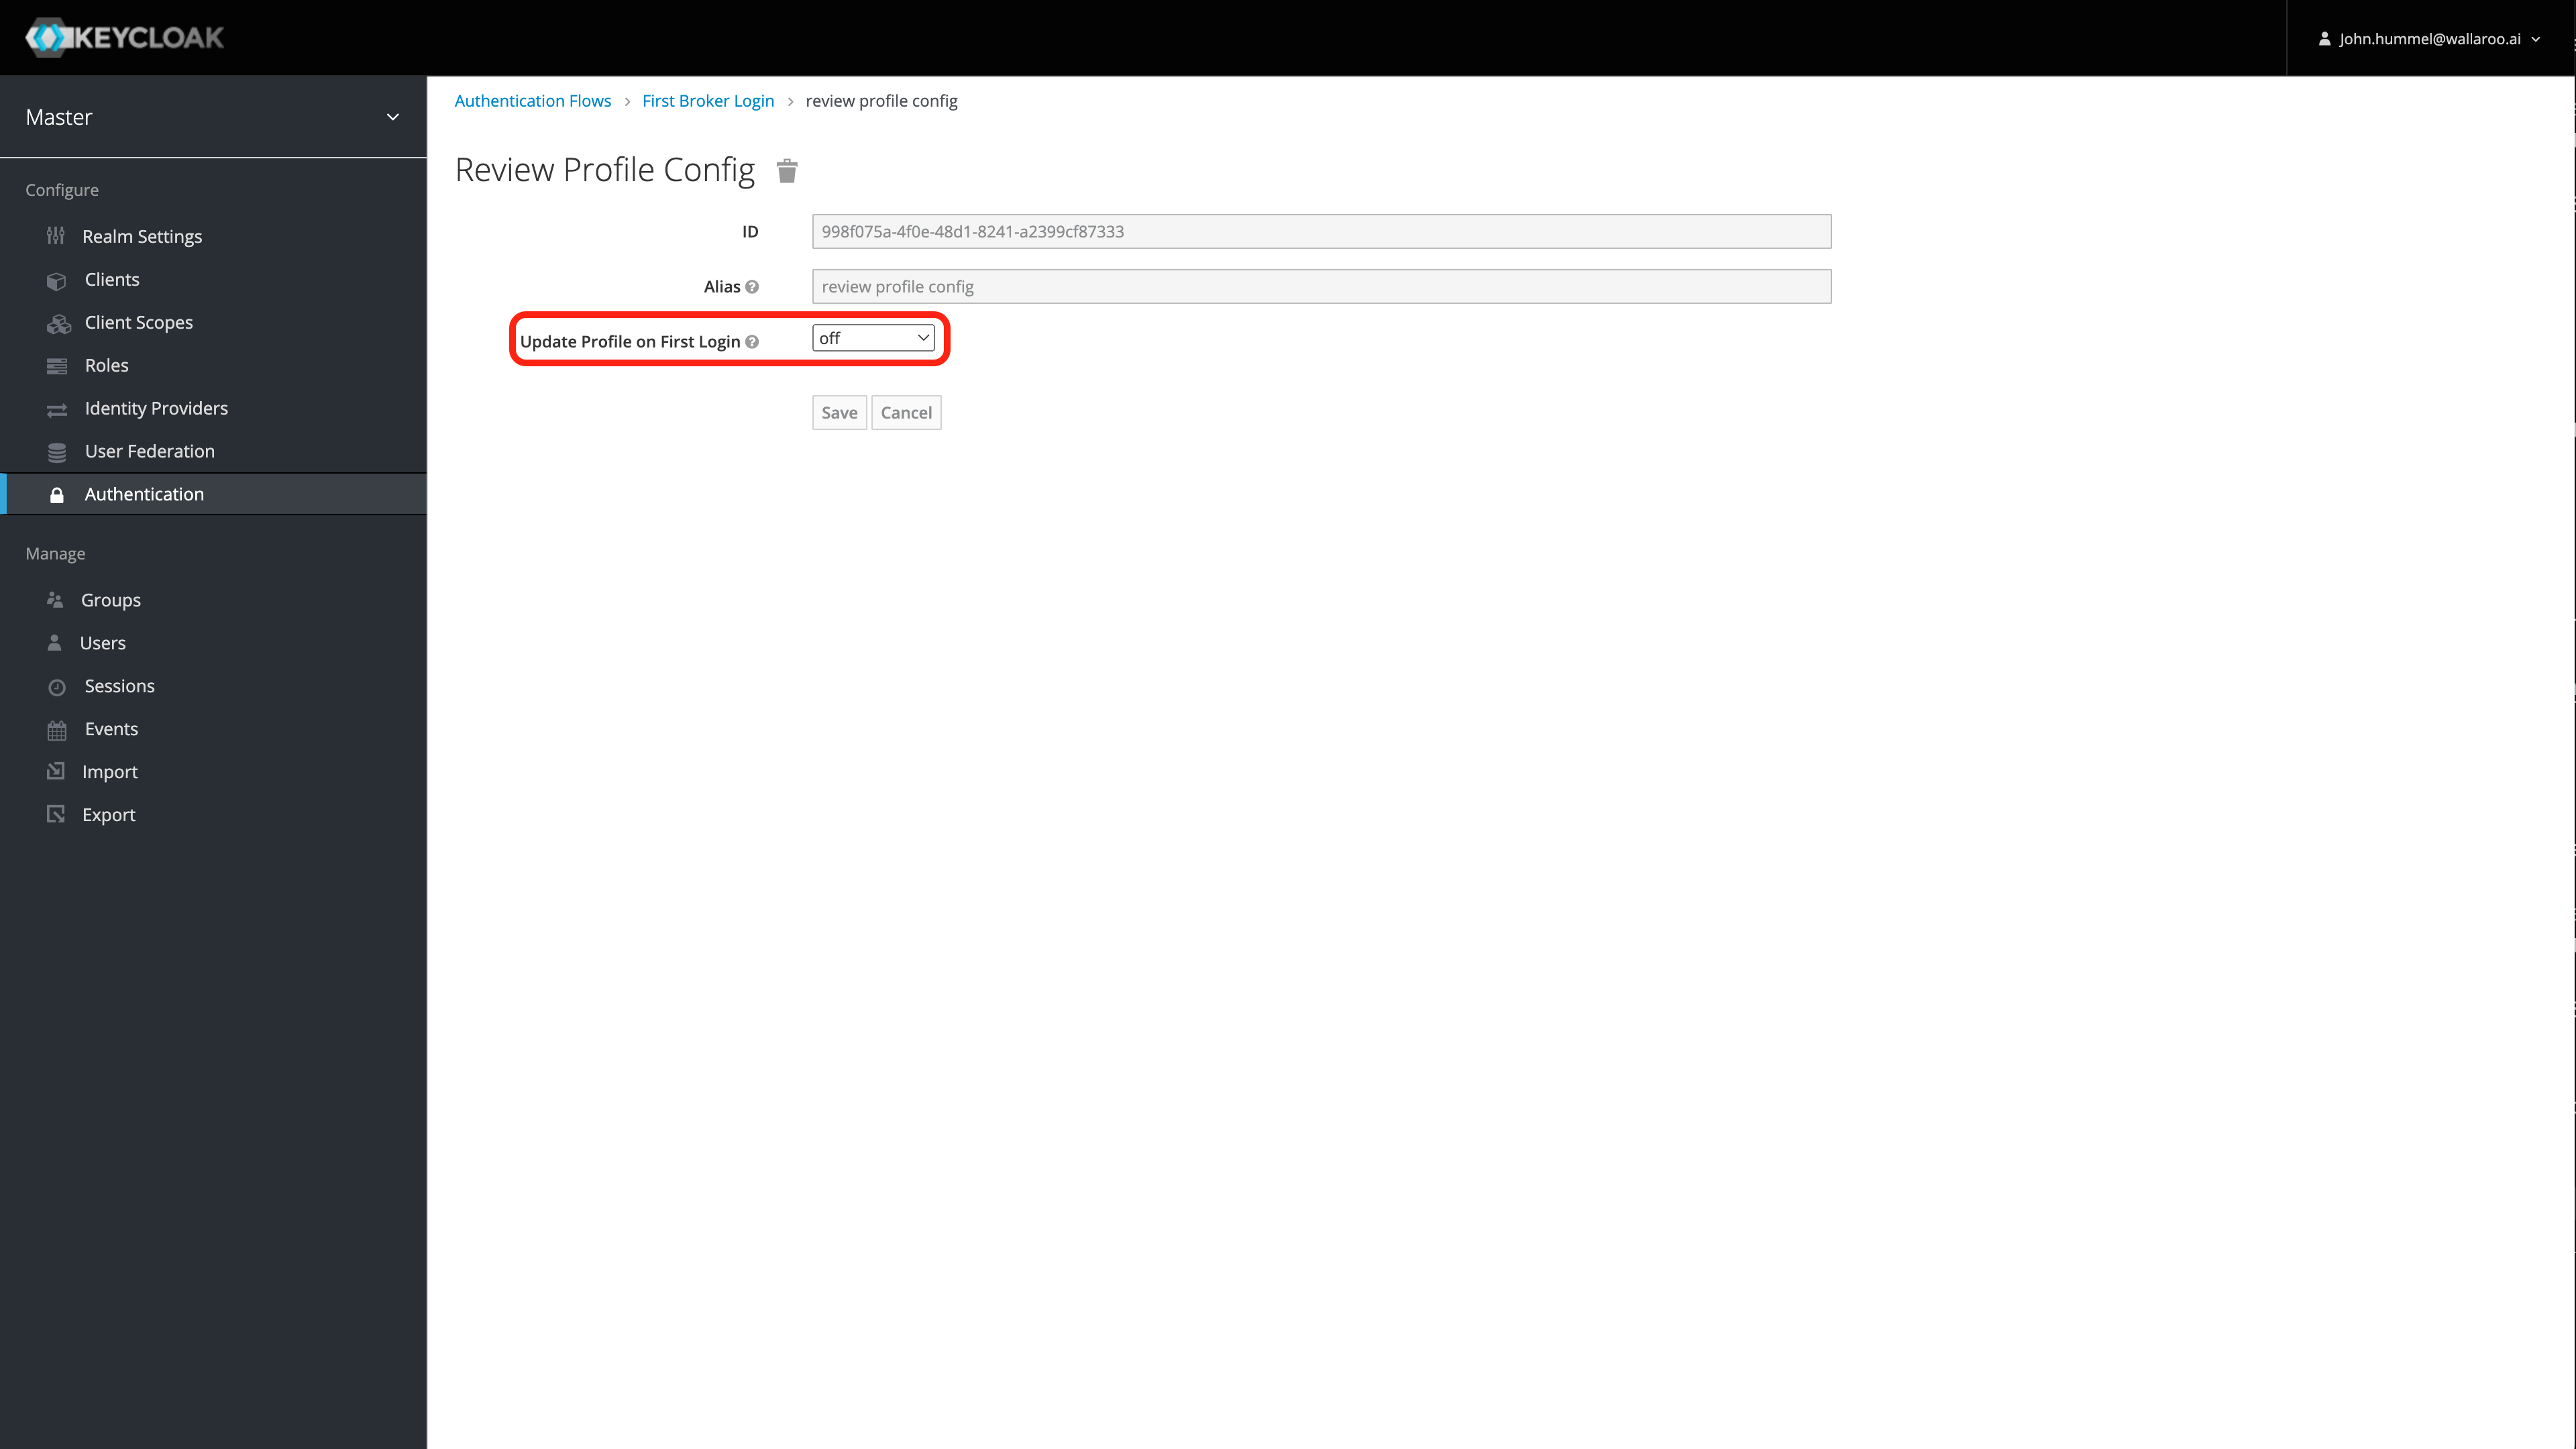
From the top drop-down list, select First Broker Login, then for the row labeled Review Profile(review profile config), select Actions->Config.
Set Update Profile on First Login to Off.
Select Save.
Disable Automatic Redirects
Disable Through Keycloak UI
To disable automatic redirects through the Keycloak UI:
Access the Wallaroo Keycloak service through a browser as an administrator. The Keycloak service URL will be in the format $WALLAROOPREFIX.keycloak.$WALLAROOSUFFIX. For example, if the Wallaroo prefix is wallaroo and the suffix example.com, then the Keycloak service URL would be wallaroo.keycloak.example.com. See the DNS Integration Guide for more details on Wallaroo services with DNS.
Select Administration Console, then log in with an administrator account. See the Wallaroo User Management guides for more information.
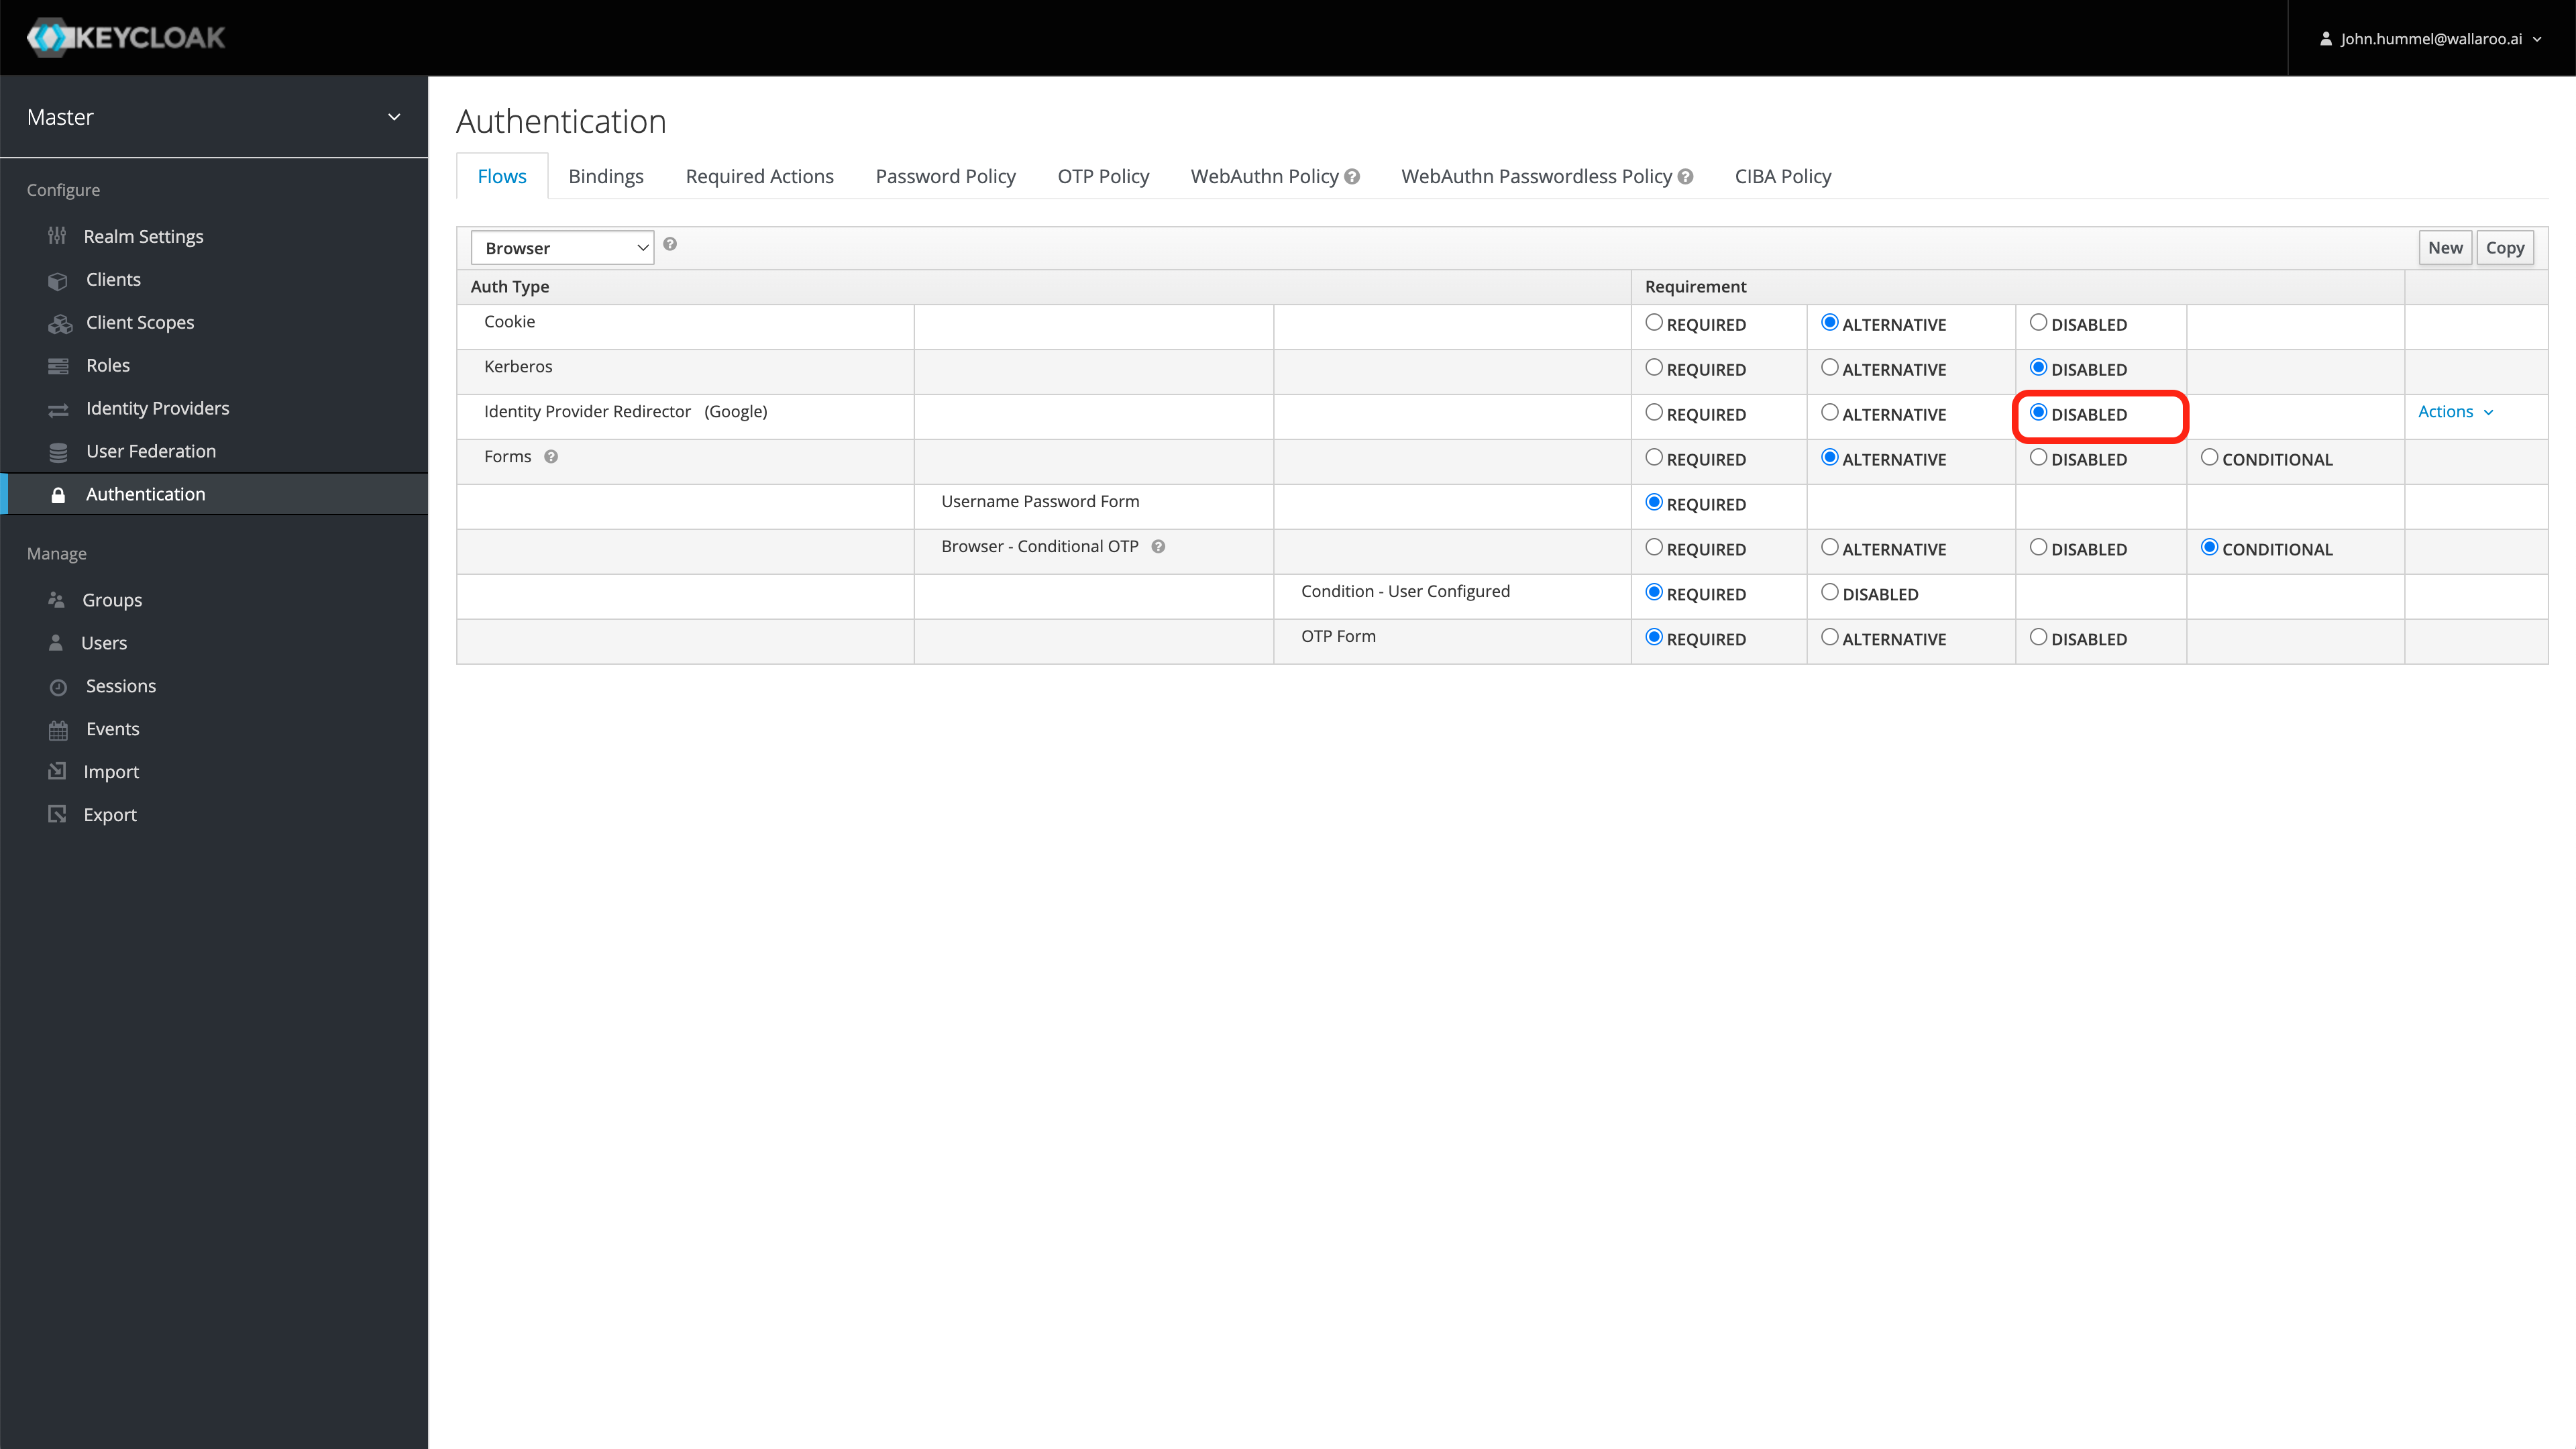
From the left navigation panel, select Authentication.
For the Auth TypeIdentity Provider Redirector row, set the Requirement to Disabled.
Seamless redirect is now disabled. Users will be able to either enter their username/password, or select the identity provider to use.
Disable through Kubernetes
This process allows users to disable the seamless redirect through through the Kubernetes administrative node. This process requires the following:
kubectl is installed on the node administrating the Kubernetes environment hosting the Wallaroo instance.
curl is installed.
These steps assume the Wallaroo instance was installed into the namespace wallaroo.
The following code will retrieve the Wallaroo Keycloak admin password,then makes a connection to the Wallaroo Keycloak service through curl, then delete the identity provider set as the Identity Provider Redirector.
The Keycloak service URL will be in the format $WALLAROOPREFIX.keycloak.$WALLAROOSUFFIX. For example, if the Wallaroo prefix is wallaroo and the suffix example.com, then the Keycloak service URL would be wallaroo.keycloak.example.com. See the DNS Integration Guide for more details on Wallaroo services with DNS.
The variable IDENTITYUUID is the Identity Provider Redirector UUID.
Replace WALLAROOPREFIX, WALLAROOSUFFIX and IDENTITYUUID with the appropriate values for your Wallaroo instance.