Wallaroo provides ML Workload Orchestrations and Tasks to automate processes in a Wallaroo instance. For example:
Deploy a pipeline, retrieve data through a data connector, submit the data for inferences, undeploy the pipeline
Replace a model with a new version
Retrieve shadow deployed inference results and submit them to a database
Orchestration Flow
ML Workload Orchestration flow works within 3 tiers:
Tier
Description
ML Workload Orchestration
User created custom instructions that provide automated processes that follow the same steps every time without error. Orchestrations contain the instructions to be performed, uploaded as a .ZIP file with the instructions, requirements, and artifacts.
Task
Instructions on when to run an Orchestration as a scheduled Task. Tasks can be Run Once, where is creates a single Task Run, or Run Scheduled, where a Task Run is created on a regular schedule based on the Kubernetes cronjob specifications. If a Task is Run Scheduled, it will create a new Task Run every time the schedule parameters are met until the Task is killed.
Task Run
The execution of an task. These validate business operations are successful identify any unsuccessful task runs. If the Task is Run Once, then only one Task Run is generated. If the Task is a Run Scheduled task, then a new Task Run will be created each time the schedule parameters are met, with each Task Run having its own results and logs.
One example may be of making donuts.
The ML Workload Orchestration is the recipe.
The Task is the order to make the donuts. It might be Run Once, so only one set of donuts are made, or Run Scheduled, so donuts are made every 2nd Sunday at 6 AM. If Run Scheduled, the donuts are made every time the schedule hits until the order is cancelled (aka killed).
The Task Run are the donuts with their own receipt of creation (logs, etc).
Orchestrations and their Tasks and Task Runs are visible through the Wallaroo Dashboard through the following process.
IMPORTANT NOTE
If you do not see the Workloads link at the top of the Wallaroo Dashboard, check with your Wallaroo administrator to verify that ML Workloads are enabled. See the ML Workload Orchestration Configuration Guide for full details.
Task User Interface Overview
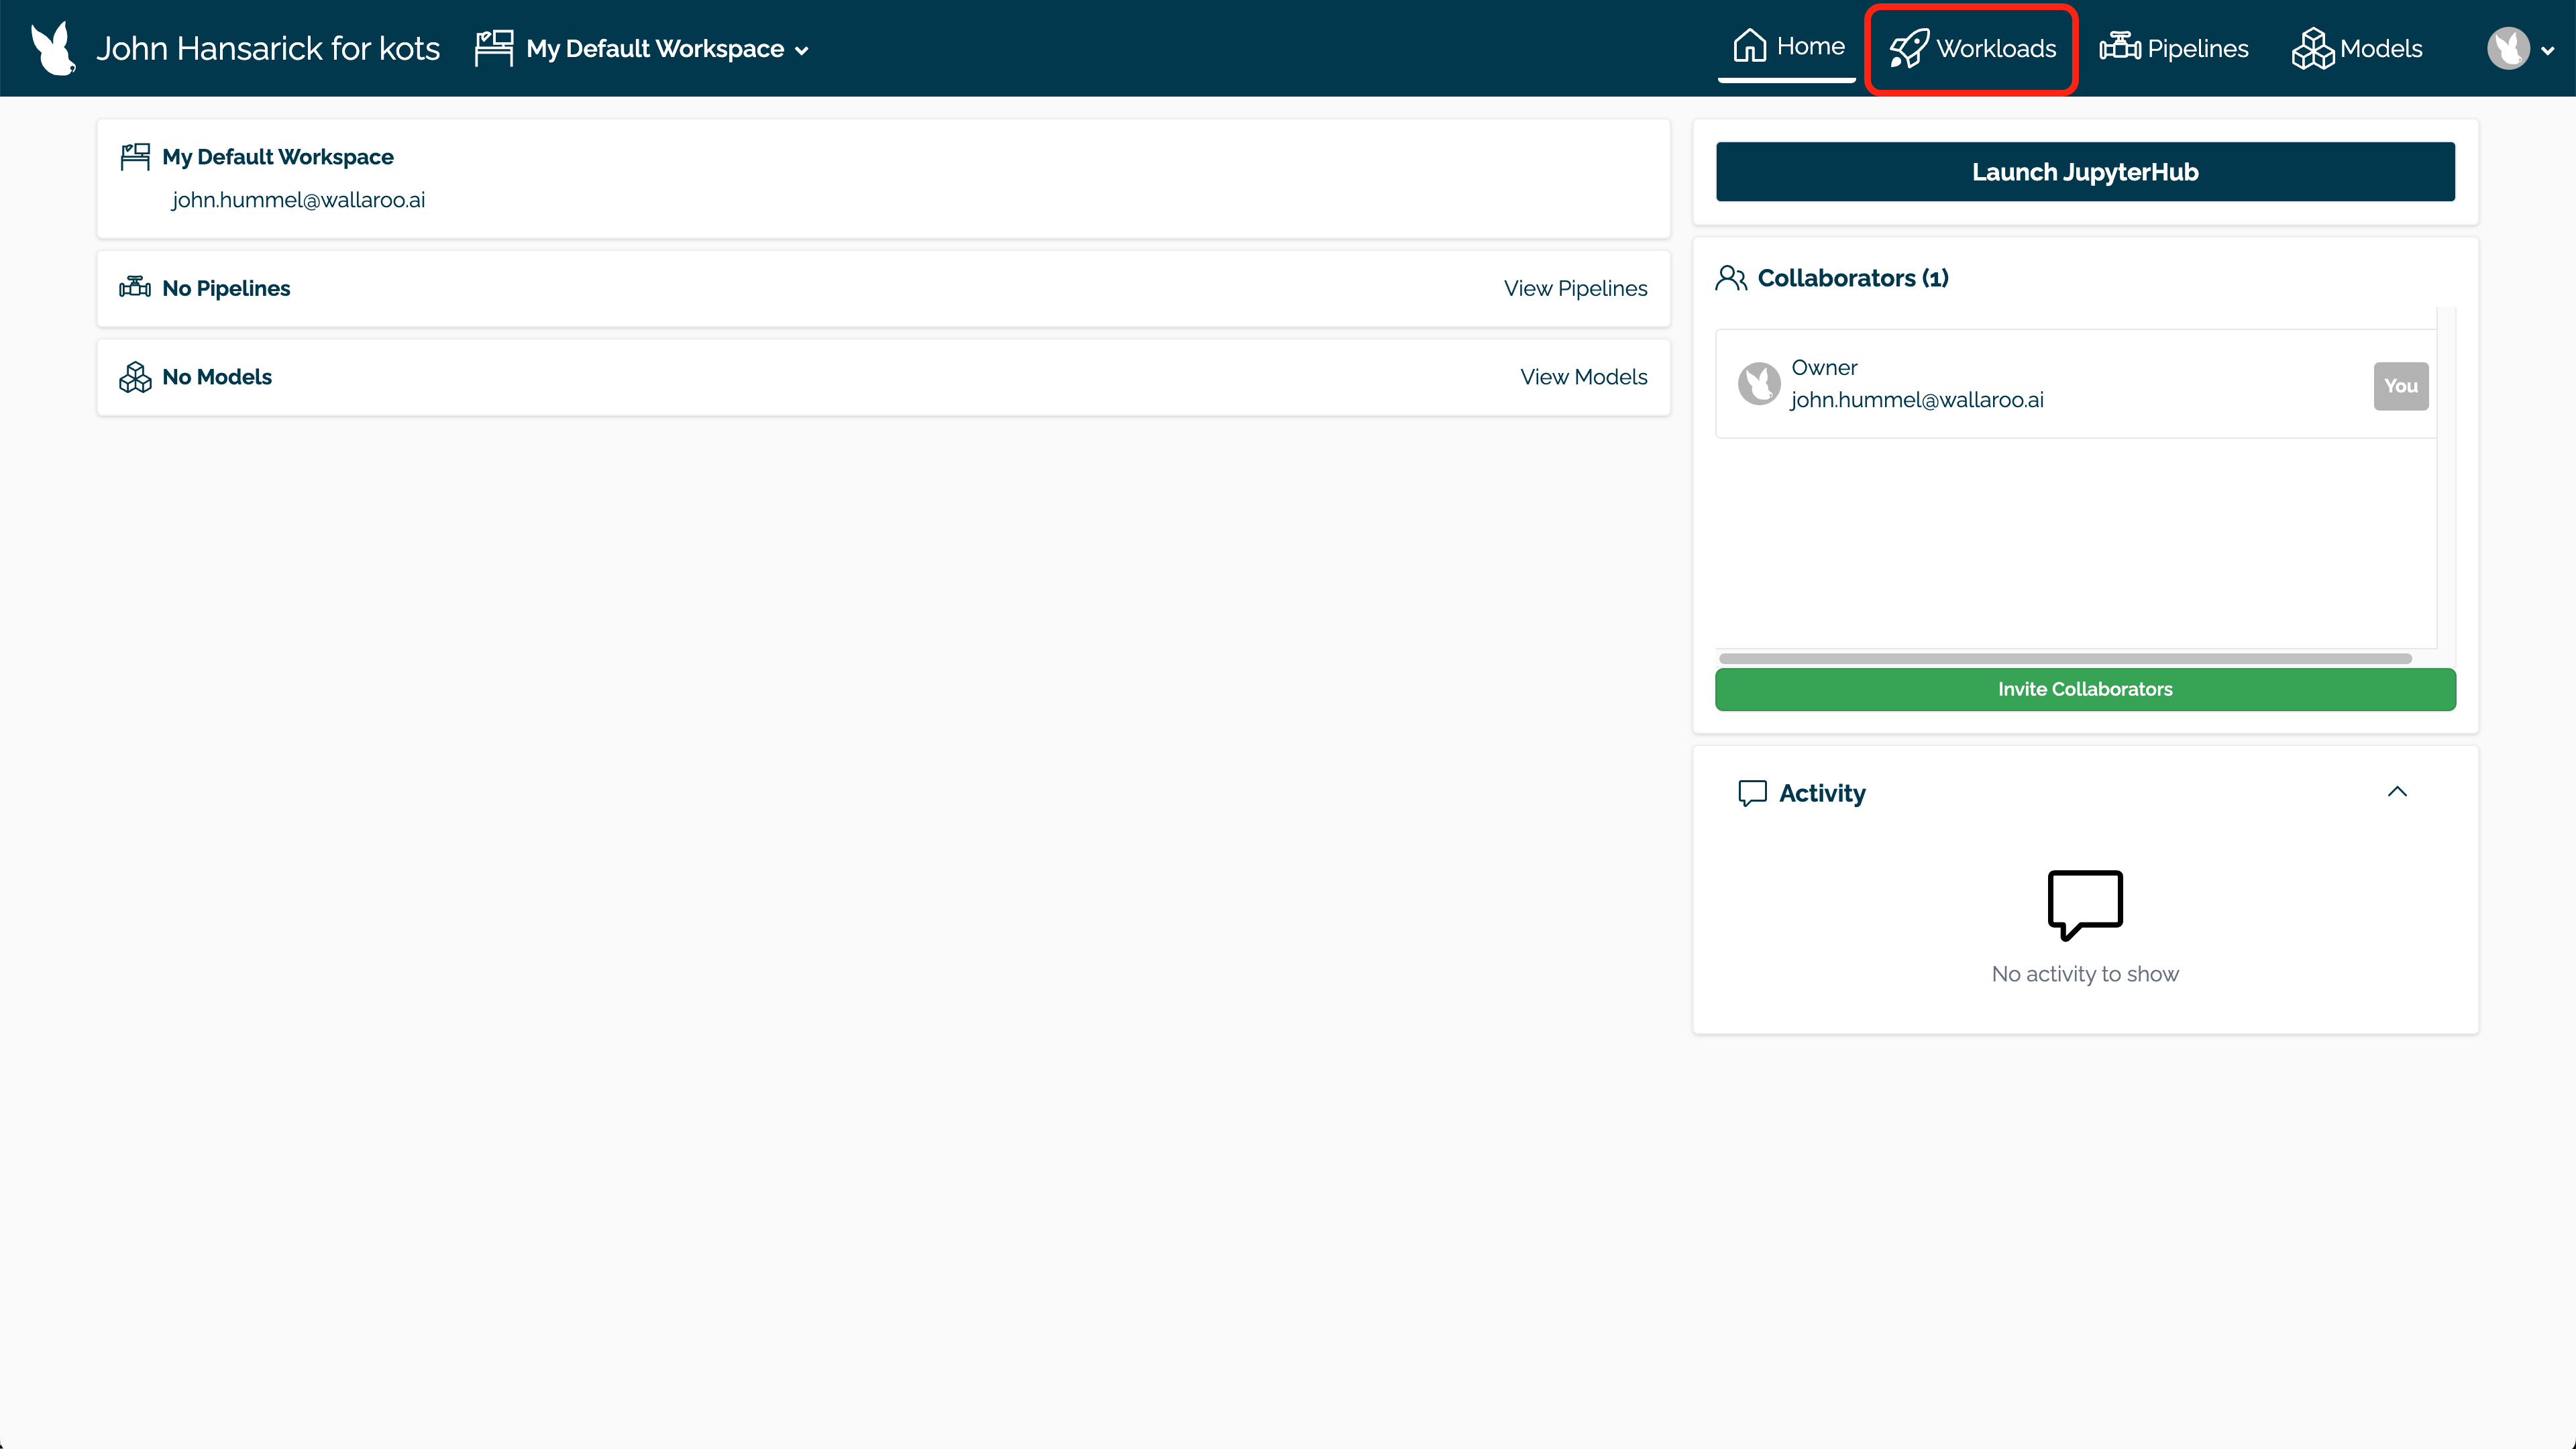
From the Wallaroo Dashboard, select the workspace where the workloads were uploaded to.
From the upper right corner, select Workloads.
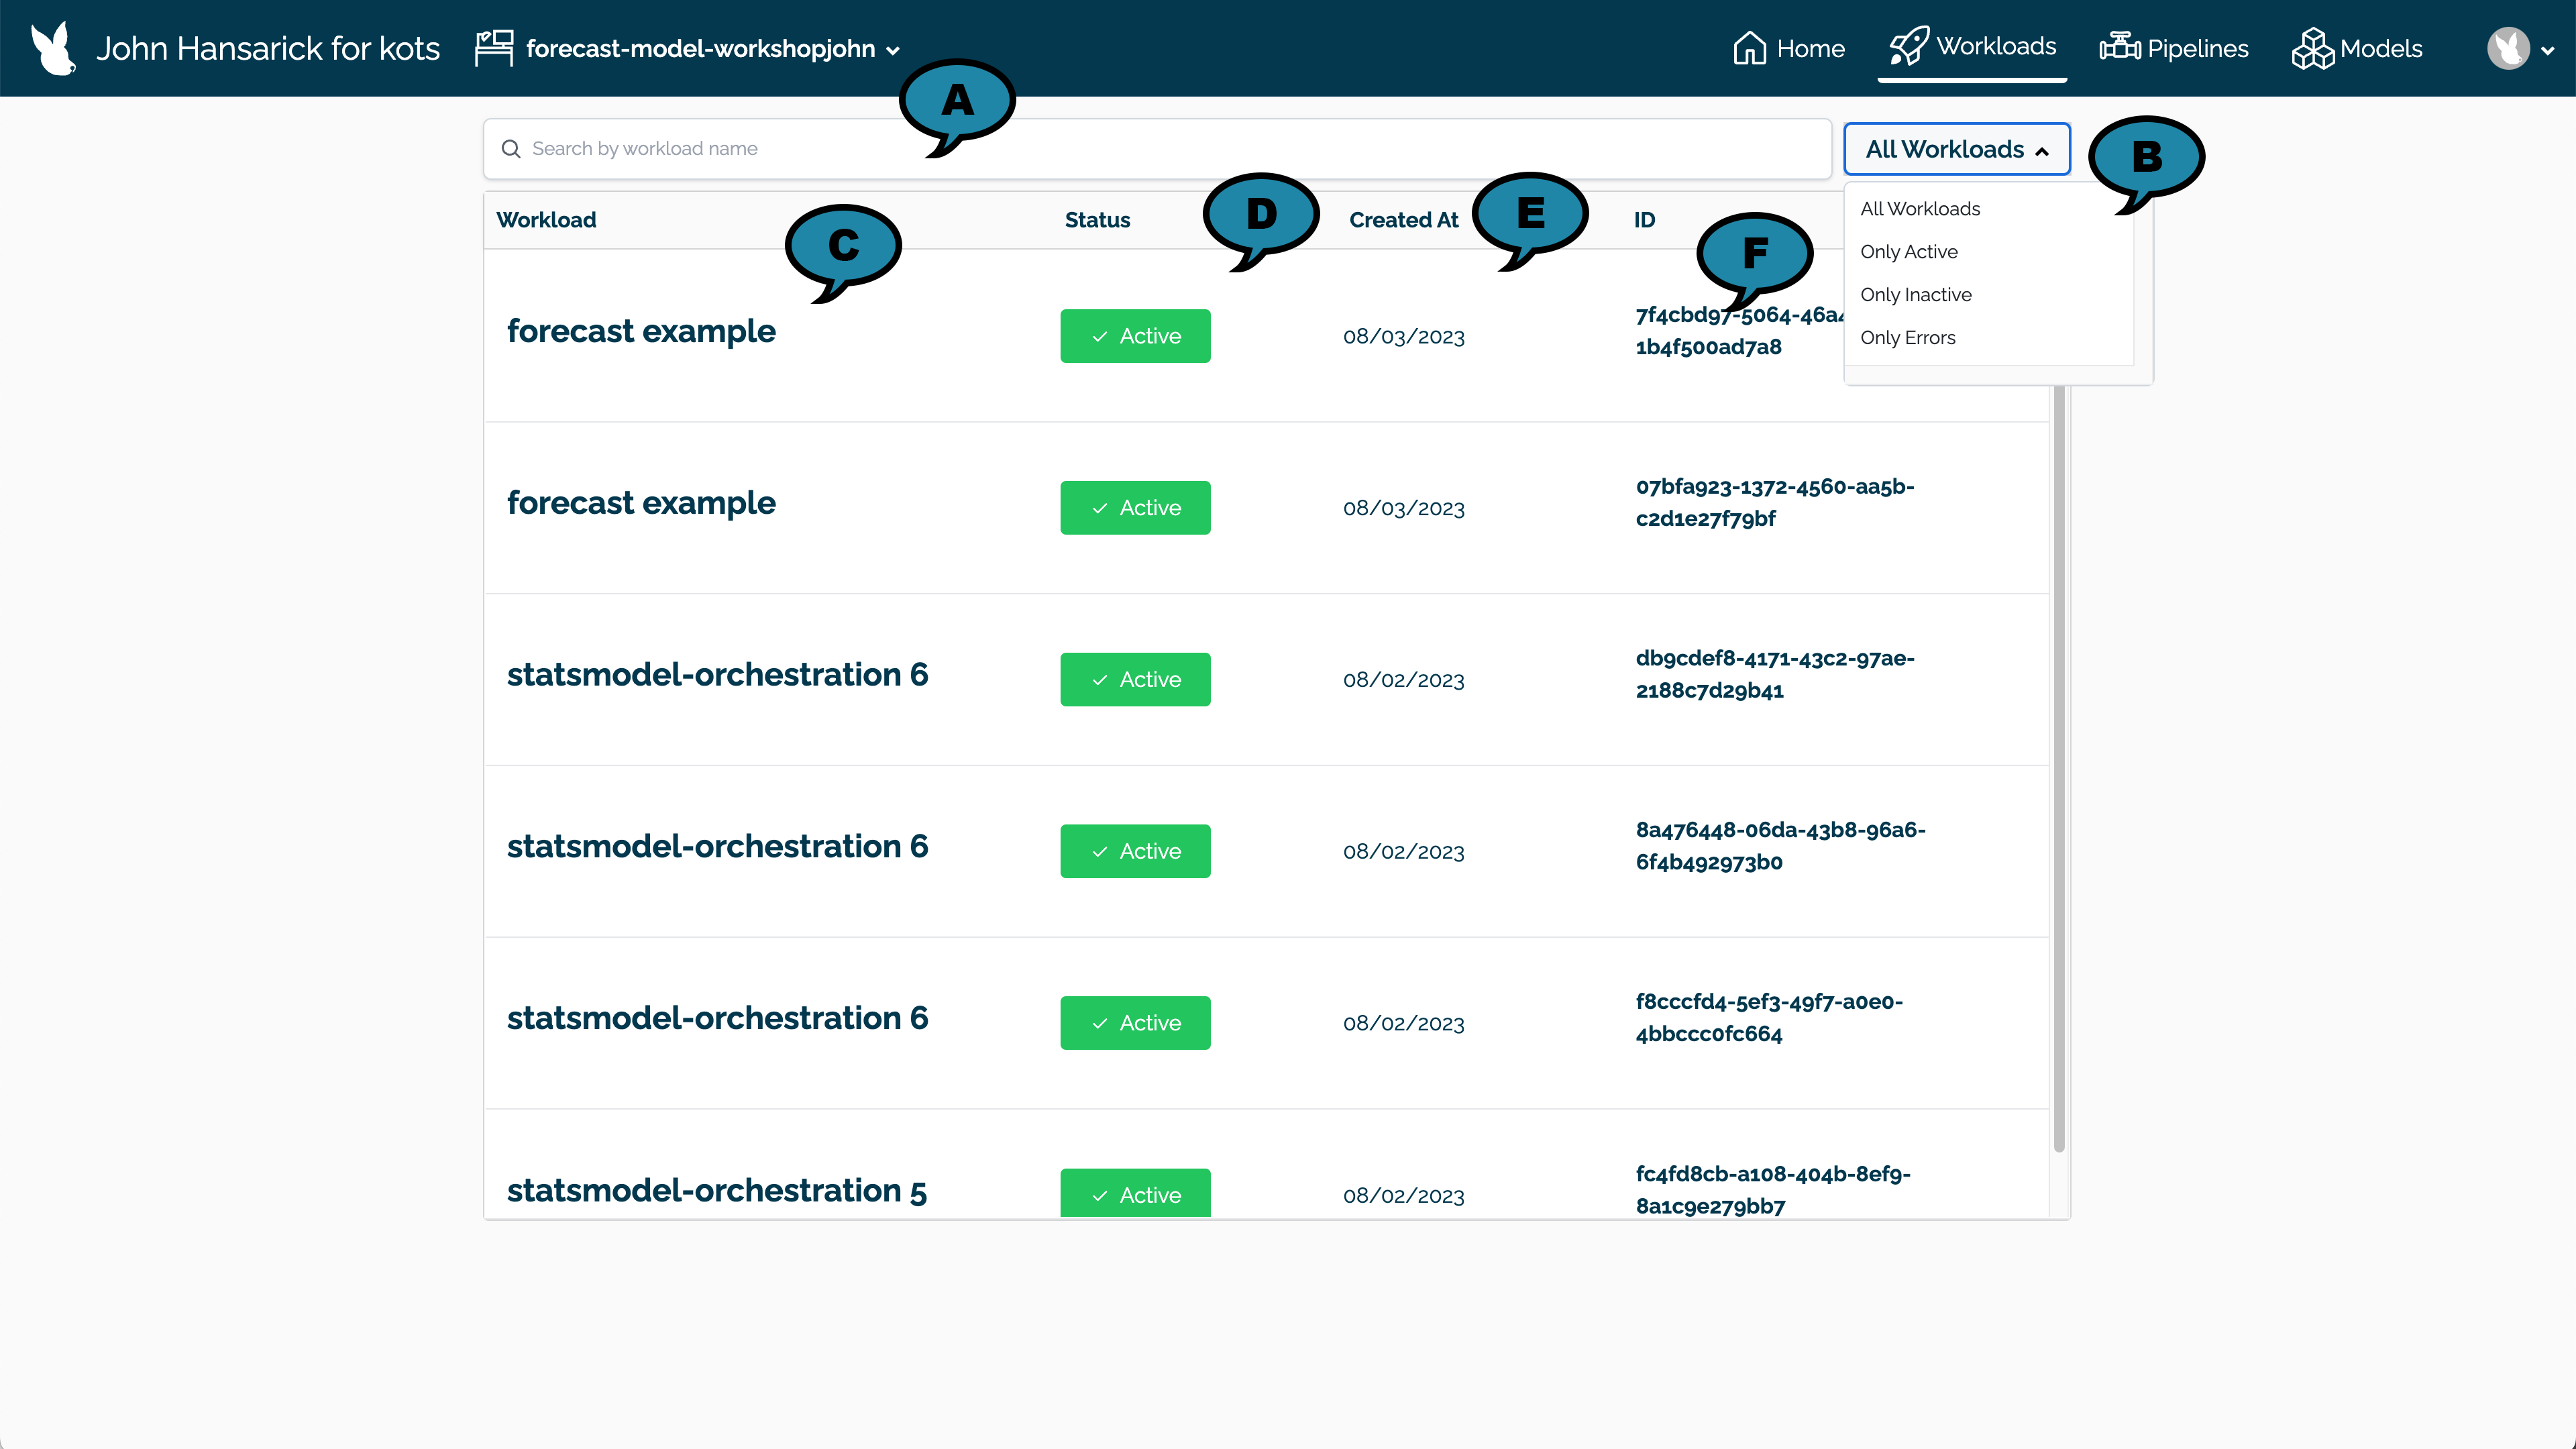
The list of uploaded ML Workload Orchestrations are displayed with the following:
Search Bar (A): Filter the list by workload name.
Status Filter (B): Filter the list by:
Only Active: Only show Active workloads.
Only Inactive: Only show Inactive workloads.
Only Error: Only show workloads flagged with an Error.
Workload (C): The assigned name of the workload.
Status (D): Whether the workload orchestration status is Active, Inactive, or has an Error.
Created At (E): The date the Orchestration was uploaded.
ID (F): The unique workload orchestration ID in UUID format.
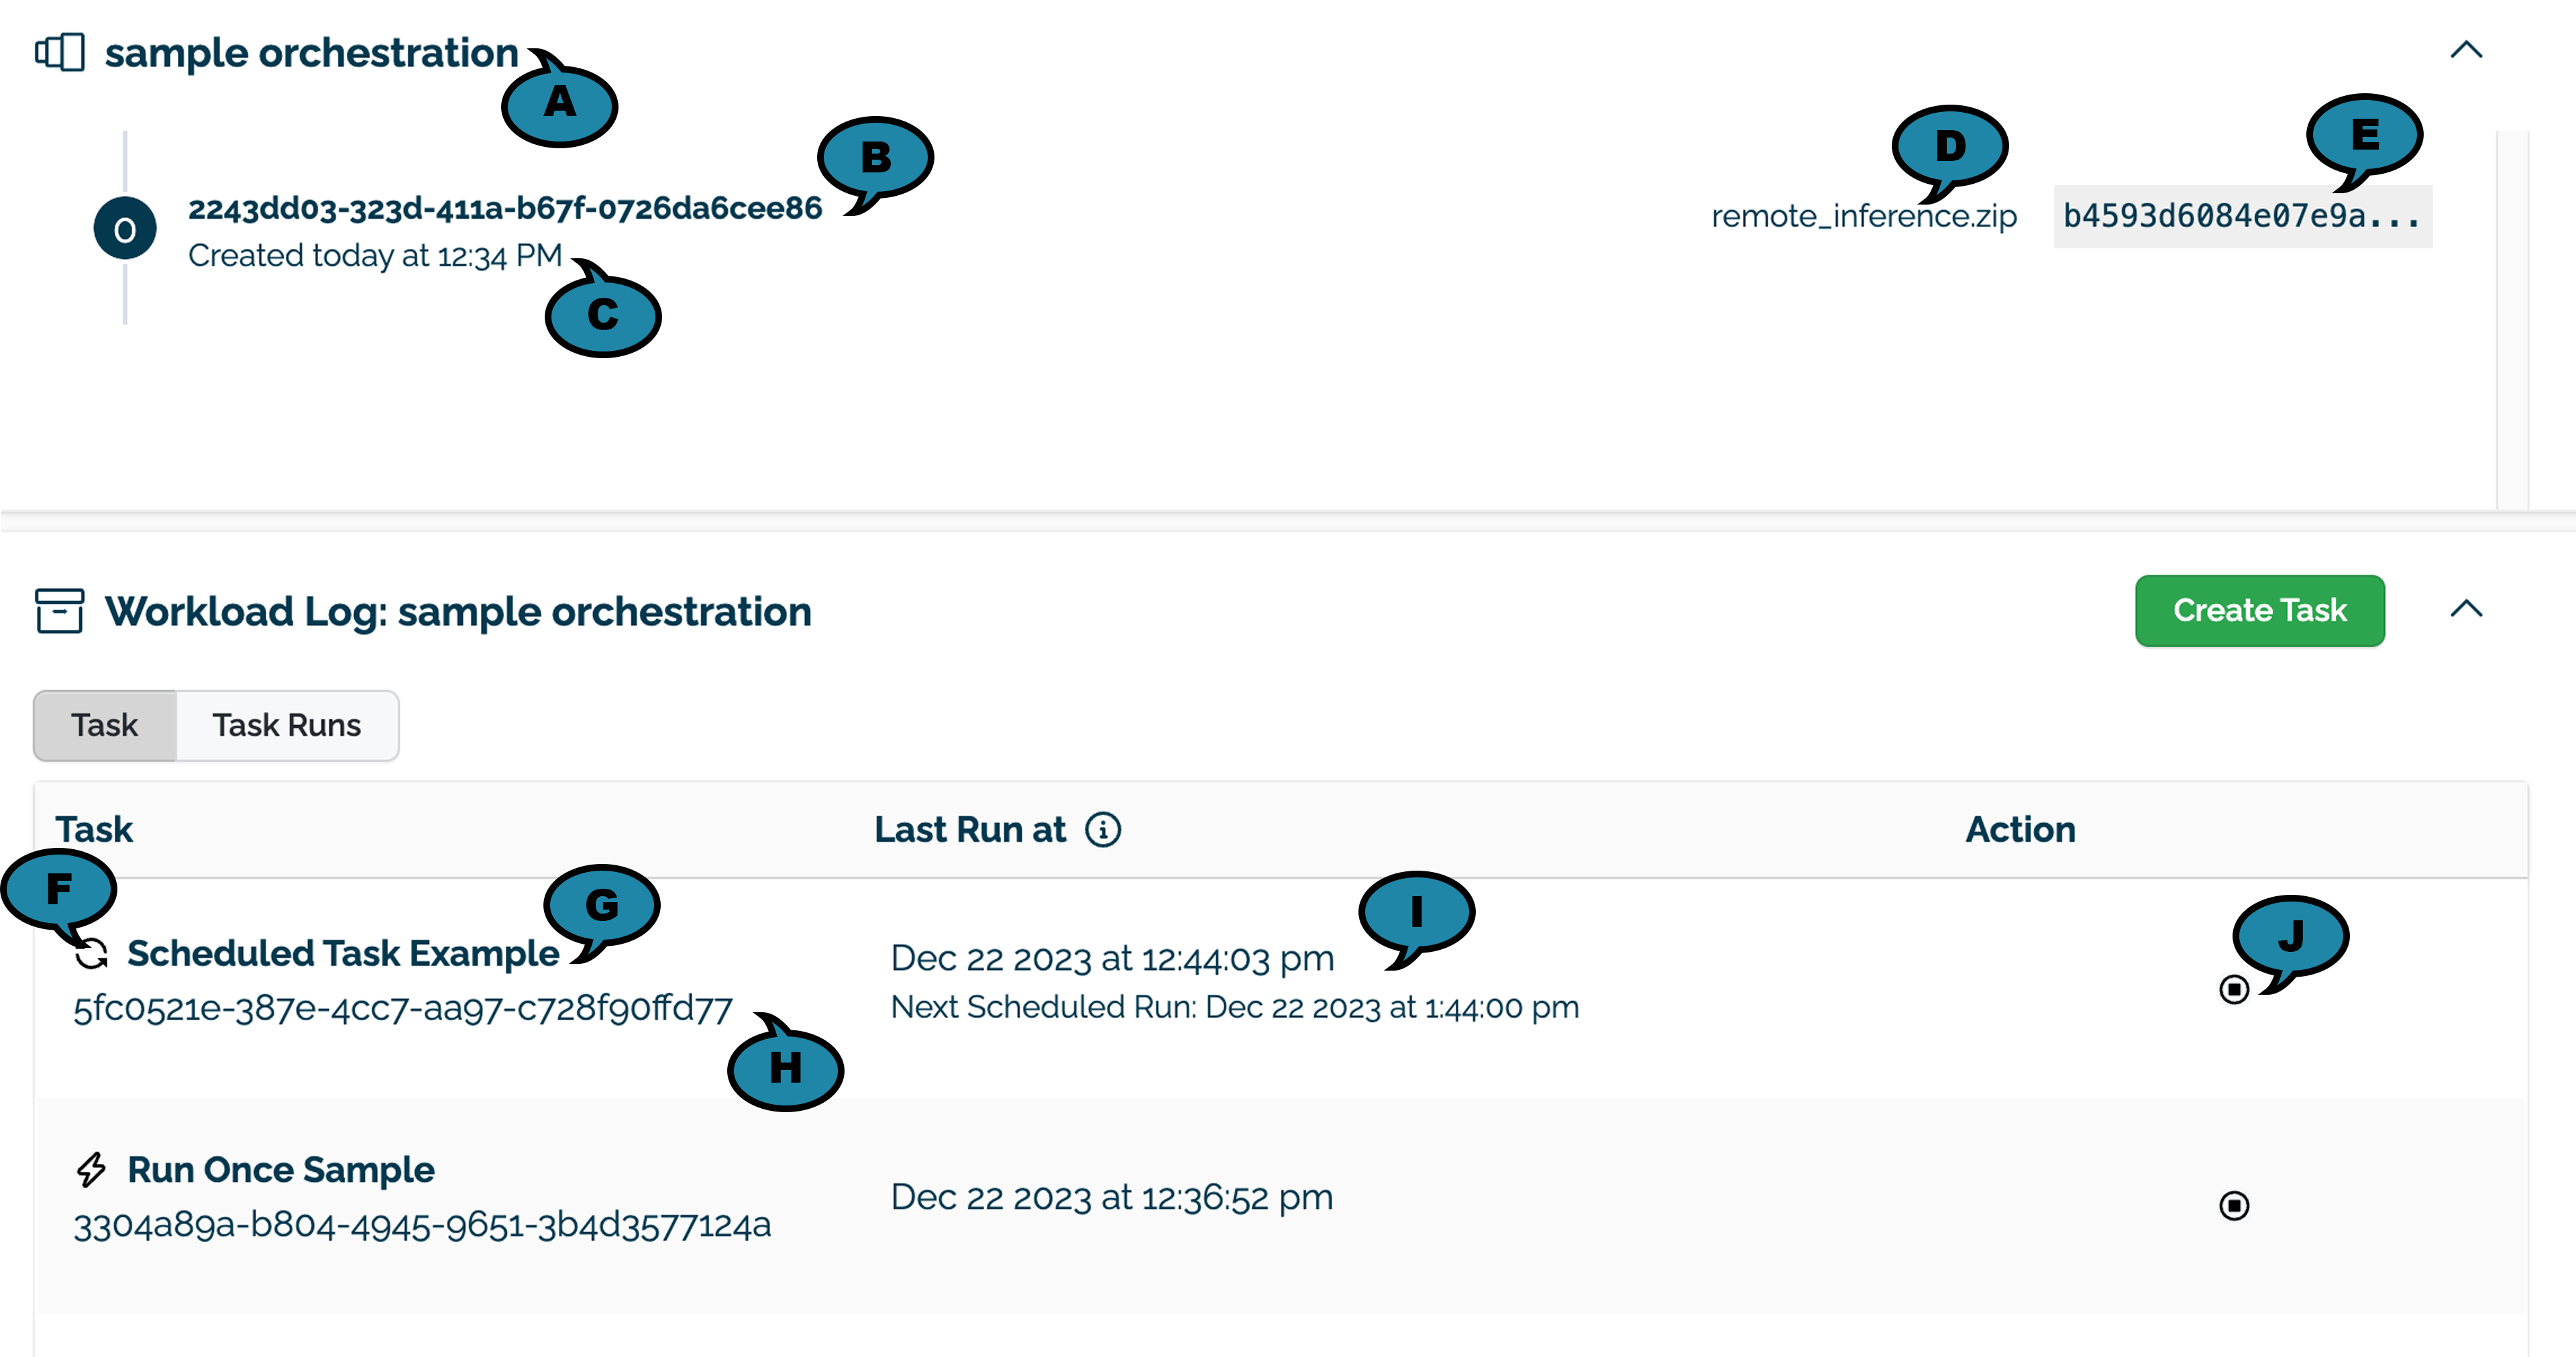
Select a workload orchestration to view Tasks generated from this workload. The Orchestration Page has the following details:
Orchestration Details:
Orchestration Name (A): The name assigned when the workload was created from the workload orchestration.
Orchestration ID (B): The ID of the workload in UUID format.
Created (C): The date the workload was uploaded.
File (D): The file the workload was uploaded from.
File Hash (E): The hash of the workload file.
Task and Task Runs buttons as detailed below.
Task: Each Task generated from the Orchestration as either a Run Once or Run Scheduled. Run Once tasks generate a single Task Run, then terminate. Run Scheduled tasks generate a Task Run each time the schedule pattern occurs. For example, a Run Scheduled task set to run every 1st of the month at 4 PM will have 12 Task Runs generated from it a year later.
Type (F): Tasks are shown as either Run Once (a lightning bolt icon) or Run Scheduled (circular arrow icon).
Task Name (G): The name of the task.
Task ID (H): The ID of the task in UUID format.
Run At (I): The last scheduled run, and for Run Scheduled tasks, the next scheduled run. The actual time of execution may depend on system load, time differences and other factors.
Actions (J): Allows the task to be Stopped. If a Run Scheduled Task, this will stop any further Task Runs.
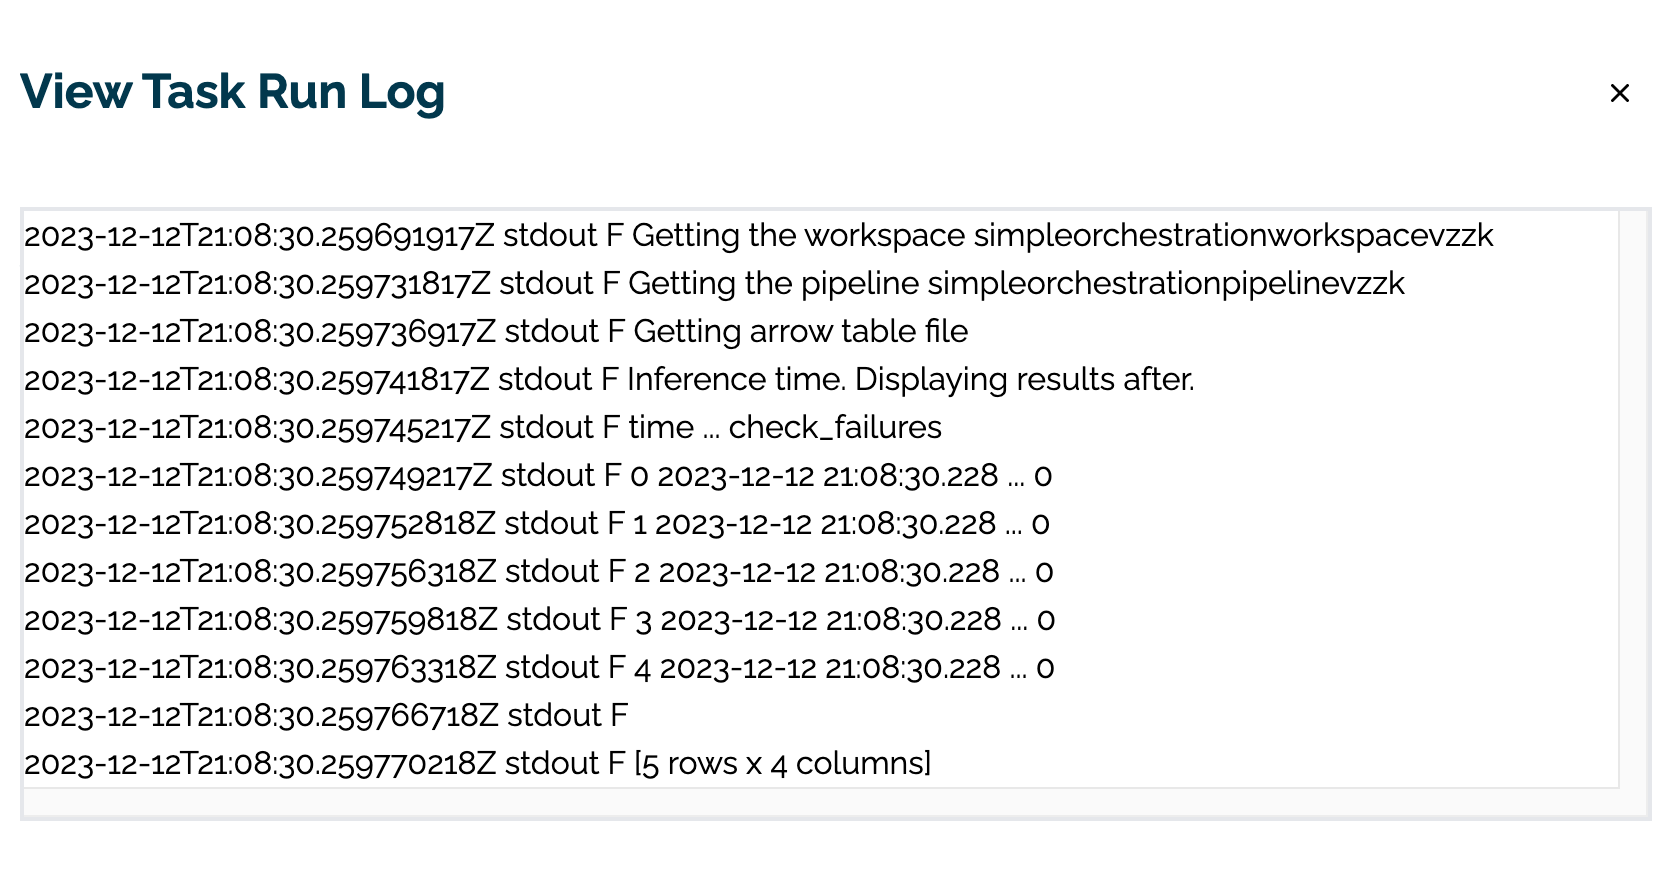
Task Run: Each Task generates one or more Task Runs with the following details.
Task Run (A): The name of the Task that generated the Task Run, including the symbol for Run Once (a lightning bolt icon) or Run Scheduled (circular arrow icon).
Task ID (B): The ID of the Task that generated the Task Run in UUID format.
Status (C): The status of the Task Run as either Success, Failure, or Timed_out.
Run At (D): The date and time the task previous ran, and for Run Scheduled tasks, the next scheduled run.
Task Run Logs (E): The logs of the Task Run that displays an abbreviated Task Run logs.
Create a Task
To create a task using the Workload Orchestration UI from the Orchestration Details page:
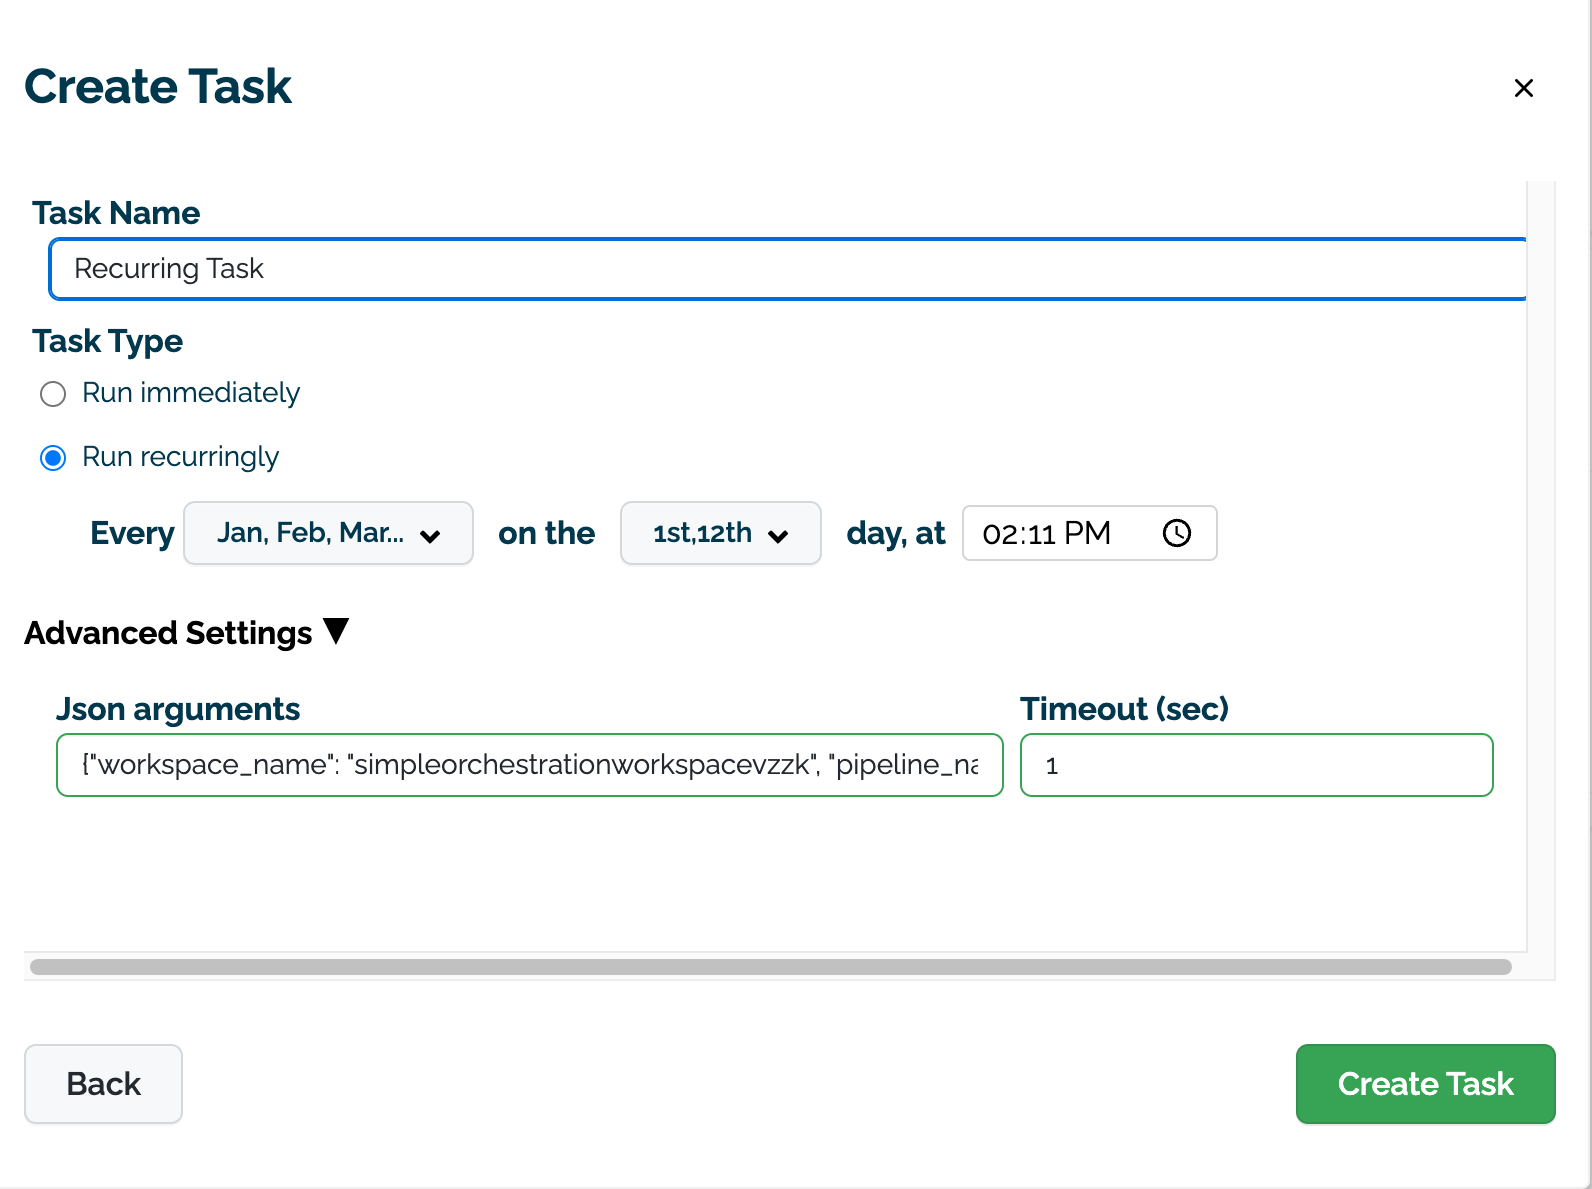
Select Create Task.
Add the following:
Task Name: The name of the Task created from the Workload Orchestration.
Task Type:
Select Run immediately to generate a Run Once task.
Select Run recurringly to generate a Run Scheduled task. For Run Scheduled tasks, select the Months, Days, and Times that the task it to run. For example, selecting only January 15 8:00 PM will only run on that date, while selecting January, March, May at 1, 7, 15, and 30 at 8:00 PM will generate a Task Run for each of those days that meet those conditions.
Advanced Settings:
Json arguments: Tasks accept Json arguments that are used to modify how each tasks is run. See the Wallaroo SDK Essentials Guide: ML Workload Orchestration for details on creating a Workload Orchestration that accepts additional Task arguments.
Timeout (sec): How long the Task should run before stopping. This is used to terminate tasks that may be in an infinite loop.
1 - ML Workload Orchestration Configuration Guide
How to enable or disable Wallaroo ML Workload Orchestration
Wallaroo ML Workload Orchestration allows organizations to automate processes and run them either on demand or on a reoccurring schedule.
The following guide shows how to enable Wallaroo ML Workload Orchestration in a Wallaroo instance.
Enable Wallaroo ML Workload Orchestration for Kots Installations
Organizations that install Wallaroo using kots can enable or disable Wallaroo ML Workload Orchestration from the Wallaroo Administrative Dashboard through the following process.
From a terminal shell with access to the Kubernetes environment hosting the Wallaroo instance, run the following. Replace wallaroo with the namespace used for the Wallaroo installation.
kubectl kots admin-console --namespace wallaroo
Access the Wallaroo Administrative Dashboard through a browser. By default, http://localhost:8080. Enter the administrative password when requested.
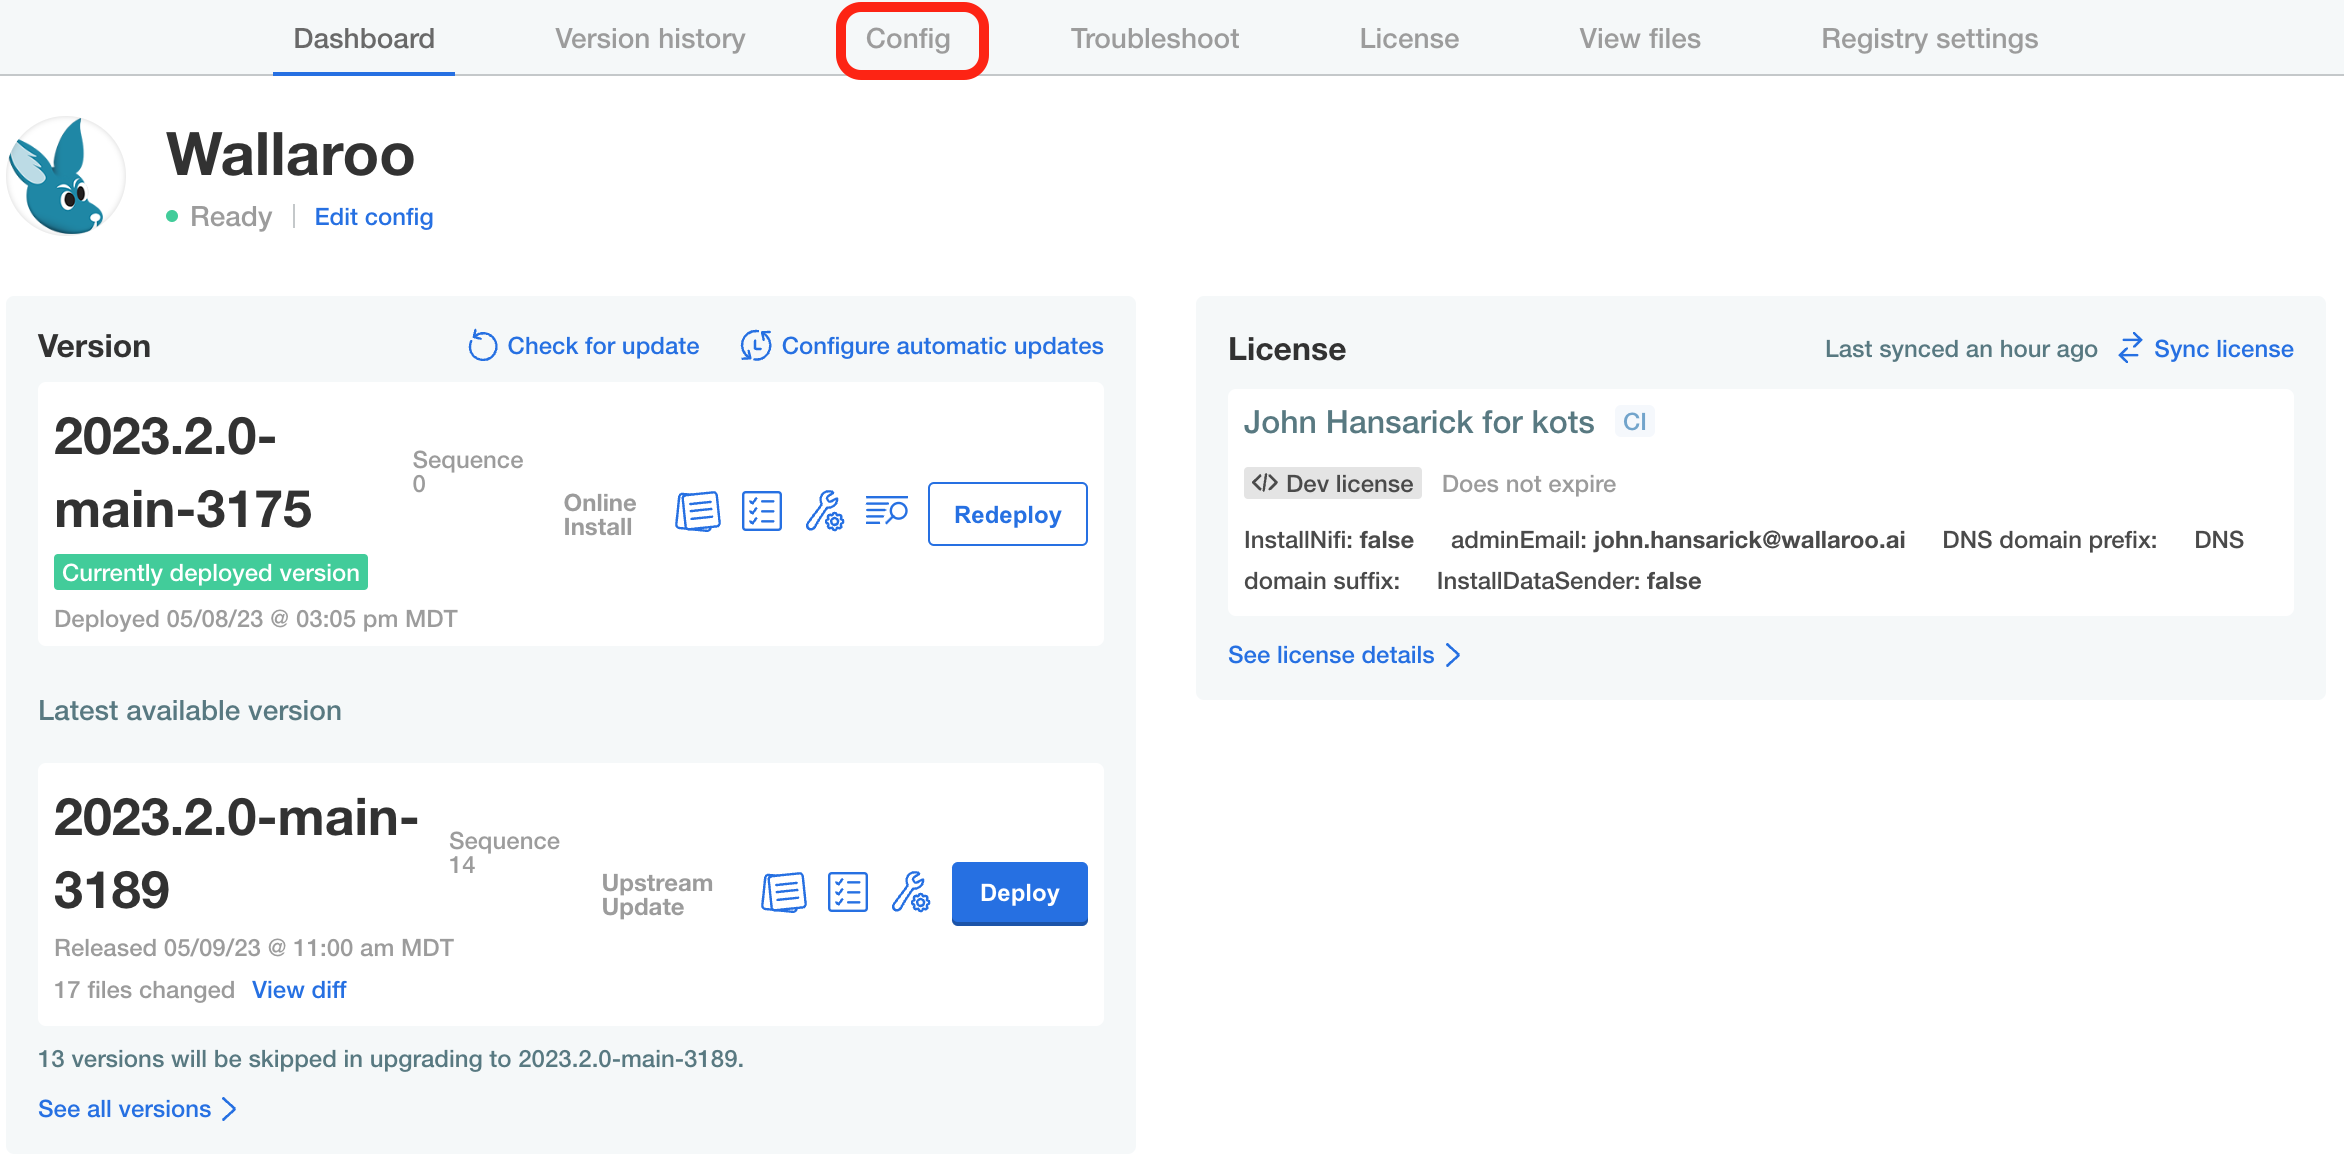
From the top navigation menu, select Config.
From Pipeline Orchestration, either enable or disable Enable Pipeline Orchestration service.
Scroll to the bottom and select Save config.
From the The config for Wallaroo has been updated. module, select Go to updated version.
Select the most recent version with the updated configuration and select Deploy.
The update process will take 10-15 minutes depending on your Wallaroo instance and other changes made.
Enable Wallaroo ML Workload Orchestration for Helm Installations
To enable Wallaroo ML Workload Orchestration for Helm based installations of Wallaroo:
Set the local values YAML file - by default local-values.yaml with the following:
orchestration:
    enabled: true
If installing Wallaroo, then format the helm install command as follows, setting the $RELEASE, $REGISTRYURL, $VERSION, and $LOCALVALUES.yaml as required for the installation settings.
If performing an update to the Wallaroo instance configuration, then use the helm upgrade, , setting the $RELEASE, $REGISTRYURL, $VERSION, and $LOCALVALUES.yaml as required for the installation settings.
For example, to upgrade the registration wallaroo from the EE channel the command would be:
The update process will take 10-15 minutes depending on your Wallaroo instance and other changes made. Once complete, set the DNS settings as described in DNS Integration Guide.
2 - Wallaroo ML Workload Orchestration Requirements
Requirements for uploading a Wallaroo ML Workload Orchestration
Orchestration Requirements
Orchestrations are uploaded to the Wallaroo instance as a ZIP file with the following requirements:
Parameter
Type
Description
User Code
(Required) Python script as .py files
If main.py exists, then that will be used as the task entrypoint. Otherwise, the firstmain.py found in any subdirectory will be used as the entrypoint. If no main.py is found, the orchestration will not be accepted.
A standard Python requirements.txt for any dependencies to be provided in the task environment. The Wallaroo SDK will already be present and should not be included in the requirements.txt. Multiple requirements.txt files are not allowed.
Other artifacts
Other artifacts such as files, data, or code to support the orchestration.
Zip Instructions
In a terminal with the zip command, assemble artifacts as above and then create the archive. The zip command is included by default with the Wallaroo JupyterHub service.
zip commands take the following format, with {zipfilename}.zip as the zip file to save the artifacts to, and each file thereafter as the files to add to the archive.
zip {zipfilename}.zip file1, file2, file3....
For example, the following command will add the files main.py and requirements.txt into the file hello.zip.
The following recommendations will make using Wallaroo orchestrations.
The version of Python used should match the same version as in the Wallaroo JupyterHub service.
The same version of the Wallaroo SDK should match the server. For a 2023.2.1 Wallaroo instance, use the Wallaroo SDK version 2023.2.1.
Specify the version of pip dependencies.
The wallaroo.Client constructor auth_type argument is ignored. Using wallaroo.Client() is sufficient.
The following methods will assist with orchestrations:
wallaroo.in_task() : Returns True if the code is running within an orchestration task.
wallaroo.task_args(): Returns a Dict of invocation-specific arguments passed to the run_ calls.
Orchestrations will be run in the same way as running within the Wallaroo JupyterHub service, from the version of Python libraries (unless specifically overridden by the requirements.txt setting, which is not recommended), and running in the virtualized directory /home/jovyan/.
Orchestration Code Samples
The following demonstres using the wallaroo.in_task() and wallaroo.task_args() methods within an Orchestration. This sample code uses wallaroo.in_task() to verify whether or not the script is running as a Wallaroo Task. If true, it will gather the wallaroo.task_args() and use them to set the workspace and pipeline. If False, then it sets the pipeline and workspace manually.
# get the argumentswl=wallaroo.Client()
# if true, get the arguments passed to the taskifwl.in_task():
arguments=wl.task_args()
# arguments is a key/value pair, set the workspace and pipeline nameworkspace_name=arguments['workspace_name']
pipeline_name=arguments['pipeline_name']
# False: We're not in a Task, so set the pipeline manuallyelse:
workspace_name="bigqueryworkspace"pipeline_name="bigquerypipeline"