The following guides demonstrate how to install Wallaroo with different options to best fit your organizations needs, and are meant to supplement the standard install guides.
Installation Configurations
Guides for different install options for Wallaroo
- 1: Create ARM Nodepools for Kubernetes Clusters
- 2: Wallaroo Enterprise Azure integration Overview
- 3: Create GPU Nodepools for Kubernetes Clusters
- 4: Install Wallaroo with Minimum Services
- 5: Install Wallaroo to Specific Nodes
- 6: Taints and Tolerations Guide
1 - Create ARM Nodepools for Kubernetes Clusters
How to create ARM nodepools for Kubernetes clusters.
The following guide demonstrates how to create nodepools with ARM architecture.
Wallaroo supports for ARM architecture CPUs. For example, Azure supports Ampere® Altra® Arm-based processor included with the following virtual machines:
The following templates demonstrate how to create an ARM nodepool, then assign that nodepool to an existing cluster. These steps can be used in conjunction with Wallaroo Enterprise Install Guides.
- ARM nodes are required both for the Wallaroo inference engine, and for converting Wallaroo non-native runtimes. For standard installs of Wallaroo, the options are either:
- Create two nodepools:
- One nodepool with the
wallaroo.ai/engine=true:NoScheduletaint for the Wallaroo Engine - One nodepool without taints for Wallaroo non-native runtime conversions.
- One nodepool with the
- Create one nodepool without taints used for both auto-conversion and engine deployments.
- Create two nodepools:
For custom tolerations, see Taints and Tolerations Guide.
The following scripts show examples of setting up an ARM nodepool for use with the Wallaroo instance.
The following sample script for Microsoft Azure command line tool creates a nodepool into an existing cluster with the Standard_D4ps_v5 virtual machine, providing 4 cpus and 16 GB RAM under the the Ampere® Altra® Arm-based processors. For more details, see Azure Virtual Machines Dpsv5 and Dpdsv5-series.
This provides as 0-3 nodes in the nodepool, allowing it to spin up or down VMs as required.
RESOURCE_GROUP="YOUR RESOURCE GROUP"
CLUSTER_NAME="YOUR CLUSTER NAME"
ARM_NODEPOOL_NAME="YOUR ARM NODEPOOL NAME"

az aks nodepool add \
    --resource-group $RESOURCE_GROUP \
    --cluster-name $CLUSTER_NAME \
    --name $ARM_NODEPOOL_NAME \
    --node-count 0 \
    --node-vm-size Standard_D4ps_v5 \
    --node-taints wallaroo.ai/engine=true:NoSchedule \
    --enable-cluster-autoscaler \
    --min-count 0 \
    --max-count 3
For example, to create an ARM nodepool arm_node_01 to the existing cluster wallaroo-cluster in the resource group sample-group, the following would be used:
RESOURCE_GROUP="sample-group"
CLUSTER_NAME="wallaroo-cluster"
ARM_NODEPOOL_NAME="arm_node_01"

az aks nodepool add \
    --resource-group $RESOURCE_GROUP \
    --cluster-name $CLUSTER_NAME \
    --name $ARM_NODEPOOL_NAME \
    --node-count 0 \
    --node-vm-size Standard_D4ps_v5 \
    --node-taints wallaroo.ai/engine=true:NoSchedule \
    --enable-cluster-autoscaler \
    --min-count 0 \
    --max-count 3
The following sample script for Amazon Web Services tool eksctl creates a nodepool with the m6g.xlarge virtual machine, providing 4 cpus and 16 GB RAM under the the Arm-based AWS Graviton2 processors processors. For more details, see Amazon EC2 M6g Instances.
The following example template shows adding the nodepool to an existing cluster.
apiVersion: eksctl.io/v1alpha5
kind: ClusterConfig

metadata:
  name: YOUR CLUSTER NAME HERE # This must match the name of the existing cluster
  region: YOUR REGION HERE

managedNodeGroups:
- name: YOUR NODEPOOL NAME HERE
  instanceType: m6g.medium # the ARM based virtual machine to use
  minSize: 1
  maxSize: 1
  taints:
    - key: wallaroo.ai/engine # allows the Wallaroo engine to run in this nodepool
      value: "true"
      effect: NoSchedule
  tags:
    k8s.io/cluster-autoscaler/node-template/label/k8s.dask.org/node-purpose: engine
    k8s.io/cluster-autoscaler/node-template/taint/k8s.dask.org/dedicated: "true:NoSchedule"
  iam:
    withAddonPolicies:
      autoScaler: true # used to autoscale between the minimum and maximum nodes
  containerRuntime: containerd
  amiFamily: AmazonLinux2
  availabilityZones:
    - INSERT YOUR ZONE HERE # this should match the region for optimal performance
  volumeSize: 100
The following sample script for Google Cloud Platform command line tool creates a nodepool with the t2a-standard-4 virtual machine, providing 4 cpus and 16 GB RAM under the the Ampere® Altra® Arm-based processors. For more details, see Tau T2A machine series.
The following must be specified:
- Cluster Name: The cluster the nodepool is attached to.
- Zone and node location: The location the nodepool is hosted in. For optimal performance, this should match the zone the cluster is in.
- Machine type: The virtual machine to use.
- Number of nodes: The number of nodes used for the nodepool. This example uses 1.
- Service account: The IAM service account. If none is specified, then the default is used.
CLUSTER_NAME="YOUR CLUSTER NAME"
ARM_NODEPOOL_NAME="YOUR NODEPOOL NAME"
ZONE="YOUR ZONE"
NODE_LOCATIONS="YOUR LOCATIONS"
NUM_NODES=YOUR NUMBER OF NODES


gcloud container node-pools create $ARM_NODEPOOL_NAME \
    --cluster $CLUSTER_NAME \
    --zone $ZONE \
    --node-locations NODE_LOCATIONS \
    --node-taints=wallaroo.ai/engine=true:NoSchedule \
    --machine-type T2A_MACHINE_TYPE \
    --num-nodes NUM_NODES
For example, to create an ARM nodepool arm_node_01 to the existing cluster wallaroo-cluster in the resource group sample-group, the following would be used:
CLUSTER_NAME="wallaroo-cluster"
ZONE="us-west1-a"
NODE_LOCATIONS="us-west1-a"
ARM_NODEPOOL_NAME="arm_node_01"
NUM_NODES=1

gcloud container node-pools create $ARM_NODEPOOL_NAME \
    --cluster $CLUSTER_NAME \
    --zone $ZONE \
    --node-locations NODE_LOCATIONS \
    --node-taints=wallaroo.ai/engine=true:NoSchedule \
    --machine-type t2a-standard-4 \
    --num-nodes NUM_NODES
Deployment Tutorials
The following tutorials demonstrate deploying a pipeline with the specified architecture.
2 - Wallaroo Enterprise Azure integration Overview
An overview of the Wallaroo Enterprise for Azure Cloud
Wallaroo is proud to announce Wallaroo Enterprise for the Microsoft Azure Marketplace. This brings Wallaroo to even more organizations who want to use Wallaroo with their other Microsoft Azure services.
The following diagram displays the architecture for this service.
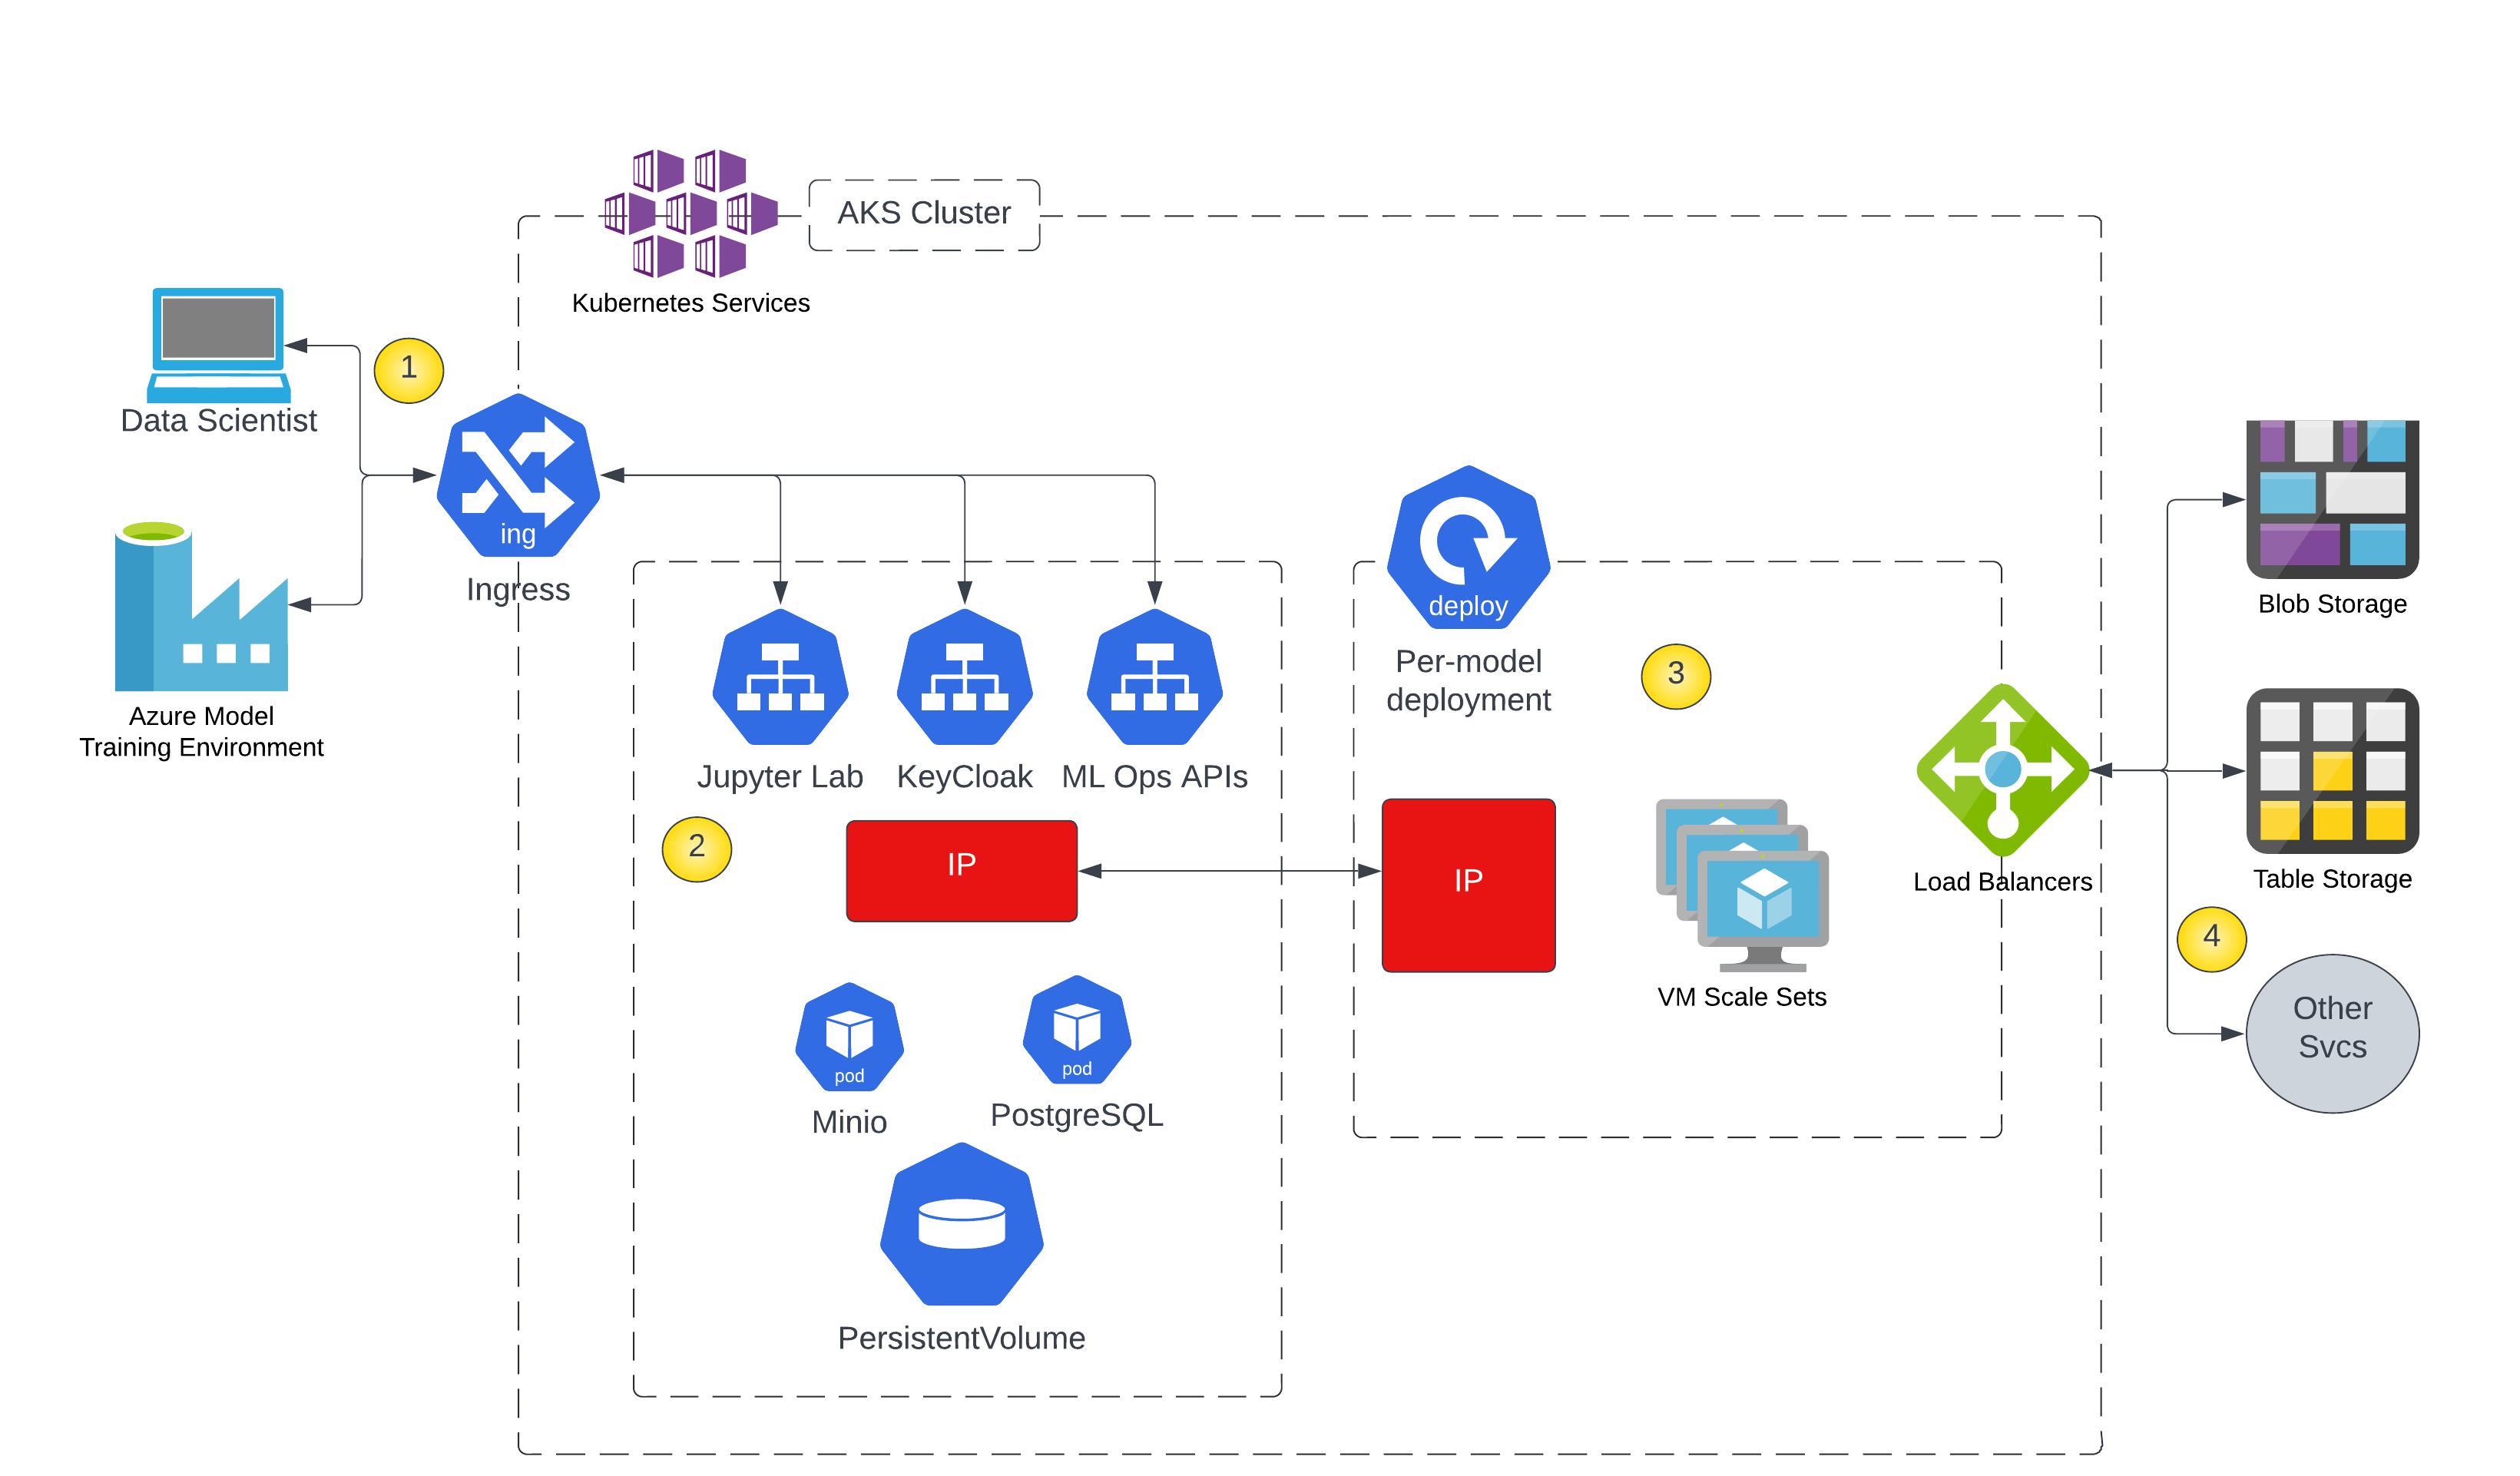
- Users and application integrations connect to Jupyter Lab and the Wallaroo ML Ops APIs hosted in an AKS cluster.
- Wallaroo cluster services are hosted in a Kubernetes namespace and manage deployments of ML models.
- ML models are deployed in AKS to scale across as many VMs as needed to handle the load.
- ML inference services are provided via a web API to allow integration with data storage systems or other services.
3 - Create GPU Nodepools for Kubernetes Clusters
How to create GPU nodepools for Kubernetes clusters.
Wallaroo provides support for ML models that use GPUs. The following templates demonstrate how to create a nodepool in different cloud providers, then assign that nodepool to an existing cluster. These steps can be used in conjunction with Wallaroo Enterprise Install Guides.
Note that deploying pipelines with GPU support is only available for Wallaroo Enterprise.
For standard Wallaroo installations, GPU nodepools must include the following taints:
sku=gpu:NoSchedulewallaroo.ai/engine=true:NoSchedule
For custom tolerations, see Taints and Tolerations Guide.
The following script creates a nodepool with NVidia Tesla K80 gpu using the Standard_NC6 machine type and autoscales from 0-3 nodes. Each node has one GPU in this example so the max .gpu() that can be requested by a pipeline step is 1.
For detailed steps on adding GPU to a cluster, see Microsoft Azure Use GPUs for compute-intensive workloads on Azure Kubernetes Service (AKS) guide.
Note that the labels are required as part of the Wallaroo pipeline deployment with GPU support. The label below is an example, but a label must be provided.
RESOURCE_GROUP="YOUR RESOURCE GROUP"
CLUSTER_NAME="YOUR CLUSTER NAME"
GPU_NODEPOOL_NAME="YOUR GPU NODEPOOL NAME"

az extension add --name aks-preview

az extension update --name aks-preview

az feature register --namespace "Microsoft.ContainerService" --name "GPUDedicatedVHDPreview"

az provider register -n Microsoft.ContainerService

az aks nodepool add \
    --resource-group $RESOURCE_GROUP \
    --cluster-name $CLUSTER_NAME \
    --name $GPU_NODEPOOL_NAME \
    --node-count 0 \
    --node-vm-size Standard_NC6 \
    --node-taints "sku=gpu:NoSchedule,wallaroo.ai/engine=true:NoSchedule" \
    --aks-custom-headers UseGPUDedicatedVHD=true \
    --enable-cluster-autoscaler \
    --min-count 0 \
    --max-count 3 \
    --labels doc-gpu-label=true
The following script creates a nodepool uses NVidia T4 GPUs and autoscales from 0-3 nodes. Each node has one GPU in this example so the max .gpu() that can be requested by a pipeline step is 1.
Google GKE automatically adds the following taint to the created nodepool.
NO_SCHEDULE nvidia.com/gpu present
Note that the labels are required as part of the Wallaroo pipeline deployment with GPU support. The label below is an example, but a label must be provided.
GCP_PROJECT="YOUR GCP PROJECT"
GCP_CLUSTER="YOUR CLUSTER NAME"
GPU_NODEPOOL_NAME="YOUR GPU NODEPOOL NAME"
REGION="YOUR REGION"

gcloud container \
    --project $GCP_PROJECT \
    node-pools create $GPU_NODEPOOL_NAME \
    --cluster $GCP_CLUSTER \
    --region $REGION \
    --node-version "1.25.8-gke.500" \
    --machine-type "n1-standard-1" \
    --accelerator "type=nvidia-tesla-t4,count=1" \
    --image-type "COS_CONTAINERD" \
    --disk-type "pd-balanced" \
    --disk-size "100" \
    --node-labels doc-gpu-label=true \
    --metadata disable-legacy-endpoints=true \
    --scopes "https://www.googleapis.com/auth/devstorage.read_only","https://www.googleapis.com/auth/logging.write","https://www.googleapis.com/auth/monitoring","https://www.googleapis.com/auth/servicecontrol","https://www.googleapis.com/auth/service.management.readonly","https://www.googleapis.com/auth/trace.append" \
    --num-nodes "3" \
    --enable-autoscaling \
    --min-nodes "0" \
    --max-nodes "3" \
    --location-policy "BALANCED" \
    --enable-autoupgrade \
    --enable-autorepair \
    --max-surge-upgrade 1 \
    --node-taints=sku=gpu:NoSchedule,wallaroo.ai/engine=true:NoSchedule \
    --max-unavailable-upgrade 0
The following steps are used to create a AWS EKS Nodepool with GPU nodes.
- Prerequisites: An existing AWS (Amazon Web Service) EKS (Elastic Kubernetes Service) cluster. See Wallaroo Enterprise Comprehensive Install Guide: Environment Setup Guides for a sample creation of an AWS EKS cluster for hosting a Wallaroo Enterprise instance.
- eksctl: Command line tool for installating and updating EKS clusters.
- Administrator access to the EKS cluster and capabilty of running
kubectlcommands.
- Create the nodepool with the following configuration file. Note that the
labelsare required as part of the Wallaroo pipeline deployment with GPU support. The label below is an example, but a label must be provided.- The sample configuration file below uses the AWS instance type
g5.2xlarge. Modify as required.
- The sample configuration file below uses the AWS instance type
eksctl create nodegroup --config-file=<path>
Sample config file:
# aws-gpu-nodepool.yaml
apiVersion: eksctl.io/v1alpha5
kind: ClusterConfig

metadata:
  name: YOUR CLUSTER NAME HERE # This must match the name of the existing cluster
  region: YOUR REGION HERE

managedNodeGroups:
- name: YOUR NODEPOOL NAME HERE
  instanceType: g5.2xlarge
  minSize: 1
  maxSize: 3
  labels:
    wallaroo.ai/gpu: "true"
    doc-gpu-label: "true"
  taints:
    - key: wallaroo.ai/engine
      value: "true"
      effect: NoSchedule
    - key: sku
      value: gpu
      effect: NoSchedule
  tags:
    k8s.io/cluster-autoscaler/node-template/label/k8s.dask.org/node-purpose: engine
    k8s.io/cluster-autoscaler/node-template/taint/k8s.dask.org/dedicated: "true:NoSchedule"
  iam:
    withAddonPolicies:
      autoScaler: true
  containerRuntime: containerd
  amiFamily: AmazonLinux2
  availabilityZones:
    - INSERT YOUR ZONE HERE
volumeSize: 100- References:
4 - Install Wallaroo with Minimum Services
How to install Wallaroo with disabled services for lower core environments
The following system requirements are required for the minimum settings for running Wallaroo in a Kubernetes cloud cluster.
The following system requirements are required for the minimum settings for running Wallaroo in a Kubernetes cloud cluster.
- Minimum number of nodes: 4
- Minimum Number of CPU Cores: 8
- Minimum RAM per node: 16 GB
- Minimum Storage: A total of 625 GB of storage will be allocated for the entire cluster based on 5 users with up to four pipelines with five steps per pipeline, with 50 GB allocated per node, including 50 GB specifically for the Jupyter Hub service. Enterprise users who deploy additional pipelines will require an additional 50 GB of storage per lab node deployed.
Wallaroo recommends at least 16 cores total to enable all services. At less than 16 cores, services will have to be disabled to allow basic functionality as detailed in this table.
Note that even when disabling these services, Wallaroo performance may be impacted by the models, pipelines, and data used. The greater the size of the models and steps in a pipeline, the more resources will be required for Wallaroo to operate efficiently. Pipeline resources are set by the pipeline configuration to control how many resources are allocated from the cluster to maintain peak effectiveness for other Wallaroo services. See the following guides for more details.
- Wallaroo SDK Essentials Guide: Pipeline Deployment Configuration
- Wallaroo MLOps API Essentials Guide: Pipeline Management
| Cluster Size | 8 core | 16 core | 32 core | Description | |
| Inference | ✔ | ✔ | ✔ | The Wallaroo inference engine that performs inference requests from deployed pipelines. | |
| Dashboard | ✔ | ✔ | ✔ | The graphics user interface for configuring workspaces, deploying pipelines, tracking metrics, and other uses. | |
| Jupyter HUB/Lab | The JupyterHub service for running Python scripts, JupyterNotebooks, and other related tasks within the Wallaroo instance. | ||||
| Single Lab | ✔ | ✔ | ✔ | ||
| Multiple Labs | ✘ | ✔ | ✔ | ||
| Prometheus | ✔ | ✔ | ✔ | Used for collecting and reporting on metrics. Typical metrics are values such as CPU utilization and memory usage. | |
| Alerting | ✘ | ✔ | ✔ | ||
| Model Validation | ✘ | ✔ | ✔ | ||
| Dashboard Graphs | ✔ | ✔ | ✔ | ||
| Plateau | ✘ | ✔ | ✔ | A Wallaroo developed service for storing inference logs at high speed. This is not a long term service; organizations are encouraged to store logs in long term solutions if required. | |
| Model Insights | ✘ | ✔ | ✔ | ||
| Python API | |||||
| Model Conversion | ✔ | ✔ | ✔ | Converts models into a native runtime for use with the Wallaroo inference engine. |
To install Wallaroo with minimum services, a configuration file will be used as parts of the kots based installation. For full details on the Wallaroo installation process, see the Wallaroo Install Guides.
Wallaroo Installation with less than 16 Cores
To install Wallaroo with less than 16 cores and 8 cores or greater, the following services must be disabled:
- Model Conversion
- Model Insights
- Plateau
The following configuration settings can be used at the installation procedure to disable these services.
Download
A sample file wallaroo-install-8-cores.yaml is available from the following link:
apiVersion: kots.io/v1beta1
kind: ConfigValues
metadata:
  name: wallaroo
spec:
  values:
    dashboard_enabled:
      value: "1"
    enable_model_insights:
      value: "0"
    model_conversion_enabled:
      value: "1"
    plateau_enabled:
      value: "0"
The configuration file can be applied via the --config-values={CONFIG YAML FILE} option. For example:
kubectl kots install "wallaroo/ce" \
-n wallaroo \
--config-values=wallaroo-install-8-cores.yaml
5 - Install Wallaroo to Specific Nodes
How to install Wallaroo to specific nodes
Organizations that share their Kubernetes environment with other applications may want to install Wallaroo to specific nodes in their cluster. The following guide demonstrates how to install a Wallaroo instance into specific nodes in the Kubernetes cluster.
This example uses Wallaroo Community as the example. For other guides for installing a Wallaroo instance, see the Wallaroo Community Setup Guides and the Wallaroo Enterprise Setup Guides.
Users who are familiar with Kubernetes clusters can skip ahead directly to the Install Steps.
Description
When installed into a Kubernetes cluster, Wallaroo will use available nodes to maximize its performance. Some organizations may use specific nodepools or nodes for specific applications.
One option is to use Kubernetes metadata to assign Node labels to nodes, then specify that Wallaroo can be installed into specific nodes that match that label. This can be done with specifying configuration options during the install process using the kots option --config-values={CONFIG YAML FILE}. For more information, see the kots set config documentation.
Install Steps
In this example, an instance of Wallaroo Community will be installed into a Kubernetes cluster that has four nodes assigned with the label wallaroo.ai/node=true;
kubectl get nodes
NAME                                 STATUS   ROLES   AGE   VERSION
aks-mainpool-18670167-vmss000000     Ready    agent   84m   v1.23.8
aks-wallarooai-12293194-vmss000000   Ready    agent   75m   v1.23.8
aks-wallarooai-12293194-vmss000001   Ready    agent   75m   v1.23.8
aks-wallarooai-12293194-vmss000002   Ready    agent   75m   v1.23.8
aks-wallarooai-12293194-vmss000003   Ready    agent   75m   v1.23.8

kubectl get nodes -l wallaroo.ai/node=true
NAME                                 STATUS   ROLES   AGE   VERSION
aks-wallarooai-12293194-vmss000000   Ready    agent   75m   v1.23.8
aks-wallarooai-12293194-vmss000001   Ready    agent   75m   v1.23.8
aks-wallarooai-12293194-vmss000002   Ready    agent   75m   v1.23.8
aks-wallarooai-12293194-vmss000003   Ready    agent   75m   v1.23.8
Create a
kotsconfiguration file and specify the label to use for installing nodes. For this example, we will usewallaroo.ai/node: "true"as the label. Any nodes with that label will be used by Wallaroo during the installation. For this example, this configuration is saved to the filetest-node.yaml.apiVersion: kots.io/v1beta1 kind: ConfigValues metadata: creationTimestamp: null name: wallaroo spec: values: wallaroo_node_selector: value: 'wallaroo.ai/node: "true"' status: {}During installation, specify the configuration file to be used with the
--config-valuesoption.IMPORTANT NOTE
`kots` typically will not alert the user if the file passed in `--config-values` does not exist. Verify the file name before proceeding.kubectl kots install "wallaroo/ce" \ -n wallaroo \ --config-values=test-node.yaml• Deploying Admin Console • Creating namespace ✓ • Waiting for datastore to be ready ✓ • Waiting for Admin Console to be ready ✓ • Press Ctrl+C to exit • Go to http://localhost:8800 to access the Admin ConsoleProceed with the installation as normal, including uploading the required license file, etc.
Once complete, verify Wallaroo was installed to specific nodes with the
kubectl get podscommand. The following shows the pods in thewallaroonamespace where the Wallaroo Community instance was installed, and the pods used for the deployed pipelineccfraudpipeline.kubectl get pods --all-namespaces -o=custom-columns=NAME:.metadata.name,Namespace:.metadata.namespace,Node:.spec.nodeNameNAME Namespace Node engine-6469d85b5c-5pz75 ccfraudpipeline-1 aks-wallarooai-12293194-vmss000003 engine-lb-db4f647fb-m9bkl ccfraudpipeline-1 aks-wallarooai-12293194-vmss000001 helm-runner-xz4vn ccfraudpipeline-1 aks-wallarooai-12293194-vmss000003 azure-ip-masq-agent-26cnd kube-system aks-wallarooai-12293194-vmss000002 azure-ip-masq-agent-745hs kube-system aks-wallarooai-12293194-vmss000000 azure-ip-masq-agent-f2nl2 kube-system aks-mainpool-18670167-vmss000000 azure-ip-masq-agent-hjxbr kube-system aks-wallarooai-12293194-vmss000003 azure-ip-masq-agent-nktlq kube-system aks-wallarooai-12293194-vmss000001 cloud-node-manager-6twk7 kube-system aks-mainpool-18670167-vmss000000 cloud-node-manager-g2bql kube-system aks-wallarooai-12293194-vmss000003 cloud-node-manager-j4xdq kube-system aks-wallarooai-12293194-vmss000001 cloud-node-manager-q6b2k kube-system aks-wallarooai-12293194-vmss000000 cloud-node-manager-rsrsg kube-system aks-wallarooai-12293194-vmss000002 coredns-autoscaler-7d56cd888-t28v5 kube-system aks-mainpool-18670167-vmss000000 coredns-dc97c5f55-8v7lh kube-system aks-mainpool-18670167-vmss000000 coredns-dc97c5f55-p2dc2 kube-system aks-mainpool-18670167-vmss000000 csi-azuredisk-node-5hlxc kube-system aks-mainpool-18670167-vmss000000 csi-azuredisk-node-6bp8l kube-system aks-wallarooai-12293194-vmss000003 csi-azuredisk-node-mthtd kube-system aks-wallarooai-12293194-vmss000000 csi-azuredisk-node-p6w8w kube-system aks-wallarooai-12293194-vmss000002 csi-azuredisk-node-sqznw kube-system aks-wallarooai-12293194-vmss000001 csi-azurefile-node-7kw5p kube-system aks-wallarooai-12293194-vmss000002 csi-azurefile-node-9zb6l kube-system aks-wallarooai-12293194-vmss000001 csi-azurefile-node-grs6g kube-system aks-wallarooai-12293194-vmss000000 csi-azurefile-node-z84nz kube-system aks-mainpool-18670167-vmss000000 csi-azurefile-node-zzqdf kube-system aks-wallarooai-12293194-vmss000003 konnectivity-agent-6c57d77bcd-5tvbh kube-system aks-mainpool-18670167-vmss000000 konnectivity-agent-6c57d77bcd-z5q48 kube-system aks-mainpool-18670167-vmss000000 kube-proxy-4nz25 kube-system aks-wallarooai-12293194-vmss000000 kube-proxy-8fv76 kube-system aks-wallarooai-12293194-vmss000002 kube-proxy-c5nvs kube-system aks-wallarooai-12293194-vmss000001 kube-proxy-lvlwc kube-system aks-wallarooai-12293194-vmss000003 kube-proxy-vbvfr kube-system aks-mainpool-18670167-vmss000000 metrics-server-64b66fbbc8-tvxpj kube-system aks-mainpool-18670167-vmss000000 api-lb-bbc98488d-24qxb wallaroo aks-wallarooai-12293194-vmss000002 continuous-image-puller-8sfw9 wallaroo aks-wallarooai-12293194-vmss000003 continuous-image-puller-bbt7c wallaroo aks-wallarooai-12293194-vmss000000 continuous-image-puller-ngr75 wallaroo aks-wallarooai-12293194-vmss000002 continuous-image-puller-stxpq wallaroo aks-wallarooai-12293194-vmss000001 dashboard-677df986d9-8c5mz wallaroo aks-wallarooai-12293194-vmss000000 deploymentmanager-69b4c6d449-j8jct wallaroo aks-wallarooai-12293194-vmss000002 graphql-api-9c664ddf-t7cnr wallaroo aks-wallarooai-12293194-vmss000000 hub-668d49b7b4-jspqj wallaroo aks-wallarooai-12293194-vmss000001 jupyter-john-2ehansarick-40wallaroo-2eai wallaroo aks-wallarooai-12293194-vmss000002 keycloak-85cf99c7bf-8vvb5 wallaroo aks-wallarooai-12293194-vmss000002 kotsadm-cbf8d8ccb-qgx2w wallaroo aks-wallarooai-12293194-vmss000002 kotsadm-minio-0 wallaroo aks-wallarooai-12293194-vmss000002 kotsadm-postgres-0 wallaroo aks-wallarooai-12293194-vmss000000 minio-68bc498d6d-xm5ht wallaroo aks-wallarooai-12293194-vmss000000 model-insights-7dcccb976-ttz64 wallaroo aks-wallarooai-12293194-vmss000000 plateau-5b777686dd-8c69s wallaroo aks-wallarooai-12293194-vmss000000 postgres-6c5fff5c57-9hr4n wallaroo aks-wallarooai-12293194-vmss000002 prometheus-deployment-7dcb484c56-7jwq4 wallaroo aks-wallarooai-12293194-vmss000000 proxy-755778dccd-mwhwz wallaroo aks-wallarooai-12293194-vmss000002 python-api-787bcb7764-nvdb4 wallaroo aks-wallarooai-12293194-vmss000002 rest-api-677dc6bdcf-q9b62 wallaroo aks-wallarooai-12293194-vmss000002 wallaroo-fluent-bit-standard-h7mrl wallaroo aks-wallarooai-12293194-vmss000002 wallaroo-fluent-bit-standard-jss2d wallaroo aks-wallarooai-12293194-vmss000000 wallaroo-fluent-bit-standard-l75cj wallaroo aks-wallarooai-12293194-vmss000001 wallaroo-fluent-bit-standard-m55tk wallaroo aks-wallarooai-12293194-vmss000003 wallaroo-telemetry-27687782-g6mhm wallaroo aks-wallarooai-12293194-vmss000001 wallaroo-telemetry-27687783-xgqpm wallaroo aks-wallarooai-12293194-vmss000001 wallaroo-telemetry-27687784-9b85g wallaroo aks-wallarooai-12293194-vmss000001
For other instructions on how to deploy or configure a Wallaroo instance, see the Wallaroo Operations Guides.
6 - Taints and Tolerations Guide
Configure custom taints and toleration for a cluster for Wallaroo
Organizations can customize the taints and tolerances for their Kubernetes cluster running Wallaroo. Nodes in a Kubernetes cluster can have a taint applied to them. Any pod that does not have a toleration matching the taint can be rejected and will not be applied to that node.
This allows organizations to determine which pods can be accepted or rejected into specific nodes, reserving their Kubernetes resources for other services. Combined with the Install Wallaroo to Specific Nodes guide this ensures that Wallaroo pods are contained to specific cluster nodes, and prevents non-Wallaroo pods from being scheduled into the same nodes to reserve those resources for the Wallaroo instance.
In this example, the node Postgres has the taint wallaroo.ai/postgres=true:NoSchedule. The pod postgres has the tolerance wallaroo.ai/postgres:NoSchedule op=Exists, so it is scheduled into the node Postgres. The pod nginx has no tolerations, so it is not scheduled into the node Postgres.

| Node: Postgres Taints:wallaroo.ai/postgres=true:NoSchedule | Scheduled |
|---|---|
| Postgres Tolerations: wallaroo.ai/postgres:NoSchedule op=Exists | √ |
| nginx Tolerations: None | 🚫 |
See the Kubernetes Taints and Tolerations documentation for more information.
Setting Tolerations and Taints
The Wallaroo Enterprise Install Guides specify default taints applied to nodepools. These can be used to contain pod scheduling only to specific nodes where the pod tolerations match the nodes taints. By default, the following nodepools and their associated taints are created
After Wallaroo release September 2022 (Codename Cobra):
| Nodepool | Taints |
|---|---|
| postgres | wallaroo.ai/postgres=true:NoSchedule |
| enginelb | wallaroo.ai/enginelb=true:NoSchedule |
| engine | wallaroo.ai/engine=true:NoSchedule |
| mainpool | N/A |
Before Wallaroo release September 2022 (Code name Mustang and before)
| Nodepool | Taints |
|---|---|
| postgres | wallaroo-postgres=true:NoSchedule |
| enginelb | wallaroo-enginelb=true:NoSchedule |
| engine | wallaroo-engine=true:NoSchedule |
| mainpool | N/A |
The nodepool mainpool is not assigned any taints to allow other Kubernetes services to run as part of the cluster.
The taint wallaroo.ai/reserved=true:NoSchedule can be applied to other nodepools. This allows additional Wallaroo resources to be scheduled in those nodes while rejecting other pods that do not have a matching toleration.
Default Tolerations
By default, the following tolerations are applied for Wallaroo pods. Organizations can add a corresponding Any pod that does not contain a taint to match these tolerances will have the condition effect:NoSchedule for the specified node.
- Toleration key for all Wallaroo pods
wallaroo.ai/reserved
- Engine toleration key
wallaroo.ai/engine
- Engine LB toleration key
wallaroo.ai/enginelb
- Postgres toleration key
wallaroo.ai/postgres
Note that these taint values are applied to the nodepools as part of the Wallaroo Enterprise Setup guides. They are not typically set up or required for Wallaroo Community instances.
Custom Tolerations
To customize the tolerations applied to Wallaroo nodes, the following prerequisites must be met:
- Access to the Kubernetes environment running the Wallaroo instances.
- Have
kubectlandkotsinstalled and connected to the Kubernetes environment.
For full details on installing Wallaroo and the prerequisite software, see the Wallaroo Prerequisites Guide.
Access the Wallaroo Administrative Dashboard.
From a terminal with
kubectlandkotsinstalled and connected to the Kubernetes environment, run:kubectl kots admin-console --namespace wallarooThis will provide access to the Wallaroo Administrative Dashboard through
http://localhost:8800:• Press Ctrl+C to exit • Go to http://localhost:8800 to access the Admin ConsoleLaunch a browser and connect to
http://localhost:8800.Enter the password created during the Wallaroo Install process. The Wallaroo Administrative Dashboard will now be available.
From the Wallaroo Administrative Dashboard, select Config -> Taints and Tolerations.
Set the custom tolerations as required by your organization. The following nodes and tolerations can be changed:
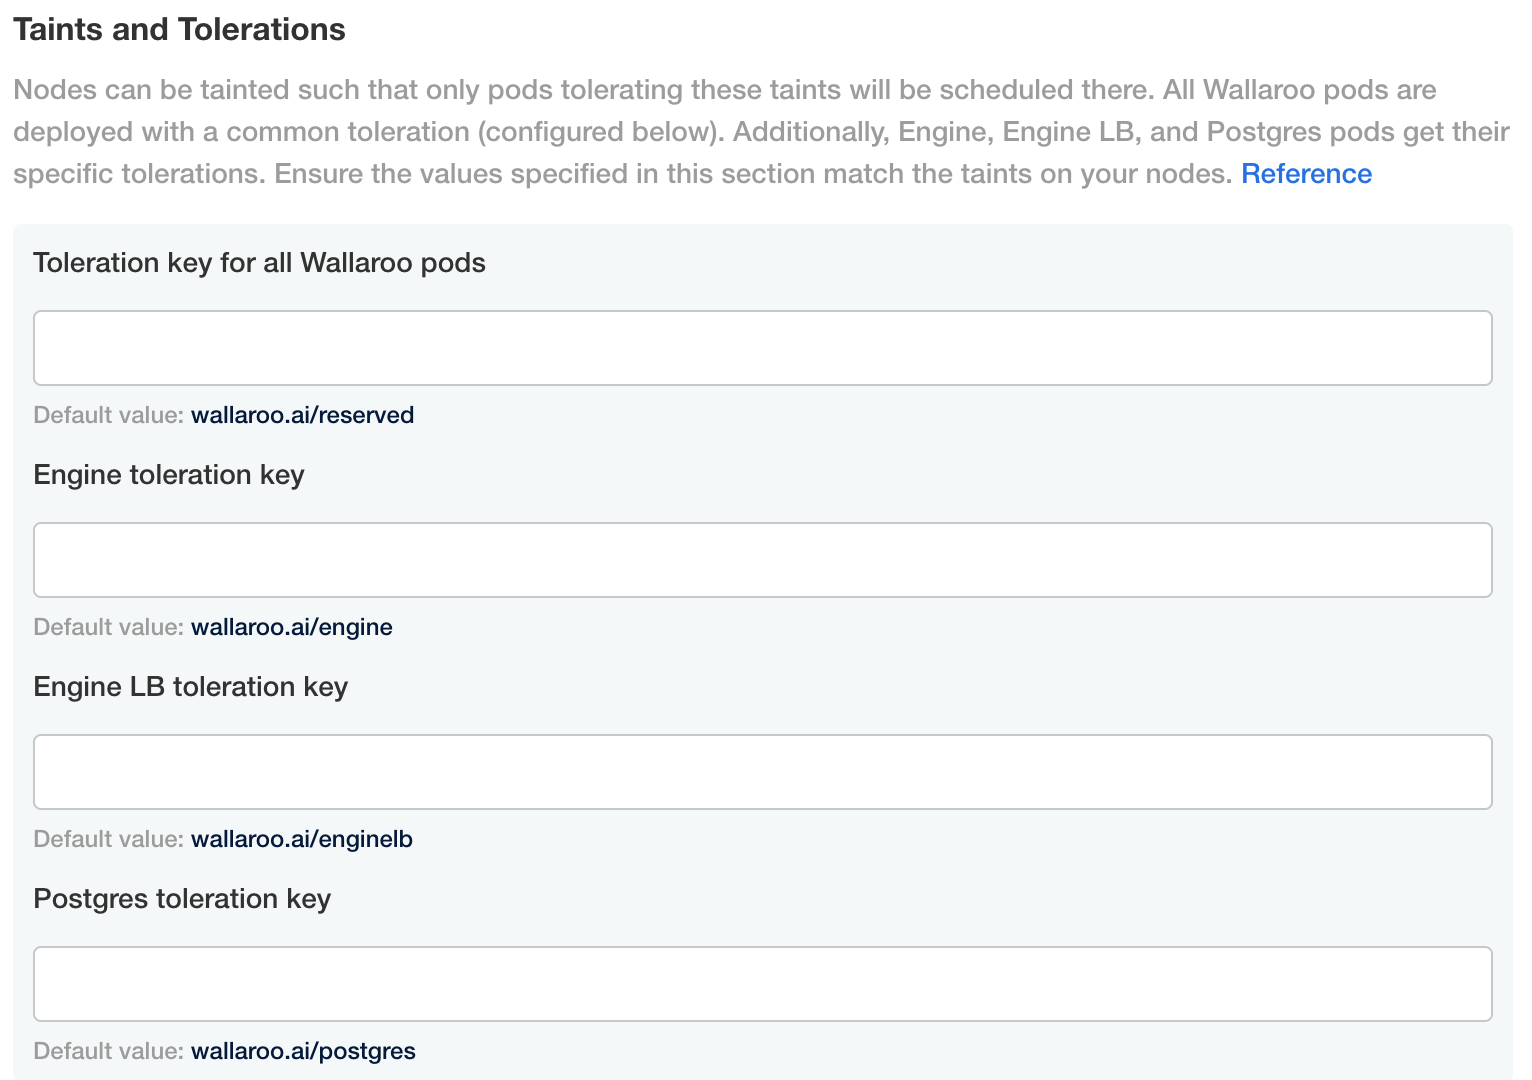
- Toleration key for all Wallaroo pods
- Default value:
wallaroo.ai/reserved
- Default value:
- Engine toleration key
- Default value:
wallaroo.ai/engine
- Default value:
- Engine LB toleration key
- Default value:
wallaroo.ai/enginelb
- Default value:
- Postgres toleration key
- Default value:
wallaroo.ai/postgres