Uninstall Guides
The following is a short version of the uninstall procedure to remove a previously installed version of Wallaroo. For full details, see the How to Uninstall Wallaroo. These instructions assume administrative use of the Kubernetes command kubectl.
To uninstall a previously installed Wallaroo instance:
Delete any Wallaroo pipelines still deployed with the command
kubectl delete namespace {namespace}. Typically these are the pipeline name with some numerical ID. For example, in the following list of namespaces the namespaceccfraud-pipeline-21correspond to the Wallaroo pipelineccfraud-pipeline. Verify these are Wallaroo pipelines before deleting.-> kubectl get namespaces NAME STATUS AGE default Active 7d4h kube-node-lease Active 7d4h kube-public Active 7d4h ccfraud-pipeline-21 Active 4h23m wallaroo Active 3d6h -> kubectl delete namespaces ccfraud-pipeline-21Use the following bash script or run the commands individually. Warning: If the selector is incorrect or missing from the kubectl command, the cluster could be damaged beyond repair. For a default installation, the selector and namespace will be
wallaroo.#!/bin/bash kubectl delete ns wallaroo && \ kubectl delete all,secret,configmap,clusterroles,clusterrolebindings,storageclass,crd \ --selector app.kubernetes.io/part-of=wallaroo --selector kots.io/app-slug=wallaroo
Wallaroo can now be reinstalled into this environment.
Azure Cluster for Wallaroo Enterprise Instructions
The following instructions are made to assist users set up their Microsoft Azure Kubernetes environment for running Wallaroo Enterprise. These represent a recommended setup, but can be modified to fit your specific needs.
If your prepared to install the environment now, skip to Setup Environment Steps.
There are two methods we’ve detailed here on how to setup your Kubernetes cloud environment in Azure:
- Quick Setup Script Download a bash script to automatically set up the Azure environment through the Microsoft Azure command line interface
az. - Manual Setup Guide A list of the
azcommands used to create the environment through manual commands.
Azure Prerequisites
To install Wallaroo in your Microsoft Azure environment, the following prerequisites must be met:
- Register a Microsoft Azure account: https://azure.microsoft.com/.
- Install the Microsoft Azure CLI and complete the Azure CLI Get Started Guide to connect your
azapplication to your Microsoft Azure account. - The Kubernetes cluster must include the following minimum settings:
- Nodes must be OS type Linux the
containerddriver as the default. - Role-based access control (RBAC) must be enabled.
- Minimum of 4 nodes, each node with a minimum of 8 CPU cores and 16 GB RAM. 50 GB will be allocated per node for a total of 625 GB for the entire cluster.
- RBAC is enabled.
- Minimum machine type is set to to
Standard_D8s_v4.
- Nodes must be OS type Linux the
- IMPORTANT NOTE
- Organizations that intend to stop and restart their Kubernetes environment on an intentional or regular basis are recommended to use a single availability zone for their nodes. This minimizes issues such as persistent volumes in different availability zones, etc.
- Organizations that intend to use Wallaroo Enterprise in a high availability cluster are encouraged to follow best practices including using separate availability zones for redundancy, etc.
Standard Setup Variables
The following variables are used in the Quick Setup Script and the Manual Setup Guide detailed below. Modify them as best fits your organization.
| Variable Name | Default Value | Description |
|---|---|---|
| WALLAROO_RESOURCE_GROUP | wallaroogroup | The Azure Resource Group used for the KUbernetes environment. |
| WALLAROO_GROUP_LOCATION | eastus | The region that the Kubernetes environment will be installed to. |
| WALLAROO_CONTAINER_REGISTRY | wallarooacr | The Azure Container Registry used for the Kubernetes environment. |
| WALLAROO_CLUSTER | wallarooaks | The name of the Kubernetes cluster that Wallaroo is installed to. |
| WALLAROO_SKU_TYPE | Base | The Azure Kubernetes Service SKU type. |
| WALLAROO_VM_SIZE | Standard_D8s_v4 | The VM type used for the standard Wallaroo cluster nodes. |
| POSTGRES_VM_SIZE | Standard_D8s_v4 | The VM type used for the postgres nodepool. |
| ENGINELB_VM_SIZE | Standard_D8s_v4 | The VM type used for the engine-lb nodepool. |
| ENGINE_VM_SIZE | Standard_F8s_v2 | The VM type used for the engine nodepool. |
Setup Environment Steps
Quick Setup Script
A sample script is available here, and creates an Azure Kubernetes environment ready for use with Wallaroo Enterprise. This script requires the following prerequisites listed above and uses the variables listed in Standard Setup Variables. Modify them as best fits your organization’s needs.
The following script is available for download: wallaroo_enterprise_azure_expandable.bash
The following steps are geared towards a standard Linux or macOS system that supports the prerequisites listed above. Modify these steps based on your local environment.
- Download the script above.
- In a terminal window set the script status as
executewith the commandchmod +x wallaroo_enterprise_install_azure_expandable.bash. - Modify the script variables listed above based on your requirements.
- Run the script with either
bash wallaroo_enterprise_install_azure_expandable.bashor./wallaroo_enterprise_install_azure_expandable.bashfrom the same directory as the script.
Manual Setup Guide
The following steps are guidelines to assist new users in setting up their Azure environment for Wallaroo.
The process uses the variables listed in Standard Setup Variables. Modify them as best fits your organization’s needs.
See the Azure Command-Line Interface for full details on commands and settings.
Setting up an Azure AKS environment is based on the Azure Kubernetes Service tutorial, streamlined to show the minimum steps in setting up your own Wallaroo environment in Azure.
This follows these major steps:
Set Variables
The following are the variables used for the rest of the commands. Modify them as fits your organization’s needs.
WALLAROO_RESOURCE_GROUP=wallaroogroup
WALLAROO_GROUP_LOCATION=eastus
WALLAROO_CONTAINER_REGISTRY=wallarooacr
WALLAROO_CLUSTER=wallarooaks
WALLAROO_SKU_TYPE=Base
WALLAROO_VM_SIZE=Standard_D8s_v4
POSTGRES_VM_SIZE=Standard_D8s_v4
ENGINELB_VM_SIZE=Standard_D8s_v4
ENGINE_VM_SIZE=Standard_F8s_v2
- Create an Azure Resource Group
To create an Azure Resource Group for Wallaroo in Microsoft Azure, use the following template:
az group create --name $WALLAROO_RESOURCE_GROUP --location $WALLAROO_GROUP_LOCATION
(Optional): Set the default Resource Group to the one recently created. This allows other Azure commands to automatically select this group for commands such as az aks list, etc.
az configure --defaults group={Resource Group Name}
For example:
az configure --defaults group=wallarooGroup
- Create an Azure Container Registry
An Azure Container Registry(ACR) manages the container images for services includes Kubernetes. The template for setting up an Azure ACR that supports Wallaroo is the following:
az acr create -n $WALLAROO_CONTAINER_REGISTRY \
-g $WALLAROO_RESOURCE_GROUP \
--sku $WALLAROO_SKU_TYPE \
--location $WALLAROO_GROUP_LOCATION
- Create an Azure Kubernetes Services
Now we can create our Kubernetes service in Azure that will host our Wallaroo with the az aks create command.
az aks create \
--resource-group $WALLAROO_RESOURCE_GROUP \
--name $WALLAROO_CLUSTER \
--node-count 3 \
--generate-ssh-keys \
--vm-set-type VirtualMachineScaleSets \
--load-balancer-sku standard \
--node-vm-size $WALLAROO_VM_SIZE \
--nodepool-name mainpool \
--attach-acr $WALLAROO_CONTAINER_REGISTRY \
--kubernetes-version=1.23.15 \
--zones 1 \
--location $WALLAROO_GROUP_LOCATION
Wallaroo Enterprise Nodepools
Wallaroo Enterprise supports autoscaling and static nodepools. The following commands are used to create both to support the Wallaroo Enterprise cluster.
The following static nodepools are set up to support the Wallaroo cluster for postgres. Update the VM_SIZE based on your requirements.
az aks nodepool add \
--resource-group $WALLAROO_RESOURCE_GROUP \
--cluster-name $WALLAROO_CLUSTER \
--name postgres \
--node-count 1 \
--node-vm-size $POSTGRES_VM_SIZE \
--no-wait \
--node-taints wallaroo.ai/postgres=true:NoSchedule \
--zones 1
The following autoscaling nodepools are used for the engineLB and the engine nodepools. Adjust the settings based on your organizations requirements.
az aks nodepool add \
--resource-group $WALLAROO_RESOURCE_GROUP \
--cluster-name $WALLAROO_CLUSTER \
--name enginelb \
--node-count 1 \
--node-vm-size $ENGINELB_VM_SIZE \
--no-wait \
--enable-cluster-autoscaler \
--max-count 3 \
--min-count 1 \
--node-taints wallaroo.ai/enginelb=true:NoSchedule \
--labels wallaroo-node-type=enginelb \
--zones 1
az aks nodepool add \
--resource-group $WALLAROO_RESOURCE_GROUP \
--cluster-name $WALLAROO_CLUSTER \
--name engine \
--node-count 1 \
--node-vm-size $ENGINE_VM_SIZE \
--no-wait \
--enable-cluster-autoscaler \
--max-count 3 \
--min-count 1 \
--node-taints wallaroo.ai/engine=true:NoSchedule \
--labels wallaroo-node-type=engine \
--zones 1
For additional settings such as customizing the node pools for your Wallaroo Kubernetes cluster to customize the type of virtual machines used and other settings, see the Microsoft Azure documentation on using system node pools.
- Download Wallaroo Kubernetes Configuration
Once the Kubernetes environment is complete, associate it with the local Kubernetes configuration by importing the credentials through the following template command:
az aks get-credentials --resource-group $WALLAROO_RESOURCE_GROUP --name $WALLAROO_CLUSTER
Verify the cluster is available through the kubectl get nodes command.
kubectl get nodes

NAME                               STATUS   ROLES   AGE   VERSION
aks-engine-99896855-vmss000000     Ready    agent   40m   v1.23.8
aks-enginelb-54433467-vmss000000   Ready    agent   48m   v1.23.8
aks-mainpool-37402055-vmss000000   Ready    agent   81m   v1.23.8
aks-mainpool-37402055-vmss000001   Ready    agent   81m   v1.23.8
aks-mainpool-37402055-vmss000002   Ready    agent   81m   v1.23.8
aks-postgres-40215394-vmss000000   Ready    agent   52m   v1.23.8
Install Wallaroo
Organizations that use cloud services such as Google Cloud Platform (GCP), Amazon Web Services (AWS), or Microsoft Azure can install Wallaroo Enterprise through the following process. These instructions also work with Single Node Linux based installations.
Before installation, the following prerequisites must be met:
- Have a Wallaroo Enterprise license file. For more information, you can request a demonstration.
- Set up a cloud Kubernetes environment that meets the requirements. Clusters must meet the following minimum specifications:
- Minimum number of nodes: 4
- Minimum Number of CPU Cores: 8
- Minimum RAM: 16 GB
- A total of 625 GB of storage will be allocated for the entire cluster based on 5 users with up to four pipelines with five steps per pipeline, with 50 GB allocated per node, including 50 GB specifically for the Jupyter Hub service. Enterprise users who deploy additional pipelines will require an additional 50 GB of storage per lab node deployed.
- Runtime: containerd is required.
- DNS services for integrating your Wallaroo Enterprise instance. See the DNS Integration Guide for the instructions on configuring Wallaroo Enterprise with your DNS services.
IMPORTANT NOTE
Wallaroo requires out-bound network connections to download the required container images and other tasks. For situations that require limiting out-bound access, refer to the air-gap installation instructions or contact your Wallaroo support representative.Wallaroo Enterprise can be installed either interactively or automatically through the kubectl and kots applications.
Automated Install
To automatically install Wallaroo into the namespace wallaroo, specify the administrative password and the license file during the installation as in the following format with the following variables:
NAMESPACE: The namespace for the Wallaroo Enterprise install, typicallywallaroo.LICENSEFILE: The location of the Wallaroo Enterprise license file.SHAREDPASSWORD: The password of for the Wallaroo Administrative Dashboard.
kubectl kots install wallaroo/ee -n $NAMESPACE --license-file $LICENSEFILE --shared-password $SHAREDPASSWORD
For example, the following settings translate to the following install command:
NAMESPACE:wallaroo.LICENSEFILE:myWallaroolicense.yamlSHAREDPASSWORD:snugglebunnies
kubectl kots install wallaroo/ee -n wallaroo --license-file myWallaroolicense.yaml --shared-password wallaroo
Interactive Install
The Interactive Install process allows users to adjust the configuration settings before Wallaroo is deployed. It requires users be able to access the Wallaroo Administrative Dashboard through a browser, typically on port 8080.
IMPORTANT NOTE: Users who install Wallaroo through another node such as in the single node installation can port use SSH tunneling to access the Wallaroo Administrative Dashboard. For example:
ssh IP -L8800:localhost:8800
Install the Wallaroo Enterprise Edition using
kots install wallaroo/ee, specifying the namespace to install Wallaroo into. For example, ifwallaroois the namespace, then the command is:kubectl kots install wallaroo/ee --namespace wallarooWallaroo Enterprise Edition will be downloaded and installed into your Kubernetes environment in the namespace specified. When prompted, set the default password for the Wallaroo environment. When complete, Wallaroo Enterprise Edition will display the URL for the Admin Console, and how to end the Admin Console from running.
• Deploying Admin Console
• Creating namespace ✓
• Waiting for datastore to be ready ✓
    Enter a new password to be used for the Admin Console: •••••••••••••
  • Waiting for Admin Console to be ready ✓

• Press Ctrl+C to exit
• Go to http://localhost:8800 to access the Admin Console
To relaunch the Wallaroo Administrative Dashboard and make changes or updates, use the following command:
kubectl-kots admin-console --namespace wallaroo
Configure Wallaroo
Once installed, Wallaroo will continue to run until terminated.
Change Wallaroo Administrative Dashboard Password
To change the password to the Wallaroo Administrative Dashboard:
From the command line, use the command:
kubectl kots reset-password -n {namespace}For example, for default installations where the Kubernetes namespace is
wallaroo, the command would be:kubectl kots reset-password -n wallarooFrom here, enter the new password.
From the Wallaroo Administrative Dashboard:
Login and authenticate with the current password.
From the upper right hand corner, select … to access the menu and select Change password.
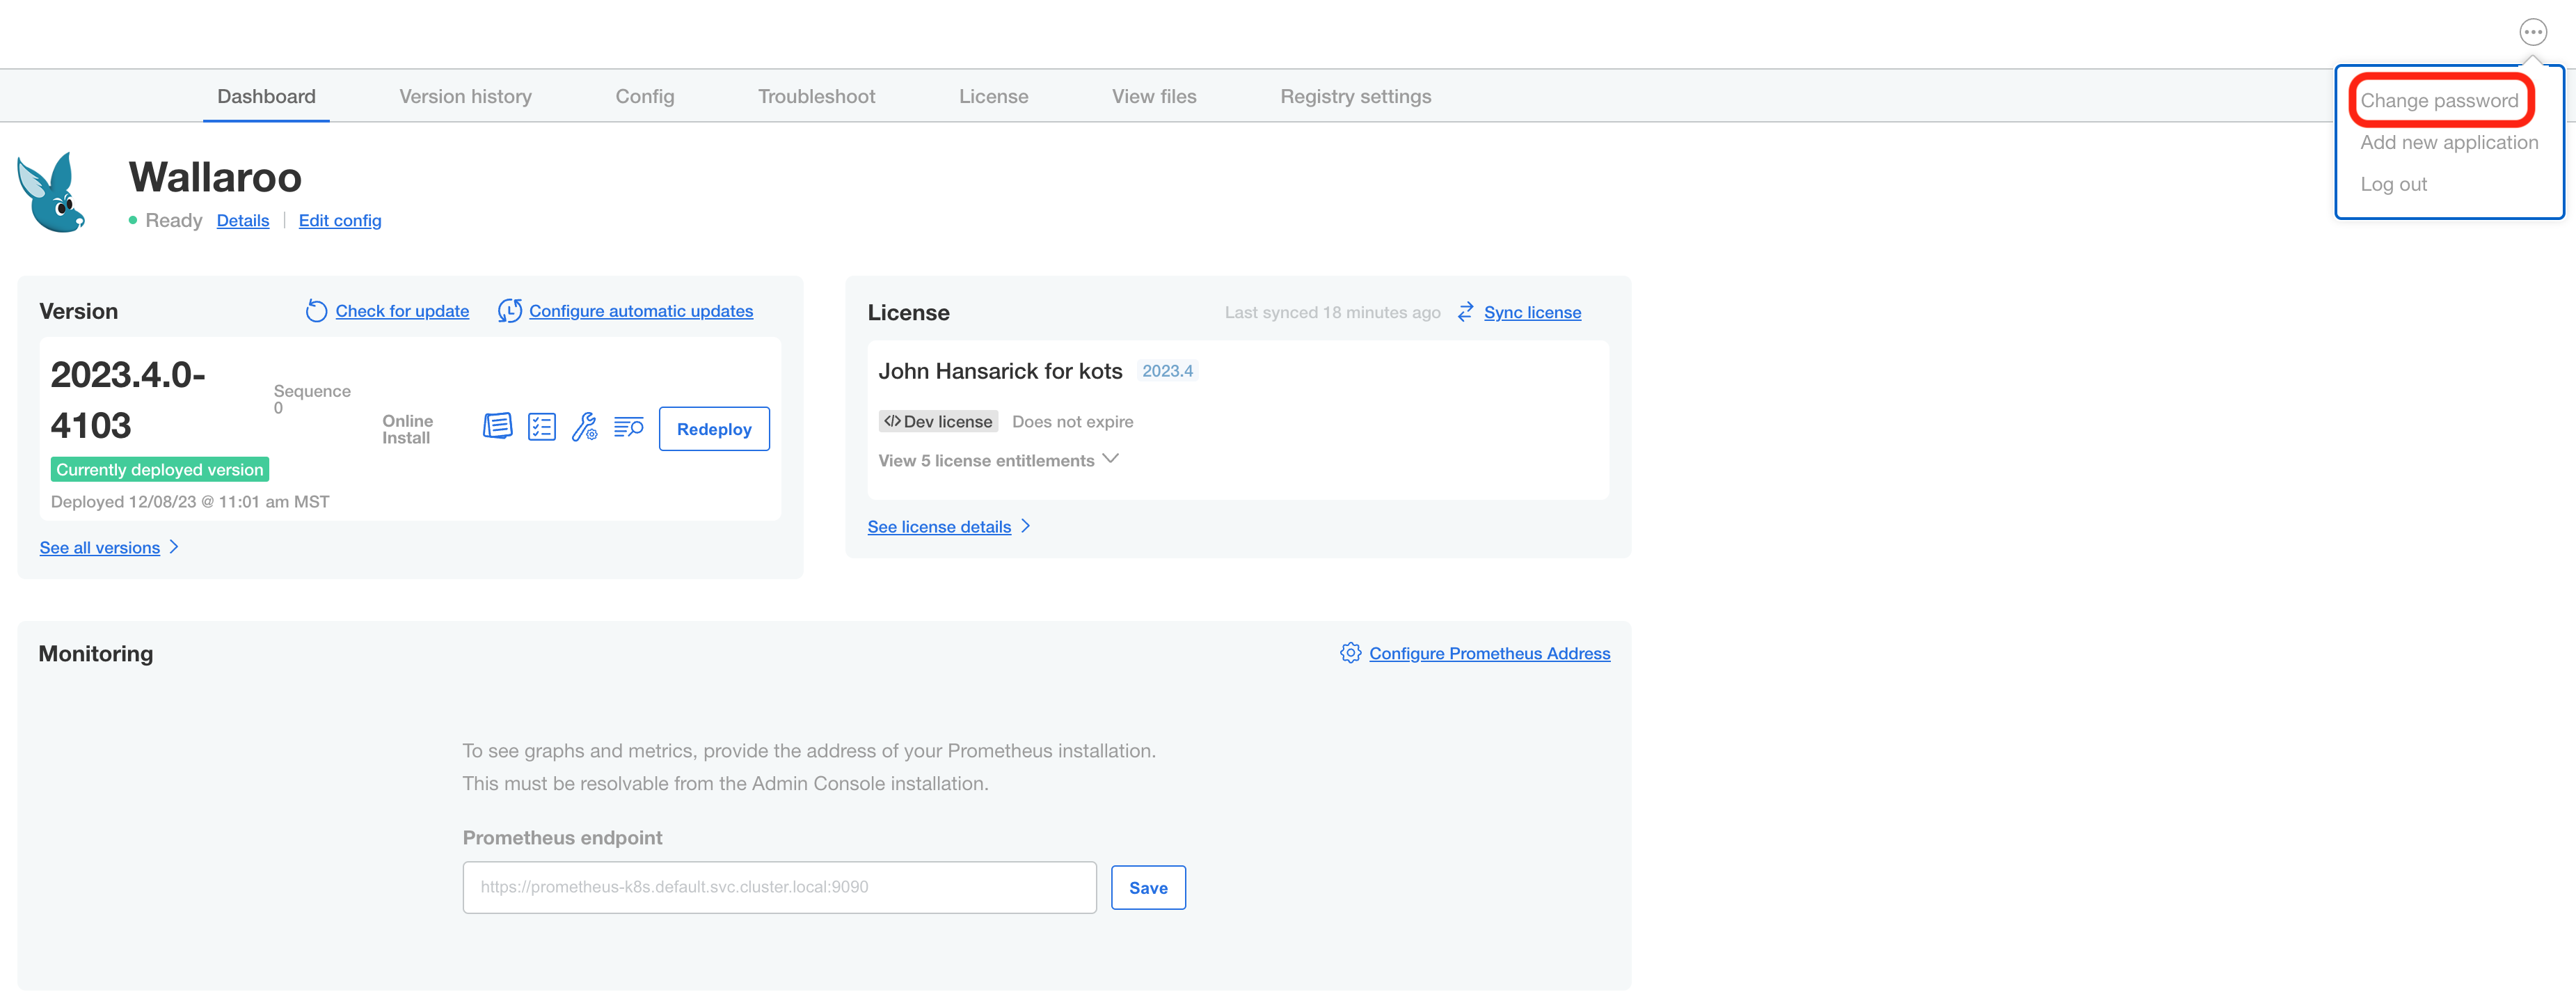
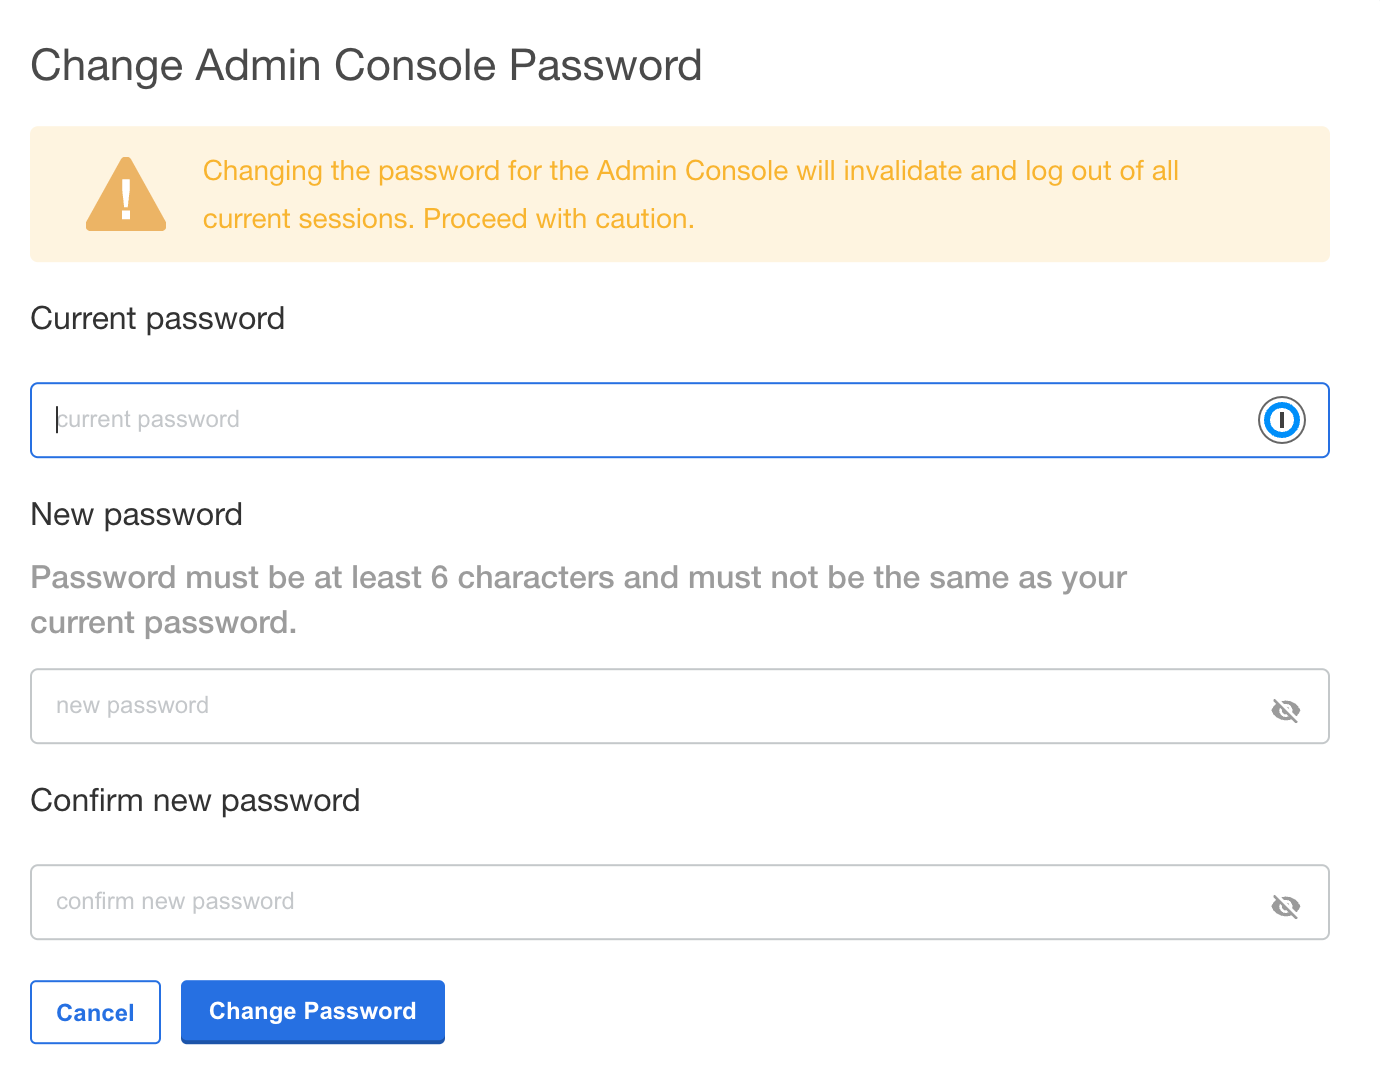
Enter the current password, then update and verify with the new password.
Setup DNS Services
Wallaroo Enterprise requires integration into your organizations DNS services.
The DNS Integration Guide details adding the Wallaroo instance to an organizations DNS services. The following is an abbreviated guide that assumes that certificates were already generated.
From the Wallaroo Dashboard, select Config and set the following:
- Networking Configuration
- Ingress Mode for Wallaroo Endpoints:
- None: Port forwarding or other methods are used for access.
- Internal: For environments where only nodes within the same Kubernetes environment and no external connections are required.
- External: Connections from outside the Kubernetes environment is allowed.
- Enable external URL inference endpoints: Creates pipeline inference endpoints. For more information, see Model Endpoints Guide.
- Ingress Mode for Wallaroo Endpoints:
- DNS
- DNS Suffix (Mandatory): The domain name for your Wallaroo instance.
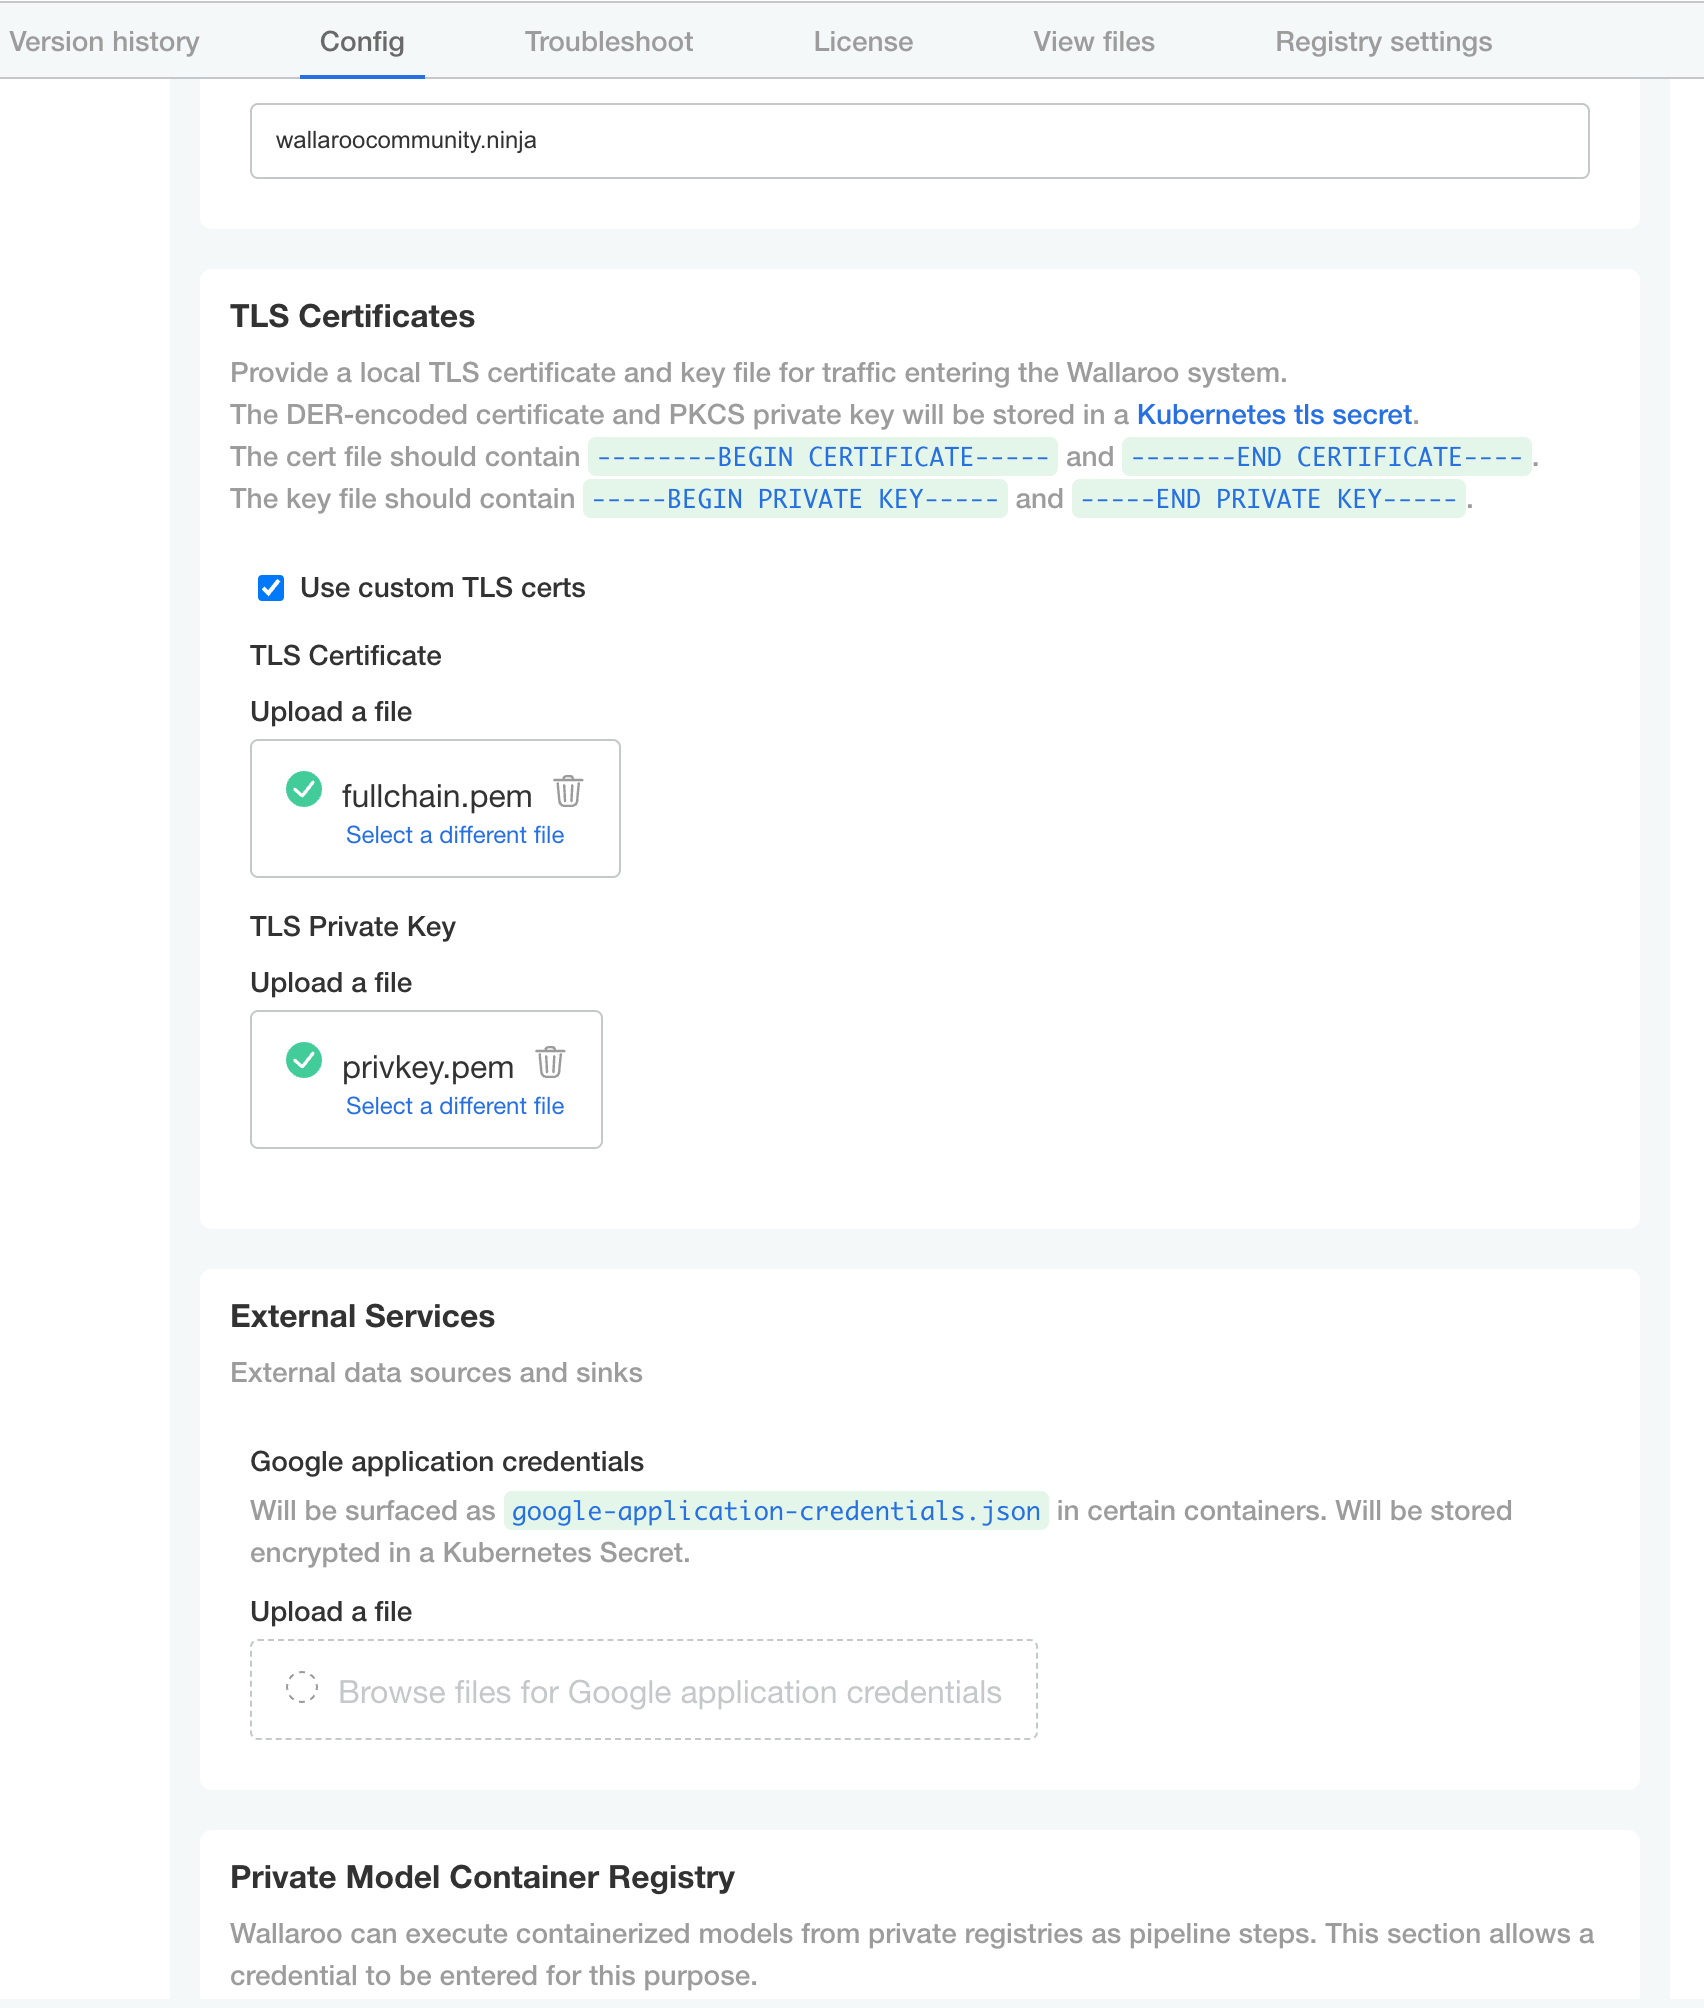
- TLS Certificates
- Use custom TLS Certs: Checked
- TLS Certificate: Enter your TLS Certificate (.crt file).
- TLS Private Key: Enter your TLS private key (.key file).
- Other settings as desired.
- Networking Configuration
Once complete, scroll to the bottom of the Config page and select Save config.
A pop-up window will display The config for Wallaroo Enterprise has been updated.. Select Go to updated version to continue.
From the Version History page, select Deploy. Once the new deployment is finished, you will be able to access your Wallaroo services via their DNS addresses.
To verify the configuration is complete, access the Wallaroo Dashboard through the suffix domain. For example if the suffix domain is wallaroo.example.com then access https://wallaroo.example.com in a browser and verify the connection and certificates.
Setup Users
User management is handled through the Wallaroo instance Keycloak service. See the Wallaroo User Management for full guides on setting up users, identity providers, and other user configuration options. This step must be completed before using Wallaroo.
The following is an abbreviated guide on setting up new Wallaroo users.
IMPORTANT NOTE
At least one user must be created before using Wallaroo.
Accessing The Wallaroo Keycloak Dashboard
Enterprise customers may access their Wallaroo Keycloak dashboard by navigating to https://keycloak.<suffix>, depending on their choice domain suffix supplied during installation.
Obtaining Administrator Credentials
The standard Wallaroo installation creates the user admin by default and assigns them a randomly generated password. The admin user credentials are obtained which may be obtained directly from Kubernetes with the following commands, assuming the Wallaroo instance namespace is wallaroo.
Retrieve Keycloak Admin Username
kubectl -n wallaroo \
get secret keycloak-admin-secret \
-o go-template='{{.data.KEYCLOAK_ADMIN_USER | base64decode }}'
Retrieve Keycloak Admin Password
kubectl -n wallaroo \
get secret keycloak-admin-secret \
-o go-template='{{.data.KEYCLOAK_ADMIN_PASSWORD | base64decode }}'
Accessing the User Management Panel
In the Keycloak Administration Console, click Manage -> Users in the left-hand side menu. Click the View all users button to see existing users. This will be under the host name keycloak.$WALLAROO_SUFFIX. For example, if the $WALLAROO_SUFFIX is wallaroo.example.com, the Keycloak Administration Console would be keycloak.wallaroo.example.com.
Adding Users
To add a user through the Keycloak interface:
Click the Add user button in the top-right corner.
Enter the following:

- A unique username and email address.
- Ensure that the Email Verified checkbox is checked - Wallaroo does not perform email verification.
- Under Required User Actions, set Update Password so the user will update their password the next time they log in.
Click Save.
Once saved, select Credentials tab, then the Set Password section, enter the new user’s desired initial password in the Password and Password Confirmation fields.
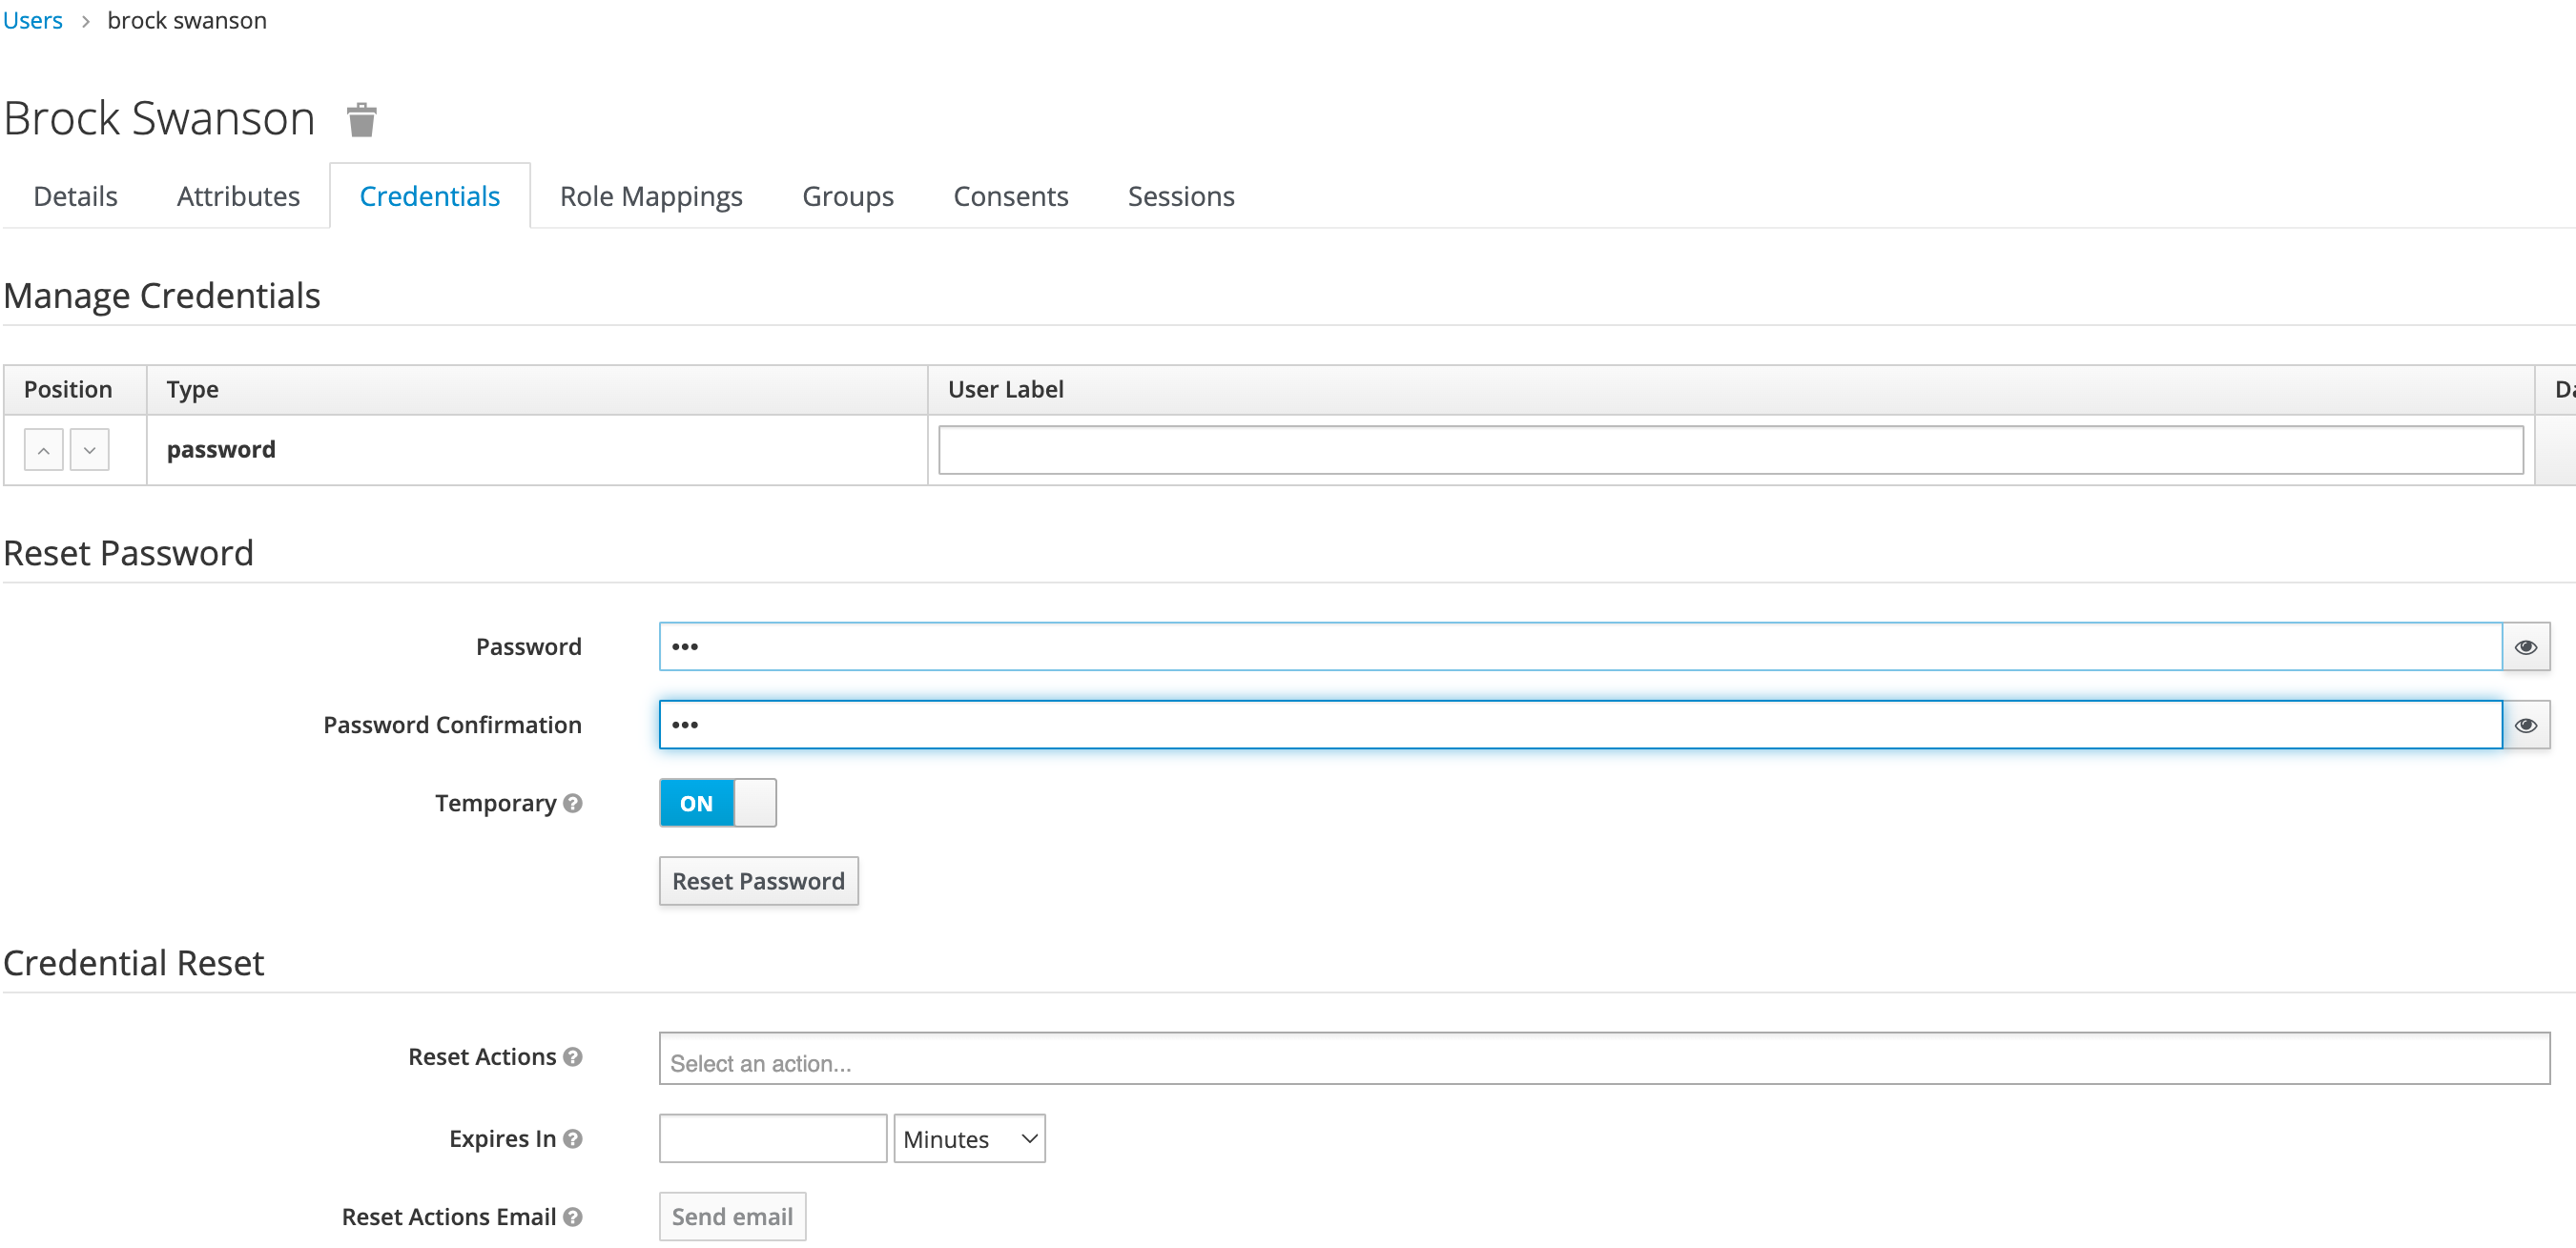
Click Set Password. Confirm the action when prompted. This will force the user to set their own password when they log in to Wallaroo.
To log into the Wallaroo dashboard, log out as the Admin user and login to the Wallaroo Dashboard as a preconfigured user or via SSO.