Wallaroo Enterprise Install Guides
- 1: Wallaroo Enterprise Comprehensive Install Guides
- 1.1: Wallaroo Enterprise Comprehensive Install Guide: Amazon Web Services EKS
- 1.2: Wallaroo Enterprise Comprehensive Install Guide: Microsoft Azure Kubernetes Services
- 1.3: Wallaroo Enterprise Comprehensive Install Guide: Google Cloud Platform Kubernetes Engine
- 1.4: Wallaroo Enterprise Comprehensive Install Guide: Single Node Linux
- 2: Wallaroo Enterprise Simple Install Guide
- 3: Wallaroo Enterprise Air Gap Install Guide
- 4: Wallaroo Enterprise Helm Setup and Install Guides
1 - Wallaroo Enterprise Comprehensive Install Guides
This guides are targeted towards system administrators and data scientists who want to work with the easiest, fastest, and comprehensive method of running your own machine learning models.
A typical installation of Wallaroo follows this process:
| Step | Description | Average Setup Time |
|---|---|---|
| Setup Environment | Create an environment that meets the Wallaroo prerequisites | 30 minutes |
| Install Wallaroo | Install Wallaroo into a prepared environment | 15 minutes |
| Configure Wallaroo | Update Wallaroo with required post-install configurations. | Variable |
Some knowledge of the following will be useful in working with this guide:
- Working knowledge of Linux distributions, particularly Ubuntu.
- A cloud provider including Google Cloud Platform (GCP), Amazon Web Services (AWS), or Microsoft Azure experience.
- Working knowledge of Kubernetes, mainly
kubectlandkotsorhelm.
For more information, Contact Us for additional details.
The following software or runtimes are required for Wallaroo 2023.4.1. Most are automatically available through the supported cloud providers.
| Software or Runtime | Description | Minimum Supported Version | Preferred Version(s) |
|---|---|---|---|
| Kubernetes | Cluster deployment management | 1.23 | 1.26 |
| containerd | Container Management | 1.7.0 | 1.7.0 |
| kubectl | Kubernetes administrative console application | 1.26 | 1.26 |
Custom Configurations
Wallaroo can be configured with custom installations depending on your organization’s needs. The following options are available:
- Install Wallaroo to Specific Nodes: How to specify what nodes in a Kubernetes cluster to install Wallaroo to.
- Install Wallaroo with Minimum Services: How to install Wallaroo with reduced services to fit into a lower-resource environment.
- Taints and Tolerances Guide: How to configure Wallaroo for specific taints and tolerances so ensure that only Wallaroo services are running in specific nodes.
1.1 - Wallaroo Enterprise Comprehensive Install Guide: Amazon Web Services EKS
Uninstall Guides
The following is a short version of the uninstall procedure to remove a previously installed version of Wallaroo. For full details, see the How to Uninstall Wallaroo. These instructions assume administrative use of the Kubernetes command kubectl.
To uninstall a previously installed Wallaroo instance:
Delete any Wallaroo pipelines still deployed with the command
kubectl delete namespace {namespace}. Typically these are the pipeline name with some numerical ID. For example, in the following list of namespaces the namespaceccfraud-pipeline-21correspond to the Wallaroo pipelineccfraud-pipeline. Verify these are Wallaroo pipelines before deleting.-> kubectl get namespaces NAME STATUS AGE default Active 7d4h kube-node-lease Active 7d4h kube-public Active 7d4h ccfraud-pipeline-21 Active 4h23m wallaroo Active 3d6h -> kubectl delete namespaces ccfraud-pipeline-21Use the following bash script or run the commands individually. Warning: If the selector is incorrect or missing from the kubectl command, the cluster could be damaged beyond repair. For a default installation, the selector and namespace will be
wallaroo.#!/bin/bash kubectl delete ns wallaroo && \ kubectl delete all,secret,configmap,clusterroles,clusterrolebindings,storageclass,crd \ --selector app.kubernetes.io/part-of=wallaroo --selector kots.io/app-slug=wallaroo
Wallaroo can now be reinstalled into this environment.
AWS Cluster for Wallaroo Enterprise Instructions
The following steps are guidelines to assist new users in setting up their AWS environment for Wallaroo. Feel free to replace these with commands with ones that match your needs.
- AWS Prerequisites
To install Wallaroo in your AWS environment based on these instructions, the following prerequisites must be met:
- Register an AWS account: https://aws.amazon.com/ and assign the proper permissions according to your organization’s needs.
- The Kubernetes cluster must include the following minimum settings:
- Nodes must be OS type Linux with using the
containerddriver. - Role-based access control (RBAC) must be enabled.
- Minimum of 4 nodes, each node with a minimum of 8 CPU cores and 16 GB RAM. 50 GB will be allocated per node for a total of 625 GB for the entire cluster.
- RBAC is enabled.
- Recommended Aws Machine type:
c5.4xlarge. For more information, see the AWS Instance Types.
- Nodes must be OS type Linux with using the
- Installed eksctl version 0.101.0 and above.
- If the cluster will utilize autoscaling, install the Cluster Autoscaler on AWS.
- IMPORTANT NOTE
- Organizations that intend to stop and restart their Kubernetes environment on an intentional or regular basis are recommended to use a single availability zone for their nodes. This minimizes issues such as persistent volumes in different availability zones, etc.
- Organizations that intend to use Wallaroo Enterprise in a high availability cluster are encouraged to follow best practices including using separate availability zones for redundancy, etc.
EKSCTL Based Instructions
These commands make use of the command line tool eksctl which streamlines the process in creating Amazon Elastic Kubernetes Service clusters for our Wallaroo environment.
The following are used for the example commands below. Replace them with your specific environment settings:
- AWS Cluster Name:
wallarooAWS
Create an AWS EKS Cluster
The following eksctl configuration file is an example of setting up the AWS environment for a Wallaroo cluster, including the static and adaptive nodepools. Adjust these names and settings based on your organizations requirements.
This sample YAML file can be downloaded from here:wallaroo_enterprise_aws_install.yaml
Or copied from here:
apiVersion: eksctl.io/v1alpha5
kind: ClusterConfig

metadata:
  name: wallarooAWS
  region: us-east-1
  version: "1.25"

addons:
  - name: aws-ebs-csi-driver

iam:
  withOIDC: true
  serviceAccounts:
  - metadata:
      name: cluster-autoscaler
      namespace: kube-system
      labels: {aws-usage: "cluster-ops"}
    wellKnownPolicies:
      autoScaler: true
    roleName: eksctl-cluster-autoscaler-role

nodeGroups:
  - name: mainpool
    instanceType: m5.2xlarge
    desiredCapacity: 3
    containerRuntime: containerd
    amiFamily: AmazonLinux2
    availabilityZones:
      - us-east-1a
  - name: postgres
    instanceType: m5.2xlarge
    desiredCapacity: 1
    taints:
      - key: wallaroo.ai/postgres
        value: "true"
        effect: NoSchedule
    containerRuntime: containerd
    amiFamily: AmazonLinux2
    availabilityZones:
      - us-east-1a
  - name: engine-lb
    instanceType: c5.4xlarge
    minSize: 1
    maxSize: 3
    taints:
      - key: wallaroo.ai/enginelb
        value: "true"
        effect: NoSchedule
    tags:
      k8s.io/cluster-autoscaler/node-template/label/k8s.dask.org/node-purpose: engine-lb
      k8s.io/cluster-autoscaler/node-template/taint/k8s.dask.org/dedicated: "true:NoSchedule"
    iam:
      withAddonPolicies:
        autoScaler: true
    containerRuntime: containerd
    amiFamily: AmazonLinux2
    availabilityZones:
      - us-east-1a
  - name: engine
    instanceType: c5.2xlarge
    minSize: 1
    maxSize: 3
    taints:
      - key: wallaroo.ai/engine
        value: "true"
        effect: NoSchedule
    tags:
      k8s.io/cluster-autoscaler/node-template/label/k8s.dask.org/node-purpose: engine
      k8s.io/cluster-autoscaler/node-template/taint/k8s.dask.org/dedicated: "true:NoSchedule"
    iam:
      withAddonPolicies:
        autoScaler: true
    containerRuntime: containerd
    amiFamily: AmazonLinux2
    availabilityZones:
      - us-east-1a
Create the Cluster
Create the cluster with the following command, which creates the environment and sets the correct Kubernetes version.
eksctl create cluster -f wallaroo_enterprise_aws_install.yaml
During the process the Kubernetes credentials will be copied into the local environment. To verify the setup is complete, use the kubectl get nodes command to display the available nodes as in the following example:
kubectl get nodes
NAME                                           STATUS   ROLES    AGE     VERSION
ip-192-168-21-253.us-east-2.compute.internal   Ready    <none>   13m     v1.23.8-eks-9017834
ip-192-168-30-36.us-east-2.compute.internal    Ready    <none>   13m     v1.23.8-eks-9017834
ip-192-168-38-31.us-east-2.compute.internal    Ready    <none>   9m46s   v1.23.8-eks-9017834
ip-192-168-55-123.us-east-2.compute.internal   Ready    <none>   12m     v1.23.8-eks-9017834
ip-192-168-79-70.us-east-2.compute.internal    Ready    <none>   13m     v1.23.8-eks-9017834
ip-192-168-37-222.us-east-2.compute.internal   Ready    <none>   13m     v1.23.8-eks-9017834
Install Wallaroo
Organizations that use cloud services such as Google Cloud Platform (GCP), Amazon Web Services (AWS), or Microsoft Azure can install Wallaroo Enterprise through the following process. These instructions also work with Single Node Linux based installations.
Before installation, the following prerequisites must be met:
- Have a Wallaroo Enterprise license file. For more information, you can request a demonstration.
- Set up a cloud Kubernetes environment that meets the requirements. Clusters must meet the following minimum specifications:
- Minimum number of nodes: 4
- Minimum Number of CPU Cores: 8
- Minimum RAM: 16 GB
- A total of 625 GB of storage will be allocated for the entire cluster based on 5 users with up to four pipelines with five steps per pipeline, with 50 GB allocated per node, including 50 GB specifically for the Jupyter Hub service. Enterprise users who deploy additional pipelines will require an additional 50 GB of storage per lab node deployed.
- Runtime: containerd is required.
- DNS services for integrating your Wallaroo Enterprise instance. See the DNS Integration Guide for the instructions on configuring Wallaroo Enterprise with your DNS services.
IMPORTANT NOTE
Wallaroo requires out-bound network connections to download the required container images and other tasks. For situations that require limiting out-bound access, refer to the air-gap installation instructions or contact your Wallaroo support representative.Wallaroo Enterprise can be installed either interactively or automatically through the kubectl and kots applications.
Automated Install
To automatically install Wallaroo into the namespace wallaroo, specify the administrative password and the license file during the installation as in the following format with the following variables:
NAMESPACE: The namespace for the Wallaroo Enterprise install, typicallywallaroo.LICENSEFILE: The location of the Wallaroo Enterprise license file.SHAREDPASSWORD: The password of for the Wallaroo Administrative Dashboard.
kubectl kots install wallaroo/ee -n $NAMESPACE --license-file $LICENSEFILE --shared-password $SHAREDPASSWORD
For example, the following settings translate to the following install command:
NAMESPACE:wallaroo.LICENSEFILE:myWallaroolicense.yamlSHAREDPASSWORD:snugglebunnies
kubectl kots install wallaroo/ee -n wallaroo --license-file myWallaroolicense.yaml --shared-password wallaroo
Interactive Install
The Interactive Install process allows users to adjust the configuration settings before Wallaroo is deployed. It requires users be able to access the Wallaroo Administrative Dashboard through a browser, typically on port 8080.
IMPORTANT NOTE: Users who install Wallaroo through another node such as in the single node installation can port use SSH tunneling to access the Wallaroo Administrative Dashboard. For example:
ssh IP -L8800:localhost:8800
Install the Wallaroo Enterprise Edition using
kots install wallaroo/ee, specifying the namespace to install Wallaroo into. For example, ifwallaroois the namespace, then the command is:kubectl kots install wallaroo/ee --namespace wallarooWallaroo Enterprise Edition will be downloaded and installed into your Kubernetes environment in the namespace specified. When prompted, set the default password for the Wallaroo environment. When complete, Wallaroo Enterprise Edition will display the URL for the Admin Console, and how to end the Admin Console from running.
• Deploying Admin Console
• Creating namespace ✓
• Waiting for datastore to be ready ✓
    Enter a new password to be used for the Admin Console: •••••••••••••
  • Waiting for Admin Console to be ready ✓

• Press Ctrl+C to exit
• Go to http://localhost:8800 to access the Admin Console
To relaunch the Wallaroo Administrative Dashboard and make changes or updates, use the following command:
kubectl-kots admin-console --namespace wallaroo
Configure Wallaroo
Once installed, Wallaroo will continue to run until terminated.
Change Wallaroo Administrative Dashboard Password
To change the password to the Wallaroo Administrative Dashboard:
From the command line, use the command:
kubectl kots reset-password -n {namespace}For example, for default installations where the Kubernetes namespace is
wallaroo, the command would be:kubectl kots reset-password -n wallarooFrom here, enter the new password.
From the Wallaroo Administrative Dashboard:
Login and authenticate with the current password.
From the upper right hand corner, select … to access the menu and select Change password.
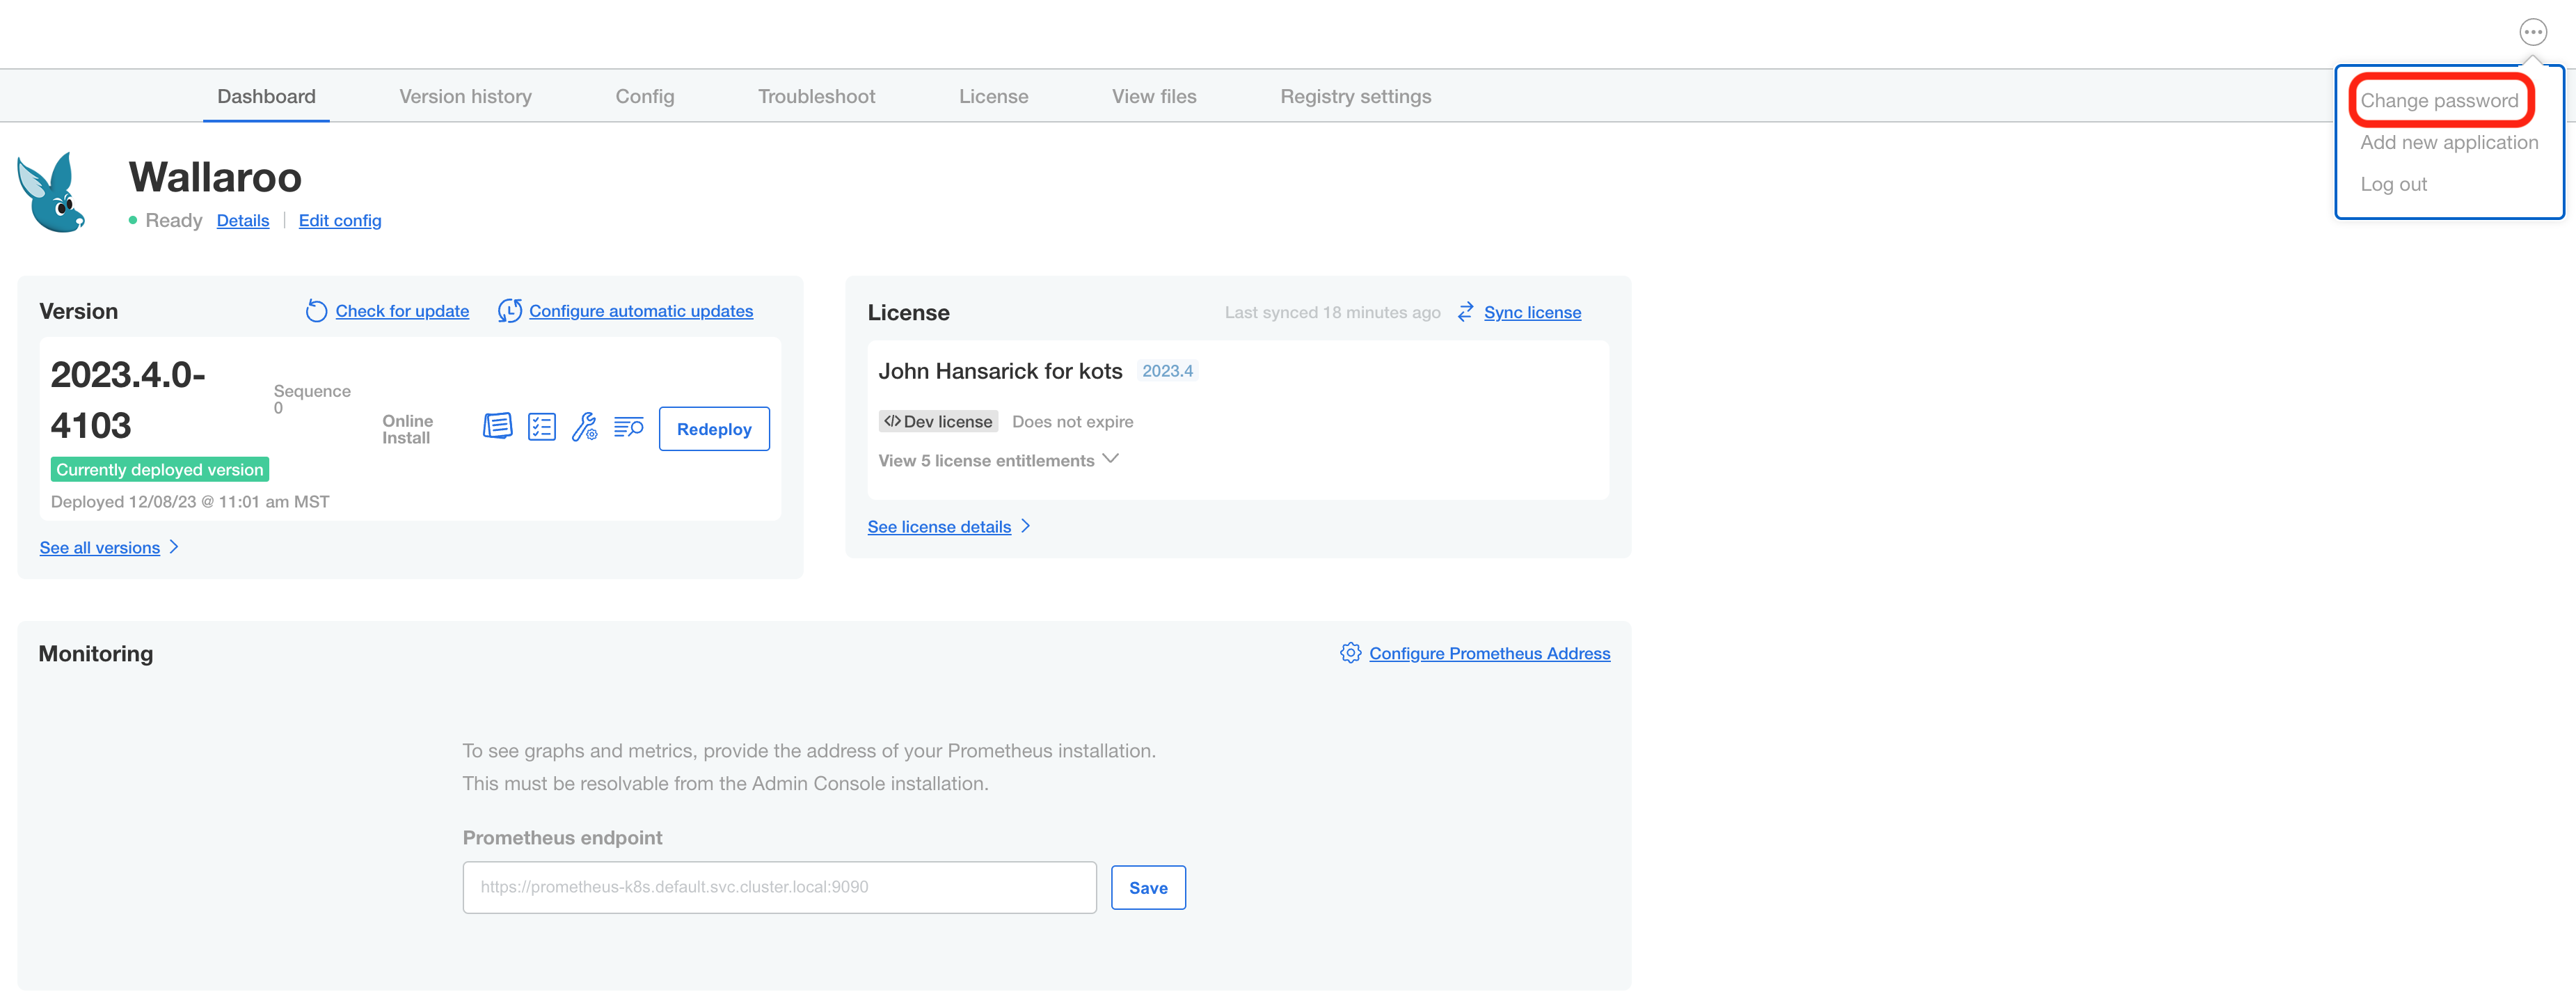
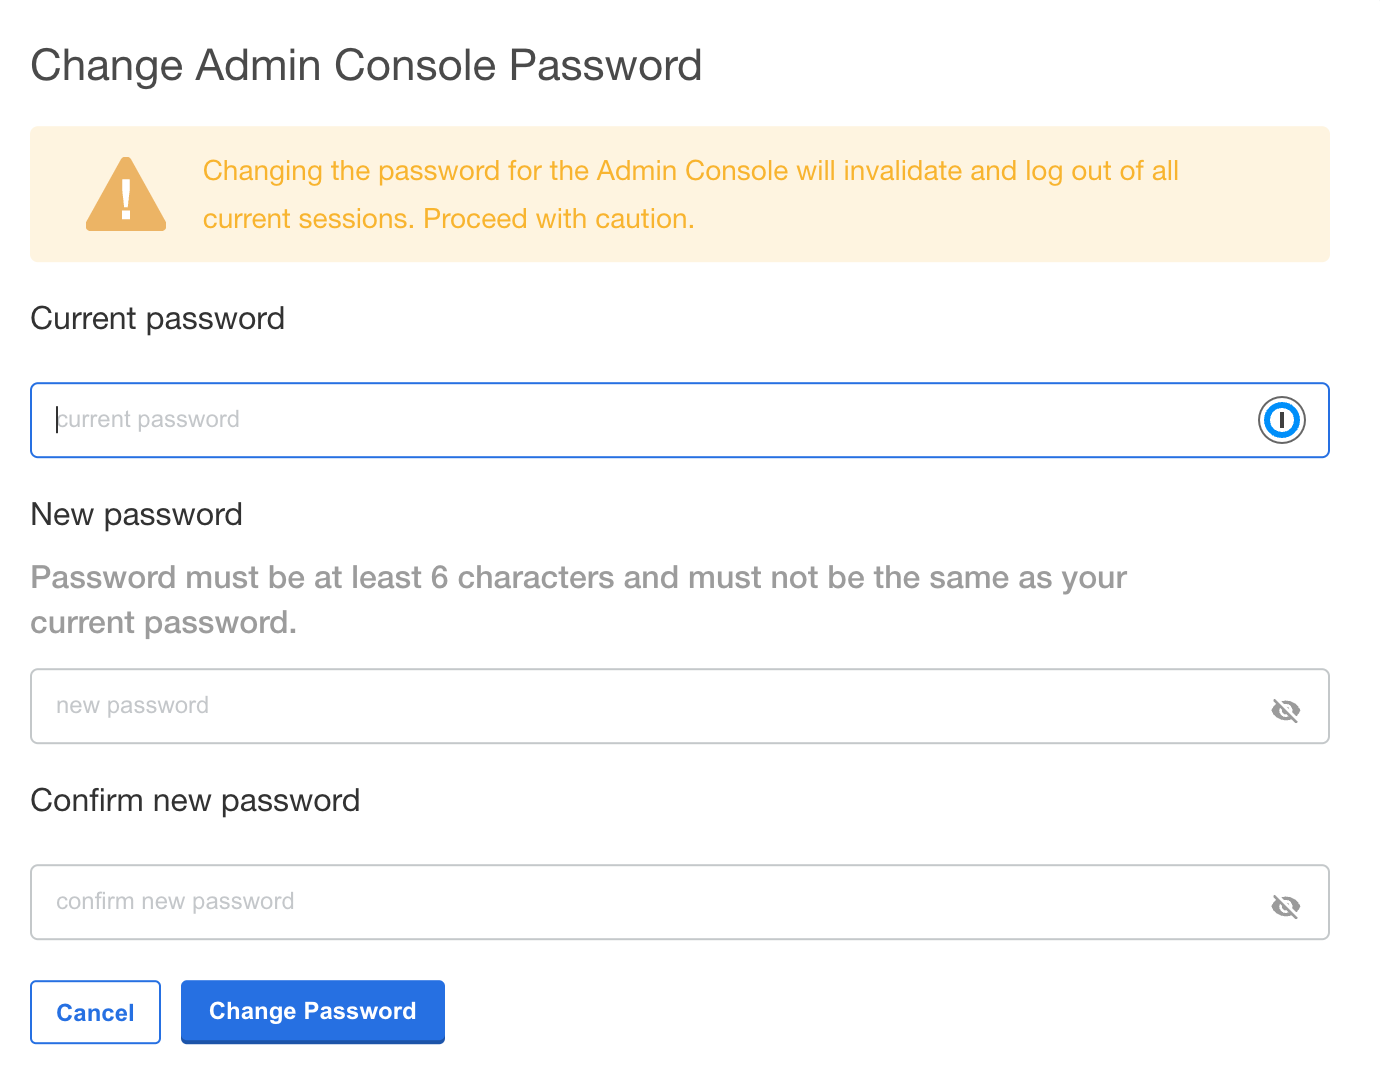
Enter the current password, then update and verify with the new password.
Setup DNS Services
Wallaroo Enterprise requires integration into your organizations DNS services.
The DNS Integration Guide details adding the Wallaroo instance to an organizations DNS services. The following is an abbreviated guide that assumes that certificates were already generated.
From the Wallaroo Dashboard, select Config and set the following:
- Networking Configuration
- Ingress Mode for Wallaroo Endpoints:
- None: Port forwarding or other methods are used for access.
- Internal: For environments where only nodes within the same Kubernetes environment and no external connections are required.
- External: Connections from outside the Kubernetes environment is allowed.
- Enable external URL inference endpoints: Creates pipeline inference endpoints. For more information, see Model Endpoints Guide.
- Ingress Mode for Wallaroo Endpoints:
- DNS
- DNS Suffix (Mandatory): The domain name for your Wallaroo instance.
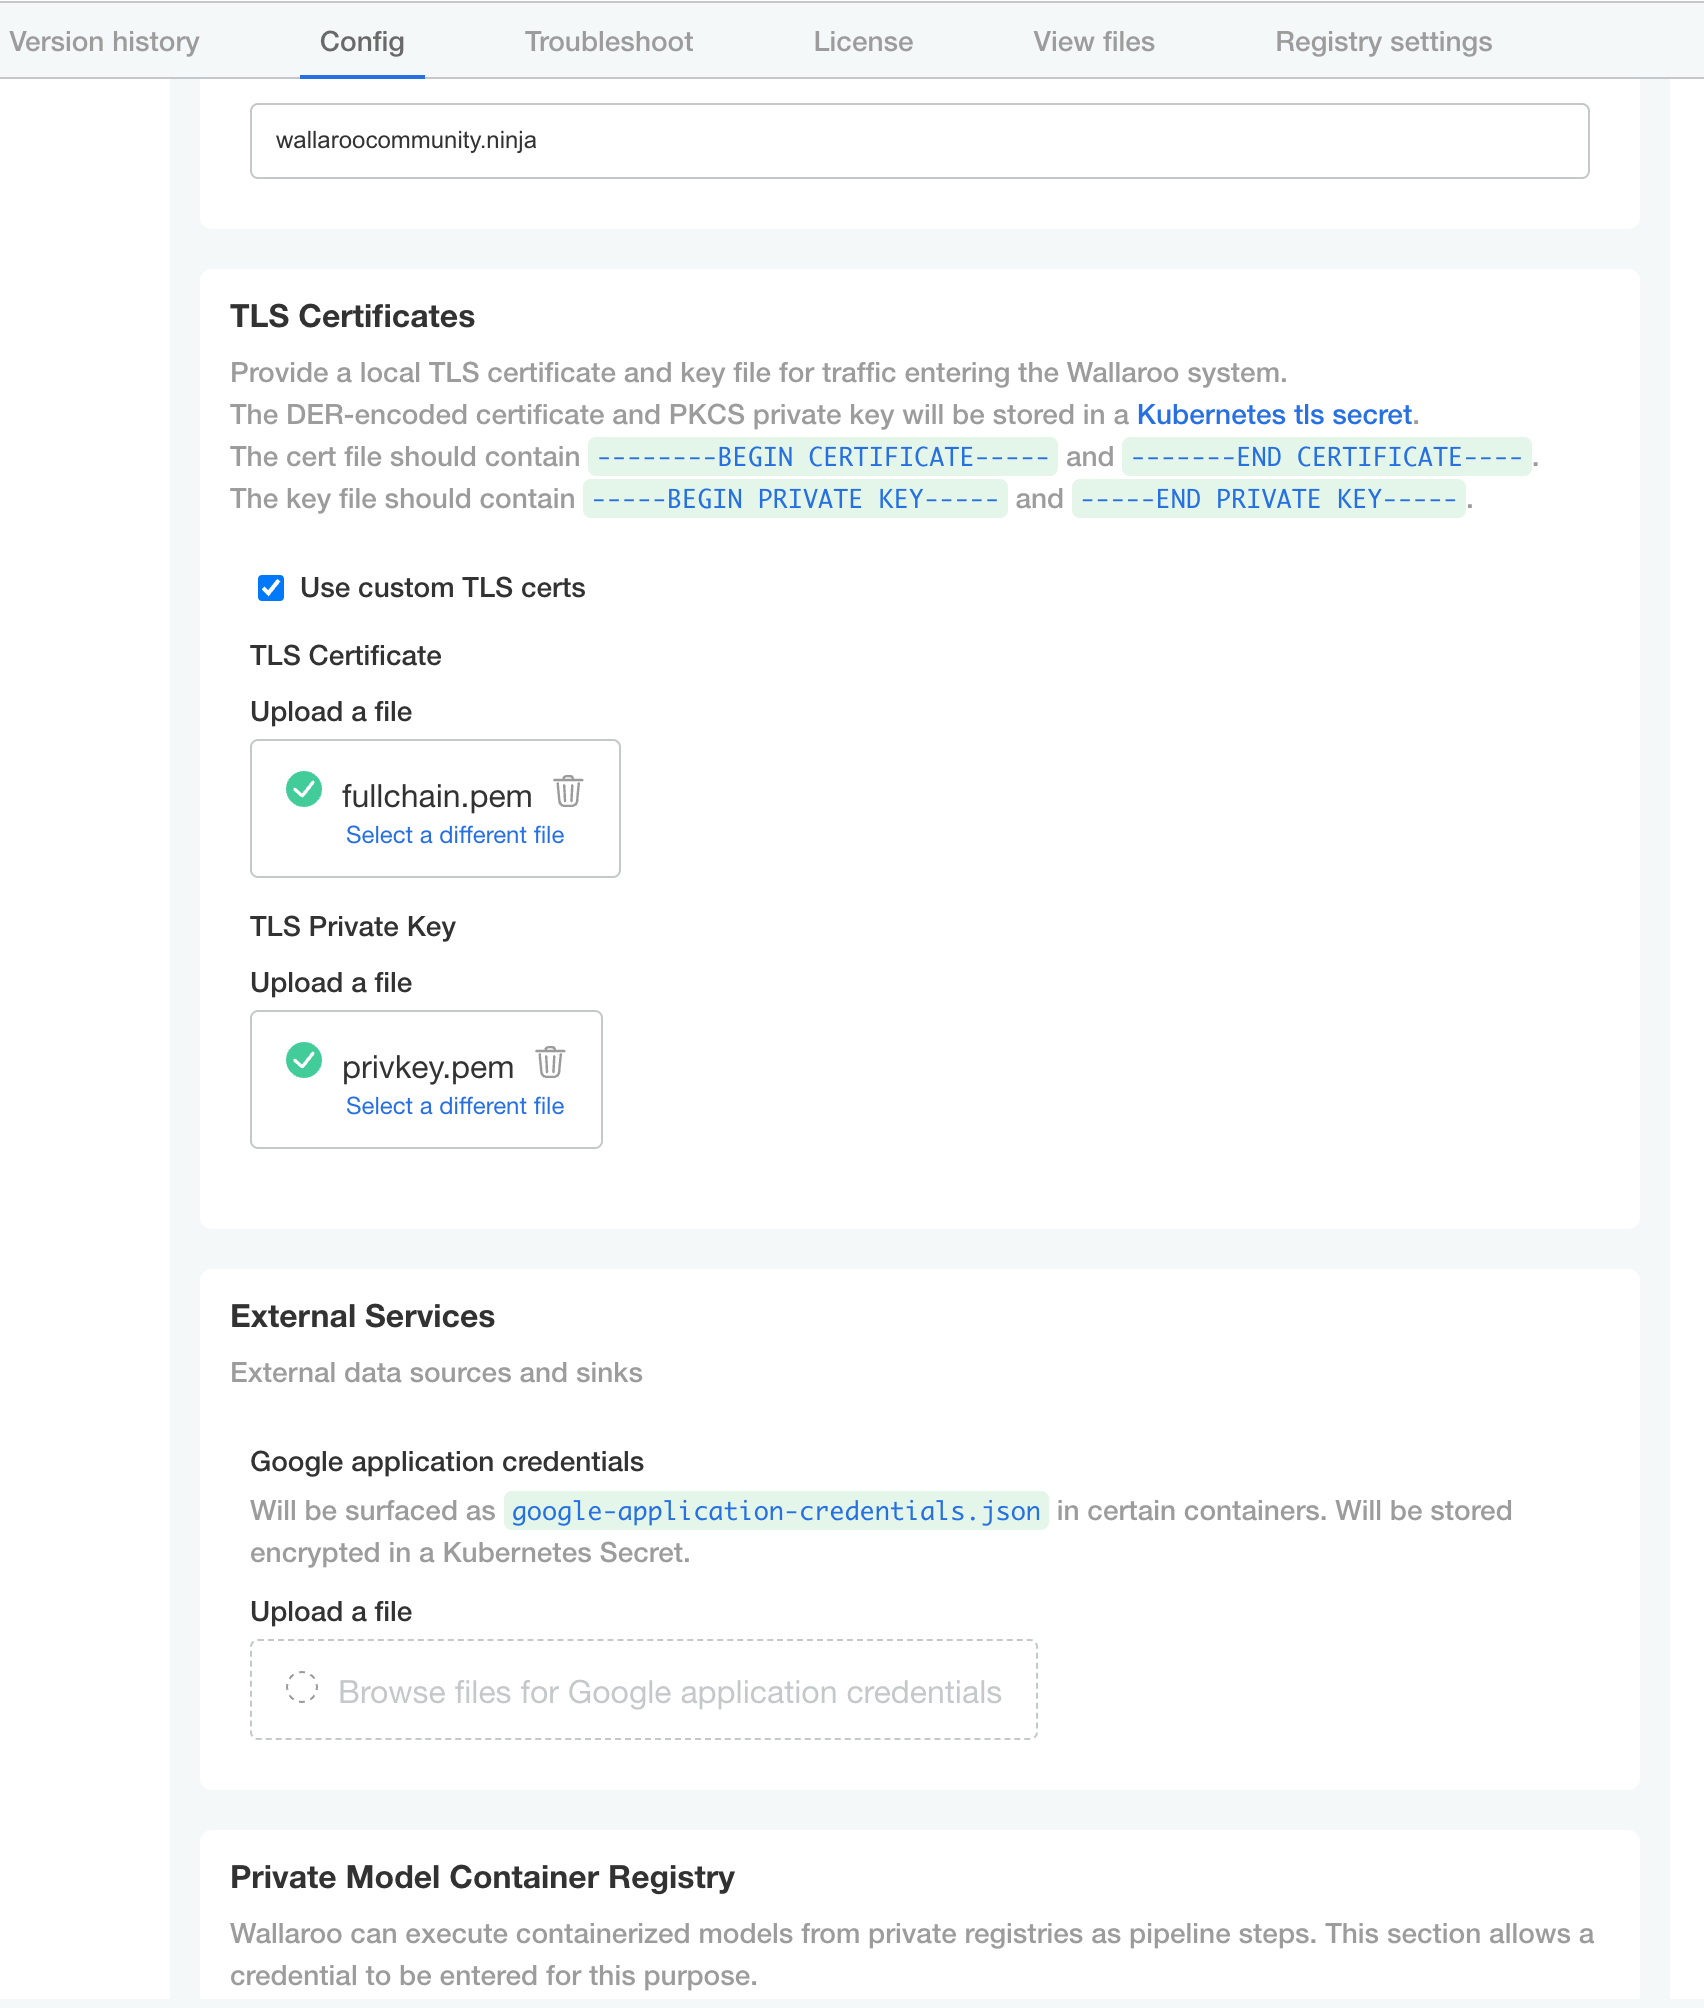
- TLS Certificates
- Use custom TLS Certs: Checked
- TLS Certificate: Enter your TLS Certificate (.crt file).
- TLS Private Key: Enter your TLS private key (.key file).
- Other settings as desired.
- Networking Configuration
Once complete, scroll to the bottom of the Config page and select Save config.
A pop-up window will display The config for Wallaroo Enterprise has been updated.. Select Go to updated version to continue.
From the Version History page, select Deploy. Once the new deployment is finished, you will be able to access your Wallaroo services via their DNS addresses.
To verify the configuration is complete, access the Wallaroo Dashboard through the suffix domain. For example if the suffix domain is wallaroo.example.com then access https://wallaroo.example.com in a browser and verify the connection and certificates.
Setup Users
User management is handled through the Wallaroo instance Keycloak service. See the Wallaroo User Management for full guides on setting up users, identity providers, and other user configuration options. This step must be completed before using Wallaroo.
The following is an abbreviated guide on setting up new Wallaroo users.
IMPORTANT NOTE
At least one user must be created before using Wallaroo.
Accessing The Wallaroo Keycloak Dashboard
Enterprise customers may access their Wallaroo Keycloak dashboard by navigating to https://keycloak.<suffix>, depending on their choice domain suffix supplied during installation.
Obtaining Administrator Credentials
The standard Wallaroo installation creates the user admin by default and assigns them a randomly generated password. The admin user credentials are obtained which may be obtained directly from Kubernetes with the following commands, assuming the Wallaroo instance namespace is wallaroo.
Retrieve Keycloak Admin Username
kubectl -n wallaroo \
get secret keycloak-admin-secret \
-o go-template='{{.data.KEYCLOAK_ADMIN_USER | base64decode }}'
Retrieve Keycloak Admin Password
kubectl -n wallaroo \
get secret keycloak-admin-secret \
-o go-template='{{.data.KEYCLOAK_ADMIN_PASSWORD | base64decode }}'
Accessing the User Management Panel
In the Keycloak Administration Console, click Manage -> Users in the left-hand side menu. Click the View all users button to see existing users. This will be under the host name keycloak.$WALLAROO_SUFFIX. For example, if the $WALLAROO_SUFFIX is wallaroo.example.com, the Keycloak Administration Console would be keycloak.wallaroo.example.com.
Adding Users
To add a user through the Keycloak interface:
Click the Add user button in the top-right corner.
Enter the following:

- A unique username and email address.
- Ensure that the Email Verified checkbox is checked - Wallaroo does not perform email verification.
- Under Required User Actions, set Update Password so the user will update their password the next time they log in.
Click Save.
Once saved, select Credentials tab, then the Set Password section, enter the new user’s desired initial password in the Password and Password Confirmation fields.
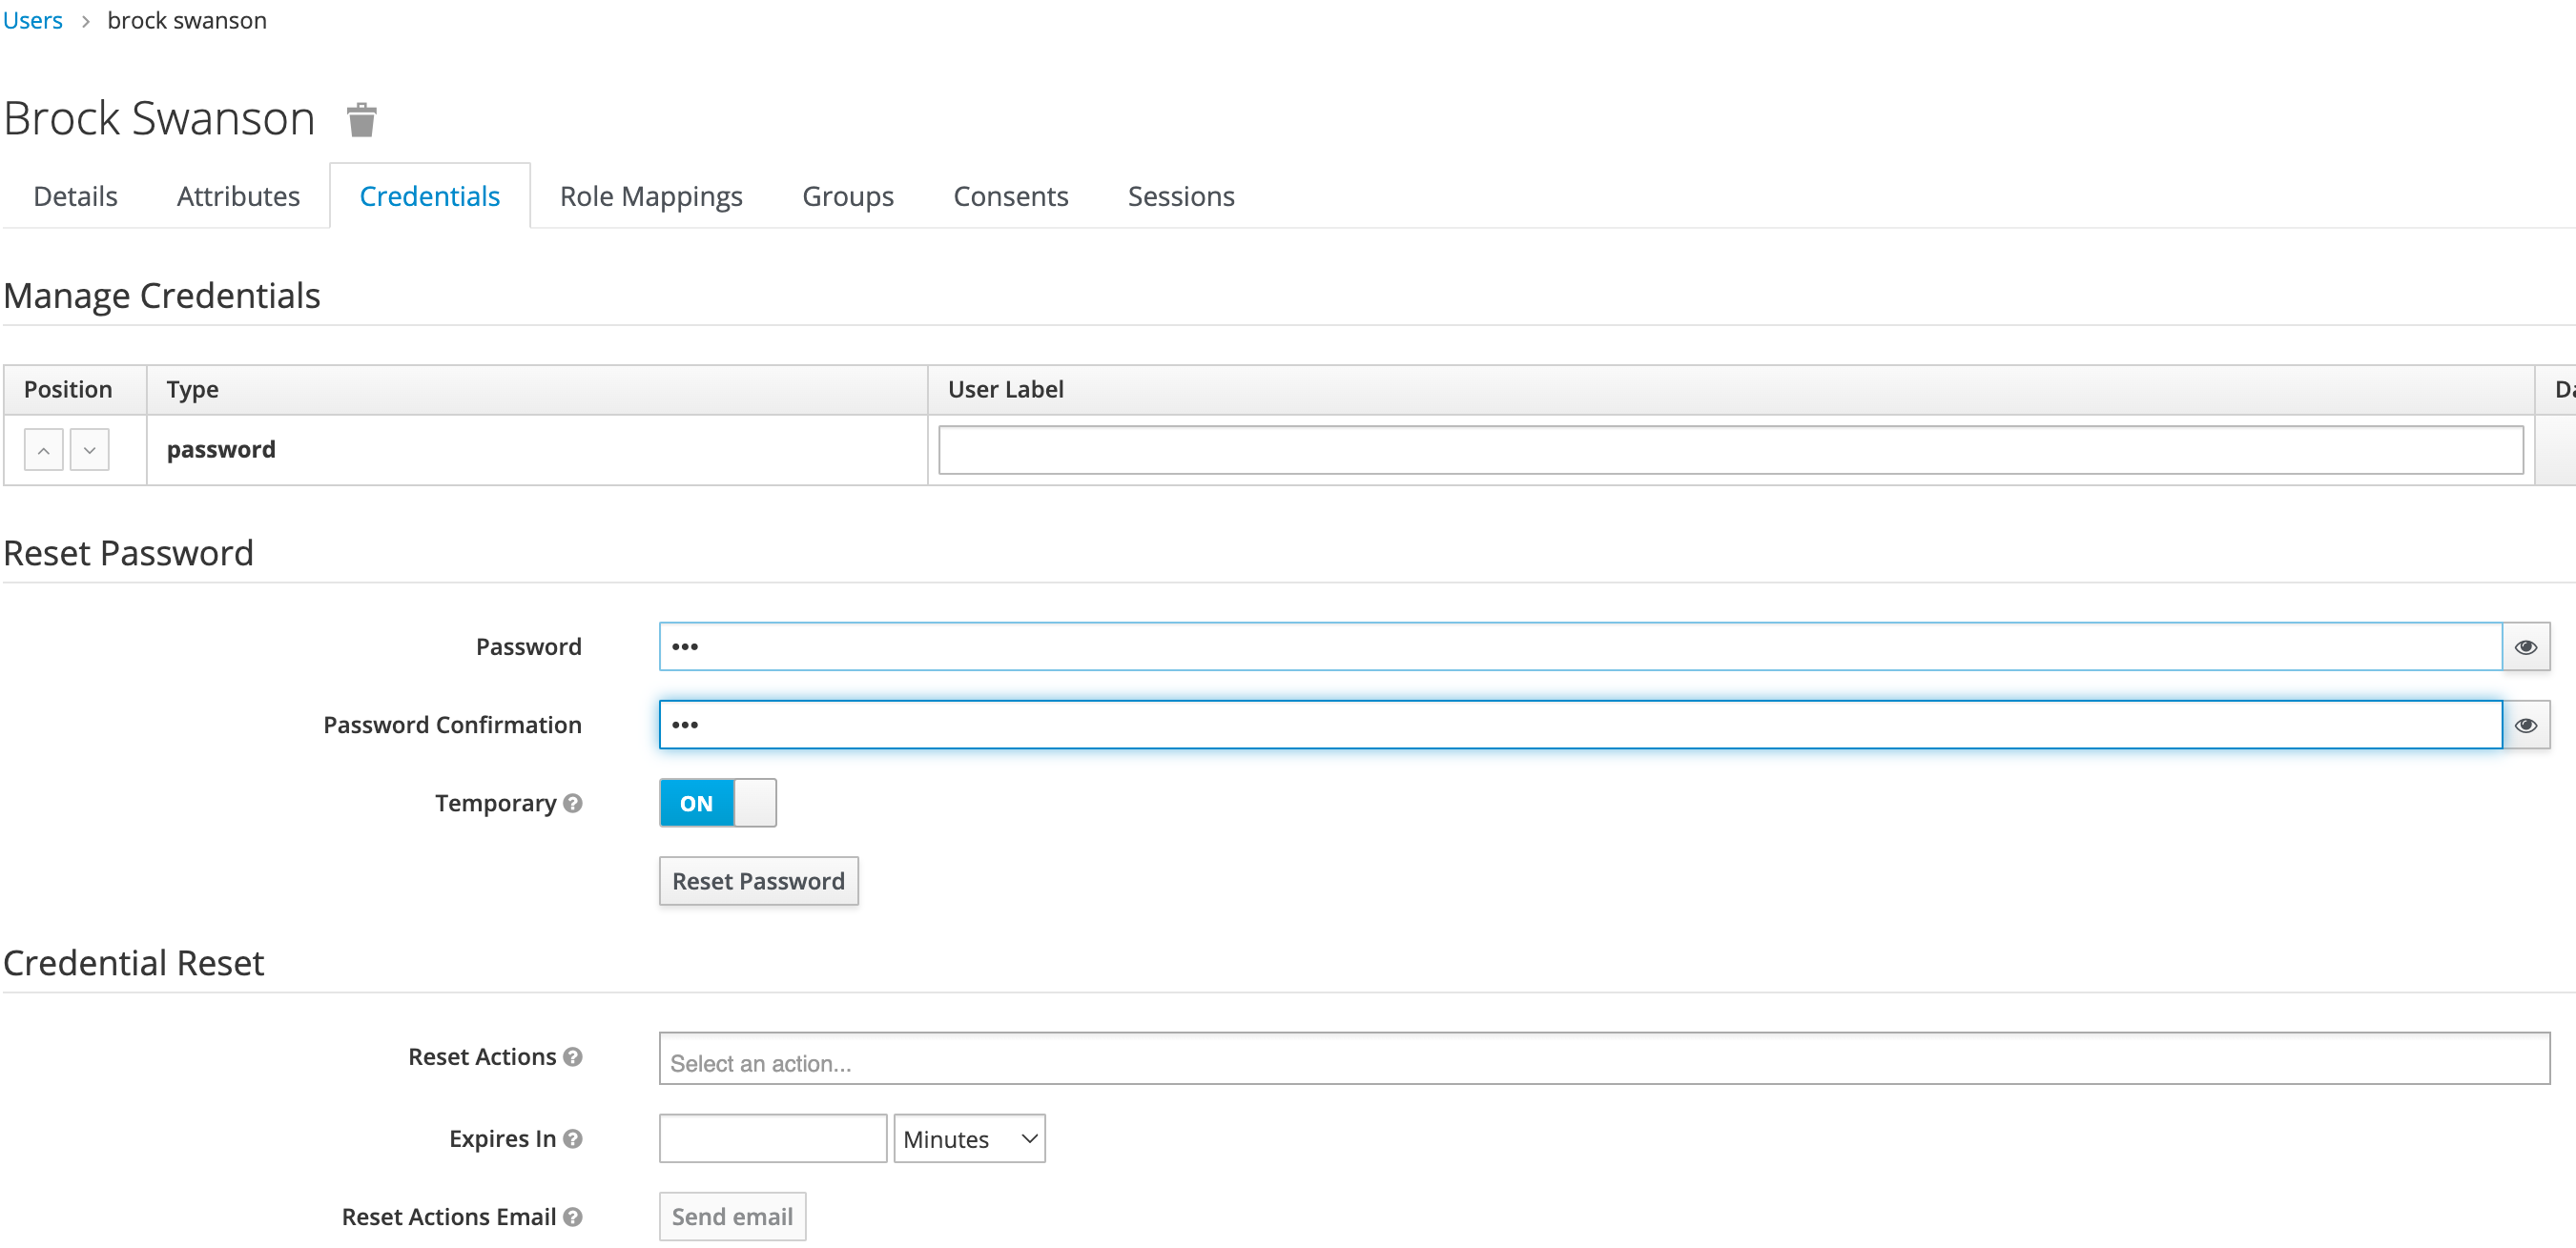
Click Set Password. Confirm the action when prompted. This will force the user to set their own password when they log in to Wallaroo.
To log into the Wallaroo dashboard, log out as the Admin user and login to the Wallaroo Dashboard as a preconfigured user or via SSO.
1.2 - Wallaroo Enterprise Comprehensive Install Guide: Microsoft Azure Kubernetes Services
Uninstall Guides
The following is a short version of the uninstall procedure to remove a previously installed version of Wallaroo. For full details, see the How to Uninstall Wallaroo. These instructions assume administrative use of the Kubernetes command kubectl.
To uninstall a previously installed Wallaroo instance:
Delete any Wallaroo pipelines still deployed with the command
kubectl delete namespace {namespace}. Typically these are the pipeline name with some numerical ID. For example, in the following list of namespaces the namespaceccfraud-pipeline-21correspond to the Wallaroo pipelineccfraud-pipeline. Verify these are Wallaroo pipelines before deleting.-> kubectl get namespaces NAME STATUS AGE default Active 7d4h kube-node-lease Active 7d4h kube-public Active 7d4h ccfraud-pipeline-21 Active 4h23m wallaroo Active 3d6h -> kubectl delete namespaces ccfraud-pipeline-21Use the following bash script or run the commands individually. Warning: If the selector is incorrect or missing from the kubectl command, the cluster could be damaged beyond repair. For a default installation, the selector and namespace will be
wallaroo.#!/bin/bash kubectl delete ns wallaroo && \ kubectl delete all,secret,configmap,clusterroles,clusterrolebindings,storageclass,crd \ --selector app.kubernetes.io/part-of=wallaroo --selector kots.io/app-slug=wallaroo
Wallaroo can now be reinstalled into this environment.
Azure Cluster for Wallaroo Enterprise Instructions
The following instructions are made to assist users set up their Microsoft Azure Kubernetes environment for running Wallaroo Enterprise. These represent a recommended setup, but can be modified to fit your specific needs.
If your prepared to install the environment now, skip to Setup Environment Steps.
There are two methods we’ve detailed here on how to setup your Kubernetes cloud environment in Azure:
- Quick Setup Script Download a bash script to automatically set up the Azure environment through the Microsoft Azure command line interface
az. - Manual Setup Guide A list of the
azcommands used to create the environment through manual commands.
Azure Prerequisites
To install Wallaroo in your Microsoft Azure environment, the following prerequisites must be met:
- Register a Microsoft Azure account: https://azure.microsoft.com/.
- Install the Microsoft Azure CLI and complete the Azure CLI Get Started Guide to connect your
azapplication to your Microsoft Azure account. - The Kubernetes cluster must include the following minimum settings:
- Nodes must be OS type Linux the
containerddriver as the default. - Role-based access control (RBAC) must be enabled.
- Minimum of 4 nodes, each node with a minimum of 8 CPU cores and 16 GB RAM. 50 GB will be allocated per node for a total of 625 GB for the entire cluster.
- RBAC is enabled.
- Minimum machine type is set to to
Standard_D8s_v4.
- Nodes must be OS type Linux the
- IMPORTANT NOTE
- Organizations that intend to stop and restart their Kubernetes environment on an intentional or regular basis are recommended to use a single availability zone for their nodes. This minimizes issues such as persistent volumes in different availability zones, etc.
- Organizations that intend to use Wallaroo Enterprise in a high availability cluster are encouraged to follow best practices including using separate availability zones for redundancy, etc.
Standard Setup Variables
The following variables are used in the Quick Setup Script and the Manual Setup Guide detailed below. Modify them as best fits your organization.
| Variable Name | Default Value | Description |
|---|---|---|
| WALLAROO_RESOURCE_GROUP | wallaroogroup | The Azure Resource Group used for the KUbernetes environment. |
| WALLAROO_GROUP_LOCATION | eastus | The region that the Kubernetes environment will be installed to. |
| WALLAROO_CONTAINER_REGISTRY | wallarooacr | The Azure Container Registry used for the Kubernetes environment. |
| WALLAROO_CLUSTER | wallarooaks | The name of the Kubernetes cluster that Wallaroo is installed to. |
| WALLAROO_SKU_TYPE | Base | The Azure Kubernetes Service SKU type. |
| WALLAROO_VM_SIZE | Standard_D8s_v4 | The VM type used for the standard Wallaroo cluster nodes. |
| POSTGRES_VM_SIZE | Standard_D8s_v4 | The VM type used for the postgres nodepool. |
| ENGINELB_VM_SIZE | Standard_D8s_v4 | The VM type used for the engine-lb nodepool. |
| ENGINE_VM_SIZE | Standard_F8s_v2 | The VM type used for the engine nodepool. |
Setup Environment Steps
Quick Setup Script
A sample script is available here, and creates an Azure Kubernetes environment ready for use with Wallaroo Enterprise. This script requires the following prerequisites listed above and uses the variables listed in Standard Setup Variables. Modify them as best fits your organization’s needs.
The following script is available for download: wallaroo_enterprise_azure_expandable.bash
The following steps are geared towards a standard Linux or macOS system that supports the prerequisites listed above. Modify these steps based on your local environment.
- Download the script above.
- In a terminal window set the script status as
executewith the commandchmod +x wallaroo_enterprise_install_azure_expandable.bash. - Modify the script variables listed above based on your requirements.
- Run the script with either
bash wallaroo_enterprise_install_azure_expandable.bashor./wallaroo_enterprise_install_azure_expandable.bashfrom the same directory as the script.
Manual Setup Guide
The following steps are guidelines to assist new users in setting up their Azure environment for Wallaroo.
The process uses the variables listed in Standard Setup Variables. Modify them as best fits your organization’s needs.
See the Azure Command-Line Interface for full details on commands and settings.
Setting up an Azure AKS environment is based on the Azure Kubernetes Service tutorial, streamlined to show the minimum steps in setting up your own Wallaroo environment in Azure.
This follows these major steps:
Set Variables
The following are the variables used for the rest of the commands. Modify them as fits your organization’s needs.
WALLAROO_RESOURCE_GROUP=wallaroogroup
WALLAROO_GROUP_LOCATION=eastus
WALLAROO_CONTAINER_REGISTRY=wallarooacr
WALLAROO_CLUSTER=wallarooaks
WALLAROO_SKU_TYPE=Base
WALLAROO_VM_SIZE=Standard_D8s_v4
POSTGRES_VM_SIZE=Standard_D8s_v4
ENGINELB_VM_SIZE=Standard_D8s_v4
ENGINE_VM_SIZE=Standard_F8s_v2
- Create an Azure Resource Group
To create an Azure Resource Group for Wallaroo in Microsoft Azure, use the following template:
az group create --name $WALLAROO_RESOURCE_GROUP --location $WALLAROO_GROUP_LOCATION
(Optional): Set the default Resource Group to the one recently created. This allows other Azure commands to automatically select this group for commands such as az aks list, etc.
az configure --defaults group={Resource Group Name}
For example:
az configure --defaults group=wallarooGroup
- Create an Azure Container Registry
An Azure Container Registry(ACR) manages the container images for services includes Kubernetes. The template for setting up an Azure ACR that supports Wallaroo is the following:
az acr create -n $WALLAROO_CONTAINER_REGISTRY \
-g $WALLAROO_RESOURCE_GROUP \
--sku $WALLAROO_SKU_TYPE \
--location $WALLAROO_GROUP_LOCATION
- Create an Azure Kubernetes Services
Now we can create our Kubernetes service in Azure that will host our Wallaroo with the az aks create command.
az aks create \
--resource-group $WALLAROO_RESOURCE_GROUP \
--name $WALLAROO_CLUSTER \
--node-count 3 \
--generate-ssh-keys \
--vm-set-type VirtualMachineScaleSets \
--load-balancer-sku standard \
--node-vm-size $WALLAROO_VM_SIZE \
--nodepool-name mainpool \
--attach-acr $WALLAROO_CONTAINER_REGISTRY \
--kubernetes-version=1.23.15 \
--zones 1 \
--location $WALLAROO_GROUP_LOCATION
Wallaroo Enterprise Nodepools
Wallaroo Enterprise supports autoscaling and static nodepools. The following commands are used to create both to support the Wallaroo Enterprise cluster.
The following static nodepools are set up to support the Wallaroo cluster for postgres. Update the VM_SIZE based on your requirements.
az aks nodepool add \
--resource-group $WALLAROO_RESOURCE_GROUP \
--cluster-name $WALLAROO_CLUSTER \
--name postgres \
--node-count 1 \
--node-vm-size $POSTGRES_VM_SIZE \
--no-wait \
--node-taints wallaroo.ai/postgres=true:NoSchedule \
--zones 1
The following autoscaling nodepools are used for the engineLB and the engine nodepools. Adjust the settings based on your organizations requirements.
az aks nodepool add \
--resource-group $WALLAROO_RESOURCE_GROUP \
--cluster-name $WALLAROO_CLUSTER \
--name enginelb \
--node-count 1 \
--node-vm-size $ENGINELB_VM_SIZE \
--no-wait \
--enable-cluster-autoscaler \
--max-count 3 \
--min-count 1 \
--node-taints wallaroo.ai/enginelb=true:NoSchedule \
--labels wallaroo-node-type=enginelb \
--zones 1
az aks nodepool add \
--resource-group $WALLAROO_RESOURCE_GROUP \
--cluster-name $WALLAROO_CLUSTER \
--name engine \
--node-count 1 \
--node-vm-size $ENGINE_VM_SIZE \
--no-wait \
--enable-cluster-autoscaler \
--max-count 3 \
--min-count 1 \
--node-taints wallaroo.ai/engine=true:NoSchedule \
--labels wallaroo-node-type=engine \
--zones 1
For additional settings such as customizing the node pools for your Wallaroo Kubernetes cluster to customize the type of virtual machines used and other settings, see the Microsoft Azure documentation on using system node pools.
- Download Wallaroo Kubernetes Configuration
Once the Kubernetes environment is complete, associate it with the local Kubernetes configuration by importing the credentials through the following template command:
az aks get-credentials --resource-group $WALLAROO_RESOURCE_GROUP --name $WALLAROO_CLUSTER
Verify the cluster is available through the kubectl get nodes command.
kubectl get nodes

NAME                               STATUS   ROLES   AGE   VERSION
aks-engine-99896855-vmss000000     Ready    agent   40m   v1.23.8
aks-enginelb-54433467-vmss000000   Ready    agent   48m   v1.23.8
aks-mainpool-37402055-vmss000000   Ready    agent   81m   v1.23.8
aks-mainpool-37402055-vmss000001   Ready    agent   81m   v1.23.8
aks-mainpool-37402055-vmss000002   Ready    agent   81m   v1.23.8
aks-postgres-40215394-vmss000000   Ready    agent   52m   v1.23.8
Install Wallaroo
Organizations that use cloud services such as Google Cloud Platform (GCP), Amazon Web Services (AWS), or Microsoft Azure can install Wallaroo Enterprise through the following process. These instructions also work with Single Node Linux based installations.
Before installation, the following prerequisites must be met:
- Have a Wallaroo Enterprise license file. For more information, you can request a demonstration.
- Set up a cloud Kubernetes environment that meets the requirements. Clusters must meet the following minimum specifications:
- Minimum number of nodes: 4
- Minimum Number of CPU Cores: 8
- Minimum RAM: 16 GB
- A total of 625 GB of storage will be allocated for the entire cluster based on 5 users with up to four pipelines with five steps per pipeline, with 50 GB allocated per node, including 50 GB specifically for the Jupyter Hub service. Enterprise users who deploy additional pipelines will require an additional 50 GB of storage per lab node deployed.
- Runtime: containerd is required.
- DNS services for integrating your Wallaroo Enterprise instance. See the DNS Integration Guide for the instructions on configuring Wallaroo Enterprise with your DNS services.
IMPORTANT NOTE
Wallaroo requires out-bound network connections to download the required container images and other tasks. For situations that require limiting out-bound access, refer to the air-gap installation instructions or contact your Wallaroo support representative.Wallaroo Enterprise can be installed either interactively or automatically through the kubectl and kots applications.
Automated Install
To automatically install Wallaroo into the namespace wallaroo, specify the administrative password and the license file during the installation as in the following format with the following variables:
NAMESPACE: The namespace for the Wallaroo Enterprise install, typicallywallaroo.LICENSEFILE: The location of the Wallaroo Enterprise license file.SHAREDPASSWORD: The password of for the Wallaroo Administrative Dashboard.
kubectl kots install wallaroo/ee -n $NAMESPACE --license-file $LICENSEFILE --shared-password $SHAREDPASSWORD
For example, the following settings translate to the following install command:
NAMESPACE:wallaroo.LICENSEFILE:myWallaroolicense.yamlSHAREDPASSWORD:snugglebunnies
kubectl kots install wallaroo/ee -n wallaroo --license-file myWallaroolicense.yaml --shared-password wallaroo
Interactive Install
The Interactive Install process allows users to adjust the configuration settings before Wallaroo is deployed. It requires users be able to access the Wallaroo Administrative Dashboard through a browser, typically on port 8080.
IMPORTANT NOTE: Users who install Wallaroo through another node such as in the single node installation can port use SSH tunneling to access the Wallaroo Administrative Dashboard. For example:
ssh IP -L8800:localhost:8800
Install the Wallaroo Enterprise Edition using
kots install wallaroo/ee, specifying the namespace to install Wallaroo into. For example, ifwallaroois the namespace, then the command is:kubectl kots install wallaroo/ee --namespace wallarooWallaroo Enterprise Edition will be downloaded and installed into your Kubernetes environment in the namespace specified. When prompted, set the default password for the Wallaroo environment. When complete, Wallaroo Enterprise Edition will display the URL for the Admin Console, and how to end the Admin Console from running.
• Deploying Admin Console
• Creating namespace ✓
• Waiting for datastore to be ready ✓
    Enter a new password to be used for the Admin Console: •••••••••••••
  • Waiting for Admin Console to be ready ✓

• Press Ctrl+C to exit
• Go to http://localhost:8800 to access the Admin Console
To relaunch the Wallaroo Administrative Dashboard and make changes or updates, use the following command:
kubectl-kots admin-console --namespace wallaroo
Configure Wallaroo
Once installed, Wallaroo will continue to run until terminated.
Change Wallaroo Administrative Dashboard Password
To change the password to the Wallaroo Administrative Dashboard:
From the command line, use the command:
kubectl kots reset-password -n {namespace}For example, for default installations where the Kubernetes namespace is
wallaroo, the command would be:kubectl kots reset-password -n wallarooFrom here, enter the new password.
From the Wallaroo Administrative Dashboard:
Login and authenticate with the current password.
From the upper right hand corner, select … to access the menu and select Change password.
Enter the current password, then update and verify with the new password.
Setup DNS Services
Wallaroo Enterprise requires integration into your organizations DNS services.
The DNS Integration Guide details adding the Wallaroo instance to an organizations DNS services. The following is an abbreviated guide that assumes that certificates were already generated.
From the Wallaroo Dashboard, select Config and set the following:
- Networking Configuration
- Ingress Mode for Wallaroo Endpoints:
- None: Port forwarding or other methods are used for access.
- Internal: For environments where only nodes within the same Kubernetes environment and no external connections are required.
- External: Connections from outside the Kubernetes environment is allowed.
- Enable external URL inference endpoints: Creates pipeline inference endpoints. For more information, see Model Endpoints Guide.
- Ingress Mode for Wallaroo Endpoints:
- DNS
- DNS Suffix (Mandatory): The domain name for your Wallaroo instance.
- TLS Certificates
- Use custom TLS Certs: Checked
- TLS Certificate: Enter your TLS Certificate (.crt file).
- TLS Private Key: Enter your TLS private key (.key file).
- Other settings as desired.
- Networking Configuration
Once complete, scroll to the bottom of the Config page and select Save config.
A pop-up window will display The config for Wallaroo Enterprise has been updated.. Select Go to updated version to continue.
From the Version History page, select Deploy. Once the new deployment is finished, you will be able to access your Wallaroo services via their DNS addresses.
To verify the configuration is complete, access the Wallaroo Dashboard through the suffix domain. For example if the suffix domain is wallaroo.example.com then access https://wallaroo.example.com in a browser and verify the connection and certificates.
Setup Users
User management is handled through the Wallaroo instance Keycloak service. See the Wallaroo User Management for full guides on setting up users, identity providers, and other user configuration options. This step must be completed before using Wallaroo.
The following is an abbreviated guide on setting up new Wallaroo users.
IMPORTANT NOTE
At least one user must be created before using Wallaroo.
Accessing The Wallaroo Keycloak Dashboard
Enterprise customers may access their Wallaroo Keycloak dashboard by navigating to https://keycloak.<suffix>, depending on their choice domain suffix supplied during installation.
Obtaining Administrator Credentials
The standard Wallaroo installation creates the user admin by default and assigns them a randomly generated password. The admin user credentials are obtained which may be obtained directly from Kubernetes with the following commands, assuming the Wallaroo instance namespace is wallaroo.
Retrieve Keycloak Admin Username
kubectl -n wallaroo \
get secret keycloak-admin-secret \
-o go-template='{{.data.KEYCLOAK_ADMIN_USER | base64decode }}'
Retrieve Keycloak Admin Password
kubectl -n wallaroo \
get secret keycloak-admin-secret \
-o go-template='{{.data.KEYCLOAK_ADMIN_PASSWORD | base64decode }}'
Accessing the User Management Panel
In the Keycloak Administration Console, click Manage -> Users in the left-hand side menu. Click the View all users button to see existing users. This will be under the host name keycloak.$WALLAROO_SUFFIX. For example, if the $WALLAROO_SUFFIX is wallaroo.example.com, the Keycloak Administration Console would be keycloak.wallaroo.example.com.
Adding Users
To add a user through the Keycloak interface:
Click the Add user button in the top-right corner.
Enter the following:
- A unique username and email address.
- Ensure that the Email Verified checkbox is checked - Wallaroo does not perform email verification.
- Under Required User Actions, set Update Password so the user will update their password the next time they log in.
Click Save.
Once saved, select Credentials tab, then the Set Password section, enter the new user’s desired initial password in the Password and Password Confirmation fields.
Click Set Password. Confirm the action when prompted. This will force the user to set their own password when they log in to Wallaroo.
To log into the Wallaroo dashboard, log out as the Admin user and login to the Wallaroo Dashboard as a preconfigured user or via SSO.
1.3 - Wallaroo Enterprise Comprehensive Install Guide: Google Cloud Platform Kubernetes Engine
Uninstall Guides
The following is a short version of the uninstall procedure to remove a previously installed version of Wallaroo. For full details, see the How to Uninstall Wallaroo. These instructions assume administrative use of the Kubernetes command kubectl.
To uninstall a previously installed Wallaroo instance:
Delete any Wallaroo pipelines still deployed with the command
kubectl delete namespace {namespace}. Typically these are the pipeline name with some numerical ID. For example, in the following list of namespaces the namespaceccfraud-pipeline-21correspond to the Wallaroo pipelineccfraud-pipeline. Verify these are Wallaroo pipelines before deleting.-> kubectl get namespaces NAME STATUS AGE default Active 7d4h kube-node-lease Active 7d4h kube-public Active 7d4h ccfraud-pipeline-21 Active 4h23m wallaroo Active 3d6h -> kubectl delete namespaces ccfraud-pipeline-21Use the following bash script or run the commands individually. Warning: If the selector is incorrect or missing from the kubectl command, the cluster could be damaged beyond repair. For a default installation, the selector and namespace will be
wallaroo.#!/bin/bash kubectl delete ns wallaroo && \ kubectl delete all,secret,configmap,clusterroles,clusterrolebindings,storageclass,crd \ --selector app.kubernetes.io/part-of=wallaroo --selector kots.io/app-slug=wallaroo
Wallaroo can now be reinstalled into this environment.
GCP Kubernetes Engine Instructions
The following instructions are made to assist users set up their Google Cloud Platform (GCP) Kubernetes environment for running Wallaroo. These represent a recommended setup, but can be modified to fit your specific needs. In particular, these instructions will provision a GKE cluster with 56 CPUs in total. Please ensure that your project’s resource limits support that.
Quick Setup Script: Download a bash script to automatically set up the GCP environment through the Google Cloud Platform command line interface
gcloud.Manual Setup Guide: A list of the
gcloudcommands used to create the environment through manual commands.
Organizations that wish to run Wallaroo in their Google Cloud Platform environment must complete the following prerequisites:
- Register a Google Cloud Account: https://cloud.google.com/
- Create a Google Cloud project: https://cloud.google.com/resource-manager/docs/creating-managing-projects
- Install
gcloudand rungcloud initorgcloud init–console on the local system used to set up your environment: https://cloud.google.com/sdk/docs/install - Enable the Google Compute Engine(GCE): https://cloud.google.com/endpoints/docs/openapi/enable-api
- Enable the Google Kubernetes Engine(GKE) on your project: https://console.cloud.google.com/apis/enableflow?apiid=container.googleapis.com
- Select a default Computer Engine region and zone: https://cloud.google.com/compute/docs/regions-zones.
- IMPORTANT NOTE
- Organizations that intend to stop and restart their Kubernetes environment on an intentional or regular basis are recommended to use a single availability zone for their nodes. This minimizes issues such as persistent volumes in different availability zones, etc.
- Organizations that intend to use Wallaroo Enterprise in a high availability cluster are encouraged to follow best practices including using separate availability zones for redundancy, etc.
Standard Setup Variables
The following variables are used in the Quick Setup Script and the Manual Setup Guide. Modify them as best fits your organization.
| Variable Name | Default Value | Description |
|---|---|---|
| WALLAROO_GCP_PROJECT | wallaroo | The name of the Google Project used for the Wallaroo instance. |
| WALLAROO_CLUSTER | wallaroo | The name of the Kubernetes cluster for the Wallaroo instance. |
| WALLAROO_GCP_REGION | us-central1 | The region the Kubernetes environment is installed to. Update this to your GCP Computer Engine region. |
| WALLAROO_NODE_LOCATION | us-central1-f | The location the Kubernetes nodes are installed to. Update this to your GCP Compute Engine Zone. |
| WALLAROO_GCP_NETWORK_NAME | wallaroo-network | The Google network used with the Kubernetes environment. |
| WALLAROO_GCP_SUBNETWORK_NAME | wallaroo-subnet-1 | The Google network subnet used with the Kubernets environment. |
| DEFAULT_VM_SIZE | e2-standard-8 | The VM type used for the default nodepool. |
| POSTGRES_VM_SIZE | n2-standard-8 | The VM type used for the postgres nodepool. |
| ENGINELB_VM_SIZE | c2-standard-8 | The VM type used for the engine-lb nodepool. |
| ENGINE_VM_SIZE | c2-standard-8 | The VM type used for the engine nodepool. |
Quick Setup Script
A sample script is available here, and creates a Google Kubernetes Engine cluster ready for use with Wallaroo Enterprise. This script requires the prerequisites listed above and uses the variables as listed in Standard Setup Variables
The following script is available for download: wallaroo_enterprise_gcp_expandable.bash
The following steps are geared towards a standard Linux or macOS system that supports the prerequisites listed above. Modify these steps based on your local environment.
- Download the script above.
- In a terminal window set the script status as
executewith the commandchmod +x bash wallaroo_enterprise_gcp_expandable.bash. - Modify the script variables listed above based on your requirements.
- Run the script with either
bash wallaroo_enterprise_gcp_expandable.bashor./wallaroo_enterprise_gcp_expandable.bashfrom the same directory as the script.
Set Variables
The following are the variables used in the environment setup process. Modify them as best fits your organization’s needs.
WALLAROO_GCP_PROJECT=wallaroo
WALLAROO_CLUSTER=wallaroo
WALLAROO_GCP_REGION=us-central1
WALLAROO_NODE_LOCATION=us-central1-f
WALLAROO_GCP_NETWORK_NAME=wallaroo-network
WALLAROO_GCP_SUBNETWORK_NAME=wallaroo-subnet-1
DEFAULT_VM_SIZE=n2-standard-8
POSTGRES_VM_SIZE=n2-standard-8
ENGINELB_VM_SIZE=c2-standard-8
ENGINE_VM_SIZE=c2-standard-8
Manual Setup Guide
The following steps are guidelines to assist new users in setting up their GCP environment for Wallaroo. The variables used in the commands are as listed in Standard Setup Variables listed above. Feel free to replace these with ones that match your needs.
See the Google Cloud SDK for full details on commands and settings.
Create a GCP Network
First create a GCP network that is used to connect to the cluster with the gcloud compute networks create command. For more information, see the gcloud compute networks create page.
gcloud compute networks \
create $WALLAROO_GCP_NETWORK_NAME \
--bgp-routing-mode regional \
--subnet-mode custom
Verify it’s creation by listing the GCP networks:
gcloud compute networks list
Create the GCP Wallaroo Cluster
Once the network is created, the gcloud container clusters create command is used to create a cluster. For more information see the gcloud container clusters create page.
The following is a recommended format, replacing the {} listed variables based on your setup. For Google GKE containerd is enabled by default.
gcloud container clusters \
create $WALLAROO_CLUSTER \
--region $WALLAROO_GCP_REGION \
--node-locations $WALLAROO_NODE_LOCATION \
--machine-type $DEFAULT_VM_SIZE \
--network $WALLAROO_GCP_NETWORK_NAME \
--create-subnetwork name=$WALLAROO_GCP_SUBNETWORK_NAME \
--enable-ip-alias \
--cluster-version=1.23
The command can take several minutes to complete based on the size and complexity of the clusters. Verify the process is complete with the clusters list command:
gcloud container clusters list
Wallaroo Enterprise Nodepools
The following static nodepools can be set based on your organizations requirements. Adjust the settings or names based on your requirements.
gcloud container node-pools create postgres \
--cluster=$WALLAROO_CLUSTER \
--machine-type=$POSTGRES_VM_SIZE \
--num-nodes=1 \
--region $WALLAROO_GCP_REGION \
--node-taints wallaroo.ai/postgres=true:NoSchedule
The following autoscaling nodepools are used for the engine load balancers and Wallaroo engine. Again, replace names and virtual machine types based on your organizations requirements.
gcloud container node-pools create engine-lb \
--cluster=$WALLAROO_CLUSTER \
--machine-type=$ENGINELB_VM_SIZE \
--enable-autoscaling \
--num-nodes=1 \
--min-nodes=0 \
--max-nodes=3 \
--region $WALLAROO_GCP_REGION \
--node-taints wallaroo-engine-lb=true:NoSchedule,wallaroo.ai/enginelb=true:NoSchedule \
--node-labels wallaroo-node-type=engine-lb
gcloud container node-pools create engine \
--cluster=$WALLAROO_CLUSTER \
--machine-type=$ENGINE_VM_SIZE \
--enable-autoscaling \
--num-nodes=1 \
--min-nodes=0 \
--max-nodes=3 \
--region $WALLAROO_GCP_REGION \
--node-taints wallaroo.ai/engine=true:NoSchedule \
--node-labels=wallaroo-node-type=engine
Retrieving Kubernetes Credentials
Once the GCP cluster is complete, the Kubernetes credentials can be installed into the local administrative system with the gcloud container clusters get-credentials command:
gcloud container clusters \
get-credentials $WALLAROO_CLUSTER \
--region $WALLAROO_GCP_REGION
To verify the Kubernetes credentials for your cluster have been installed locally, use the kubectl get nodes command. This will display the nodes in the cluster as demonstrated below:
kubectl get nodes
NAME                                         STATUS   ROLES    AGE   VERSION
gke-wallaroo-default-pool-863f02db-7xd4   Ready    <none>   39m   v1.21.6-gke.1503
gke-wallaroo-default-pool-863f02db-8j2d   Ready    <none>   39m   v1.21.6-gke.1503
gke-wallaroo-default-pool-863f02db-hn06   Ready    <none>   39m   v1.21.6-gke.1503
gke-wallaroo-engine-3946eaca-4l3s         Ready    <none>   89s   v1.21.6-gke.1503
gke-wallaroo-engine-lb-2e33a27f-64wb      Ready    <none>   26m   v1.21.6-gke.1503
gke-wallaroo-postgres-d22d73d3-5qp5       Ready    <none>   28m   v1.21.6-gke.1503
Troubleshooting
- What does the error
Insufficient project quota to satisfy request: resource "CPUS_ALL_REGIONS"mean?- Make sure that the Compute Engine Zone and Region are properly set based on your organization’s requirements. The instructions above default to
us-central1, so change that zone to install your Wallaroo instance in the correct location.
- Make sure that the Compute Engine Zone and Region are properly set based on your organization’s requirements. The instructions above default to
Install Wallaroo
Organizations that use cloud services such as Google Cloud Platform (GCP), Amazon Web Services (AWS), or Microsoft Azure can install Wallaroo Enterprise through the following process. These instructions also work with Single Node Linux based installations.
Before installation, the following prerequisites must be met:
- Have a Wallaroo Enterprise license file. For more information, you can request a demonstration.
- Set up a cloud Kubernetes environment that meets the requirements. Clusters must meet the following minimum specifications:
- Minimum number of nodes: 4
- Minimum Number of CPU Cores: 8
- Minimum RAM: 16 GB
- A total of 625 GB of storage will be allocated for the entire cluster based on 5 users with up to four pipelines with five steps per pipeline, with 50 GB allocated per node, including 50 GB specifically for the Jupyter Hub service. Enterprise users who deploy additional pipelines will require an additional 50 GB of storage per lab node deployed.
- Runtime: containerd is required.
- DNS services for integrating your Wallaroo Enterprise instance. See the DNS Integration Guide for the instructions on configuring Wallaroo Enterprise with your DNS services.
IMPORTANT NOTE
Wallaroo requires out-bound network connections to download the required container images and other tasks. For situations that require limiting out-bound access, refer to the air-gap installation instructions or contact your Wallaroo support representative.Wallaroo Enterprise can be installed either interactively or automatically through the kubectl and kots applications.
Automated Install
To automatically install Wallaroo into the namespace wallaroo, specify the administrative password and the license file during the installation as in the following format with the following variables:
NAMESPACE: The namespace for the Wallaroo Enterprise install, typicallywallaroo.LICENSEFILE: The location of the Wallaroo Enterprise license file.SHAREDPASSWORD: The password of for the Wallaroo Administrative Dashboard.
kubectl kots install wallaroo/ee -n $NAMESPACE --license-file $LICENSEFILE --shared-password $SHAREDPASSWORD
For example, the following settings translate to the following install command:
NAMESPACE:wallaroo.LICENSEFILE:myWallaroolicense.yamlSHAREDPASSWORD:snugglebunnies
kubectl kots install wallaroo/ee -n wallaroo --license-file myWallaroolicense.yaml --shared-password wallaroo
Interactive Install
The Interactive Install process allows users to adjust the configuration settings before Wallaroo is deployed. It requires users be able to access the Wallaroo Administrative Dashboard through a browser, typically on port 8080.
IMPORTANT NOTE: Users who install Wallaroo through another node such as in the single node installation can port use SSH tunneling to access the Wallaroo Administrative Dashboard. For example:
ssh IP -L8800:localhost:8800
Install the Wallaroo Enterprise Edition using
kots install wallaroo/ee, specifying the namespace to install Wallaroo into. For example, ifwallaroois the namespace, then the command is:kubectl kots install wallaroo/ee --namespace wallarooWallaroo Enterprise Edition will be downloaded and installed into your Kubernetes environment in the namespace specified. When prompted, set the default password for the Wallaroo environment. When complete, Wallaroo Enterprise Edition will display the URL for the Admin Console, and how to end the Admin Console from running.
• Deploying Admin Console
• Creating namespace ✓
• Waiting for datastore to be ready ✓
    Enter a new password to be used for the Admin Console: •••••••••••••
  • Waiting for Admin Console to be ready ✓

• Press Ctrl+C to exit
• Go to http://localhost:8800 to access the Admin Console
To relaunch the Wallaroo Administrative Dashboard and make changes or updates, use the following command:
kubectl-kots admin-console --namespace wallaroo
Configure Wallaroo
Once installed, Wallaroo will continue to run until terminated.
Change Wallaroo Administrative Dashboard Password
To change the password to the Wallaroo Administrative Dashboard:
From the command line, use the command:
kubectl kots reset-password -n {namespace}For example, for default installations where the Kubernetes namespace is
wallaroo, the command would be:kubectl kots reset-password -n wallarooFrom here, enter the new password.
From the Wallaroo Administrative Dashboard:
Login and authenticate with the current password.
From the upper right hand corner, select … to access the menu and select Change password.
Enter the current password, then update and verify with the new password.
Setup DNS Services
Wallaroo Enterprise requires integration into your organizations DNS services.
The DNS Integration Guide details adding the Wallaroo instance to an organizations DNS services. The following is an abbreviated guide that assumes that certificates were already generated.
From the Wallaroo Dashboard, select Config and set the following:
- Networking Configuration
- Ingress Mode for Wallaroo Endpoints:
- None: Port forwarding or other methods are used for access.
- Internal: For environments where only nodes within the same Kubernetes environment and no external connections are required.
- External: Connections from outside the Kubernetes environment is allowed.
- Enable external URL inference endpoints: Creates pipeline inference endpoints. For more information, see Model Endpoints Guide.
- Ingress Mode for Wallaroo Endpoints:
- DNS
- DNS Suffix (Mandatory): The domain name for your Wallaroo instance.
- TLS Certificates
- Use custom TLS Certs: Checked
- TLS Certificate: Enter your TLS Certificate (.crt file).
- TLS Private Key: Enter your TLS private key (.key file).
- Other settings as desired.
- Networking Configuration
Once complete, scroll to the bottom of the Config page and select Save config.
A pop-up window will display The config for Wallaroo Enterprise has been updated.. Select Go to updated version to continue.
From the Version History page, select Deploy. Once the new deployment is finished, you will be able to access your Wallaroo services via their DNS addresses.
To verify the configuration is complete, access the Wallaroo Dashboard through the suffix domain. For example if the suffix domain is wallaroo.example.com then access https://wallaroo.example.com in a browser and verify the connection and certificates.
Setup Users
User management is handled through the Wallaroo instance Keycloak service. See the Wallaroo User Management for full guides on setting up users, identity providers, and other user configuration options. This step must be completed before using Wallaroo.
The following is an abbreviated guide on setting up new Wallaroo users.
IMPORTANT NOTE
At least one user must be created before using Wallaroo.
Accessing The Wallaroo Keycloak Dashboard
Enterprise customers may access their Wallaroo Keycloak dashboard by navigating to https://keycloak.<suffix>, depending on their choice domain suffix supplied during installation.
Obtaining Administrator Credentials
The standard Wallaroo installation creates the user admin by default and assigns them a randomly generated password. The admin user credentials are obtained which may be obtained directly from Kubernetes with the following commands, assuming the Wallaroo instance namespace is wallaroo.
Retrieve Keycloak Admin Username
kubectl -n wallaroo \
get secret keycloak-admin-secret \
-o go-template='{{.data.KEYCLOAK_ADMIN_USER | base64decode }}'
Retrieve Keycloak Admin Password
kubectl -n wallaroo \
get secret keycloak-admin-secret \
-o go-template='{{.data.KEYCLOAK_ADMIN_PASSWORD | base64decode }}'
Accessing the User Management Panel
In the Keycloak Administration Console, click Manage -> Users in the left-hand side menu. Click the View all users button to see existing users. This will be under the host name keycloak.$WALLAROO_SUFFIX. For example, if the $WALLAROO_SUFFIX is wallaroo.example.com, the Keycloak Administration Console would be keycloak.wallaroo.example.com.
Adding Users
To add a user through the Keycloak interface:
Click the Add user button in the top-right corner.
Enter the following:
- A unique username and email address.
- Ensure that the Email Verified checkbox is checked - Wallaroo does not perform email verification.
- Under Required User Actions, set Update Password so the user will update their password the next time they log in.
Click Save.
Once saved, select Credentials tab, then the Set Password section, enter the new user’s desired initial password in the Password and Password Confirmation fields.
Click Set Password. Confirm the action when prompted. This will force the user to set their own password when they log in to Wallaroo.
To log into the Wallaroo dashboard, log out as the Admin user and login to the Wallaroo Dashboard as a preconfigured user or via SSO.
1.4 - Wallaroo Enterprise Comprehensive Install Guide: Single Node Linux
Single Node Linux
Organizations can run Wallaroo within a single node Linux environment that meet the prerequisites.
The following guide is based on installing Wallaroo Enterprise into virtual machines based on Ubuntu 22.04.
For other environments and configurations, consult your Wallaroo support representative.
- Prerequisites
Before starting the bare Linux installation, the following conditions must be met:
Have a Wallaroo Enterprise license file. For more information, you can request a demonstration.
A Linux bare-metal system or virtual machine with at least 32 cores and 64 GB RAM with Ubuntu 20.04 installed.
- See the Install Wallaroo with Minimum Services for installing Wallaroo with reduced services.
650 GB allocated for the root partition, plus 50 GB allocated per node and another 50 GB for the JupyterHub service. Enterprise users who deploy additional pipelines will require an additional 50 GB of storage per lab node deployed.
Ensure memory swapping is disabled by removing it from
/etc/fstabif needed.DNS services for integrating your Wallaroo Enterprise instance. See the DNS Integration Guide for the instructions on configuring Wallaroo Enterprise with your DNS services.
IMPORTANT NOTE
- Wallaroo requires out-bound network connections to download the required container images and other tasks. For situations that require limiting out-bound access, refer to the air-gap installation instructions or contact your Wallaroo support representative. Also note that if Wallaroo is being installed into a cloud environment such as Google Cloud Platform, Microsoft Azure, Amazon Web Services, etc, then additional considerations such as networking, DNS, certificates, and other considerations must be accounted for. For IP address restricted environments, see the Air Gap Installation Guide.
- The steps below are based on minimum requirements for install Wallaroo in a single node environment.
- For situations that require limiting external IP access or other questions, refer to your Wallaroo support representative.
Template Single Node Scripts
The following template scripts are provided as examples on how to create single node virtual machines that meet the requirements listed above in AWS, GCP, and Microsoft Azure environments.
AWS VM Template Script
Dependencies
- AWS CLI
- IAM permissions to create resources. See IAM policies for Amazon EC2.
Download template script here: aws-single-node-vm.bash
# Variables

# The name of the virtual machine
NAME=$USER-demo-vm                     # eg bob-demo-vm

# The image used : ubuntu/images/2023.4.1/hvm-ssd/ubuntu-jammy-22.04-amd64-server-20230208
IMAGE_ID=ami-0557a15b87f6559cf

# Instance type meeting the Wallaroo requirements.
INSTANCE_TYPE=c6i.8xlarge # c6a.8xlarge is also acceptable

# key name - generate keys using Amazon EC2 Key Pairs
# https://docs.aws.amazon.com/AWSEC2/latest/UserGuide/ec2-key-pairs.html
# Wallaroo people: https://us-east-1.console.aws.amazon.com/ec2/home?region=us-east-1#KeyPairs:v=3 -
MYKEY=DocNode


# We will whitelist the our source IP for maximum security -- just use 0.0.0.0/0 if you don't care.
MY_IP=$(curl -s https://checkip.amazonaws.com)/32

# Create security group in the Default VPC
aws ec2 create-security-group --group-name $NAME --description "$USER demo" --no-cli-pager

# Open port 22 and 443
aws ec2 authorize-security-group-ingress --group-name $NAME --protocol tcp --port 22 --cidr $MY_IP --no-cli-pager
aws ec2 authorize-security-group-ingress --group-name $NAME --protocol tcp --port 443 --cidr $MY_IP --no-cli-pager

# increase Boot device size to 650 GB
# Change the location from `/tmp/device.json` as required.
# cat <<EOF > /tmp/device.json
# [{
#   "DeviceName": "/dev/sda1",
#   "Ebs": {
#     "VolumeSize": 650,
#     "VolumeType": "gp2"
#   }
# }]
# EOF

# Launch instance with a 650 GB Boot device.
aws ec2 run-instances --image-id $IMAGE_ID --count 1 --instance-type $INSTANCE_TYPE \
    --no-cli-pager \
    --key-name $MYKEY \
    --block-device-mappings '[{"DeviceName":"/dev/sda1","Ebs":{"VolumeSize":650,"VolumeType":"gp2"}}]'  \
    --tag-specifications "ResourceType=instance,Tags=[{Key=Name,Value=$NAME}]" \
    --security-groups $NAME

# Sample output:
# {
#     "Instances": [
#         {
#             ...
#             "InstanceId": "i-0123456789abcdef",     # Keep this instance-id for later
#             ...
#         }
#     ]
# }

#INSTANCEID=YOURINSTANCE

# After several minutes, a public IP will be known. This command will retrieve it.
# aws ec2 describe-instances  --output text --instance-id $INSTANCEID \
#    --query 'Reservations[*].Instances[*].{ip:PublicIpAddress}'

# Sample Output
# 12.23.34.56

# KEYFILE=KEYFILELOCATION       #usually ~/.ssh/key.pem - verify this is the same as the key above.
# SSH to the VM - replace $INSTANCEIP
#ssh -i $KEYFILE ubuntu@$INSTANCEIP

# Stop the VM - replace the $INSTANCEID
#aws ec2 stop-instances --instance-id $INSTANCEID

# Restart the VM
#aws ec2 start-instances --instance-id $INSTANCEID

# Clean up - destroy VM
#aws ec2 terminate-instances --instance-id $INSTANCEID
Azure VM Template Script
Dependencies
Download template script here: azure-single-node-vm.bash
#!/bin/bash

# Variables list.  Update as per your organization's settings
NAME=$USER-demo-vm                          # eg bob-demo-vm
RESOURCEGROUP=YOURRESOURCEGROUP
LOCATION=eastus
IMAGE=Canonical:0001-com-ubuntu-server-jammy:22_04-lts:22.04.202301140

# Pick a location
az account list-locations  -o table |egrep 'US|----|Name'

# Create resource group
az group create -l $LOCATION --name $USER-demo-$(date +%y%m%d)

# Create VM. This will create ~/.ssh/id_rsa and id_rsa.pub - store these for later use.
az vm create --resource-group $RESOURCEGROUP --name $NAME --image $IMAGE  --generate-ssh-keys \
   --size Standard_D32s_v4 --os-disk-size-gb 500 --public-ip-sku Standard

# Sample output
# {
#   "location": "eastus",
#   "privateIpAddress": "10.0.0.4",
#   "publicIpAddress": "20.127.249.196",    <-- Write this down as MYPUBIP
#   "resourceGroup": "mnp-demo-230213",
#   ...
# }

# SSH port is open by default. This adds an application port.
az vm open-port --resource-group $RESOURCEGROUP --name $NAME --port 443

# SSH to the VM - assumes that ~/.ssh/id_rsa and ~/.ssh/id_rsa.pub from above are availble.
# ssh $MYPUBIP

# Use this Stop the VM ("deallocate" frees resources and billing; "stop" does not)
# az vm deallocate --resource-group $RESOURCEGROUP --name $NAME

# Restart the VM
# az vm start --resource-group $RESOURCEGROUP --name $NAME- GCP VM Template Script
Dependencies:
- Gcloud CLI
- GCP Project ID
Download template script here: gcp-single-node-vm.bash
# Settings

NAME=$USER-demo-$(date +%y%m%d)      # eg bob-demo-230210
ZONE=us-west1-a                      # For a complete list, use `gcloud compute zones list | egrep ^us-`
PROJECT=wallaroo-dev-253816          # Insert the GCP Project ID here.  This is the one for Wallaroo.

# Create VM

IMAGE=projects/ubuntu-os-cloud/global/images/ubuntu-2204-jammy-v20231030

# Port 22 and 443 open by default
gcloud compute instances create $NAME \
    --project=$PROJECT \
    --zone=$ZONE \
    --machine-type=e2-standard-32 \
    --network-interface=network-tier=STANDARD,subnet=default \
    --maintenance-policy=MIGRATE \
    --provisioning-model=STANDARD \
    --no-service-account \
    --no-scopes \
    --tags=https-server \
    --create-disk=boot=yes,image=${IMAGE},size=500,type=pd-standard \
    --no-shielded-secure-boot \
    --no-shielded-vtpm \
    --no-shielded-integrity-monitoring \
    --reservation-affinity=any


# Get the external IP address
gcloud compute instances describe $NAME --zone $ZONE --format='get(networkInterfaces[0].accessConfigs[0].natIP)'

# SSH to the VM
#gcloud compute ssh $NAME --zone $ZONE

# SCP file to the instance - replace $FILE with the file path.  Useful for copying up the license file up to the instance.

#gcloud compute scp --zone $ZONE $FILE $NAME:~/

# SSH port forward to the VM
#gcloud compute ssh $NAME --zone $ZONE -- -NL 8800:localhost:8800

# Suspend the VM
#gcloud compute instances stop $NAME --zone $ZONE

# Restart the VM
#gcloud compute instances start $NAME --zone $ZONE
- Kubernetes Installation Steps
The following script and steps will install the Kubernetes version and requirements into the Linux node that supports a Wallaroo single node installation.
The process includes these major steps:
Install Kubernetes
Install Kots Version
Install Kubernetes
curl is installed in the default scripts provided above. Verify that it is installed if using some other platform.
Verify that the Ubuntu distribution is up to date, and reboot if necessary after updating.
sudo apt update
sudo apt upgrade
Start the Kubernetes installation with the following script, substituting the URL path as appropriate for your license.
For Wallaroo versions 2022.4 and below:
curl https://kurl.sh/9398a3a | sudo bashFor Wallaroo versions 2023.1 and later, the install is based on the license channel. For example, if your license uses the
EEchannel, then the path is/wallaroo-ee; that is,/wallaroo-plus the lower-case channel name. Note that the Kubernetes install channel must match the License version. Check with your Wallaroo support representative with any questions about your version.curl https://kurl.sh/wallaroo-ee | sudo bash- If prompted with
This application is incompatible with memory swapping enabled. Disable swap to continue? (Y/n), replyY.
- If prompted with
Set up the Kubernetes configuration with the following commands:
mkdir -p $HOME/.kube
sudo cp -i /etc/kubernetes/admin.conf $HOME/.kube/config
sudo chown $(id -u):$(id -g) $HOME/.kube/config
chmod u+w $HOME/.kube/config
echo 'export KUBECONFIG=$HOME/.kube/config' >> ~/.bashrc
Log out, and log back in as the same user. Verify the installation was successful with the following:
kubectl get nodesIt should return results similar to the following:
NAME     STATUS   ROLES                  AGE     VERSION
wallux   Ready    control-plane,master   6m26s   v1.23.6
- Install Kots
Install kots with the following process.
Run the following script and provide your password for the
sudobased commands when prompted.curl https://kots.io/install/1.103.3 | REPL_USE_SUDO=y bashVerify
kotswas installed with the following command:kubectl kots versionIt should return results similar to the following:
Replicated KOTS 1.103.3
For instructions on updating the kots version for the Wallaroo Ops installation, see Updating KOTS.
- Connection Options
Once Kubernetes has been set up on the Linux node, users can opt to copy the Kubernetes configuration to a local system, updating the IP address and other information as required. See the Configure Access to Multiple Clusters.
The easiest method is to create a SSH tunnel to the Linux node. Usually this will be in the format:
ssh $IP -L8800:localhost:8800
For example, in an AWS instance that may be as follows, replaying $KEYFILE with the link to the keyfile and $IP with the IP address of the Linux node.
ssh -i $KEYFILE ubuntu@$IP -L8800:localhost:8800
In a GCP instance, gcloud can be used as follows, replacing $NAME with the name of the GCP instance, $ZONE with the zone it was installed into.
gcloud compute ssh $NAME --zone $ZONE -- -NL 8800:localhost:8800
Port forwarding port 8800 is used for kots based installation to access the Wallaroo Administrative Dashboard.
- Network Configurations
Note that the standard procedure of installing Wallaroo, the Model Endpoints Guide details how to enable external public communications with the Wallaroo instance.
When Ingress Mode for Wallaroo interactive services are set to None, the user will have to use port forwarding services to access the Wallaroo instance.
When Ingress Mode for Wallaroo interactive services are set to Internal or External, the IP address is set via NodePort, and requires the following ports be open to access from remote locations:
- 80
- 443
- 8081
- 8083
Check the network settings for the single node linux hosting the Wallaroo instance for instructions on how to enable external or port forwarding access as required.
Install Wallaroo
Organizations that use cloud services such as Google Cloud Platform (GCP), Amazon Web Services (AWS), or Microsoft Azure can install Wallaroo Enterprise through the following process. These instructions also work with Single Node Linux based installations.
Before installation, the following prerequisites must be met:
- Have a Wallaroo Enterprise license file. For more information, you can request a demonstration.
- Set up a cloud Kubernetes environment that meets the requirements. Clusters must meet the following minimum specifications:
- Minimum number of nodes: 4
- Minimum Number of CPU Cores: 8
- Minimum RAM: 16 GB
- A total of 625 GB of storage will be allocated for the entire cluster based on 5 users with up to four pipelines with five steps per pipeline, with 50 GB allocated per node, including 50 GB specifically for the Jupyter Hub service. Enterprise users who deploy additional pipelines will require an additional 50 GB of storage per lab node deployed.
- Runtime: containerd is required.
- DNS services for integrating your Wallaroo Enterprise instance. See the DNS Integration Guide for the instructions on configuring Wallaroo Enterprise with your DNS services.
IMPORTANT NOTE
Wallaroo requires out-bound network connections to download the required container images and other tasks. For situations that require limiting out-bound access, refer to the air-gap installation instructions or contact your Wallaroo support representative.Wallaroo Enterprise can be installed either interactively or automatically through the kubectl and kots applications.
Automated Install
To automatically install Wallaroo into the namespace wallaroo, specify the administrative password and the license file during the installation as in the following format with the following variables:
NAMESPACE: The namespace for the Wallaroo Enterprise install, typicallywallaroo.LICENSEFILE: The location of the Wallaroo Enterprise license file.SHAREDPASSWORD: The password of for the Wallaroo Administrative Dashboard.
kubectl kots install wallaroo/ee -n $NAMESPACE --license-file $LICENSEFILE --shared-password $SHAREDPASSWORD
For example, the following settings translate to the following install command:
NAMESPACE:wallaroo.LICENSEFILE:myWallaroolicense.yamlSHAREDPASSWORD:snugglebunnies
kubectl kots install wallaroo/ee -n wallaroo --license-file myWallaroolicense.yaml --shared-password wallaroo
Interactive Install
The Interactive Install process allows users to adjust the configuration settings before Wallaroo is deployed. It requires users be able to access the Wallaroo Administrative Dashboard through a browser, typically on port 8080.
IMPORTANT NOTE: Users who install Wallaroo through another node such as in the single node installation can port use SSH tunneling to access the Wallaroo Administrative Dashboard. For example:
ssh IP -L8800:localhost:8800
Install the Wallaroo Enterprise Edition using
kots install wallaroo/ee, specifying the namespace to install Wallaroo into. For example, ifwallaroois the namespace, then the command is:kubectl kots install wallaroo/ee --namespace wallarooWallaroo Enterprise Edition will be downloaded and installed into your Kubernetes environment in the namespace specified. When prompted, set the default password for the Wallaroo environment. When complete, Wallaroo Enterprise Edition will display the URL for the Admin Console, and how to end the Admin Console from running.
• Deploying Admin Console
• Creating namespace ✓
• Waiting for datastore to be ready ✓
    Enter a new password to be used for the Admin Console: •••••••••••••
  • Waiting for Admin Console to be ready ✓

• Press Ctrl+C to exit
• Go to http://localhost:8800 to access the Admin Console
To relaunch the Wallaroo Administrative Dashboard and make changes or updates, use the following command:
kubectl-kots admin-console --namespace wallaroo
Configure Wallaroo
Once installed, Wallaroo will continue to run until terminated.
Change Wallaroo Administrative Dashboard Password
To change the password to the Wallaroo Administrative Dashboard:
From the command line, use the command:
kubectl kots reset-password -n {namespace}For example, for default installations where the Kubernetes namespace is
wallaroo, the command would be:kubectl kots reset-password -n wallarooFrom here, enter the new password.
From the Wallaroo Administrative Dashboard:
Login and authenticate with the current password.
From the upper right hand corner, select … to access the menu and select Change password.
Enter the current password, then update and verify with the new password.
Setup DNS Services
Wallaroo Enterprise requires integration into your organizations DNS services.
The DNS Integration Guide details adding the Wallaroo instance to an organizations DNS services. The following is an abbreviated guide that assumes that certificates were already generated.
From the Wallaroo Dashboard, select Config and set the following:
- Networking Configuration
- Ingress Mode for Wallaroo Endpoints:
- None: Port forwarding or other methods are used for access.
- Internal: For environments where only nodes within the same Kubernetes environment and no external connections are required.
- External: Connections from outside the Kubernetes environment is allowed.
- Enable external URL inference endpoints: Creates pipeline inference endpoints. For more information, see Model Endpoints Guide.
- Ingress Mode for Wallaroo Endpoints:
- DNS
- DNS Suffix (Mandatory): The domain name for your Wallaroo instance.
- TLS Certificates
- Use custom TLS Certs: Checked
- TLS Certificate: Enter your TLS Certificate (.crt file).
- TLS Private Key: Enter your TLS private key (.key file).
- Other settings as desired.
- Networking Configuration
Once complete, scroll to the bottom of the Config page and select Save config.
A pop-up window will display The config for Wallaroo Enterprise has been updated.. Select Go to updated version to continue.
From the Version History page, select Deploy. Once the new deployment is finished, you will be able to access your Wallaroo services via their DNS addresses.
To verify the configuration is complete, access the Wallaroo Dashboard through the suffix domain. For example if the suffix domain is wallaroo.example.com then access https://wallaroo.example.com in a browser and verify the connection and certificates.
Setup Users
User management is handled through the Wallaroo instance Keycloak service. See the Wallaroo User Management for full guides on setting up users, identity providers, and other user configuration options. This step must be completed before using Wallaroo.
The following is an abbreviated guide on setting up new Wallaroo users.
IMPORTANT NOTE
At least one user must be created before using Wallaroo.
Accessing The Wallaroo Keycloak Dashboard
Enterprise customers may access their Wallaroo Keycloak dashboard by navigating to https://keycloak.<suffix>, depending on their choice domain suffix supplied during installation.
Obtaining Administrator Credentials
The standard Wallaroo installation creates the user admin by default and assigns them a randomly generated password. The admin user credentials are obtained which may be obtained directly from Kubernetes with the following commands, assuming the Wallaroo instance namespace is wallaroo.
Retrieve Keycloak Admin Username
kubectl -n wallaroo \
get secret keycloak-admin-secret \
-o go-template='{{.data.KEYCLOAK_ADMIN_USER | base64decode }}'
Retrieve Keycloak Admin Password
kubectl -n wallaroo \
get secret keycloak-admin-secret \
-o go-template='{{.data.KEYCLOAK_ADMIN_PASSWORD | base64decode }}'
Accessing the User Management Panel
In the Keycloak Administration Console, click Manage -> Users in the left-hand side menu. Click the View all users button to see existing users. This will be under the host name keycloak.$WALLAROO_SUFFIX. For example, if the $WALLAROO_SUFFIX is wallaroo.example.com, the Keycloak Administration Console would be keycloak.wallaroo.example.com.
Adding Users
To add a user through the Keycloak interface:
Click the Add user button in the top-right corner.
Enter the following:
- A unique username and email address.
- Ensure that the Email Verified checkbox is checked - Wallaroo does not perform email verification.
- Under Required User Actions, set Update Password so the user will update their password the next time they log in.
Click Save.
Once saved, select Credentials tab, then the Set Password section, enter the new user’s desired initial password in the Password and Password Confirmation fields.
Click Set Password. Confirm the action when prompted. This will force the user to set their own password when they log in to Wallaroo.
To log into the Wallaroo dashboard, log out as the Admin user and login to the Wallaroo Dashboard as a preconfigured user or via SSO.
2 - Wallaroo Enterprise Simple Install Guide
The following guide is prepared for organizations that have an environment that meets the prerequisites for installing Wallaroo, and want to jump directly to the installation process.
For a complete guide that includes environment setup for different cloud providers, select the Wallaroo Enterprise Comprehensive Install Guide.
Some knowledge of the following will be useful in working with this guide:
Working knowledge of Linux distributions, particularly Ubuntu.
A cloud provider including Google Cloud Platform (GCP), Amazon Web Services (AWS), or Microsoft Azure experience.
Working knowledge of Kubernetes, mainly
kubectlandkotsorhelm.The following software or runtimes are required for Wallaroo 2023.4.1. Most are automatically available through the supported cloud providers.
| Software or Runtime | Description | Minimum Supported Version | Preferred Version(s) |
|---|---|---|---|
| Kubernetes | Cluster deployment management | 1.23 | 1.26 |
| containerd | Container Management | 1.7.0 | 1.7.0 |
| kubectl | Kubernetes administrative console application | 1.26 | 1.26 |
Install Wallaroo
Install the Wallaroo Enterprise Edition using
kots install wallaroo/ee, specifying the namespace to install Wallaroo into. For example, ifwallaroois the namespace, then the command is:kubectl kots install wallaroo/ee --namespace wallarooWallaroo Enterprise Edition will be downloaded and installed into your Kubernetes environment in the namespace specified. When prompted, set the default password for the Wallaroo environment. When complete, Wallaroo Enterprise Edition will display the URL for the Admin Console, and how to end the Admin Console from running.
• Deploying Admin Console
• Creating namespace ✓
• Waiting for datastore to be ready ✓
    Enter a new password to be used for the Admin Console: •••••••••••••
  • Waiting for Admin Console to be ready ✓

• Press Ctrl+C to exit
• Go to http://localhost:8800 to access the Admin Console
Configure Wallaroo
Once installed, Wallaroo will continue to run until terminated.
To relaunch the Wallaroo Administrative Dashboard and make changes or updates, use the following command:
kubectl-kots admin-console --namespace wallaroo
DNS Services
Wallaroo Enterprise requires integration into your organizations DNS services.
The DNS Integration Guide details adding the Wallaroo instance to an organizations DNS services.
User Management
User management is handled through the Wallaroo instance Keycloak service. See the Wallaroo User Management for full guides on setting up users, identity providers, and other user configuration options.
3 - Wallaroo Enterprise Air Gap Install Guide
Average Install Time
45 minutes depending on system performance and network connections.Organizations that require Wallaroo be installed into an “air gap” environment - where the Wallaroo instance does not connect to the public Internet - can use these instructions to install Wallaroo into an existing Kubernetes cluster.
This guide assumes knowledge of how to use Kubernetes and work with internal clusters. The following conditions must be completed before starting an air gap installation of Wallaroo:
- A Kubernetes cluster is installed and meets the prerequisites listed below.
- A private container registry is available to the cluster, along with push and read credentials for that registry. This service is required for the air gap installation process to have images pushed and pulled for the installation. For examples on setting up a private container registry service, see the Docker Documentation “Deploy a registry server”. See Example Registry Service Install for an example of installing an unsecure private registry for testing purposes. For more details on setting up a container registry in a cloud environment, see the related documentation for your preferred cloud provider:
- All commands will assume a method of connecting to the cluster remotely (VPN, etc).
If all prerequisites are met, skip directly to Install Instructions
General Time to Completion: 30 minutes.
Before installing Wallaroo version, verify that the following hardware and software requirements are met.
Environment Requirements
Environment Hardware Requirements
The following system requirements are required for the minimum settings for running Wallaroo in a Kubernetes cloud cluster.
- Minimum number of nodes: 4
- Minimum Number of CPU Cores: 8
- Minimum RAM per node: 16 GB
- Minimum Storage: A total of 625 GB of storage will be allocated for the entire cluster based on 5 users with up to four pipelines with five steps per pipeline, with 50 GB allocated per node, including 50 GB specifically for the Jupyter Hub service. Enterprise users who deploy additional pipelines will require an additional 50 GB of storage per lab node deployed.
Wallaroo recommends at least 16 cores total to enable all services. At less than 16 cores, services will have to be disabled to allow basic functionality as detailed in this table.
Note that even when disabling these services, Wallaroo performance may be impacted by the models, pipelines, and data used. The greater the size of the models and steps in a pipeline, the more resources will be required for Wallaroo to operate efficiently. Pipeline resources are set by the pipeline configuration to control how many resources are allocated from the cluster to maintain peak effectiveness for other Wallaroo services. See the following guides for more details.
- Wallaroo SDK Essentials Guide: Pipeline Deployment Configuration
- Wallaroo MLOps API Essentials Guide: Pipeline Management
| Cluster Size | 8 core | 16 core | 32 core | Description | |
| Inference | ✔ | ✔ | ✔ | The Wallaroo inference engine that performs inference requests from deployed pipelines. | |
| Dashboard | ✔ | ✔ | ✔ | The graphics user interface for configuring workspaces, deploying pipelines, tracking metrics, and other uses. | |
| Jupyter HUB/Lab | The JupyterHub service for running Python scripts, JupyterNotebooks, and other related tasks within the Wallaroo instance. | ||||
| Single Lab | ✔ | ✔ | ✔ | ||
| Multiple Labs | ✘ | ✔ | ✔ | ||
| Prometheus | ✔ | ✔ | ✔ | Used for collecting and reporting on metrics. Typical metrics are values such as CPU utilization and memory usage. | |
| Alerting | ✘ | ✔ | ✔ | ||
| Model Validation | ✘ | ✔ | ✔ | ||
| Dashboard Graphs | ✔ | ✔ | ✔ | ||
| Plateau | ✘ | ✔ | ✔ | A Wallaroo developed service for storing inference logs at high speed. This is not a long term service; organizations are encouraged to store logs in long term solutions if required. | |
| Model Insights | ✘ | ✔ | ✔ | ||
| Python API | |||||
| Model Conversion | ✔ | ✔ | ✔ | Converts models into a native runtime for use with the Wallaroo inference engine. |
To install Wallaroo with minimum services, a configuration file will be used as parts of the kots based installation. For full details on the Wallaroo installation process, see the Wallaroo Install Guides.
Enterprise Network Requirements
The following network requirements are required for the minimum settings for running Wallaroo:
For Wallaroo Enterprise users: 200 IP addresses are required to be allocated per cloud environment.
For Wallaroo Community users: 98 IP addresses are required to be allocated per cloud environment.
DNS services integration is required for Wallaroo Enterprise edition. See the DNS Integration Guide for the instructions on configuring Wallaroo Enterprise with your DNS services.
DNS services integration is required to provide access to the various supporting services that are part of the Wallaroo instance. These include:
- Simplified user authentication and management.
- Centralized services for accessing the Wallaroo Dashboard, Wallaroo SDK and Authentication.
- Collaboration features allowing teams to work together.
- Managed security, auditing and traceability.
Environment Software Requirements
The following software or runtimes are required for Wallaroo 2023.4.1. Most are automatically available through the supported cloud providers.
| Software or Runtime | Description | Minimum Supported Version | Preferred Version(s) |
|---|---|---|---|
| Kubernetes | Cluster deployment management | 1.23 | 1.26 |
| containerd | Container Management | 1.7.0 | 1.7.0 |
| kubectl | Kubernetes administrative console application | 1.26 | 1.26 |
Node Selectors
Wallaroo uses different nodes for various services, which can be assigned to a different node pool to contain resources separate from other nodes. The following nodes selectors can be configured:
- ML Engine node selector
- ML Engine Load Balance node selector
- Database Node Selector
- Grafana node selector
- Prometheus node selector
- Each Lab * Node Selector
Install Instructions
The installation is broken into the following major processes:
Download Assets
The Wallaroo delivery team the URL and password to your organization’s License and Air Gap Download page. The following links are provided:
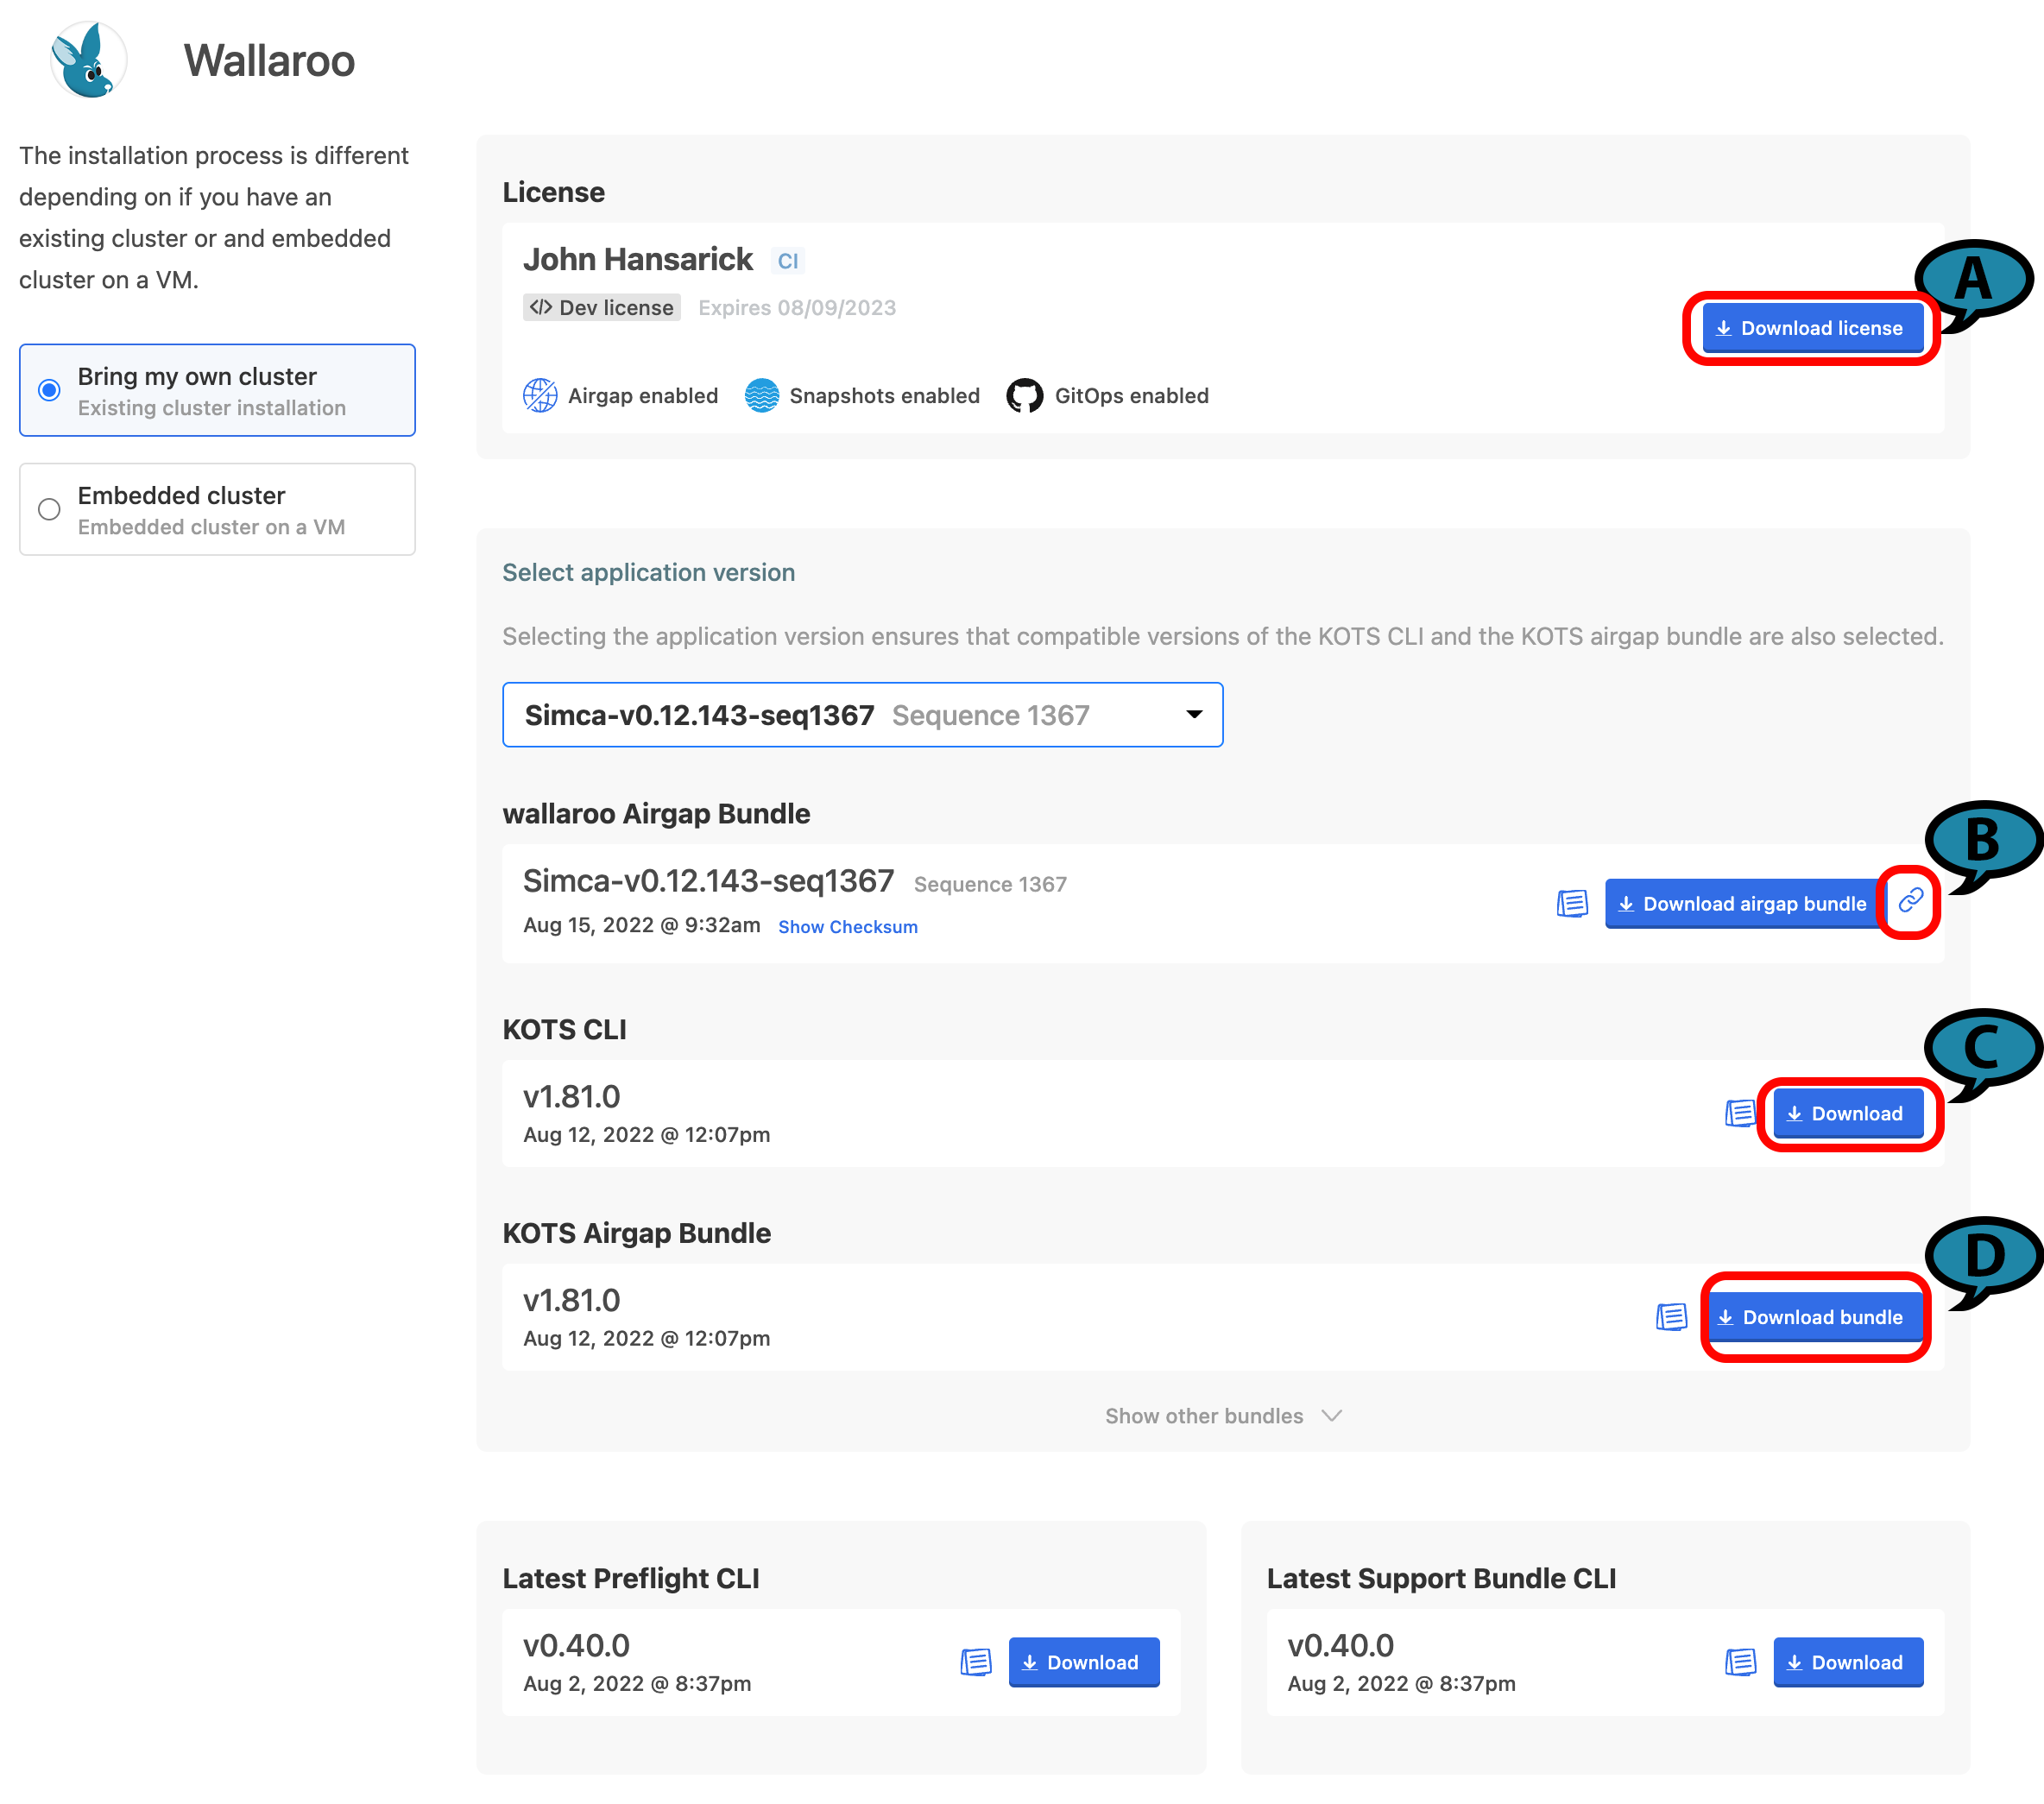
(A) Wallaroo Enterprise License File: The Wallaroo enterprise license file for this account. This is downloaded as a
yamlfile.(B) Wallaroo Airgap Installation File: The air gap installation file that includes the necessary containers for the Wallaroo installation. This is typically about 6 GB in size. By selecting the link icon, the Wallaroo Airgap Installation File URL will be copied to the clipboard that can be used for
curlor similar download commands. This file is typically downloaded aswallaroo.airgap.IMPORTANT NOTE
If the Wallaroo Air Gap Bundle link is not available, contact your Wallaroo support representative.(C) KOTS CLI: The installation files to install
kotsinto the node that manages the Kubernetes cluster. This file is typically downloaded askots_linux_amd64.tar.gz.(D) KOTS Airgap Bundle: A set of files required by the Kubernetes environment to install Wallaroo via the air gap method. This file is typically downloaded as
kotsadm.tar.gz.
Download these files either through the provided License and Airgap Download page, or by copying the links from the page and using the following command line commands into node performing the air gap installation with curl as follows:
Wallaroo Enterprise License File:
curl -LO {Link to Wallaroo Enterprise License File}Airgap Installation File. Note the use of the
-Looption to download the Wallaroo air gap file aswallaroo.airgap, and the use of the single quotes around the Wallaroo Air Gap Installation File URL.curl -Lo wallaroo.airgap '{Wallaroo Airgap Installation File URL}'KOTS CLI
curl -LO {Link to KOTS CLI}KOTS Airgap Bundle
curl -LO {Link to KOTS Airgap Bundle}
Place these files onto the air gap server or node that administrates the Kubernetes cluster. Once these files are on the node, the cluster can be air gapped and the required software installed through the next steps.
Install Kots
Install kots into the node managing the Kubernetes cluster with the following commands:
Extract the archive:
tar zxvf kots_linux_amd64.tar.gz kotsInstall
kotsto the/usr/local/bindirectory. Adjust this directory to match the location of thekubectlcommand.sudo mv kots /usr/local/bin/kubectl-kotsVerify the
kotsinstallation by checking the version. The result should be similar to the following:kubectl kots version Replicated KOTS 1.91.3
Install the Kots Admin Console
This step will Extract the KOTS Admin Console container images and push them into a private registry. Registry credentials provided in this step must have push access. These credentials will not be stored anywhere or reused later.
This requires the following:
- Private Registry Host: The URL of the private registry host used by the Kubernetes cluster.
- Private Registry Port: The port of the private registry used by the Kubernetes cluster (
5000by default). - KOTS Airgap Bundle (default:
kotsadm.tar.gz): Downloaded as part of Download Assets step. - Registry Push Username: The username with push access to the private registry.
- Registry Push Password: The password of the registry user with push access to the private registry.
This command takes the following format:
kubectl kots admin-console push-images {KOTS Airgap Bundle} \
    {Private Registry Host}:{Private Registry Port} \
    --registry-username {Registry Push Username} \
    --registry-password {Registry Push Password}
Adjust the command based on your organizations registry setup.
Install Wallaroo Airgap
This step will install the Wallaroo air gap file into the Kubernetes cluster through the Kots Admin images.
Registry credentials provided in this step only need to have read access, and they will be stored in a Kubernetes secret in the same namespace where Admin Console will be installed. These credentials will be used to pull the images, and will be automatically created as an imagePullSecret on all of the Admin Console pods.
This requires the following:
- Private Registry Host: The URL of the private registry host used by the Kubernetes cluster.
- Private Registry Port: The port of the private registry used by the Kubernetes cluster (
5000by default). - Wallaroo Namespace (default:
wallaroo): The kubernetes namespace used to install the Wallaroo isntance. - Wallaroo Airgap Installation File (default:
wallaroo.airgap): Downloaded as part of Download Assets step. - Wallaroo License File: Downloaded as part of Download Assets step.
- Registry Read Username: The username with read access to the private registry.
- Registry Read Password: The password of the registry user with read access to the private registry.
The command will take the following format. Note that the option --license-file {Wallaroo License File} is required. This will point to the license REQUIRED for an air gap installation.
kubectl kots install wallaroo/ea \
    --kotsadm-registry {Private Registry Host}:{Private Registry Port} \
    --registry-username {Registry Read Username} --registry-password {Registry Read Password} \
    --airgap-bundle {Wallaroo Airgap Installation File} \
    --namespace {Wallaroo Namespace} \
    --license-file {Wallaroo License File}
The following flags can be added to speed up the configuration process:
--shared-password {Wallaroo Admin Dashboard Password}: The password used to access the Wallaroo Admin Dashboard.--config-values config.yaml: Sets up the Wallaroo instance configuration based on the suppliedyamlfile.--no-port-forward: Does not forward port8800for use.--skip-preflights: Skip the standard preflight checks and launch the Wallaroo instance.
For example, the following will install Wallaroo Enterprise into the namespace wallaroo using the provided license file, using the shared password wallaroo and skipping the preflight checks:
kubectl kots install wallaroo/ea \
    --kotsadm-registry private.host:5000 \
    --registry-username xxx --registry-password yyy \
    --airgap-bundle wallaroo.airgap \
    --namespace wallaroo \
    --license-file license.yaml \
    --shared-password wallaroo \
    --skip-preflights
When complete, a link to the Wallaroo Admin Console will be made available unless the option --no-port-forward is selected.
  • Press Ctrl+C to exit
  • Go to http://localhost:8800 to access the Admin Console
Using Ctrl+C will disable the Wallaroo Admin Console, but the Wallaroo instance and services will continue to run in the cluster.
To reenable the Wallaroo Admin Console, use the following command:
kubectl-kots admin-console --namespace {Wallaroo Namespace}
Preflight Checks
Preflight checks will verify that the Wallaroo instance meets the prerequisites. If any fail, check your Kubernetes environment and verify they are in alignment.
Preflight checks will be skipped if Wallaroo was installed with the --skip-preflights option.
Wallaroo Admin Console
If no license file was provided through the command line, it can be provided through the Wallaroo Admin Console on port 8800. To access the Wallaroo Admin Console, some method of port forwarding through the jump box will have to be configured to the air gapped cluster.
Status Checks
While the installer allocates resources and deploys workloads, the status page will show as Missing or Unavailable. If it stays in this state for more than twenty minutes, proceed to troubleshooting or contact Wallaroo technical support.

Once the application has become ready, the status indication will turn green and ready Ready.
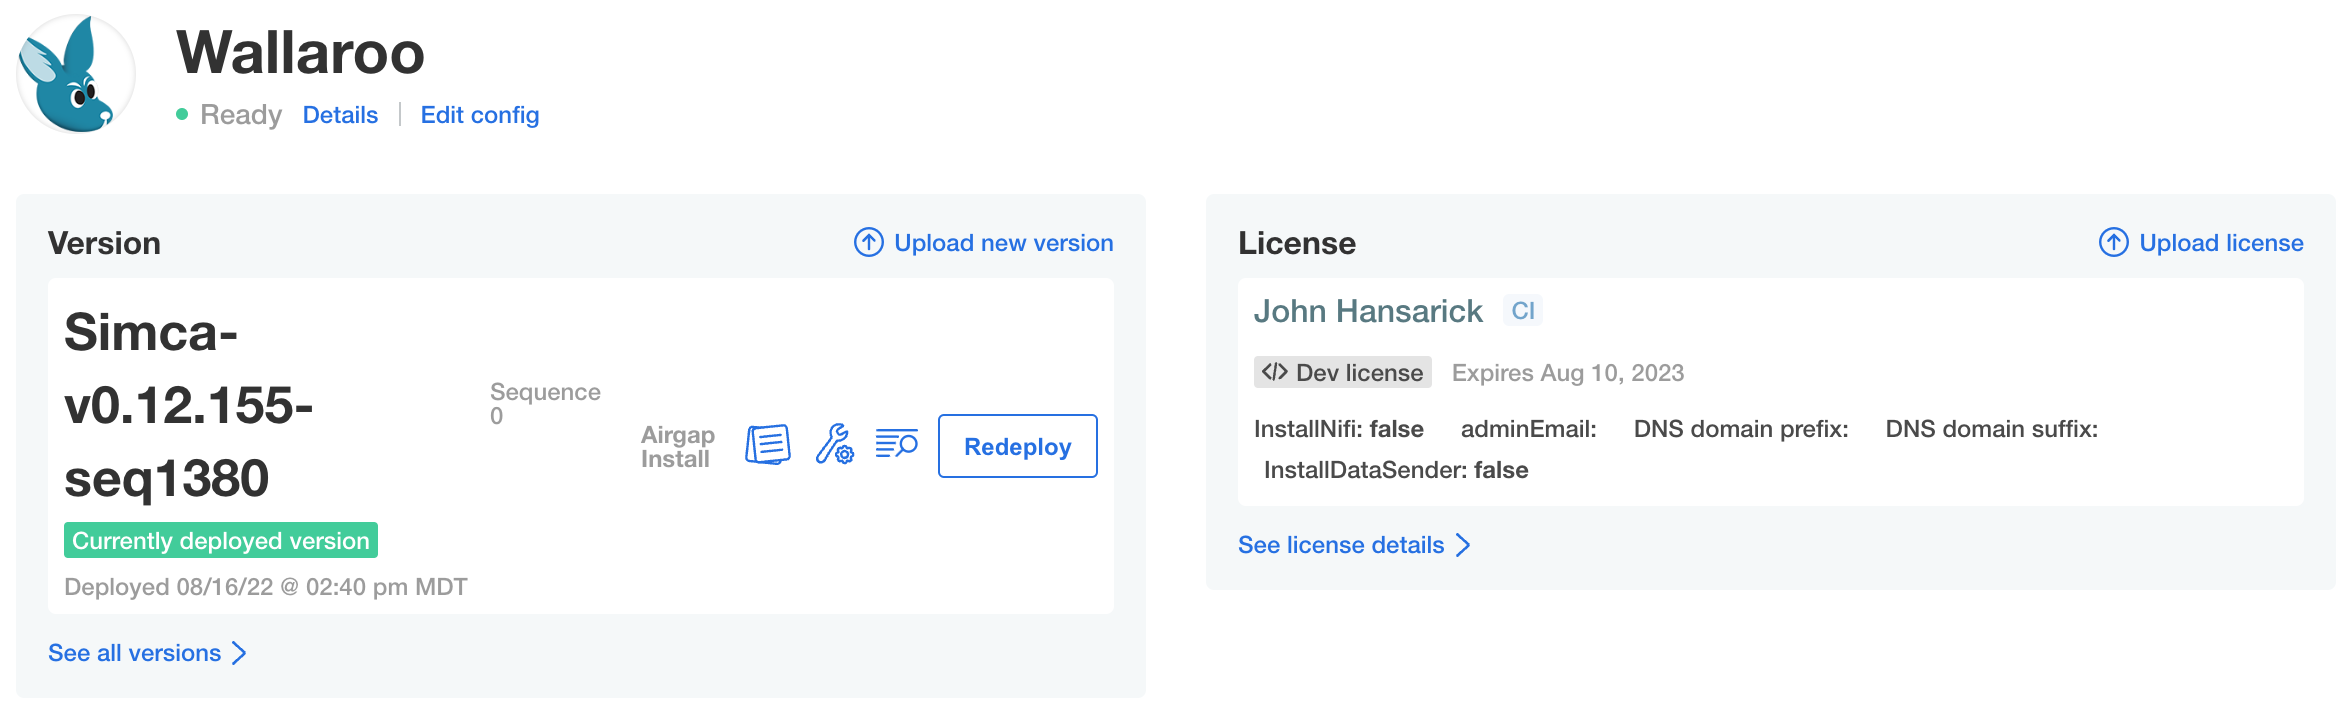
Troubleshooting
At any time, the administration console can create troubleshooting bundles for Wallaroo technical support to assess product health and help with problems. Support bundles contain logs and configuration files which can be examined before downloading and transmitting to Wallaroo. The console also has a configurable redaction mechanism in cases where sensitive information such as passwords, tokens, or PII (Personally Identifiable Information) need to be removed from logs in the bundle.
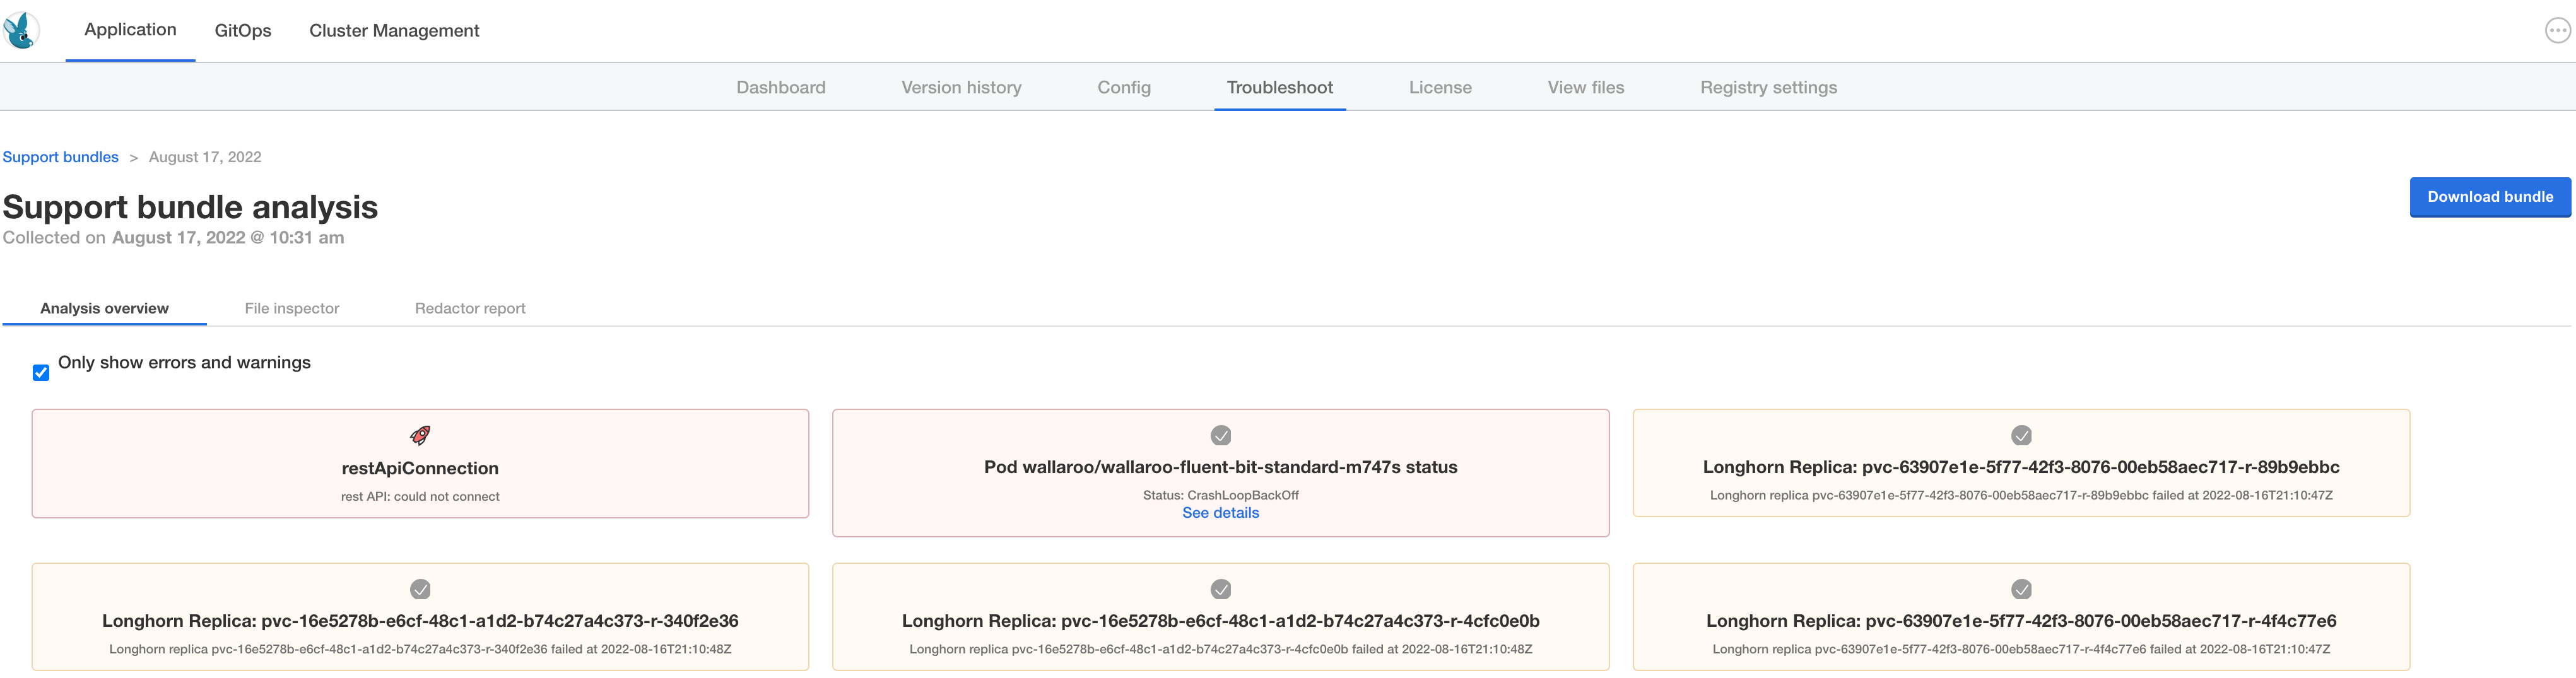
To manage support bundles:
- Log into the administration console.
- Select the Troubleshoot tab.
- Select Analyze Wallaroo.
- Select
Download bundleto save the bundle file as a compressed archive. Depending on your browser settings the file download location can be specified. - Send the file to Wallaroo technical support.
At any time, any existing bundle can be examined and downloaded from the Troubleshoot tab.
Example Registry Service Install
The following example demonstrates how to set up an unsecure local registry service that can be used for testing. This process is not advised for production systems, and it only provided as an example for testing the air gap install process. This example uses an Ubuntu 20.04 instance as the installation environment.
This example assumes that the containerd service is installed and used by the Kubernetes cluster.
Private Container Registry Service Install Process
To install a demo container registry service on an Ubuntu 20.04 instance:
Install the registry service:
sudo apt update
sudo apt install docker-registry jq
Replace the file
/etc/docker/registry/config.ymlwith the following. Note that this configures the service with no security:version: 0.1 log: fields: service: registry storage: cache: blobdescriptor: inmemory filesystem: rootdirectory: /var/lib/docker-registry http: addr: :5000 headers: X-Content-Type-Options: [nosniff] health: storagedriver: enabled: true interval: 10s threshold: 3Update the
containerdservice as follows, replacingYOUR-HOST-HEREwith the hostname of the registry service configured above. Comment out any existingregistryentries and replace with the new insecure registry service:[plugins."io.containerd.grpc.v1.cri".registry] [plugins."io.containerd.grpc.v1.cri".registry.mirrors] [plugins."io.containerd.grpc.v1.cri".registry.mirrors."YOUR-HOST-HERE:5000"] endpoint = ["http://YOUR-HOST-HERE:5000"] [plugins."io.containerd.grpc.v1.cri".registry.configs] [plugins."io.containerd.grpc.v1.cri".registry.configs."YOUR-HOST-HERE:5000".tls] insecure_skip_verify = true # [plugins."io.containerd.grpc.v1.cri".registry] # config_path = "" # [plugins."io.containerd.grpc.v1.cri".registry.auths] # [plugins."io.containerd.grpc.v1.cri".registry.configs] # [plugins."io.containerd.grpc.v1.cri".registry.headers] # [plugins."io.containerd.grpc.v1.cri".registry.mirrors]Restart the registry service and
containerdservice.sudo systemctl restart docker-registry sudo systemctl restart containerd
4 - Wallaroo Enterprise Helm Setup and Install Guides
Organizations that prefer to use the Helm package manager for Kubernetes can install Wallaroo versions 2022.4 and above via Helm.
The following procedures demonstrates how to install Wallaroo using Helm. For more information on settings and options for a Helm based install, see the Wallaroo Helm Reference Guides.
4.1 - Wallaroo Helm Standard Cloud Install Procedures
General Time to Completion: 30 minutes.
Before installing Wallaroo version, verify that the following hardware and software requirements are met.
Environment Requirements
Environment Hardware Requirements
The following system requirements are required for the minimum settings for running Wallaroo in a Kubernetes cloud cluster.
- Minimum number of nodes: 4
- Minimum Number of CPU Cores: 8
- Minimum RAM per node: 16 GB
- Minimum Storage: A total of 625 GB of storage will be allocated for the entire cluster based on 5 users with up to four pipelines with five steps per pipeline, with 50 GB allocated per node, including 50 GB specifically for the Jupyter Hub service. Enterprise users who deploy additional pipelines will require an additional 50 GB of storage per lab node deployed.
Wallaroo recommends at least 16 cores total to enable all services. At less than 16 cores, services will have to be disabled to allow basic functionality as detailed in this table.
Note that even when disabling these services, Wallaroo performance may be impacted by the models, pipelines, and data used. The greater the size of the models and steps in a pipeline, the more resources will be required for Wallaroo to operate efficiently. Pipeline resources are set by the pipeline configuration to control how many resources are allocated from the cluster to maintain peak effectiveness for other Wallaroo services. See the following guides for more details.
- Wallaroo SDK Essentials Guide: Pipeline Deployment Configuration
- Wallaroo MLOps API Essentials Guide: Pipeline Management
| Cluster Size | 8 core | 16 core | 32 core | Description | |
| Inference | ✔ | ✔ | ✔ | The Wallaroo inference engine that performs inference requests from deployed pipelines. | |
| Dashboard | ✔ | ✔ | ✔ | The graphics user interface for configuring workspaces, deploying pipelines, tracking metrics, and other uses. | |
| Jupyter HUB/Lab | The JupyterHub service for running Python scripts, JupyterNotebooks, and other related tasks within the Wallaroo instance. | ||||
| Single Lab | ✔ | ✔ | ✔ | ||
| Multiple Labs | ✘ | ✔ | ✔ | ||
| Prometheus | ✔ | ✔ | ✔ | Used for collecting and reporting on metrics. Typical metrics are values such as CPU utilization and memory usage. | |
| Alerting | ✘ | ✔ | ✔ | ||
| Model Validation | ✘ | ✔ | ✔ | ||
| Dashboard Graphs | ✔ | ✔ | ✔ | ||
| Plateau | ✘ | ✔ | ✔ | A Wallaroo developed service for storing inference logs at high speed. This is not a long term service; organizations are encouraged to store logs in long term solutions if required. | |
| Model Insights | ✘ | ✔ | ✔ | ||
| Python API | |||||
| Model Conversion | ✔ | ✔ | ✔ | Converts models into a native runtime for use with the Wallaroo inference engine. |
To install Wallaroo with minimum services, a configuration file will be used as parts of the kots based installation. For full details on the Wallaroo installation process, see the Wallaroo Install Guides.
Enterprise Network Requirements
The following network requirements are required for the minimum settings for running Wallaroo:
For Wallaroo Enterprise users: 200 IP addresses are required to be allocated per cloud environment.
For Wallaroo Community users: 98 IP addresses are required to be allocated per cloud environment.
DNS services integration is required for Wallaroo Enterprise edition. See the DNS Integration Guide for the instructions on configuring Wallaroo Enterprise with your DNS services.
DNS services integration is required to provide access to the various supporting services that are part of the Wallaroo instance. These include:
- Simplified user authentication and management.
- Centralized services for accessing the Wallaroo Dashboard, Wallaroo SDK and Authentication.
- Collaboration features allowing teams to work together.
- Managed security, auditing and traceability.
Environment Software Requirements
The following software or runtimes are required for Wallaroo 2023.4.1. Most are automatically available through the supported cloud providers.
| Software or Runtime | Description | Minimum Supported Version | Preferred Version(s) |
|---|---|---|---|
| Kubernetes | Cluster deployment management | 1.23 | 1.26 |
| containerd | Container Management | 1.7.0 | 1.7.0 |
| kubectl | Kubernetes administrative console application | 1.26 | 1.26 |
Node Selectors
Wallaroo uses different nodes for various services, which can be assigned to a different node pool to contain resources separate from other nodes. The following nodes selectors can be configured:
- ML Engine node selector
- ML Engine Load Balance node selector
- Database Node Selector
- Grafana node selector
- Prometheus node selector
- Each Lab * Node Selector
- For Helm installs:
helm: Install Helm- Minimum supported version: Helm 3.11.2
krew: Install Krewkrew preflightandkrew support-bundle.
Kubernetes Installation Instructions
This sample Helm installation procedure has the following steps:
Install Kubernetes
This example requires the user use a Cloud Kubernetes installation.
Setup the Kubernetes Cloud cluster as defined in the Wallaroo Enterprise Environment Setup Guides.
Install Helm
The follow the instructions from the Installing Helm guide for your environment.
Install Krew
The following instructions were taken from the Install Krew guide.
To install the kubectl plugin krew:
Verify that
gitis installed in the local system.Run the following to install
krew:( set -x; cd "$(mktemp -d)" && OS="$(uname | tr '[:upper:]' '[:lower:]')" && ARCH="$(uname -m | sed -e 's/x86_64/amd64/' -e 's/\(arm\)\(64\)\?.*/\1\2/' -e 's/aarch64$/arm64/')" && KREW="krew-${OS}_${ARCH}" && curl -fsSLO "https://github.com/kubernetes-sigs/krew/releases/latest/download/${KREW}.tar.gz" && tar zxvf "${KREW}.tar.gz" && ./"${KREW}" install krew )Once complete, add the following to the
.bashrcfile:export PATH="${KREW_ROOT:-$HOME/.krew}/bin:$PATH"
Install Support Tools
Install the preflight and support-bundle Krew tools via the following commands:
kubectl krew install preflight
kubectl krew install support-bundle
Install Wallaroo via Helm
Wallaroo Provided Data
Members of the Wallaroo support staff will provide the following information:
- Wallaroo Container Registration Login: Commands to login to the Wallaroo container registry.
- Preflight and Support Bundle configuration files: The files
preflight.yamlandsupport-bundle.yamlare used in the commands below to complete the preflight process and generate the support bundle package as needed for troubleshooting needs. - Preflight verification command: The commands to verify that the Kubernetes environment meets the requirements for the Wallaroo install.
- Install Wallaroo Command: Instructions on installations into the Kubernetes environment using Helm through the Wallaroo container registry.
The following steps are used with these command and configuration files to install Wallaroo Enterprise via Helm.
Registration Login
The first step in the Wallaroo installation process via Helm is to connect to the Kubernetes environment that will host the Wallaroo Enterprise instance and login into the Wallaroo container registry through the command provided by the Wallaroo support staff. The command will take the following format, replacing $YOURUSERNAME and $YOURPASSWORD with the respective username and password provided.
helm registry login registry.replicated.com --username $YOURUSERNAME --password $YOURPASSWORD
Preflight Verification
IMPORTANT NOTE
The preflight test is not programmatically enforced during installation via Helm and should be performed manually before installation. If the Kubernetes environment does not meet the requirements the Wallaroo installation may fail or perform erratically. Please verify that all preflight test run successfully before proceeding to install Wallaroo.Preflight verification is performed with the following command, using the preflight.yaml configuration file provided by the Wallaroo support representative as listed above.
kubectl preflight --interactive=false preflight.yaml
If successful, the tests will show PASS for each preflight requirement as in the following example:
name: cluster-resources    status: running         completed: 0    total: 2
name: cluster-resources    status: completed       completed: 1    total: 2
name: cluster-info         status: running         completed: 1    total: 2
name: cluster-info         status: completed       completed: 2    total: 2

   --- PASS Required Kubernetes Version
      --- Your cluster meets the recommended and required versions of Kubernetes.
   --- PASS Container Runtime
      --- Containerd container runtime was found.
   --- PASS Check Kubernetes environment.
      --- KURL is a supported distribution
   --- PASS Cluster Resources
      --- Cluster resources are satisfactory
   --- PASS Every node in the cluster must have at least 12Gi of memory
      --- All nodes have at least 12 GB of memory capacity
   --- PASS Every node in the cluster must have at least 8 cpus allocatable.
      --- All nodes have at least 8 CPU capacity
--- PASS   wallaroo
PASS
The following instructions detail how to install Wallaroo Enterprise via Helm for Kubernetes cloud environments such as Microsoft Azure, Amazon Web Service, and Google Cloud Platform.
IMPORTANT NOTE
These instructions are for Wallaroo Enterprise only.Install Wallaroo
With the preflight checks and prerequisites met, Wallaroo can be installed via Helm through the following process:
Create namespace. By default, the namespace
wallaroois used:kubectl create namespace wallarooSet the new namespace as the current namespace:
kubectl config set-context --current --namespace wallarooSet the TLS certificate secret in the Kubernetes environment:
Create the certificate and private key. It is recommended to name it after the domain name of your Wallaroo instance. For example:
wallaroo.example.com. For production environments, organizations are recommended to use certificates from their certificate authority. Note that the Wallaroo SDK will not connect from an external connection without valid certificates. For more information on using DNS settings and certificates, see the Wallaroo DNS Integration Guide.Create the Kubernetes secret from the certificates created in the previous step, replacing
$TLSCONFIGwith the name of the Kubernetes secret. Store the secret name for a the step Configure local values file.kubectl create secret tls $TLSCONFIG --cert=$TLSSECRETS --key=$TLSSECRETSFor example, if
$TLSCONFIGismy-tls-secretswithexample.com.crtand keyexample.com.key, then the command would be translated askubectl create secret tls my-tls-secrets --cert=example.com.crt --key=example.com.key
Configure local values file: The default Helm install of Wallaroo contains various default settings. The local values file overwrites values based on the organization needs. The following represents the minimum mandatory values for a Wallaroo installation using certificates and the default LoadBalancer for a cloud Kubernetes cluster. The configuration details below is saved as
local-values.yamlfor these examples.For information on taints and tolerations settings, see the Taints and Tolerations Guide.
Note the following required settings:
domainPrefixanddomainSuffix: Used to set the DNS settings for the Wallaroo instance. For more information, see the Wallaroo DNS Integration Guide.deploymentStageandcustTlsSecretName: These are set for use with the Kubernetes secret created in the previous step. External connections through the Wallaroo SDK require valid certificates.replImagePrefix: proxy.replicated.com/proxy/wallaroo/ghcr.io/wallaroolabs: Sets the Replicated installation containe proxy. Set toproxy.replicated.com/proxy/wallaroo/ghcr.io/wallaroolabsunless using a private container registry. Contact a Wallaroo Support representative for details.- generate_secrets: Secrets for administrative and other users can be generated by the Helm install process, or set manually. This setting scrambles the passwords during installation.
apilb: Sets theapilbservice options including the following:serviceType: LoadBalancer: Uses the default LoadBalancer setting for the Kubernetes cloud service the Wallaroo instance is installed into. Replace with the specific service connection settings as required.external_inference_endpoints_enabled: true: This setting is required for performing external SDK inferences to a Wallaroo instance. For more information, see the Wallaroo Model Endpoints Guide
domainPrefix: "" # optional if using a DNS Prefix
domainSuffix: {Your Wallaroo DNS Suffix}

deploymentStage: cust
custTlsSecretName: cust-cert-secret

generate_secrets: true

apilb:
  serviceType: LoadBalancer
  external_inference_endpoints_enabled: true

dashboard:
  clientName: "xx" # Insert the name displayed in the Wallaroo Dashboard

arbEx:
  enabled: true

nats:
  enabled: true

orchestration:
  enabled: true

pipelines:
  enabled: false

imageRegistry: proxy.replicated.com/proxy/wallaroo/ghcr.io/wallaroolabs
replImagePrefix: proxy.replicated.com/proxy/wallaroo/ghcr.io/wallaroolabs

minio:
  persistence:
    size: 25Gi     # Minio model storage disk size. Smaller than 10Gi is not recommended.

models:
  enabled: true

pythonAPIServer:
  enabled: true
Install Wallaroo: The Wallaroo support representative will provide the installation command for the Helm install that will use the Wallaroo container registry. This assumes that the preflight checks were successful. This command uses the following format:
helm install $RELEASE $REGISTRYURL --version $VERSION--values $LOCALVALUES.yamlWhere:
$RELEASE: The name of the Helm release. By default,wallaroo.$REGISTRYURL: The URl for the Wallaroo container registry service.$VERSION: The version of Wallaroo to install. For this example,2022.4.0-main-2297.$LOCALVALUES: The .yaml file containing the local values overrides. For this example,local-values.yaml.
For example, for the registration
wallaroothe command would be:helm install wallaroo oci://registry.replicated.com/wallaroo/EE/wallaroo --version 2022.4.0-main-2297 --values local-values.yamlVerify the Installation: Once the installation is complete, verify the installation with the
helm test $RELEASEcommand. With the settings above, this would be:helm test wallarooA successful installation will resemble the following:
NAME: wallaroo
LAST DEPLOYED: Wed Dec 21 09:15:23 2022
NAMESPACE: wallaroo
STATUS: deployed
REVISION: 1
TEST SUITE:     wallaroo-fluent-bit-test-connection
Last Started:   Wed Dec 21 11:58:34 2022
Last Completed: Wed Dec 21 11:58:37 2022
Phase:          Succeeded
TEST SUITE:     wallaroo-test-connections-hook
Last Started:   Wed Dec 21 11:58:37 2022
Last Completed: Wed Dec 21 11:58:41 2022
Phase:          Succeeded
TEST SUITE:     wallaroo-test-objects-hook
Last Started:   Wed Dec 21 11:58:41 2022
Last Completed: Wed Dec 21 11:58:53 2022
Phase:          Succeeded
At this point, the installation is complete and can be accessed through the fully qualified domain names set in the installation process above. Verify that the DNS settings are accurate before attempting to connect to the Wallaroo instance. For more information, see the Wallaroo DNS Integration Guide.
To add the initial users if they were not set up through Helm values, see the Wallaroo Enterprise User Management guide.
Network Configuration
apilb.serviceType and edgelb.serviceType settings have the following effects depending on whether they are installed on single node Linux installations, or part of a cloud Kubernetes installation.
| Setting | Single Node Linux | Cloud Kubernetes |
|---|---|---|
| Internal Only Connections | ClusterIP | ClusterIP |
| External Connections | NodePort | LoadBalancer |
Refer to the instructions for environment host for details on IP address allocation and support.
Troubleshoot Wallaroo
If issues are detected in the Wallaroo instance, a support bundle file is generated using the support-bundle.yaml file provided by the Wallaroo support representative.
This creates a collection of log files, configuration files and other details into a .tar.gz file in the same directory as the command is run from in the format support-bundle-YYYY-MM-DDTHH-MM-SS.tar.gz. This file is submitted to the Wallaroo support team for review.
This support bundle is generated through the following command:
kubectl support-bundle support-bundle.yaml --interactive=false
Uninstall
To uninstall Wallaroo via Helm, use the following command replacing the $RELEASE with the name of the release used to install Wallaroo. By default, this is wallaroo:
helm uninstall wallaroo
It is also recommended to remove the wallaroo namespace after the helm uninstall is complete.
IMPORTANT NOTE
Do not remove the Wallaroo namespace until after thehelm uninstall is complete. Removing the namespace first can leave resources hanging and can cause issues when trying to reinstall Wallaroo via Helm.kubectl delete namespace wallaroo
4.2 - Wallaroo Helm Reference Guides
The following guides include reference details related to installing Wallaroo via Helm.
4.2.1 - Wallaroo Helm Reference Table
Wallaroo
A Helm chart for the control plane for Wallaroo
Configuration
The following table lists the configurable parameters of the Wallaroo chart and their default values.
| Parameter | Description | Default |
|---|---|---|
kubernetes_distribution | One of: aks, eks, gke, or kurl. May be safe to leave defaulted. | "" |
imageRegistry | imageRegistry where images are pulled from | "ghcr.io/wallaroolabs" |
replImagePrefix | imageRegistry where images are pulled from, as overridden by Kots | "ghcr.io/wallaroolabs" |
assays.enabled | Controls the display of Assay data in the Dashboard | true |
custTlsSecretName | Name of existing Kubernetes TLS type secret | "" |
deploymentStage | Deployment stage, must be set to “cust” when deployed | "dev" |
custTlsCert | Customer provided certificate chain when deploymentStage is “cust”. | "" |
custTlsKey | Customer provided private key when deploymentStage is “cust”. | "" |
nodeSelector | Global node selector | {} |
tolerations | Global tolerations | [{"key": "wallaroo", "operator": "Exists", "effect": "NoSchedule"}] |
domainPrefix | DNS prefix of Wallaroo endpoints, can be empty for none | "xxx" |
domainSuffix | DNS suffix of Wallaroo endpoints, MUST be provided | "yyy" |
externalIpOverride | Used in cases where we can’t accurately determine our external, inbound IP address. Normally “”. | "" |
imagePullPolicy | Global policy saying when K8s pulls images: Always, Never, or IfNotPresent. | "Always" |
wallarooSecretName | Secret name for pulling Wallaroo images | "regcred" |
privateModelRegistry.enabled | If true, external containerized models can be accessed | false |
privateModelRegistry.registry | Registry URL, eg “reg.big.corp:3579” | "" |
privateModelRegistry.email | Optional, for bookkeeping | "" |
privateModelRegistry.username | Username access credential | "" |
privateModelRegistry.password | Password access credential | "" |
ociRegistry.enabled | If true, pipelines can be published to this OCI registry for use in edge deployments | false |
ociRegistry.registry | Registry URL, eg “reg.big.corp:3579” | "" |
ociRegistry.repository | Repository within the registry. May contain cloud account, eg “account123/wallaroothings” | "" |
ociRegistry.email | Optional, for bookkeeping | "" |
ociRegistry.username | Username access credential | "" |
ociRegistry.password | Password access credential | "" |
ociRegistry.noTls | Set to true if the registry does not support TLS - for development only | false |
apilb.nodeSelector | standard node selector for API-LB | {} |
apilb.annotations | Annotations for api-lb service | {} |
apilb.serviceType | Service type of api-lb service | "ClusterIP" |
apilb.external_inference_endpoints_enabled | Enable external URL inference endpoints: pipeline inference endpoints that are accessible outside of the Wallaroo cluster. | true |
jupyter.enabled | If true, a jupyer hub was deployed which components can point to. | false |
keycloak.user | administrative username | "admin" |
keycloak.password | default admin password: overridden if generate_secrets is true | "admin" |
keycloak.provider.clientId | upstream client id | "" |
keycloak.provider.clientSecret | upstream client secret | "" |
keycloak.provider.name | human name for provider | "" |
keycloak.provider.id | Type of provider, one of: “github”, “google”, or “OIDC” | "" |
keycloak.provider.authorizationUrl | URL to contact the upstream client for auth requests | null |
keycloak.provider.clientAuthMethod | client auth method - Must be client_secret_post for OIDC provider type, leave blank otherwise. | null |
keycloak.provider.displayName | human name for provider, displayed to end user in login dialogs | null |
keycloak.provider.tokenUrl | Used only for ODIC, see token endpoint under Azure endpoints. | null |
dbcleaner.schedule | when the cleaner runs, default is every eight hours | "* */8 * * *" |
dbcleaner.maxAgeDays | delete older than this many days | "30" |
plateau.enabled | Enable Plateau deployment | true |
plateau.diskSize | Disk space to allocate. Smaller than 100Gi is not recommended. | "100Gi" |
telemetry.enabled | Used only for our CE product. Leave disabled for EE/Helm installs. | false |
dashboard.enabled | Enable dashboard service | true |
dashboard.clientName | Customer display name which appears at the top of the dashboard window. | "Fitzroy Macropods, LLC" |
minio.imagePullSecrets | Must override for helm + private registry; eg -name: "some-secret" | [] |
minio.image.repository | Must override for helm + private registry | "quay.io/minio/minio" |
minio.mcImage.repository | Must override for helm + private registry | "quay.io/minio/mc" |
minio.persistence.size | Minio model storage disk size. Smaller than 10Gi is not recommended. | "10Gi" |
fluent-bit.imagePullSecrets | Must override for helm + private registry; eg -name: "some-secret" | [] |
fluent-bit.image.repository | Must override for helm + private registry | "cr.fluentbit.io/fluent/fluent-bit" |
helmTests.enabled | When enabled, create “helm test” resources. | true |
helmTests.nodeSelector | When helm test is run, this selector places the test pods. | {} |
explainabilityServer.enabled | Enable the model explainability service | false |
replImagePrefix | Sets the replicated image prefix for installation containers. Set to replImagePrefix: proxy.replicated.com/proxy/wallaroo/ghcr.io/wallaroolabs unless otherwise instructed. |
4.2.2 - Wallaroo Helm Reference Details
post_delete_hook
This hook runs when you do helm uninstall unless:
- you give –no-hooks to helm
- you set the enable flag to False at INSTALL time.
imageRegistry
Registry and Tag portion of Wallaroo images. Third party images are not included. Tag is
computed at runtime and overridden. In online Helm installs, these should not be touched; in
airgap Helm installs imageRegistry must be overridden to local registry.
generate_secrets
If true, generate random secrets for several services at install time.
If false, use the generic defaults listed here, which can also be overridden by caller.
assays
This is a (currently) Dashboard-specific feature flag to control the display of Assays.
custTlsSecretName
To provide TLS certificates, (1) set deploymentStage to “cust”, then (2) provide EITHER the
name of an existing Kubernetes TLS secret in custTlsSecret OR provide base64 encoded secrets
in custTlsCert and custTlsKey.
domainPrefix
DNS specification for our named external service endpoints.
To form URLs, we concatenate the optional domainPrefix, the service name in question, and then
the domainSuffix. Their values are based on license, type, and customer config inputs. They
MUST be overriden per install via helm values, or by Replicated.
Community – prefix/suffix in license
| domainPrefix | domainSuffix | dashboard_fqdn | thing_fqdn (thing = jup, kc, etc) |
|---|---|---|---|
| "" | wallaroo.community | (never) | (never) |
| cust123 | wallaroo.community | cust123.wallaroo.community | cust123.thing.wallaroo.community |
Enterprise et al – prefix/suffix from config
| domainPrefix | domainSuffix | dashboard_fqdn | thing_fqdn (thing = jup, kc, etc) |
|---|---|---|---|
| "" | wl.bigco | wl.bigco | thing.wl.bigco |
| cust123 | wl.bigco | cust123.wl.bigco | cust123.thing.wl.bigco |
wallarooSecretName
In online Helm installs, an image pull secret is created and this is its name. The secret allows
the Kubernetes node to pull images from proxy.replicated.com. In airgap Helm installs, a local
Secret of type docker-registry must be created and this value set to its name.
privateModelRegistry
If the customer has specified a private model container registry, the enable flag will reflect
and the secret will be populated. registry, username, and password are mandatory. email
is optional. registry is of the form “hostname:port”. See the Wallaroo Private Model Registry
Guide for registry specific details.
ociRegistry
In order to support edge deployments, a customer-supplied OCI registry is required. The enable
flag turns on the feature, which causes the secret to be populated. registry, repository,username, and password are mandatory. email is optional. registry is of the form
“hostname:port”. Important: some cloud OCI registries require creation of the repository before
it can be published to. See the Wallaroo Private Model Registry Guide for registry specific
details.
apilb
Main ingress LB for Wallaroo services.
The Kubernetes Ingress object is not used, instead we deploy a single Envoy load balancer with a
single IP in all cases, which serves: TLS termination, authentication (JWT) checking, and both
host based and path based application routing. Customer should be aware of two values in particular.
api.serviceType defaults to ClusterIP. If api.serviceType is set to LoadBalancer, cloud
services will allocate a hosted LB service, in which case the apilb.annotations should be
provided, in order to pass configuration such as “internal” or “external” to the cloud service.
Example:
    apilb:
        serviceType: LoadBalancer
        annotations: service.beta.kubernetes.io/aws-load-balancer-internal: "true"
keycloak
Wallaroo can connect to a variety of identity providers, broker OpenID Connect authentication
requests, and then limit access to endpoints. This section configures a https://www.keycloak.org
installation. If a provider is specified here, Keycloak will configure itself to use that on
install. If no providers are specified here, the administrator must login to the Keycloak
service as the administrative user and either add users by hand or create an auth provider. In
general, a client must be created upstream and a URL, client ID, and secret (token) for that
client is entered here.
dbcleaner
Manage retention for fluentbit table. This contains log message outputs from orchestration tasks.
plateau
Plateau is a low-profile fixed-footprint log processor / event store for fast storage of
inference results. The amount of disk space provisioned is adjustable. Smaller than “100Gi” is
not recommended for performance reasons.
wsProxy
This controls the wsProxy, and should only be enabled if nats (ArbEx) is also enabled.
wsProxy is required for the Dashboard to subscribe to events and show notifications.
arbEx
Arbitrary Execution
orchestration
Pipeline orchestration is general task execution service that allows users to upload arbitrary
code and have it executed on their behalf by the system. nats and arbex must be enabled.
pipelines
Pipelines is service that supports packaging and publishing pipelines suitable for edge deployments.
It requires ociRegistry to be configured.
wallsvc
Wallsvc runs arbex, models, pipelines and orchestration.