Configure Wallaroo with a Private Containerized Model Container Registry
Organizations can configure Wallaroo to use private Containerized Model Container Registry. This allows for the use of containerized models such as MLFlow.
The following steps will provide sample instructions on setting up different private registry services from different providers. In each case, refer to the official documentation for the providers for any updates or more complex use cases.
The following process is used with a GitHub Container Registry to create the authentication tokens for use with a Wallaroo instance’s Private Model Registry configuration.
See the GitHub Working with the Container registry for full details.
The following process is used register a GitHub Container Registry with Wallaroo.
- Create a new token as per the instructions from the Creating a personal access token (classic) guide. Note that a classic token is recommended for this process. Store this token in a secure location as it will not be able to be retrieved later from GitHub. Verify the following permissions are set:
Select the
write:packagesscope to download and upload container images and read and write their metadata.Select the
read:packagesscope to download container images and read their metadata (selected whenwrite:packagesis selected by default).Select the
delete:packagesscope to delete container images.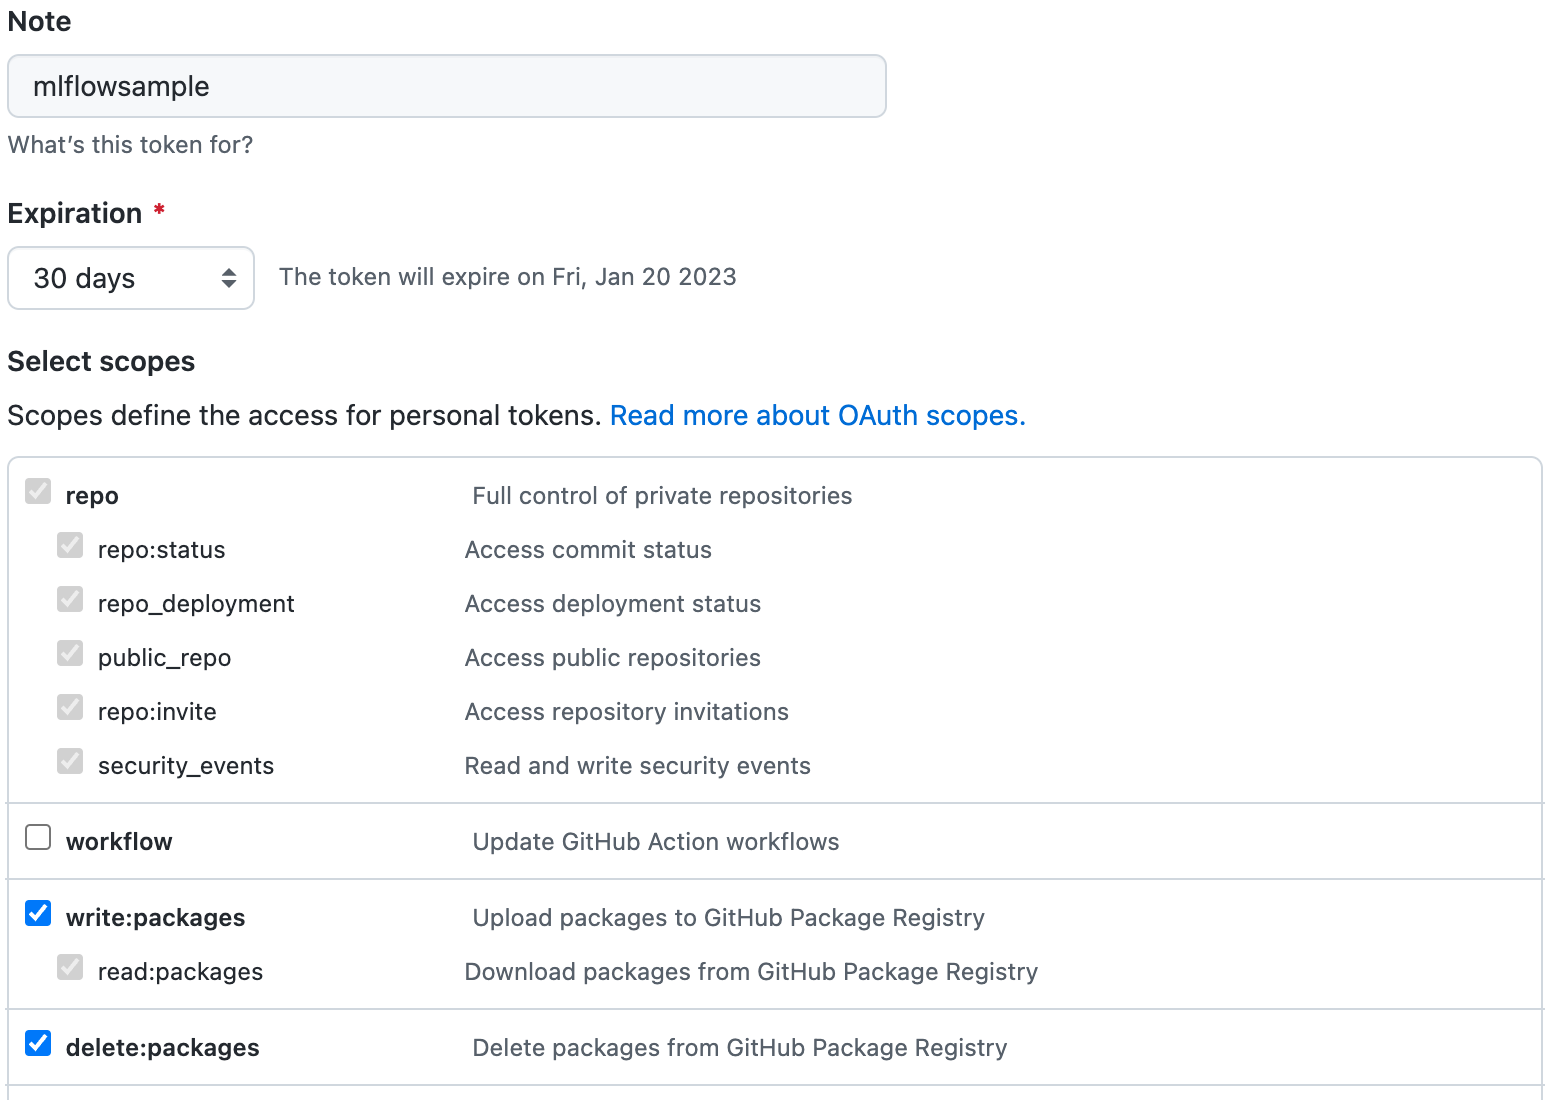
- Configure Wallaroo Via Kots
If Wallaroo was installed via kots, use the following procedure to add the private model registry information.
Launch the Wallaroo Administrative Dashboard through a terminal linked to the Kubernetes cluster. Replace the namespace with the one used in your installation.
kubectl kots admin-console --namespace wallarooLaunch the dashboard, by default at http://localhost:8800.
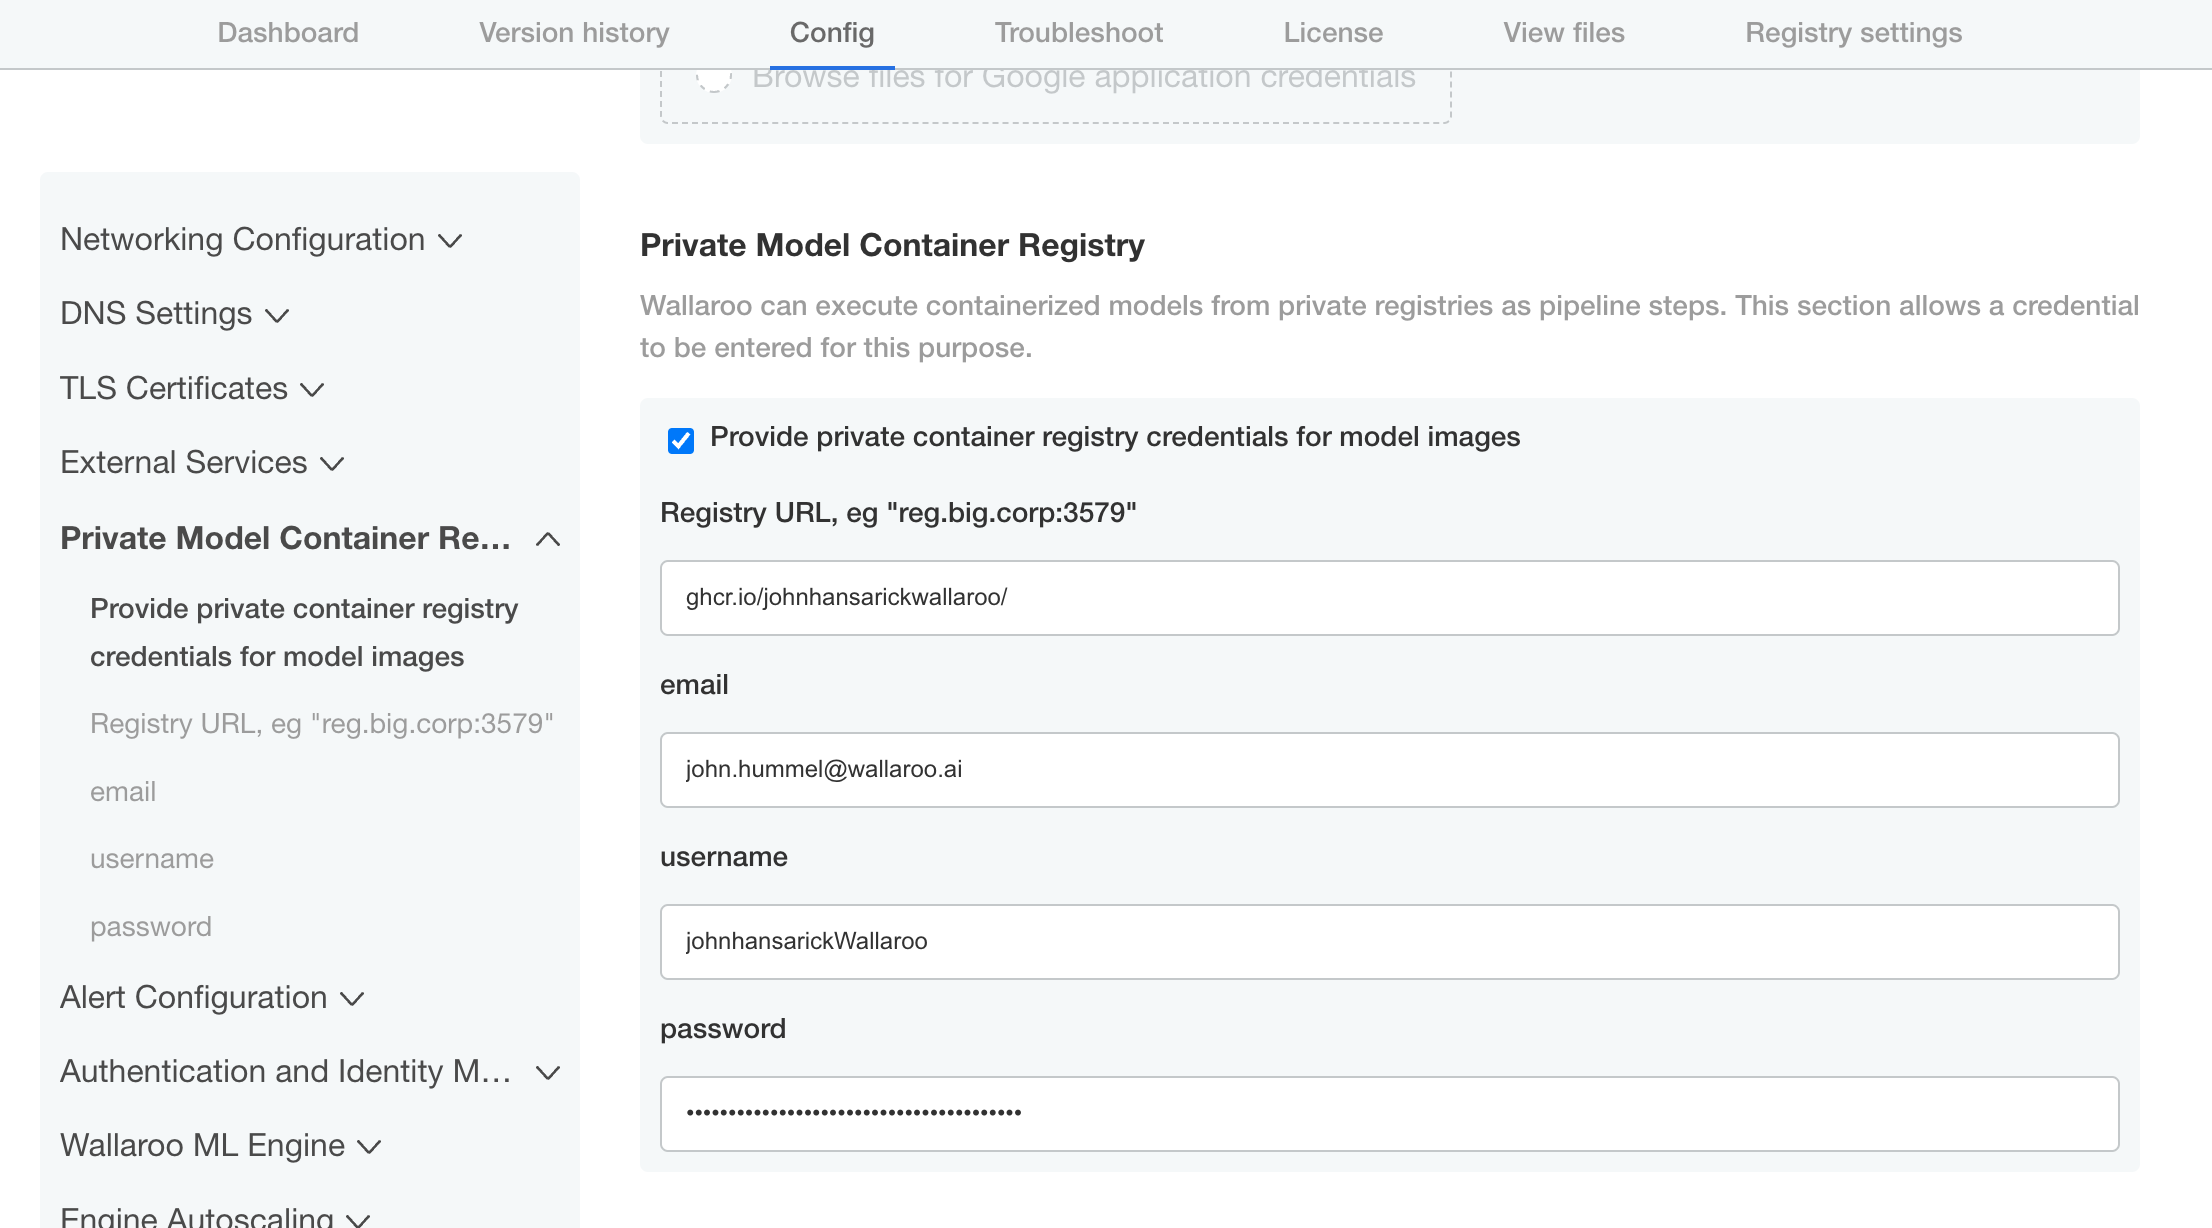
From the admin dashboard, select Config -> Private Model Container Registry.
Enable Provide private container registry credentials for model images.
Provide the following:
Registry URL: The URL of the Containerized Model Container Registry. Typically in the format
host:port. In this example, the registry for GitHub is used.email: The email address of the Github user generating the token.
username: The username of the Github user authentication to the registry service.
password: The GitHub token generated in the previous steps.
Scroll down and select Save config.
Deploy the new version.
Once complete, the Wallaroo instance will be able to authenticate to the Containerized Model Container Registry and retrieve the images.
- Configure Wallaroo Via Helm
During either the installation process or updates, set the following in the
local-values.yamlfile:privateModelRegistry:enabled: truesecretName:model-registry-secretregistry: The URL of the Containerized Model Container Registry. Typically in the formathost:port.email: The email address of the Github user generating the token.username: The username of the Github user authentication to the registry service.password: The GitHub token generated in the previous steps.For example:
# Other settings - DNS entries, etc.

# The private registry settings
privateModelRegistry:
   enabled: true
   secretName: model-registry-secret
   registry: "ghcr.io/johnhansarickwallaroo"
   email: "sample.user@wallaroo.ai"
   username: "johnhansarickwallaroo"
   password: "abcdefg"
Install or update the Wallaroo instance via Helm as per the Wallaroo Helm Install instructions.
Once complete, the Wallaroo instance will be able to authenticate to the registry service and retrieve the images.
The following process is an example of setting up an Artifact Registry Service with Google Cloud Platform (GCP) that is used to store containerized model images and retrieve them for use with Wallaroo.
Uploading and downloading containerized models to a Google Cloud Platform Registry follows these general steps.
Create the GCP registry.
Create a Service Account that will manage the registry service requests.
Assign appropriate Artifact Registry role to the Service Account
Retrieve the Service Account credentials.
Using either a specific user, or the Service Account credentials, upload the containerized model to the registry service.
Add the service account credentials to the Wallaroo instance’s containerized model private registry configuration.
Prerequisites
The commands below use the Google gcloud command line tool, and expect that a Google Cloud Platform account is created and the gcloud application is associated with the GCP Project for the organization.
For full details on the process and other methods, see the Google GCP documentation.
- Create the Registry
The following is based on the Create a repository using the Google Cloud CLI.
The following information is needed up front:
- $REPOSITORY_NAME: What to call the registry.
- $LOCATION: Where the repository will be located. GCP locations are derived through the
gcloud artifacts locations listcommand. - $DESCRIPTION: Any details to be displayed. Sensitive data should not be included.
The follow example script will create a GCP registry with the minimum requirements.
REPOSITORY_NAME="YOUR NAME"
LOCATION="us-west1"
DESCRIPTION="My amazing registry."

gcloud artifacts repositories create REPOSITORY \
    --repository-format=docker \
    --location=LOCATION \
    --description="$DESCRIPTION" \
    --async
- Create a GCP Registry Service Account
The GCP Registry Service Account is used to manage the GCP registry service. The steps are details from the Google Create a service account guide.
The gcloud process for these steps are:
Connect the
gcloudapplication to the organization’s project.$PROJECT_ID="YOUR PROJECT ID" gcloud config set project $PROJECT_IDCreate the service account with the following:
- The name of the service account.
- A description of its purpose.
- The name to show when displayed.
SA_NAME="YOUR SERVICE ACCOUNT NAME"
DESCRIPTION="Wallaroo container registry SA"
DISPLAY_NAME="Wallaroo the Roo"

gcloud iam service-accounts create $SA_NAME \
--description=$DESCRIPTION \
--display-name=$DISPLAY_NAME
- Assign Artifact Registry Role
Assign one or more of the following accounts to the new registry role based on the following criteria, as detailed in the Google GCP Repository Roles and Permissions Guide.
- For
pkg.devdomains.
| Role | Description |
|---|---|
| Artifact Registry Reader (roles/artifactregistry.reader) | View and get artifacts, view repository metadata. |
| Artifact Registry Writer (roles/artifactregistry.writer) | Read and write artifacts. |
| Artifact Registry Repository Administrator (roles/artifactregistry.repoAdmin) | Read, write, and delete artifacts. |
| Artifact Registry Administrator (roles/artifactregistry.admin) | Create and manage repositories and artifacts. |
- For
gcr.iorepositories.
| Role | Description |
|---|---|
| Artifact Registry Create-on-push Writer (roles/artifactregistry.createOnPushWriter) | Read and write artifacts. Create gcr.io repositories. |
| Artifact Registry Create-on-push Repository Administrator (roles/artifactregistry.createOnPushRepoAdmin) | Read, write, and delete artifacts. Create gcr.io repositories. |
For this example, we will add the Artifact Registry Create-on-push Writer to the created Service Account from the previous step.
Add the role to the service account, specifying the
memberas the new service account, and the role as the selected role. For this example, apkg.devis assumed for the Artifact Registry type.# for pkg.dev ROLE="roles/artifactregistry.writer" # for gcr.io #ROLE="roles/artifactregistry.createOnPushWriter gcloud projects add-iam-policy-binding \ $PROJECT_ID \ --member="serviceAccount:$SA_NAME@$PROJECT_ID.iam.gserviceaccount.com" \ --role=$ROLE
- Authenticate to Repository
To push and pull image from the new registry, we’ll use our new service account and authenticate through the local Docker application. See the GCP Push and pull images for details on using Docker and other methods to add artifacts to the GCP artifact registry.
- Set up Service Account Key
To set up the Service Account key, we’ll use the Google Console IAM & ADMIN dashboard based on the Set up authentication for Docker, using the JSON key approach.
From GCP console, search for
IAM & Admin.Select Service Accounts.
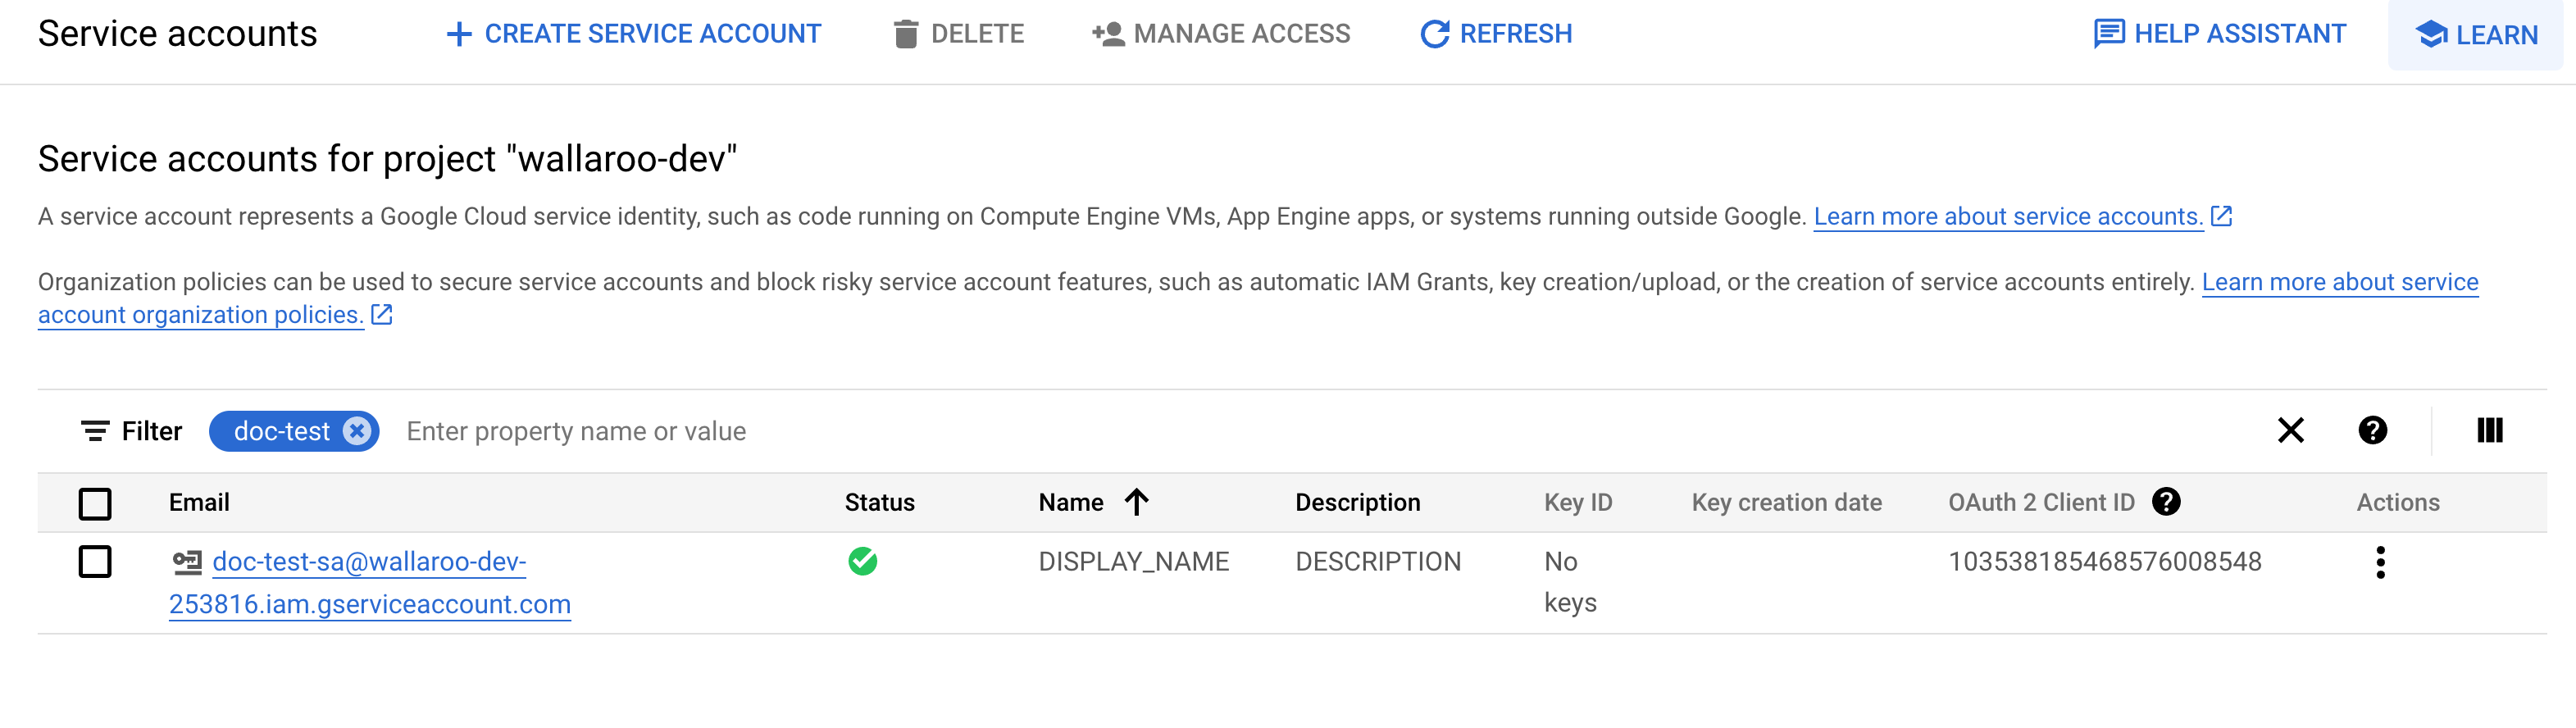
Select the service account to generate keys for.
Select the Email address listed and store this for later steps with the key generated through this process.
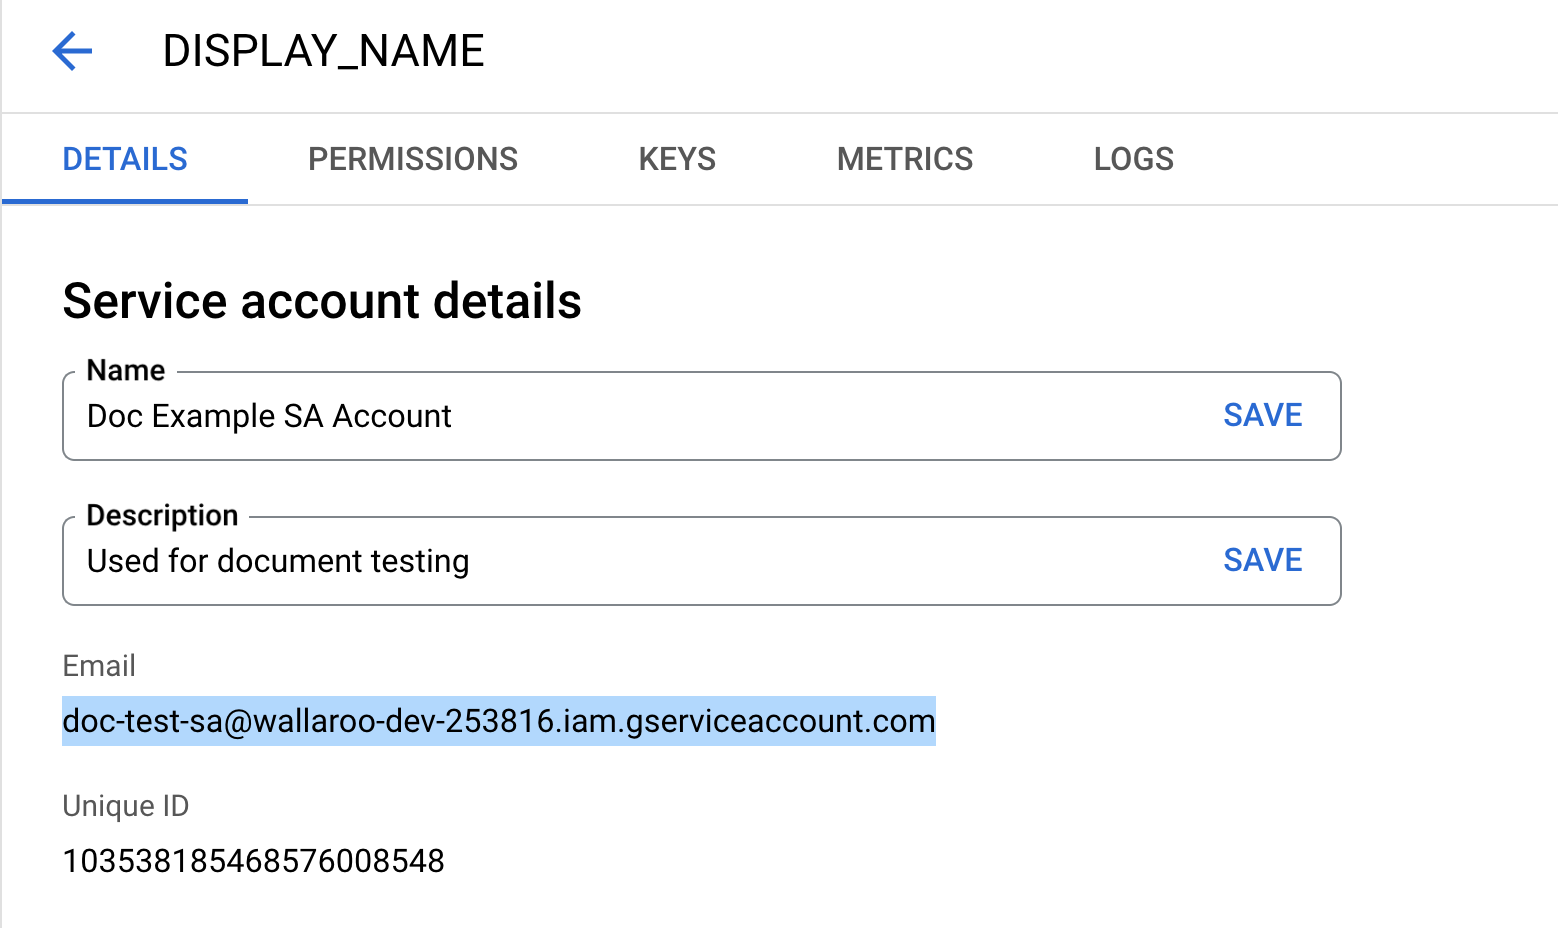
Select Keys, then Add Key, then Create new key.
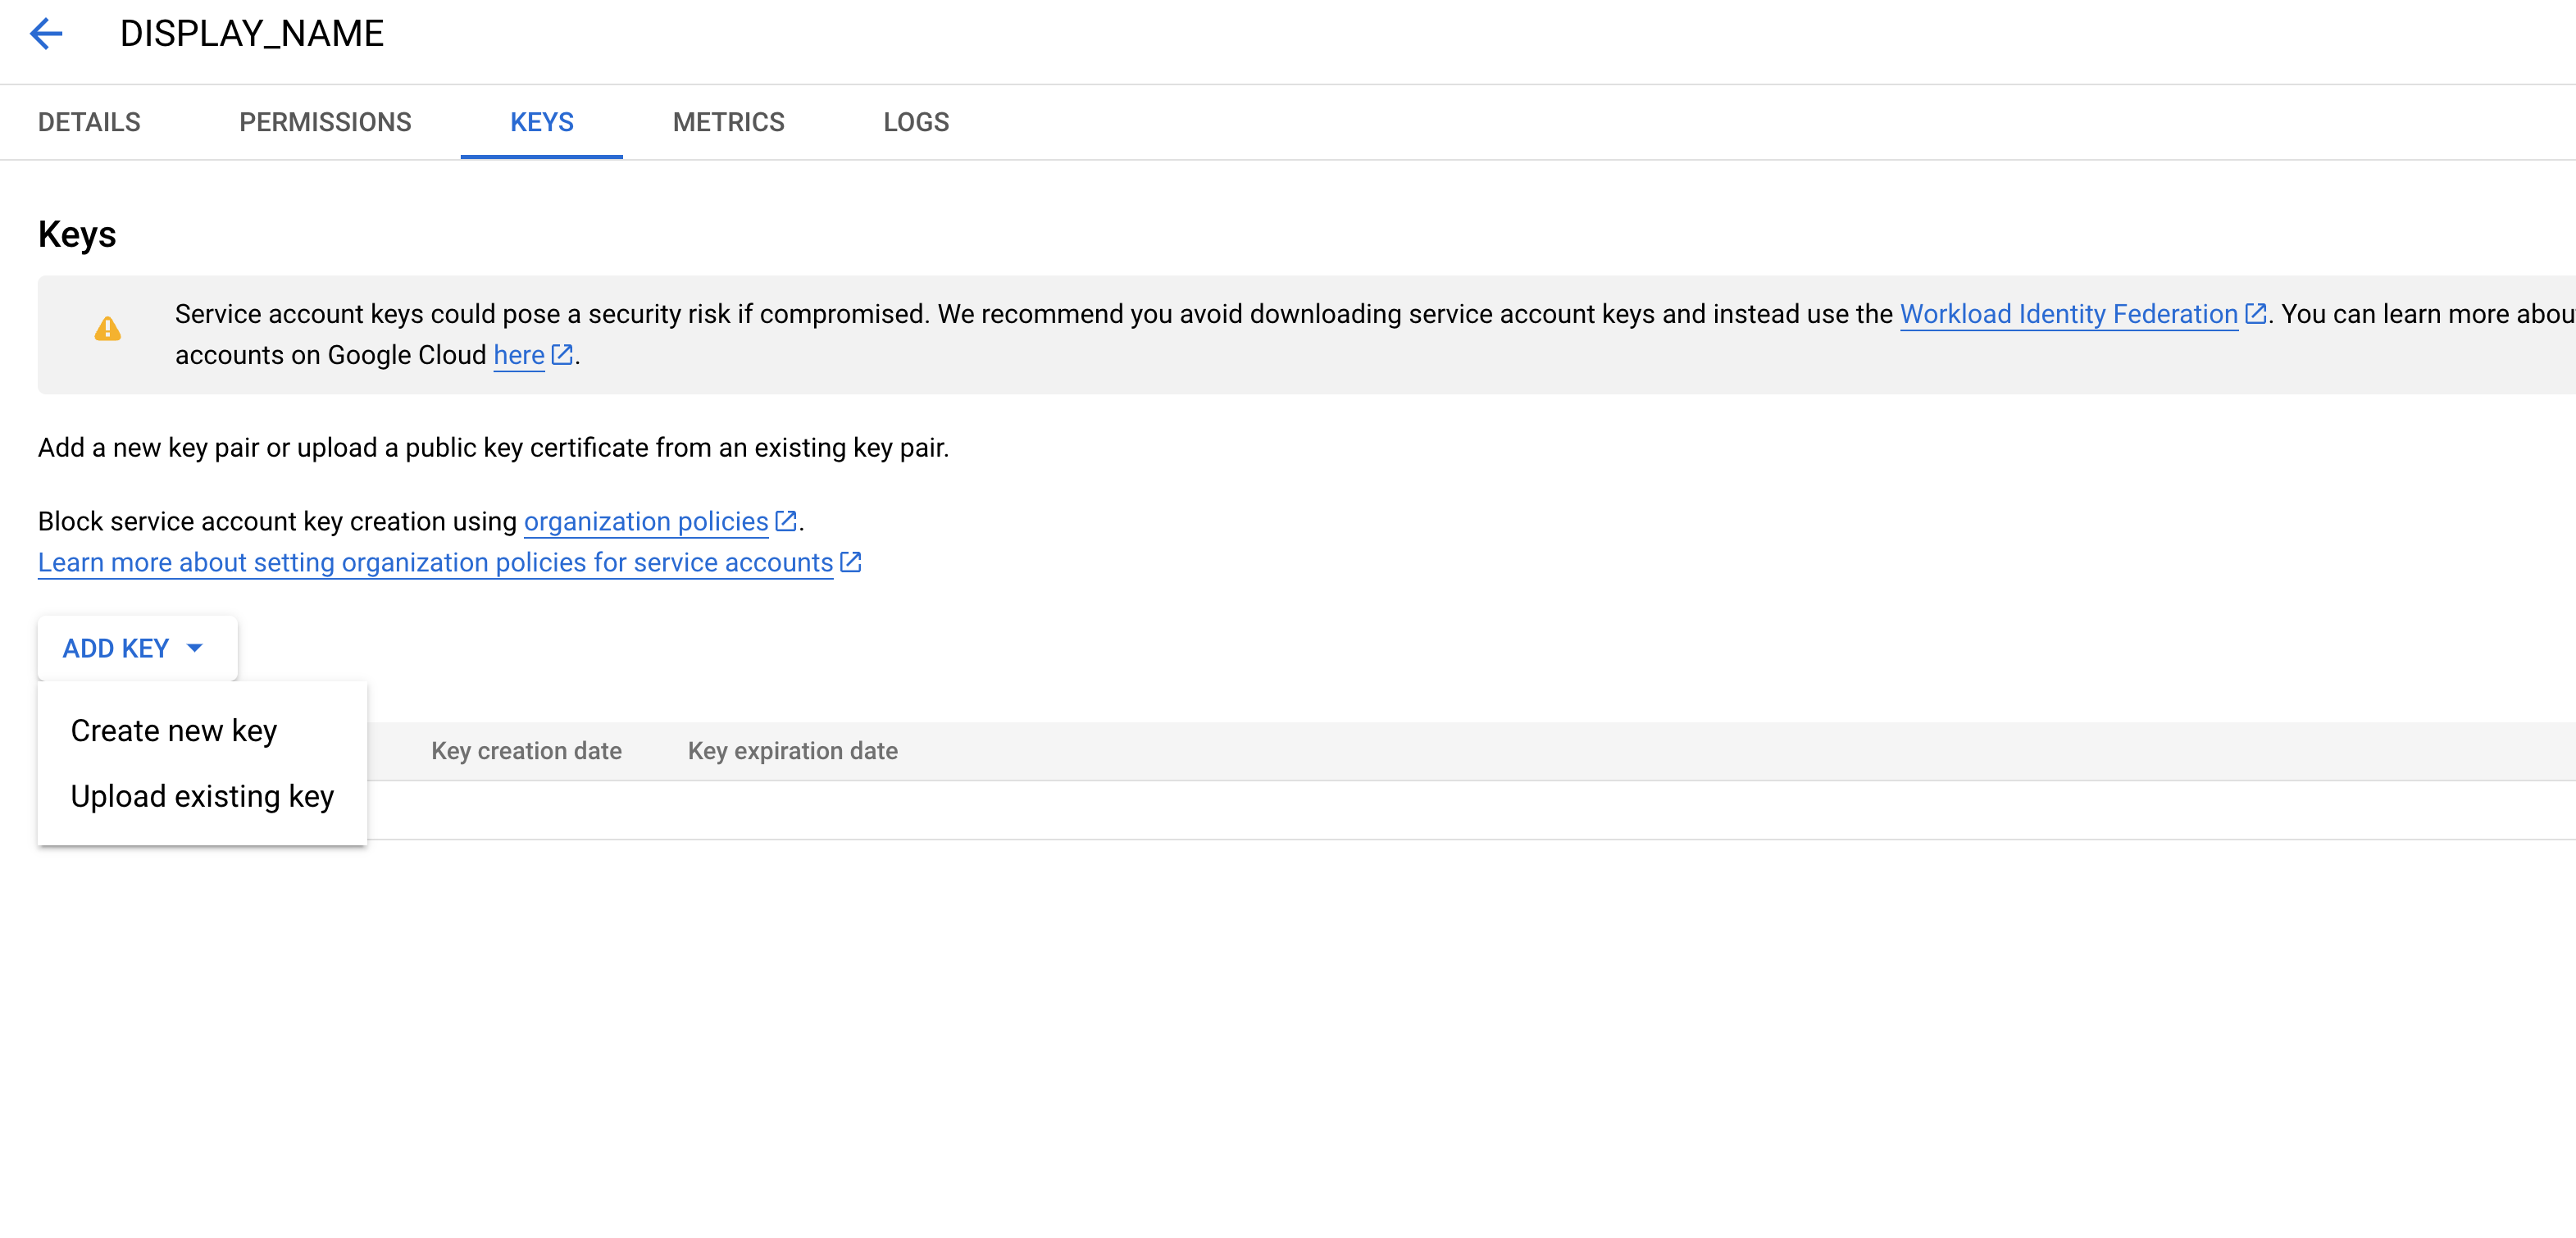
Select JSON, then Create.
Store the key in a safe location.
- Convert SA Key to Base64
The key file downloaded in Set up Service Account Key needs to be converted to base64 with the following command, replacing the locations of KEY_FILE and KEYFILEBASE64:
KEY_FILE = ~/.gcp-sa-registry-keyfile.json
KEYFILEBASE64 = ~/.gcp-sa-registry-keyfile-b64.json
base64 -i $KEY_FILE -o $KEYFILEBASE64
- Authenticate with Docker
Launch Docker.
Run the following command using the base64 version of the key file.
cat $KEYFILEBASE64 | docker login -u _json_key_base64 --password-stdin https://$LOCATION-docker.pkg.devIf successful, the following will be returned.
Login Succeeded.Tag the
statsmodelandpostprocesscontainers based on the repository used for the container registry. The GCP Registry format is$LOCATION-docker.pkg.dev/$PROJECT_ID/$REPOSITORY/$IMAGE. In this example, it isus-west1-docker.pkg.dev/wallaroo-dev-253816/doc-test-registry/, with the imagesmlflow-postprocess-exampleandmlflow-statsmodels-example.Get the internal name through
docker images.docker image list REPOSITORY TAG IMAGE ID CREATED SIZE mlflow-postprocess-example 2023.1 ff121d335e24 5 months ago 3.28GB mlflow-statsmodels-example 2023.1 4c23cac0a7b1 5 months ago 3.34GBTag the images with the repository address. Note the repository must be in lowercase.
docker tag mlflow-postprocess-example:2023.1 us-west1-docker.pkg.dev/wallaroo-dev-253816/doc-test-registry/mlflow-postprocess-example:2023.1docker tag mlflow-statsmodels-example:2023.1 us-west1-docker.pkg.dev/wallaroo-dev-253816/doc-test-registry/mlflow-statsmodels-example:2023.1- Verify with
docker images. Note that the new tags match the same Image ID as the original tags.
docker images

REPOSITORY                                                                                 TAG       IMAGE ID       CREATED        SIZE
mlflow-postprocess-example                                                                 2023.1    ff121d335e24   5 months ago   3.28GB
us-west1-docker.pkg.dev/wallaroo-dev-253816/doc-test-registry/mlflow-postprocess-example   2023.1    ff121d335e24   5 months ago   3.28GB
mlflow-statsmodels-example                                                                 2023.1    4c23cac0a7b1   5 months ago   3.34GB
us-west1-docker.pkg.dev/wallaroo-dev-253816/doc-test-registry/mlflow-statsmodels-example   2023.1    4c23cac0a7b1   5 months ago   3.34GB
Push the containers to the registry. This may take some time depending on the speed of your connection. Wait until both are complete.
docker push us-west1-docker.pkg.dev/wallaroo-dev-253816/doc-test-registry/mlflow-postprocess-example:2023.1docker push us-west1-docker.pkg.dev/wallaroo-dev-253816/doc-test-registry/mlflow-statsmodels-example:2023.1Verify the uploaded containers are available. From the GCP console, search for “Artifact Registry”, then select the registry.

With the packages published, they will be available to a Wallaroo instance.
- Configure Wallaroo Private Registry for GCP Registry
The following process demonstrates how to configure a Wallaroo Instance to use the GCP Registry created and used in previous steps.
- Prerequisites
Before starting, the following will be needed:
The GCP Registry service full URL as created from the Create the Registry process. This can be retrieved through the
gcloudcommand:gcloud artifacts repositories describe $REPOSITORY_NAME --location=$LOCATIONThe private registry service account email address. This is retrieved as described in the process Set up Service Account Key.
The private registry service account credentials in base64. These were created in the step Convert SA Key to Base64. These can be displayed directly from the base Service Account credentials file with:
cat $KEYFILEBASE64Configure for Kots Installations
For kots based installations of Wallaroo, use the following procedure. These are based on the Wallaroo Install Guides.
Log into the Wallaroo Administrative Dashboard from a Kubernetes terminal with administrative access to the Wallaroo instance with the following command, replacing the namespace
wallaroowith the one where the Wallaroo instance is installed.kubectl kots admin-console --namespace wallarooSelect Config, then Private Model Container Registry.
Enable Provide private container registry credentials for model images.
Update the following fields:
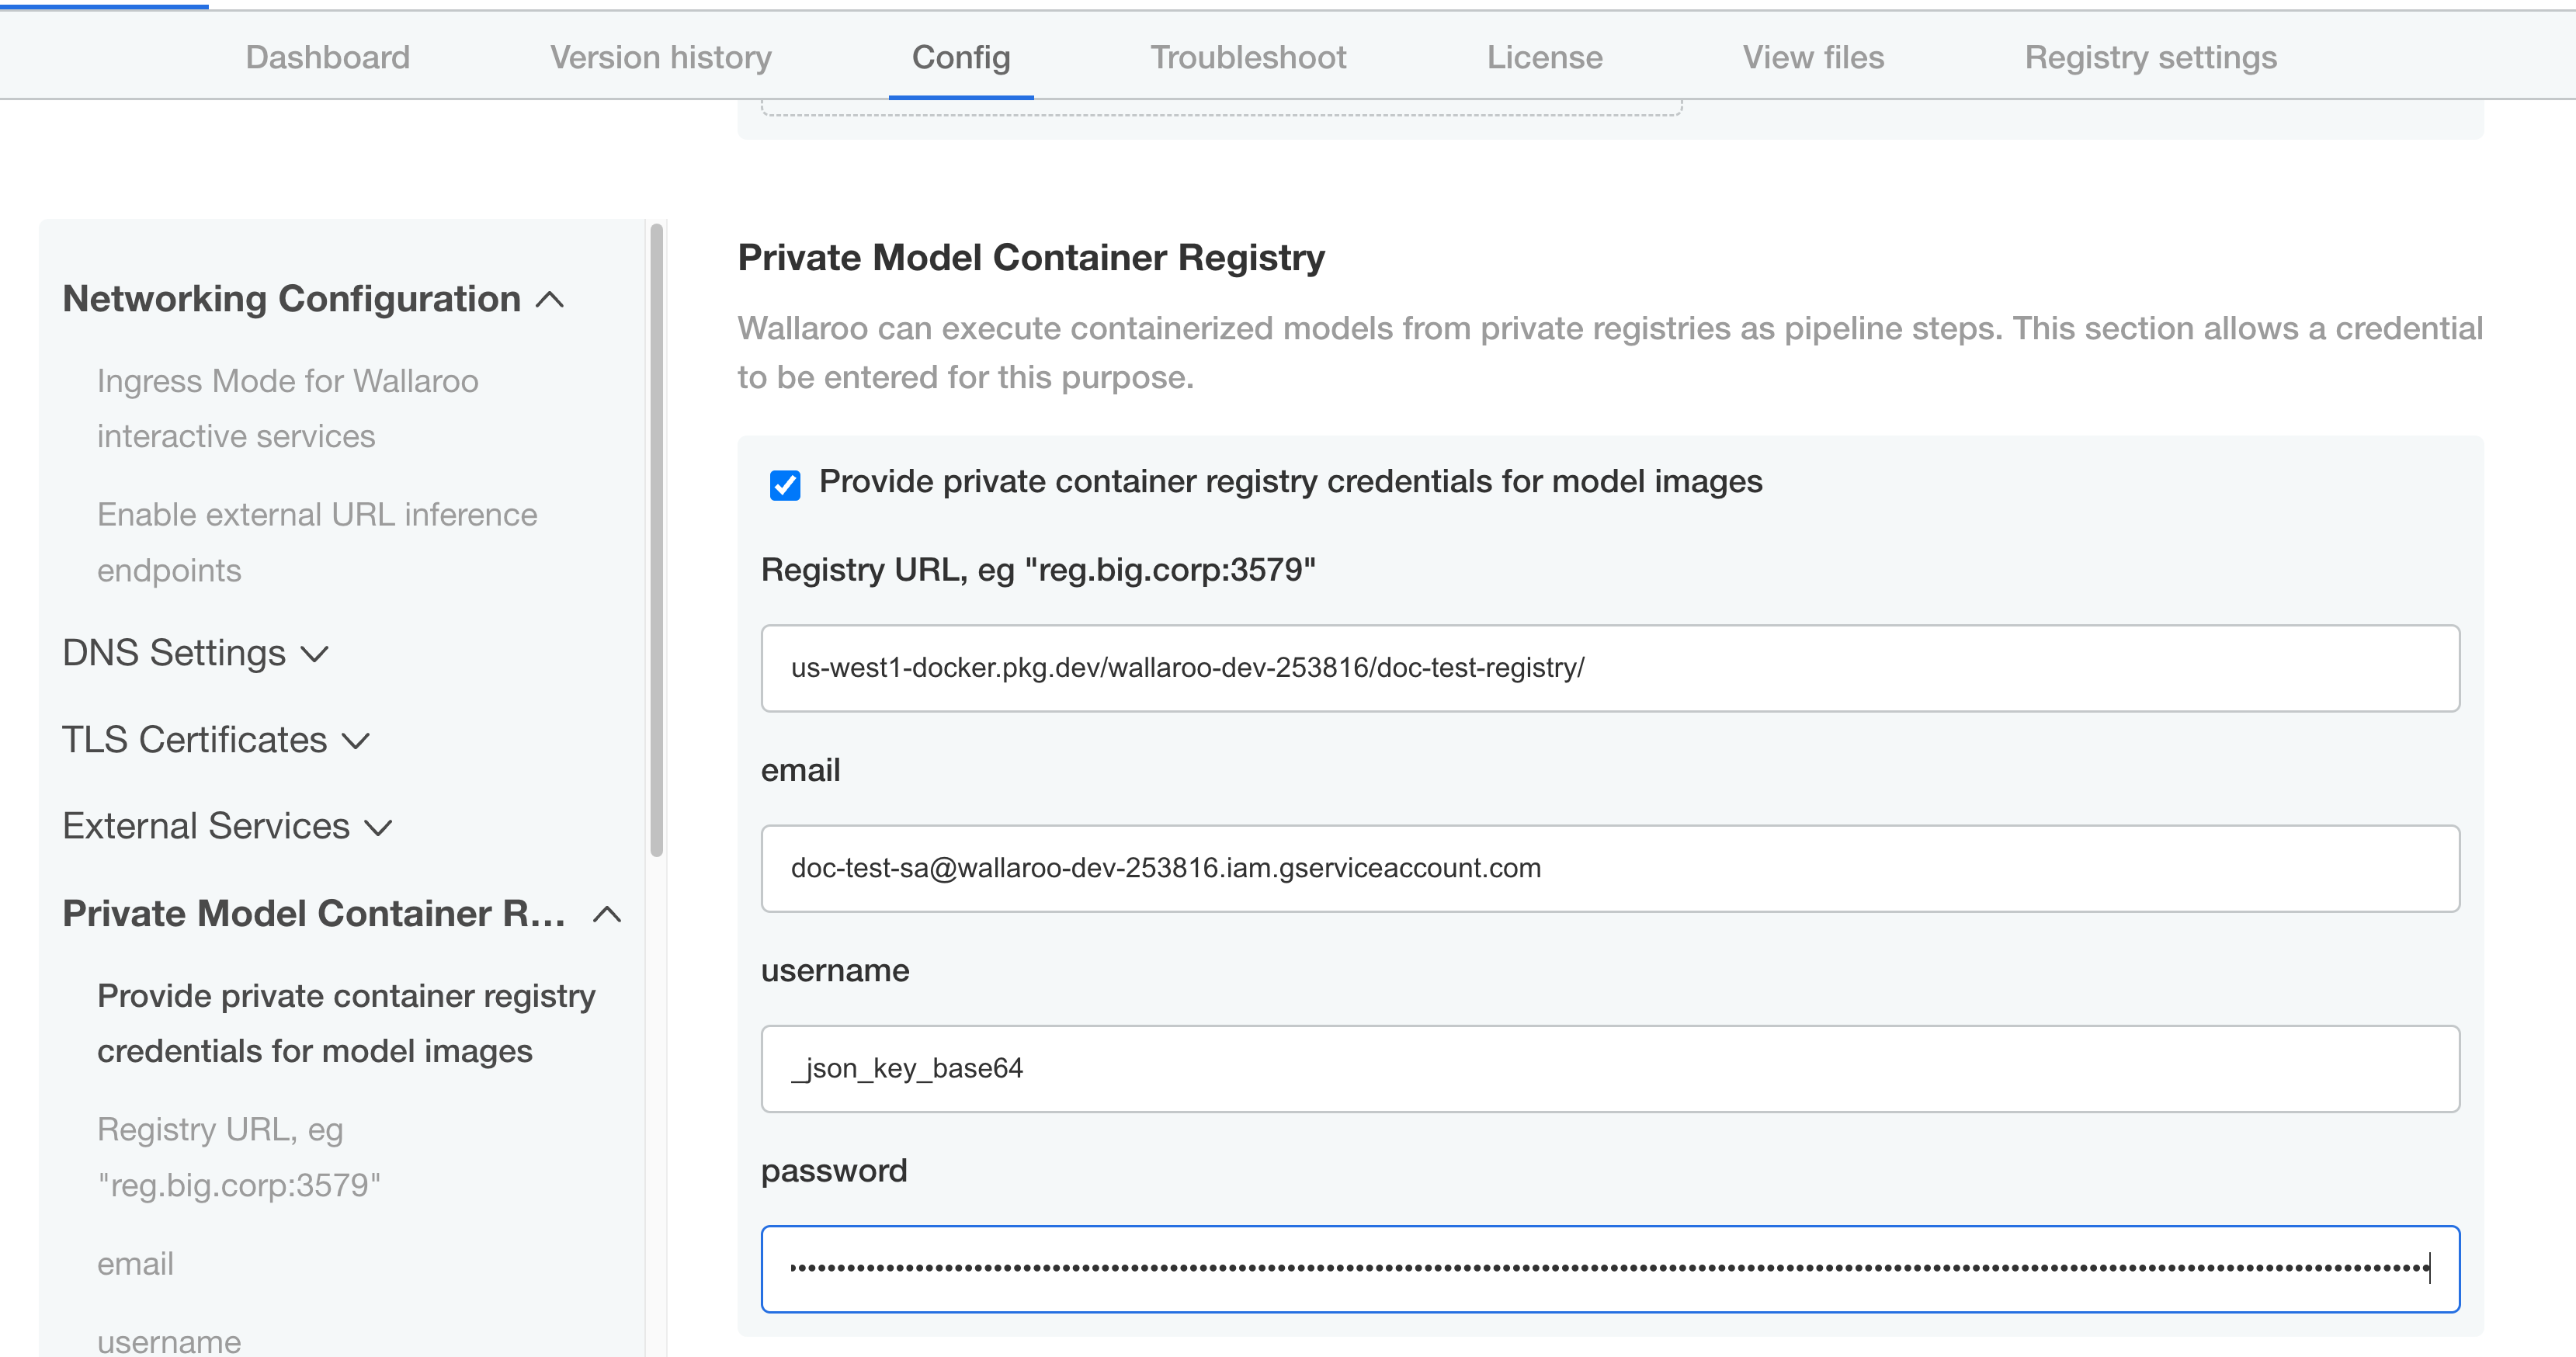
- Registry URL: Insert the full path of your registry. The GCP Registry format is
$LOCATION-docker.pkg.dev/$PROJECT_ID/$REPOSITORY/$IMAGE. In this example, it isus-west1-docker.pkg.dev/wallaroo-dev-253816/doc-test-registry/. - Email: The email address of the service account used with the registry service.
- User: Set to
_json_key_base64. - Password: Set to the private registry service account credentials in base64.
- Registry URL: Insert the full path of your registry. The GCP Registry format is
Scroll to the bottom and select Save Config.
When the update module appears, select Go to updated version.
Wait for the preflight checks to completed, then select Deploy.
- Configure Wallaroo Via Helm
During either the installation process or updates, set the following in the
local-values.yamlfile:privateModelRegistry:enabled: truesecretName:model-registry-secretregistry: Insert the full path of your registry. The GCP Registry format is$LOCATION-docker.pkg.dev/$PROJECT_ID/$REPOSITORY/$IMAGE. In this example, it isus-west1-docker.pkg.dev/wallaroo-dev-253816/doc-test-registry/.email: The email address of the service account used with the registry service.username: Set to_json_key_base64.password: Set to the private registry service account credentials in base64.For example:
# Other settings - DNS entries, etc.

# The private registry settings
privateModelRegistry:
enabled: true
secretName: model-registry-secret
registry: "YOUR REGISTRY URL:YOUR REGISTRY PORT"
email: "serviceAccount:doc-test@wallaroo-dev.iam.gserviceaccount.com"
username: "_json_key_base64_"
password: "abcde"
Install or update the Wallaroo instance via Helm as per the Wallaroo Helm Install instructions.
Once complete, the Wallaroo instance will be able to authenticate to the registry service and retrieve the images.
Setting Private Registry Configuration in Wallaroo
Configure Via Kots
If Wallaroo was installed via kots, use the following procedure to add the private model registry information.
Launch the Wallaroo Administrative Dashboard through a terminal linked to the Kubernetes cluster. Replace the namespace with the one used in your installation.
kubectl kots admin-console --namespace wallarooLaunch the dashboard, by default at
http://localhost:8800.From the admin dashboard, select Config -> Private Model Container Registry.
Enable Provide private container registry credentials for model images.
Provide the following:
- Registry URL: The URL of the Containerized Model Container Registry. Typically in the format
host:port. In this example, the registry for GitHub is used. NOTE: When setting the URL for the Containerized Model Container Registry, only the actual service address is needed. For example: with the full URL of the model asghcr.io/wallaroolabs/wallaroo_tutorials/mlflow-statsmodels-example:2022.4, the URL would beghcr.io/wallaroolabs. - email: The email address of the user authenticating to the registry service.
- username: The username of the user authentication to the registry service.
- password: The password of the user authentication or token to the registry service.
- Registry URL: The URL of the Containerized Model Container Registry. Typically in the format
Scroll down and select Save config.
Deploy the new version.
Once complete, the Wallaroo instance will be able to authenticate to the Containerized Model Container Registry and retrieve the images.
Configure via Helm
During either the installation process or updates, set the following in the
local-values.yamlfile:privateModelRegistry:enabled: truesecretName:model-registry-secretregistry: The URL of the private registry.email: The email address of the user authenticating to the registry service.username: The username of the user authentication to the registry service.password: The password of the user authentication to the registry service.
For example:
# Other settings - DNS entries, etc.

# The private registry settings
privateModelRegistry:
  enabled: true
  secretName: model-registry-secret
  registry: "YOUR REGISTRY URL:YOUR REGISTRY PORT"
  email: "YOUR EMAIL ADDRESS"
  username: "YOUR USERNAME"
  password: "Your Password here"
Install or update the Wallaroo instance via Helm as per the Wallaroo Helm Install instructions.
Once complete, the Wallaroo instance will be able to authenticate to the registry service and retrieve the images.