Wallaroo comes with a plethora of options to enable different services, set performance options, and everything you need to run Wallaroo in the most efficient way.
The following guides are made to help organizations configure Wallaroo and provides integrate it into other services.
1 - DNS Integration Guide
Integrate Wallaroo Enterprise Into an Organization’s DNS.
The following guide demonstrates how to integrate a Wallaroo Enterprise instance with an organization’s DNS. DNS services integration is required for Wallaroo Enterprise edition. It is not required for Wallaroo Community. This guide is indented to assist organizations complete their Wallaroo Enterprise installation, and can be used as a reference if changes to the DNS services are modified and updates to the Wallaroo Enterprise instance are required.
IMPORTANT NOTE
Changing either the DNS name or the security certificates will require the Wallaroo instance be reinstalled.
DNS Services Integration Introduction
DNS services integration is required for Wallaroo Enterprise to provide access to the various supporting services that are part of the Wallaroo instance. These include:
Simplified user authentication and management.
Centralized services for accessing the Wallaroo Dashboard, Wallaroo SDK and Authentication.
Collaboration features allowing teams to work together.
Managed security, auditing and traceability.
This guide is not intended for Wallaroo Community, as those DNS entries are managed by Wallaroo during the installation. For more information on installing Wallaroo Community, see the Wallaroo Community Install Guides.
Once integrated, users can access the following services directly from a URL starting with the suffix domain - this is the domain name where other DNS entries are appended to. For example, if the suffix domain is sales.example.com, then the other services would be referenced by https://api.sales.sample.com, etc.
Note that even when accessing specific Wallaroo services directly that the user must still be authenticated through Wallaroo.
Service
DNS Entry
Description
Wallaroo Dashboard
suffix domain
Provides access to a user interface for updating workspaces, pipelines, and models. Also provides access to the integrated JupyterHub service.
JupyterHub
jupyterhub
Allows the use of Jupyter Notebooks and access to the Wallaroo SDK.
API
api
Provides access to the Wallaroo API.
Keycloak
keycloak
Keycloak provides user management to the Wallaroo instance.
Connections to Wallaroo services are provided as https://service.{suffix domain}. For example, if the domain suffix is wallaroo.example.com then the URLs to access the various Wallaroo services would be:
Determine whether your organization will use a prefix or not as detailed above.
Have access to the Wallaroo Administrative Dashboard - this requires access to the Kubernetes environment that the Wallaroo instance is installed into.
Have access to internal corporate DNS configurations that can be updated. A subdomain for the Wallaroo instance will be created through this process.
Have the IP address for the Wallaroo instance.
Install kubectl into the Kubernetes cluster administrative node.
Wallaroo IP Address Retrieval Methods
Retrieve LoadBalancer IP with kubectl
For most organizations that install Wallaroo into a cloud based Kubernetes cluster such as Micosoft Azure, AWS, etc the external IP address is tied to Wallaroo Loadbalancer service. This can be retrieved with the kubectl command as follows:
Retrieve the external IP address for your Wallaroo instance LoadBalancer. For example, this can be performed through the following kubectl command:
kubectl get svc -A
Example Result:
NAMESPACE     NAME                           TYPE           CLUSTER-IP     EXTERNAL-IP    PORT(S)                                     AGE
default       kubernetes                     ClusterIP      10.64.16.1     <none>         443/TCP                                     3d19h
wallaroo      alertmanager                   ClusterIP      10.64.16.48    <none>         9093/TCP                                    2d22h
wallaroo      api-lb                         LoadBalancer   10.64.30.169   34.173.211.9   80:32176/TCP,443:32332/TCP,8080:30971/TCP   2d22h
In this example, the External-IP of the wallarooLoadBalancer is 34.173.211.9. A more specific command to retrieve just the LoadBalancer address would be:
kubectl get svc api-lb -n wallaroo -o jsonpath='{.status.loadBalancer.ingress[0].ip}'
34.173.211.9
This procedure is appropriate for both clusters that are in external or internal mode.
Other Methods
For organizations install Wallaroo other methods, such as Air Gap or Single Node Linux may find the kubectl get svc api-lb command only returns the internal IP address.
Depending on the instance, there are different methods of acquiring that IP address. The links below reference difference sources.
Refer to your Wallaroo support representative if further assistance is needed.
DNS Integration Steps
To integrate the Wallaroo instance IP address with a DNS service:
Create a CA-signed TLS certificate for your Wallaroo domain with the following settings:
Certificate Authority Options:
Use a public Certificate Authority such as Let’s Encrypt or Verisign. In general, you would send a Certificate Signing Request to your CA and they would respond with your certificates.
Use a private Certificate Authority (CA) to provide the certificates. Your organization will have procedures for clients to verify the certificates from the private CA.
Use a Wallaroo certificate and public name server. Contact our CSS team for details.
Subject Domain:
Set the certificate’s Subject CN to your Wallaroo domain.
With Wildcards: To use wildcards, use the wildcard *.{suffix domain}. For example, if the domain suffix is wallaroo.example.com, then the Subject CNs would be:
wallaroo.example.com
*.wallaroo.example.com
If wildcard domains are not desired, use a combination of Subject and Subject Alternative Names to set names as follows:
wallaroo.example.com
api.wallaroo.example.com
jupyter.wallaroo.example.com
keycloak.wallaroo.example.com
Save your certificates.
You should have two files: the TLS Certificate (.crt) and TLS private key (.key). Store these in a secure location - these will be installed into Wallaroo at a later step.
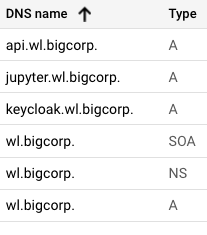
Create DNS the following entries based on the list above for the Wallaroo instance’s IP address, updating the domain name depending on whether there is a prefix or not:
api: A (address) record
jupyter: A (address) record
keycloak: A (address) record
Suffix domain: A record, NS (Name Server) record, SOA (Start Of Authority) record.
For example:
Access the Wallaroo Administrative Dashboard in your browser. This can be done either after installation, or through the following command (assuming your Wallaroo instance was installed into the namespace wallaroo). By default this provides the Wallaroo Administrative Dashboard through the URL https://localhost:8080.
kubectl-kots admin-console --namespace wallaroo
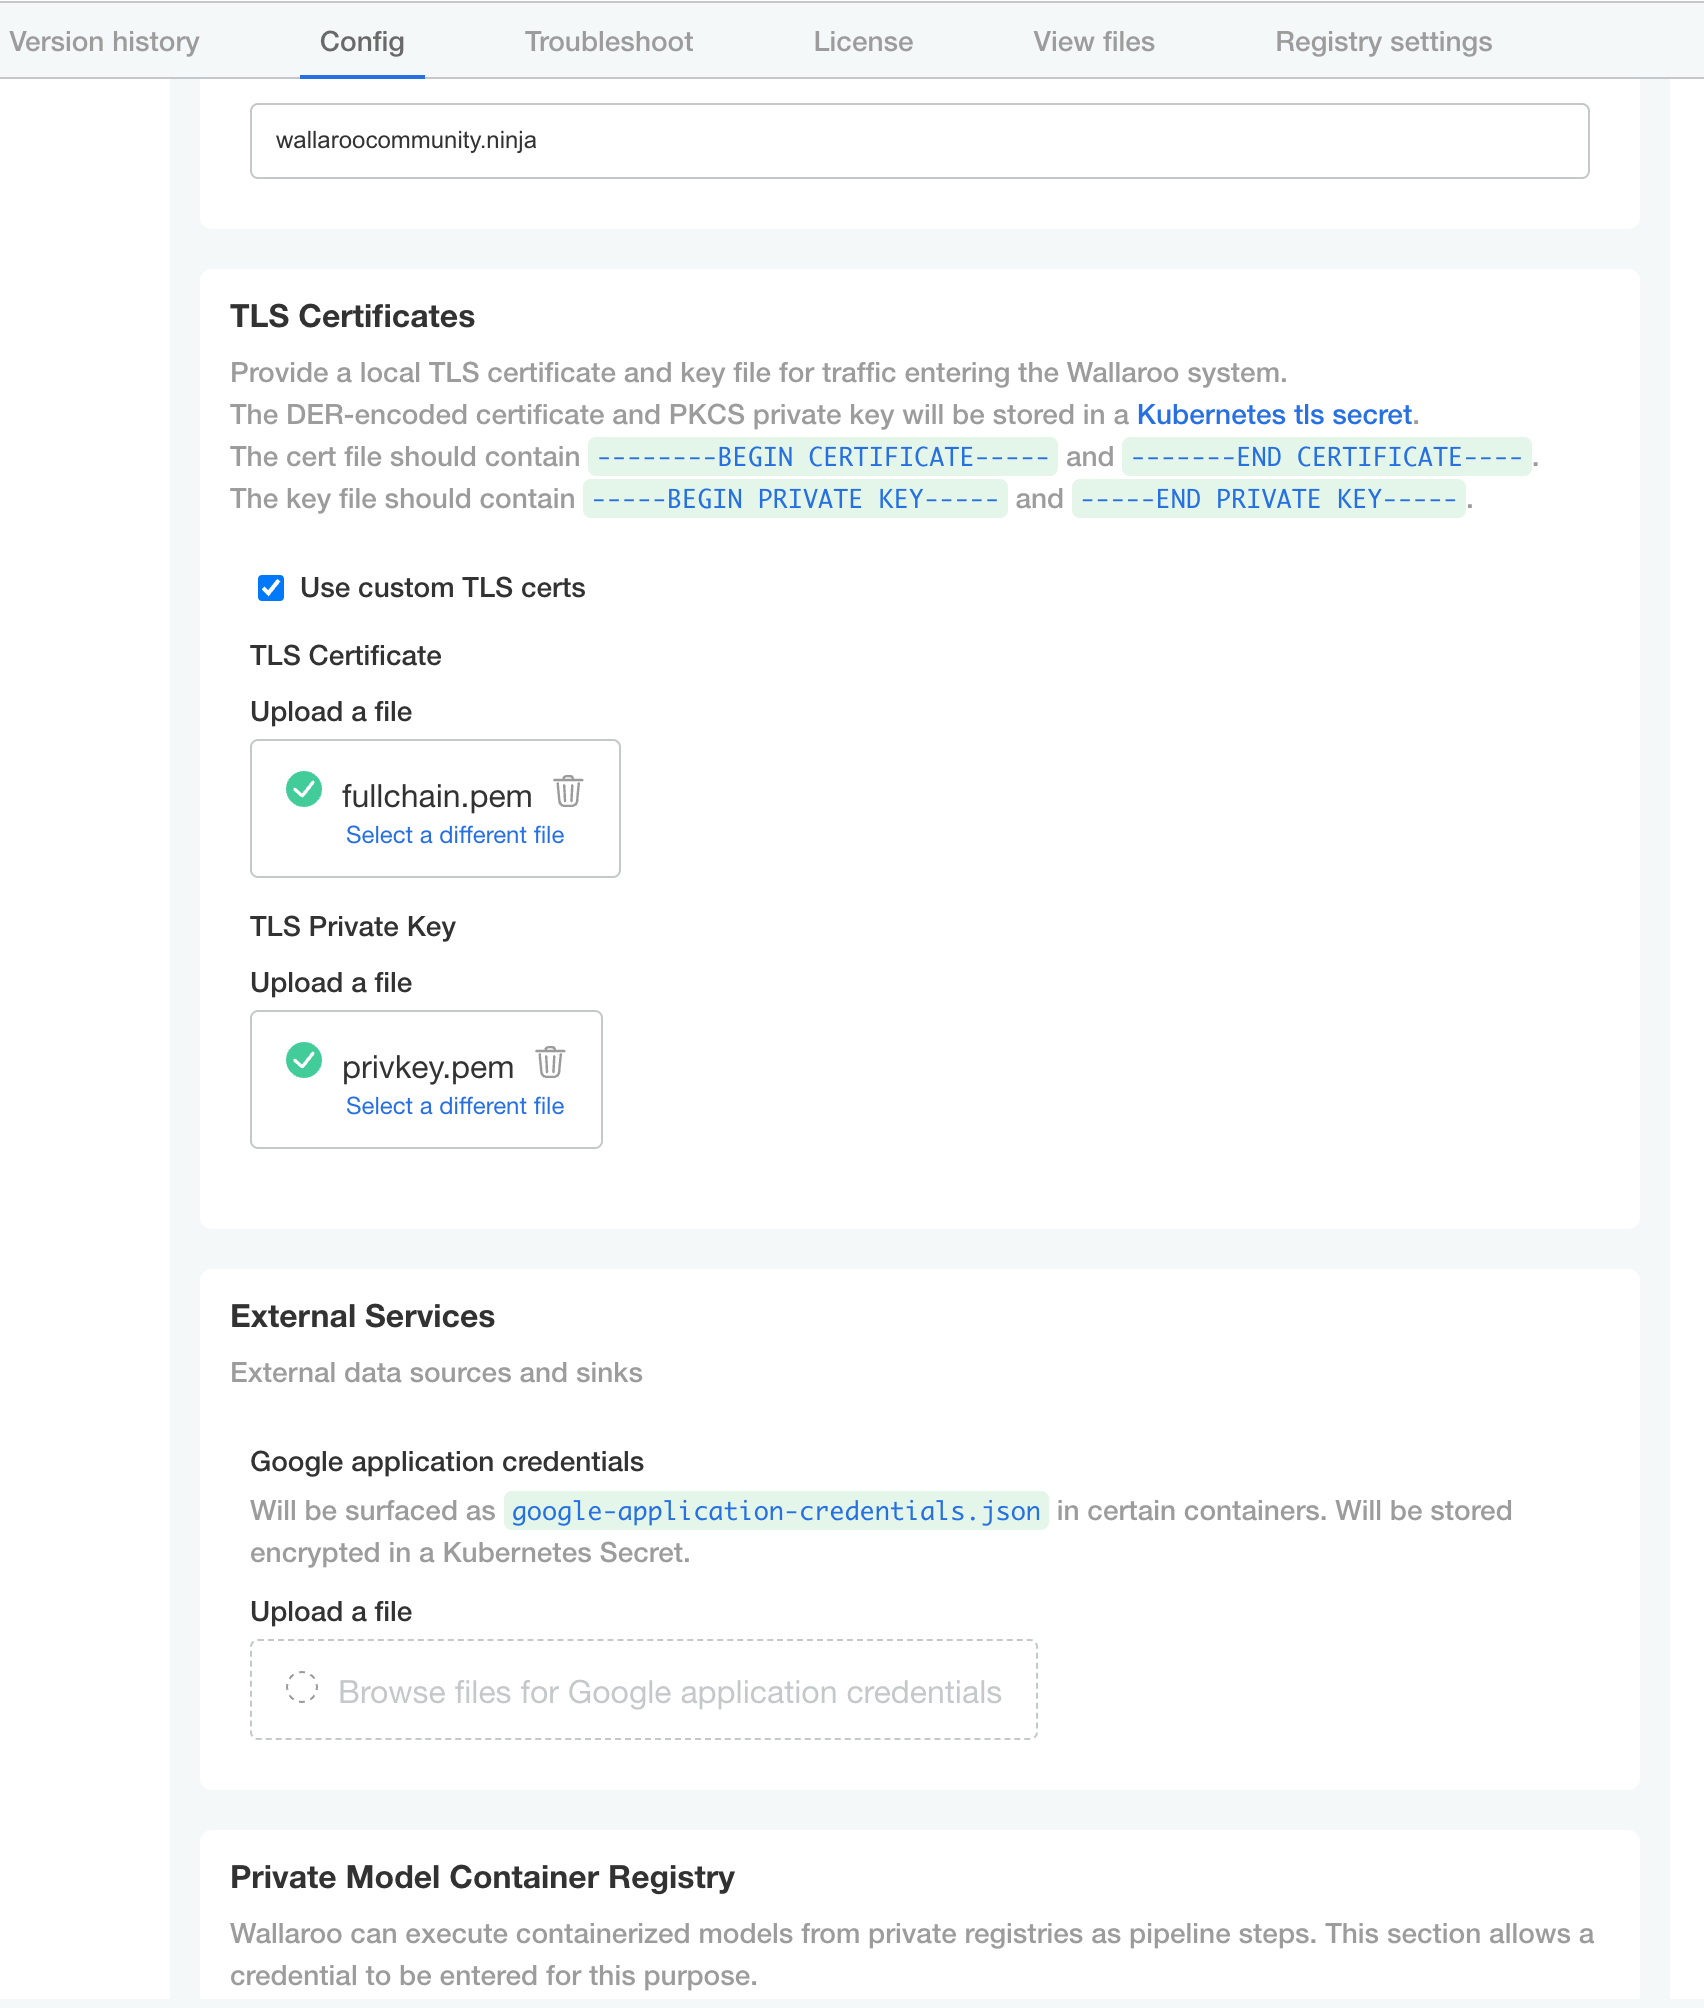
From the Wallaroo Dashboard, select Config and set the following:
Networking Configuration
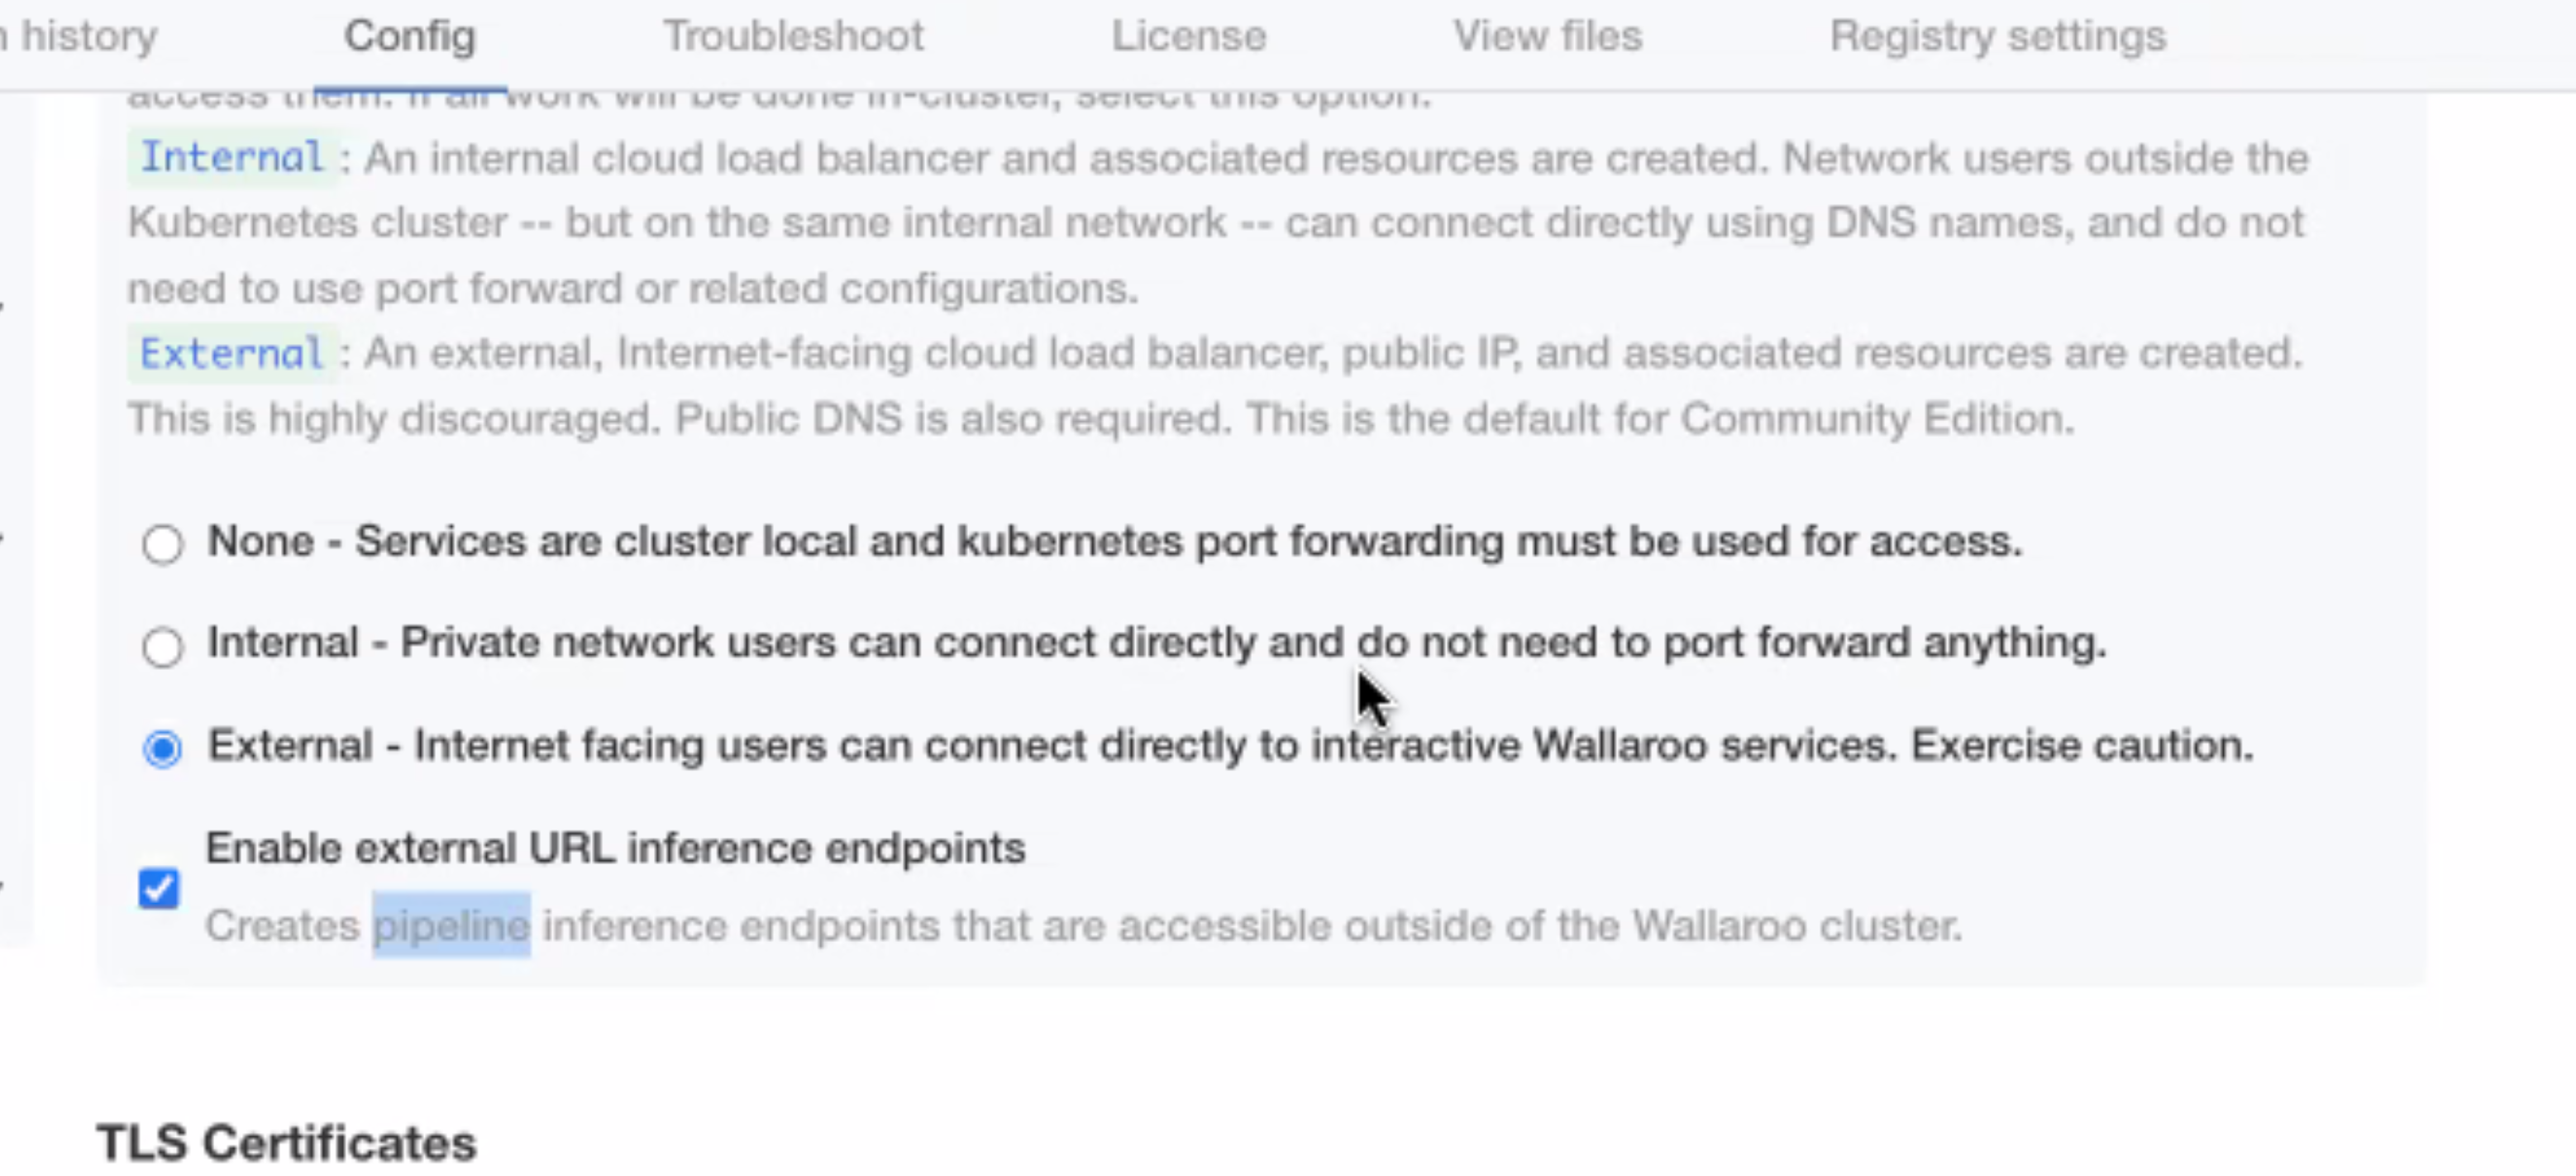
Ingress Mode for Wallaroo Endpoints:
None: Port forwarding or other methods are used for access.
Internal: For environments where only nodes within the same Kubernetes environment and no external connections are required.
External: Connections from outside the Kubernetes environment is allowed.
Enable external URL inference endpoints: Creates pipeline inference endpoints. For more information, see Model Endpoints Guide.
DNS
DNS Suffix (Mandatory): The domain name for your Wallaroo instance.
TLS Certificates
Use custom TLS Certs: Checked
TLS Certificate: Enter your TLS Certificate (.crt file).
TLS Private Key: Enter your TLS private key (.key file).
Other settings as desired.
Once complete, scroll to the bottom of the Config page and select Save config.
A pop-up window will display The config for Wallaroo Enterprise has been updated.. Select Go to updated version to continue.
From the Version History page, select Deploy. Once the new deployment is finished, you will be able to access your Wallaroo services via their DNS addresses.
To verify the configuration is complete, access the Wallaroo Dashboard through the suffix domain. For example if the suffix domain is wallaroo.example.com then access https://wallaroo.example.com in a browser and verify the connection and certificates.
Edge Observability Enablement
For organizations that deploy Wallaroo pipelines on edge devices as Wallaroo Servers, see the DNS settings from the Edge Deployment Registry Guide.
2 - Model Endpoints Guide
Enable external deployment URLs to perform inferences through API calls.
Wallaroo provides the ability to perform inferences through deployed pipelines via both internal and external inferences URLs. These URLs allow inferences to be performed by submitting data to the internal or external inferences URL, with the inference results returned in the same format as the InferenceResult Object.
Internal URLs are available only through the internal Kubernetes environment hosting the Wallaroo instance. External URLs are available outside of the Kubernetes environment, such as the public internet. Authentication will be required to connect to these external deployment URLs.
The following process will enable external inference URLs
helm users can update the configuration and enable endpoints by setting the apilb\external_inference_endpoints_enabled to true as follows:
apilb:
# Required to perform remote inferences either through the SDK or the APIexternal_inference_endpoints_enabled: true
For kots users: To access the Wallaroo Administrative Dashboard:
From a terminal shell connected to the Kubernetes environment hosting the Wallaroo instance, run the following kots command:
kubectl kots admin-console --namespace wallaroo
This provides the following standard output:
  • Press Ctrl+C to exit
  • Go to http://localhost:8800 to access the Admin Console
This will host a http connection to the Wallaroo Administrative Dashboard, by default at http://localhost:8800.
Open a browser at the URL detailed in the step above and authenticate using the console password set as described in the as detailed in the Wallaroo Install Guides.
From the top menu, select Config then verify that Networking Configuration -> Ingress Mode for Wallaroo interactive services -> Enable external URL inference endpoints is enabled.
Save the updated configuration, then deploy it. Once complete, the external URL inference endpoints will be enabled.
3 - Manage Minio Storage for Models Storage
How to manage model storage in Wallaroo
Targeted Role
Dev Ops
Organizations can manage their ML Model storage in their Wallaroo instances through the MinIO interface included in the standard Wallaroo installation.
The following details how to access and the Wallaroo MinIO service. For full details on using the MinIO service, see the MinIO Documentation site.
All of the steps below require administrative access to the Kubernetes service hosting the Wallaroo instance.
IMPORTANT NOTE
Deleting a model from MinIO storage frees up storage by deleting the model artifacts, but does not remove the model objects from Wallaroo workspaces. Please ensure that pipeline deployments are not dependent on the model artifacts being deleted.
Wallaroo MinIO Model Storage
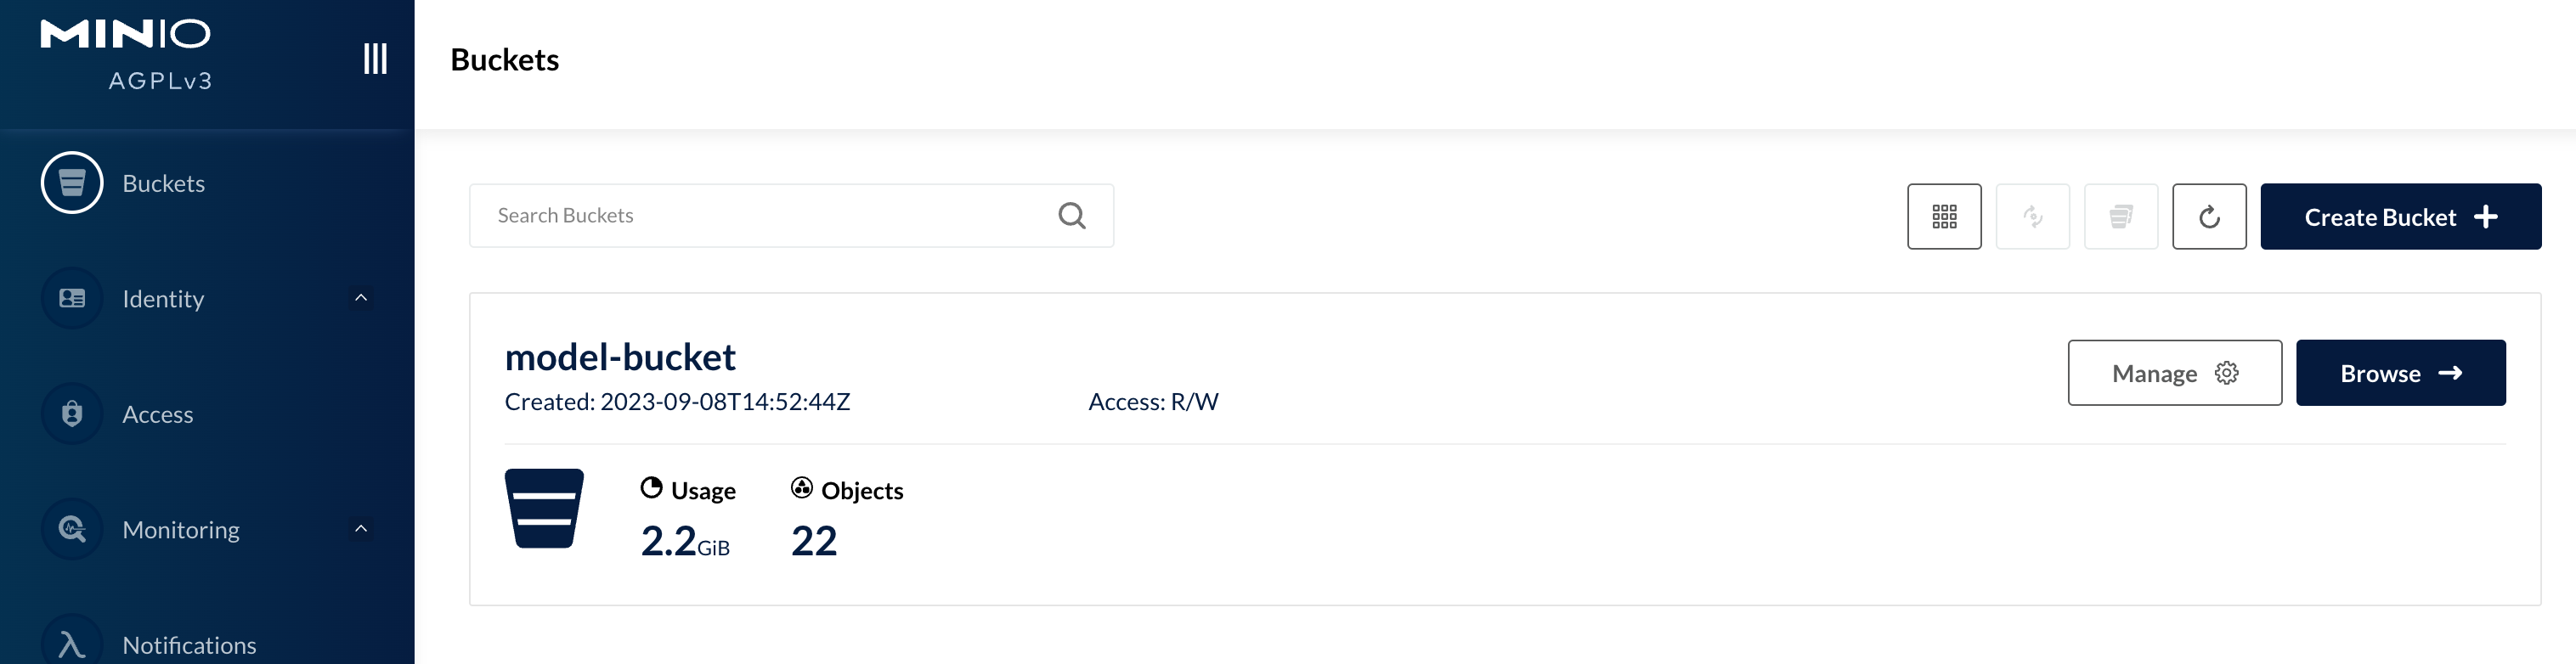
Wallaroo ML Models are stored in the MinIO bucket model-bucket.
Retrieving the Wallaroo MinIO Password
Access to the Wallaroo MinIO service is password protected. DevOps with administrative access to the Kubernetes cluster hosting the Wallaroo instance can retrieve this password with the following:
The kubectl command.
The namespace the Wallaroo instance is installed to.
Access to the MinIO service in a Wallaroo instance is performed either with the Command Line Interface (CLI), or through a browser based User Interface (UI).
Accessing the MinIO Service Through CLI
Access to the MinIO service included with the Wallaroo instance can be performed with the command line tool mc. For more details, see the MinIO Client documentation.
Installing Minio CLI
The following demonstrates installing the mc command for MacOS and Linux.
Installing for MacOS with Brew
MacOS users who have installed Homebrew can install mc with the following:
brew install minio/stable/mc
Installing for Linux
Linux users can install the MinIO CLI tool mc with the following:
wget https://dl.min.io/client/mc/release/linux-amd64/mc
chmod +x mc
sudo mv mc /usr/local/bin/mc
Port Forward for MinIO CLI Access
To access the Wallaroo MinIO service, use Kubernetes port-forward to connect. By default this is on port 9000. This command requires the following:
The kubectl command.
The namespace the Wallaroo instance is installed to.
Once the port forward command is running, the MinIO UI is access through a browser on port 9001 with the user minio and the MinIO administrative password retrieved through the step Retrieving the Minio Administrative Password.
Viewing General Storage
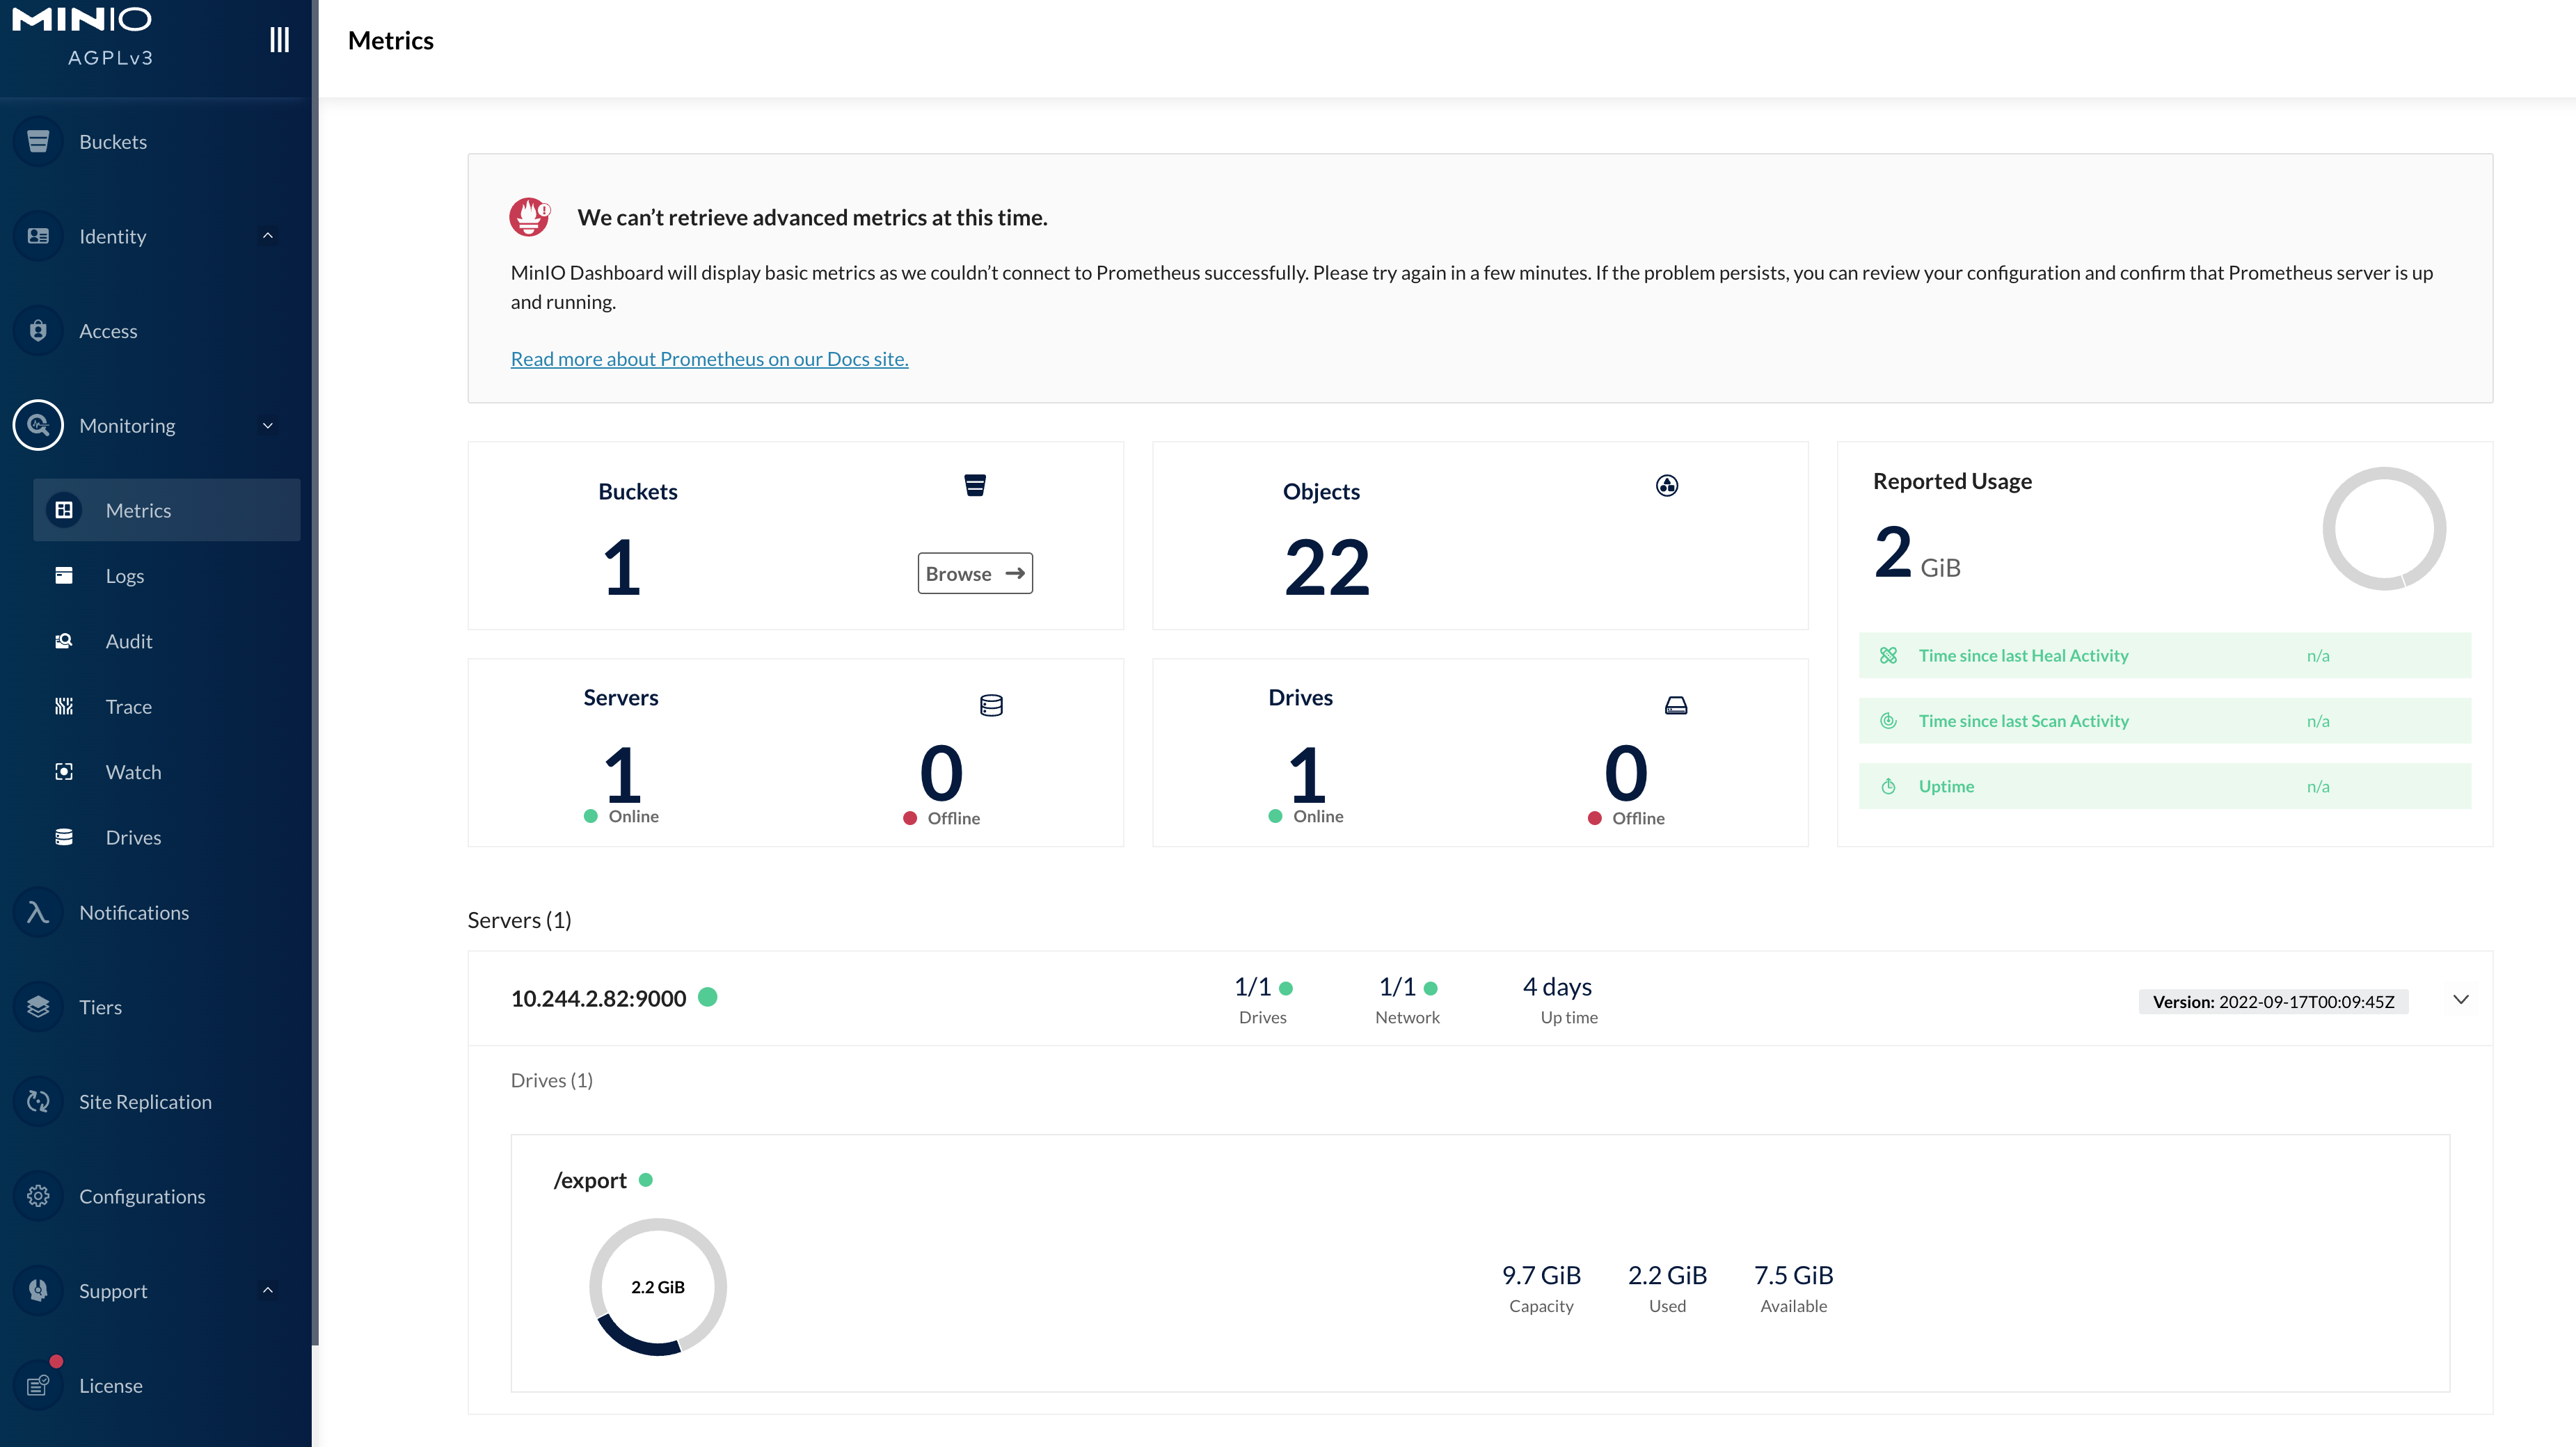
General disk usage is displayed through Monitoring->Metrics.
Viewing ML Model Storage
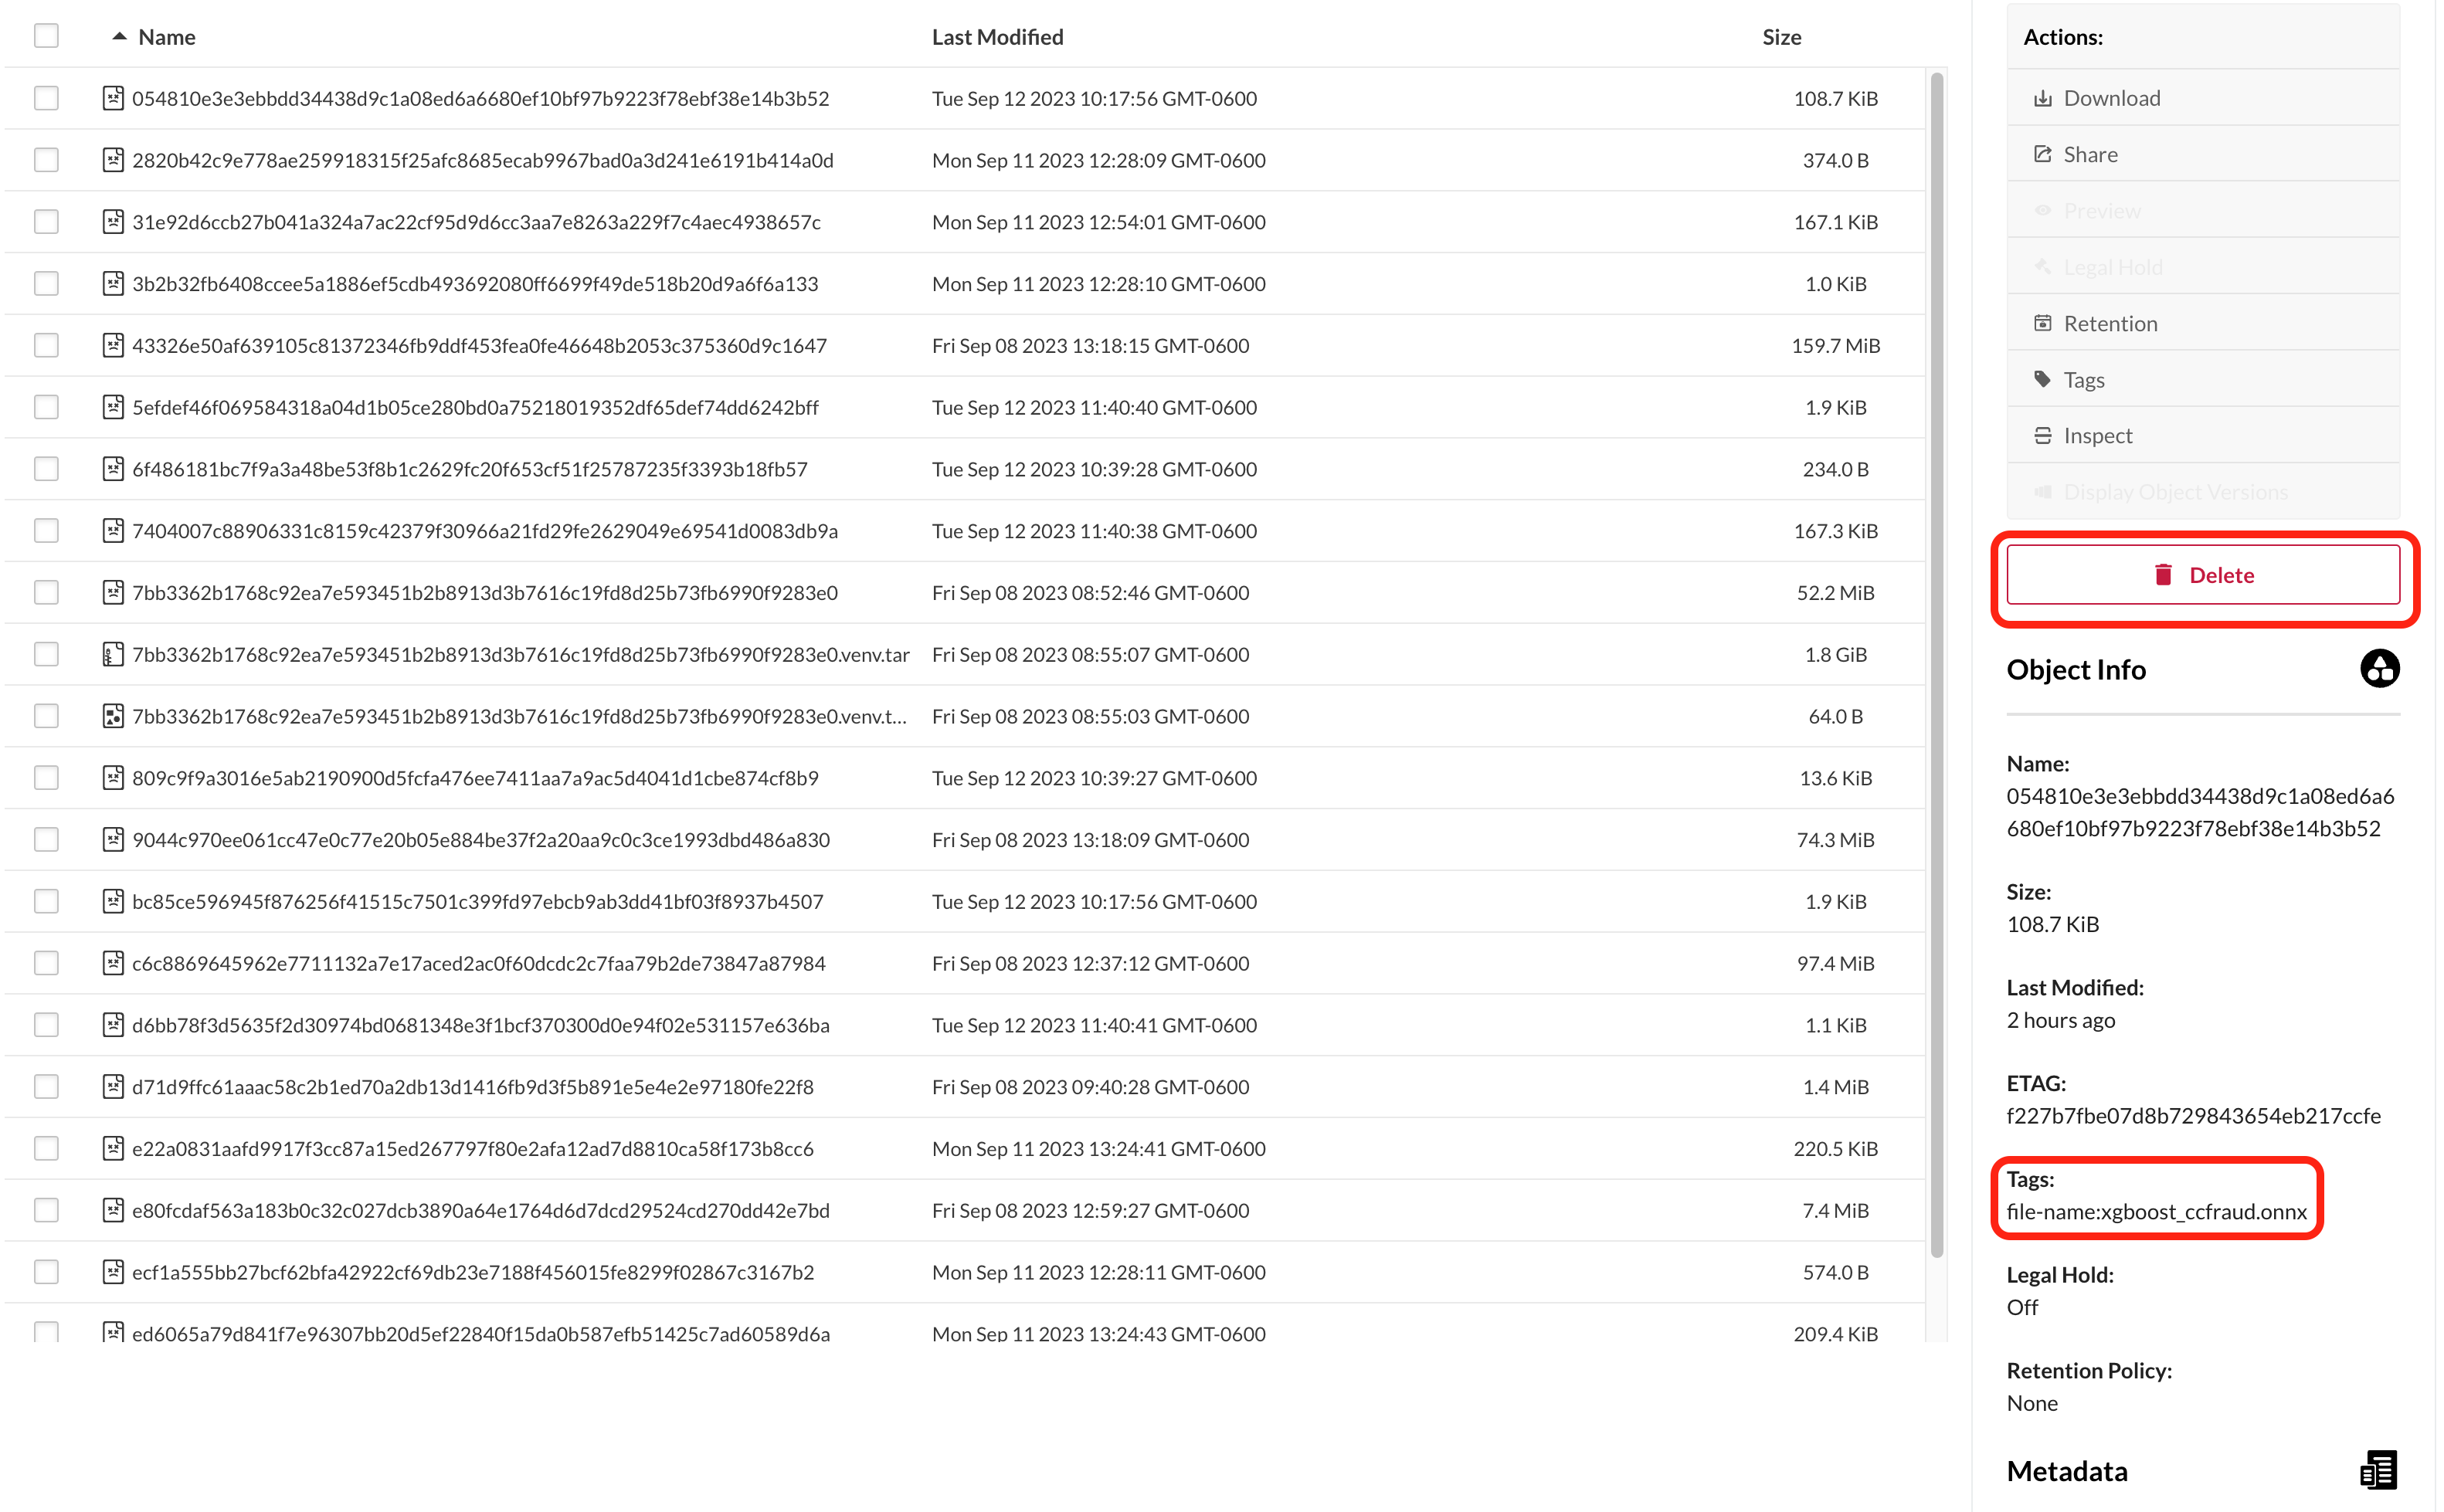
ML Models stored for Wallaroo are accessed through the bucket model-bucket.
Select Browse to view the contents of the model-bucket. To determine the specific file name, access the Name of the object and view the Tags. The file name is access via the Tag file-name.
Objects can be deleted from this bucket with the Delete option.
4 - Private Containerized Model Container Registry Guide
How to enable private Containerized Model Container Registry with Wallaroo.
Configure Wallaroo with a Private Containerized Model Container Registry
Organizations can configure Wallaroo to use private Containerized Model Container Registry. This allows for the use of containerized models such as MLFlow.
The following steps will provide sample instructions on setting up different private registry services from different providers. In each case, refer to the official documentation for the providers for any updates or more complex use cases.
The following process is used with a GitHub Container Registry to create the authentication tokens for use with a Wallaroo instance’s Private Model Registry configuration.
The following process is used register a GitHub Container Registry with Wallaroo.
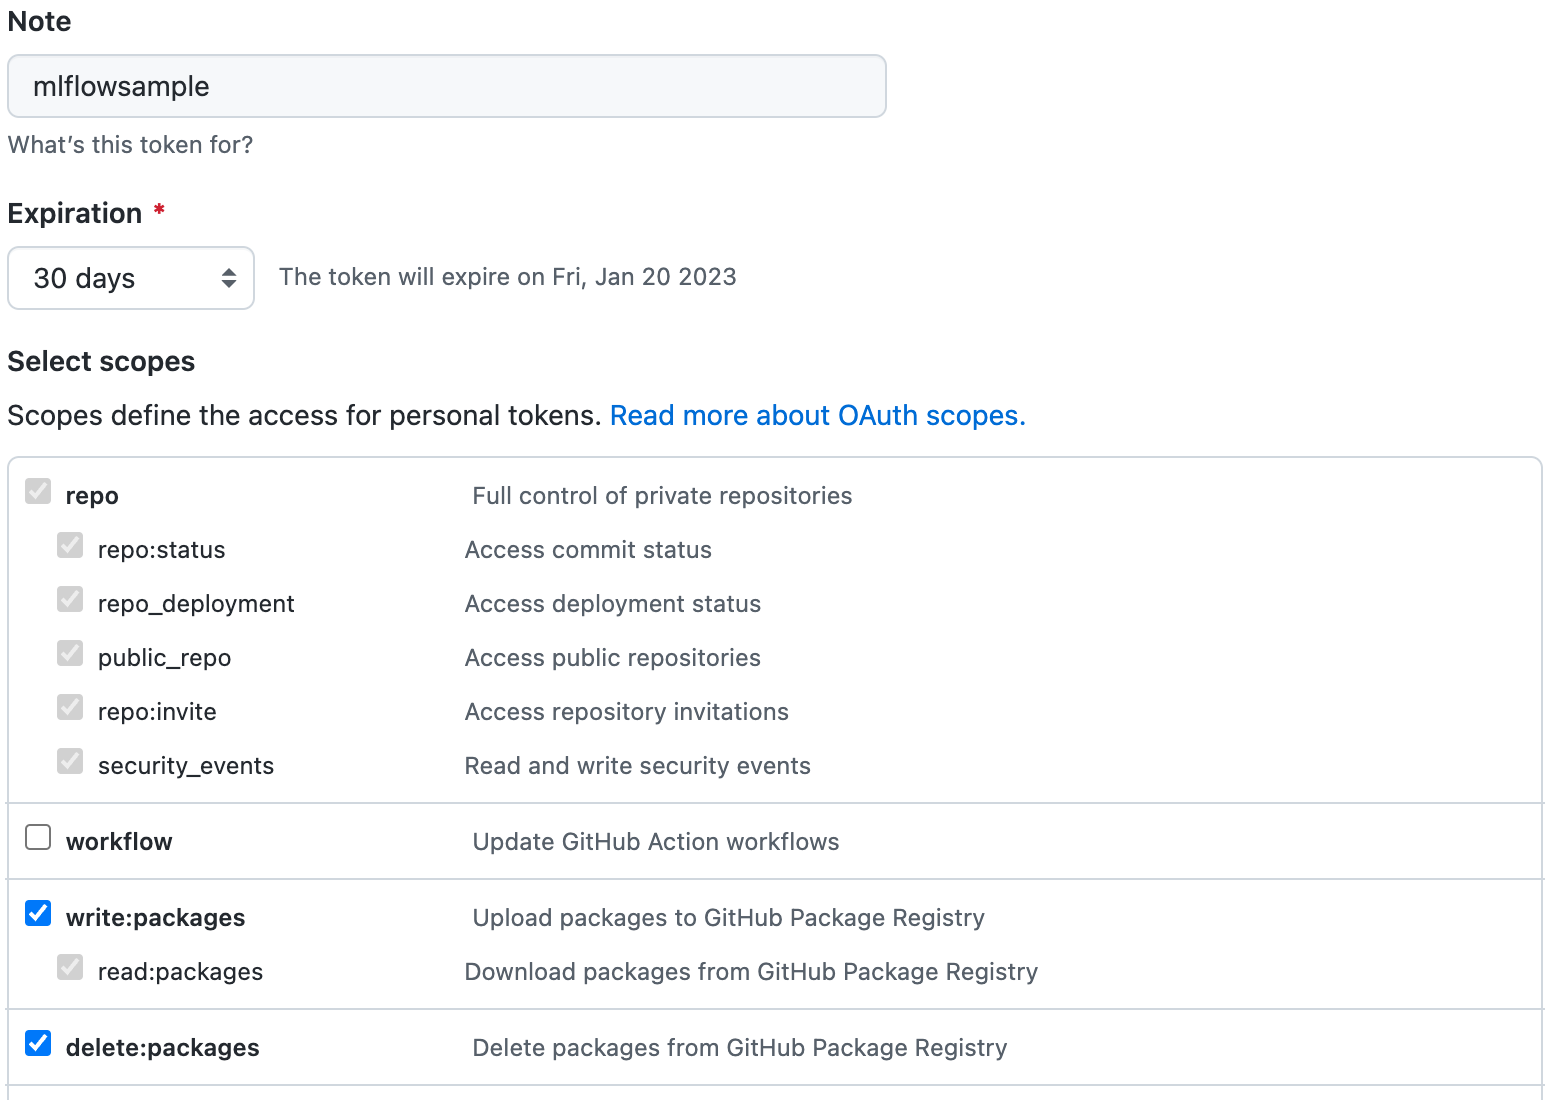
Create a new token as per the instructions from the Creating a personal access token (classic) guide. Note that a classic token is recommended for this process. Store this token in a secure location as it will not be able to be retrieved later from GitHub. Verify the following permissions are set:
Select the write:packages scope to download and upload container images and read and write their metadata.
Select the read:packages scope to download container images and read their metadata (selected when write:packages is selected by default).
Select the delete:packages scope to delete container images.
Configure Wallaroo Via Kots
If Wallaroo was installed via kots, use the following procedure to add the private model registry information.
Launch the Wallaroo Administrative Dashboard through a terminal linked to the Kubernetes cluster. Replace the namespace with the one used in your installation.
kubectl kots admin-console --namespace wallaroo
Launch the dashboard, by default at http://localhost:8800.
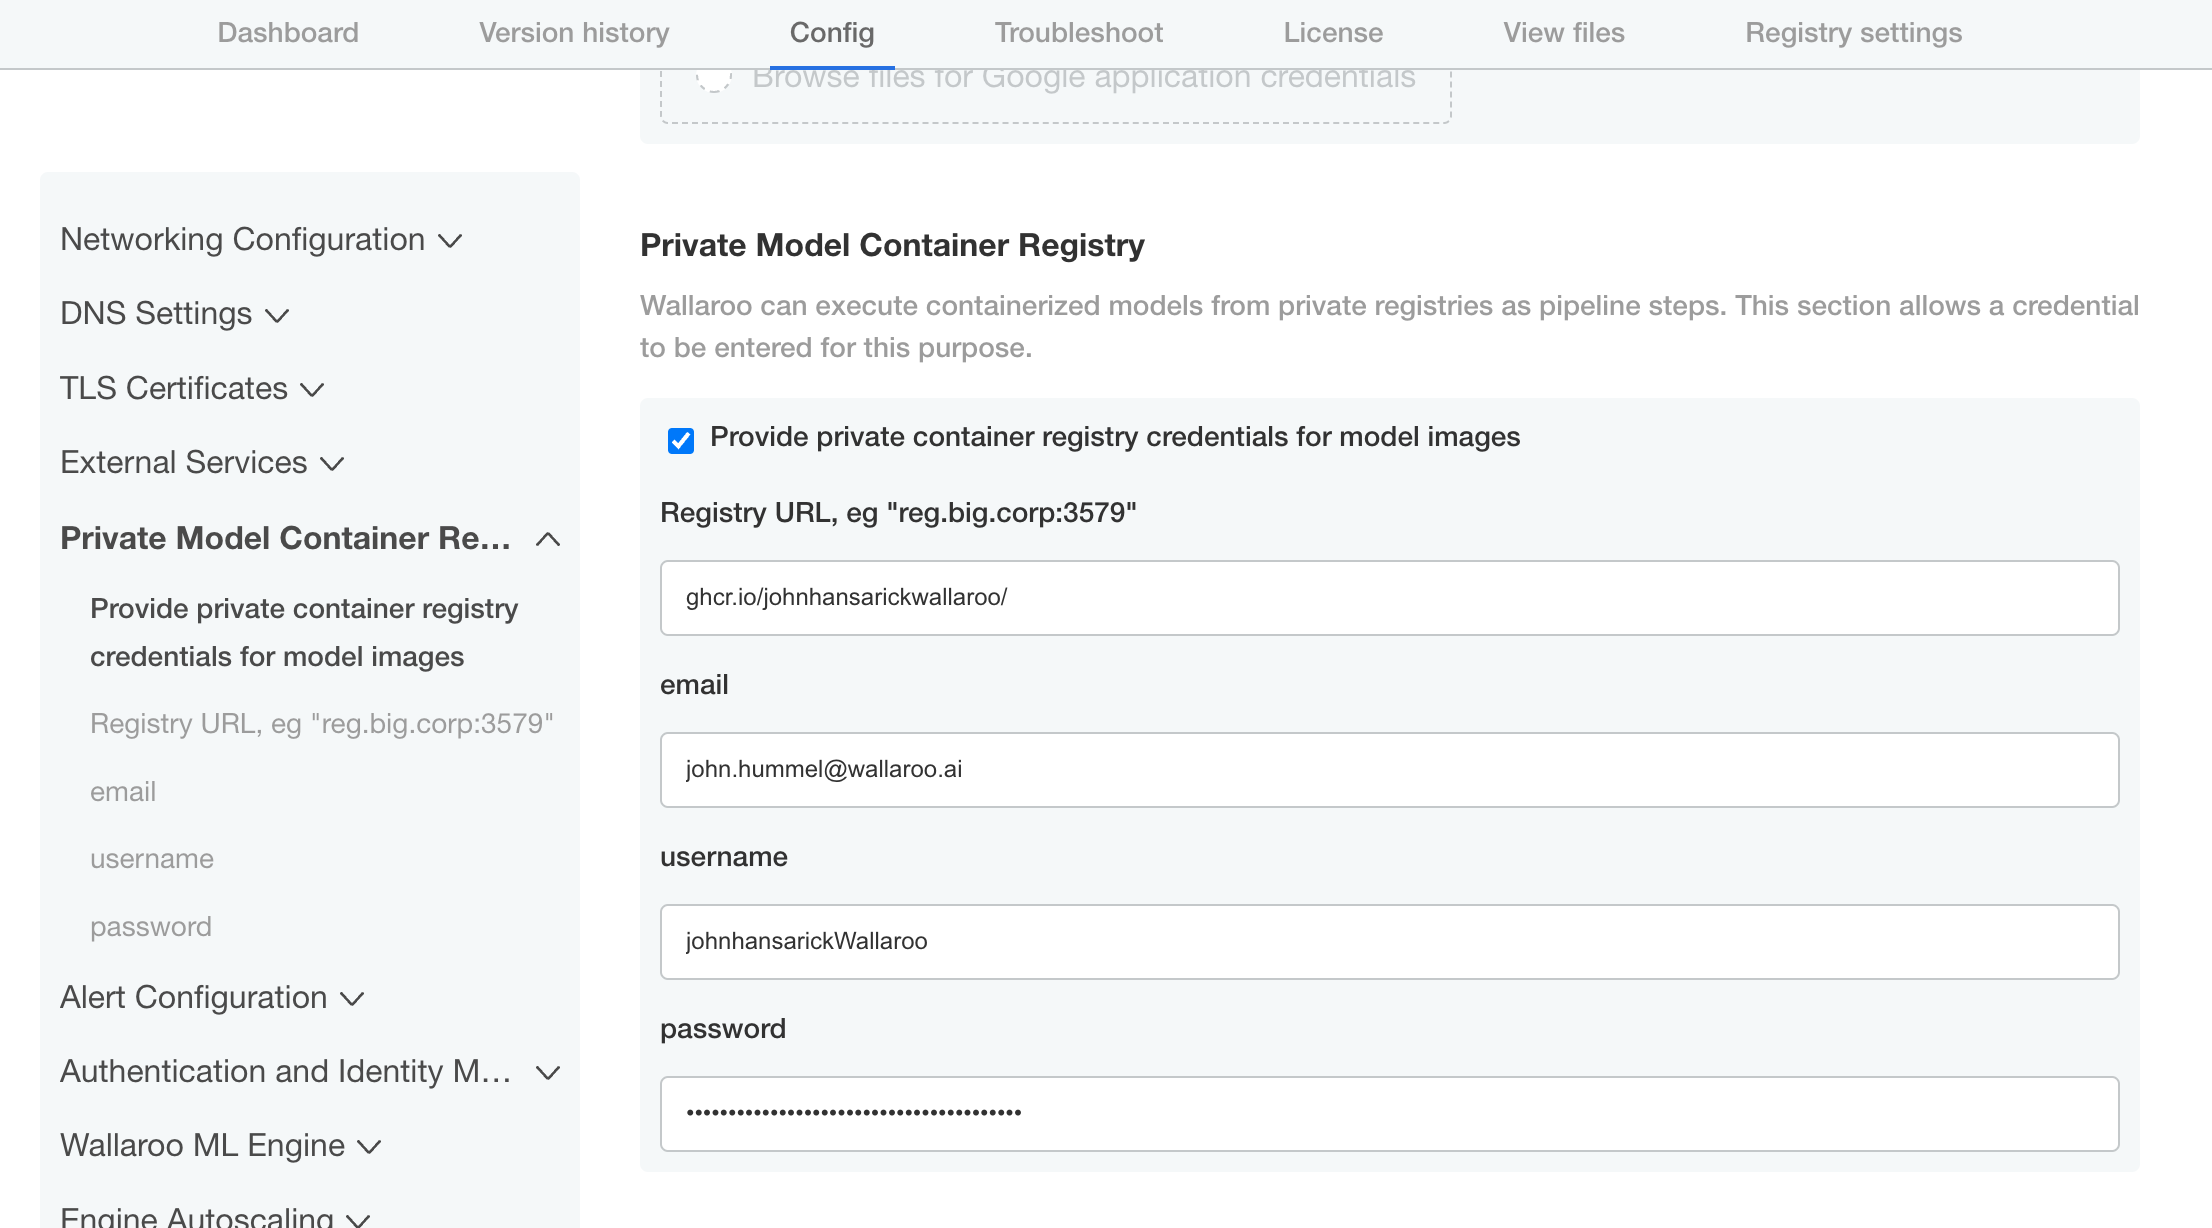
From the admin dashboard, select Config -> Private Model Container Registry.
Enable Provide private container registry credentials for model images.
Provide the following:
Registry URL: The URL of the Containerized Model Container Registry. Typically in the format host:port. In this example, the registry for GitHub is used.
email: The email address of the Github user generating the token.
username: The username of the Github user authentication to the registry service.
password: The GitHub token generated in the previous steps.
Scroll down and select Save config.
Deploy the new version.
Once complete, the Wallaroo instance will be able to authenticate to the Containerized Model Container Registry and retrieve the images.
Configure Wallaroo Via Helm
During either the installation process or updates, set the following in the local-values.yaml file:
privateModelRegistry:
enabled: true
secretName: model-registry-secret
registry: The URL of the Containerized Model Container Registry. Typically in the format host:port.
email: The email address of the Github user generating the token.
username: The username of the Github user authentication to the registry service.
password: The GitHub token generated in the previous steps.
For example:
# Other settings - DNS entries, etc.# The private registry settingsprivateModelRegistry:
enabled: truesecretName: model-registry-secret
registry: "ghcr.io/johnhansarickwallaroo"email: "sample.user@wallaroo.ai"username: "johnhansarickwallaroo"password: "abcdefg"
Once complete, the Wallaroo instance will be able to authenticate to the registry service and retrieve the images.
The following process is an example of setting up an Artifact Registry Service with Google Cloud Platform (GCP) that is used to store containerized model images and retrieve them for use with Wallaroo.
Uploading and downloading containerized models to a Google Cloud Platform Registry follows these general steps.
Create the GCP registry.
Create a Service Account that will manage the registry service requests.
Assign appropriate Artifact Registry role to the Service Account
Retrieve the Service Account credentials.
Using either a specific user, or the Service Account credentials, upload the containerized model to the registry service.
Add the service account credentials to the Wallaroo instance’s containerized model private registry configuration.
Prerequisites
The commands below use the Google gcloud command line tool, and expect that a Google Cloud Platform account is created and the gcloud application is associated with the GCP Project for the organization.
For full details on the process and other methods, see the Google GCP documentation.
The GCP Registry Service Account is used to manage the GCP registry service. The steps are details from the Google Create a service account guide.
The gcloud process for these steps are:
Connect the gcloud application to the organization’s project.
$PROJECT_ID="YOUR PROJECT ID"gcloud config set project $PROJECT_ID
Create the service account with the following:
The name of the service account.
A description of its purpose.
The name to show when displayed.
SA_NAME="YOUR SERVICE ACCOUNT NAME"DESCRIPTION="Wallaroo container registry SA"DISPLAY_NAME="Wallaroo the Roo"gcloud iam service-accounts create $SA_NAME\
--description=$DESCRIPTION\
--display-name=$DISPLAY_NAME
Read, write, and delete artifacts. Create gcr.io repositories.
For this example, we will add the Artifact Registry Create-on-push Writer to the created Service Account from the previous step.
Add the role to the service account, specifying the member as the new service account, and the role as the selected role. For this example, a pkg.dev is assumed for the Artifact Registry type.
# for pkg.devROLE="roles/artifactregistry.writer"# for gcr.io #ROLE="roles/artifactregistry.createOnPushWritergcloud projects add-iam-policy-binding \
$PROJECT_ID\
--member="serviceAccount:$SA_NAME@$PROJECT_ID.iam.gserviceaccount.com"\
--role=$ROLE
Authenticate to Repository
To push and pull image from the new registry, we’ll use our new service account and authenticate through the local Docker application. See the GCP Push and pull images for details on using Docker and other methods to add artifacts to the GCP artifact registry.
Set up Service Account Key
To set up the Service Account key, we’ll use the Google Console IAM & ADMIN dashboard based on the Set up authentication for Docker, using the JSON key approach.
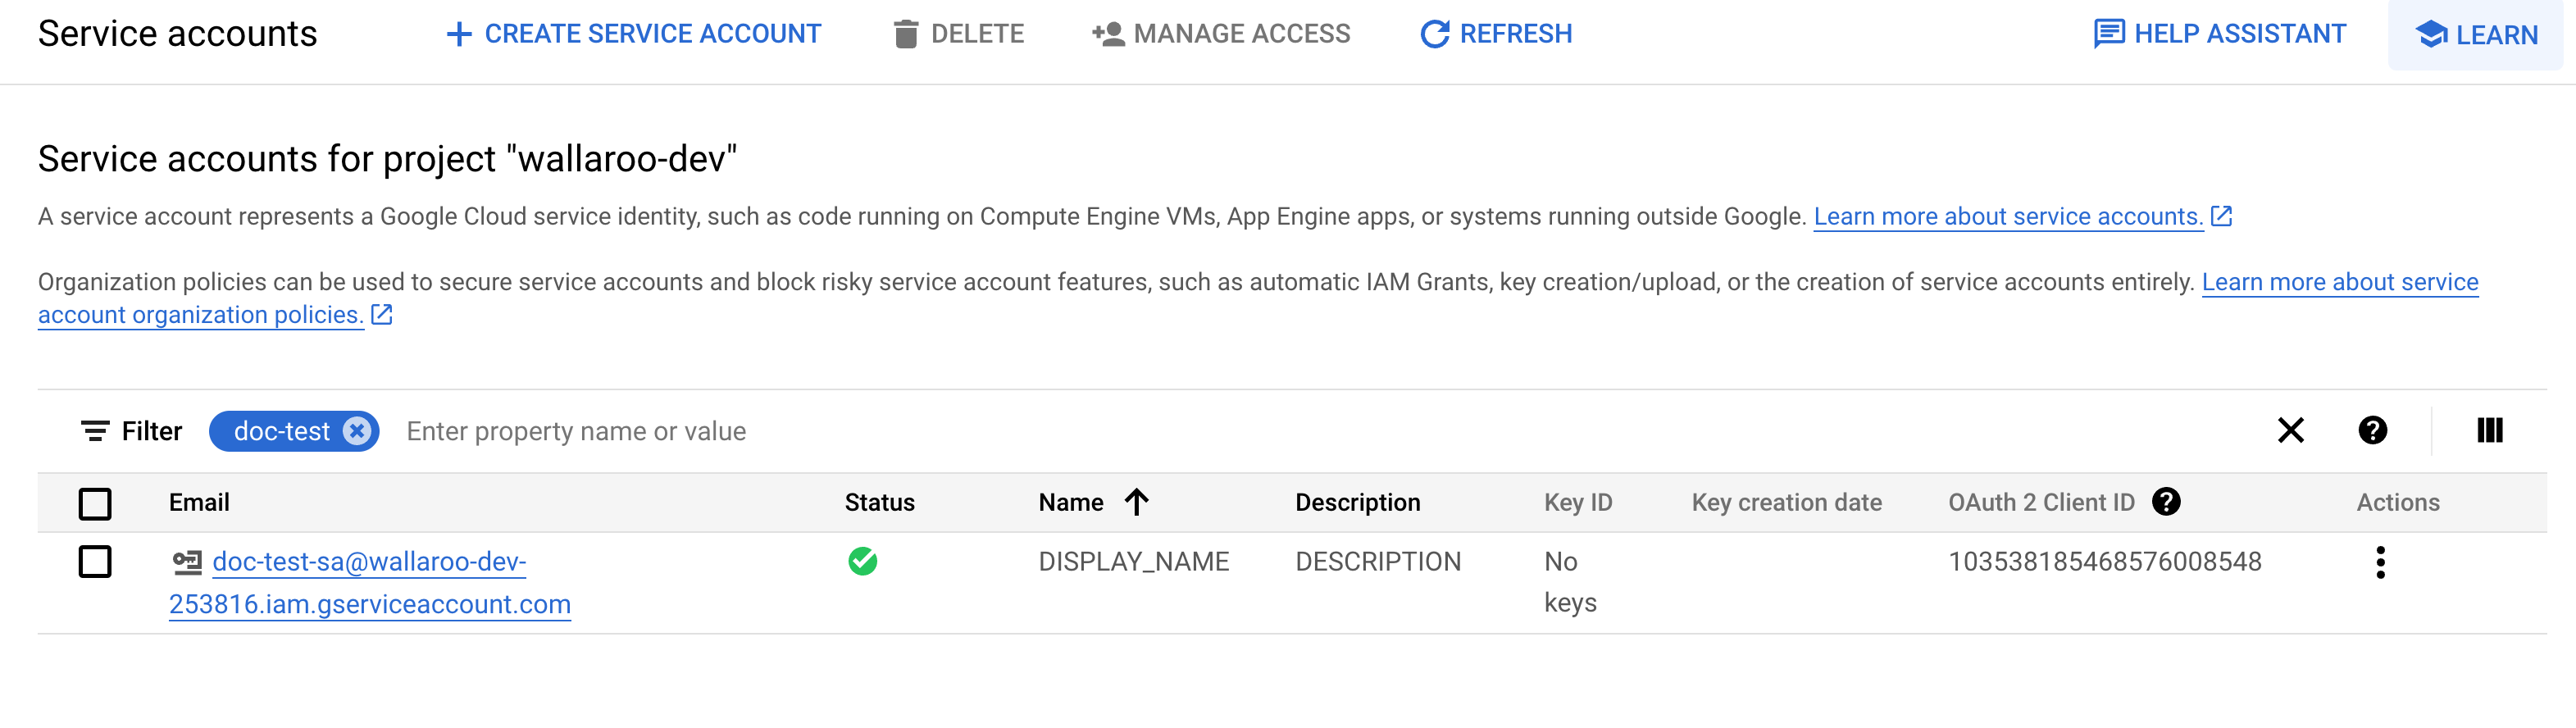
From GCP console, search for IAM & Admin.
Select Service Accounts.
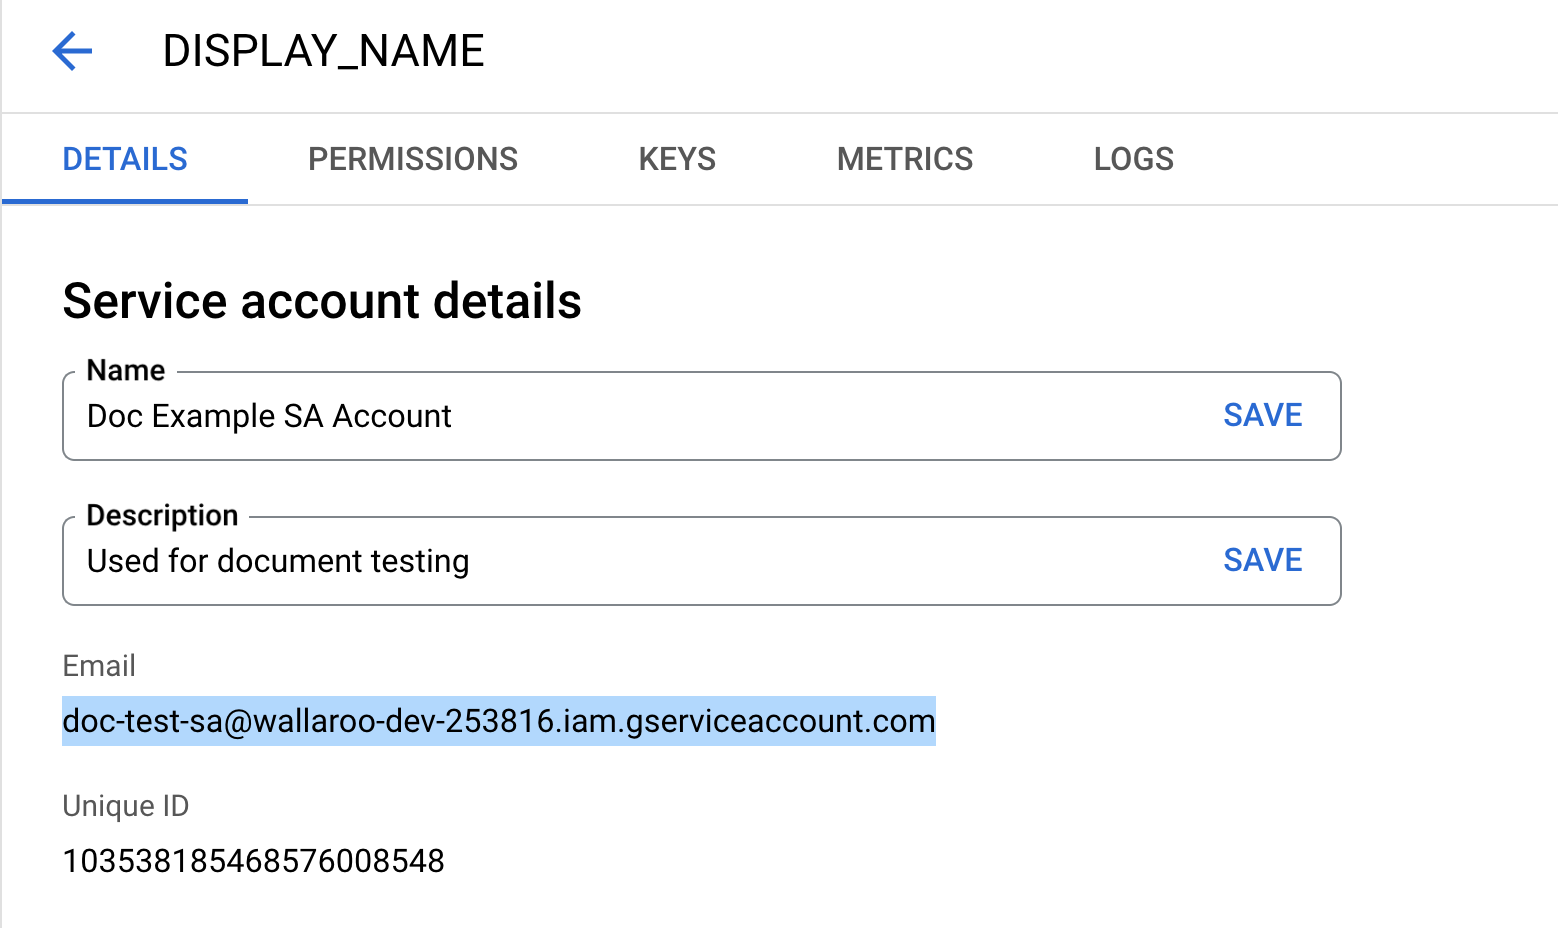
Select the service account to generate keys for.
Select the Email address listed and store this for later steps with the key generated through this process.
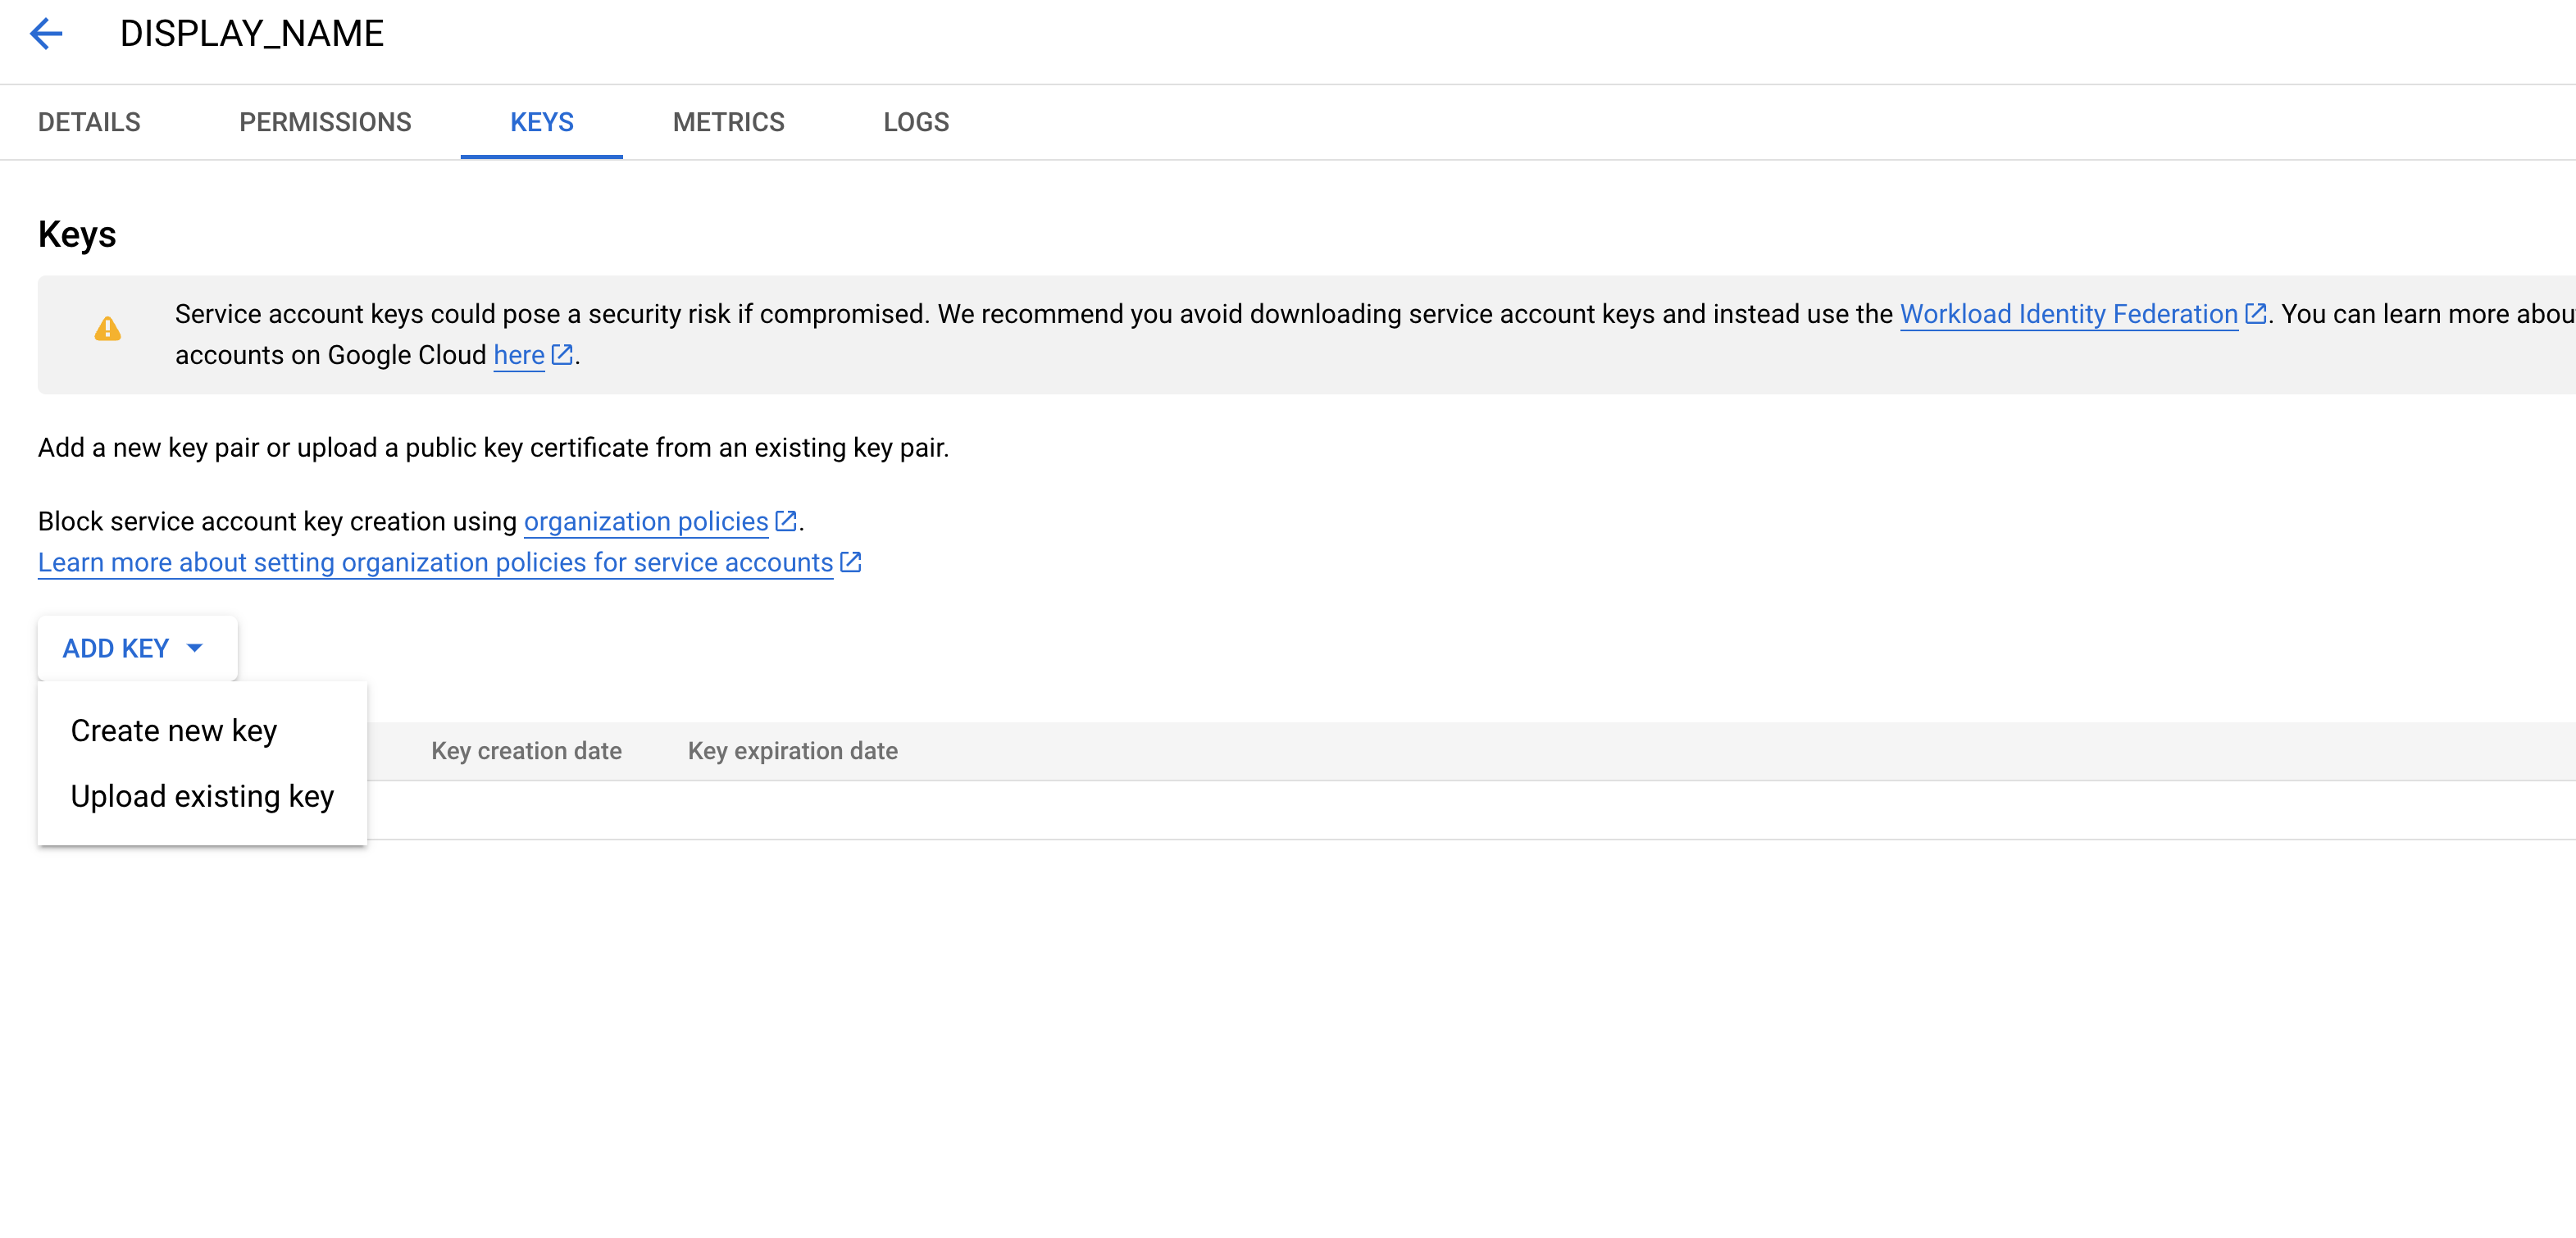
Select Keys, then Add Key, then Create new key.
Select JSON, then Create.
Store the key in a safe location.
Convert SA Key to Base64
The key file downloaded in Set up Service Account Key needs to be converted to base64 with the following command, replacing the locations of KEY_FILE and KEYFILEBASE64:
Tag the statsmodel and postprocess containers based on the repository used for the container registry. The GCP Registry format is $LOCATION-docker.pkg.dev/$PROJECT_ID/$REPOSITORY/$IMAGE. In this example, it is us-west1-docker.pkg.dev/wallaroo-dev-253816/doc-test-registry/, with the images mlflow-postprocess-example and mlflow-statsmodels-example.
Get the internal name through docker images.
docker image list

REPOSITORY                                                           TAG       IMAGE ID       CREATED        SIZE
mlflow-postprocess-example                                           2023.1    ff121d335e24   5 months ago   3.28GB
mlflow-statsmodels-example                                           2023.1    4c23cac0a7b1   5 months ago   3.34GB
Tag the images with the repository address. Note the repository must be in lowercase.
docker tag mlflow-postprocess-example:2023.1 us-west1-docker.pkg.dev/wallaroo-dev-253816/doc-test-registry/mlflow-postprocess-example:2023.1
docker tag mlflow-statsmodels-example:2023.1 us-west1-docker.pkg.dev/wallaroo-dev-253816/doc-test-registry/mlflow-statsmodels-example:2023.1
Verify with docker images. Note that the new tags match the same Image ID as the original tags.
docker images

REPOSITORY                                                                                 TAG       IMAGE ID       CREATED        SIZE
mlflow-postprocess-example                                                                 2023.1    ff121d335e24   5 months ago   3.28GB
us-west1-docker.pkg.dev/wallaroo-dev-253816/doc-test-registry/mlflow-postprocess-example   2023.1    ff121d335e24   5 months ago   3.28GB
mlflow-statsmodels-example                                                                 2023.1    4c23cac0a7b1   5 months ago   3.34GB
us-west1-docker.pkg.dev/wallaroo-dev-253816/doc-test-registry/mlflow-statsmodels-example   2023.1    4c23cac0a7b1   5 months ago   3.34GB
Push the containers to the registry. This may take some time depending on the speed of your connection. Wait until both are complete.
The private registry service account email address. This is retrieved as described in the process Set up Service Account Key.
The private registry service account credentials in base64. These were created in the step Convert SA Key to Base64. These can be displayed directly from the base Service Account credentials file with:
cat $KEYFILEBASE64
Configure for Kots Installations
For kots based installations of Wallaroo, use the following procedure. These are based on the Wallaroo Install Guides.
Log into the Wallaroo Administrative Dashboard from a Kubernetes terminal with administrative access to the Wallaroo instance with the following command, replacing the namespace wallaroo with the one where the Wallaroo instance is installed.
kubectl kots admin-console --namespace wallaroo
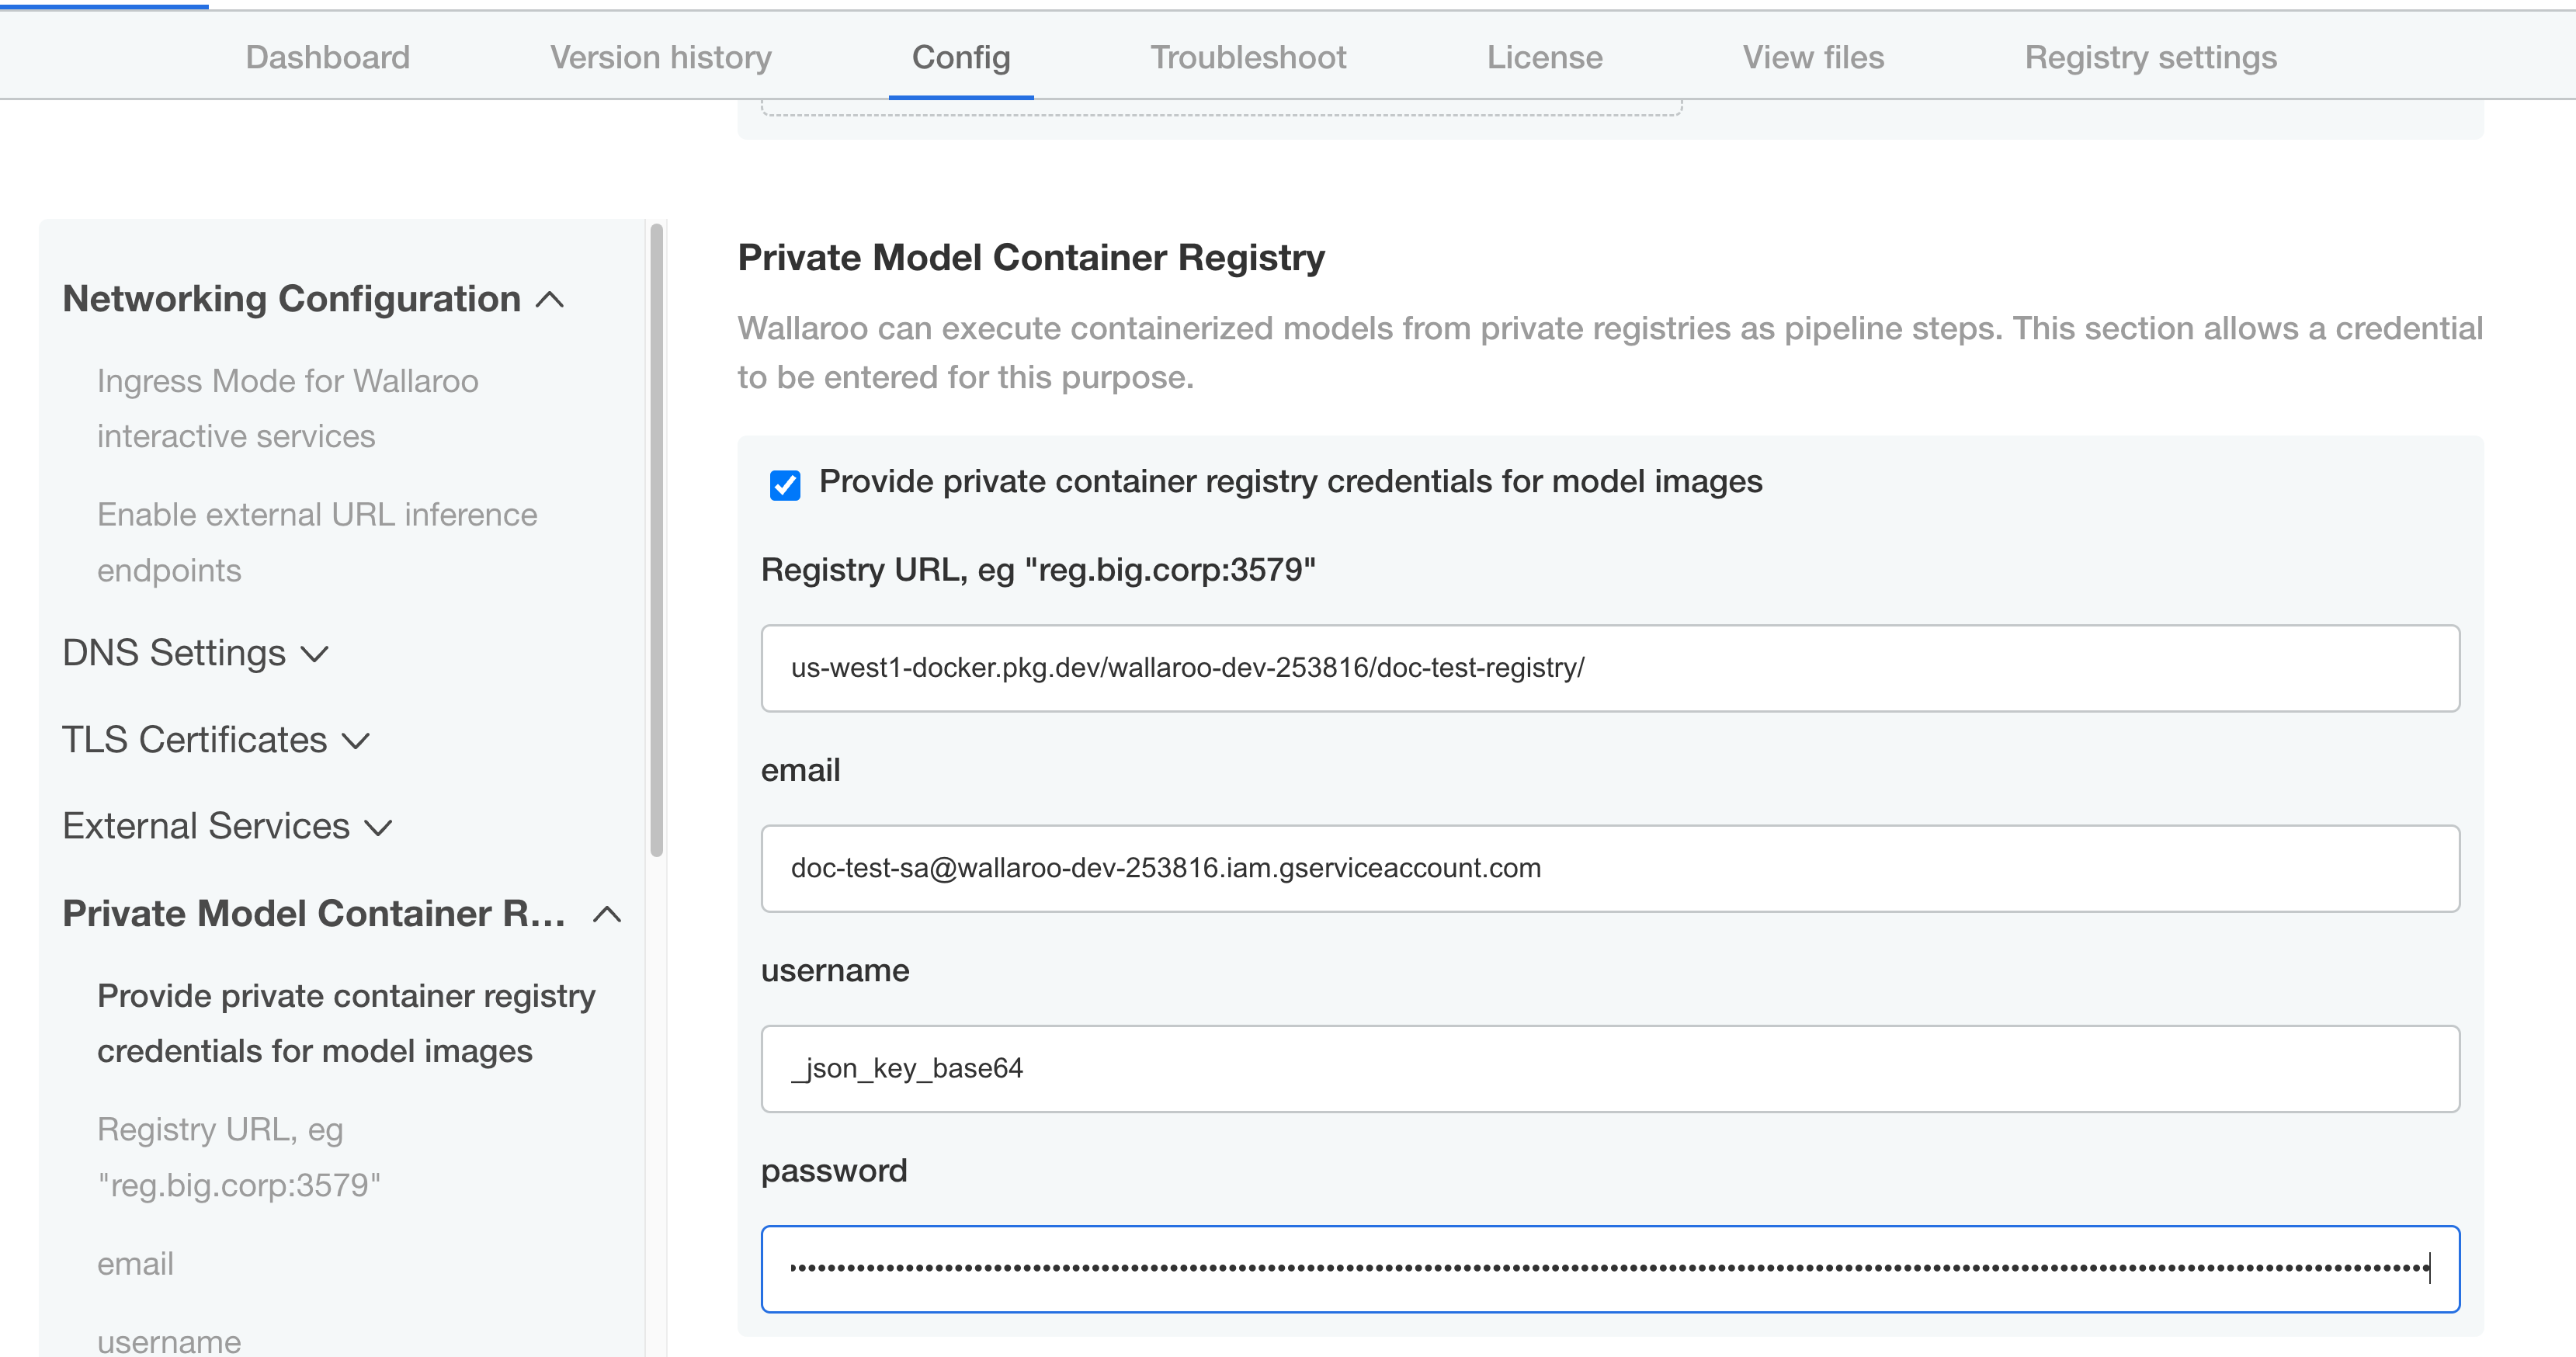
Select Config, then Private Model Container Registry.
Enable Provide private container registry credentials for model images.
Update the following fields:
Registry URL: Insert the full path of your registry. The GCP Registry format is $LOCATION-docker.pkg.dev/$PROJECT_ID/$REPOSITORY/$IMAGE. In this example, it is us-west1-docker.pkg.dev/wallaroo-dev-253816/doc-test-registry/.
Email: The email address of the service account used with the registry service.
User: Set to _json_key_base64.
Password: Set to the private registry service account credentials in base64.
Scroll to the bottom and select Save Config.
When the update module appears, select Go to updated version.
Wait for the preflight checks to completed, then select Deploy.
Configure Wallaroo Via Helm
During either the installation process or updates, set the following in the local-values.yaml file:
privateModelRegistry:
enabled: true
secretName: model-registry-secret
registry: Insert the full path of your registry. The GCP Registry format is $LOCATION-docker.pkg.dev/$PROJECT_ID/$REPOSITORY/$IMAGE. In this example, it is us-west1-docker.pkg.dev/wallaroo-dev-253816/doc-test-registry/.
email: The email address of the service account used with the registry service.
username: Set to _json_key_base64.
password: Set to the private registry service account credentials in base64.
For example:
# Other settings - DNS entries, etc.# The private registry settingsprivateModelRegistry:
enabled: truesecretName: model-registry-secret
registry: "YOUR REGISTRY URL:YOUR REGISTRY PORT"email: "serviceAccount:doc-test@wallaroo-dev.iam.gserviceaccount.com"username: "_json_key_base64_"password: "abcde"
Once complete, the Wallaroo instance will be able to authenticate to the registry service and retrieve the images.
Setting Private Registry Configuration in Wallaroo
Configure Via Kots
If Wallaroo was installed via kots, use the following procedure to add the private model registry information.
Launch the Wallaroo Administrative Dashboard through a terminal linked to the Kubernetes cluster. Replace the namespace with the one used in your installation.
kubectl kots admin-console --namespace wallaroo
Launch the dashboard, by default at http://localhost:8800.
From the admin dashboard, select Config -> Private Model Container Registry.
Enable Provide private container registry credentials for model images.
Provide the following:
Registry URL: The URL of the Containerized Model Container Registry. Typically in the format host:port. In this example, the registry for GitHub is used. NOTE: When setting the URL for the Containerized Model Container Registry, only the actual service address is needed. For example: with the full URL of the model as ghcr.io/wallaroolabs/wallaroo_tutorials/mlflow-statsmodels-example:2022.4, the URL would be ghcr.io/wallaroolabs.
email: The email address of the user authenticating to the registry service.
username: The username of the user authentication to the registry service.
password: The password of the user authentication or token to the registry service.
Scroll down and select Save config.
Deploy the new version.
Once complete, the Wallaroo instance will be able to authenticate to the Containerized Model Container Registry and retrieve the images.
Configure via Helm
During either the installation process or updates, set the following in the local-values.yaml file:
privateModelRegistry:
enabled: true
secretName: model-registry-secret
registry: The URL of the private registry.
email: The email address of the user authenticating to the registry service.
username: The username of the user authentication to the registry service.
password: The password of the user authentication to the registry service.
For example:
# Other settings - DNS entries, etc.# The private registry settingsprivateModelRegistry:
enabled: truesecretName: model-registry-secret
registry: "YOUR REGISTRY URL:YOUR REGISTRY PORT"email: "YOUR EMAIL ADDRESS"username: "YOUR USERNAME"password: "Your Password here"
Once complete, the Wallaroo instance will be able to authenticate to the registry service and retrieve the images.
5 - Edge Deployment Registry Guide
How to enable a Edge Deployment Registry with Wallaroo.
Wallaroo pipelines can be published to a Edge Open Container Initiative (OCI) Registry Service, known here as the Edge Registry Service, as a container images. This allows the Wallaroo pipelines to be deployed in other environments, such as Docker or Kubernetes with all of the pipeline model. When deployed, these pipelines can perform inferences from the ML models exactly as if they were deployed as part of a Wallaroo instance.
When a pipeline is updated with new model steps or deployment configurations, the updated pipeline is republished to the Edge Registry as a new repo and version. This allows DevOps engineers to update an Wallaroo pipeline in any container supporting environment with the new versions of the pipeline.
Pipeline Publishing Flow
A typical ML Model and Pipeline deployment to Wallaroo Ops and to remote locations as a Wallaroo Inference server is as follows:
Components:
Wallaroo Ops: The Wallaroo Ops provides the backbone services for ML Model deployment. This is where ML models are uploaded, pipelines created and deployed for inferencing, pipelines published to OCI compliant registries, and other functions.
Wallaroo Inference Server: A remote deployment of a published Wallaroo pipeline with the Wallaroo Inference Engine outside the Wallaroo Ops instance. When the edge name is added to a Wallaroo publish, the Wallaroo Inference Server’s inference logs are submitted to the Wallaroo Ops instance. These inference logs are stored as part of the Wallaroo pipeline the remote deployment is published from.
DevOps:
Add Edge Publishing and Edge Observability to the Wallaroo Ops center. See Edge Deployment Registry Guide for details on updating the Wallaroo instance with Edge Publishing and Edge Observability.
Data Scientists:
Develop and train models.
Test their deployments in Wallaroo Ops Center as Pipelines with:
Pipeline Steps: The models part of the inference flow.
Pipeline Deployment Configurations: CPUs, RAM, GPU, and Architecture settings to run the pipeline.
Publish the Pipeline from the Wallaroo Ops to an OCI Registry: Store a image version of the Pipeline with models and pipeline configuration into the OCI Registry set by the DevOps engineers as the Wallaroo Edge Registry Service.
DevOps:
Retrieve the new or updated Wallaroo published pipeline from the Wallaroo Edge Registry Service.
(Optional): Add an edge to the Wallaroo publish. This provides the EDGE_BUNDLE with the credentials for the Wallaroo Inference Server to transmit its inference result logs back to the Wallaroo Ops instance. These inference logs are added to the originating Wallaroo pipeline, labeled with the metadata.partition being the name of the edge deployed Wallaroo Inference server. For more details, see Wallaroo SDK Essentials Guide: Pipeline Edge Publication: Edge Observability
Deploy the Pipeline as a Wallaroo Inference Server as a Docker or Kubernetes container, updating the resource allocations as part of the Helm chart, Docker Compose file, etc.
Enable Wallaroo Edge Deployment Registry
Set Edge Registry Service
Wallaroo Pipeline Publishes aka Wallaroo Servers are automatically routed to the Edge Open Container Initiative (OCI) Registry Service registered in the Wallaroo instance. This is enabled through either the Wallaroo Administrative Dashboard through kots, or by enabling it through a helm chart setting. From here on out, we will refer to it as the Edge Registry Service.
Set Edge Registry Service through Kots
To set the Edge Registry Settings through the Wallaroo Administrative Dashboard:
Launch the Wallaroo Administrative Dashboard using the following command, replacing the --namespace parameter with the Kubernetes namespace for the Wallaroo instance:
kubectl kots admin-console --namespace wallaroo
Open a browser at the URL detailed in the step above and authenticate using the console password set as described in the as detailed in the Wallaroo Install Guides.
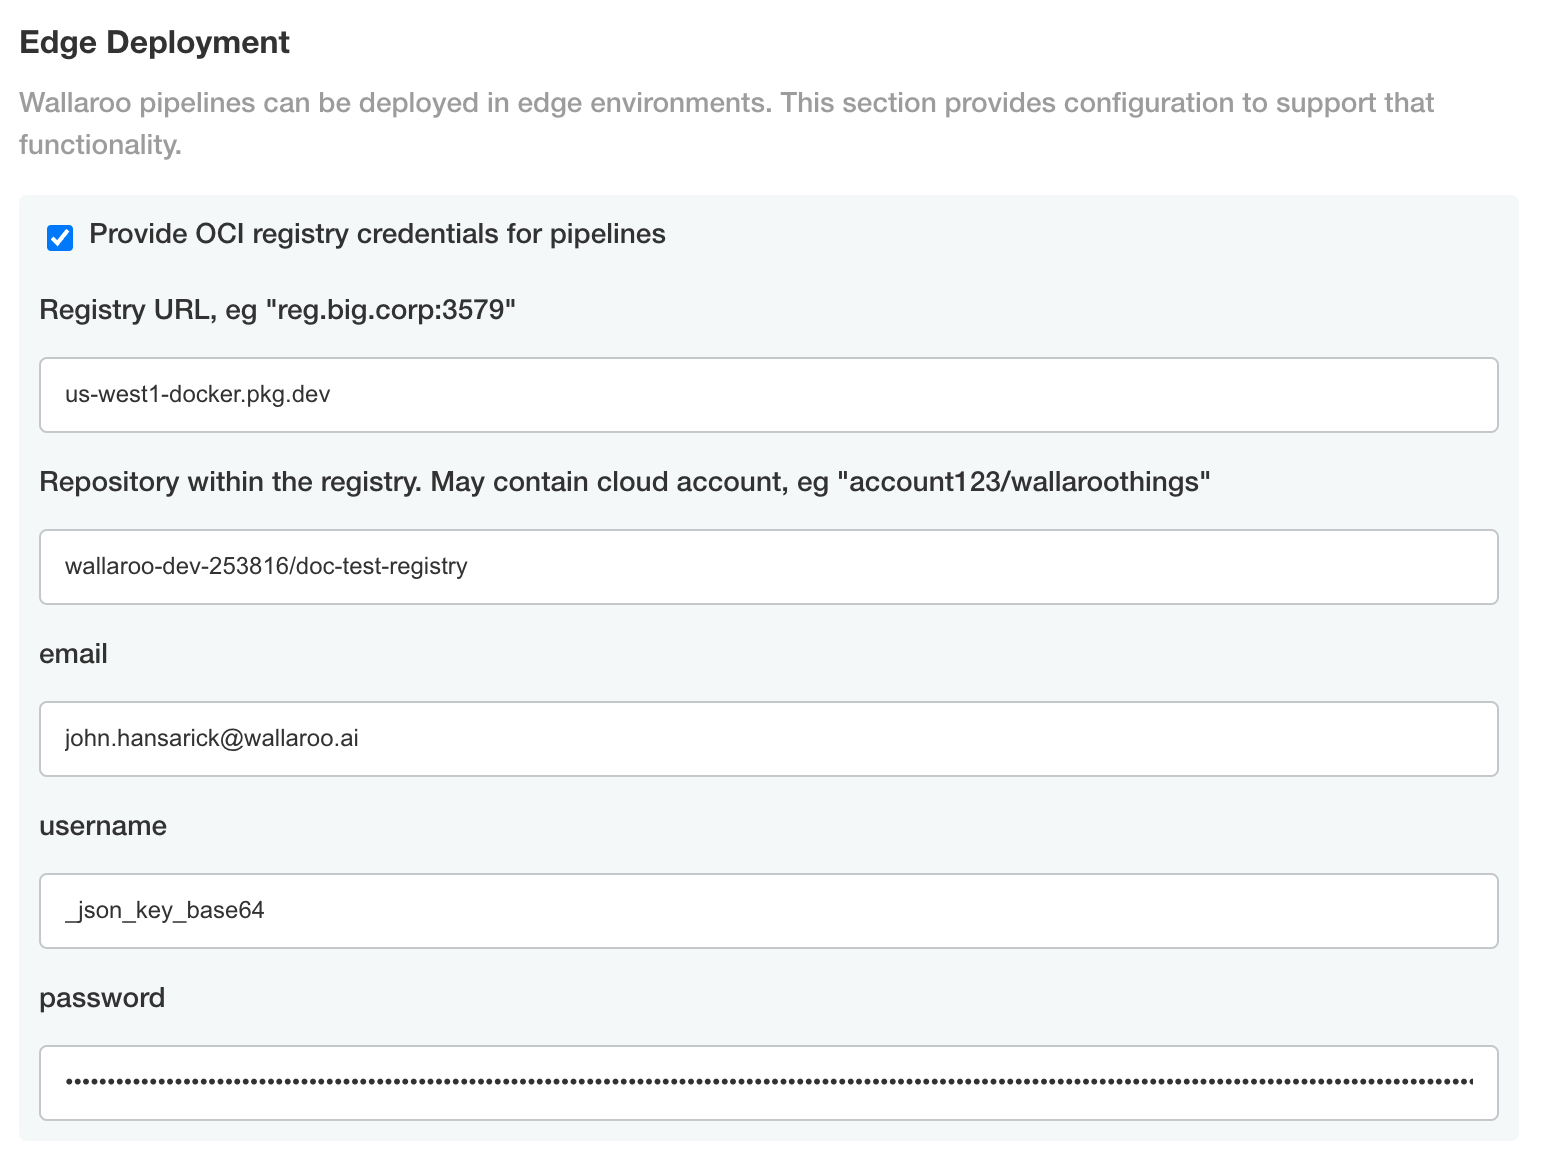
From the top menu, select Config then scroll to Edge Deployment.
Enable Provide OCI registry credentials for pipelines.
Enter the following:
Registry URL: The address of the registry service. For example: us-west1-docker.pkg.dev.
email: The email address of the user account used to authenticate to the service.
username: The account used to authenticate to the registry service.
password: The password or token used to authenticate to the registry service.
Save the updated configuration, then deploy it. Once complete, the edge registry settings will be available.
Set Edge Registry Service through Helm
The helm settings for adding the Edge Server configuration details are set through the ociRegistry element, with the following settings.
ociRegistry: Sets the Edge Server registry information.
enabled: true enables the Edge Server registry information, false disables it.
registry: The registry url. For example: reg.big.corp:3579.
repository: The repository within the registry. This may include the cloud account, or the full path where the Wallaroo published pipelines should be kept. For example: account123/wallaroo/pipelines.
email: Optional field to track the email address of the registry credential.
username: The username to the registry. This may vary based on the provider. For example, GCP Artifact Registry with service accounts uses the username _json_key_base64 with the password as a base64 processed token of the credential information.
password: The password or token for the registry service.
Set Edge Observability Service
Edge Observability allows published Wallaroo Servers to community with the Wallaroo Ops center to update their associated Wallaroo Pipeline with inference results, visible in the Pipeline logs.
This process will create a new Kubernetes service edge-lb. Based on the configuration options below, the service will require an additional IP address separate from the Wallaroo service api-lb. The edge-lb will require a DNS hostname.
Set Edge Observability Service through Kots
To enable Edge Observability using the Wallaroo Administrative Dashboard for kots installed instances of Wallaroo Ops:
Launch the Wallaroo Administrative Dashboard using the following command, replacing the --namespace parameter with the Kubernetes namespace for the Wallaroo instance:
kubectl kots admin-console --namespace wallaroo
Open a browser at the URL detailed in the step above and authenticate using the console password set as described in the as detailed in the Wallaroo Install Guides.
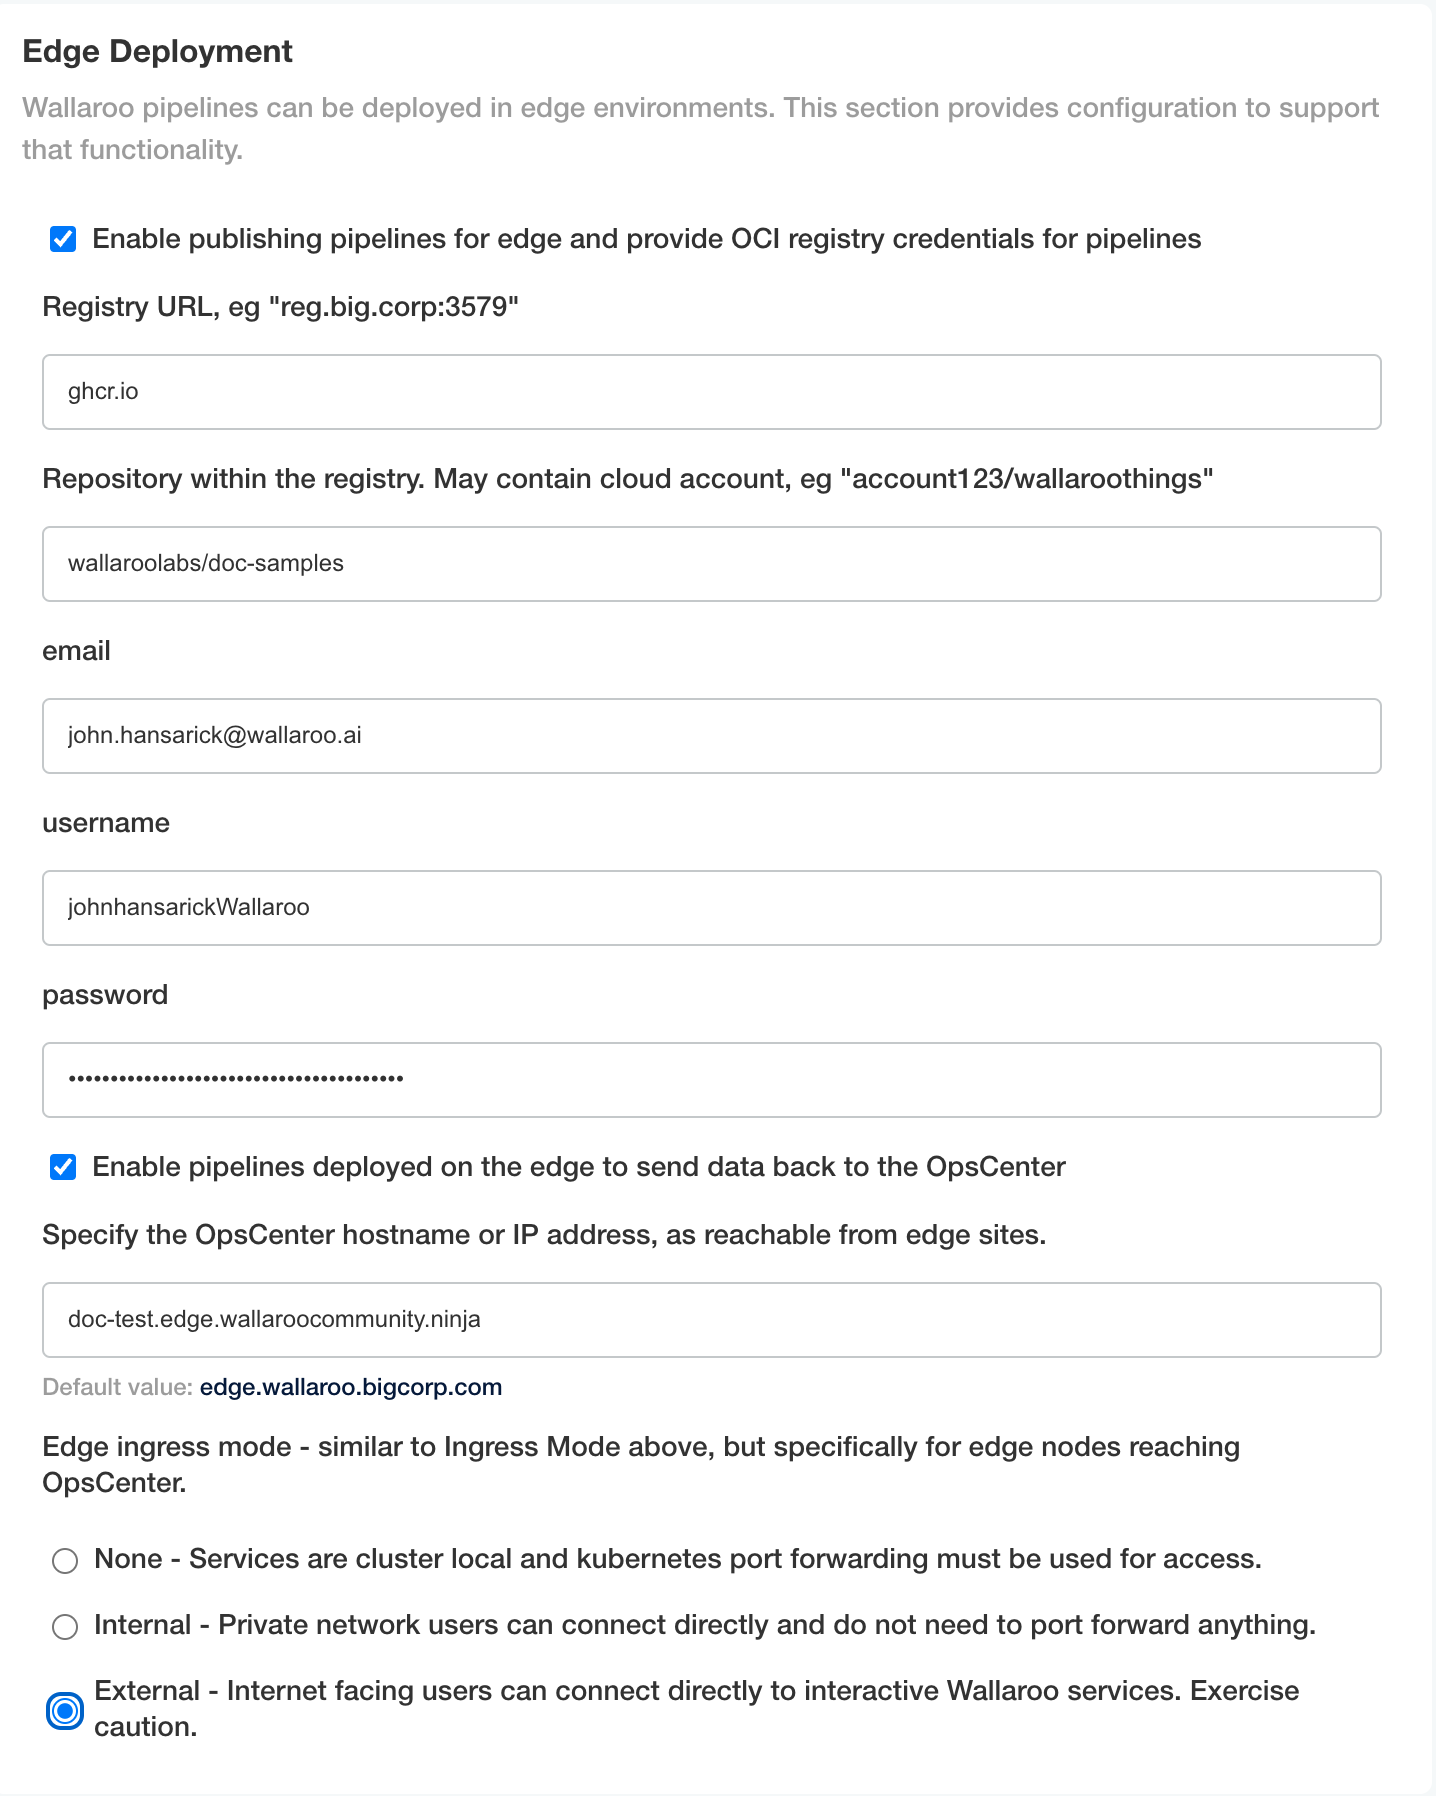
Access Config and scroll to Edge Deployment and enable Enable pipelines deployed on the edge to send data back to the OpsCenter.
Set the following:
Specify the OpsCenter hostname or IP address, as reachable from edge sites.: Set the DNS address in the format https://service.{suffix domain}. For example, if the domain suffix is wallaroo.example.com and the Wallaroo Edge Observabilty Service is set to the hostname edge, then the URL to access the edge service is:
edge.wallaroo.example.com
Edge ingress mode: Set one of the following.
None - Services are cluster local and kubernetes port forwarding must be used for access.
Internal - Private network users can connect directly and do not need to port forward anything.
External - Internet facing users can connect directly to interactive Wallaroo services. Exercise caution.
Save the updated configuration, then deploy it. Once complete, the edge observability service is available.
To enable the Edge Observability Service for Wallaroo Ops Helm based installation, include the following variables for the helm settings. For these instructions they are stored in local-values.yaml:
Update the Wallaroo Helm installation with the same version as the Wallaroo ops and the channel. For example, if updating Wallaroo Enterprise server, use the following:
This process will take 5-15 minutes depending on other configuration options. Once complete, set the DNS address as described in Set Edge Observability Service DNS Hostname.
Set Edge Observability Service DNS Hostname
Once enabled, the Wallaroo Edge Observability Service requires a DNS address. The following instructions are specified for Edge ingress mode:External.
Obtain the external IP address of the the Wallaroo Edge Observability Service with the following command, replacing the -n wallaroo namespace option with the one the Wallaroo Ops instance is installed into.
EDGE_LOADBALANCER=$(kubectl get svc edge-lb -n wallaroo -o jsonpath='{.status.loadBalancer.ingress[0].ip}')&&echo$EDGE_LOADBALANCER
The following are short guides for setting up the credentials for different registry services. Refer to the registry documentation for full details.
The following process is used with a GitHub Container Registry to create the authentication tokens for use with a Wallaroo instance’s Private Model Registry configuration.
The following process is used register a GitHub Container Registry with Wallaroo.
Create a new token as per the instructions from the Creating a personal access token (classic) guide. Note that a classic token is recommended for this process. Store this token in a secure location as it will not be able to be retrieved later from GitHub. Verify the following permissions are set:
Select the write:packages scope to download and upload container images and read and write their metadata.
Select the read:packages scope to download container images and read their metadata (selected when write:packages is selected by default).
Select the delete:packages scope to delete container images.
Store the token in a secure location.
This can be tested with docker by logging into the specified registry. For example:
The following process is an example of setting up an Artifact Registry Service with Google Cloud Platform (GCP) that is used to store containerized model images and retrieve them for use with Wallaroo.
Uploading and downloading containerized models to a Google Cloud Platform Registry follows these general steps.
Create the GCP registry.
Create a Service Account that will manage the registry service requests.
Assign appropriate Artifact Registry role to the Service Account
Retrieve the Service Account credentials.
Using either a specific user, or the Service Account credentials, upload the containerized model to the registry service.
Add the service account credentials to the Wallaroo instance’s containerized model private registry configuration.
Prerequisites
The commands below use the Google gcloud command line tool, and expect that a Google Cloud Platform account is created and the gcloud application is associated with the GCP Project for the organization.
For full details on the process and other methods, see the Google GCP documentation.
The GCP Registry Service Account is used to manage the GCP registry service. The steps are details from the Google Create a service account guide.
The gcloud process for these steps are:
Connect the gcloud application to the organization’s project.
$PROJECT_ID="YOUR PROJECT ID"gcloud config set project $PROJECT_ID
Create the service account with the following:
The name of the service account.
A description of its purpose.
The name to show when displayed.
SA_NAME="YOUR SERVICE ACCOUNT NAME"DESCRIPTION="Wallaroo container registry SA"DISPLAY_NAME="Wallaroo the Roo"gcloud iam service-accounts create $SA_NAME\
--description=$DESCRIPTION\
--display-name=$DISPLAY_NAME
Read, write, and delete artifacts. Create gcr.io repositories.
For this example, we will add the Artifact Registry Create-on-push Writer to the created Service Account from the previous step.
Add the role to the service account, specifying the member as the new service account, and the role as the selected role. For this example, a pkg.dev is assumed for the Artifact Registry type.
# for pkg.devROLE="roles/artifactregistry.writer"# for gcr.io #ROLE="roles/artifactregistry.createOnPushWritergcloud projects add-iam-policy-binding \
$PROJECT_ID\
--member="serviceAccount:$SA_NAME@$PROJECT_ID.iam.gserviceaccount.com"\
--role=$ROLE
Authenticate to Repository
To push and pull image from the new registry, we’ll use our new service account and authenticate through the local Docker application. See the GCP Push and pull images for details on using Docker and other methods to add artifacts to the GCP artifact registry.
Set up Service Account Key
To set up the Service Account key, we’ll use the Google Console IAM & ADMIN dashboard based on the Set up authentication for Docker, using the JSON key approach.
From GCP console, search for IAM & Admin.
Select Service Accounts.
Select the service account to generate keys for.
Select the Email address listed and store this for later steps with the key generated through this process.
Select Keys, then Add Key, then Create new key.
Select JSON, then Create.
Store the key in a safe location.
Convert SA Key to Base64
The key file downloaded in Set up Service Account Key needs to be converted to base64 with the following command, replacing the locations of KEY_FILE and KEYFILEBASE64:
How to generate support bundles to troubleshoot Wallaroo
To track potential issues, Wallaroo provides a method to create a support bundle: a collection of logs, configurations, and other information that is submitted to Wallaroo support staff to determine where an issue may be and offer a correction.
Support bundles are generated depending on the method of installation:
kots: If Wallaroo was installed via kots, the support bundle is generated through the Wallaroo Administrative Dashboard.
helm: If Wallaroo was installed via helm, the support bundle is generated through a command line process.
Generating via Kots
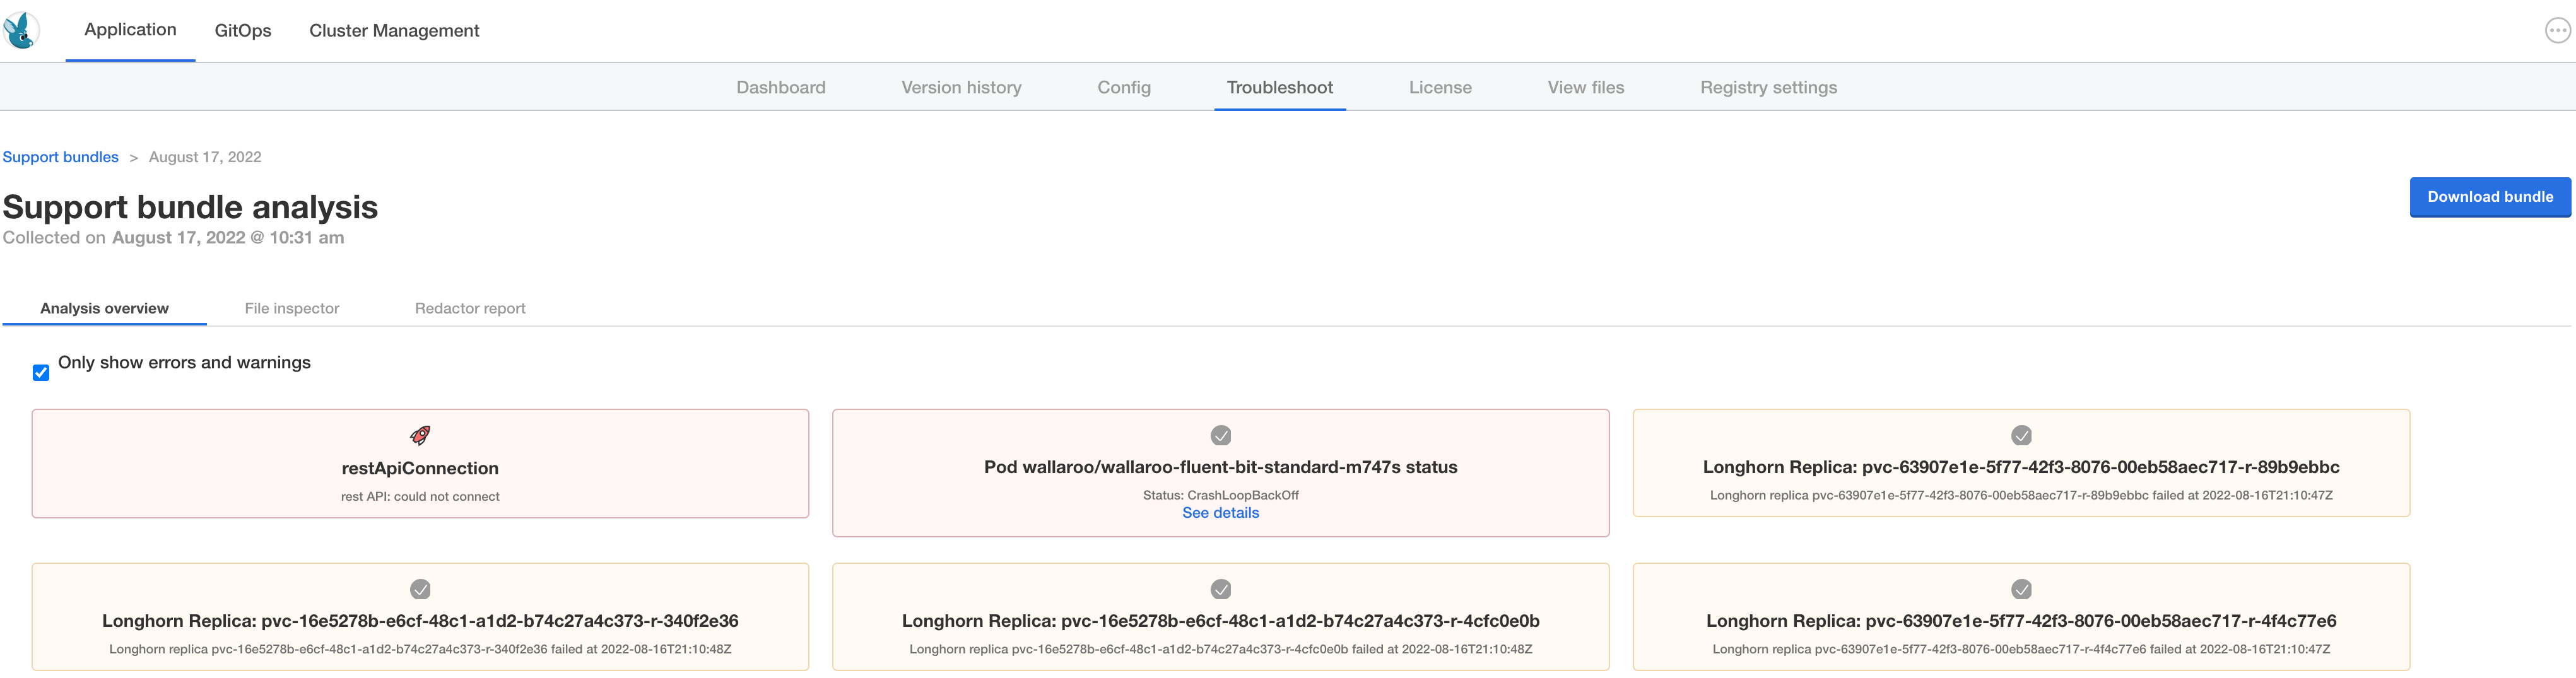
At any time, the administration console can create troubleshooting bundles for Wallaroo technical support to assess product health and help with problems. Support bundles contain logs and configuration files which can be examined before downloading and transmitting to Wallaroo. The console also has a configurable redaction mechanism in cases where sensitive information such as passwords, tokens, or PII (Personally Identifiable Information) need to be removed from logs in the bundle.
To manage support bundles:
Log into the administration console.
Select the Troubleshoot tab.
Select Analyze Wallaroo.
Select Download bundle to save the bundle file as a compressed archive. Depending on your browser settings the file download location can be specified.
Send the file to Wallaroo technical support.
At any time, any existing bundle can be examined and downloaded from the Troubleshoot tab.
Generating via Helm
If issues are detected in the Wallaroo instance, a support bundle file is generated using the support-bundle.yaml file provided by the Wallaroo support representative.
This creates a collection of log files, configuration files and other details into a .tar.gz file in the same directory as the command is run from in the format support-bundle-YYYY-MM-DDTHH-MM-SS.tar.gz. This file is submitted to the Wallaroo support team for review.
This support bundle is generated through the following command: