Wallaroo AI Starter Kit Deployment
Table of Contents
The Wallaroo AI Starter Kit for IBM Power gives a quick path to running AI models in an IBM Logical Partition (LPAR) leveraging the Power architecture. The following procedure gets you up and running with three quick steps:
- Select the Model
- Deploy the Model
- Inference
Prerequisites
Before starting, verify that the LPAR is ready to run models from the LPAR (Logical Partition) Prerequisites.
Procedure
The following procedure details the process for deploying a model from the Wallaroo AI Starter Kit and performing inferences on the deployed models.
Select the Model
To select the model to the LPAR:
Navigate to the URL https://launchpad.wallaroo.ai/.
Select from the list of models available from the Model Card:
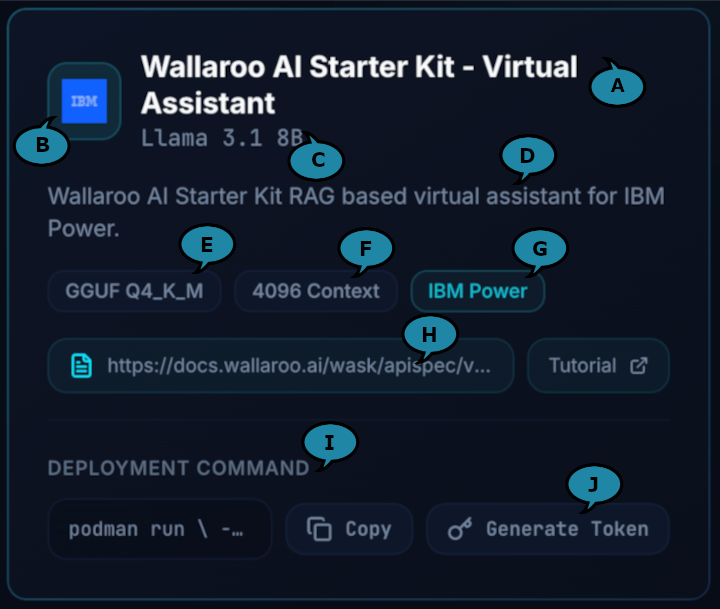
- Each model card includes the following:
- AI Use Case Name (A): The name of the AI’s intended purpose aka use case.
- Hardware Company Logo (B): The company hardware the model is configured for.
- AI Model (C): The specific model used.
- Description of Use Case (D): The intended purpose for the use case and other useful details.
- Model Format (E): The model’s format including its specifics.
- Context Length (F): The number of tokens the model is set to process per inference request.
- Compatible Hardware (G): The hardware architecture the model is configured for.
- Docs Reference (H): The URL to the API reference documentation.
- Deployment Command (I): The model deployment command.
- Generate Token (J): Generates the authentication token.
- Each model card includes the following:
From the Model Card, copy the Deployment Command and store this. This is used in the next step Deploy the Model. The Deployment Command uses the following format. The details are covered in the next section.
podman run \
    -p $EDGE_PORT:8080 \
    -e OCI_USERNAME="$USERNAME" \
    -e OCI_PASSWORD="$GENERATED_TOKEN" \
    -e SYSTEM_PROMPT="$SYSTEM_PROMPT" \
    -e MODEL_CONTEXT_FILENAME="/$(basename $MODEL_CONTEXT_FILENAME)" \
    -v $MODEL_CONTEXT_FILENAME:/$(basename $MODEL_CONTEXT_FILENAME) \
    -e PIPELINE_URL={URL to MODEL} \
    -e CONFIG_CPUS=$CONFIG_CPUS --cpus=$NUMBER_OF_CPUS --memory=$MEMORY_ALLOCATED
Typically the
CONFIG_CPUS,--cpusandmemoryprovide the resource allocations recommended by the model publishers. In the following example, those values are set to1.0,15.0, and20grespectively.podman run \ -p $EDGE_PORT:8080 \ -e OCI_USERNAME="$USERNAME" \ -e OCI_PASSWORD="$GENERATED_TOKEN" \ -e SYSTEM_PROMPT="$SYSTEM_PROMPT" \ -e MODEL_CONTEXT_FILENAME="/$(basename $MODEL_CONTEXT_FILENAME)" \ -v $MODEL_CONTEXT_FILENAME:/$(basename $MODEL_CONTEXT_FILENAME) \ -e PIPELINE_URL=quay.io/wallarooai/wask/wask-sample-pipeline:abcdefg \ -e CONFIG_CPUS=1.0 --cpus=15.0 --memory=20g \ quay.io/wallarooai/wask/fitzroy-mini-ppc64le:v2025.2.0-6480From the Model Card, retrieve the Token by selecting Generate Token next to the Deploy Command. If this token is lost, return to the Wallaroo AI Starter Kit page and generate a new token.
Deploy the Model
With the Deployment Command available, the following process will deploy it.
The default Deployment Command contains the following variables. There are two methods for deploying with these variables:
- Manually set each variable. This guide assumes that this method is used.
- Set each variable as an environmental variable, for example
EDGE_PORT=8080.
Set the following variables:
GENERATED_TOKEN: This is set to the generated token retrieved from the previous step.EDGE_PORT: The external IP port used to make inference requests. Verify this port is open and accessible from the requesting systems.SYSTEM_PROMPT: This is a system prompt, for example: “Answer the question in 10 words or less using the following context”. The system prompt is appended with the context in the following format. Note that the variable names are representative of the format and not actual environmental variable names.
prompt = "$SYSTEM_PROMPT:\n{$MODEL_CONTEXT}\n\nQuestion: $QUERY\nAnswer:"MODEL_CONTEXT_FILENAME: This is a reference to a JSON file with the contents used as theMODEL_CONTEXT. The format of this file is detailed in the following section.
Create the
MODEL_CONTEXT_FILENAMEfile in the same path specified (for example:context.json). This file is in the following format:{ "type": "array", "items": { "type": "object", "properties": { "question": { "type": "string", "description": "The question being asked" }, "answer": { "type": "string", "description": "The answer to the question" } }, "required": ["question", "answer"] } }The following is an example of this file contents:
[
    {
        "question": "How do I make a sandwich?",
        "answer": "Put two pieces of bread together with desired filling such as jam, peanut butter, meats and cheese, etc."
    },
    {
        "question": "What is the difference between hot mustard and regular mustard?",
        "answer": "Hot mustard is more finely ground mustard seeds in higher concentrations compared to regular mustard.."
    },
    {
        "question": "What cheese is best for grilled cheese sandwich?",
        "answer": "Any type of cheese with a low melting point is a good choice; most people prefer American cheese for simple grilled cheese sandwiches."
    }
]
Execute the prepared Deployment Command. This will download the model from the model registry, allocate the requested resources, and deploy it. The following shows an example running this command and the final output showing the model is deployed and ready for inference requests.
podman run \
    -p 3030:8080 \
    -e OCI_USERNAME="$USERNAME" \
    -e OCI_PASSWORD="$GENERATED_TOKEN" \
    -e SYSTEM_PROMPT="Answer the question in 10 words or less using the following context" \
    -e MODEL_CONTEXT_FILENAME="/$(basename context.json)" \
    -v $MODEL_CONTEXT_FILENAME:/$(basename context.json) \
    -e PIPELINE_URL=quay.io/wallarooai/wask/wask-sample-pipeline:abcdefg \
    -e CONFIG_CPUS=1.0 --cpus=15.0 --memory=20g \
    quay.io/wallarooai/wask/fitzroy-mini-ppc64le:v2025.2.0-6480
INFO 12-Jan-26 21:16:45.964 - root - INFO: [📡] arrow_flight_service.py:30 Starting server on `grpc://0.0.0.0:32100`...
The model is now ready for inference requests
Inference
Inference requests are made against the Deployment URL, which is in the format:
$HOST_NAME:$EDGE_PORT/infer
For example, if the hostname is localhost, the Deployment URL is from the previously set variables is:
localhost:3030/infer
Inferences are performed by submitting a POST request with the data in pandas Record Format as JSON in the following format:
curl POST $DEPLOYMENT_URL -H "Content-Type: application/json" -v --data '$REQUEST_DATA'
For example:
curl POST localhost:3030/infer -H "Content-Type: application/json" -v --data '[{"query":"How do I make a sandwich?"}]'
The response to this query is in pandas Record Format as JSON. For example:
[{"time":1768252715611,"in":{"query":"How do I make a sandwich?"},"out":{"generated_text":"Put two pieces of bread together with desired filling such as jam, peanut butter, meats and cheese, etc."},"anomaly":{"count":0},"metadata":{"last_model":"{\"model_name\":\"wask-qa-bot-byop-model\",\"model_sha\":\"175e19b1cabd8a05c7888c43f4bff90b4442be407d89364826505726d53d347b\"}","pipeline_version":"bfb42a37-45ea-4d99-8ebf-c37a1de7dd70","elapsed":[6309508,41709268743],"dropped":[],"partition":"b6578b9c5d36"}}]
Tutorials
The following tutorials are available to show deploying and performing inferences against models deployed through the Wallaroo AI Starter Kit for IBM Power.
FAQ
How to Use IBM i LPAR with WASK
The Wallaroo AI Start Kit is deployed on a Linux-based LPAR, which serves as the primary node for the deployment. Environments with IBM i LPAR interact with the Wallaroo AI Start Kit deployment by submitting inference requests to the Linux LPAR hosting the Wallaroo AI Start Kit and consuming the results.