Wallaroo AI Starter Kit Virtual Assistant Deployment Guide
This tutorial and the assets can be downloaded as part of the Wallaroo Tutorials repository.
The following is a demonstration of downloading, deploying, and inferring from a RAG based virtual assistant from the Wallaroo AI Starter Kit for IBM Power.
Wallaroo AI Starter Kit for IBM: Virtual Assistant Deployment Guide
This tutorial functions as a practical example of using the Wallaroo AI Starter Kit for IBM Power to deploy the Virtual Assistant model powered by IBM Granite model in an IBM Logical Partition (LPAR).
Prerequisites
Before starting, verify that the Wallaroo AI Start Kit LPAR (Logical Partition) Prerequisites are complete.
Procedure
Retrieve the Deployment Command
Proceed to the Wallaroo AI Starter Kit URL.
Select the Model Card for the Wallaroo AI Starter Kit - Virtual Assistant and copy the Deployment Command.
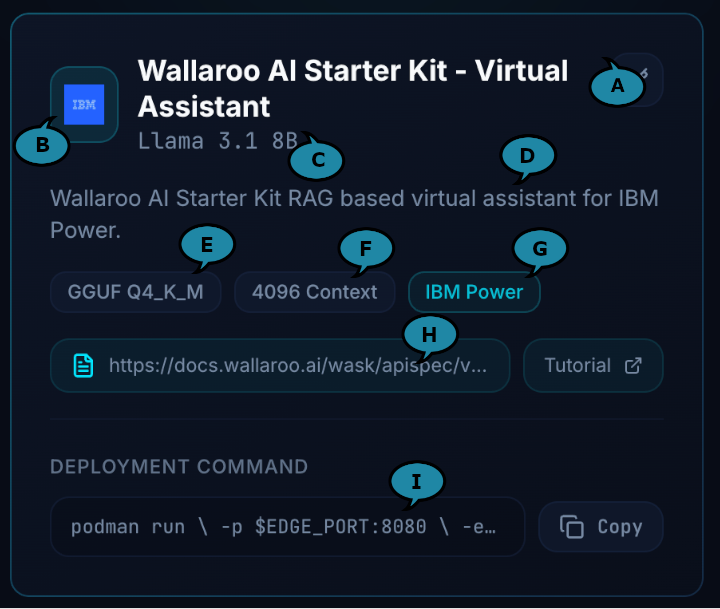
The following shows an example of this command.
podman run \
    -p $EDGE_PORT:8080 \
    -e OCI_USERNAME="$USERNAME" \
    -e OCI_PASSWORD="$GENERATED_TOKEN" \
    -e SYSTEM_PROMPT="$SYSTEM_PROMPT" \
    -e MODEL_CONTEXT_FILENAME="/$(basename $MODEL_CONTEXT_FILENAME)" \
    -v $MODEL_CONTEXT_FILENAME:/$(basename $MODEL_CONTEXT_FILENAME) \
    -e PIPELINE_URL=quay.io/wallarooai/wask/wask-va-pipeline:bfb42a37-45ea-4d99-8ebf-c37a1de7dd70 \
    -e CONFIG_CPUS=1.0 --cpus=15.0 --memory=20g \
    quay.io/wallarooai/wask/fitzroy-mini-ppc64le:v2025.2.0-6480
Retrieve the Generated Token by selecting Generate Token next to the Deploy Command. If this token is lost, return to the Wallaroo AI Starter Kit page and generate a new token.
Set the Deployment Command
Login to the LPAR through a terminal shell - for example, ssh.
Set the following variables:
EDGE_PORT(Required): The external IP port used to make inference requests. Verify this port is open and accessible from the requesting systems.SYSTEM_PROMPT(Optional): This is a system prompt, for example: “Answer the question in 10 words or less using the following context”.- If no prompt is provided, the following prompt is set as the default:
"You're a helpful AI assistant named Wally. Answer the following question in 10 words or less."
- If no prompt is provided, the following prompt is set as the default:
MODEL_CONTEXT_FILENAME(Required): This is a reference to a JSON file.
The following variables are optional and should only be altered from their defaults by experienced users who accept the risks of the model performing in unexpected ways if these values are altered:
CONTEXT_LEN(Default:4096): The context length of the LLM.CONTEXT_THRESHOLD(Default:0.75): The cosine similarity threshold required to use a Q/A pair chunk as context.
Create the
MODEL_CONTEXT_FILENAMEfile in the same path specified (for example:context.json). This file is in the following format:{ "type": "array", "items": { "type": "object", "properties": { "question": { "type": "string", "description": "The question being asked" }, "answer": { "type": "string", "description": "The answer to the question" } }, "required": ["question", "answer"] } }The following is an example of this file contents:
[
    {
        "question": "How do I launch DX+",
        "answer": "You can launch DX+ by opening the DX+ application from your desktop or web portal and signing in using your credentials."
    },
    {
        "question": "What credentials do I use to sign into DX+",
        "answer": "Use your assigned company username and password to sign into DX+."
    },
    {
        "question": "What should I do if I forget my DX+ password",
        "answer": "Click the 'Forgot Password' link on the login screen or contact your system administrator to reset it."
    }
]
The following shows an example of these values declared in the command without altering the optional parameters:
podman run \
    -p 3030:8080 \
    -e OCI_USERNAME="$USERNAME" \
    -e OCI_PASSWORD="$GENERATED_TOKEN" \
    -e SYSTEM_PROMPT="Answer the question in 10 words or less using the following context" \
    -e MODEL_CONTEXT_FILENAME="/$(basename context.json)" \
    -v $MODEL_CONTEXT_FILENAME:/$(basename context.json) \
    -e PIPELINE_URL=quay.io/wallarooai/wask/wask-virtual-assistant:9ad07d12-952a-4b67-b8b7-c5af57b8636b \
    -e CONFIG_CPUS=1.0 --cpus=15.0 --memory=20g \
    quay.io/wallarooai/wask/fitzroy-mini-ppc64le:v2026.1.0-6654
The following shows an example of the optional values altered:
podman run \
    -p 3030:8080 \
    -e OCI_USERNAME="$USERNAME" \
    -e OCI_PASSWORD="$GENERATED_TOKEN" \
    -e SYSTEM_PROMPT="Answer the question in 10 words or less using the following context" \
    -e MODEL_CONTEXT_FILENAME="/$(basename context.json)" \
    -v $MODEL_CONTEXT_FILENAME:/$(basename context.json) \
    -e CONTEXT_LEN=4096 \
    -e CONTEXT_THRESHOLD=0.75 \
    -e PIPELINE_URL=quay.io/wallarooai/wask/wask-virtual-assistant:9ad07d12-952a-4b67-b8b7-c5af57b8636b \
    -e CONFIG_CPUS=1.0 --cpus=15.0 --memory=20g \
    quay.io/wallarooai/wask/fitzroy-mini-ppc64le:v2026.1.0-6654
Once ready, deploy the model by running the updated Deploy Command for your environment.
Inference
Inference requests are made by submitting Apache Arrow tables or Pandas Tables in Record Format as JSON.
The Inference URL is in the format:
$HOSTNAME:$PORT/infer
For example, if the hostname is localhost and the port is 3030, the Inference URL is:
localhost:3030/infer
The format for inference requests is in the format:
[{"prompt":"User: {PROMPT}"}]
Note the prefix USER: for the prompt.
The following shows an example of performing the inference request on the deployed Virtual Assistant via the curl command.
Note that this command is run within a Jupyter Notebook for the tutorial; in a terminal shell, remove the !curl and replace it with curl.
!curl POST localhost:3030/infer -H "Content-Type: application/json" -v --data '[{"prompt":"User: How do I launch DX+?"}]'
[{"time":1781527044221,"in":{"prompt":"User: How do I launch DX+?"},"out":{"generated_text":"Open DX+ app, sign in."},"anomaly":{"count":0},"metadata":{"last_model":"{\"model_name\":\"wask-demo-rag-byop\",\"model_sha\":\"d122466d95585bf130d8a1452ed16f6b99d1e4f2cddd73b9be5b0fe8e69163e4\"}","pipeline_version":"925d824a-9164-493d-9744-a4c2455f5605","elapsed":[19967,530742689],"dropped":[],"partition":"7ebad82c9628"}}]
Prompts also provide history by adding the the previous conversation in the format User:{PREVIOUS PROMPT} and Assistant:{PREVIOUS RESPONSE(S)} and then ending with User:{NEW PROMPT}. The format example for this request is:
[{"prompt":"User: {PREVIOUS PROMPT N}\nAssistant: {RESPONSE TO PREVIOUS PROMPT N}\nUser: {PREVIOUS PROMPT N-1}\nAssistant: {RESPONSE TO PREVIOUS PROMPT N-1}...\nUser: NEW PROMPT"}]
The following is an example of an inference providing prev
!curl POST localhost:3030/infer -H "Content-Type: application/json" -v --data '[{"prompt":"User: How do I launch DX+?\nAssistant: Launch DX+ by opening the DX+ app and signing in with your credentials.\nUser: What did I previously ask?"}]'
[{"time":1781527044221,"in":{"prompt":"User: How do I launch DX+?\nAssistant: Launch DX+ by opening the DX+ app and signing in with your credentials.\nUser: What did I previously ask?"},"out":{"generated_text":"How to launch DX+."},"anomaly":{"count":0},"metadata":{"last_model":"{\"model_name\":\"wask-demo-rag-byop\",\"model_sha\":\"d122466d95585bf130d8a1452ed16f6b99d1e4f2cddd73b9be5b0fe8e69163e4\"}","pipeline_version":"925d824a-9164-493d-9744-a4c2455f5605","elapsed":[19967,530742689],"dropped":[],"partition":"7ebad82c9628"}}]
The virtual assistant will auto trim the prompt to fit the context length using the following rules:
- First trim from the history.
- If further trimming is required, trim from the context and then from the prompt itself until it fits the context length.