Wallaroo SDK Azure Databricks Install Guide
This tutorial and the assets can be downloaded as part of the Wallaroo Tutorials repository.
Installing the Wallaroo SDK into Workspace
Organizations that use Azure Databricks for model training and development can deploy models to Wallaroo through the Wallaroo SDK. The following guide is created to assist users with installing the Wallaroo SDK, setting up authentication through Azure Databricks, and making a standard connection to a Wallaroo instance through Azure Databricks Workspace.
These instructions are based on the on the Wallaroo SSO for Microsoft Azure and the Connect to Wallaroo guides.
This tutorial provides the following:
ccfraud.onnx: A pretrained model from the Machine Learning Group’s demonstration on Credit Card Fraud detection.- Sample inference test data:
cc_data_1k.arrow: Sample input file with 1,000 records.cc_data_10k.arrow: Sample input file with 10,000 records.
To use the Wallaroo SDK within Azure Databricks Workspace, a virtual environment will be used. This will set the necessary libraries and specific Python version required.
Prerequisites
The following is required for this tutorial:
- A Wallaroo instance version 2024.4 or later with External Inference URls enabled.
- An Azure Databricks workspace with a cluster
- The following Python libraries installed:
General Steps
For our example, we will perform the following:
- Wallaroo SDK Install
- Install the Wallaroo SDK into the Azure Databricks cluster.
- Install the Wallaroo Python SDK.
- Connect to a remote Wallaroo instance. This instance is configured to use the Wallaroo Authentication service.
- Wallaroo SDK from Azure Databricks Workspace (Optional)
- The following steps are used to demonstrate using the Wallaroo SDK in an Azure Databricks Workspace environment. The entire tutorial can be found on the Wallaroo Tutorials repository.
- Create a workspace for our work.
- Upload the CCFraud model.
- Create a pipeline that can ingest our submitted data, submit it to the model, and export the results
- Run a sample inference through our pipeline by loading a file
- Undeploy the pipeline and return resources back to the Wallaroo instance’s Kubernetes environment.
- The following steps are used to demonstrate using the Wallaroo SDK in an Azure Databricks Workspace environment. The entire tutorial can be found on the Wallaroo Tutorials repository.
Install Wallaroo SDK
Add Wallaroo SDK to Cluster
To install the Wallaroo SDK in a Azure Databricks environment:
- From the Azure Databricks dashboard, select Computer, then the cluster to use.
- Select Libraries.
- Select Install new.
- Select PyPI. In the Package field, enter the current version of the Wallaroo SDK. It is recommended to specify the version, which as of this writing is
wallaroo==2026.1.3. - Select Install.
Once the Status shows Installed, it will be available in Azure Databricks notebooks and other tools that use the cluster.
Add Tutorial Files
The following instructions can be used to upload this tutorial and it’s files into Databricks. Depending on how your Azure Databricks is configured and your organizations standards, there are multiple ways of uploading files to your Azure Databricks environment. The following example is used for the tutorial and makes it easy to reference data files from within this Notebook. Adjust based on your requirements.
- IMPORTANT NOTE: Importing a repo from a Git repository may not convert the included Jupyter Notebooks into the Databricks format. This method
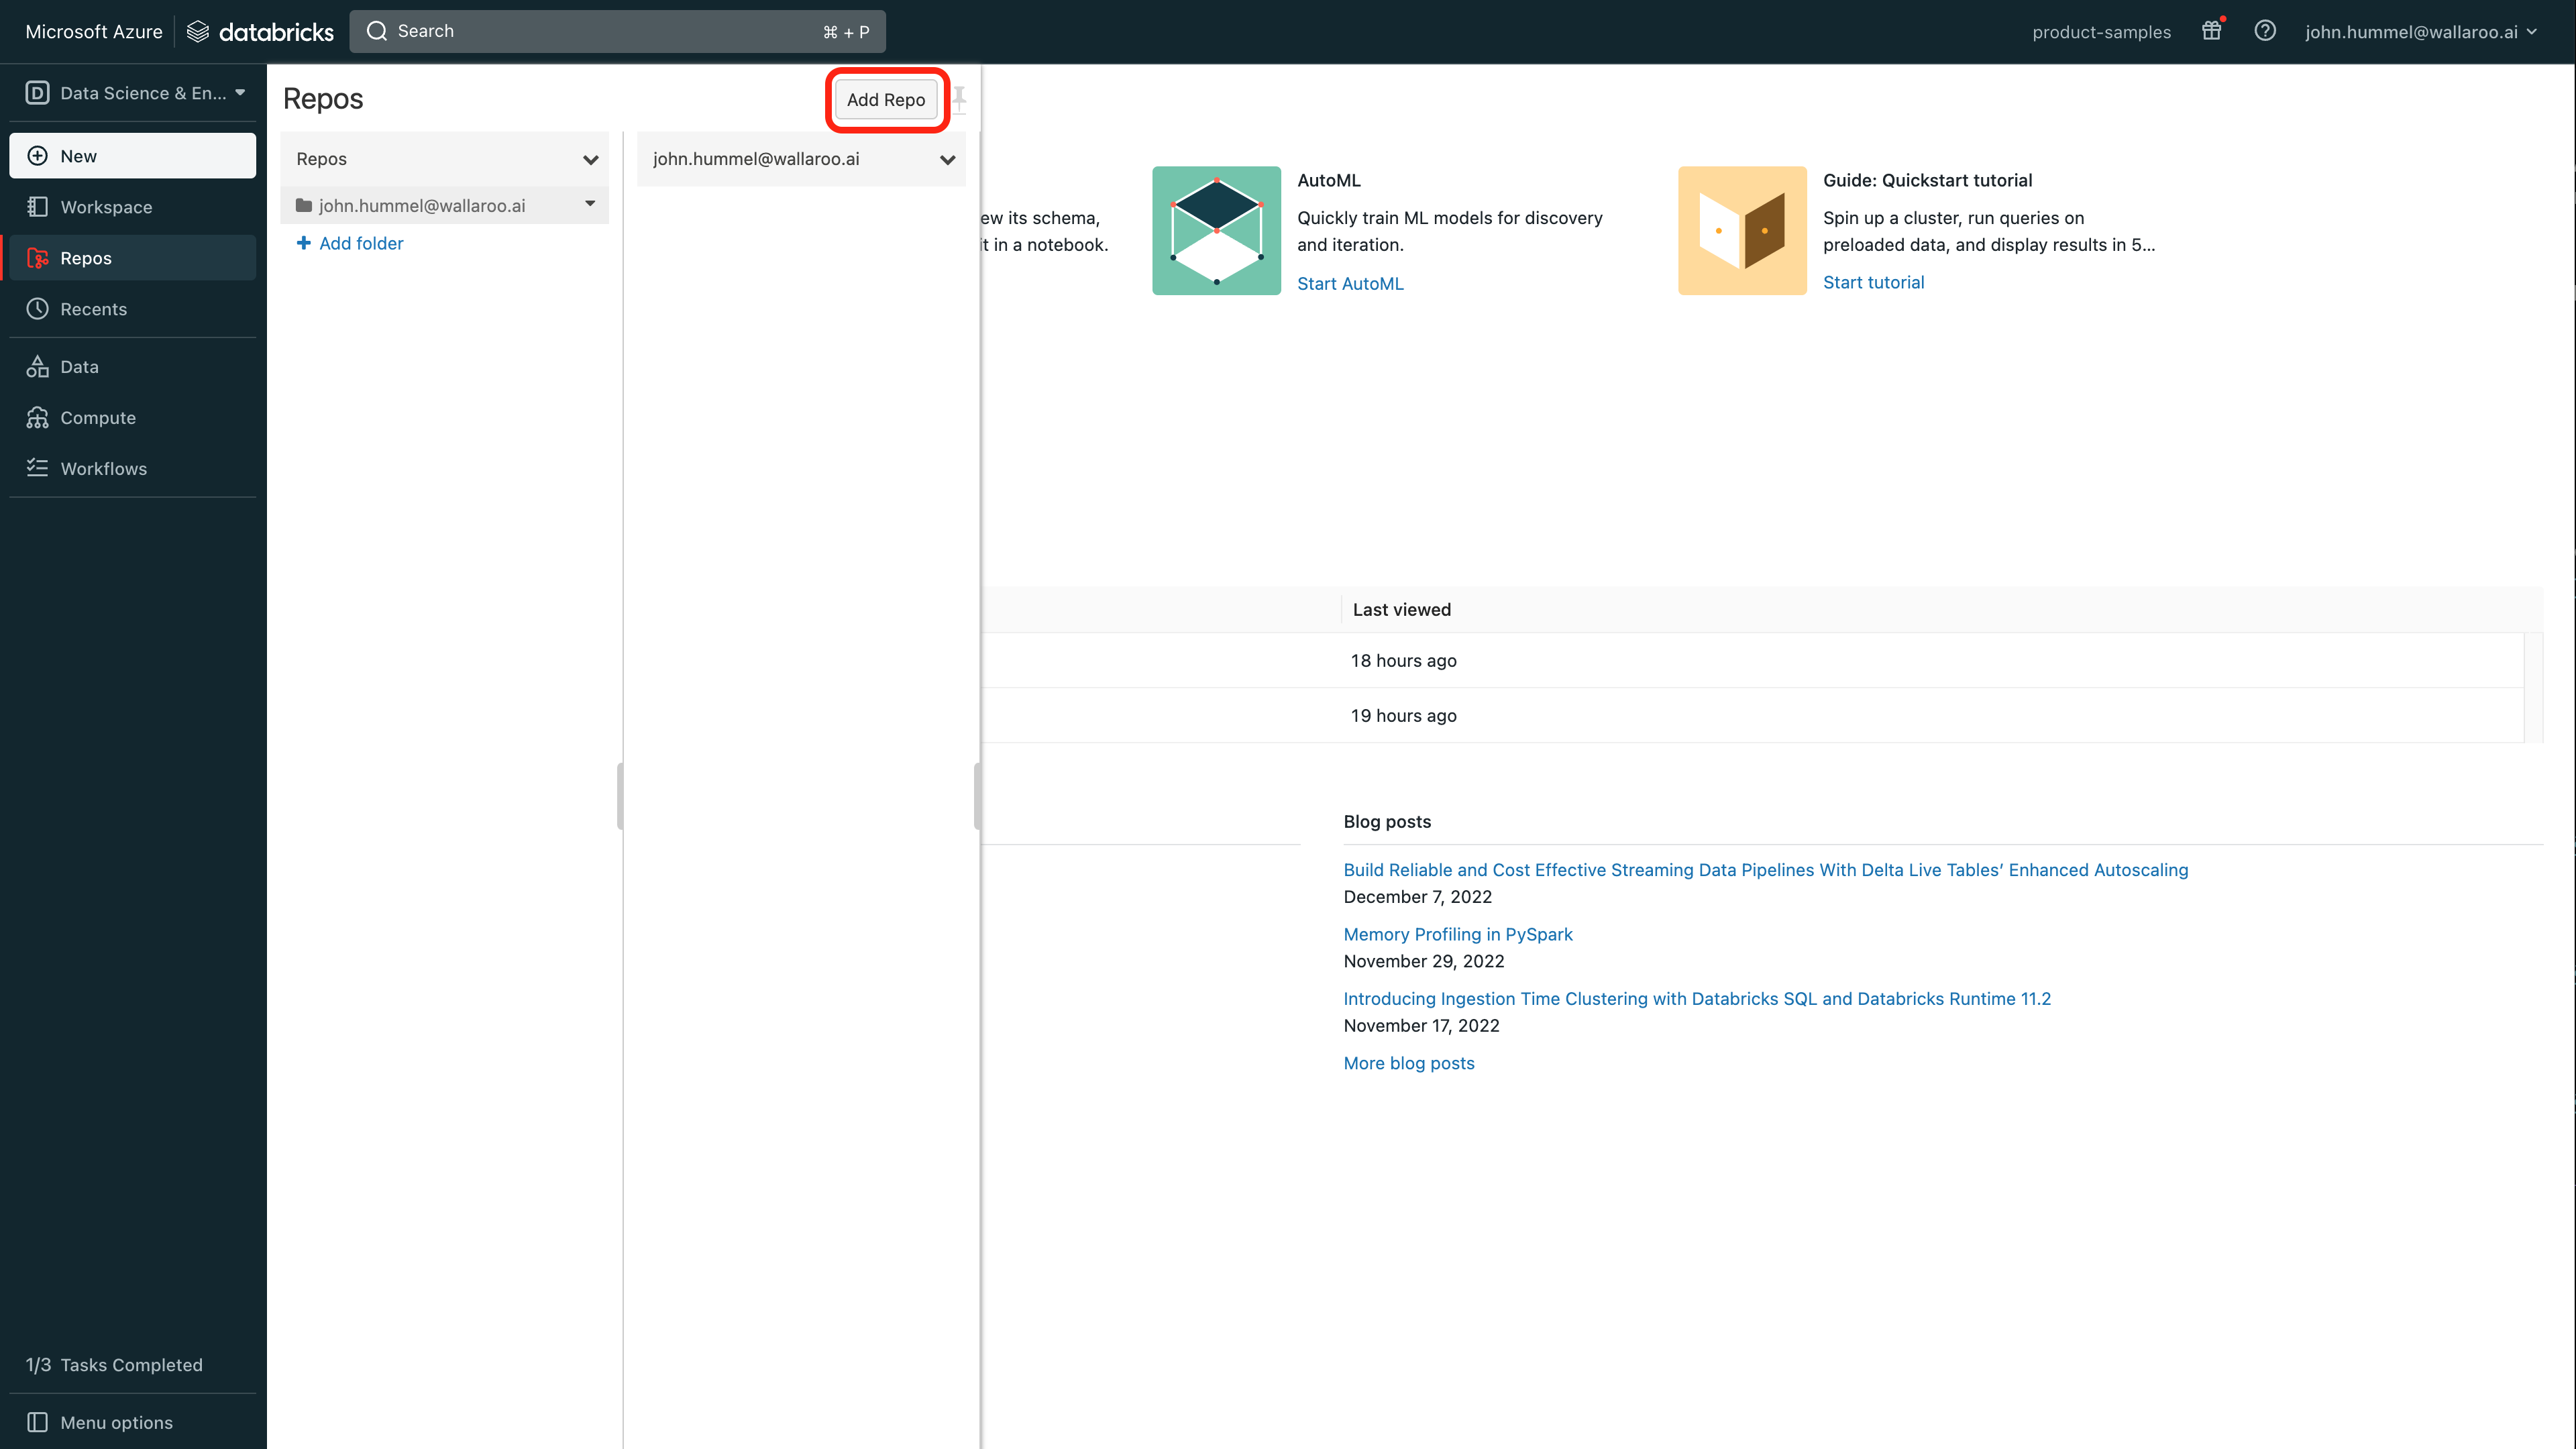
From the Azure Databricks dashboard, select Repos.
Select where to place the repo, then select Add Repo.
Set the following:
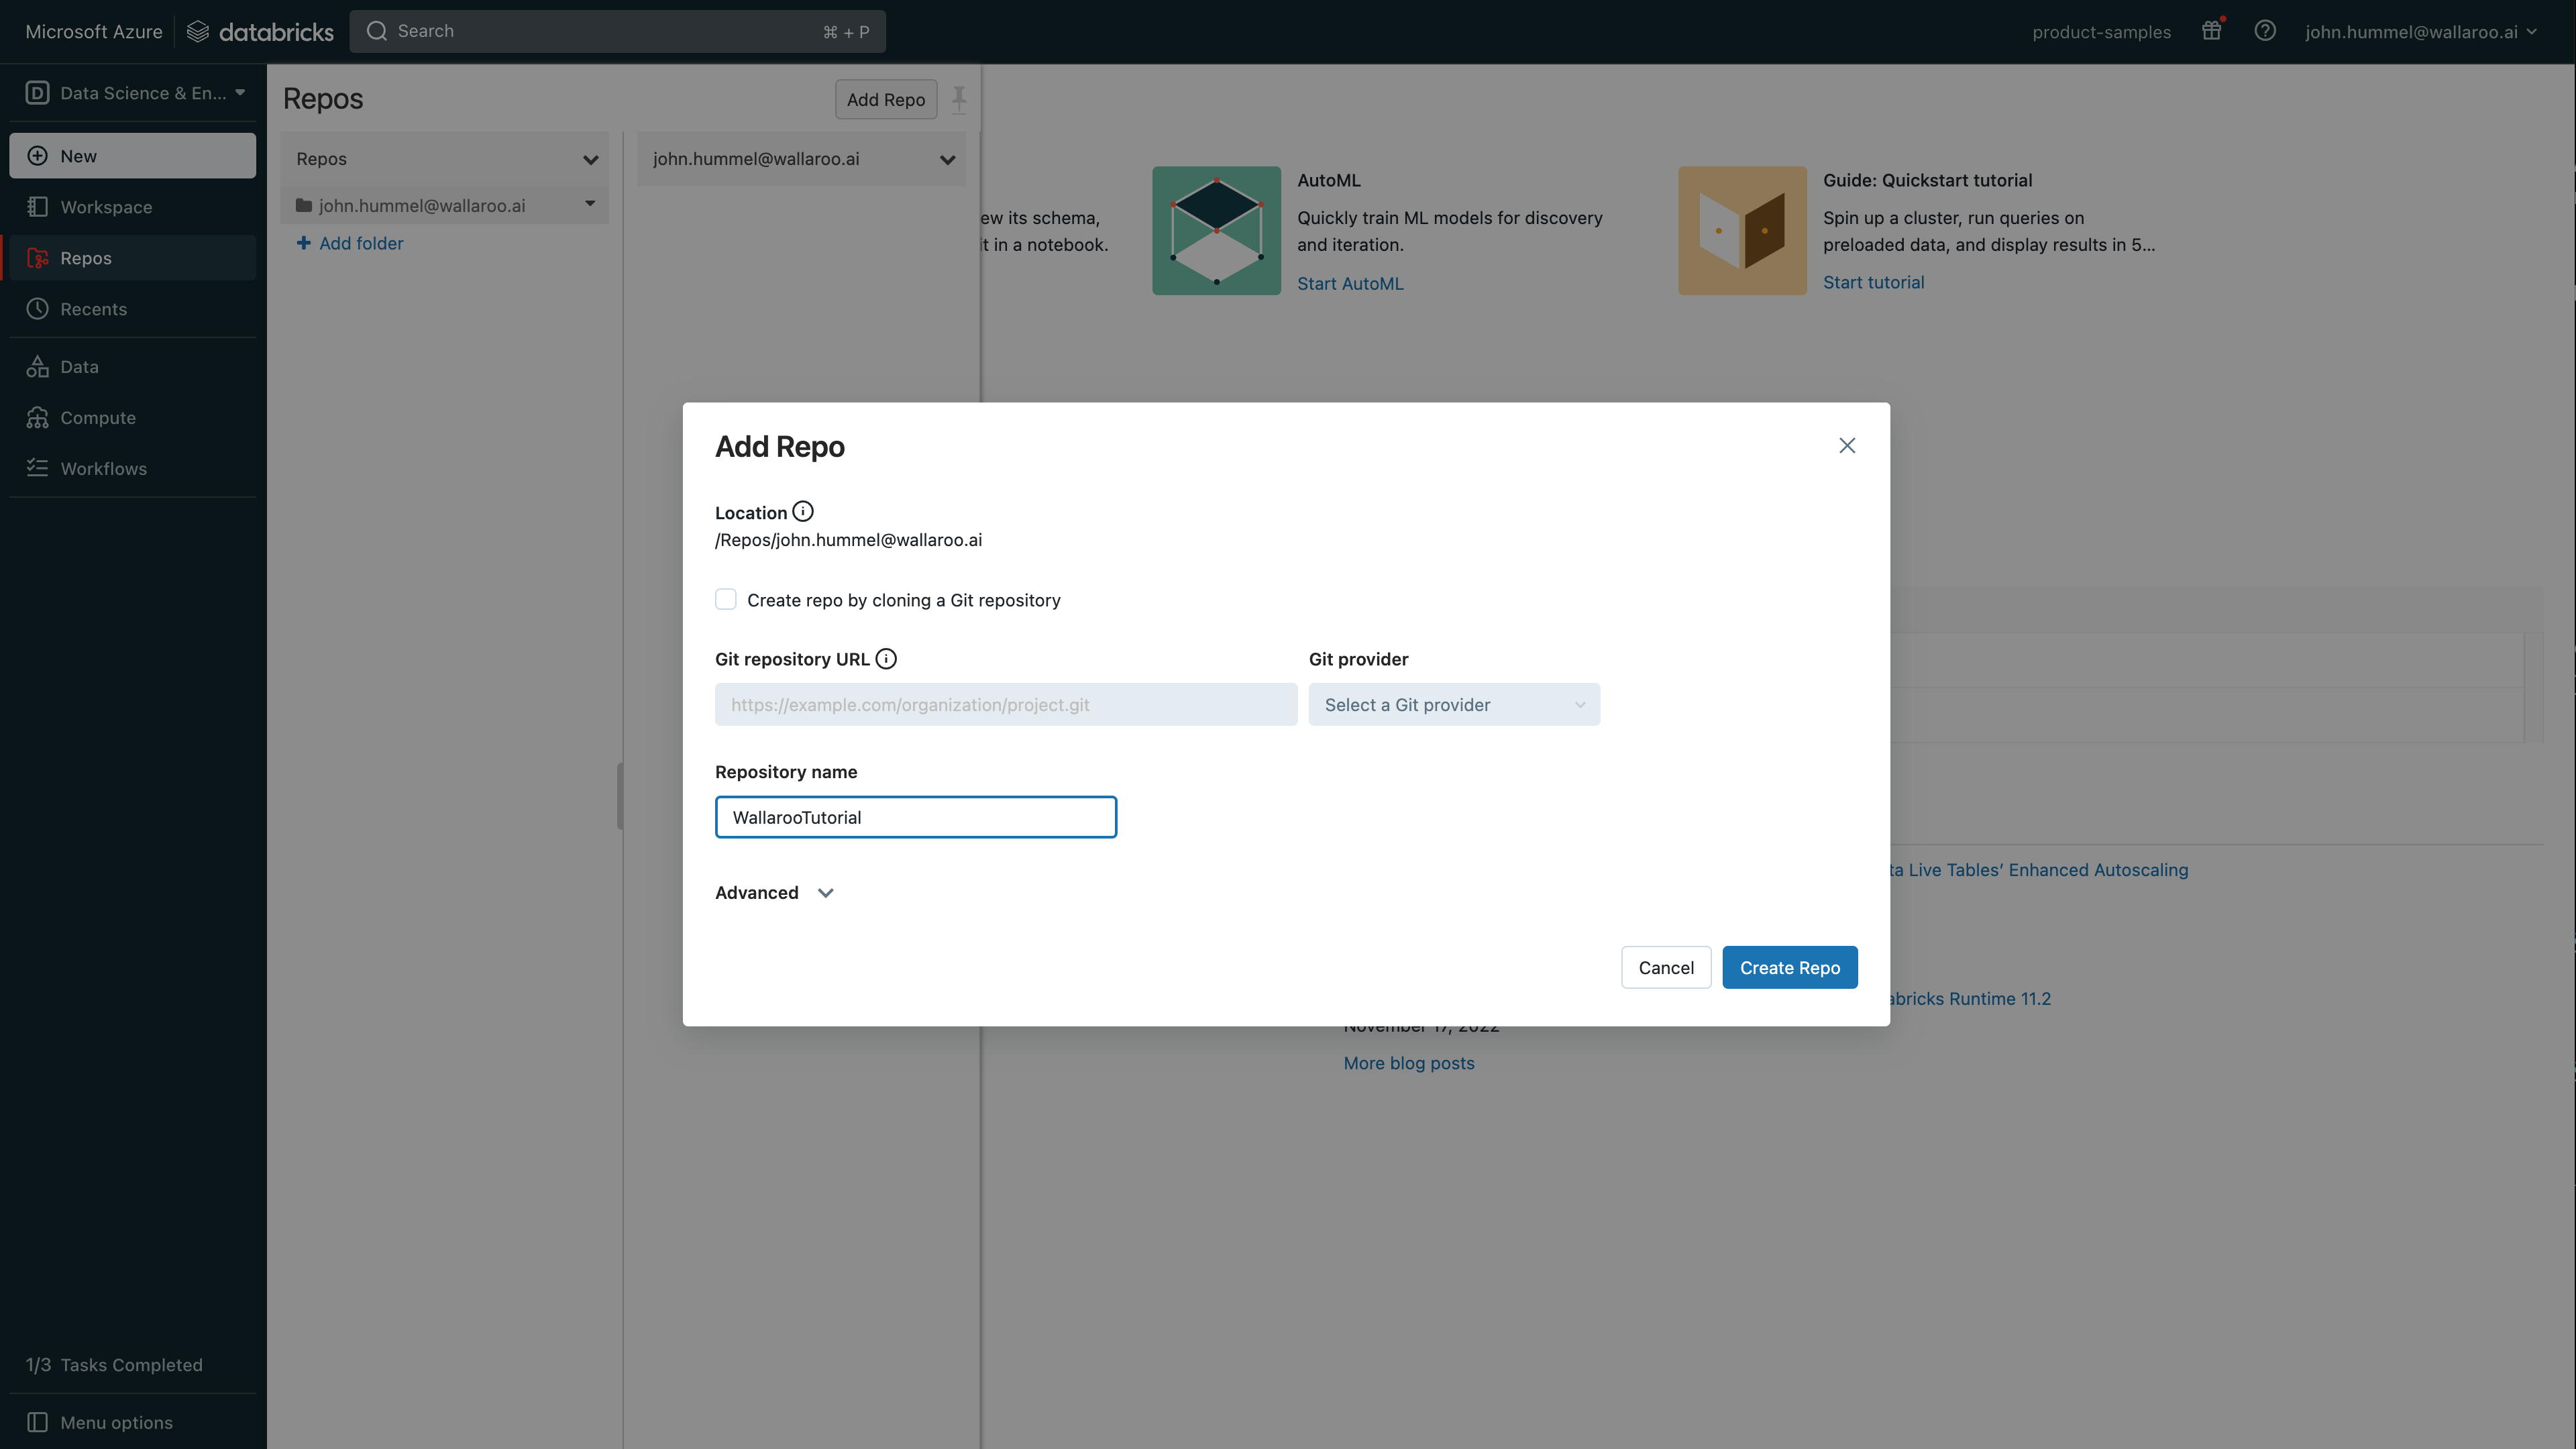
- Create repo by cloning a Git repository: Uncheck
- Repository name: Set any name based on the Databricks standard (no spaces, etc).
- Select Create Repo.
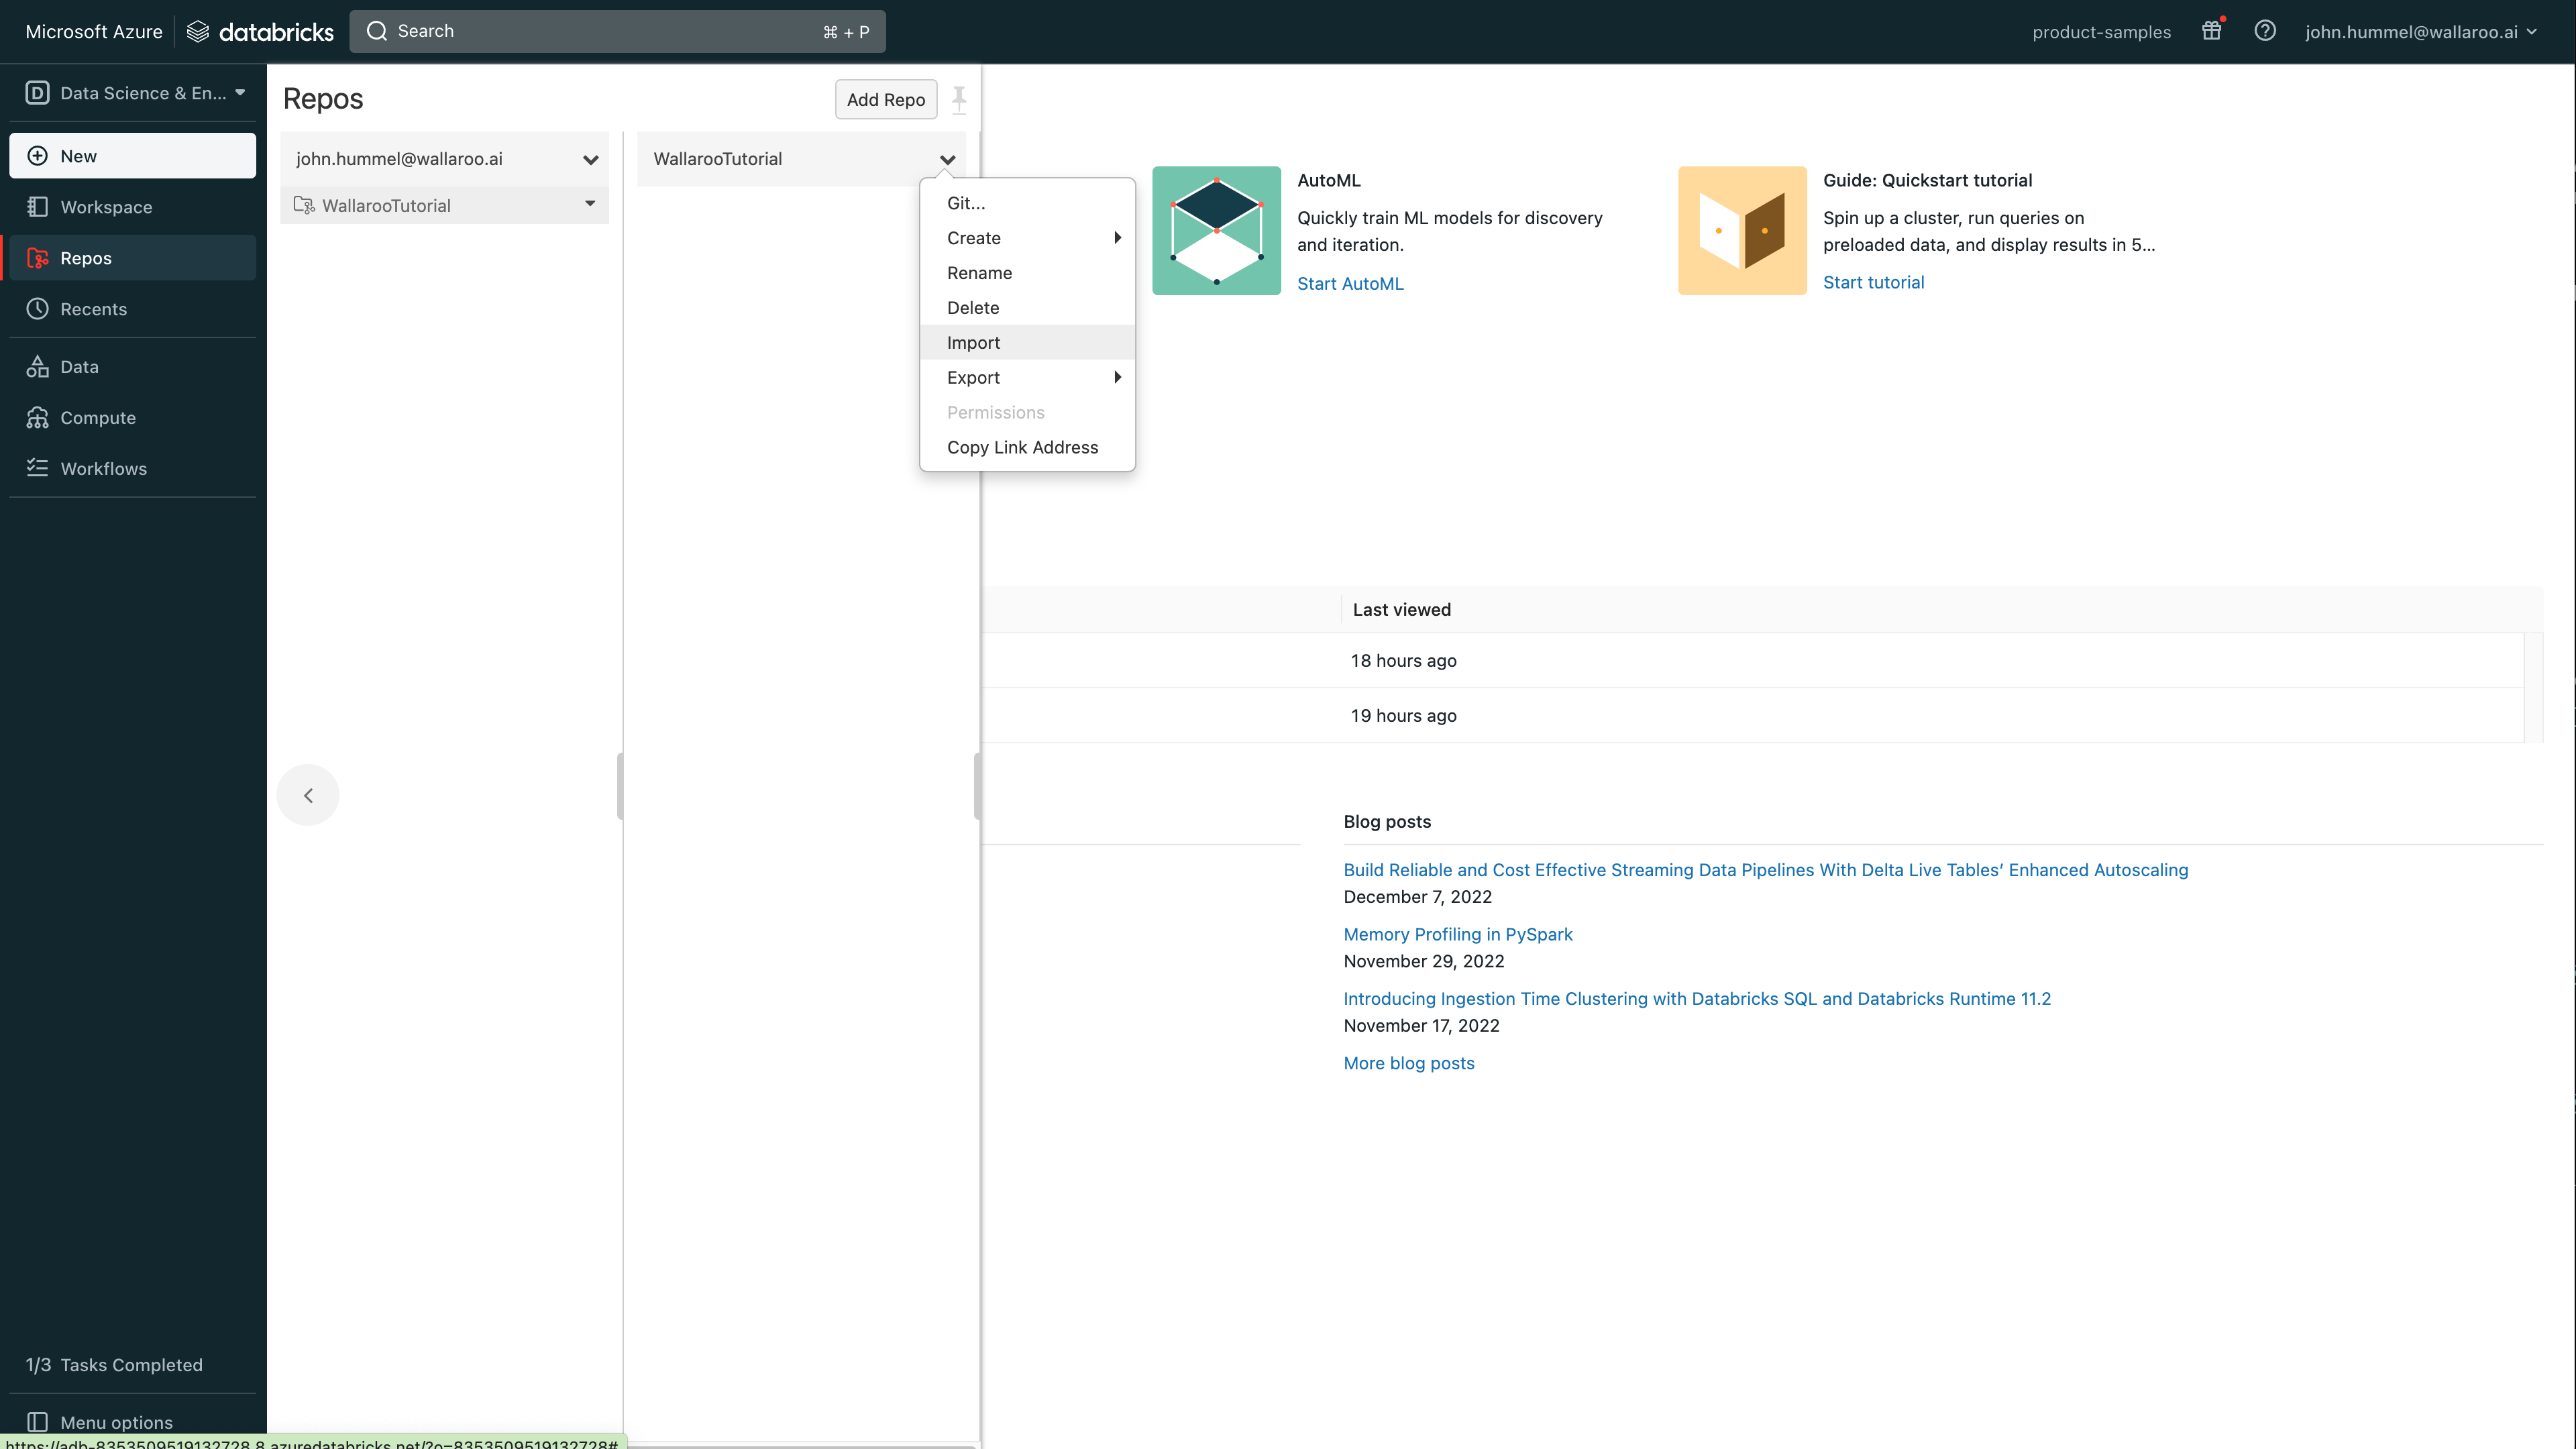
Select the new tutorial, then from the repo menu dropdown, select Import.
Select the files to upload. For this example, the following files are uploaded:
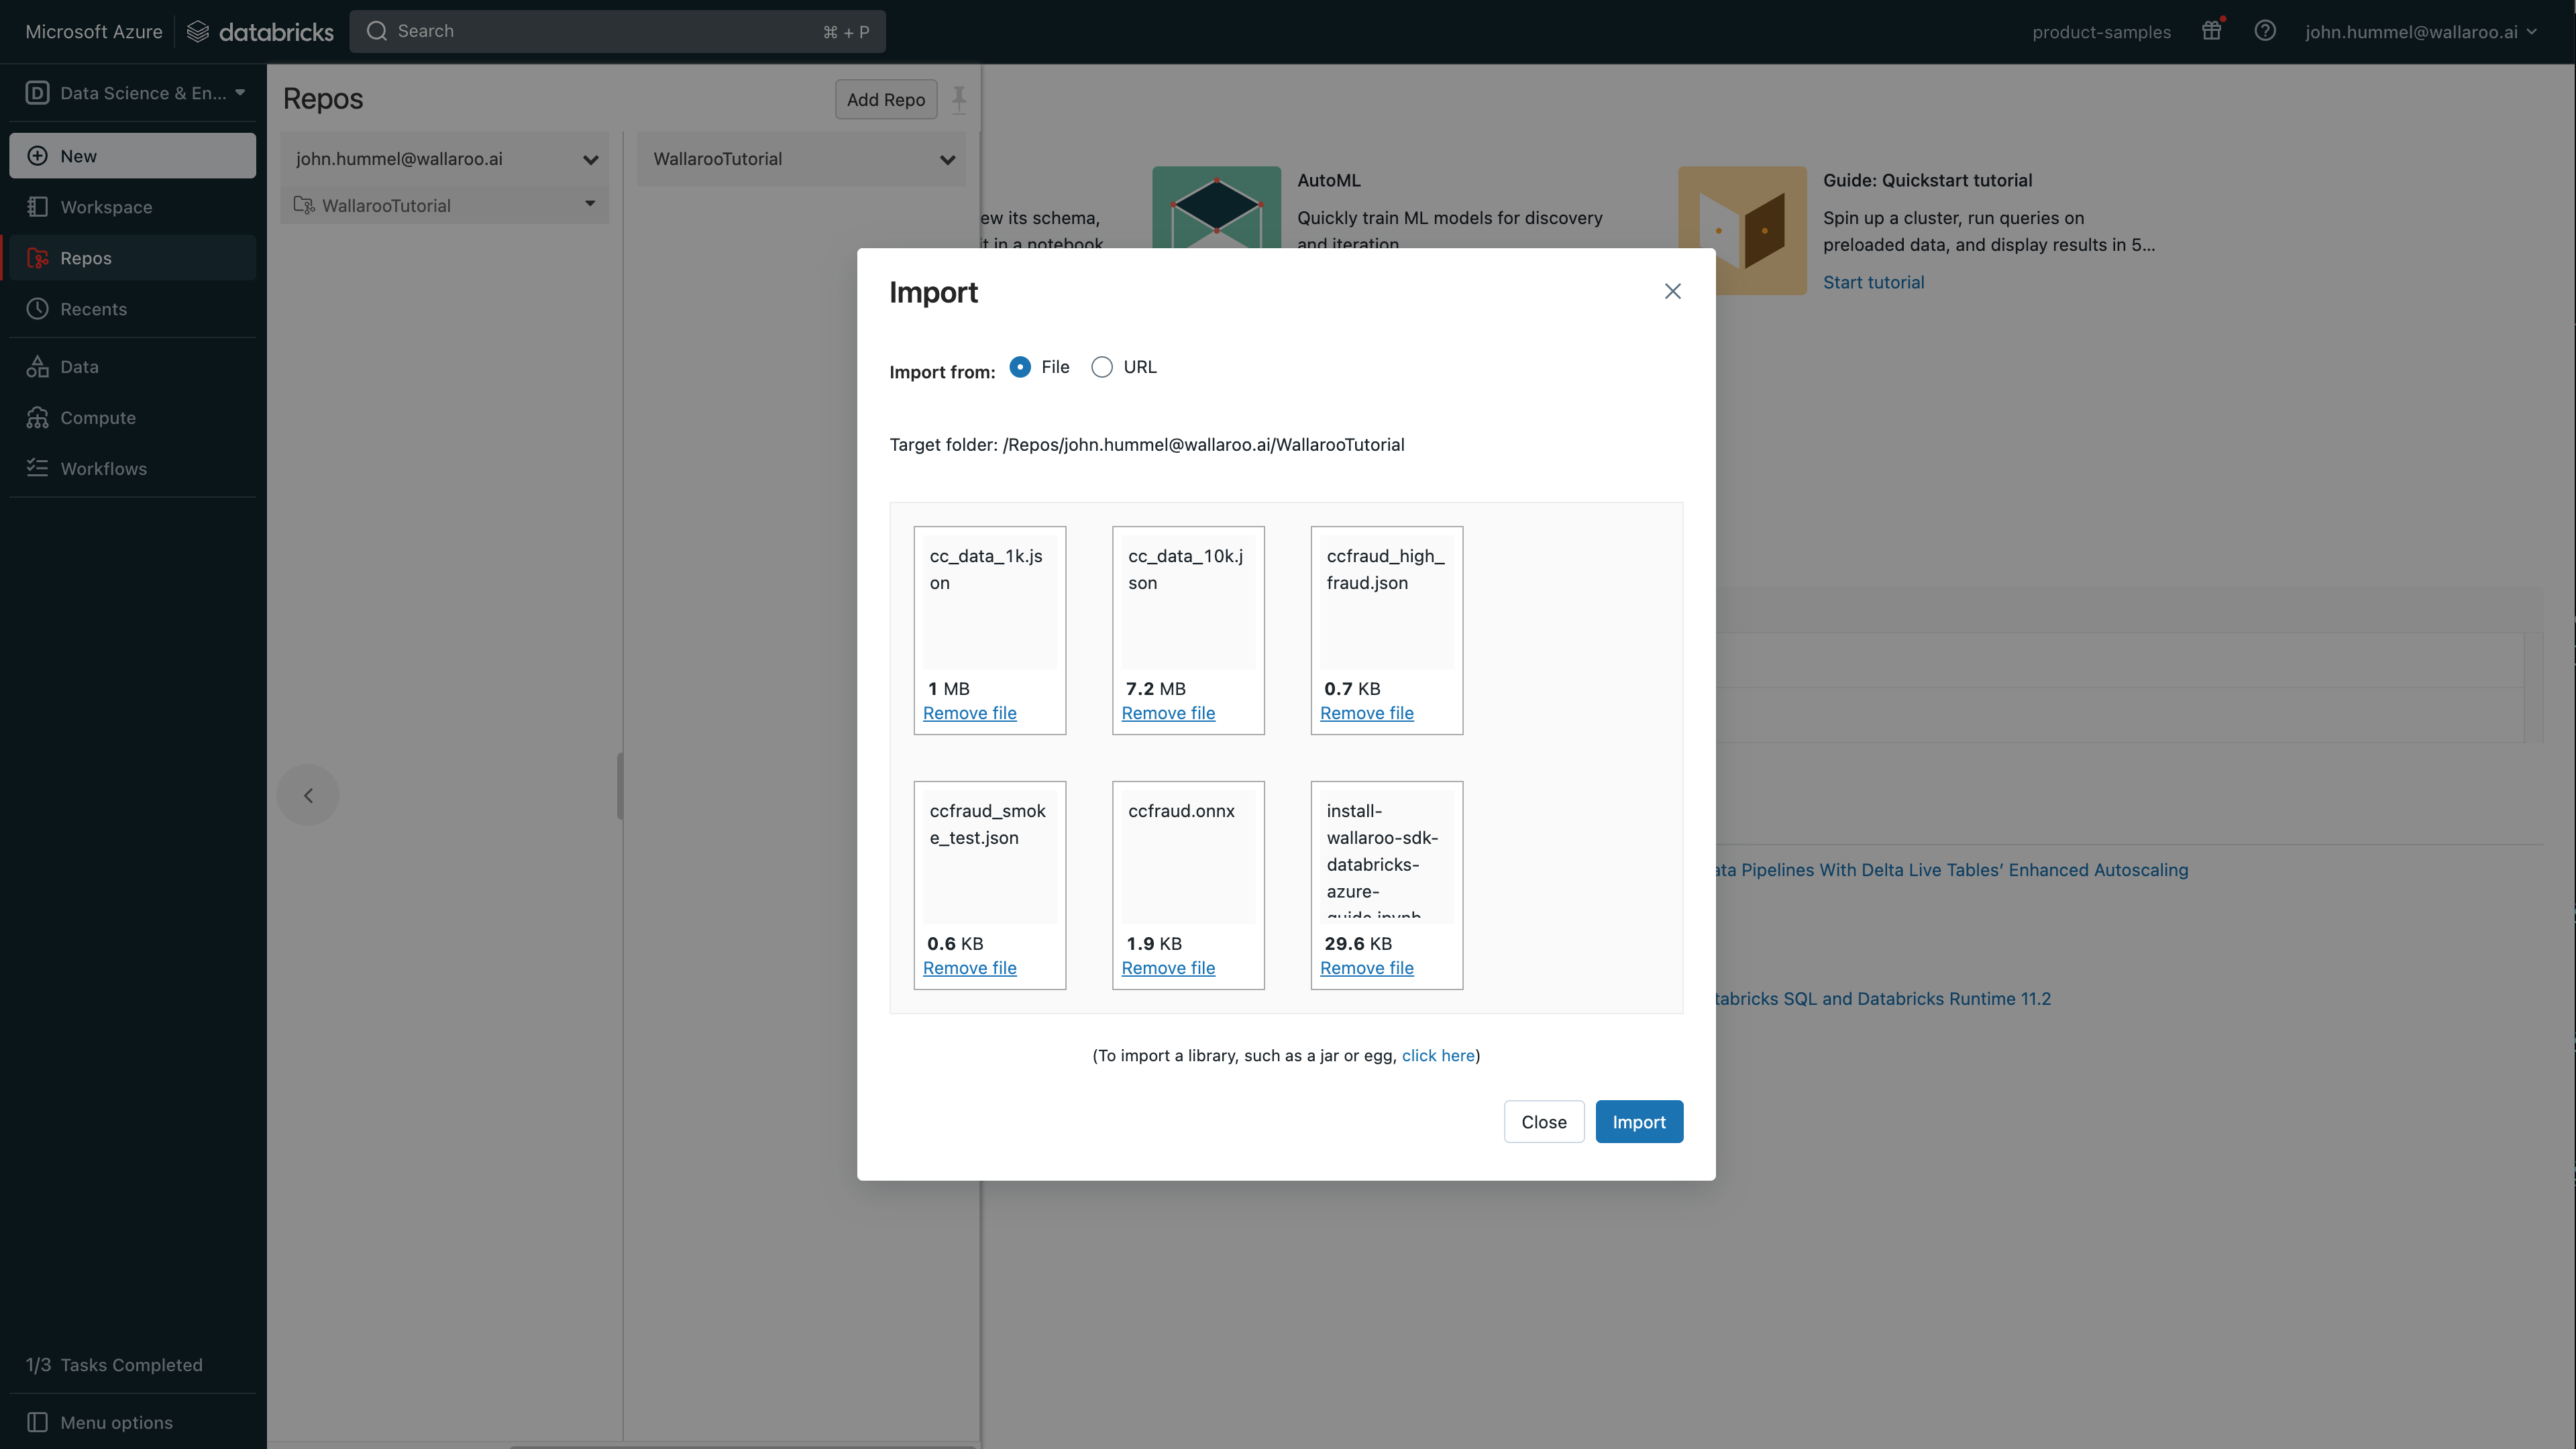
ccfraud.onnx: A pretrained model from the Machine Learning Group’s demonstration on Credit Card Fraud detection.- Sample inference test data:
ccfraud_high_fraud.json: Test input file that returns a high likelihood of credit card fraud.ccfraud_smoke_test.json: Test input file that returns a low likelihood of credit card fraud.cc_data_1k.json: Sample input file with 1,000 records.cc_data_10k.json: Sample input file with 10,000 records.
install-wallaroo-sdk-databricks-azure-guide.ipynb: This notebook.
Select Import.
The Jupyter Notebook can be opened from this new Azure Databricks repository, and relative files it references will be accessible with the exceptions listed below.
Zip files added via the method above are automatically decompressed, so can not be used as model files. For example, tensor based models such as the Wallaroo Aloha Demo. Zip files can be uploaded using DBFS and used through the following process:
To upload model files to Azure Databricks using DBFS:
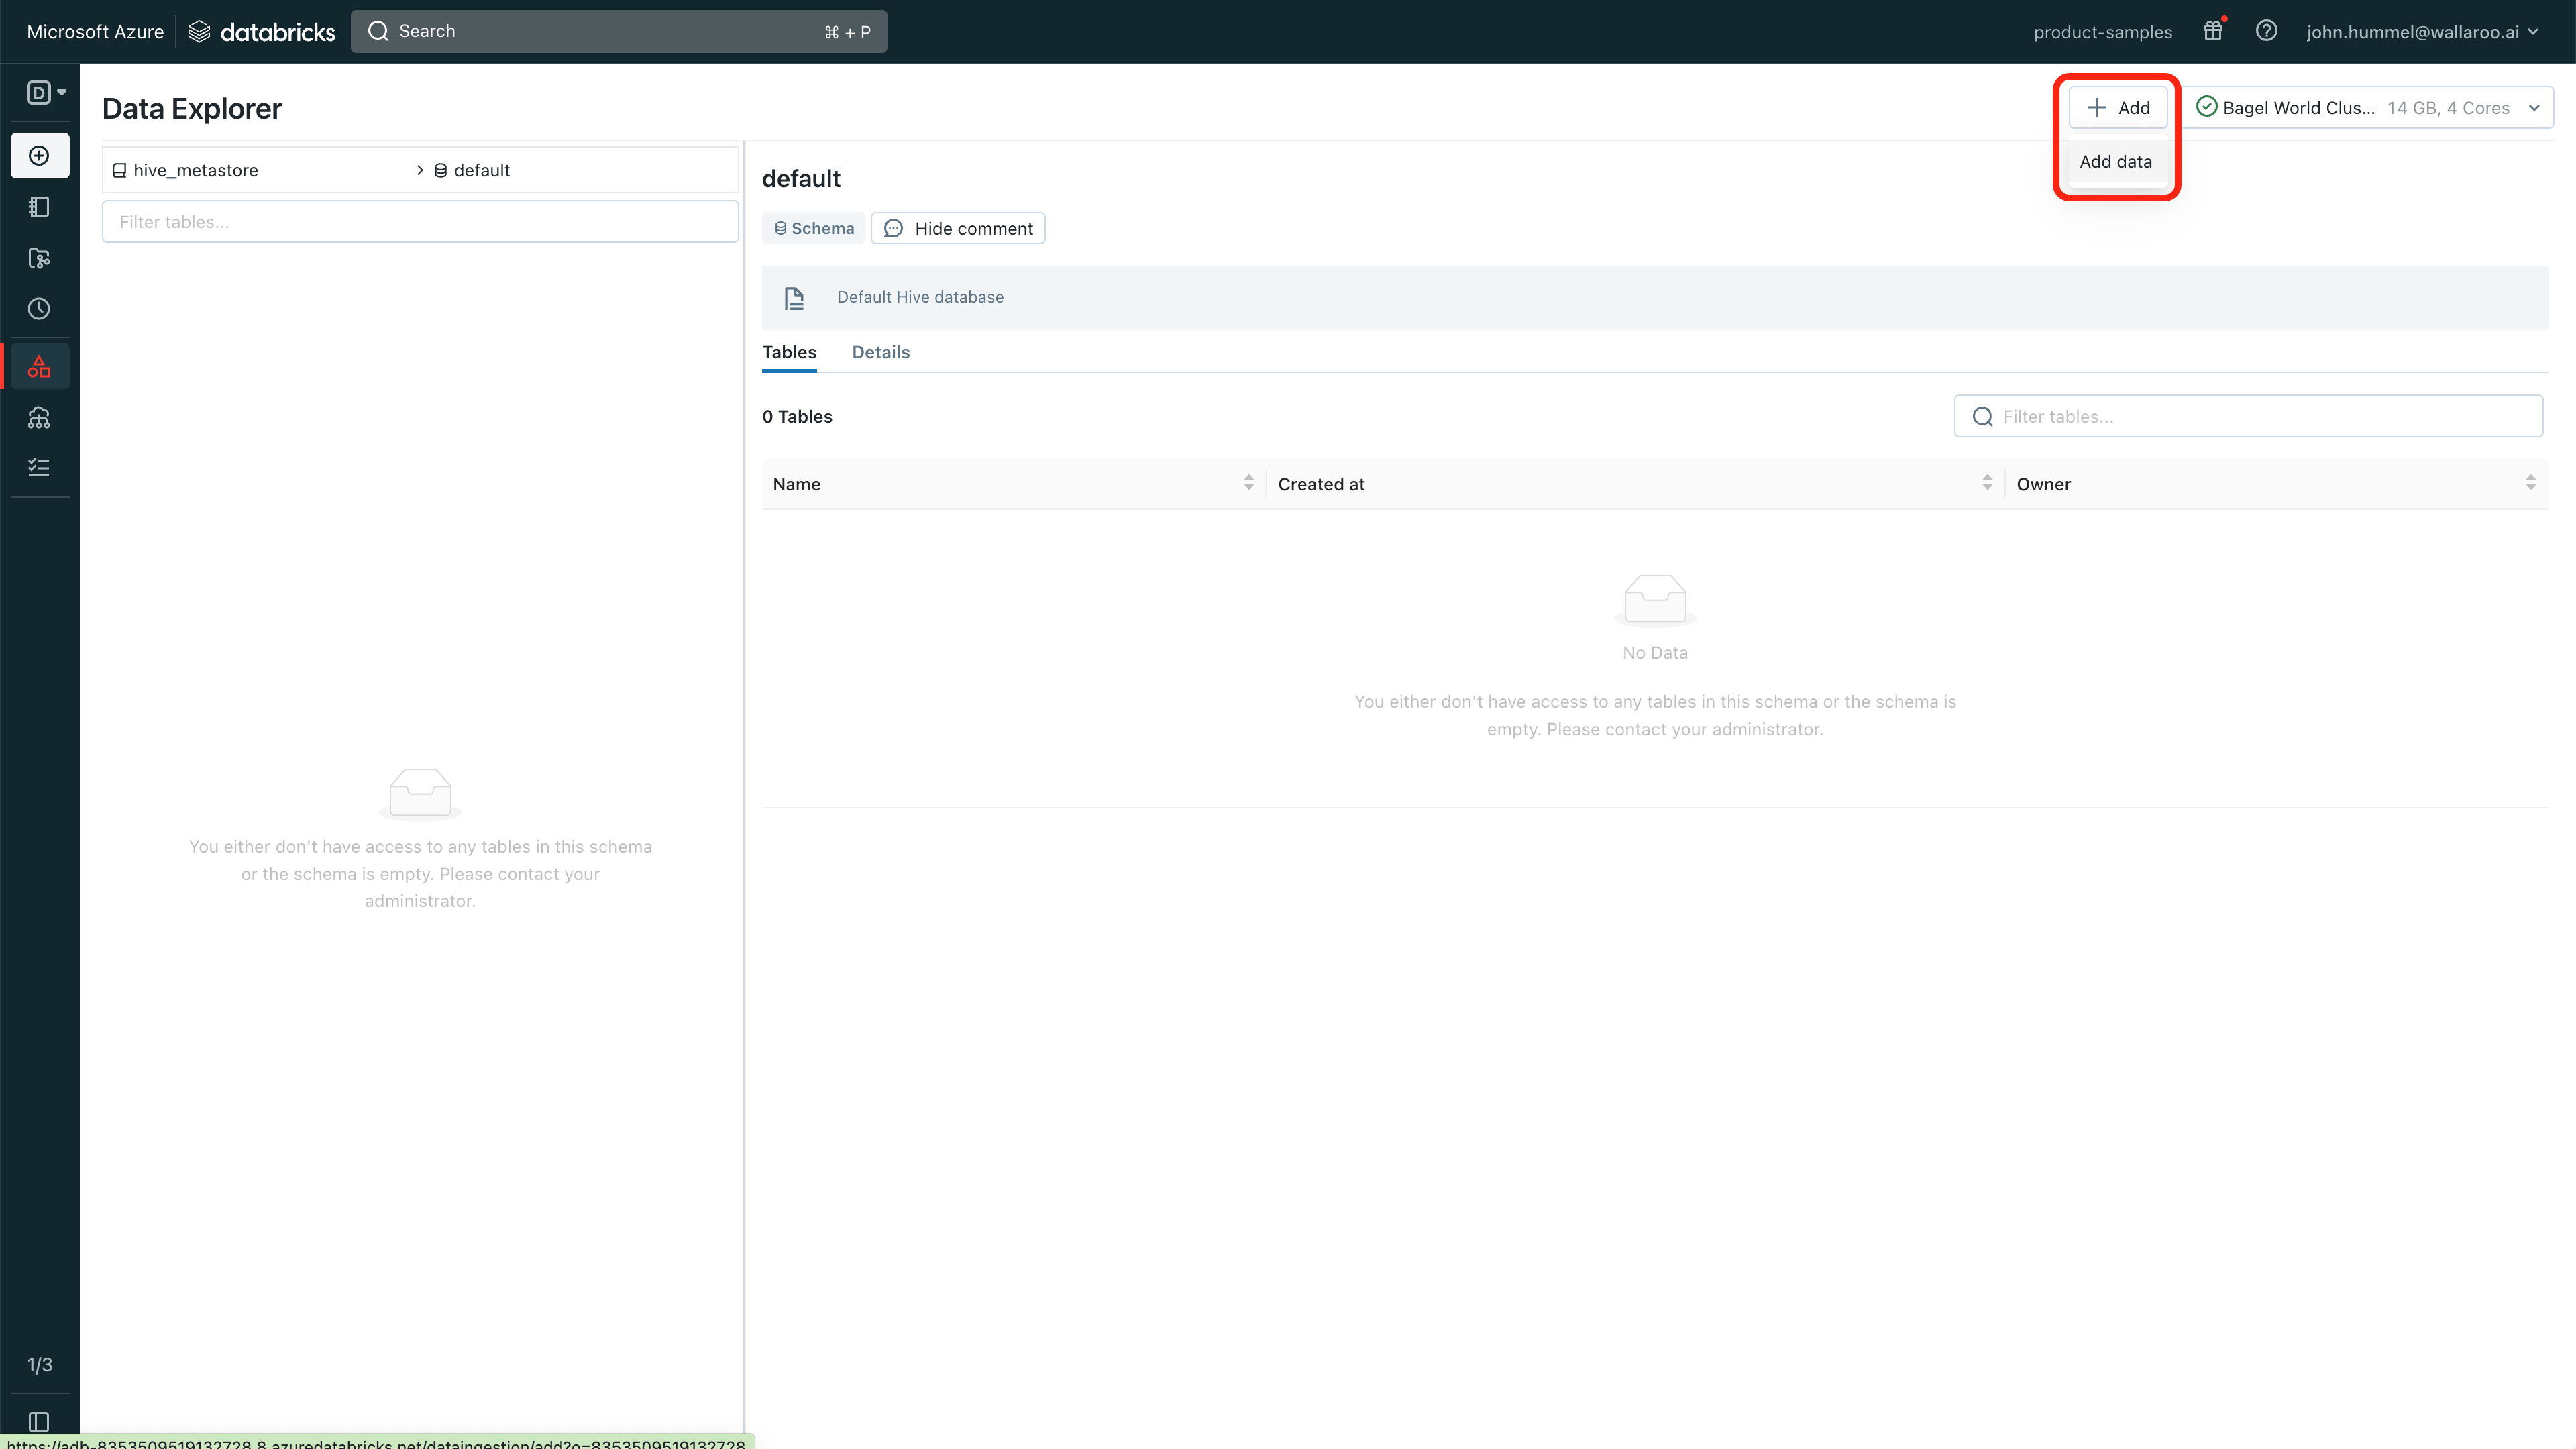
From the Azure Databricks dashboard, select Data.
Select Add->Add data.
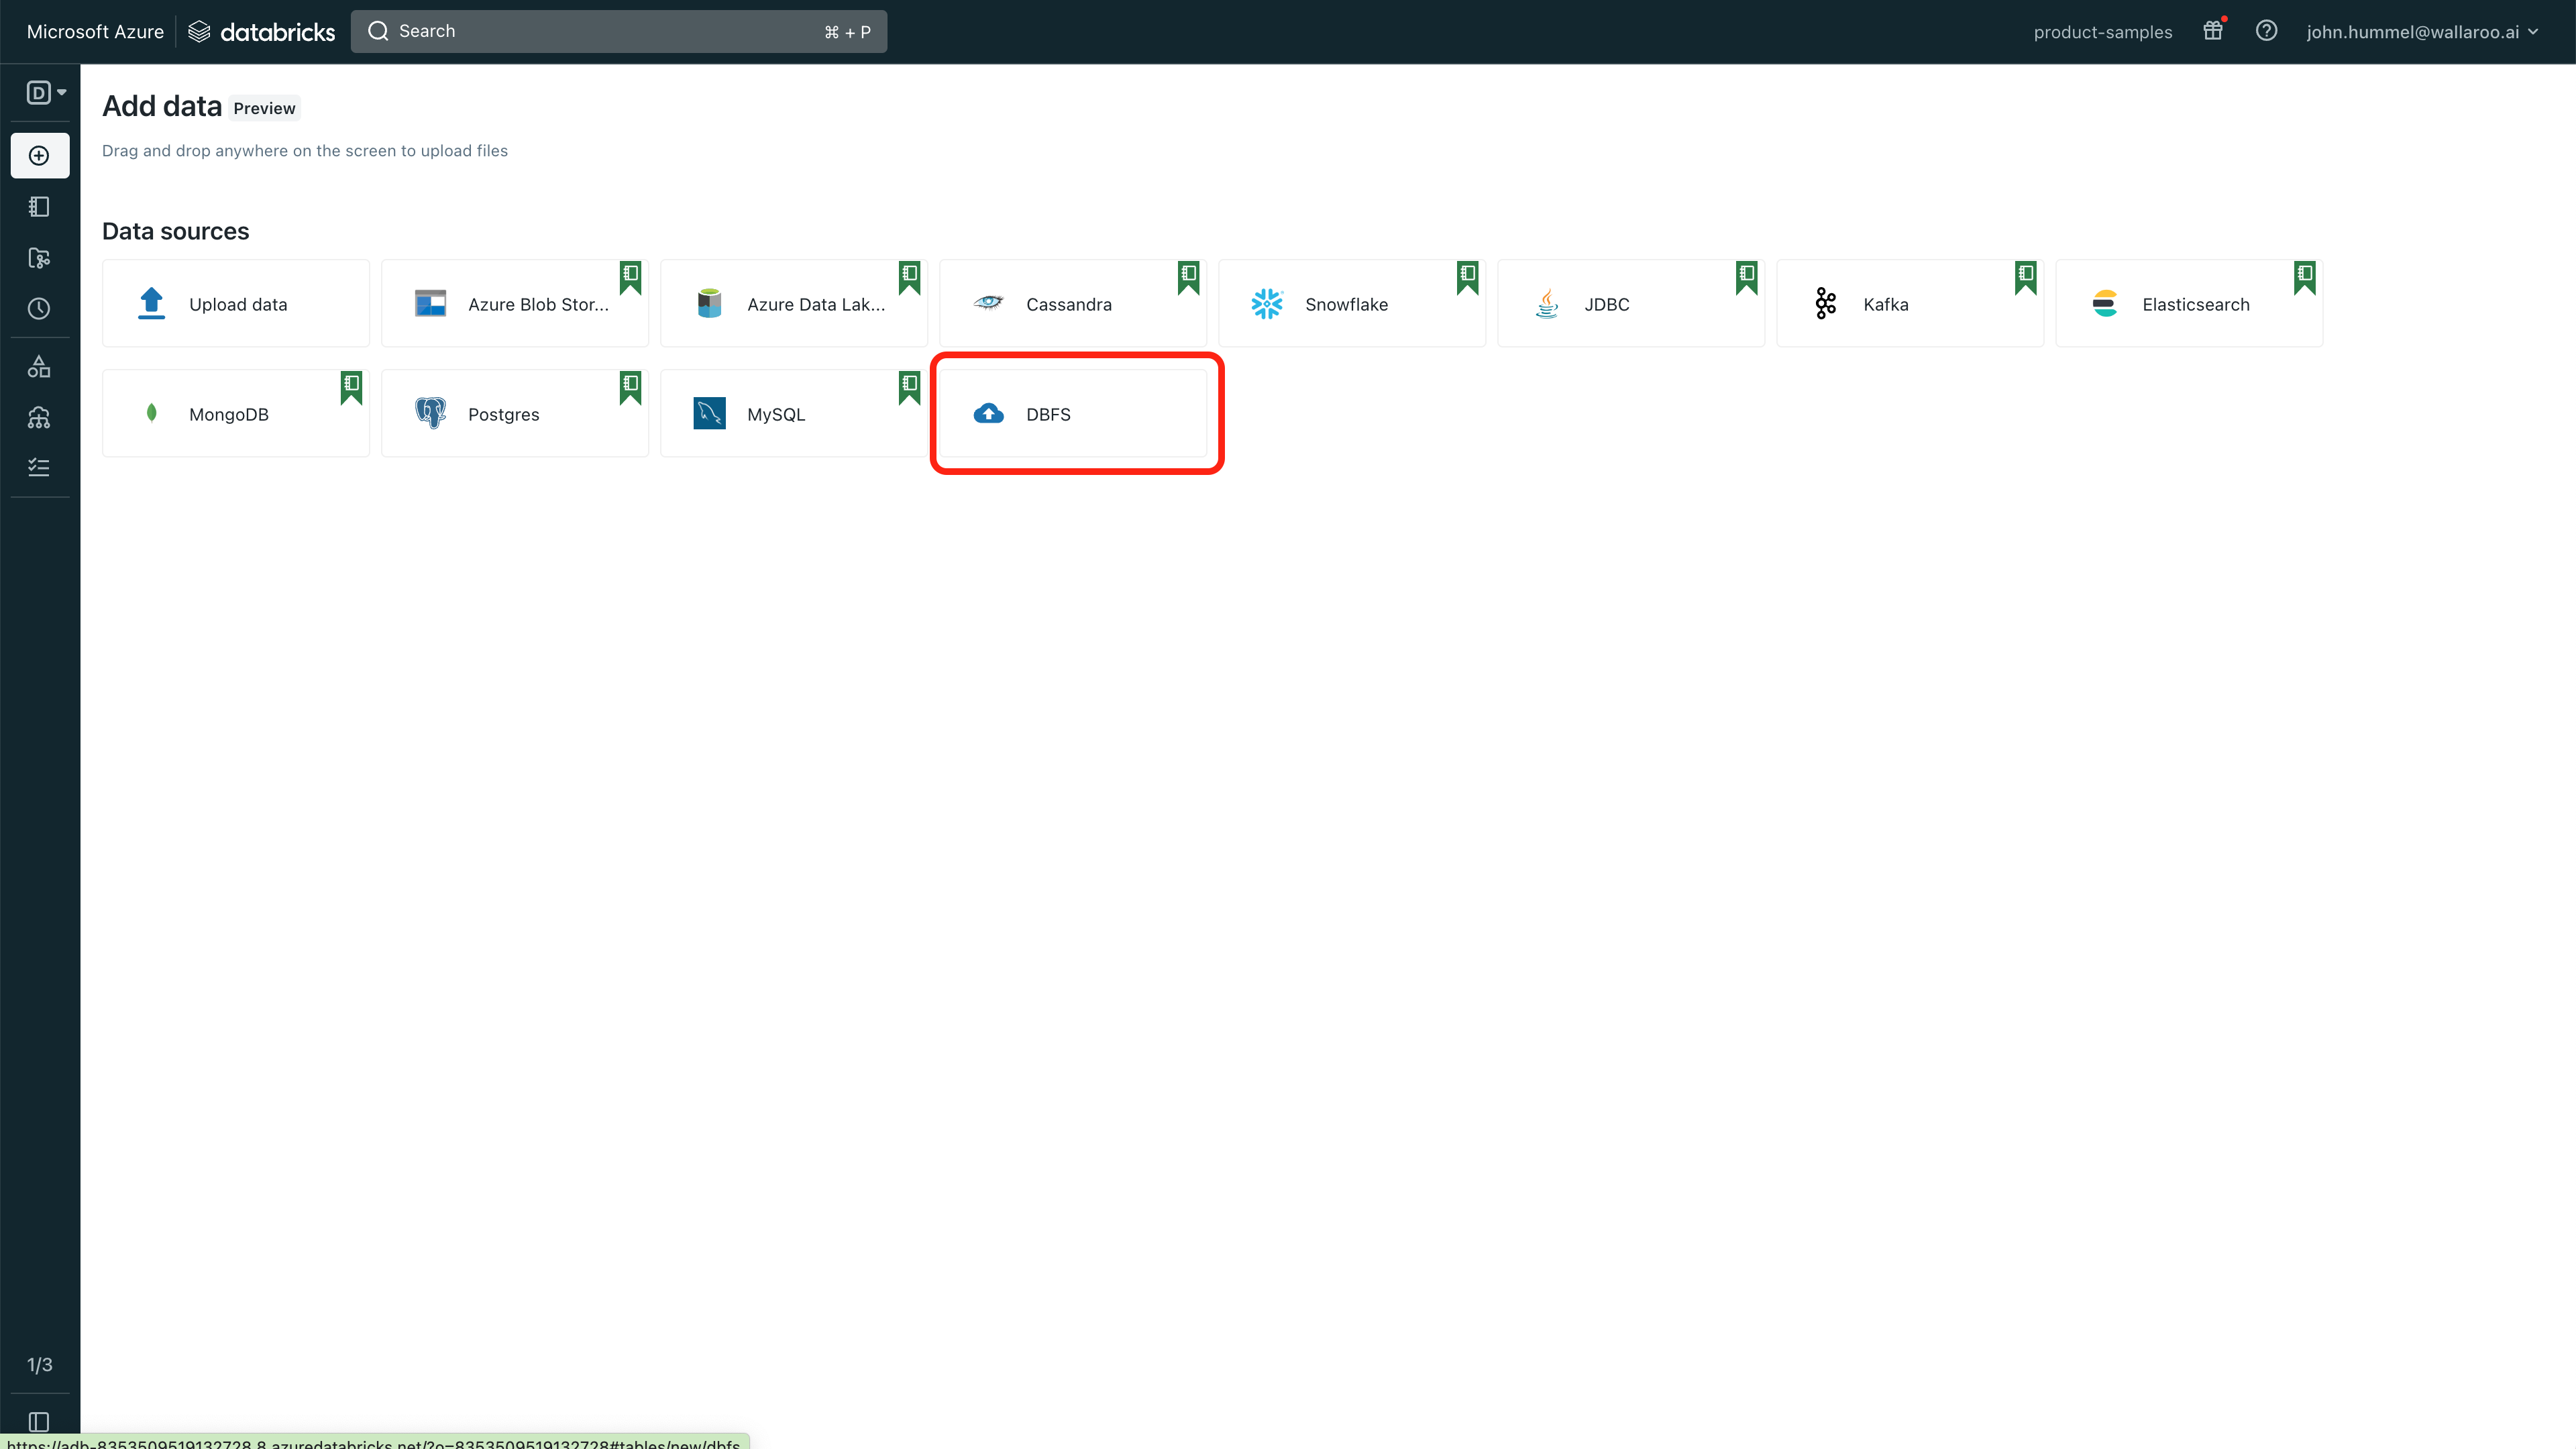
Select DBFS.
Select Upload File and enter the following:
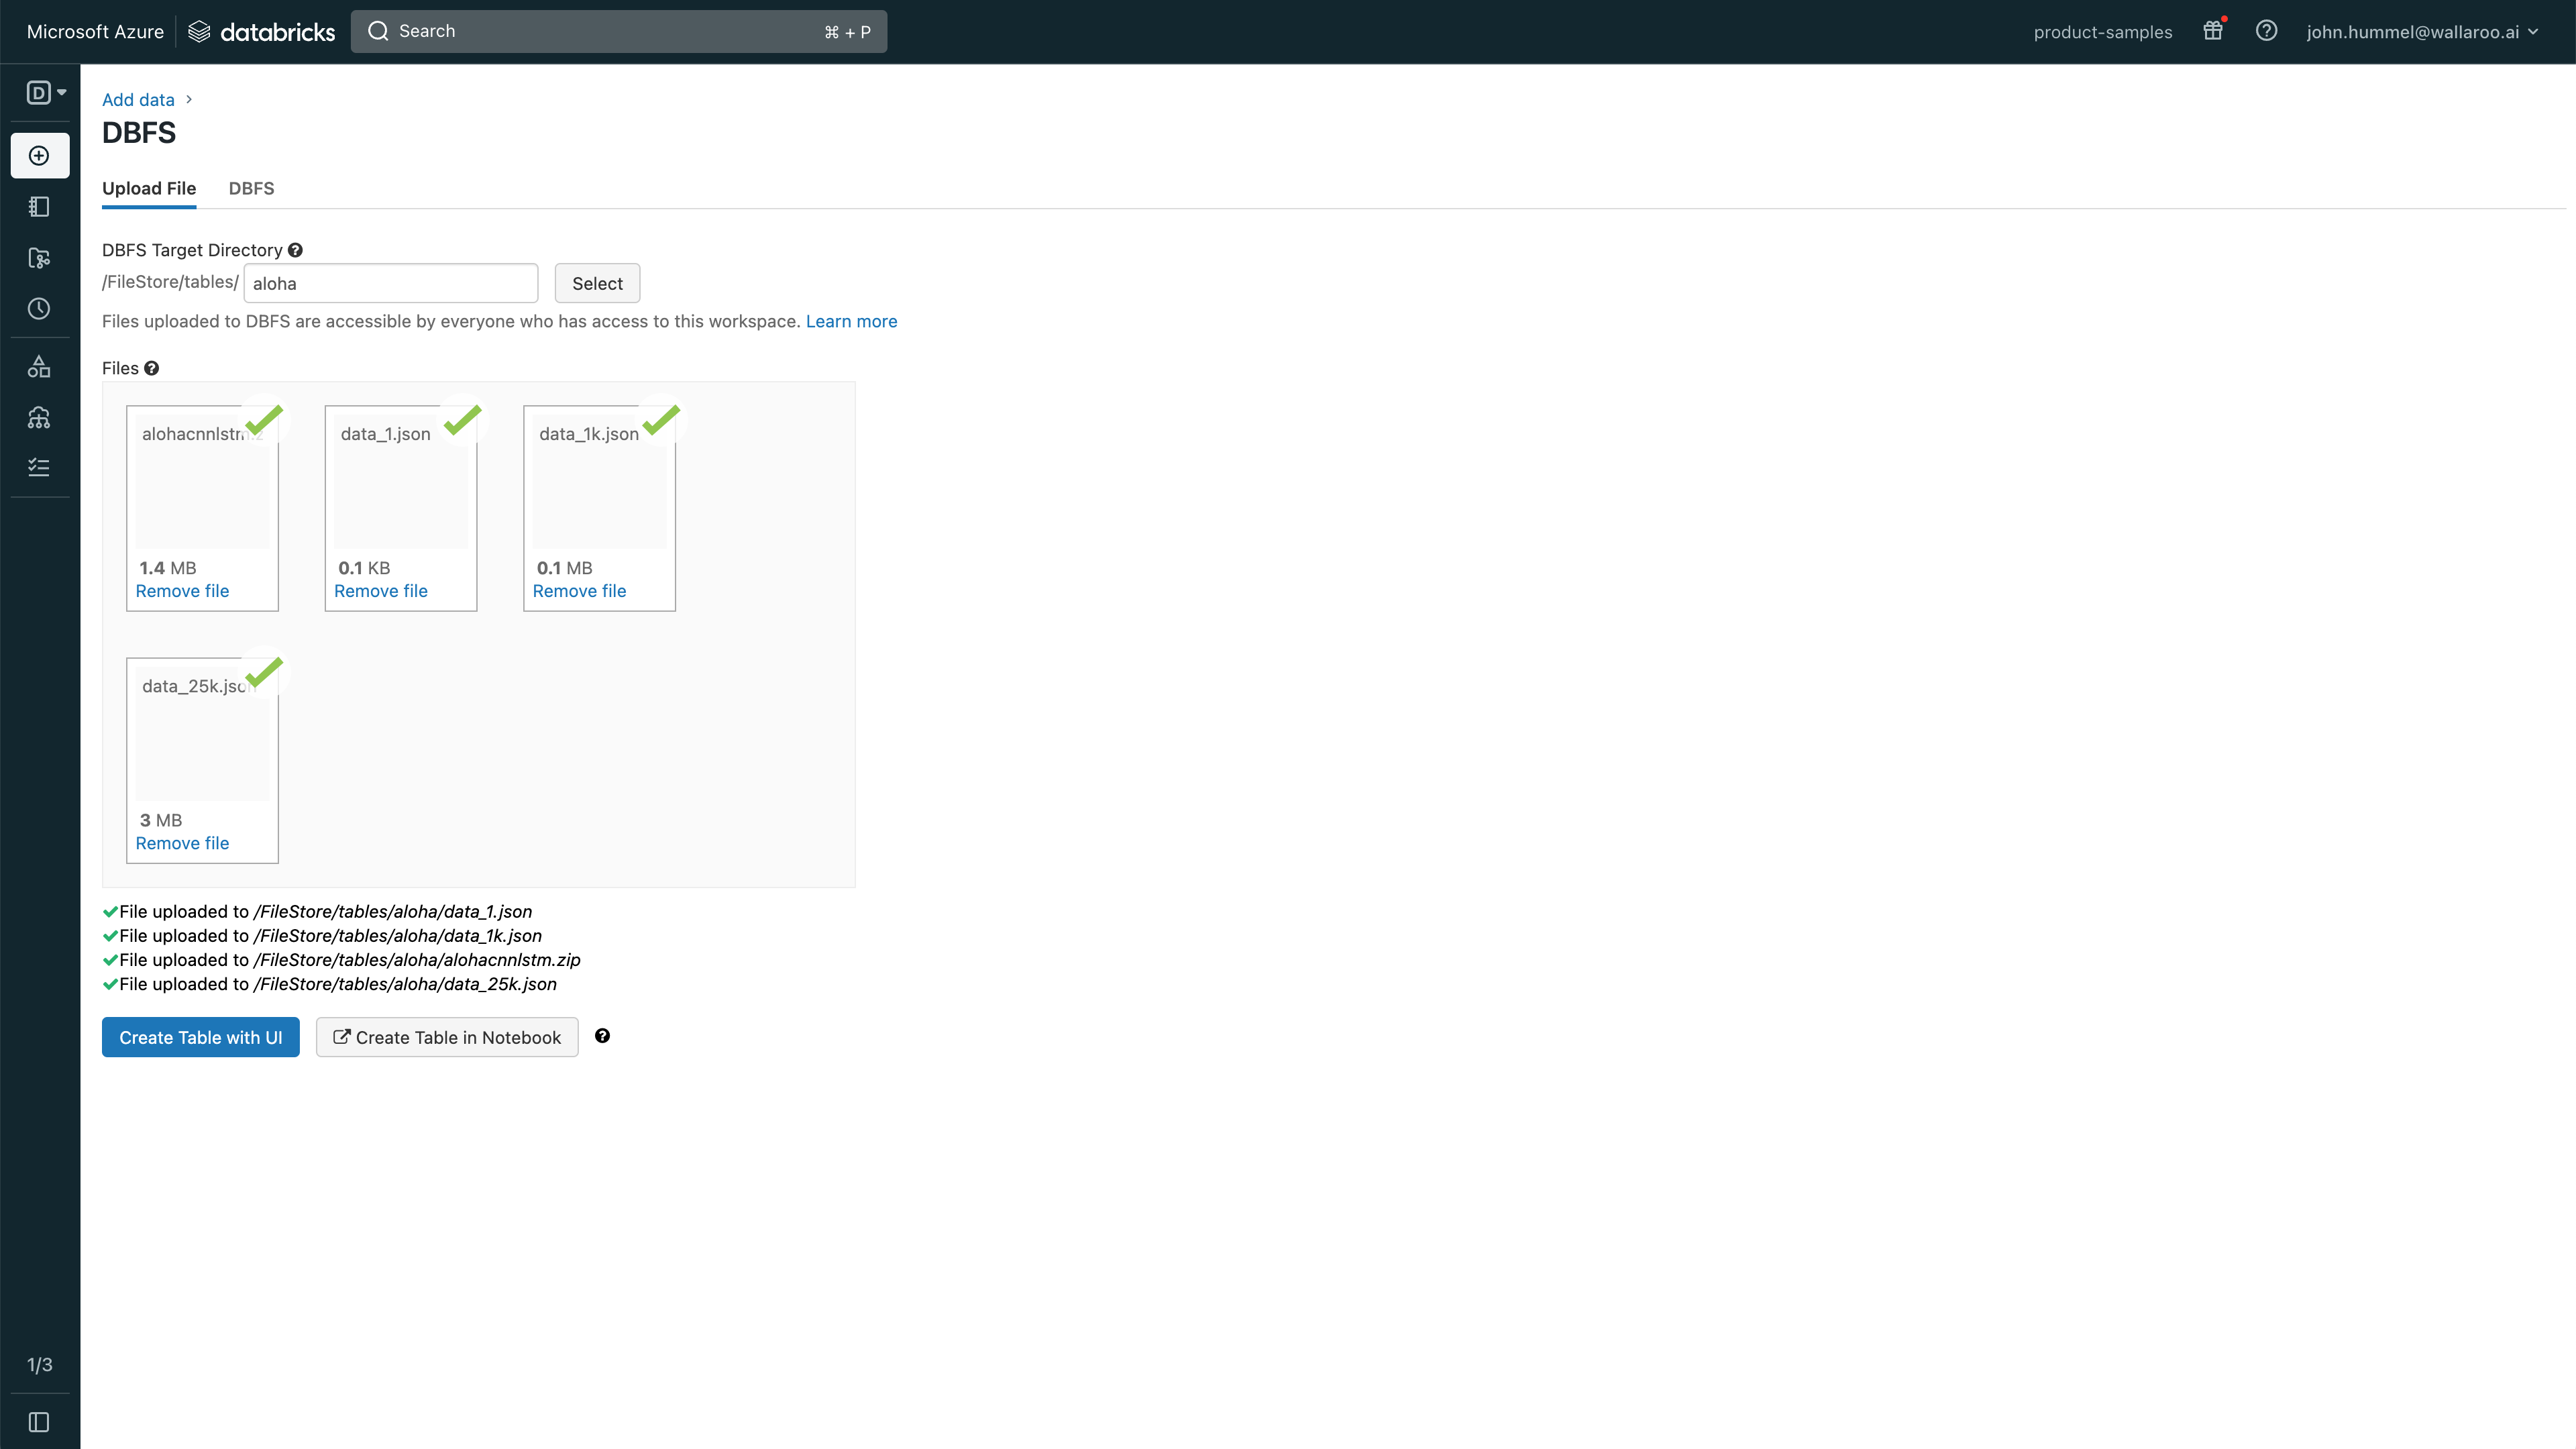
- DBFS Target Directory (Optional): Optional step: Set the directory where the files will be uploaded.
Select the files to upload. Note that each file will be given a location and they can be access with
/dbfs/PATH. For example, the filealohacnnlstm.zipuploaded to the directoryalohawould be referenced with `/dbfs/FileStore/tables/aloha/alohacnnlstm.zip
Sample Wallaroo Connection
With the Wallaroo Python SDK installed, remote commands and inferences can be performed through the following steps.
Open a Connection to Wallaroo
The first step is to connect to Wallaroo through the Wallaroo client.
This is accomplished using the wallaroo.Client(api_endpoint, auth_endpoint, auth_type command) command that connects to the Wallaroo instance services.
The Client method takes the following parameters:
- api_endpoint (String): The Wallaroo Domain name.
- auth_type command (String): The authorization type. In this case,
SSO.
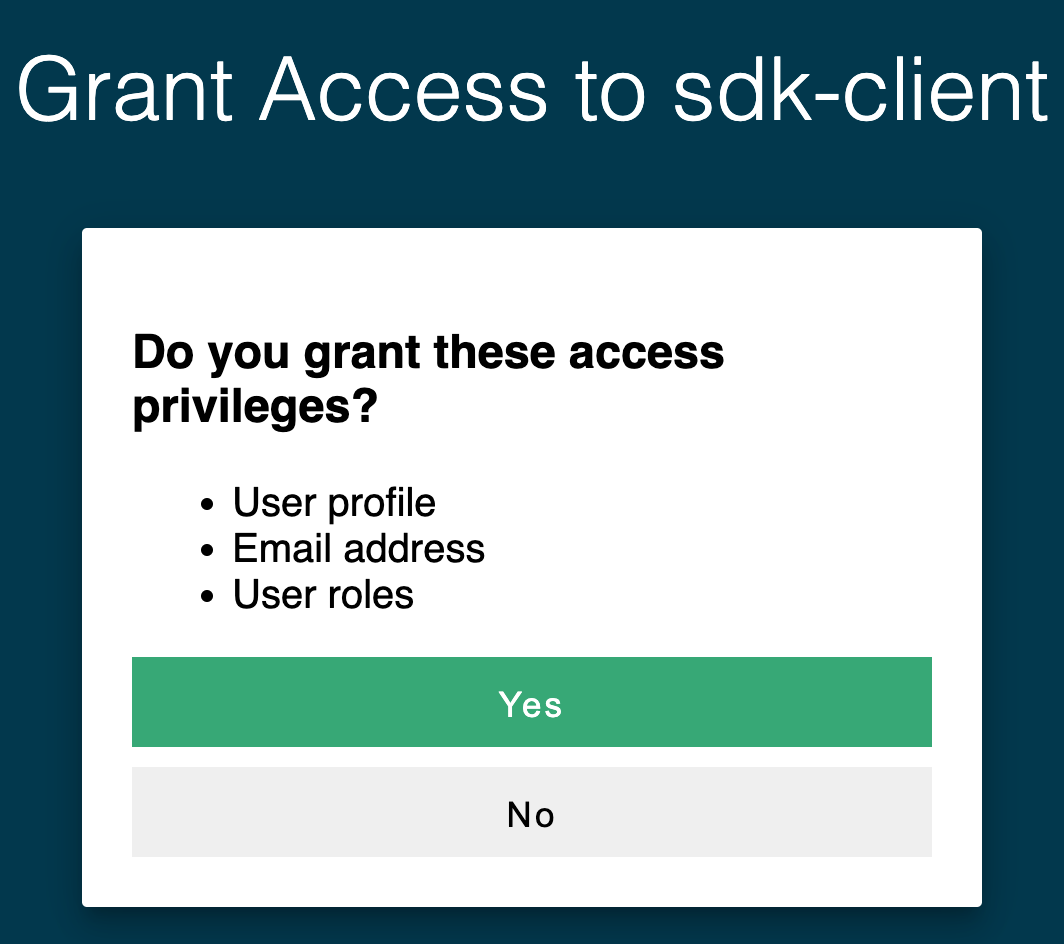
Once run, the wallaroo.Client command provides a URL to grant the SDK permission to your specific Wallaroo environment. When displayed, enter the URL into a browser and confirm permissions.
Depending on the configuration of the Wallaroo instance, the user will either be presented with a login request to the Wallaroo instance or be authenticated through a broker such as Google, Github, etc. To use the broker, select it from the list under the username/password login forms. For more information on Wallaroo authentication configurations, see the Wallaroo Authentication Configuration Guides.
Once authenticated, the user will verify adding the device the user is establishing the connection from. Once both steps are complete, then the connection is granted.
The connection is stored in the variable wl for use in all other Wallaroo calls.
import wallaroo
from wallaroo.object import EntityNotFoundError

# used to display dataframe information without truncating
from IPython.display import display
import pandas as pd
pd.set_option('display.max_colwidth', None)

# For Apache Arrow functions
import pyarrow
Connect to Wallaroo
For this example, a connection through the Wallaroo SDK is used. For more information, see the Wallaroo SDK Essentials Guide: Client Connection.
# SSO login

wallarooDomain = "YOUR WALLAROO DOMAIN NAME"

wl = wallaroo.Client(api_endpoint=f"https://{wallarooDomain}",
                    auth_type="sso")
Create the Workspace
We will create a workspace to work in and call it the databricksazuresdkworkspace, then set it as current workspace environment. We’ll also create our pipeline in advance as databricksazuresdkpipeline.
- IMPORTANT NOTE: For this example, the CCFraud model is stored in the file
ccfraud.onnxand is referenced from a relative link. For platforms such as Databricks, the files may need to be in a universal file format. For those, the example file location below may be:
model_file_name = '/dbfs/FileStore/tables/aloha/alohacnnlstm.zip
Adjust file names and locations based on your requirements.
workspace_name = 'databricksazuresdkworkspace'
pipeline_name = 'databricksazuresdkpipeline'
model_name = 'ccfraudmodel'
model_file_name = './ccfraud.onnx'
def get_workspace(name):
    workspace = None
    for ws in wl.list_workspaces():
        if ws.name() == name:
            workspace= ws
    if(workspace == None):
        workspace = wl.create_workspace(name)
    return workspace

def get_pipeline(name):
    try:
        pipeline = wl.pipelines_by_name(name)[0]
    except EntityNotFoundError:
        pipeline = wl.build_pipeline(name)
    return pipeline
workspace = get_workspace(workspace_name)

wl.set_current_workspace(workspace)

pipeline = get_pipeline(pipeline_name)
pipeline
| name | databricksazuresdkpipeline |
|---|---|
| created | 2023-10-17 16:13:18.634612+00:00 |
| last_updated | 2023-10-17 16:13:37.331399+00:00 |
| deployed | False |
| tags | |
| versions | 00a6193b-9efd-4d1a-94fd-2d09441a8a7b, e9e98ff2-2bc8-4be8-a6d8-d7009f744bbd |
| steps | ccfraudmodel |
| published | False |
We can verify the workspace is created the current default workspace with the get_current_workspace() command.
wl.get_current_workspace()
{'name': 'databricksazuresdkworkspace', 'id': 6, 'archived': False, 'created_by': '56e0aaa9-aa5a-43af-a209-e1d0fdf777d2', 'created_at': '2023-10-17T16:13:17.206655+00:00', 'models': [{'name': 'ccfraudmodel', 'versions': 1, 'owner_id': '""', 'last_update_time': datetime.datetime(2023, 10, 17, 16, 13, 21, 973119, tzinfo=tzutc()), 'created_at': datetime.datetime(2023, 10, 17, 16, 13, 21, 973119, tzinfo=tzutc())}], 'pipelines': [{'name': 'databricksazuresdkpipeline', 'create_time': datetime.datetime(2023, 10, 17, 16, 13, 18, 634612, tzinfo=tzutc()), 'definition': '[]'}]}
Upload the Models
Now we will upload our model.
IMPORTANT NOTE: If using DBFS, use the file path format such as /dbfs/FileStore/shared_uploads/YOURWORKSPACE/file format rather than the dbfs: format.
For this sample, we will add the model configure parameter .configure(tensor_fields=["tensor"]) to match the data input types and override the model’s input parameter.
from wallaroo.framework import Framework
model = (wl.upload_model(model_name,
                         model_file_name,
                         framework=Framework.ONNX)
                         .configure(tensor_fields=["tensor"])
        )
model
| Name | ccfraudmodel |
| Version | c152437a-4642-4cbd-ae18-44c73476f5f6 |
| File Name | ccfraud.onnx |
| SHA | bc85ce596945f876256f41515c7501c399fd97ebcb9ab3dd41bf03f8937b4507 |
| Status | ready |
| Image Path | None |
| Architecture | None |
| Updated At | 2023-19-Oct 18:17:19 |
Deploy a Model
Now that we have a model that we want to use we will create a deployment for it.
To do this, we’ll create our pipeline that can ingest the data, pass the data to our CCFraud model, and give us a final output. We’ll call our pipeline databricksazuresdkpipeline, then deploy it so it’s ready to receive data. The deployment process usually takes about 45 seconds.
pipeline.add_model_step(model)
| name | databricksazuresdkpipeline |
|---|---|
| created | 2023-10-17 16:13:18.634612+00:00 |
| last_updated | 2023-10-17 16:13:37.331399+00:00 |
| deployed | False |
| tags | |
| versions | 00a6193b-9efd-4d1a-94fd-2d09441a8a7b, e9e98ff2-2bc8-4be8-a6d8-d7009f744bbd |
| steps | ccfraudmodel |
| published | False |
deploy_config = wallaroo.DeploymentConfigBuilder().replica_count(1).cpus(0.5).memory("1Gi").build()
pipeline.deploy(deployment_config=deploy_config)
| name | databricksazuresdkpipeline |
|---|---|
| created | 2023-10-17 16:13:18.634612+00:00 |
| last_updated | 2023-10-19 18:17:21.518913+00:00 |
| deployed | True |
| tags | |
| versions | a1b5ad90-7510-4136-a95b-bf74e3c1a4ba, 00a6193b-9efd-4d1a-94fd-2d09441a8a7b, e9e98ff2-2bc8-4be8-a6d8-d7009f744bbd |
| steps | ccfraudmodel |
| published | False |
We can verify that the pipeline is running and list what models are associated with it.
pipeline.status()
{'status': 'Running',
 'details': [],
 'engines': [{'ip': '10.244.3.27',
   'name': 'engine-8f94f778-64s68',
   'status': 'Running',
   'reason': None,
   'details': [],
   'pipeline_statuses': {'pipelines': [{'id': 'databricksazuresdkpipeline',
      'status': 'Running'}]},
   'model_statuses': {'models': [{'name': 'ccfraudmodel',
      'version': 'c152437a-4642-4cbd-ae18-44c73476f5f6',
      'sha': 'bc85ce596945f876256f41515c7501c399fd97ebcb9ab3dd41bf03f8937b4507',
      'status': 'Running'}]}}],
 'engine_lbs': [{'ip': '10.244.4.50',
   'name': 'engine-lb-584f54c899-vcnt9',
   'status': 'Running',
   'reason': None,
   'details': []}],
 'sidekicks': []}
Inferences
Infer 1 row
Now that the pipeline is deployed and our CCfraud model is in place, we’ll perform a smoke test to verify the pipeline is up and running properly. We’ll use the infer_from_file command to load a single transaction and determine if it is flagged for fraud. If it returns correctly, a small value should be returned indicating a low likelihood that the transaction was fraudulent.
smoke_test = pd.DataFrame.from_records([
    {
        "tensor":[
            1.0678324729,
            0.2177810266,
            -1.7115145262,
            0.682285721,
            1.0138553067,
            -0.4335000013,
            0.7395859437,
            -0.2882839595,
            -0.447262688,
            0.5146124988,
            0.3791316964,
            0.5190619748,
            -0.4904593222,
            1.1656456469,
            -0.9776307444,
            -0.6322198963,
            -0.6891477694,
            0.1783317857,
            0.1397992467,
            -0.3554220649,
            0.4394217877,
            1.4588397512,
            -0.3886829615,
            0.4353492889,
            1.7420053483,
            -0.4434654615,
            -0.1515747891,
            -0.2668451725,
            -1.4549617756
        ]
    }
])
result = pipeline.infer(smoke_test)
display(result)
| time | in.tensor | out.dense_1 | check_failures | |
|---|---|---|---|---|
| 0 | 2023-10-19 18:17:40.873 | [1.0678324729, 0.2177810266, -1.7115145262, 0.682285721, 1.0138553067, -0.4335000013, 0.7395859437, -0.2882839595, -0.447262688, 0.5146124988, 0.3791316964, 0.5190619748, -0.4904593222, 1.1656456469, -0.9776307444, -0.6322198963, -0.6891477694, 0.1783317857, 0.1397992467, -0.3554220649, 0.4394217877, 1.4588397512, -0.3886829615, 0.4353492889, 1.7420053483, -0.4434654615, -0.1515747891, -0.2668451725, -1.4549617756] | [0.0014974177] | 0 |
result.loc[0,["out.dense_1"]]
out.dense_1    [0.0014974177]
Name: 0, dtype: object
Batch Inference
Now that our smoke test is successful, let’s really give it some data. We’ll use the cc_data_1k.jarrowson file that contains 1,000 inferences to be performed, then convert that to a DataFrame and display the first 5 rows.
result = pipeline.infer_from_file("./data/cc_data_1k.arrow")
display(result)

outputs = result.to_pandas()
display(outputs.head(5))
    pyarrow.Table
    time: timestamp[ms]
    in.tensor: list<item: float> not null
      child 0, item: float
    out.dense_1: list<inner: float not null> not null
      child 0, inner: float not null
    check_failures: int8
    ----
    time: [[2023-10-19 18:17:41.511,2023-10-19 18:17:41.511,2023-10-19 18:17:41.511,2023-10-19 18:17:41.511,2023-10-19 18:17:41.511,...,2023-10-19 18:17:41.511,2023-10-19 18:17:41.511,2023-10-19 18:17:41.511,2023-10-19 18:17:41.511,2023-10-19 18:17:41.511]]
    in.tensor: [[[-1.0603298,2.3544967,-3.5638788,5.138735,-1.2308457,...,0.038412016,1.0993439,1.2603409,-0.14662448,-1.4463212],[-1.0603298,2.3544967,-3.5638788,5.138735,-1.2308457,...,0.038412016,1.0993439,1.2603409,-0.14662448,-1.4463212],...,[0.49511018,-0.24993694,0.4553345,0.92427504,-0.36435103,...,1.1117147,-0.566654,0.12122019,0.06676402,0.6583282],[0.61188054,0.1726081,0.43105456,0.50321484,-0.27466634,...,0.30260187,0.081211455,-0.15578508,0.017189292,-0.7236631]]]
    out.dense_1: [[[0.99300325],[0.99300325],...,[0.0008533001],[0.0012498498]]]
    check_failures: [[0,0,0,0,0,...,0,0,0,0,0]]
| time | in.tensor | out.dense_1 | check_failures | |
|---|---|---|---|---|
| 0 | 2023-10-19 18:17:41.511 | [-1.0603298, 2.3544967, -3.5638788, 5.138735, -1.2308457, -0.76878244, -3.5881228, 1.8880838, -3.2789674, -3.9563255, 4.099344, -5.653918, -0.8775733, -9.131571, -0.6093538, -3.7480276, -5.0309124, -0.8748149, 1.9870535, 0.7005486, 0.9204423, -0.10414918, 0.32295644, -0.74181414, 0.038412016, 1.0993439, 1.2603409, -0.14662448, -1.4463212] | [0.99300325] | 0 |
| 1 | 2023-10-19 18:17:41.511 | [-1.0603298, 2.3544967, -3.5638788, 5.138735, -1.2308457, -0.76878244, -3.5881228, 1.8880838, -3.2789674, -3.9563255, 4.099344, -5.653918, -0.8775733, -9.131571, -0.6093538, -3.7480276, -5.0309124, -0.8748149, 1.9870535, 0.7005486, 0.9204423, -0.10414918, 0.32295644, -0.74181414, 0.038412016, 1.0993439, 1.2603409, -0.14662448, -1.4463212] | [0.99300325] | 0 |
| 2 | 2023-10-19 18:17:41.511 | [-1.0603298, 2.3544967, -3.5638788, 5.138735, -1.2308457, -0.76878244, -3.5881228, 1.8880838, -3.2789674, -3.9563255, 4.099344, -5.653918, -0.8775733, -9.131571, -0.6093538, -3.7480276, -5.0309124, -0.8748149, 1.9870535, 0.7005486, 0.9204423, -0.10414918, 0.32295644, -0.74181414, 0.038412016, 1.0993439, 1.2603409, -0.14662448, -1.4463212] | [0.99300325] | 0 |
| 3 | 2023-10-19 18:17:41.511 | [-1.0603298, 2.3544967, -3.5638788, 5.138735, -1.2308457, -0.76878244, -3.5881228, 1.8880838, -3.2789674, -3.9563255, 4.099344, -5.653918, -0.8775733, -9.131571, -0.6093538, -3.7480276, -5.0309124, -0.8748149, 1.9870535, 0.7005486, 0.9204423, -0.10414918, 0.32295644, -0.74181414, 0.038412016, 1.0993439, 1.2603409, -0.14662448, -1.4463212] | [0.99300325] | 0 |
| 4 | 2023-10-19 18:17:41.511 | [0.5817662, 0.09788155, 0.15468194, 0.4754102, -0.19788623, -0.45043448, 0.016654044, -0.025607055, 0.09205616, -0.27839172, 0.059329946, -0.019658541, -0.42250833, -0.12175389, 1.5473095, 0.23916228, 0.3553975, -0.76851654, -0.7000849, -0.11900433, -0.3450517, -1.1065114, 0.25234112, 0.020944182, 0.21992674, 0.25406894, -0.04502251, 0.10867739, 0.25471792] | [0.0010916889] | 0 |
Undeploy Pipeline
When finished with our tests, we will undeploy the pipeline so we have the Kubernetes resources back for other tasks. Note that if the deployment variable is unchanged pipeline.deploy() will restart the inference engine in the same configuration as before.
pipeline.undeploy()
| name | databricksazuresdkpipeline |
|---|---|
| created | 2023-10-17 16:13:18.634612+00:00 |
| last_updated | 2023-10-19 18:17:21.518913+00:00 |
| deployed | False |
| tags | |
| versions | a1b5ad90-7510-4136-a95b-bf74e3c1a4ba, 00a6193b-9efd-4d1a-94fd-2d09441a8a7b, e9e98ff2-2bc8-4be8-a6d8-d7009f744bbd |
| steps | ccfraudmodel |
| published | False |