Wallaroo SDK Essentials Guide: Pipeline Edge Publication
Table of Contents
Wallaroo pipelines can be published to a Edge Open Container Initiative (OCI) Registry Service, known here as the Edge Registry Service, as a container images. This allows the Wallaroo pipelines to be deployed in other environments, such as Docker or Kubernetes with all of the pipeline model. When deployed, these pipelines can perform inferences from the ML models exactly as if they were deployed as part of a Wallaroo instance.
When a pipeline is updated with new model steps or deployment configurations, the updated pipeline is republished to the Edge Registry as a new repo and version. This allows DevOps engineers to update an Wallaroo pipeline in any container supporting environment with the new versions of the pipeline.
Pipeline Publishing Flow
A typical ML Model and Pipeline deployment to Wallaroo Ops and to remote locations as a Wallaroo Inference server is as follows:
- Components:
- Wallaroo Ops: The Wallaroo Ops provides the backbone services for ML Model deployment. This is where ML models are uploaded, pipelines created and deployed for inferencing, pipelines published to OCI compliant registries, and other functions.
- Wallaroo Inference Server: A remote deployment of a published Wallaroo pipeline with the Wallaroo Inference Engine outside the Wallaroo Ops instance. When the edge name is added to a Wallaroo publish, the Wallaroo Inference Server’s inference logs are submitted to the Wallaroo Ops instance. These inference logs are stored as part of the Wallaroo pipeline the remote deployment is published from.
- DevOps:
- Add Edge Publishing and Edge Observability to the Wallaroo Ops center. See Edge Deployment Registry Guide for details on updating the Wallaroo instance with Edge Publishing and Edge Observability.
- Data Scientists:
- Develop and train models.
- Test their deployments in Wallaroo Ops Center as Pipelines with:
- Pipeline Steps: The models part of the inference flow.
- Pipeline Deployment Configurations: CPUs, RAM, GPU, and Architecture settings to run the pipeline.
- Publish the Pipeline from the Wallaroo Ops to an OCI Registry: Store a image version of the Pipeline with models and pipeline configuration into the OCI Registry set by the DevOps engineers as the Wallaroo Edge Registry Service.
- DevOps:
- Retrieve the new or updated Wallaroo published pipeline from the Wallaroo Edge Registry Service.
- (Optional): Add an edge to the Wallaroo publish. This provides the
EDGE_BUNDLEwith the credentials for the Wallaroo Inference Server to transmit its inference result logs back to the Wallaroo Ops instance. These inference logs are added to the originating Wallaroo pipeline, labeled with themetadata.partitionbeing the name of the edge deployed Wallaroo Inference server. For more details, see Wallaroo SDK Essentials Guide: Pipeline Edge Publication: Edge Observability - Deploy the Pipeline as a Wallaroo Inference Server as a Docker or Kubernetes container, updating the resource allocations as part of the Helm chart, Docker Compose file, etc.

Enable Wallaroo Edge Registry
Set Edge Registry Service
Wallaroo Pipeline Publishes aka Wallaroo Servers are automatically routed to the Edge Open Container Initiative (OCI) Registry Service registered in the Wallaroo instance. This is enabled through either the Kots Administrative Dashboard through kots, or by enabling it through a helm chart setting. From here on out, we will refer to it as the Edge Registry Service.
Set Edge Registry Service through Kots
To set the Edge Registry Settings through the Kots Administrative Dashboard:
Launch the Kots Administrative Dashboard using the following command, replacing the
--namespaceparameter with the Kubernetes namespace for the Wallaroo instance:kubectl kots admin-console --namespace wallarooOpen a browser at the URL detailed in the step above and authenticate using the console password set as described in the as detailed in the Wallaroo Install Guides.
From the top menu, select Config then scroll to Edge Deployment.
Enable Provide OCI registry credentials for pipelines.
Enter the following:
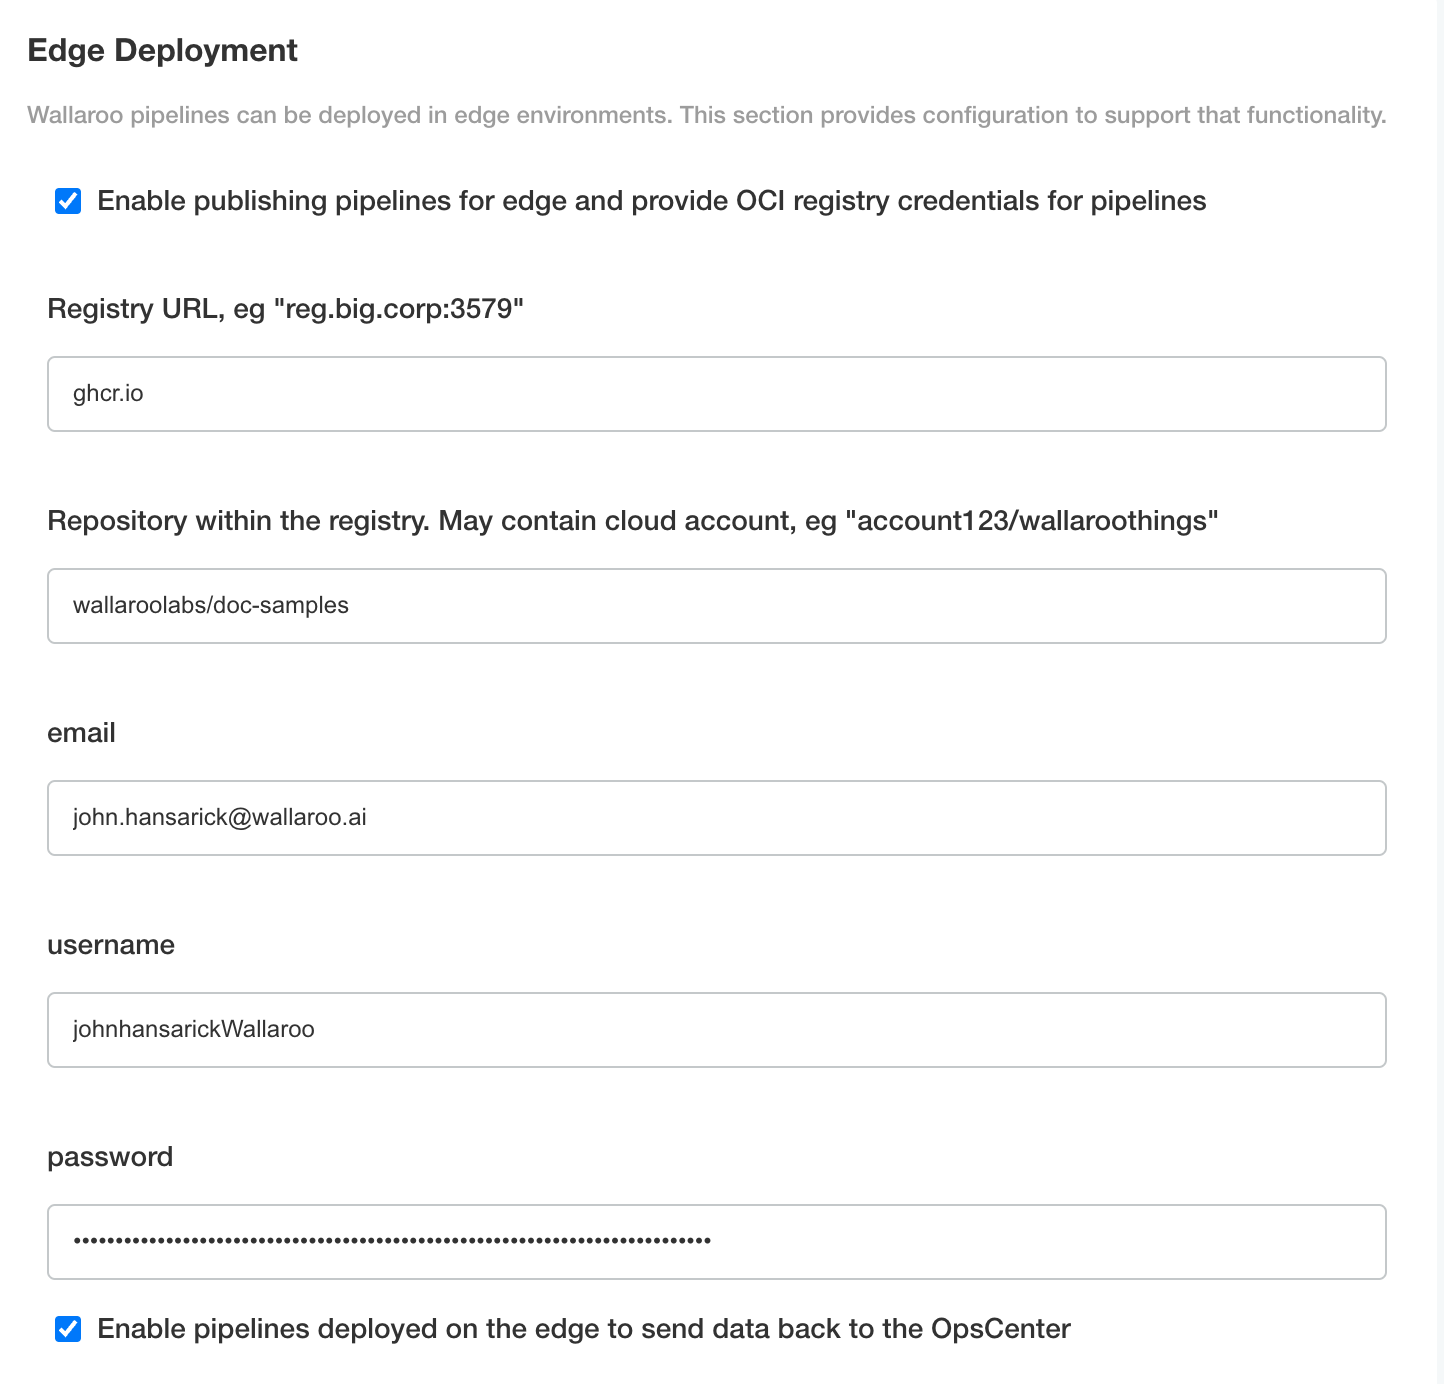
- Registry URL: The address of the registry service. For example:
us-west1-docker.pkg.dev. - email: The email address of the user account used to authenticate to the service.
- username: The account used to authenticate to the registry service.
- password: The password or token used to authenticate to the registry service.
- To enable edge observability, enable Enable pipelines deployed on the edge to send data back to the OpsCenter.
- Registry URL: The address of the registry service. For example:
Save the updated configuration, then deploy it. Once complete, the edge registry settings will be available.
Set Edge Registry Service through Helm
The helm settings for adding the Edge Server configuration details are set through the ociRegistry element, with the following settings.
- ociRegistry: Sets the Edge Server registry information.
- enabled:
trueenables the Edge Server registry information,falsedisables it. - registry: The registry url. For example:
reg.big.corp:3579. - repository: The repository within the registry. This may include the cloud account, or the full path where the Wallaroo published pipelines should be kept. For example:
account123/wallaroo/pipelines. - email: Optional field to track the email address of the registry credential.
- username: The username to the registry. This may vary based on the provider. For example, GCP Artifact Registry with service accounts uses the username
_json_key_base64with the password as a base64 processed token of the credential information. - password: The password or token for the registry service.
- enabled:
Set Edge Observability Service
Edge Observability allows published Wallaroo Servers to community with the Wallaroo Ops center to update their associated Wallaroo Pipeline with inference results, visible in the Pipeline logs.
The edge sites will report their inference results to the address $WALLAROODOMAIN/edge. For example: If the Wallaroo Domain Name is wallaroo.example.com, then the Edge Observability Service address is wallaroo.example.com/edge.
Set Edge Observability Service through Kots
To enable Edge Observability using the Kots Administrative Dashboard for kots installed instances of Wallaroo Ops:
Launch the Kots Administrative Dashboard using the following command, replacing the
--namespaceparameter with the Kubernetes namespace for the Wallaroo instance:kubectl kots admin-console --namespace wallarooOpen a browser at the URL detailed in the step above and authenticate using the console password set as described in the as detailed in the Wallaroo Install Guides.
Access Config and scroll to Edge Deployment and enable Enable pipelines deployed on the edge to send data back to the OpsCenter.
Set the following:
- Enable Enable pipelines deployed on the edge to send data back to the OpsCenter.
Save the updated configuration, then deploy it. Once complete, the edge observability service is available.
Set Edge Observability Service through Helm
To enable the Edge Observability Service for Wallaroo Ops Helm based installation, include the following variables for the helm settings. For these instructions they are stored in local-values.yaml:
edgelb:
    enabled: true

pipelines:
    enabled: true
Update the Wallaroo Helm installation with the same version as the Wallaroo ops and the channel. For example, if updating Wallaroo Enterprise server, use the following:
helm upgrade wallaroo oci://registry.replicated.com/wallaroo/2026-1/wallaroo --version 2026.1.3-6786 --values local-values.yaml --timeout 10m --wait --wait-for-jobs
This process will take 5-15 minutes depending on other configuration options.
Registry Setup Guides
The following are short guides for setting up the credentials for different registry services. Refer to the registry documentation for full details.
The following process is used with a GitHub Container Registry to create the authentication tokens for use with a Wallaroo instance’s Private Model Registry configuration.
See the GitHub Working with the Container registry for full details.
The following process is used register a GitHub Container Registry with Wallaroo.
Create a new token as per the instructions from the Creating a personal access token (classic) guide. Note that a classic token is recommended for this process. Store this token in a secure location as it will not be able to be retrieved later from GitHub. Verify the following permissions are set:
Select the
write:packagesscope to download and upload container images and read and write their metadata.Select the
read:packagesscope to download container images and read their metadata (selected whenwrite:packagesis selected by default).Select the
delete:packagesscope to delete container images.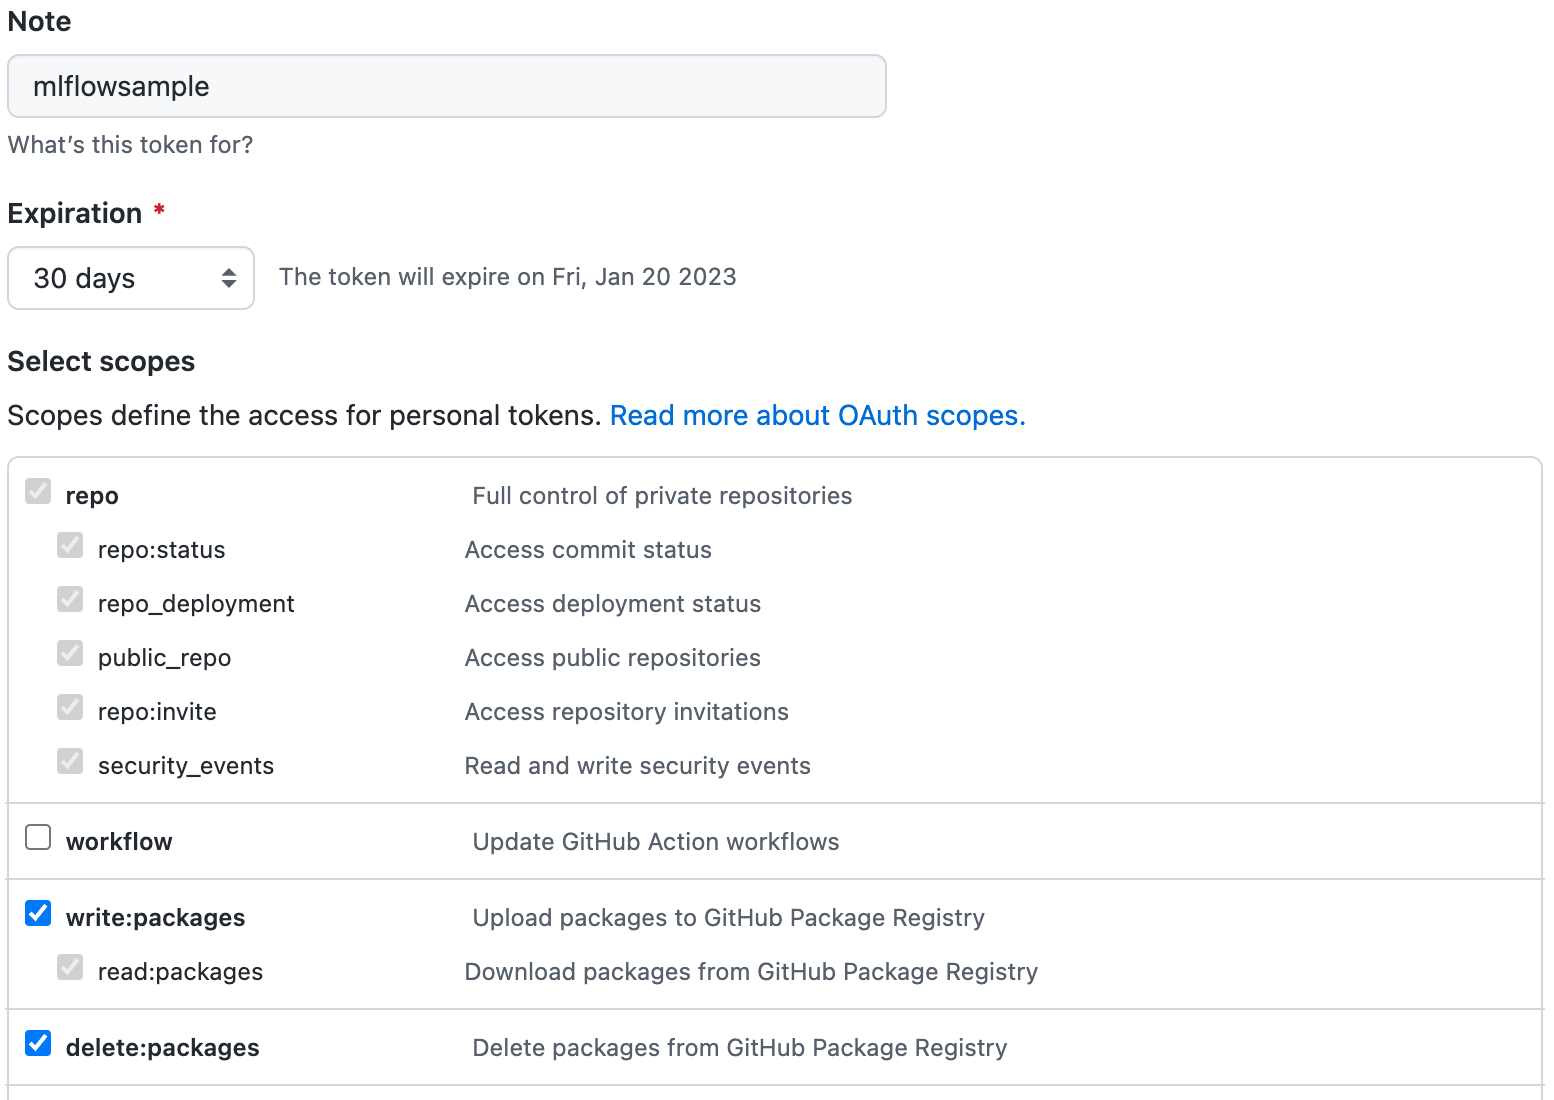
Store the token in a secure location.
This can be tested with docker by logging into the specified registry. For example:
docker login -u {Github Username} --password {Your Token} ghcr.io/{Your Github Username or Organization}
The following process is an example of setting up an Artifact Registry Service with Google Cloud Platform (GCP) that is used to store containerized model images and retrieve them for use with Wallaroo.
Uploading and downloading containerized models to a Google Cloud Platform Registry follows these general steps.
Create the GCP registry.
Create a Service Account that will manage the registry service requests.
Assign appropriate Artifact Registry role to the Service Account
Retrieve the Service Account credentials.
Using either a specific user, or the Service Account credentials, upload the containerized model to the registry service.
Add the service account credentials to the Wallaroo instance’s containerized model private registry configuration.
Prerequisites
The commands below use the Google gcloud command line tool, and expect that a Google Cloud Platform account is created and the gcloud application is associated with the GCP Project for the organization.
For full details on the process and other methods, see the Google GCP documentation.
- Create the Registry
The following is based on the Create a repository using the Google Cloud CLI.
The following information is needed up front:
- $REPOSITORY_NAME: What to call the registry.
- $LOCATION: Where the repository will be located. GCP locations are derived through the
gcloud artifacts locations listcommand. - $DESCRIPTION: Any details to be displayed. Sensitive data should not be included.
The follow example script will create a GCP registry with the minimum requirements.
REPOSITORY_NAME="YOUR NAME"
LOCATION="us-west1"
DESCRIPTION="My amazing registry."

gcloud artifacts repositories create REPOSITORY \
    --repository-format=docker \
    --location=LOCATION \
    --description="$DESCRIPTION" \
    --async
- Create a GCP Registry Service Account
The GCP Registry Service Account is used to manage the GCP registry service. The steps are details from the Google Create a service account guide.
The gcloud process for these steps are:
Connect the
gcloudapplication to the organization’s project.$PROJECT_ID="YOUR PROJECT ID" gcloud config set project $PROJECT_IDCreate the service account with the following:
- The name of the service account.
- A description of its purpose.
- The name to show when displayed.
SA_NAME="YOUR SERVICE ACCOUNT NAME"
DESCRIPTION="Wallaroo container registry SA"
DISPLAY_NAME="Wallaroo the Roo"

gcloud iam service-accounts create $SA_NAME \
--description=$DESCRIPTION \
--display-name=$DISPLAY_NAME
- Assign Artifact Registry Role
Assign one or more of the following accounts to the new registry role based on the following criteria, as detailed in the Google GCP Repository Roles and Permissions Guide.
- For
pkg.devdomains.
| Role | Description |
|---|---|
| Artifact Registry Reader (roles/artifactregistry.reader) | View and get artifacts, view repository metadata. |
| Artifact Registry Writer (roles/artifactregistry.writer) | Read and write artifacts. |
| Artifact Registry Repository Administrator (roles/artifactregistry.repoAdmin) | Read, write, and delete artifacts. |
| Artifact Registry Administrator (roles/artifactregistry.admin) | Create and manage repositories and artifacts. |
- For
gcr.iorepositories.
| Role | Description |
|---|---|
| Artifact Registry Create-on-push Writer (roles/artifactregistry.createOnPushWriter) | Read and write artifacts. Create gcr.io repositories. |
| Artifact Registry Create-on-push Repository Administrator (roles/artifactregistry.createOnPushRepoAdmin) | Read, write, and delete artifacts. Create gcr.io repositories. |
For this example, we will add the Artifact Registry Create-on-push Writer to the created Service Account from the previous step.
Add the role to the service account, specifying the
memberas the new service account, and the role as the selected role. For this example, apkg.devis assumed for the Artifact Registry type.# for pkg.dev ROLE="roles/artifactregistry.writer" # for gcr.io #ROLE="roles/artifactregistry.createOnPushWriter gcloud projects add-iam-policy-binding \ $PROJECT_ID \ --member="serviceAccount:$SA_NAME@$PROJECT_ID.iam.gserviceaccount.com" \ --role=$ROLE
- Authenticate to Repository
To push and pull image from the new registry, we’ll use our new service account and authenticate through the local Docker application. See the GCP Push and pull images for details on using Docker and other methods to add artifacts to the GCP artifact registry.
- Set up Service Account Key
To set up the Service Account key, we’ll use the Google Console IAM & ADMIN dashboard based on the Set up authentication for Docker, using the JSON key approach.
From GCP console, search for
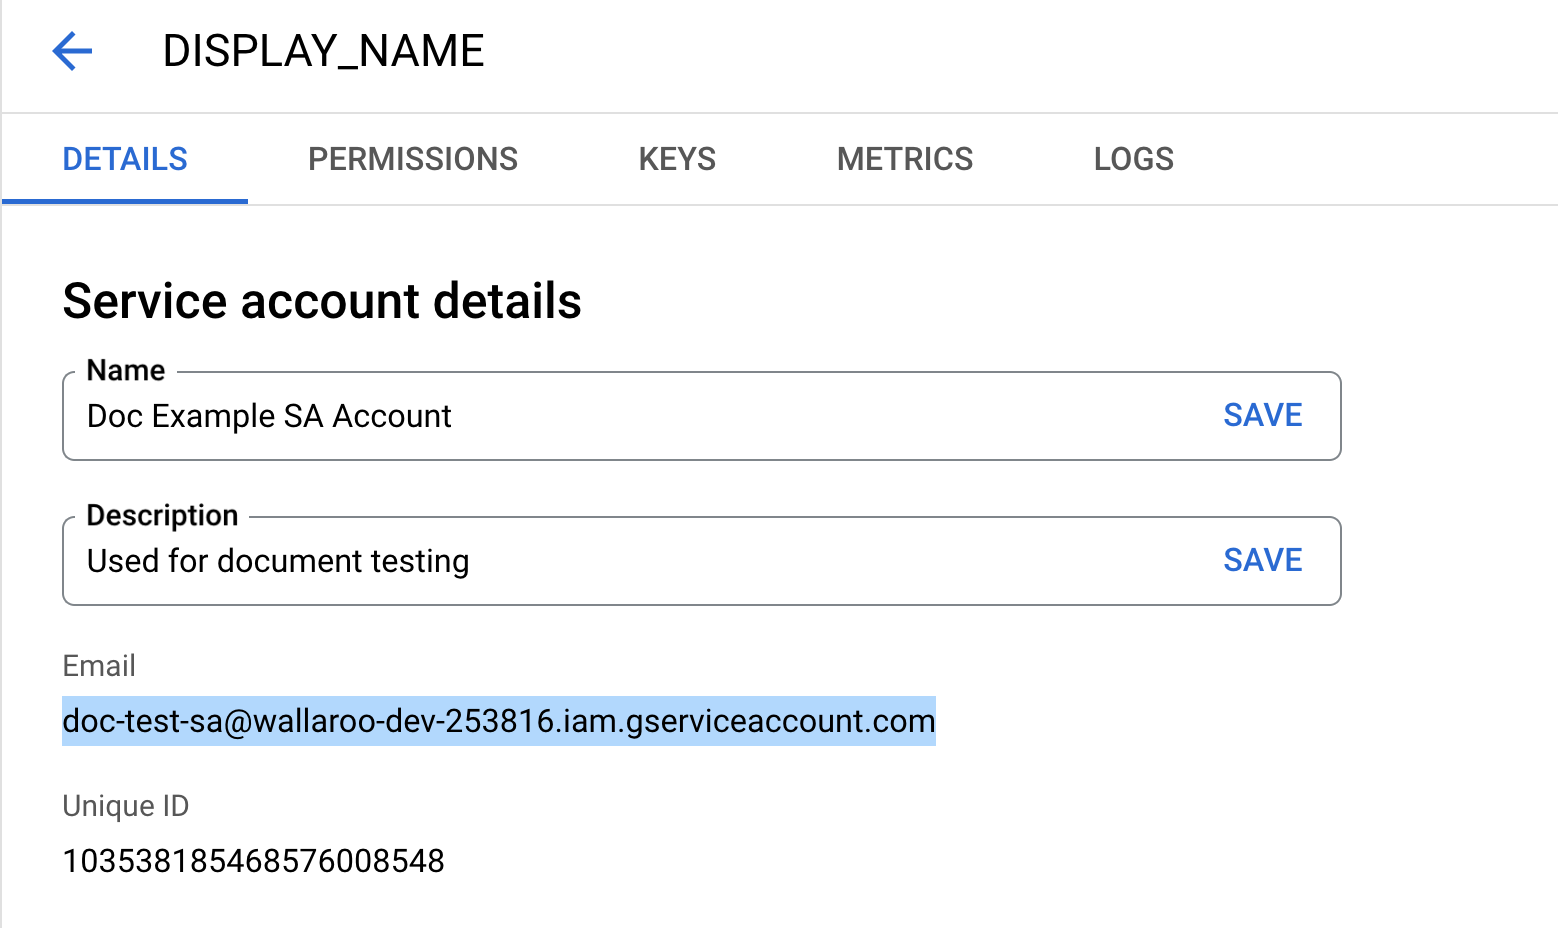
IAM & Admin.Select Service Accounts.
Select the service account to generate keys for.
Select the Email address listed and store this for later steps with the key generated through this process.
Select Keys, then Add Key, then Create new key.
Select JSON, then Create.
Store the key in a safe location.
- Convert SA Key to Base64
The key file downloaded in Set up Service Account Key needs to be converted to base64 with the following command, replacing the locations of KEY_FILE and KEYFILEBASE64:
KEY_FILE = ~/.gcp-sa-registry-keyfile.json
KEYFILEBASE64 = ~/.gcp-sa-registry-keyfile-b64.json
base64 -i $KEY_FILE -o $KEYFILEBASE64
This base64 key is then used as the authentication token, with the username _json_key_base64.
This can be tested with docker by logging into the specified registry. For example:
token=$(cat $KEYFILEBASE64)
cat $tok | docker login -u _json_key_base64 --password-stdin https://{GCP artifact registry region}.pkg.dev
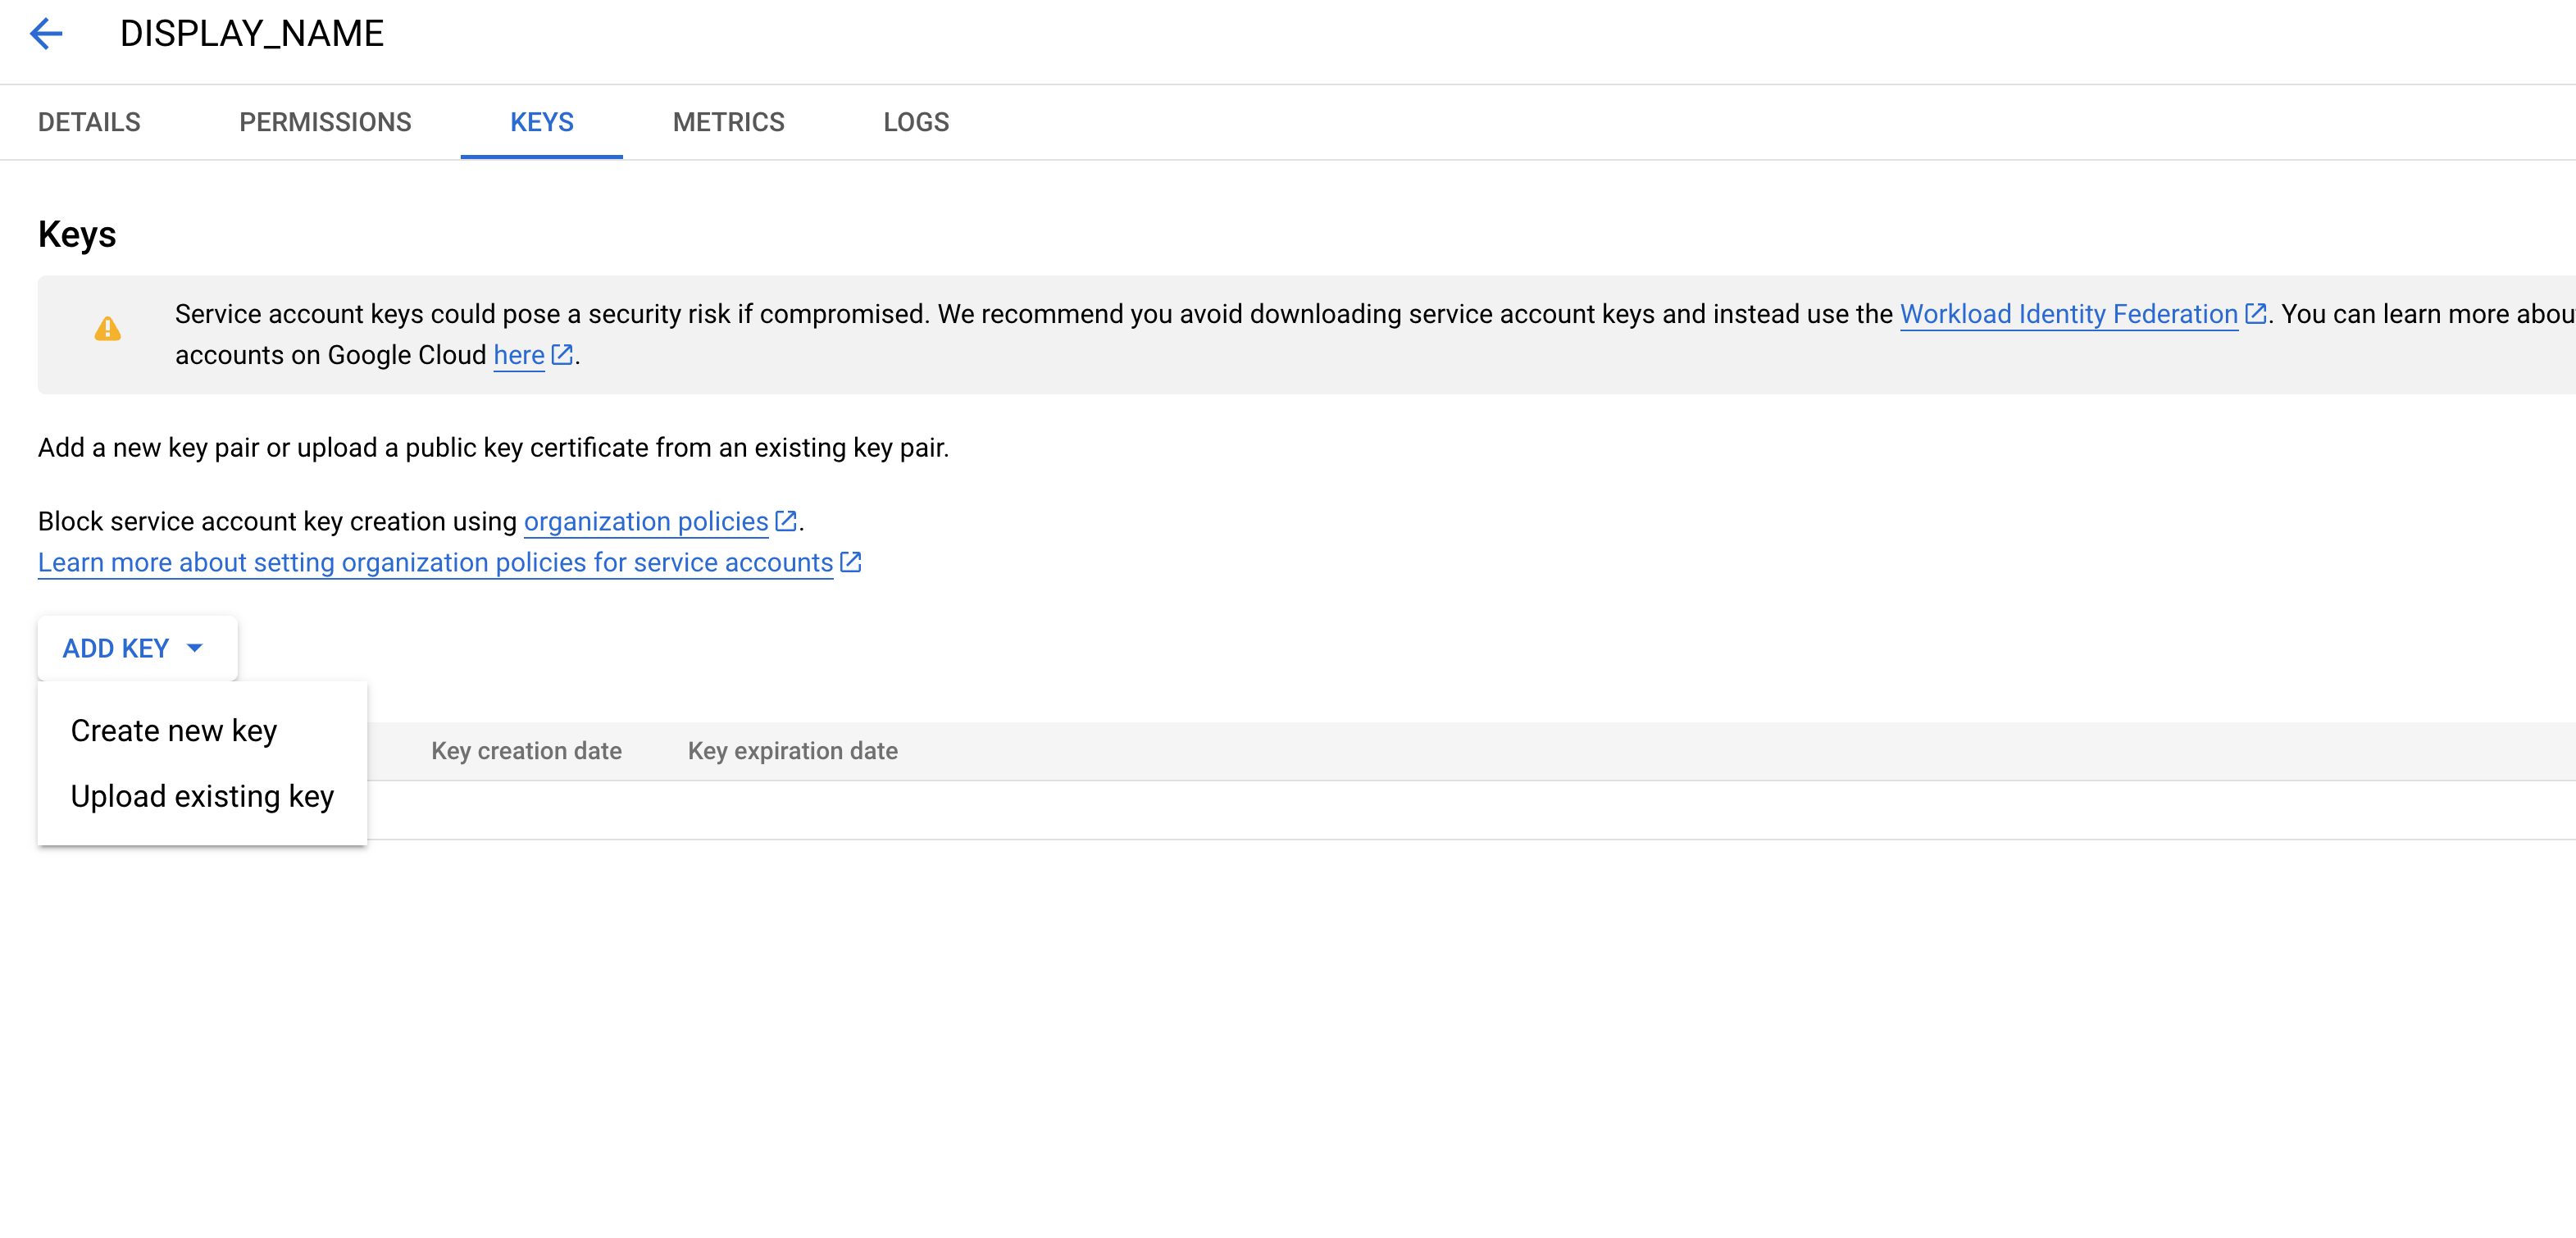
Publish a Pipeline to the Edge Registry Service
See also the reference documentation: wallaroo.pipeline.publish.
Publish a Pipeline
Pipelines are published as images to the edge registry set in the Enable Wallaroo Edge Registry with the wallaroo.pipeline.Pipeline.publish method.
When a pipeline is published, the containerized pipeline with its models, and the inference engine for the architecture and acceleration uploaded to the OCI registry. Once published, the publish is deployed on edge locations either with Docker or helm based deployments. See DevOps - Pipeline Edge Deployment for more details.
Publish a Pipeline Parameters
The wallaroo.pipeline.Pipeline.publish method takes the following parameters. The containerized pipeline will be pushed to the Edge registry service with the model, pipeline configurations, and other artifacts needed to deploy the pipeline.
| Parameter | Type | Description |
|---|---|---|
deployment_config | wallaroo.deployment_config.DeploymentConfig (Optional) | Sets the pipeline deployment configuration. For more information on pipeline deployment configuration, see the Wallaroo SDK Essentials Guide: Pipeline Deployment Configuration. |
replaces | **List[wallaroo.pipeline_publish] (Optional) | The pipeline publish(es) to replace. For more details, see Replace Publish. |
Publish a Pipeline Returns
The following publish fields are displayed with the method IPython.display.
| Field | Type | Description |
|---|---|---|
ID | Integer | The numerical ID of the publish. |
Pipeline Name | String | The pipeline the publish was generated from. |
Pipeline Version | String | The pipeline version the publish was generated from, in UUID format. |
Status | String | The status of the publish. Values include:
|
Workspace Id | Integer | The numerical id of the workspace the publish is associated with. |
Workspace Name | String | The name of the workspace the publish is associated with. |
Edges | List[String] | A list of edges associated with this publish. If no edges exist, this field will be empty. |
Engine URL | String | The OCI Registry URL for the inference engine. |
Pipeline URL | String | The OCI Registry URL of the containerized pipeline. |
Helm Chart URL | String | The OCI Registry URL of the Helm chart. |
Helm Chart Reference | String | The OCI Registry URL of the Helm Chart reference. |
Helm Chart Version | String | The Helm Chart Version. |
Engine Config | Dict | The details of the wallaroo.engine_config used for the publish. Unless specified, it will use the same engine config for the pipeline, which inherits its arch and accel settings from the model upon upload. See Wallaroo SDK Essentials Guide: Model Uploads and Registrations for more details. |
User Images | List | Any user images used with the deployment. |
Created By | String | The user name, typically the email address, of the user that created the publish. |
Created At | DateTime | The DateTime of the publish was created. |
Updated At | DateTime | The DateTime of the publish was updated. |
Replaces | List | A list of the publishes that were replaced by this one with the following attributes. Note that each variable represents the value displayed:
|
Docker Run Command | String | The Docker Run commands for the publish. The following variables must be set before executing the command.
Additional options are detailed in the DevOps - Pipeline Edge Deployment |
Podman Run Command | String | The Podman run commands for each edge location for the publish. The following variables must be set before executing the command.
Additional options are detailed in the DevOps - Pipeline Edge Deployment |
Helm Install Command | String | The Helm Install or Upgrade commands for each location or replaced locations for the pipeline. For replaced publishes, the helm upgrade command is shown for performing in-line model updates. The following variables must be set before executing the command.
|
Individual Publish Fields
The following fields are available from the PipelinePublish object.
| Field | Type | Description |
|---|---|---|
id | Integer | Numerical Wallaroo id of the published pipeline. |
pipeline_name | String | The name of the pipeline the publish is generated from. |
pipeline_version_id | Integer | Numerical Wallaroo id of the pipeline version published. |
status | String | The status of the pipeline publication. Values include:
|
engine_url | String | The URL of the published pipeline engine in the edge registry. |
pipeline_url | String | The URL of the published pipeline in the edge registry. |
pipeline_version_name | String | The pipeline version in UUID format. |
helm | Dict | The details used for a helm based deployment of the with the following attributes:
|
additional_properties | Dict | Any additional properties for the publish. |
docker_run_variables | The Docker Run variables used for Docker based deployments. This includes:
| |
list_edges() | wallaroo.edge.EdgeList | A List of wallaroo.edge.Edge associated with the publish. |
engine_url | String | The URL for the inference engine used for the edge deployment. |
user_images | List | A List of custom images used for the edge deployment. |
created_by | String | The unique identifier of the user ID that created the publish in UUID format. |
error | String | Any errors associated with the publish. |
engine_config | wallaroo.deployment_config.DeploymentConfig | The pipeline configuration included with the published pipeline. |
created_at | DateTime | When the published pipeline was created. |
updated_at | DateTime | When the published pipeline was updated. |
created_on_version | String | The version of Wallaroo the publish was generated from. |
replaces | List(Integer) | List of other publishes that were replaced by this one. |
Publish a Pipeline Example
The following example shows how to publish a pipeline to the edge registry service associated with the Wallaroo instance.
# set the configuration
deployment_config = wallaroo.DeploymentConfigBuilder().replica_count(1).cpus(0.5).memory("900Mi").build()

# build the pipeline
pipeline = wl.build_pipeline("publish-example")
# add a model as a model step
pipeline.add_model_step(m2)
publish = pipeline.publish(deployment_config)
display(publish)
| ID | 1 | |
| Pipeline Name | assay-demonstration-tutorial | |
| Pipeline Version | 1ff19772-f41f-42fb-b0d1-f82130bf5801 | |
| Status | Published | |
| Workspace Id | 12 | |
| Workspace Name | run-anywhere-assay-demonstration-tutorial | |
| Edges | ||
| Engine URL | ghcr.io/wallaroolabs/doc-samples/engines/proxy/wallaroo/ghcr.io/wallaroolabs/fitzroy-mini:v2025.1.0-6250 | |
| Pipeline URL | ghcr.io/wallaroolabs/doc-samples/pipelines/assay-demonstration-tutorial:1ff19772-f41f-42fb-b0d1-f82130bf5801 | |
| Helm Chart URL | oci://ghcr.io/wallaroolabs/doc-samples/charts/assay-demonstration-tutorial | |
| Helm Chart Reference | ghcr.io/wallaroolabs/doc-samples/charts@sha256:353f286f0d39dd751e09aa815609a9edbbf3357d31f7e779fa18d5f97c28986c | |
| Helm Chart Version | 0.0.1-1ff19772-f41f-42fb-b0d1-f82130bf5801 | |
| Engine Config | {'engine': {'resources': {'limits': {'cpu': 4.0, 'memory': '3Gi'}, 'requests': {'cpu': 4.0, 'memory': '3Gi'}, 'accel': 'none', 'arch': 'x86', 'gpu': False}}, 'engineAux': {'autoscale': {'type': 'none', 'cpu_utilization': 50.0}}} | |
| User Images | [] | |
| Created By | john.hansarick@wallaroo.ai | |
| Created At | 2025-07-15 17:03:13.754534+00:00 | |
| Updated At | 2025-07-15 17:03:13.754534+00:00 | |
| Replaces | ||
| Docker Run Command |
Note: Please set the EDGE_PORT, OCI_USERNAME, and OCI_PASSWORD environment variables. | |
| Podman Run Command |
Note: Please set the EDGE_PORT, OCI_USERNAME, and OCI_PASSWORD environment variables. | |
| Helm Install Command |
Note: Please set the HELM_INSTALL_NAME, HELM_INSTALL_NAMESPACE,
OCI_USERNAME, and OCI_PASSWORD environment variables. |
List Publishes
Publishes are listed from any of the following methods.
All publishes across all available workspaces are displayed with the wallaroo.client.Client.list_publishes method. This is filtered by the requesting user type:
- Admin users: All publishes across all workspaces.
- Non-Admin users: All publishes across all workspaces the user is a member of.
wallaroo.client.Client.list_publishes takes the following parameters.
| Parameter | Type | Description |
|---|---|---|
workspace_id | Integer (Optional) | The numerical id of the workspace. Mutually exclusive with the parameter workspace_name. If workspace_id is used, do not use the parameter workspace_name. |
workspace_name | Integer (Optional) | The numerical id of the workspace. Mutually exclusive with the parameter workspace_id. If workspace_name is used, do not use the parameter workspace_id. |
The Wallaroo client list_publishes method returns a List of wallaroo.pipeline_publish.PipelinePublish objects. The following fields are displayed using IPython.display.
| Field | Type | Description |
|---|---|---|
id | Integer | Numerical Wallaroo id of the published pipeline. |
Pipeline Name | String | The name of the pipeline the publish is associated with. |
Pipeline Version | String | The pipeline version in UUID format the publish was generated from. |
Workspace Id | Integer | The workspace numerical id the pipeline is associated with. |
Workspace Name | String | The name of the workspace the pipeline is associated with. |
Edges | String | A list of the edges associated with the publish. For more details, see Edge Observability |
Engine URL | String | The URL for the published Wallaroo engine in the edge registry. The Wallaroo engine is tied to the [model’s architecture](({<ref “wallaroo-model-operations-upload-register/#upload-model-parameters”>})). |
Pipeline URL | String | The URL for the published pipeline in the edge registry. |
Created By | String | The email address of the Wallaroo user that created the publish. |
Created At | String | The date and time the publish was created. |
Updated At | String | The date and time the publish was updated. |
Publish Fields
The following attributes are available from the PipelinePublish object.
| Field | Type | Description |
|---|---|---|
id | Integer | The numerical id of the publish. |
pipeline_name | String | The name of the pipeline the publish is associated with. |
pipeline_version_id | String | The pipeline version the publish is generated from. |
engine_config | Dict | The engine configuration as defined by the deployment configuration. |
engine_url | String | The URL for the Wallaroo engine in the edge registry. The Wallaroo engine is tied to the model’s architecture. |
pipeline_url | String | The URL for the containerized pipeline with all models and artifacts for deployment. |
docker_run_variables | Dict | Any additional Docker run variables. |
helm | Dict | The helm deployment parameters including:
|
list_edges() | wallaroo.edge.EdgeList | Returns list of edges associated with the publish of type wallaroo.edge.Edge. Each Edge contains the following parameters:
|
created_at | Datetime.Datetime | The date and time the publish was created. |
created_by | String | The id of the user that created the publish in UUID format. |
created_by_email | String | The email address of the user that created the publish. |
The following example demonstrates:
- Listing all publishes shows all publishes from an admin user performing the client
list_publishesmethod with no workspace filtering. - Displaying a specific publish from the list.
import wallaroo
wl = wallaroo.Client()
display(wl.list_publishes())
display(wl.list_publishes()[1])
| ID | 2 | |
| Pipeline Name | edge-replacement-demo-pk | |
| Pipeline Version | a90c10d2-34d8-4aa0-b620-6ce3647d92e0 | |
| Status | Published | |
| Workspace Id | 44 | |
| Workspace Name | edge-replacement-demo-pk | |
| Edges | ||
| Engine URL | us-central1-docker.pkg.dev/wallaroo-dev-253816/uat/engines/proxy/wallaroo/ghcr.io/wallaroolabs/fitzroy-mini:v2026.1.0-main-5922 | |
| Pipeline URL | us-central1-docker.pkg.dev/wallaroo-dev-253816/uat/pipelines/edge-replacement-demo-pk:a90c10d2-34d8-4aa0-b620-6ce3647d92e0 | |
| Helm Chart URL | oci://us-central1-docker.pkg.dev/wallaroo-dev-253816/uat/charts/edge-replacement-demo-pk | |
| Helm Chart Reference | us-central1-docker.pkg.dev/wallaroo-dev-253816/uat/charts@sha256:025a8ef3df25e9bae9e126c5d93b505ac5c5600166f5d425341fd7cf6518ad4c | |
| Helm Chart Version | 0.0.1-a90c10d2-34d8-4aa0-b620-6ce3647d92e0 | |
| Engine Config | {'engine': {'resources': {'limits': {'cpu': 4.0, 'memory': '3Gi'}, 'requests': {'cpu': 4.0, 'memory': '3Gi'}, 'arch': 'x86', 'accel': 'none', 'gpu': False}}, 'engineAux': {'autoscale': {'type': 'none'}}} | |
| User Images | [] | |
| Created By | preethi.kumar@wallaroo.ai | |
| Created At | 2025-02-10 17:34:59.834090+00:00 | |
| Updated At | 2025-02-10 17:34:59.834090+00:00 | |
| Replaces | ||
| Docker Run Command |
Note: Please set the EDGE_PORT, OCI_USERNAME, and OCI_PASSWORD environment variables. | |
| Helm Install Command |
Note: Please set the HELM_INSTALL_NAME, HELM_INSTALL_NAMESPACE,
OCI_USERNAME, and OCI_PASSWORD environment variables. |
All publishes created from specific pipeline are displayed with the wallaroo.pipeline.publishes method.
The pipeline publishes method returns a List of wallaroo.pipeline_publish.PipelinePublish objects.
The following fields are displayed using IPython.display.
| Field | Type | Description |
|---|---|---|
id | Integer | Numerical Wallaroo id of the published pipeline. |
Pipeline Name | String | The name of the pipeline the publish is associated with. |
Pipeline Version | String | The pipeline version in UUID format the publish was generated from. |
Workspace Id | Integer | The workspace numerical id the pipeline is associated with. |
Workspace Name | String | The name of the workspace the pipeline is associated with. |
Edges | String | A list of the edges associated with the publish. For more details, see Edge Observability |
Engine URL | String | The URL for the published Wallaroo engine in the edge registry. The Wallaroo engine is tied to the [model’s architecture](({<ref “wallaroo-model-operations-upload-register/#upload-model-parameters”>})). |
Pipeline URL | String | The URL for the published pipeline in the edge registry. |
Created By | String | The email address of the Wallaroo user that created the publish. |
Created At | String | The date and time the publish was created. |
Updated At | String | The date and time the publish was updated. |
Publish Fields
The following attributes are available from the PipelinePublish object.
| Field | Type | Description |
|---|---|---|
id | Integer | The numerical id of the publish. |
pipeline_name | String | The name of the pipeline the publish is associated with. |
pipeline_version_id | String | The pipeline version the publish is generated from. |
engine_config | Dict | The engine configuration as defined by the deployment configuration. |
engine_url | String | The URL for the Wallaroo engine in the edge registry. The Wallaroo engine is tied to the model’s architecture. |
pipeline_url | String | The URL for the containerized pipeline with all models and artifacts for deployment. |
docker_run_variables | Dict | Any additional Docker run variables. |
helm | Dict | The helm deployment parameters including:
|
list_edges() | wallaroo.edge.EdgeList | Returns list of edges associated with the publish of type wallaroo.edge.Edge. Each Edge contains the following parameters:
|
created_at | Datetime.Datetime | The date and time the publish was created. |
created_by | String | The id of the user that created the publish in UUID format. |
created_by_email | String | The email address of the user that created the publish. |
The following demonstrates:
- Displaying a list of publishes from the pipeline
edge-replacement-demo-pk. - Displaying a specific publish from the list acquired from the pipeline.
display(pipeline.publishes())
| id | Pipeline Name | Pipeline Version | Workspace Id | Workspace Name | Edges | Engine URL | Pipeline URL | Created By | Created At | Updated At |
|---|---|---|---|---|---|---|---|---|---|---|
| 2 | edge-replacement-demo-pk | a90c10d2-34d8-4aa0-b620-6ce3647d92e0 | 44 | edge-replacement-demo-pk | us-central1-docker.pkg.dev/wallaroo-dev-253816/uat/engines/proxy/wallaroo/ghcr.io/wallaroolabs/fitzroy-mini:v2026.1.0-main-5922 | us-central1-docker.pkg.dev/wallaroo-dev-253816/uat/pipelines/edge-replacement-demo-pk:a90c10d2-34d8-4aa0-b620-6ce3647d92e0 | preethi.kumar@wallaroo.ai | 2025-10-Feb 17:34:59 | 2025-10-Feb 17:34:59 | |
| 3 | edge-replacement-demo-pk | 3dde7889-9d1b-4e72-8b8b-7cf882ee9b3a | 44 | edge-replacement-demo-pk | edge-replacement-demo-pk-edge-1 | us-central1-docker.pkg.dev/wallaroo-dev-253816/uat/engines/proxy/wallaroo/ghcr.io/wallaroolabs/fitzroy-mini:v2026.1.0-main-5922 | us-central1-docker.pkg.dev/wallaroo-dev-253816/uat/pipelines/edge-replacement-demo-pk:3dde7889-9d1b-4e72-8b8b-7cf882ee9b3a | preethi.kumar@wallaroo.ai | 2025-10-Feb 17:50:05 | 2025-10-Feb 17:50:05 |
display(pipeline.publishes()[1])
| ID | 3 | |
| Pipeline Name | edge-replacement-demo-pk | |
| Pipeline Version | 3dde7889-9d1b-4e72-8b8b-7cf882ee9b3a | |
| Status | Published | |
| Workspace Id | 44 | |
| Workspace Name | edge-replacement-demo-pk | |
| Edges | edge-replacement-demo-pk-edge-1 | |
| Engine URL | us-central1-docker.pkg.dev/wallaroo-dev-253816/uat/engines/proxy/wallaroo/ghcr.io/wallaroolabs/fitzroy-mini:v2026.1.0-main-5922 | |
| Pipeline URL | us-central1-docker.pkg.dev/wallaroo-dev-253816/uat/pipelines/edge-replacement-demo-pk:3dde7889-9d1b-4e72-8b8b-7cf882ee9b3a | |
| Helm Chart URL | oci://us-central1-docker.pkg.dev/wallaroo-dev-253816/uat/charts/edge-replacement-demo-pk | |
| Helm Chart Reference | us-central1-docker.pkg.dev/wallaroo-dev-253816/uat/charts@sha256:f6a68bdbebf5c2827f01bc98f7bfc88eadb55b65f11eb815f51aa65c8ef5f442 | |
| Helm Chart Version | 0.0.1-3dde7889-9d1b-4e72-8b8b-7cf882ee9b3a | |
| Engine Config | {'engine': {'resources': {'limits': {'cpu': 4.0, 'memory': '3Gi'}, 'requests': {'cpu': 4.0, 'memory': '3Gi'}, 'arch': 'x86', 'accel': 'none', 'gpu': False}}, 'engineAux': {'autoscale': {'type': 'none'}}} | |
| User Images | [] | |
| Created By | preethi.kumar@wallaroo.ai | |
| Created At | 2025-02-10 17:50:05.332463+00:00 | |
| Updated At | 2025-02-10 17:50:05.332463+00:00 | |
| Replaces | Publish 2, Pipeline "edge-replacement-demo-pk", Version a90c10d2-34d8-4aa0-b620-6ce3647d92e0 | |
| Docker Run Command |
Note: Please set the EDGE_PORT, OCI_USERNAME, and OCI_PASSWORD environment variables. | |
| Helm Install Command |
Note: Please set the HELM_INSTALL_NAME, HELM_INSTALL_NAMESPACE,
OCI_USERNAME, and OCI_PASSWORD environment variables. |
Replace Publish
Publishes are replaced either from a pipeline version, or an entirely new pipeline via the wallaroo.pipeline.Pipeline.publish(replace=List**wallaroo.pipeline_publish.PipelinePublish]) method. When replaced, the original publish’s [edge locations** are transferred to the pipeline associated with the new publish.
When a publish is replaced by a pipeline version, the pipeline logs will continue to include the edge locations with any new changes to the schema, based on the new pipeline steps.
When a publish is replaced by a entirely different pipeline, the previous pipeline logs are associated with the previous pipeline. New logs are associated with the new pipeline.
When a publish is replaced, the edge locations can be redeployed with the new publish information, which includes the new pipeline steps, models, and other settings.
Replace Publish Considerations
When a pipeline is publish, the following considerations must be taken.
- Model Drift Observability updates: Assays created for the specific pipeline and model name will cease to generate new analyses if the pipeline steps change the model names or field outputs that were previously set. In these instances, the assay should be paused and a new assay generated with the updated model name and fields. For more details see Model Drift Detection with Model Insights.
- Pipeline Log Schema Changes: The pipeline log schema will change based on the input and output parameters with the new pipeline steps. For more details see Wallaroo SDK Essentials Guide: Pipeline Log Management.
The following methods are used to replace a publish.
Replace Publish Methods
Replace Publish From Pipeline
The wallaroo.pipeline.Pipeline.publish method takes the following parameters. The containerized pipeline will be pushed to the Edge registry service with the model, pipeline configurations, and other artifacts needed to deploy the pipeline.
| Parameter | Type | Description |
|---|---|---|
deployment_config | wallaroo.deployment_config.DeploymentConfig (Optional) | Sets the pipeline deployment configuration. For example: For more information on pipeline deployment configuration, see the Wallaroo SDK Essentials Guide: Pipeline Deployment Configuration. |
replaces | [List[wallaroo.pipeline_publish]] (Optional) | The pipeline publish(es) to replace. |
The following parameters are returned when a pipeline is published.
| Field | Type | Description |
|---|---|---|
id | Integer | Numerical Wallaroo id of the published pipeline. |
pipeline_name | String | The name of the pipeline the publish is generated from. |
pipeline_version_id | Integer | Numerical Wallaroo id of the pipeline version published. |
status | String | The status of the pipeline publication. Values include:
|
engine_url | String | The URL of the published pipeline engine in the edge registry. |
pipeline_url | String | The URL of the published pipeline in the edge registry. |
pipeline_version_name | String | The pipeline version in UUID format. |
helm | Dict | The details used for a helm based deployment of the with the following attributes:
|
additional_properties | Dict | Any additional properties for the publish. |
docker_run_variables | The Docker Run variables used for Docker based deployments. This includes:
| |
engine_url | String | The URL for the inference engine used for the edge deployment. |
user_images | List | A List of custom images used for the edge deployment. |
created_by | String | The unique user ID of the user that created the publish in UUID format. |
error | String | Any errors associated with the publish. |
engine_config | wallaroo.deployment_config.DeploymentConfig | The pipeline configuration included with the published pipeline. |
created_at | DateTime | When the published pipeline was created. |
updated_at | DateTime | When the published pipeline was updated. |
created_on_version | String | The version of Wallaroo the publish was generated from. |
replaces | List(Integer) | List of other publishes that were replaced by this one. |
When a publish is displayed using IPython.display, the following fields are generated. Some are generated from the fields above to make deployment easier for end users.
| Field | Type | Description |
|---|---|---|
ID | Integer | The numerical ID of the publish. |
Pipeline Name | String | The pipeline the publish was generated from. |
Pipeline Version | String | The pipeline version the publish was generated from, in UUID format. |
Status | String | The status of the publish. Values include:
|
Engine URL | String | The OCI Registry URL for the inference engine. |
Pipeline URL | String | The OCI Registry URL of the containerized pipeline. |
Helm Chart URL | String | The OCI Registry URL of the Helm chart. |
Helm Chart Reference | String | The OCI Registry URL of the Helm Chart reference. |
Helm Chart Version | String | The Helm Chart Version. |
Engine Config | Dict | The details of the wallaroo.engine_config used for the publish. Unless specified, it will use the same engine config for the pipeline, which inherits its arch and accel settings from the model upon upload. See Wallaroo SDK Essentials Guide: Model Uploads and Registrations for more details. |
User Images | List | Any user images used with the deployment. |
Created By | String | The username, typically the email address, of the user that created the publish. |
Created At | DateTime | The DateTime of the publish was created. |
Updated At | DateTime | The DateTime of the publish was updated. |
Replaces | List | A list of the publishes that were replaced by this one. These detail:
|
Docker Run Command | The Docker Run commands for each edge location for the publish. Each Edge will show its Edge Location name, and the Docker Run command for that edge location. The following variables must be set before executing the command.
| |
Helm Install Command | The Helm Install or Upgrade commands for each location or replaced locations for the pipeline. For replaced publishes, the helm upgrade command is shown for performing in-line model updates. The following variables must be set before executing the command.
|
The following shows a pipeline with publishes and edge locations. The full demonstration is available at In-Line Model Updates at the Edge Tutorial.
display(mainpipeline)
| name | edge-inline-replacement-demo |
| created | 2024-03-26 18:53:24.630184+00:00 |
| last_updated | 2024-03-26 22:01:14.641540+00:00 |
| deployed | False |
| arch | None |
| accel | None |
| tags | |
| versions | c0396244-66ea-4729-9830-3dd11ccdf85a, f3c59078-3245-4697-bdec-238c65cab749, e41738a7-9d80-4f20-a8d6-0b479c53fa5a, d9192be1-4d5d-49be-b106-bf77dba8173f, 446aeed9-2d52-47ae-9e5c-f2a05ef0d4d6, 85058098-d395-4af4-98ce-25754175547f, 90643d74-8883-451c-aa2b-4c41d9af04f8, 5a1bf0a2-9595-41de-9852-44d211c2c0fb, a5105a19-7215-4e6b-9a8a-5ddcc6aa875c |
| steps | rf-house-price-estimator |
| published | True |
display(mainpipeline.publishes())
| id | pipeline_version_name | engine_url | pipeline_url | created_by | created_at | updated_at |
|---|---|---|---|---|---|---|
| 11 | 446aeed9-2d52-47ae-9e5c-f2a05ef0d4d6 | ghcr.io/wallaroolabs/doc-samples/engines/proxy/wallaroo/ghcr.io/wallaroolabs/fitzroy-mini:v2024.1.0-main-4781 | ghcr.io/wallaroolabs/doc-samples/pipelines/edge-inline-replacement-demo:446aeed9-2d52-47ae-9e5c-f2a05ef0d4d6 | john.hummel@wallaroo.ai | 2024-26-Mar 19:07:43 | 2024-26-Mar 19:07:43 |
| 10 | 90643d74-8883-451c-aa2b-4c41d9af04f8 | ghcr.io/wallaroolabs/doc-samples/engines/proxy/wallaroo/ghcr.io/wallaroolabs/fitzroy-mini:v2024.1.0-main-4781 | ghcr.io/wallaroolabs/doc-samples/pipelines/edge-inline-replacement-demo:90643d74-8883-451c-aa2b-4c41d9af04f8 | john.hummel@wallaroo.ai | 2024-26-Mar 18:54:24 | 2024-26-Mar 18:54:24 |
| 14 | f3c59078-3245-4697-bdec-238c65cab749 | ghcr.io/wallaroolabs/doc-samples/engines/proxy/wallaroo/ghcr.io/wallaroolabs/fitzroy-mini:v2024.1.0-main-4781 | ghcr.io/wallaroolabs/doc-samples/pipelines/edge-inline-replacement-demo:f3c59078-3245-4697-bdec-238c65cab749 | john.hummel@wallaroo.ai | 2024-26-Mar 21:31:16 | 2024-26-Mar 21:31:16 |
display(mainpipeline.list_edges())
| ID | Name | Tags | SPIFFE ID |
|---|---|---|---|
| 50fa7f30-7725-4f27-8ddb-6000e8674cd6 | houseprice-edge-inline-replacement-demo2 | [] | wallaroo.ai/ns/deployments/edge/50fa7f30-7725-4f27-8ddb-6000e8674cd6 |
Replace Publish From Pipeline Version
For the following, the pipeline model steps are replaced, and the new version is published. The previous publish set to the variable pub is replaced by the new publish, which is stored in the variable new_pub.
housing_model_challenger01 = (wl.upload_model("xgb-house-price-estimator",
'./models/xgb_model.onnx',
framework=Framework.ONNX)
.configure(tensor_fields=["tensor"])
)
mainpipeline.clear()
mainpipeline.add_model_step(housing_model_challenger01)
new_pub = mainpipeline.publish(replaces=[pub])
new_pub
Waiting for pipeline publish... It may take up to 600 sec.
Pipeline is publishing...... Published.
| ID | 11 | ||||
| Pipeline Name | edge-inline-replacement-demo | ||||
| Pipeline Version | 446aeed9-2d52-47ae-9e5c-f2a05ef0d4d6 | ||||
| Status | Published | ||||
| Engine URL | ghcr.io/wallaroolabs/doc-samples/engines/proxy/wallaroo/ghcr.io/wallaroolabs/fitzroy-mini:v2024.1.0-main-4781 | ||||
| Pipeline URL | ghcr.io/wallaroolabs/doc-samples/pipelines/edge-inline-replacement-demo:446aeed9-2d52-47ae-9e5c-f2a05ef0d4d6 | ||||
| Helm Chart URL | oci://ghcr.io/wallaroolabs/doc-samples/charts/edge-inline-replacement-demo | ||||
| Helm Chart Reference | ghcr.io/wallaroolabs/doc-samples/charts@sha256:268a8b7b22b3ab9a62127f56ac5152d264fec194212d2100550ecb6dd6b1cc37 | ||||
| Helm Chart Version | 0.0.1-446aeed9-2d52-47ae-9e5c-f2a05ef0d4d6 | ||||
| Engine Config | {'engine': {'resources': {'limits': {'cpu': 4.0, 'memory': '3Gi'}, 'requests': {'cpu': 4.0, 'memory': '3Gi'}, 'accel': 'none', 'arch': 'x86', 'gpu': False}}, 'engineAux': {'autoscale': {'type': 'none'}, 'images': None}, 'enginelb': {'resources': {'limits': {'cpu': 1.0, 'memory': '512Mi'}, 'requests': {'cpu': 0.2, 'memory': '512Mi'}, 'accel': 'none', 'arch': 'x86', 'gpu': False}}} | ||||
| User Images | [] | ||||
| Created By | john.hummel@wallaroo.ai | ||||
| Created At | 2024-03-26 19:07:43.158229+00:00 | ||||
| Updated At | 2024-03-26 19:07:43.158229+00:00 | ||||
| Replaces | Publish 10, Pipeline "edge-inline-replacement-demo", Version aa29385c-dd28-49a0-8a09-7081a986180e | ||||
| Docker Run Command |
Note: Please set the PERSISTENT_VOLUME_DIR, OCI_USERNAME, and OCI_PASSWORD environment variables. | ||||
| Helm Install Command |
Note: Please set the PERSISTENT_VOLUME_DIR, HELM_INSTALL_NAME, HELM_INSTALL_NAMESPACE,
OCI_USERNAME, and OCI_PASSWORD environment variables. |
Note that in the Replaces section, updates are given for each edge location.
For this example, a new pipeline is created, The publish new_pub is then replaced by the publish from this new pipeline.
housing_model_challenger02 = (wl.upload_model("gbr-house-price-estimator",
'./models/gbr_model.onnx',
framework=Framework.ONNX)
.configure(tensor_fields=["tensor"])
)
new_pipeline = wl.build_pipeline("new-edge-inline-replacement")
# clear the steps if used before
new_pipeline.clear()
new_pipeline.add_model_step(housing_model_challenger02)
new_pipeline_pub = new_pipeline.publish(replaces=[new_pub])
new_pipeline_pub
Waiting for pipeline publish... It may take up to 600 sec.
Pipeline is publishing...... Published.
| ID | 13 | ||||
| Pipeline Name | new-edge-inline-replacement | ||||
| Pipeline Version | 00921571-3db7-4bf9-94dc-377aab558475 | ||||
| Status | Published | ||||
| Engine URL | ghcr.io/wallaroolabs/doc-samples/engines/proxy/wallaroo/ghcr.io/wallaroolabs/fitzroy-mini:v2024.1.0-main-4781 | ||||
| Pipeline URL | ghcr.io/wallaroolabs/doc-samples/pipelines/new-edge-inline-replacement:00921571-3db7-4bf9-94dc-377aab558475 | ||||
| Helm Chart URL | oci://ghcr.io/wallaroolabs/doc-samples/charts/new-edge-inline-replacement | ||||
| Helm Chart Reference | ghcr.io/wallaroolabs/doc-samples/charts@sha256:fe9a2d04f09723d5f09d0bc83d4b02367c91bdfc442007a9881e64b2f6eccfad | ||||
| Helm Chart Version | 0.0.1-00921571-3db7-4bf9-94dc-377aab558475 | ||||
| Engine Config | {'engine': {'resources': {'limits': {'cpu': 4.0, 'memory': '3Gi'}, 'requests': {'cpu': 4.0, 'memory': '3Gi'}, 'accel': 'none', 'arch': 'x86', 'gpu': False}}, 'engineAux': {'autoscale': {'type': 'none'}, 'images': None}, 'enginelb': {'resources': {'limits': {'cpu': 1.0, 'memory': '512Mi'}, 'requests': {'cpu': 0.2, 'memory': '512Mi'}, 'accel': 'none', 'arch': 'x86', 'gpu': False}}} | ||||
| User Images | [] | ||||
| Created By | john.hummel@wallaroo.ai | ||||
| Created At | 2024-03-26 19:16:41.564433+00:00 | ||||
| Updated At | 2024-03-26 19:16:41.564433+00:00 | ||||
| Replaces | Publish 12, Pipeline "new-edge-replacement", Version aa29385c-dd28-49a0-8a09-7081a986180e | ||||
| Docker Run Command |
Note: Please set the PERSISTENT_VOLUME_DIR, OCI_USERNAME, and OCI_PASSWORD environment variables. | ||||
| Helm Install Command |
Note: Please set the PERSISTENT_VOLUME_DIR, HELM_INSTALL_NAME, HELM_INSTALL_NAMESPACE,
OCI_USERNAME, and OCI_PASSWORD environment variables. |
With the edge location replacement complete with the new pipeline, we list the edges to the original pipeline and the new one to show the edge location is transferred to the new pipeline.
mainpipeline.list_edges()
(no pipelines)
new_pipeline.list_edges()
| ID | Name | Tags | SPIFFE ID |
|---|---|---|---|
| 4a9f77c4-c9bc-4e4b-b59e-b232b80ebce7 | houseprice-edge-inline-replacement-demo | [] | wallaroo.ai/ns/deployments/edge/4a9f77c4-c9bc-4e4b-b59e-b232b80ebce7 |
Edge Observability
Edge Observability allows edge deployments of Wallaroo Server to transmit inference results back to the Wallaroo Ops center and become part of the pipeline’s logs. This is valuable for data scientists and MLOps engineers to retrieve edge deployment logs for use in model observability, drift, and other use cases.
Before starting, the Edge Observability Service must be enabled in the Wallaroo Ops center. See the Edge Deployment Registry Guide for details on enabling the Wallaroo Edge Deployment service.
Wallaroo Server edge observability is enabled when a new edge location is added to the pipeline publish. Each location has its own EDGE_BUNDLE settings, a Base64 encoded set of instructions informing the edge deployed Wallaroo Server on how to communicate with Wallaroo Ops center.
Add Edge
Wallaroo Servers edge deployments are added to a Wallaroo pipeline’s publish with the wallaroo.pipeline_publish.add_edge(name: string, tags: List[string]) method. The name is the unique primary key for each edge added to the pipeline publish and must be unique.
Add Edge Parameters
wallaroo.pipeline_publish.add_edge(name: string, tags: List[string]) has the following parameters.
| Field | Type | Description |
|---|---|---|
name | String (Required) | The name of the edge location. This must be a unique value across all edges in the Wallaroo instance. |
tags | List[String] (Optional) | A list of optional tags. |
Add Edge Returns
Add Edge Returns with Display
The following publish fields are displayed with the method IPython.display.
| Field | Type | Description |
|---|---|---|
ID | Integer | The numerical ID of the publish. |
Pipeline Name | String | The pipeline the publish was generated from. |
Pipeline Version | String | The pipeline version the publish was generated from, in UUID format. |
Status | String | The status of the publish. Values include:
|
Workspace Id | Integer | The numerical id of the workspace the publish is associated with. |
Workspace Name | String | The name of the workspace the publish is associated with. |
Edges | List[String] | A list of edges associated with this publish. If no edges exist, this field will be empty. |
Engine URL | String | The OCI Registry URL for the inference engine. |
Pipeline URL | String | The OCI Registry URL of the containerized pipeline. |
Helm Chart URL | String | The OCI Registry URL of the Helm chart. |
Helm Chart Reference | String | The OCI Registry URL of the Helm Chart reference. |
Helm Chart Version | String | The Helm Chart Version. |
Engine Config | Dict | The details of the wallaroo.engine_config used for the publish. Unless specified, it will use the same engine config for the pipeline, which inherits its arch and accel settings from the model upon upload. See Wallaroo SDK Essentials Guide: Model Uploads and Registrations for more details. |
User Images | List | Any user images used with the deployment. |
Created By | String | The user name, typically the email address, of the user that created the publish. |
Created At | DateTime | The DateTime of the publish was created. |
Updated At | DateTime | The DateTime of the publish was updated. |
Replaces | List | A list of the publishes that were replaced by this one with the following attributes. Note that each variable represents the value displayed:
|
Docker Run Command | String | The Docker Run commands for the publish. The following variables must be set before executing the command.
Additional options are detailed in the DevOps - Pipeline Edge Deployment |
Podman Run Command | String | The Podman run commands for each edge location for the publish. The following variables must be set before executing the command.
Additional options are detailed in the DevOps - Pipeline Edge Deployment |
Helm Install Command | String | The Helm Install or Upgrade commands for each location or replaced locations for the pipeline. For replaced publishes, the helm upgrade command is shown for performing in-line model updates. The following variables must be set before executing the command.
|
Add Edge Returns Fields
The following fields are available from the PipelinePublish object.
| Field | Type | Description |
|---|---|---|
id | Integer | Numerical Wallaroo id of the published pipeline. |
pipeline_name | String | The name of the pipeline the publish is generated from. |
pipeline_version_id | Integer | Numerical Wallaroo id of the pipeline version published. |
status | String | The status of the pipeline publication. Values include:
|
engine_url | String | The URL of the published pipeline engine in the edge registry. |
pipeline_url | String | The URL of the published pipeline in the edge registry. |
pipeline_version_name | String | The pipeline version in UUID format. |
helm | Dict | The details used for a helm based deployment of the with the following attributes:
|
additional_properties | Dict | Any additional properties for the publish. |
docker_run_variables | The Docker Run variables used for Docker based deployments. This includes:
| |
list_edges() | wallaroo.edge.EdgeList | A List of wallaroo.edge.Edge associated with the publish. |
engine_url | String | The URL for the inference engine used for the edge deployment. |
user_images | List | A List of custom images used for the edge deployment. |
created_by | String | The unique identifier of the user ID that created the publish in UUID format. |
error | String | Any errors associated with the publish. |
engine_config | wallaroo.deployment_config.DeploymentConfig | The pipeline configuration included with the published pipeline. |
created_at | DateTime | When the published pipeline was created. |
updated_at | DateTime | When the published pipeline was updated. |
created_on_version | String | The version of Wallaroo the publish was generated from. |
replaces | List(Integer) | List of other publishes that were replaced by this one. |
Add Edge Example
The following example demonstrates creating a publish from a pipeline, then adding a new edge to the publish.
# create publish
pub = mainpipeline.publish()
pub
Waiting for pipeline publish... It may take up to 600 sec.
.... Published.lishing.
| ID | 1 | |
| Pipeline Name | assay-demonstration-tutorial | |
| Pipeline Version | 1ff19772-f41f-42fb-b0d1-f82130bf5801 | |
| Status | Published | |
| Workspace Id | 12 | |
| Workspace Name | run-anywhere-assay-demonstration-tutorial | |
| Edges | ||
| Engine URL | ghcr.io/wallaroolabs/doc-samples/engines/proxy/wallaroo/ghcr.io/wallaroolabs/fitzroy-mini:v2025.1.0-6250 | |
| Pipeline URL | ghcr.io/wallaroolabs/doc-samples/pipelines/assay-demonstration-tutorial:1ff19772-f41f-42fb-b0d1-f82130bf5801 | |
| Helm Chart URL | oci://ghcr.io/wallaroolabs/doc-samples/charts/assay-demonstration-tutorial | |
| Helm Chart Reference | ghcr.io/wallaroolabs/doc-samples/charts@sha256:353f286f0d39dd751e09aa815609a9edbbf3357d31f7e779fa18d5f97c28986c | |
| Helm Chart Version | 0.0.1-1ff19772-f41f-42fb-b0d1-f82130bf5801 | |
| Engine Config | {'engine': {'resources': {'limits': {'cpu': 4.0, 'memory': '3Gi'}, 'requests': {'cpu': 4.0, 'memory': '3Gi'}, 'accel': 'none', 'arch': 'x86', 'gpu': False}}, 'engineAux': {'autoscale': {'type': 'none', 'cpu_utilization': 50.0}}} | |
| User Images | [] | |
| Created By | john.hansarick@wallaroo.ai | |
| Created At | 2025-07-15 17:03:13.754534+00:00 | |
| Updated At | 2025-07-15 17:03:13.754534+00:00 | |
| Replaces | ||
| Docker Run Command |
Note: Please set the EDGE_PORT, OCI_USERNAME, and OCI_PASSWORD environment variables. | |
| Podman Run Command |
Note: Please set the EDGE_PORT, OCI_USERNAME, and OCI_PASSWORD environment variables. | |
| Helm Install Command |
Note: Please set the HELM_INSTALL_NAME, HELM_INSTALL_NAMESPACE,
OCI_USERNAME, and OCI_PASSWORD environment variables. |
# create edge
edge_name_01 = "houseprice-edge-demonstration-01"
edge_publish_01 = pub.add_edge(edge_name_01)
display(edge_publish_01)
| ID | 1 | |
| Pipeline Name | assay-demonstration-tutorial | |
| Pipeline Version | 1ff19772-f41f-42fb-b0d1-f82130bf5801 | |
| Status | Published | |
| Workspace Id | 12 | |
| Workspace Name | run-anywhere-assay-demonstration-tutorial | |
| Edges | houseprice-edge-demonstration-01 | |
| Engine URL | ghcr.io/wallaroolabs/doc-samples/engines/proxy/wallaroo/ghcr.io/wallaroolabs/fitzroy-mini:v2025.1.0-6250 | |
| Pipeline URL | ghcr.io/wallaroolabs/doc-samples/pipelines/assay-demonstration-tutorial:1ff19772-f41f-42fb-b0d1-f82130bf5801 | |
| Helm Chart URL | oci://ghcr.io/wallaroolabs/doc-samples/charts/assay-demonstration-tutorial | |
| Helm Chart Reference | ghcr.io/wallaroolabs/doc-samples/charts@sha256:353f286f0d39dd751e09aa815609a9edbbf3357d31f7e779fa18d5f97c28986c | |
| Helm Chart Version | 0.0.1-1ff19772-f41f-42fb-b0d1-f82130bf5801 | |
| Engine Config | {'engine': {'resources': {'limits': {'cpu': 4.0, 'memory': '3Gi'}, 'requests': {'cpu': 4.0, 'memory': '3Gi'}, 'accel': 'none', 'arch': 'x86', 'gpu': False}}, 'engineAux': {'autoscale': {'type': 'none', 'cpu_utilization': 50.0}}} | |
| User Images | [] | |
| Created By | john.hansarick@wallaroo.ai | |
| Created At | 2025-07-15 17:03:13.754534+00:00 | |
| Updated At | 2025-07-15 17:03:13.754534+00:00 | |
| Replaces | ||
| Docker Run Command |
Note: Please set the PERSISTENT_VOLUME_DIR, EDGE_PORT, OCI_USERNAME, and OCI_PASSWORD environment variables. | |
| Podman Run Command |
Note: Please set the PERSISTENT_VOLUME_DIR, EDGE_PORT, OCI_USERNAME, and OCI_PASSWORD environment variables. | |
| Helm Install Command |
Note: Please set the HELM_INSTALL_NAME, HELM_INSTALL_NAMESPACE,
OCI_USERNAME, and OCI_PASSWORD environment variables. |
Remove Edge
Edges are removed with the wallaroo.pipeline_publish.remove_edge(name: string)
Remove Edge Parameters
wallaroo.pipeline_publish.remove_edge(name: string) has the following parameters.
| Field | Type | Description |
|---|---|---|
name | String (Required) | The name of the edge location being removed. |
Remove Edge Returns
Null
Remove Edge Example
This example will add two edges to a pipeline publish, list the edges for the pipeline, then remove one of the edges.
edge_01_name = f'edge-ccfraud-observability{random_suffix}'
edge01 = pub.add_edge(edge_01_name)
edge_02_name = f'edge-ccfraud-observability-02{random_suffix}'
edge02 = pub.add_edge(edge_02_name)
pipeline.list_edges()
| ID | Name | Tags | Pipeline Version | SPIFFE ID |
|---|---|---|---|---|
| 898bb58c-77c2-4164-b6cc-f004dc39e125 | edge-ccfraud-observabilityymgy | [] | 6 | wallaroo.ai/ns/deployments/edge/898bb58c-77c2-4164-b6cc-f004dc39e125 |
| 1f35731a-f4f6-4cd0-a23a-c4a326b73277 | edge-ccfraud-observability-02ymgy | [] | 6 | wallaroo.ai/ns/deployments/edge/1f35731a-f4f6-4cd0-a23a-c4a326b73277 |
sample = pub.remove_edge(edge_02_name)
display(sample)
| ID | Name | Tags | Pipeline Version | SPIFFE ID |
|---|---|---|---|---|
| 898bb58c-77c2-4164-b6cc-f004dc39e125 | edge-ccfraud-observabilityymgy | [] | 6 | wallaroo.ai/ns/deployments/edge/898bb58c-77c2-4164-b6cc-f004dc39e125 |
Edge Bundle Token TTL
When an edge is added to a pipeline publish, the field docker_run_variables contains a JSON value for edge devices to connect to the Wallaroo Ops instance. The settings are stored in the key EDGE_BUNDLE as a base64 encoded value that include the following:
BUNDLE_VERSION: The current version of the bundled Wallaroo pipeline.EDGE_NAME: The edge name as defined when created and added to the pipeline publish.JOIN_TOKEN_: The one time authentication token for authenticating to the Wallaroo Ops instance.OPSCENTER_HOST: The hostname of the Wallaroo Ops edge service. See Edge Deployment Registry Guide for full details on enabling pipeline publishing and edge observability to Wallaroo.PIPELINE_URLWORKSPACE_ID.
For example:
{'edgeBundle': 'ZXhwb3J0IEJVTkRMRV9WRVJTSU9OPTEKZXhwb3J0IEVER0VfTkFNRT14Z2ItY2NmcmF1ZC1lZGdlLXRlc3QKZXhwb3J0IEpPSU5fVE9LRU49MzE0OGFkYTUtMjg1YS00ZmNhLWIzYjgtYjUwYTQ4ZDc1MTFiCmV4cG9ydCBPUFNDRU5URVJfSE9TVD1kb2MtdGVzdC5lZGdlLndhbGxhcm9vY29tbXVuaXR5Lm5pbmphCmV4cG9ydCBQSVBFTElORV9VUkw9Z2hjci5pby93YWxsYXJvb2xhYnMvZG9jLXNhbXBsZXMvcGlwZWxpbmVzL2VkZ2UtcGlwZWxpbmU6ZjM4OGMxMDktOGQ1Ny00ZWQyLTk4MDYtYWExM2Y4NTQ1NzZiCmV4cG9ydCBXT1JLU1BBQ0VfSUQ9NQ=='}
base64 -D
ZXhwb3J0IEJVTkRMRV9WRVJTSU9OPTEKZXhwb3J0IEVER0VfTkFNRT14Z2ItY2NmcmF1ZC1lZGdlLXRlc3QKZXhwb3J0IEpPSU5fVE9LRU49MzE0OGFkYTUtMjg1YS00ZmNhLWIzYjgtYjUwYTQ4ZDc1MTFiCmV4cG9ydCBPUFNDRU5URVJfSE9TVD1kb2MtdGVzdC5lZGdlLndhbGxhcm9vY29tbXVuaXR5Lm5pbmphCmV4cG9ydCBQSVBFTElORV9VUkw9Z2hjci5pby93YWxsYXJvb2xhYnMvZG9jLXNhbXBsZXMvcGlwZWxpbmVzL2VkZ2UtcGlwZWxpbmU6ZjM4OGMxMDktOGQ1Ny00ZWQyLTk4MDYtYWExM2Y4NTQ1NzZiCmV4cG9ydCBXT1JLU1BBQ0VfSUQ9NQ==^D
export BUNDLE_VERSION=1
export EDGE_NAME=xgb-ccfraud-edge-test
export JOIN_TOKEN=3148ada5-285a-4fca-b3b8-b50a48d7511b
export OPSCENTER_HOST=doc-test.wallaroocommunity.ninja/edge
export PIPELINE_URL=ghcr.io/wallaroolabs/doc-samples/pipelines/edge-pipeline:f388c109-8d57-4ed2-9806-aa13f854576b
export WORKSPACE_ID=5
The JOIN_TOKEN is a one time access token. Once used, a JOIN_TOKEN expires. The authentication session data is stored in persistent volumes. Persistent volumes must be specified for docker and docker compose based deployments of Wallaroo pipelines; helm based deployments automatically provide persistent volumes to store authentication credentials.
The JOIN_TOKEN has the following time to live (TTL) parameters.
- Once created, the
JOIN_TOKENis valid for 24 hours. After it expires the edge will not be allowed to contact the OpsCenter the first time and a new edge bundle will have to be created. - After an Edge joins to Wallaroo Ops for the first time with persistent storage, the edge must contact the Wallaroo Ops instance at least once every 7 days.
- If this period is exceeded, the authentication credentials will expire and a new edge bundle must be created with a new and valid
JOIN_TOKEN.
- If this period is exceeded, the authentication credentials will expire and a new edge bundle must be created with a new and valid
Wallaroo edges require unique names. To create a new edge bundle with the same name:
- Use the Remove Edge to remove the edge by name.
- Use Add Edge to add the edge with the same name. A new
EDGE_BUNDLEis generated with a newJOIN_TOKEN.
List Edges
The following methods provide means to list edges.
List Edges from Publish
A list of edges from a pipeline publish is generated from the wallaroo.pipeline_publish.PipelinePublish.list_edges method. This method takes no parameters.
wallaroo.pipeline_publish.PipelinePublish.list_edges returns wallaroo.edge.EdgeList which is a List of wallaroo.edge.Edge.
When a publish list_edges is displayed using IPython.display, the following fields are displayed.
| Field | Type | Description |
|---|---|---|
ID | String | The edge identifier in UUID format. |
Name | String | The edge name. |
Publish ID | Integer | The id of the publish the edge is associated with. |
Created At | String | The datetime the edge was created. |
Tags | List[String] | A list of tags assigned to the edge. |
CPUs | Float | The number of cpus set for the edge deployment. |
Memory | String | The amount of memory in {Amount} {Unit} format. For example, 10 Gigabyes is 10 Gi, etc. |
SPIFFE ID | String | The deployment edge identifier used to for edge communications. |
Pipeline Name | String | The name of the pipeline the edge is assigned to. |
Pipeline Version | String | The pipeline version the edge was generated from. |
Workspace ID | Integer | The numerical id of the workspace the edge is assigned to. |
Workspace Name | String | The name of the workspace the edge is assigned to. |
The following demonstrates:
- Displaying a lists the edges from a publish.
- Displaying a specific edge from the list of edges acquired from the publish.
publish = pipeline.publishes()[1]
publish.list_edges()
| ID | Name | Publish ID | Created At | Tags | CPUs | Memory | SPIFFE ID | Pipeline Name | Pipeline Version | Workspace ID | Workspace Name |
|---|---|---|---|---|---|---|---|---|---|---|---|
| 86990030-680b-4c40-9a79-9b3769ebdd50 | houseprice-edge-demonstration-01 | 1 | 2025-07-15 17:03:34.182697+00:00 | [] | 4.0 | 3Gi | wallaroo.ai/ns/deployments/edge/86990030-680b-4c40-9a79-9b3769ebdd50 | assay-demonstration-tutorial | 1ff19772-f41f-42fb-b0d1-f82130bf5801 | 12 | run-anywhere-assay-demonstration-tutorial |
| f51dc49d-baa9-451e-a93d-424dc7caec8d | houseprice-edge-demonstration-02 | 1 | 2025-07-15 17:03:34.321038+00:00 | [] | 4.0 | 3Gi | wallaroo.ai/ns/deployments/edge/f51dc49d-baa9-451e-a93d-424dc7caec8d | assay-demonstration-tutorial | 1ff19772-f41f-42fb-b0d1-f82130bf5801 | 12 | run-anywhere-assay-demonstration-tutorial |
pipeline.publishes()[1].list_edges()[0]
| ID | 1 | |
| Pipeline Name | assay-demonstration-tutorial | |
| Pipeline Version | 1ff19772-f41f-42fb-b0d1-f82130bf5801 | |
| Status | Published | |
| Workspace Id | 12 | |
| Workspace Name | run-anywhere-assay-demonstration-tutorial | |
| Edges | houseprice-edge-demonstration-01 | |
| Engine URL | ghcr.io/wallaroolabs/doc-samples/engines/proxy/wallaroo/ghcr.io/wallaroolabs/fitzroy-mini:v2025.1.0-6250 | |
| Pipeline URL | ghcr.io/wallaroolabs/doc-samples/pipelines/assay-demonstration-tutorial:1ff19772-f41f-42fb-b0d1-f82130bf5801 | |
| Helm Chart URL | oci://ghcr.io/wallaroolabs/doc-samples/charts/assay-demonstration-tutorial | |
| Helm Chart Reference | ghcr.io/wallaroolabs/doc-samples/charts@sha256:353f286f0d39dd751e09aa815609a9edbbf3357d31f7e779fa18d5f97c28986c | |
| Helm Chart Version | 0.0.1-1ff19772-f41f-42fb-b0d1-f82130bf5801 | |
| Engine Config | {'engine': {'resources': {'limits': {'cpu': 4.0, 'memory': '3Gi'}, 'requests': {'cpu': 4.0, 'memory': '3Gi'}, 'accel': 'none', 'arch': 'x86', 'gpu': False}}, 'engineAux': {'autoscale': {'type': 'none', 'cpu_utilization': 50.0}}} | |
| User Images | [] | |
| Created By | john.hansarick@wallaroo.ai | |
| Created At | 2025-07-15 17:03:13.754534+00:00 | |
| Updated At | 2025-07-15 17:03:13.754534+00:00 | |
| Replaces | ||
| Docker Run Command |
Note: Please set the PERSISTENT_VOLUME_DIR, EDGE_PORT, OCI_USERNAME, and OCI_PASSWORD environment variables. | |
| Podman Run Command |
Note: Please set the PERSISTENT_VOLUME_DIR, EDGE_PORT, OCI_USERNAME, and OCI_PASSWORD environment variables. | |
| Helm Install Command |
Note: Please set the HELM_INSTALL_NAME, HELM_INSTALL_NAMESPACE,
OCI_USERNAME, and OCI_PASSWORD environment variables. |
List Edges from Pipelines**
The method wallaroo.pipeline.list_edges() displays any edges added to a pipeline’s publishes and takes no parameters.
wallaroo.pipeline.list_edges() returns wallaroo.pipeline_publish.PipelinePublishList, as a List of wallaroo.pipeline_publish.PipelinePublish
When the pipeline list_edges() is displayed using IPython.display, the following fields are displayed.
| Field | Type | Description |
|---|---|---|
ID | String | The identifier of the edge in UUID format. |
Name | String | The assigned name for the edge. Edge names are used as the primary key. |
Publish ID | Integer | The numerical identifier for the publish the edge is assigned to. |
Created At | DateTime | The date and time the edge was created. |
Tags | List[String] | A list of tags assigned to the edge. |
Cpus | Float | The number of cpus assigned as part of the deployment configuration. |
Memory | String | The memory assigned as part of the deployment configuration in Kubernetes memory format. |
SPIFFE ID | String | The deployment edge identifier used to for edge communications. |
The following demonstrates:
- Displaying a list of all edges from a pipeline.
- Displaying a specific edge from the acquired list.
display(pipeline.list_edges())
| ID | Name | Publish ID | Created At | Tags | CPUs | Memory | SPIFFE ID |
|---|---|---|---|---|---|---|---|
| f3410c94-e50a-4153-8ec6-81bb7b5cfe4e | edge-replacement-demo-pk-edge-1 | 3 | 2025-02-10T17:36:27.49131+00:00 | [] | 4.0 | 3Gi | wallaroo.ai/ns/deployments/edge/f3410c94-e50a-4153-8ec6-81bb7b5cfe4e |
display(pipeline.list_edges()[0])
| Key | Value |
|---|---|
| ID | f3410c94-e50a-4153-8ec6-81bb7b5cfe4e |
| Name | edge-replacement-demo-pk-edge-1 |
| Tags | [] |
| CPUs | 4.0 |
| Memory | 3Gi |
| SPIFFE ID | wallaroo.ai/ns/deployments/edge/f3410c94-e50a-4153-8ec6-81bb7b5cfe4e |
| Publish Id | 3 |
Pipeline Edge Deployment
Once a pipeline is published to the Edge Registry service, it can be deployed in environments such as Docker, Kubernetes, or similar container running services by a DevOps engineer. Before starting, verify the pipeline is published as per the Edge and Multi-cloud Pipeline Publish guide.
Docker Deployment
Before starting, verify that the the Docker environment is able to connect to the artifact registry service.
For more details, check with the documentation on the artifact registry service. The following are provided for the three major cloud services:
- Set up authentication for Docker
- Authenticate with an Azure container registry
- Authenticating Amazon ECR Repositories for Docker CLI with Credential Helper
For the deployment, the engine URL is specified with the following environmental variables:
DEBUG(true|false): Whether to include debug output.OCI_REGISTRY: The URL of the registry service.CONFIG_CPUS: The number of CPUs to use. This applies to the inference engine only.The following options apply to the inference pipeline and the models assigned as pipeline steps.
gpus: Whether to allocate available gpus to the deployment. If no gpus are to be allocated, this options is not available. For more details on how to specify gpu resources based on the edge hardware configuration, see Docker Engine: Containers: Access an NVIDIA GPU For example, to allocate gpus to the inference pipeline:--gpus all
cpus: The fractional number of cpus to apply. For example:--cpus=1.25--cpus=2.0
memory: The amount of ram to allocate in unit values of:k: kilobytem: megabyteg: gigabyte
For example:
--memory=1536m--memory=512k
PIPELINE_URL: The published pipeline URL.EDGE_BUNDLE(Optional): The base64 encoded edge token and other values to connect to the Wallaroo Ops instance. This is used for edge management and transmitting inference results for observability. IMPORTANT NOTE: The token forEDGE_BUNDLEis valid for one deployment. Best practice is to use thePERSISTENT_VOLUME_DIRto store the authentication credentials between deployments. For subsequent deployments, generate a new edge location with its ownEDGE_BUNDLE.LOCAL_INFERENCE_STORAGE(Optional): Sets amount of storage to allocate for the edge deployments inference log storage capacity. This is in the format{size as number}{unit value}. The values are similar to the Kubernetes memory resource units format. If used, must be used withPLATEAU_PAGE_SIZE. The accepted unit values are:Ki(for KiloBytes)Mi(for MegaBytes)Gi(for GigaBytes)Ti(for TeraBytes)
PLATEAU_PAGE_SIZE(Optional): How many inference log rows to upload from the edge deployment at a time. Must be used withLOCAL_INFERENCE_STORAGE.
The following variables must be set by the user.
OCI_USERNAME: The edge registry username.OCI_PASSWORD: The edge registry password or token.EDGE_PORT: The external port used to connect to the edge endpoints.PERSISTENT_VOLUME_DIR(Only applies to edge deployments with edge locations): The location for the persistent volume used by the edge location to store session information, logs, etc.
The following example shows deploying models in an edge environment with the following resources allocated:
- Wallaroo inference engine:
- cpus: 1
- Inference Pipeline:
- cpus: 1.25
- memory: 1536m
- gpus: true
docker run \
-p $EDGE_PORT:8080 \
-e OCI_USERNAME=$OCI_USERNAME \
-e OCI_PASSWORD=$OCI_PASSWORD \
-e PIPELINE_URL=sample-pipeline-url \
-e CONFIG_CPUS=1.0 --gpus all --cpus=1.25 --memory=1536m \
sample-engine-url
Docker Deployment Example
Using our sample environment, here’s sample deployment using Docker with a computer vision ML model, the same used in the Wallaroo Use Case Tutorials Computer Vision: Retail tutorials.
Login through
dockerto confirm access to the registry service. First,docker login. For example, logging into the artifact registry with the token stored in the variabletok:cat $tok | docker login -u _json_key_base64 --password-stdin https://sample-registry.comThen deploy the Wallaroo published pipeline with an edge added to the pipeline publish through
docker run.IMPORTANT NOTE: Edge deployments with Edge Observability enabled with the
EDGE_BUNDLEoption include an authentication token that only authenticates once. To store the token long term, include the persistent volume flag-v {path to storage}setting.Deployment with
EDGE_BUNDLEfor observability.docker run -p 8080:8080 \ -v ./data:/persist \ -e DEBUG=true \ -e OCI_REGISTRY=$REGISTRYURL \ -e EDGE_BUNDLE=ZXhwb3J0IEJVTkRMRV9WRVJTSU9OPTEKZXhwb3J0IEVER0VfTkFNRT1lZGdlLWNjZnJhdWQtb2JzZXJ2YWJpbGl0eXlhaWcKZXhwb3J0IEpPSU5fVE9LRU49MjZmYzFjYjgtMjUxMi00YmU3LTk0ZGUtNjQ2NGI1MGQ2MzhiCmV4cG9ydCBPUFNDRU5URVJfSE9TVD1kb2MtdGVzdC5lZGdlLndhbGxhcm9vY29tbXVuaXR5Lm5pbmphCmV4cG9ydCBQSVBFTElORV9VUkw9Z2hjci5pby93YWxsYXJvb2xhYnMvZG9jLXNhbXBsZXMvcGlwZWxpbmVzL2VkZ2Utb2JzZXJ2YWJpbGl0eS1waXBlbGluZTozYjQ5ZmJhOC05NGQ4LTRmY2EtYWVjYy1jNzUyNTdmZDE2YzYKZXhwb3J0IFdPUktTUEFDRV9JRD03 \ -e CONFIG_CPUS=1 \ -e OCI_USERNAME=$REGISTRYUSERNAME \ -e OCI_PASSWORD=$REGISTRYPASSWORD \ -e PIPELINE_URL=ghcr.io/wallaroolabs/doc-samples/pipelines/edge-observability-pipeline:3b49fba8-94d8-4fca-aecc-c75257fd16c6 \ ghcr.io/wallaroolabs/doc-samples/engines/proxy/wallaroo/ghcr.io/wallaroolabs/standalone-mini:v2023.4.0-main-4079Connection to the Wallaroo Ops instance from edge deployment with
EDGE_BUNDLEis verified with the long entryNode attestation was successful.Deployment without observability.
docker run -p 8080:8080 \ -e DEBUG=true \ -e OCI_REGISTRY=$REGISTRYURL \ -e CONFIG_CPUS=1 \ -e OCI_USERNAME=$REGISTRYUSERNAME \ -e OCI_PASSWORD=$REGISTRYPASSWORD \ -e PIPELINE_URL=ghcr.io/wallaroolabs/doc-samples/pipelines/edge-observability-pipeline:3b49fba8-94d8-4fca-aecc-c75257fd16c6 \ ghcr.io/wallaroolabs/doc-samples/engines/proxy/wallaroo/ghcr.io/wallaroolabs/standalo
Docker Compose Deployment
For users who prefer to use docker compose, the following sample compose.yaml file is used to launch the Wallaroo Edge pipeline. This is the same used in the Wallaroo Use Case Tutorials Computer Vision: Retail tutorials. The volumes tag is used to preserve the login session from the one-time token generated as part of the EDGE_BUNDLE.
EDGE_BUNDLE is only required when adding an edge to a Wallaroo publish for observability. The following is deployed without observability.
services:
engine:
image: {Your Engine URL}
ports:
- 8080:8080
environment:
PIPELINE_URL: {Your Pipeline URL}
OCI_REGISTRY: {Your Edge Registry URL}
OCI_USERNAME: {Your Registry Username}
OCI_PASSWORD: {Your Token or Password}
CONFIG_CPUS: 4
The procedure is:
Login through
dockerto confirm access to the registry service. First,docker login. For example, logging into the artifact registry with the token stored in the variabletokto the registryus-west1-docker.pkg.dev:cat $tok | docker login -u _json_key_base64 --password-stdin https://sample-registry.comSet up the
compose.yamlfile.IMPORTANT NOTE: Edge deployments with Edge Observability enabled with the
EDGE_BUNDLEoption include an authentication token that only authenticates once. To store the token long term, include the persistent volume with thevolumes:tag.services: engine: image: sample-registry.com/engine:v2023.3.0-main-3707 ports: - 8080:8080 volumes: - ./data:/persist environment: PIPELINE_URL: sample-registry.com/pipelines/edge-cv-retail:bf70eaf7-8c11-4b46-b751-916a43b1a555 EDGE_BUNDLE: ZXhwb3J0IEJVTkRMRV9WRVJTSU9OPTEKZXhwb3J0IEVER0VfTkFNRT1lZGdlLWNjZnJhdWQtb2JzZXJ2YWJpbGl0eXlhaWcKZXhwb3J0IEpPSU5fVE9LRU49MjZmYzFjYjgtMjUxMi00YmU3LTk0ZGUtNjQ2NGI1MGQ2MzhiCmV4cG9ydCBPUFNDRU5URVJfSE9TVD1kb2MtdGVzdC5lZGdlLndhbGxhcm9vY29tbXVuaXR5Lm5pbmphCmV4cG9ydCBQSVBFTElORV9VUkw9Z2hjci5pby93YWxsYXJvb2xhYnMvZG9jLXNhbXBsZXMvcGlwZWxpbmVzL2VkZ2Utb2JzZXJ2YWJpbGl0eS1waXBlbGluZTozYjQ5ZmJhOC05NGQ4LTRmY2EtYWVjYy1jNzUyNTdmZDE2YzYKZXhwb3J0IFdPUktTUEFDRV9JRD03 OCI_REGISTRY: sample-registry.com OCI_USERNAME: _json_key_base64 OCI_PASSWORD: abc123 CONFIG_CPUS: 4Then deploy with
docker compose up.
Docker Compose Deployment Example
The deployment and undeployment is then just a simple docker compose up and docker compose down. The following shows an example of deploying the Wallaroo edge pipeline using docker compose.
docker compose up
[+] Running 1/1
✔ Container cv_data-engine-1 Recreated 0.5s
Attaching to cv_data-engine-1
cv_data-engine-1 | Wallaroo Engine - Standalone mode
cv_data-engine-1 | Login Succeeded
cv_data-engine-1 | Fetching manifest and config for pipeline: sample-registry.com/pipelines/edge-cv-retail:bf70eaf7-8c11-4b46-b751-916a43b1a555
cv_data-engine-1 | Fetching model layers
cv_data-engine-1 | digest: sha256:c6c8869645962e7711132a7e17aced2ac0f60dcdc2c7faa79b2de73847a87984
cv_data-engine-1 | filename: c6c8869645962e7711132a7e17aced2ac0f60dcdc2c7faa79b2de73847a87984
cv_data-engine-1 | name: resnet-50
cv_data-engine-1 | type: model
cv_data-engine-1 | runtime: onnx
cv_data-engine-1 | version: 693e19b5-0dc7-4afb-9922-e3f7feefe66d
cv_data-engine-1 |
cv_data-engine-1 | Fetched
cv_data-engine-1 | Starting engine
cv_data-engine-1 | Looking for preexisting `yaml` files in //modelconfigs
cv_data-engine-1 | Looking for preexisting `yaml` files in //pipelines
Podman Deployment
Wallaroo edge deployments can be made using Podman.
For the deployment, the engine URL is specified with the following environmental variables:
DEBUG(true|false): Whether to include debug output.OCI_REGISTRY: The URL of the registry service.CONFIG_CPUS: The number of CPUs to use. This applies to the inference engine only.The following options apply to the inference pipeline and the models assigned as pipeline steps.
gpus: Whether to allocate available gpus to the deployment. If no gpus are to be allocated, this options is not available. For more details on how to specify gpu resources based on the edge hardware configuration, see Docker Engine: Containers: Access an NVIDIA GPU For example, to allocate gpus to the inference pipeline:--gpus all
cpus: The fractional number of cpus to apply. For example:--cpus=1.25--cpus=2.0
memory: The amount of ram to allocate in unit values of:k: kilobytem: megabyteg: gigabyte
For example:
--memory=1536m--memory=512k
PIPELINE_URL: The published pipeline URL.EDGE_BUNDLE(Optional): The base64 encoded edge token and other values to connect to the Wallaroo Ops instance. This is used for edge management and transmitting inference results for observability. IMPORTANT NOTE: The token forEDGE_BUNDLEis valid for one deployment. For subsequent deployments, generate a new edge location with its ownEDGE_BUNDLE.LOCAL_INFERENCE_STORAGE(Optional): Sets amount of storage to allocate for the edge deployments inference log storage capacity. This is in the format{size as number}{unit value}. The values are similar to the Kubernetes memory resource units format. If used, must be used withPLATEAU_PAGE_SIZE. The accepted unit values are:Ki(for KiloBytes)Mi(for MegaBytes)Gi(for GigaBytes)Ti(for TeraBytes)
PLATEAU_PAGE_SIZE(Optional): How many inference log rows to upload from the edge deployment at a time. Must be used withLOCAL_INFERENCE_STORAGE.
The following variables must be set by the user.
OCI_USERNAME: The edge registry username.OCI_PASSWORD: The edge registry password or token.EDGE_PORT: The external port used to connect to the edge endpoints.PERSISTENT_VOLUME_DIR(Only applies to edge deployments with edge locations): The location for the persistent volume used by the edge location to store session information, logs, etc.
Podman Deployment Example
Using our sample environment, here’s sample deployment using Podman with a linear regression ML model, the same used in the Wallaroo Edge Observability with Wallaroo Assays tutorials.
Best practice is to login as the root user before running
podman. For example:sudo su-.Deploy the Wallaroo published pipeline with an edge added to the pipeline publish through
podman run.IMPORTANT NOTE: Edge deployments with Edge Observability enabled with the
EDGE_BUNDLEoption include an authentication token that only authenticates once. To store the token long term, include the persistent volume flag-v {path to storage}setting.Deployment with
EDGE_BUNDLEfor observability. This is for edge deployments with specific edge locations defined for observability. For more details, see Edge Observabilitypodman run -v $PERSISTENT_VOLUME_DIR:/persist \ -p $EDGE_PORT:8080 \ -e OCI_USERNAME=$OCI_USERNAME \ -e OCI_PASSWORD=$OCI_PASSWORD \ -e PIPELINE_URL=ghcr.io/wallaroolabs/doc-samples/pipelines/assay-demonstration-tutorial:1ff19772-f41f-42fb-b0d1-f82130bf5801\ -e EDGE_BUNDLE=ZXhwb3J0IEJVTkRMRV9WRVJTSU9OPTEKZXhwb3J0IENPTkZJR19DUFVTPTQKZXhwb3J0IEVER0VfTkFNRT1ob3VzZXByaWNlLWVkZ2UtZGVtb25zdHJhdGlvbi0wMgpleHBvcnQgT1BTQ0VOVEVSX0hPU1Q9ZG9jLXRlc3Qud2FsbGFyb29jb21tdW5pdHkubmluamEKZXhwb3J0IFBJUEVMSU5FX1VSTD1naGNyLmlvL3dhbGxhcm9vbGFicy9kb2Mtc2FtcGxlcy9waXBlbGluZXMvYXNzYXktZGVtb25zdHJhdGlvbi10dXRvcmlhbDoxZmYxOTc3Mi1mNDFmLTQyZmItYjBkMS1mODIxMzBiZjU4MDEKZXhwb3J0IEpPSU5fVE9LRU49YTQ0OGIyZjItNjgwYi00Y2ZiLThiMjItY2ZjNTI5MTk5ZjY5CmV4cG9ydCBPQ0lfUkVHSVNUUlk9Z2hjci5pbw== \ -e CONFIG_CPUS=4 --cpus=4.0 --memory=3g \ ghcr.io/wallaroolabs/doc-samples/engines/proxy/wallaroo/ghcr.io/wallaroolabs/fitzroy-mini:v2025.1.0-6250Deployment without observability. This is for publishes that do not have a specific edge location defined.
podman run \
    -p $EDGE_PORT:8080 \
    -e OCI_USERNAME=$OCI_USERNAME \
    -e OCI_PASSWORD=$OCI_PASSWORD \
    -e PIPELINE_URL=ghcr.io/wallaroolabs/doc-samples/pipelines/assay-demonstration-tutorial:1ff19772-f41f-42fb-b0d1-f82130bf5801 \
    -e CONFIG_CPUS=4 --cpus=4.0 --memory=3g \
    ghcr.io/wallaroolabs/doc-samples/engines/proxy/wallaroo/ghcr.io/wallaroolabs/fitzroy-mini:v2025.1.0-6250
Helm Deployment
Published pipelines can be deployed through the use of helm charts.
Helm deployments take up to two steps - the first step is in retrieving the required values.yaml and making updates to override.
IMPORTANT NOTE: Edge deployments with Edge Observability enabled with the EDGE_BUNDLE option include an authentication token that only authenticates once. Helm chart installations automatically add a persistent volume during deployment to store the authentication session data for future deployments.
Login to the registry service with
helm registry login. For example, if the token is stored in the variabletok:helm registry login sample-registry.com --username _json_key_base64 --password $tokPull the helm charts from the published pipeline. The two fields are the Helm Chart URL and the Helm Chart version to specify the OCI . This typically takes the format of:
helm pull oci://{published.helm_chart_url} --version {published.helm_chart_version}Extract the
tgzfile and copy thevalues.yamland copy the values used to edit engine allocations, etc. The following are required for the deployment to run:ociRegistry: registry: {your registry service} username: {registry username here} password: {registry token here}For Wallaroo Server deployments with edge location set, the values include
edgeBundleas generated when the edge was added to the pipeline publish.ociRegistry: registry: {your registry service} username: {registry username here} password: {registry token here} edgeBundle: abcdefg
Store this into another file, suc as local-values.yaml.
Create the namespace to deploy the pipeline to. For example, the namespace
wallaroo-edge-pipelinewould be:kubectl create -n wallaroo-edge-pipelineDeploy the
helminstallation withhelm installthrough one of the following options:Specify the
tgzfile that was downloaded and the local values file. For example:helm install --namespace {namespace} --values {local values file} {helm install name} {tgz path} --timeout 10m --wait --wait-for-jobsSpecify the expended directory from the downloaded
tgzfile.helm install --namespace {namespace} --values {local values file} {helm install name} {helm directory path} --timeout 10m --wait --wait-for-jobsSpecify the Helm Pipeline Helm Chart and the Pipeline Helm Version.
helm install --namespace {namespace} --values {local values file} {helm install name} oci://{published.helm_chart_url} --version {published.helm_chart_version} --timeout 10m --wait --wait-for-jobs
Once deployed, the DevOps engineer will have to forward the appropriate ports to the
svc/engine-svcservice in the specific pipeline. For example, usingkubectl port-forwardto the namespaceccfraudthat would be:kubectl port-forward svc/engine-svc -n ccfraud01 8080 --address 0.0.0.0`