The Definitive Introductory Guide to Wallaroo.AI
Table of Contents
Wallaroo.AI is proud to announce Wallaroo, the most efficient way to deploy Machine Learning (ML) models and get results.
There are two versions of Wallaroo: Wallaroo Community and Wallaroo Enterprise.
Wallaroo Community is aimed at those looking to speed up and simplify the deployment and management of ML models and pipelines. This can be everyone from a small ML team, Open Source projects, or just those wishing to learn MLOps with hands-on experience.
Wallaroo Community is free. Just register an account at https://portal.wallaroo.community for your free license. Instructions on how to set up your cloud environment in preparation and install Wallaroo are available at https://docs.wallaroo.ai.
Wallaroo Enterprise is geared for organizations who require the full power of their resources for their MLOps needs. It can be integrated into an organization’s single sign-on systems, DNS services, and deployed on bare-metal Linux or powerful Kubernetes clusters.

With the Wallaroo Community Edition you get:
- Simple install and configuration of Wallaroo in any major cloud (Amazon Web Services, Microsoft Azure, Google Cloud Platform).
- Self-service toolkit to deploy ML pipelines and run inferences.
- Model management and collaboration features.
- Model performance metrics and advanced experimentation.
- A modern, ultrafast inference engine.
- Up to 32 CPUs of compute for inferencing.
- Up to 5 active deployments for up to 5 users.
- Access to the Wallaroo Community Slack for support.
Wallaroo Enterprise provides:
- Installation for bare-metal Linux, Kubernetes and major cloud services (Amazon Web Services, Microsoft Azure, Google Cloud Platform).
- Enterprise Single Sign-On (SSO) and role based access controls.
- Compute auto-scaling to allow more resources to be allocated on a “as needed” basis.
- Active support through Wallaroo
- No restrictions on the number of CPUs supported, number of users, or deployments.
- Self-service toolkit to deploy ML pipelines and run inferences.
- Model management and collaboration features.
- Model performance metrics and advanced experimentation.
- A modern, ultrafast inference engine.
- Access to Wallaroo support services.
Wallaroo Overview
If this is your first time encountering Wallaroo, here’s a brief introduction. The Wallaroo platform enables companies to manage their Machine Learning (ML) models in a simple, secure, and scalable fashion. The Wallaroo platform offering is comprised of 3 core components:
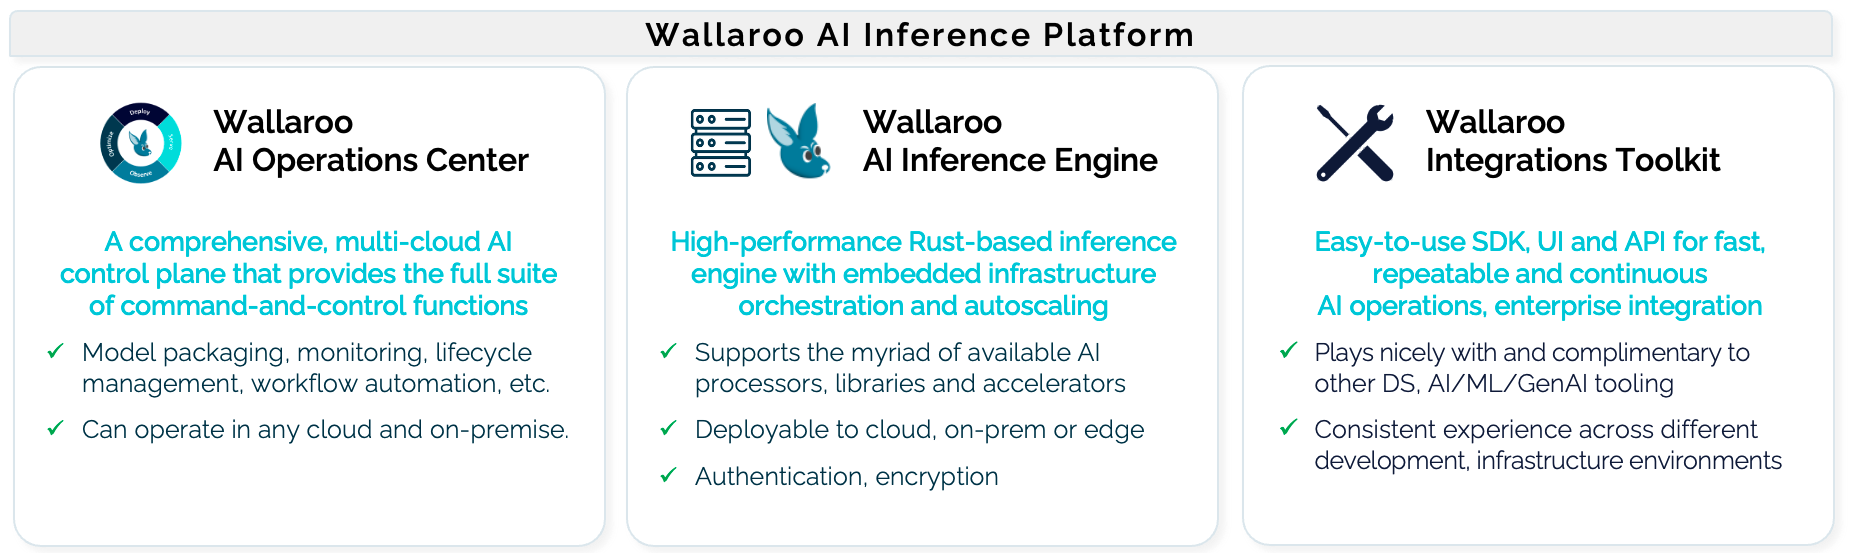
Wallaroo Components (Click to expand.)
Workspaces, Models and Pipelines
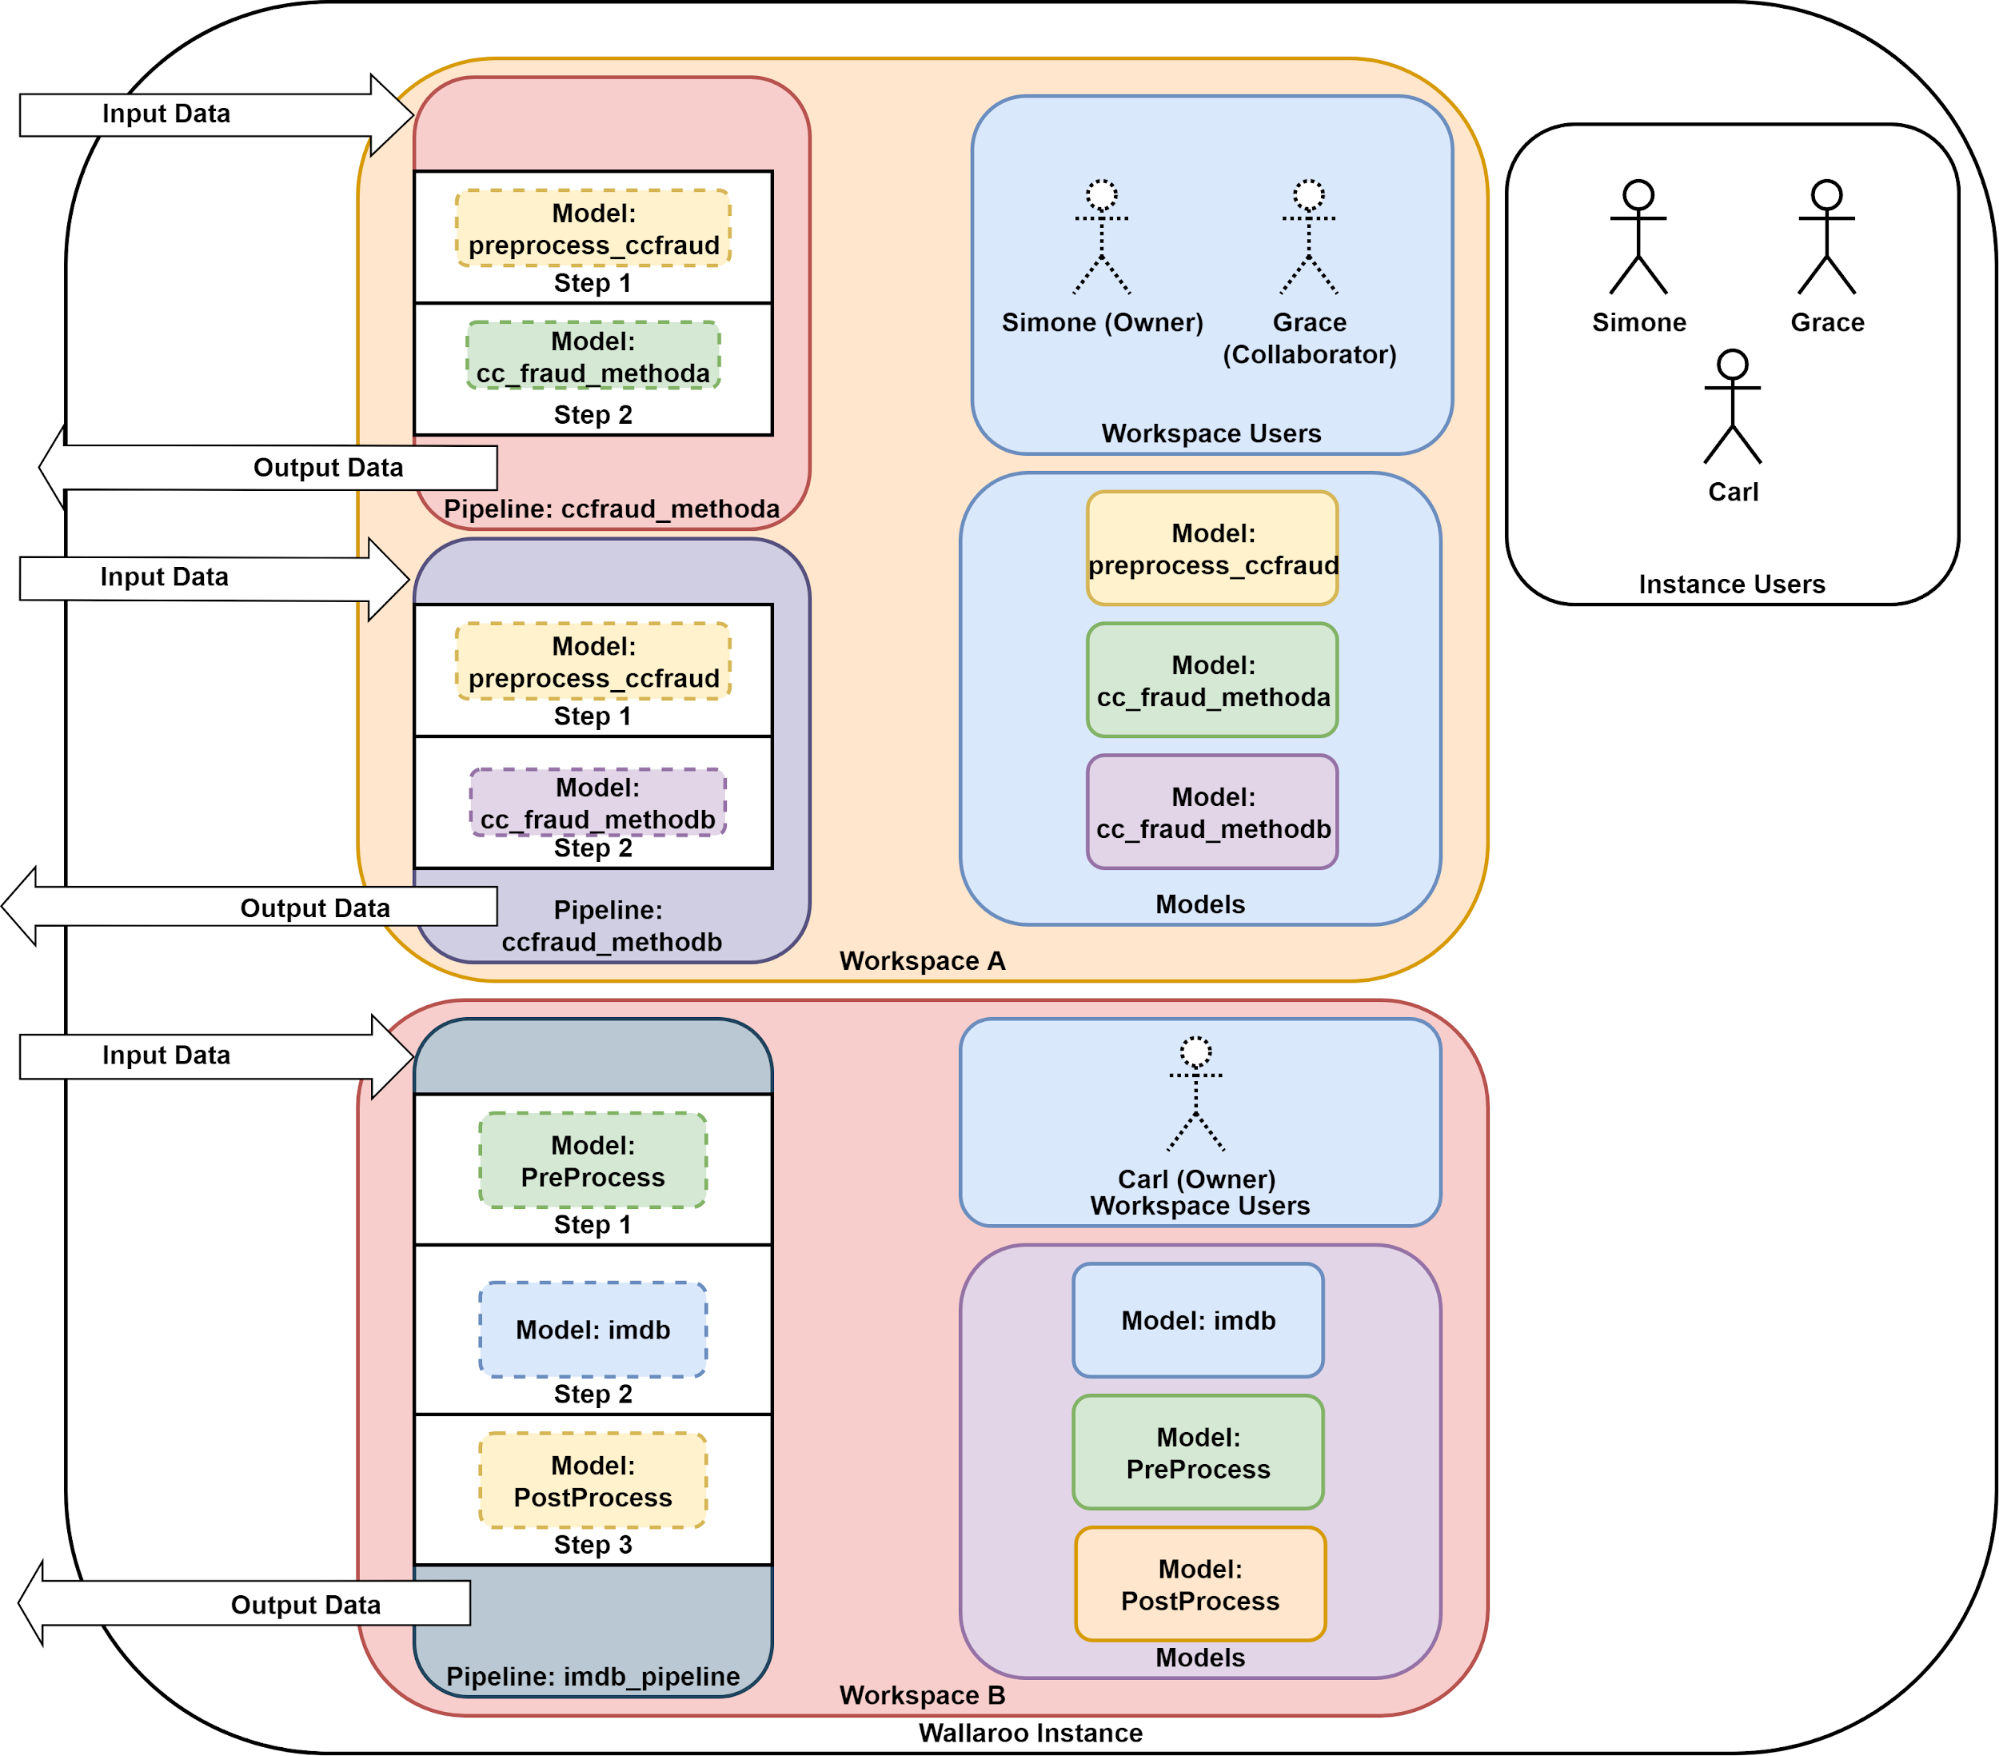
Wallaroo functions with the following parts:
- Users: Users are individual entities that are invited to the Wallaroo instance and workspaces.
- Workspace: A Wallaroo Workspace allows you to manage a set of models and pipelines for a given project or team that you are part of. You can assign users to a workspace as either an owner or collaborator.
- Model: A Wallaroo model is a trained Machine Learning (ML) model that is uploaded to your current workspace. All models uploaded to Wallaroo should be either in the ONNX format or run through the auto-converter method.
- Pipeline: A Wallaroo pipeline is where the deployment of models is managed. A pipeline contains a series of steps - sequential sets of models which take in the data from the preceding step, process it through the model, then return a result. Some pipelines can have just one step, while others may have multiple models with multiple steps or arranged for A/B testing. Deployed pipelines allocate resources and can then process data either through local files or through a deployment URL.
In the example below, a Wallaroo instance has a set of users with two workspaces. Workspace A has two pipelines with two steps each using the same preprocessing model, while Workspace B has one pipeline with multiple steps. Users part of the Wallaroo instance are assigned as owners or collaborators of each workspace.
Wallaroo Dashboard
Wallaroo comes with a user interface that allows you to:
- Set up workspaces.
- Collaborate with other users.
- Launch the JupyterHub service.
Full details can be found in the Wallaroo Operations Guide on the Wallaroo documentation site.
Once you’ve logged into your Wallaroo instance, you’ll be presented with the Wallaroo Dashboard which allows you to do the following:
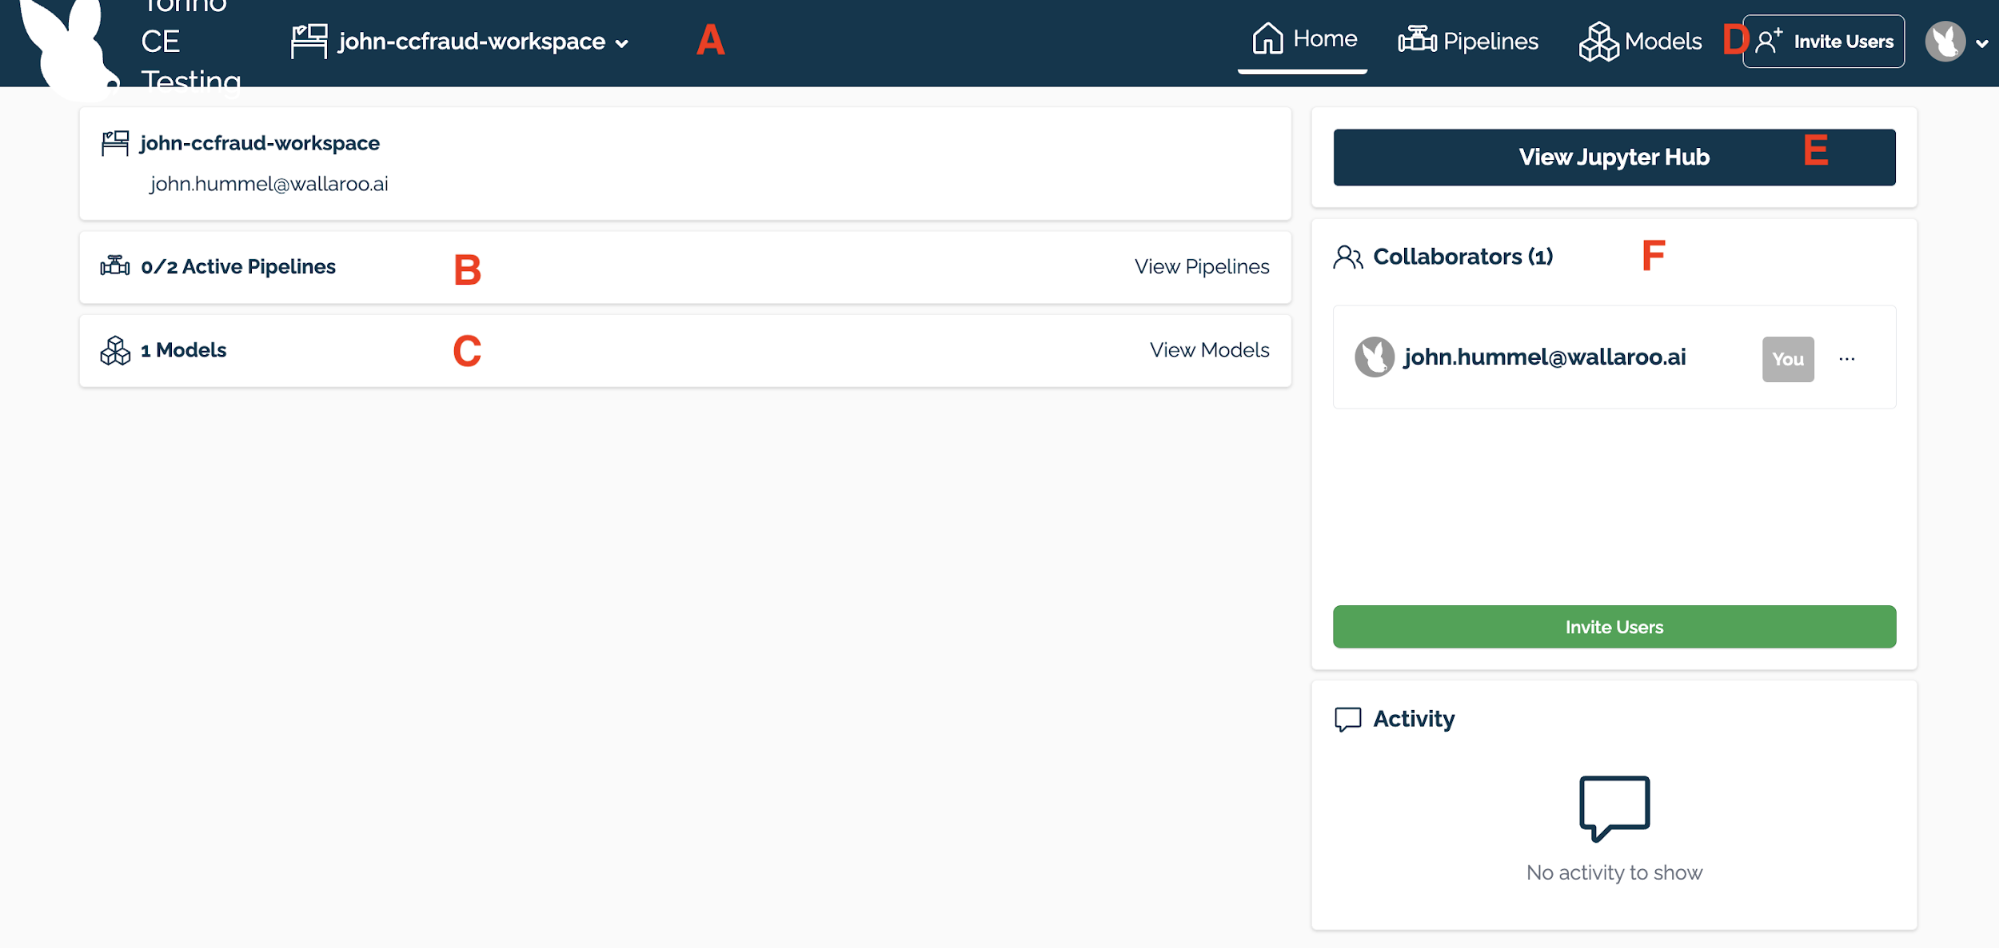
- A Change Current Workspace and Workspace Management: Select the workspace to work in and create new workspaces. Each workspace has its own Models and Pipelines.
- B Pipeline Management: View information on this workspace’s pipelines and performance.
- C Model Management: View information on this workspace’s models and details.
- D User Management: Invite users to your Wallaroo instance.
- E Access JupyterHub: Access the JupyterHub service to run Jupyter Notebooks and shell access to your Wallaroo environment.
- F View Collaborators: Invite users in the instance to the currently selected workspace, and displays a list of users who have been granted to this workspace.
Wallaroo Workflow
A typical Wallaroo deployment workflow follows this general template. Most tasks can be performed with either the Wallaroo Dashboard interface or the Wallaroo SDK. The Wallaroo SDK can be used from the JupyterHub service included with Wallaroo.
To access the JupyterHub service, select View JupyterHub from the primary Wallaroo Dashboard. The Wallaroo and other Python libraries are included with the service.
Here’s a break down of a common series of steps most users will perform the first time they create a deployment with Wallaroo:
- Connect to your Wallaroo Instance.
- Invite Users to your Wallaroo Instance.
- Create or Select a Workspace.
- Assign Users to a Workspace.
- Upload Models.
- Create or Select a Pipeline.
- Create Pipeline Steps.
- Deploy the Pipeline.
- Perform Inferences.
The following steps will detail how to use either the Wallaroo Dashboard interface or the SDK to accomplish these tasks. They assume that the Wallaroo Community instance has already been installed into a Kubernetes environment. For details on how to install Wallaroo Community into a Kubernetes environment, see the Wallaroo Operations Guide at https://docs.wallaroo.ai/wallaroo-operations-guide/.
Connect to your Wallaroo Instance
To login to your Wallaroo instance through a browser
- From your browser, enter the URL for your Wallaroo. This is provided either during the installation process or when you are invited to a Wallaroo environment.
- Select Sign In.
- Enter your username and password, then select Sign In.
To connect to your Wallaroo instance through the SDK:
Use the Wallaroo Client method and save it as a variable:
import wallaroo
wl = wallaroo.Client()
A URL will be displayed which grants the SDK permission to your specific Wallaroo environment. When displayed, enter the URL into a browser and confirm permissions.
Invite Users to your Wallaroo Community Instance
- Note: Up to two users can work together in the same Wallaroo Community instance, while the Wallaroo Enterprise version has no user restrictions.
To invite another user to your Wallaroo Community instance:
Login to your Wallaroo Community instance.
Select Invite Users from the upper right hand corner of the Wallaroo Dashboard.
Under the Invite Users module, enter the email address for each user to invite.
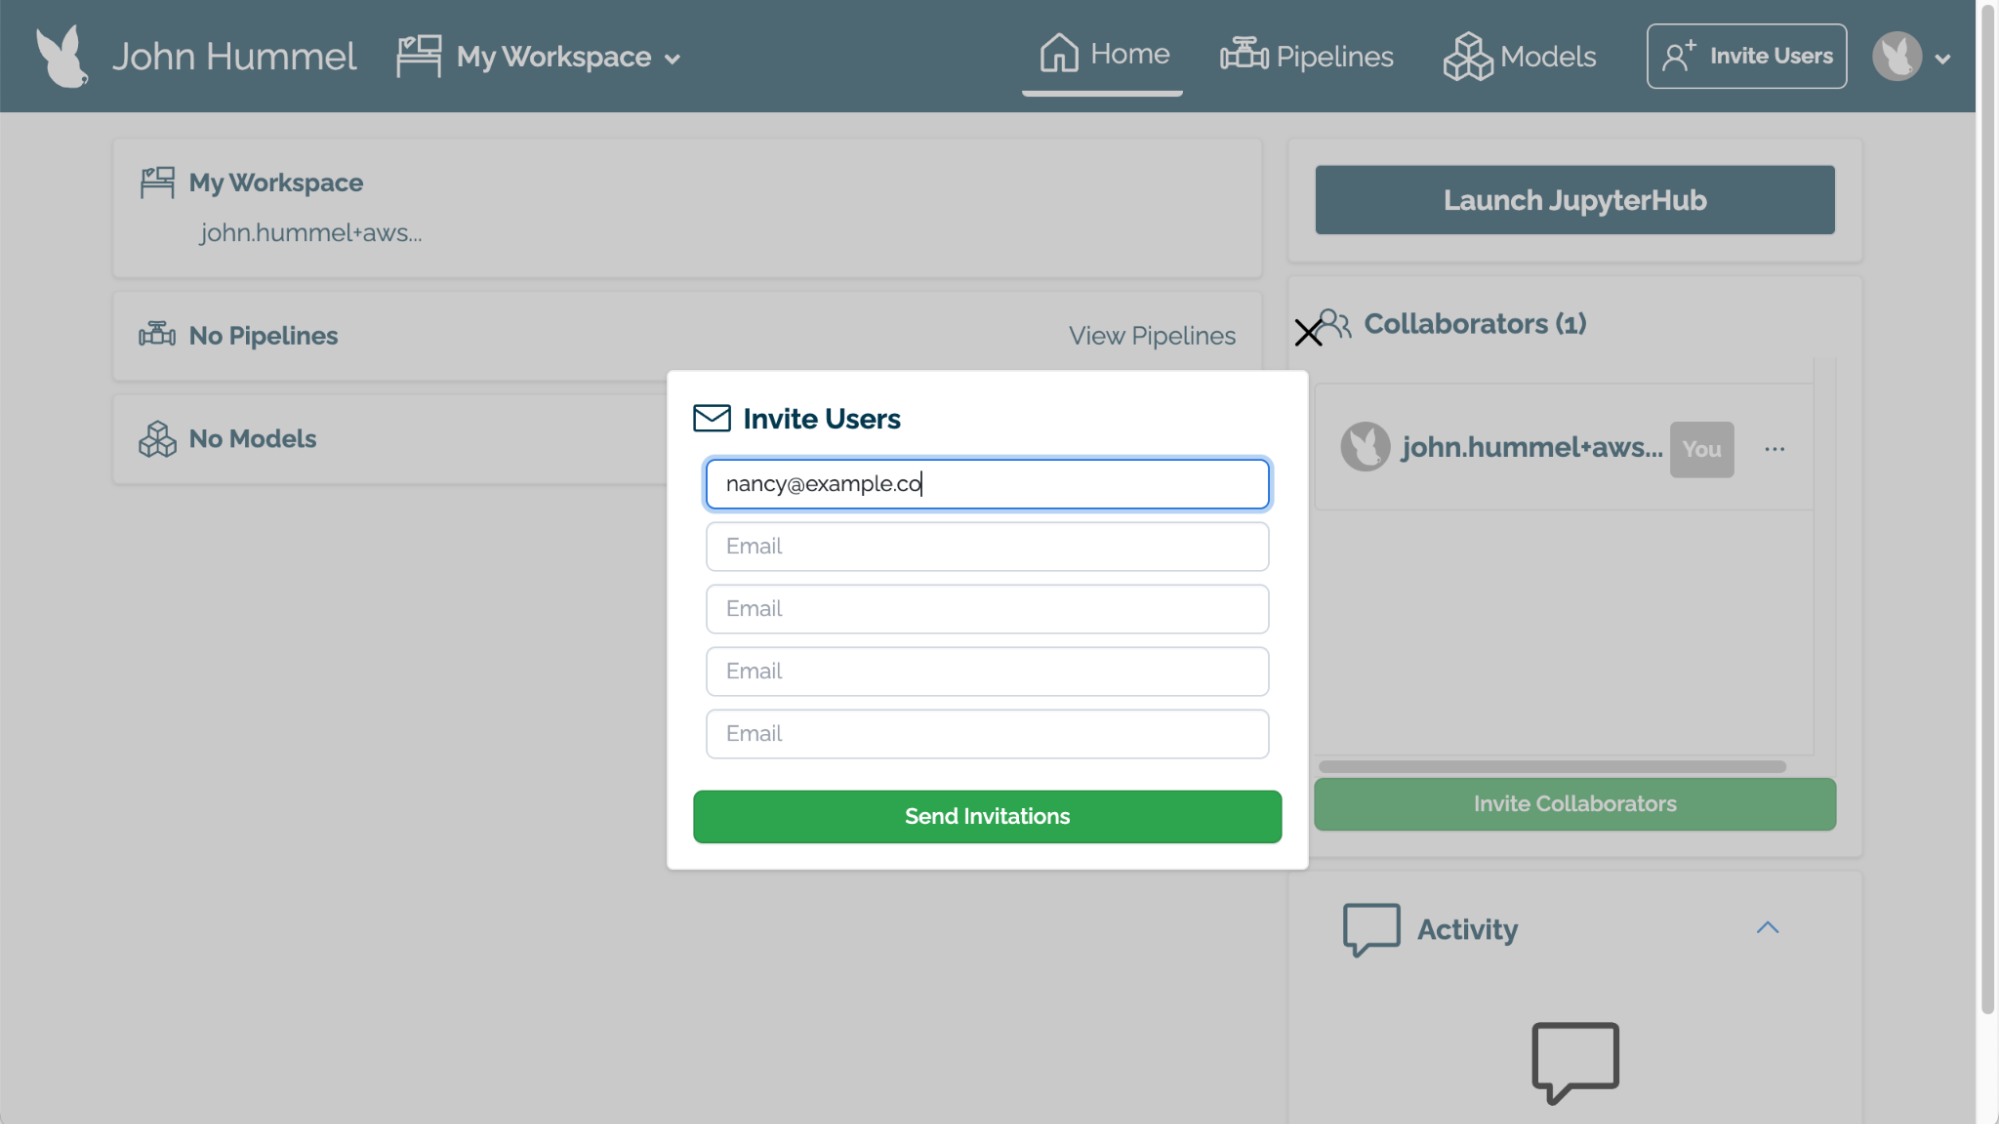
When finished, select Send Invitations.
Each user will be sent a link in their email with instructions on how to login to your Wallaroo instance.
Enterprise users are added through a separate process based on the organization’s preferences. See the Wallaroo Documentation site for more details.
Create or Select a Workspace
IMPORTANT NOTE
Workspaces must have unique names. If a new workspace request is submitted with the same name as another, the request will return an error. It is highly recommended that organizations coordinate with their teams to coordinate workspace naming conventions.To create or select a Workspace via the Wallaroo Dashboard interface:
In the top navigation panel next to your user name there’s a drop down with your workspaces.
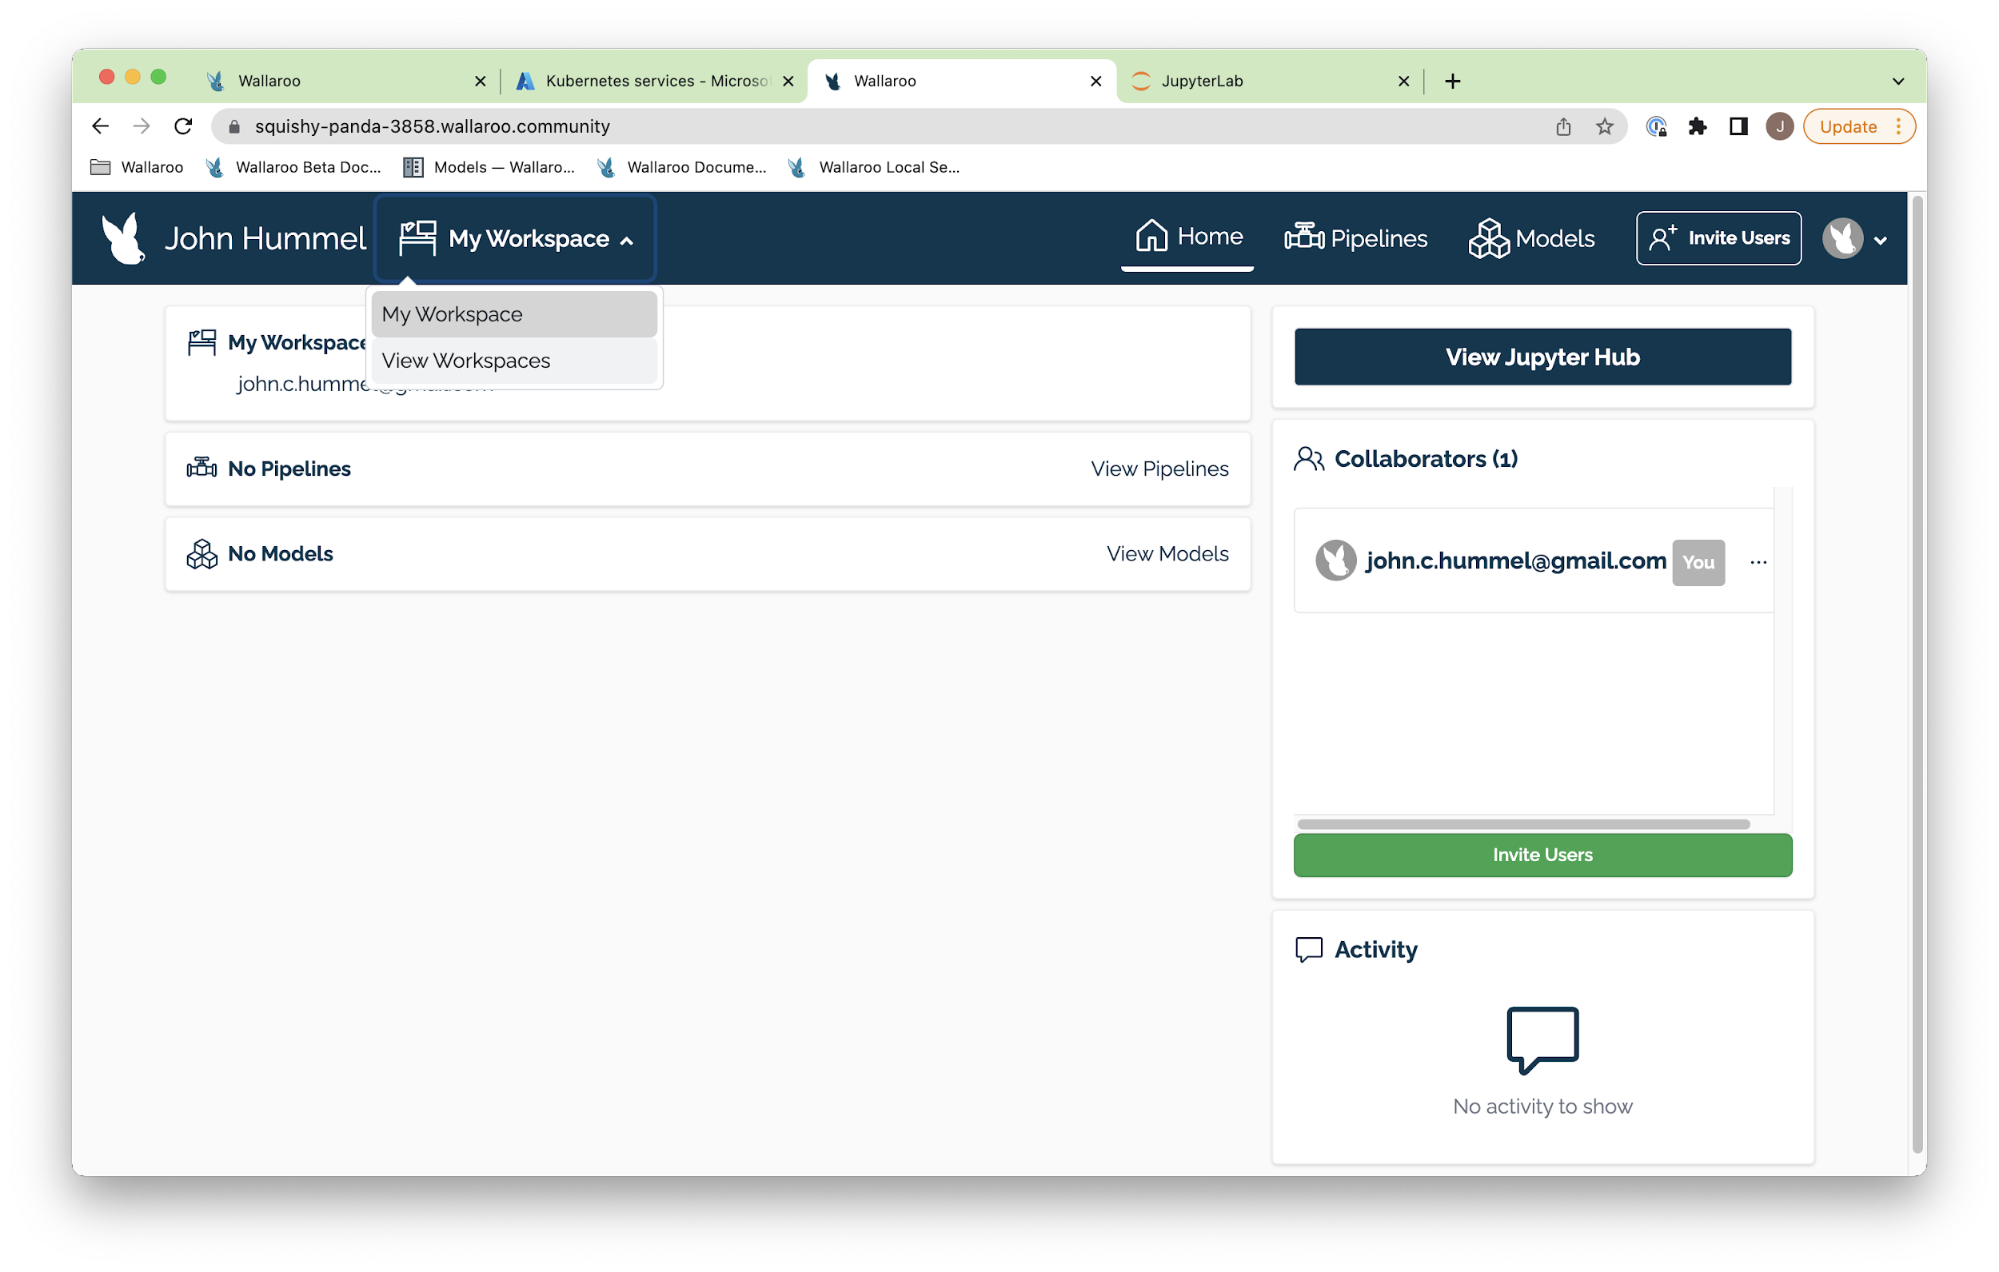
- To select a workspace as the current workspace, select one from the drop down list.
- To create a new workspace:
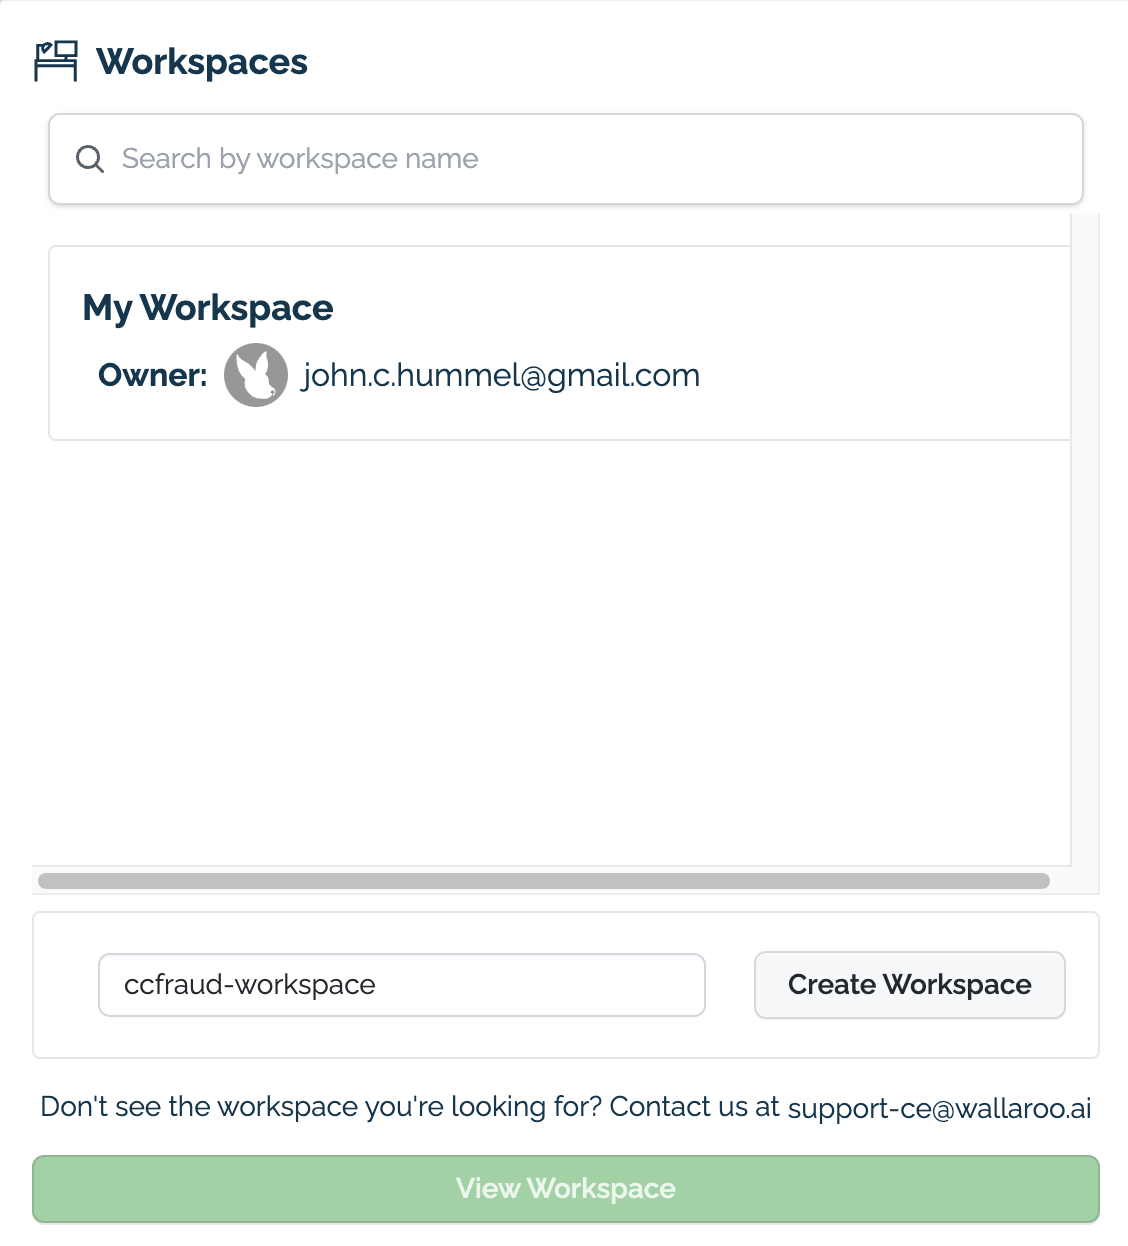
- Select View Workspaces.
- Enter the name of the new workspace.
- Select Create Workspace.
To create a workspace via the SDK, use the create_workspace("{WORKSPACE NAME}") command through an established Wallaroo connection and store the workspace settings into a new variable. Once the new workspace is created, the user who created the workspace is assigned as its owner.
For example, if the Wallaroo client connection is stored in the variable wl and the new workspace will be named imdb-workspace, then the command to store it in the new_workspace variable would be:
new_workspace = wl.create_workspace("imdb-workspace")
To select from an existing workspace, use the list_workspaces() method and set the workspace to use to a variable. In this example, ccfraud-workspace is the 2nd workspace in the list. Arrays start at 0, so we’ll use [1] to select our ccfraud-workspace. Update the numbering to reflect the workspace you want to select.
Name                Created At            Users                        Models    Pipelines
My Workspace        2022-04-12 17:19:13   ['john.c.hummel@gmail.com']  0         0
ccfraud-workspace   2022-04-12 17:37:41   ['john.c.hummel@gmail.com']  0         0

new_workspace = wl.list_workspaces()[1]
Set the current workspace with the set_current_workspace("{Workspace Variable}") method. In this example, the workspace ccfraud-workspace is set to the variable new_workspace, then set as the current workspace.
wl.list_workspaces()

Name                Created At            Users                          Models    Pipelines
My Workspace        2022-04-12 17:19:13   ['john.c.hummel@gmail.com']    0         0
ccfraud-workspace   2022-04-12 17:37:41   ['john.c.hummel@gmail.com']    0         0

new_workspace = wl.list_workspaces()[1]
wl.set_current_workspace(new_workspace)
Display the current workspace with the get_current_workspace() method as displayed below:
wl.get_current_workspace()

{'name': 'ccfraud-workspace', 'id': 2, 'archived': False, 'created_by': 'ba7344a0-eb27-4103-a08c-10ab20d524ec', 'created_at': '2022-04-12T17:37:41.797647+00:00', 'models': [], 'pipelines': []}
Assign Users to a Workspace
To assign users to a workspace through the Wallaroo Dashboard:
From the top left navigation panel, select the workspace. By default, this is My Workspace.
Select the workspace to set as the current workspace.
Select Invite Users from the Collaborators list.
Select from the users listed. Note that only users in your Wallaroo instance can be invited.
- To add the user as a co-owner, select the checkbox Add as Co-Owner? next to their name.
Select Send Invitations.
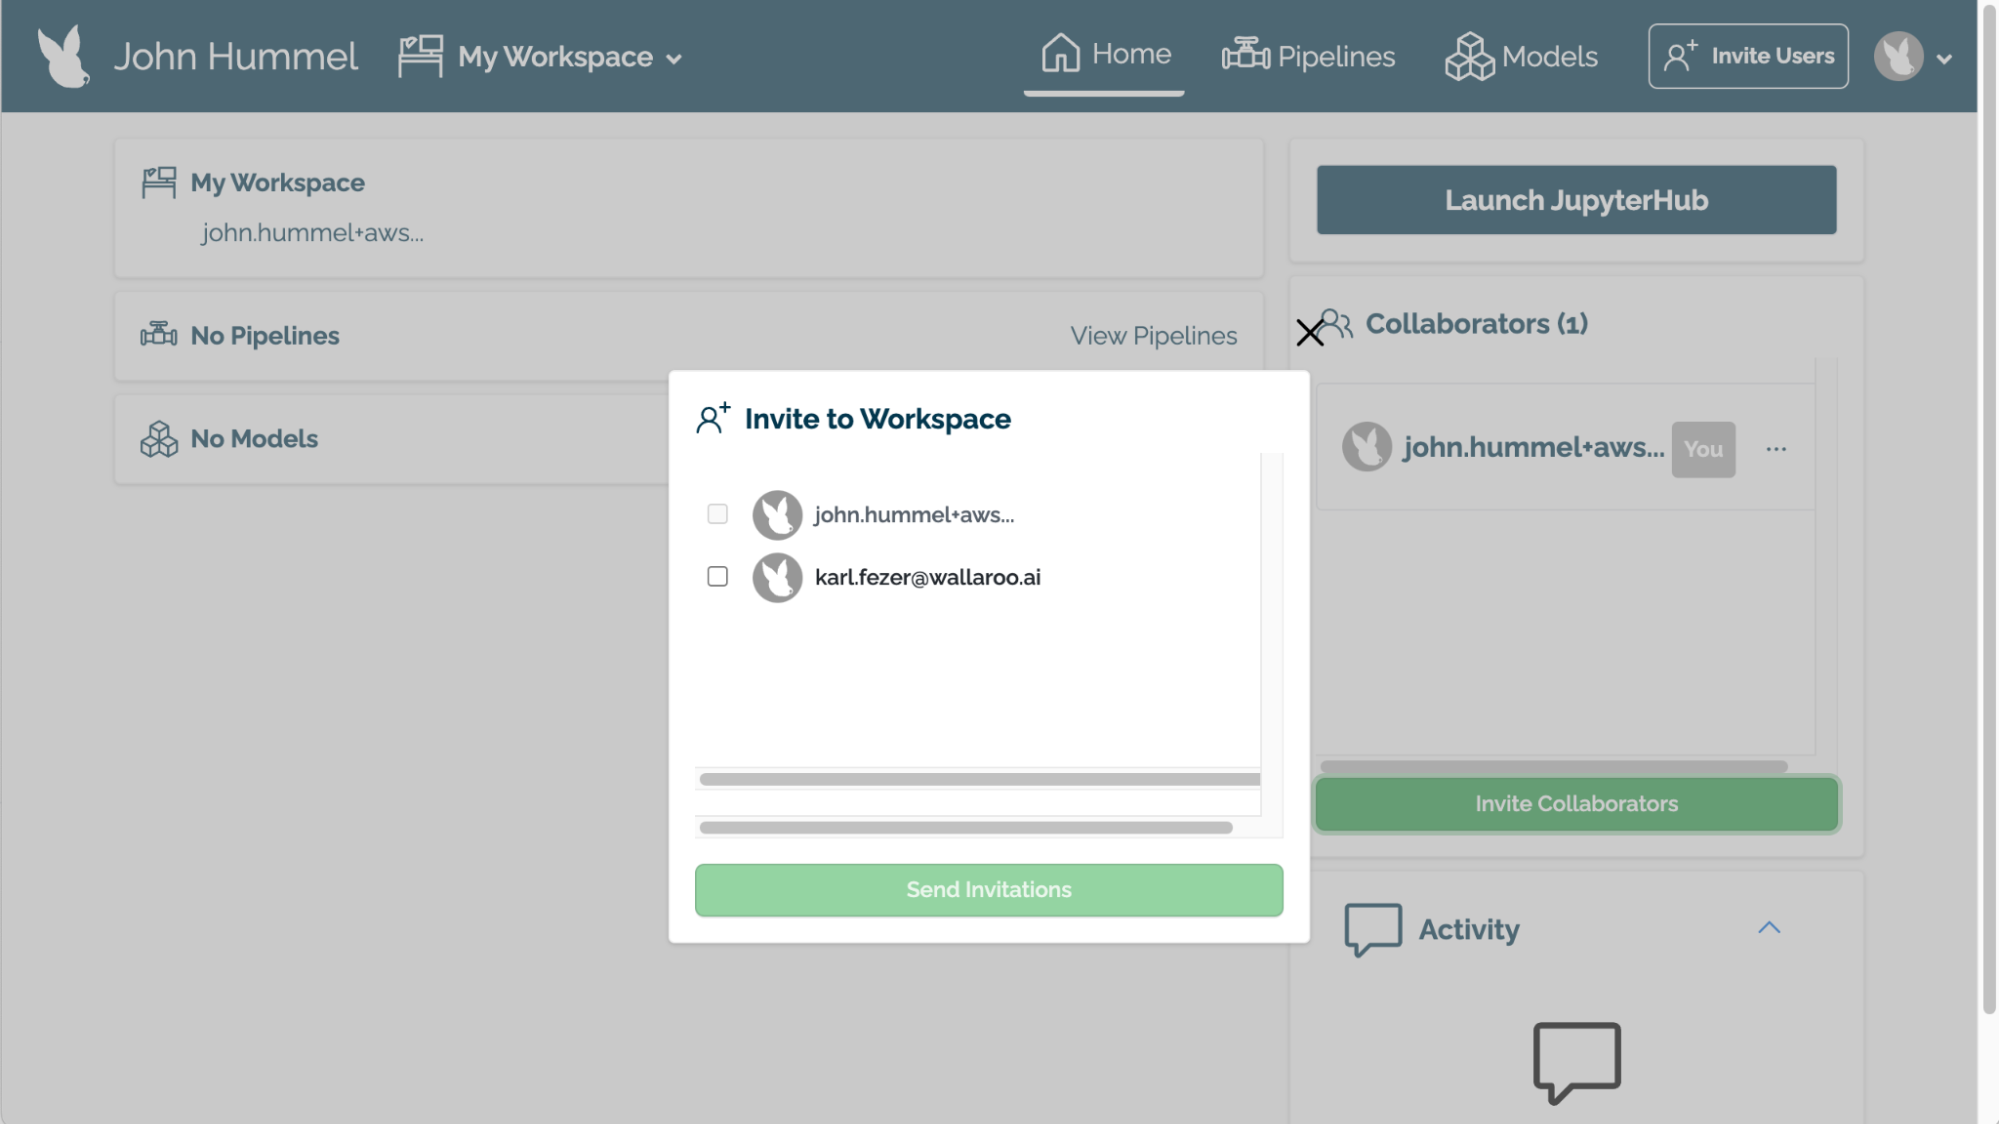
Users will be notified via email that they have been added to the workspace.
To add a user to a workspace via the SDK, use the wallaroo.workspace.Workspace.add_user({email address}) command. The email address must be assigned to a current user in the Wallaroo platform before they can be assigned to the workspace.
For example, the following workspace imdb-workspace has the user steve@ex.co. We will add the user john@ex.co to this workspace:
current_workspace.add_user("john@ex.co")

{'name': 'imdb-workspace', 'id': 4, 'archived': False, 'created_by': '45e6b641-fe57-4fb2-83d2-2c2bd201efe8', 'created_at': '2022-03-29T20:23:08.742676+00:00', 'models': [{'name': 'embedder-o', 'version': '23a33c3d-68e6-4bdb-a8bc-32ea846908ee', 'file_name': 'embedder.onnx', 'last_update_time': datetime.datetime(2022, 3, 29, 20, 23, 8, 833716, tzinfo=tzutc())}, {'name': 'smodel-o', 'version': '2c298aa9-be9d-482d-8188-e3564bdbab43', 'file_name': 'sentiment_model.onnx', 'last_update_time': datetime.datetime(2022, 3, 29, 20, 23, 9, 49881, tzinfo=tzutc())}], 'pipelines': [{'name': 'imdb-pipeline', 'create_time': datetime.datetime(2022, 3, 29, 20, 23, 28, 518946, tzinfo=tzutc()), 'definition': '[]'}]}

wl.list_workspaces()

Name                    Created At	        Users	                        Models	Pipelines

aloha-workspace         2022-03-29 20:15:38	['steve@ex.co']	                1	    1

ccfraud-workspace       2022-03-29 20:20:55	['steve@ex.co']	                1	    1

demandcurve-workspace   2022-03-29 20:21:32	['steve@ex.co']	                3	    1

imdb-workspace          2022-03-29 20:23:08	['steve@ex.co', 'john@ex.co']	2	    1

aloha-workspace         2022-03-29 20:33:54	['steve@ex.co']	                1	    1

imdb-workspace          2022-03-30 17:09:23	['steve@ex.co']	                2	    1

imdb-workspace          2022-03-30 17:43:09	['steve@ex.co']	                0	    0
Upload Models
Models are uploaded to the current workspace through the Wallaroo Client upload_model("{Model Name}", "{Model Path}).configure(options). In most cases, leaving the options field can be left blank. For more details, see the full SDK guide.
The model must be uploaded in the Open Neural Network eXchange(ONNX) format or converted using the Wallaroo auto-converter.
The following example shows how to upload two models to the imdb-workspace workspace:
embedder = wl.upload_model('embedder-o', './embedder.onnx').configure()

smodel = wl.upload_model('smodel-o', './sentiment_model.onnx').configure()
Create or Select a Pipeline
New pipelines are created in the current workspace.
IMPORTANT NOTICE
Pipeline names are not forced to be unique. You can have 50 pipelines all named my-pipeline, which can cause confusion in determining which workspace to use. Pipeline names are unique within the workspace, but not across the Wallaroo instance.
It is recommended that organizations agree on a naming convention and select a pipeline to use rather than creating a new one each time.
To create a new pipeline, use the Wallaroo Client build_pipeline("{Pipeline Name}") command.
The following example creates a new pipeline imdb-pipeline through a Wallaroo Client connection wl:
imdb_pipeline = wl.build_pipeline("imdb-pipeline")
To select an existing pipeline, use the Wallaroo Client list_pipelines() method to assign an existing pipeline to a variable.
The following example sets the pipeline ccfraud-pipeline to the variable current_pipeline, then retrieves the pipeline’s status.
wl.list_pipelines()

[{'name': 'ccfraud-pipeline', 'create_time': datetime.datetime(2022, 4, 12, 17, 55, 41, 944976, tzinfo=tzutc()), 'definition': '[]'}]

current_pipeline = wl.list_pipelines()[0]

current_pipeline.status()

{'status': 'Running',

'details': None,

'engines': [{'ip': '10.244.5.4',

  'name': 'engine-7fcc7df596-hvlxb',

  'status': 'Running',

  'reason': None,

  'pipeline_statuses': {'pipelines': [{'id': 'ccfraud-pipeline',

     'status': 'Running'}]},

  'model_statuses': {'models': [{'name': 'ccfraud-model',

     'version': '4624e8a8-1414-4408-8b40-e03da4b5cb68',

     'sha': 'bc85ce596945f876256f41515c7501c399fd97ebcb9ab3dd41bf03f8937b4507',

     'status': 'Running'}]}}],

'engine_lbs': [{'ip': '10.244.1.24',

  'name': 'engine-lb-85846c64f8-mtq9p',

  'status': 'Running',

  'reason': None}]}
Create Pipeline Steps
IMPORTANT NOTE
The Community Edition of Wallaroo limits users to 2 active pipelines, with a maximum of five steps per pipeline.Create one or more pipeline steps and assign that step to a model in the same workspace. Once a step is created you can add additional steps, remove a step, or swap one out until everything is running perfectly.
Once a pipeline has been created, or during its creation process, a pipeline step can be added. The pipeline step refers to the model that will perform an inference off of the data submitted to it. Each time a step is added, it is added to the pipeline’s models array.
A pipeline step is added through the pipeline add_model_step({Model}) command.
In the following example, two models uploaded to the workspace are added as pipeline step, and then displayed in the pipeline status command:
imdb_pipeline.add_model_step(embedder)

imdb_pipeline.add_model_step(smodel)

imdb_pipeline.status()

{'name': 'imdb-pipeline', 'create_time': datetime.datetime(2022, 3, 30, 21, 21, 31, 127756, tzinfo=tzutc()), 'definition': "[{'ModelInference': {'models': [{'name': 'embedder-o', 'version': '1c16d21d-fe4c-4081-98bc-65fefa465f7d', 'sha': 'd083fd87fa84451904f71ab8b9adfa88580beb92ca77c046800f79780a20b7e4'}]}}, {'ModelInference': {'models': [{'name': 'smodel-o', 'version': '8d311ba3-c336-48d3-99cd-85d95baa6f19', 'sha': '3473ea8700fbf1a1a8bfb112554a0dde8aab36758030dcde94a9357a83fd5650'}]}}]"}
Deploy the Pipeline
To perform an inference through a pipeline, the pipeline must be deployed through the pipeline deploy() method. This allocates resources to the pipeline from the Kubernetes environment and make it available to submit information to perform inferences. This process typically takes 45 seconds. Once complete, the pipeline status() command will show 'status':'Running'.
Pipelines must be redeployed when pipeline steps are added or removed.
In the following example, the pipeline imdb-pipeline that contains two steps will be deployed:
imdb_pipeline.deploy()

Waiting for deployment - this will take up to 45s ...... ok

imdb_pipeline.status()

{'status': 'Running',

'details': None,

'engines': [{'ip': '10.12.1.65',

  'name': 'engine-778b65459-f9mt5',

  'status': 'Running',

  'reason': None,

  'pipeline_statuses': {'pipelines': [{'id': 'imdb-pipeline',

     'status': 'Running'}]},

  'model_statuses': {'models': [{'name': 'embedder-o',

     'version': '1c16d21d-fe4c-4081-98bc-65fefa465f7d',

     'sha': 'd083fd87fa84451904f71ab8b9adfa88580beb92ca77c046800f79780a20b7e4',

     'status': 'Running'},

    {'name': 'smodel-o',

     'version': '8d311ba3-c336-48d3-99cd-85d95baa6f19',

     'sha': '3473ea8700fbf1a1a8bfb112554a0dde8aab36758030dcde94a9357a83fd5650',

     'status': 'Running'}]}}],

'engine_lbs': [{'ip': '10.12.1.66',

  'name': 'engine-lb-85846c64f8-ggg2t',

  'status': 'Running',

  'reason': None}]}
Perform Inferences
Once a pipeline has been deployed, an inference can be run. This will submit data to the pipeline, where it will then be submitted through each of the pipeline’s steps, with the output of the previous step providing the input for the new step. The final step will then output the result of all of the pipeline’s steps.
Both methods return a List[wallaroo.inference_result.InferenceResult] object. More details on the InferenceResult are listed below.
Run Inference through Pipeline Deployment URL
The pipeline _deployment._url() provides a URL where information can be submitted through HTTP POST in JSON format to the pipeline to perform an inference. This is useful in providing a resource where information can be submitted to the pipeline from different sources to the same pipeline remotely.
- IMPORTANT NOTE: The
_deployment._url()method will return an internal URL when using Python commands from within the Wallaroo instance - for example, the Wallaroo JupyterHub service. When connecting via an external connection,_deployment._url()returns an external URL. External URL connections requires the authentication be included in the HTTP request, and that Model Endpoints Guide external endpoints are enabled in the Wallaroo configuration options.
In this example, the aloha_pipeline’s deployment URL will be determined. An inference will then be made on data submitted to the aloha_pipeline through its deployment URL via a curl HTTP POST command:
aloha_pipeline._deployment._url()

'http://engine-lb.aloha-test-demo-5:29502/pipelines/aloha-test-demo'
!curl -X POST http://engine-lb.aloha-test-demo-5:29502/pipelines/aloha-test-demo -H "Content-Type:application/json" --data @data-25k.json > curl_response.txt
Run Inference From A File
To submit a data file directly to a pipeline, use the pipeline infer_from_file({Data File}) command, where {Data File} is the path name to the submitted file.
In this example, an inference will be submitted to the aloha_pipeline with the file data-1.json:
aloha_pipeline.infer_from_file("data-1.json")

Waiting for inference response - this will take up to 45s .... ok

[InferenceResult({'check_failures': [],

 'elapsed': 329803334,

 'model_name': 'aloha-2',

 'model_version': '3dc9b7f9-faff-40cc-b1b6-7724edf11b12',

 'original_data': {'text_input': [[0,

                                   …

                                   26,

                                   17]]},

 'outputs': [{'Float': {'data': [0.001519620418548584], 'dim': [1, 1], 'v': 1}},
    …

 'pipeline_name': 'aloha-test-demo',

 'time': 1648744282452})]
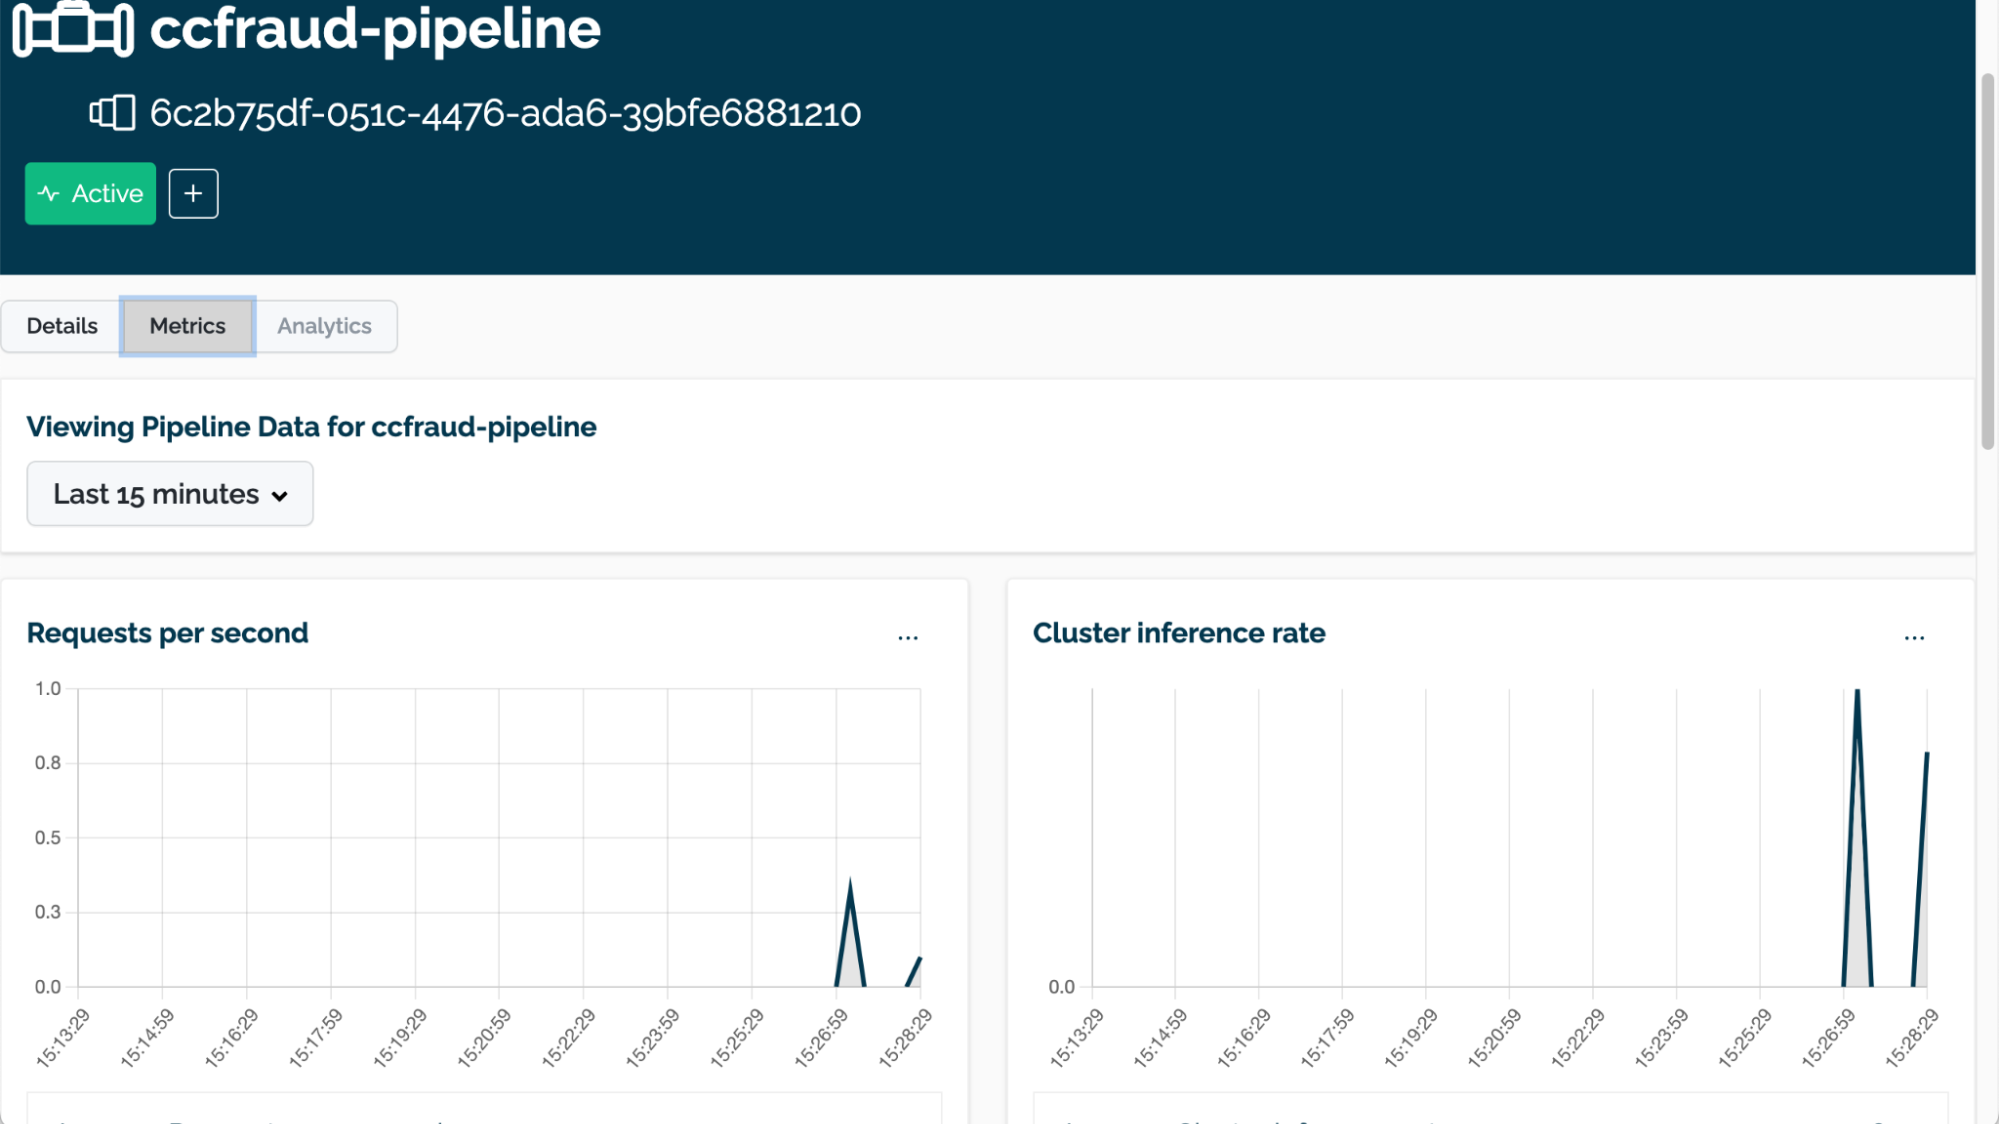
Pipeline Metrics
The performance and other metrics for a pipeline can be tracked through the Pipeline Metrics page. This provides a visual representation of requests per second, the cluster inference rate, and other useful data.
To access the Pipeline Metrics page for the Wallaroo instance:
- From the Wallaroo Dashboard, set the current workspace from the top left dropdown list.
- Select View Pipelines from the pipeline’s row.
- To view details on the pipeline, select the name of the pipeline.
- A list of the pipeline’s details will be displayed.
- Select Metrics to view the following information. From here you can select the time period to display metrics from through the drop down to display the following:
- Requests per second
- Cluster inference rate
- Inference latency
- The Audit Log and Anomaly Log are available to view further details of the pipeline’s activities.
Resources
Full instructions for how to use Wallaroo are available at https://docs.wallaroo.ai .
To try Wallaroo for free, visit https://portal.wallaroo.community.