Wallaroo Enterprise User Management
Table of Contents
Wallaroo Enterprise User Management
Organizations can manage their users through the Wallaroo Dashboard via the Platform Admin Dashboard. This dashboard is the default login view users who are assigned the type admin.
How to Access the Platform Admin Dashboard
To access the Platform Admin Dashboard:
- Login to the Wallaroo Dashboard as a user of type
admin.
If a user is not assigned the admin type, the option Platform Admin Dashboard is not available. If they attempt to reference the Platform Admin Dashboard without being of type admin, the following error message is displayed:
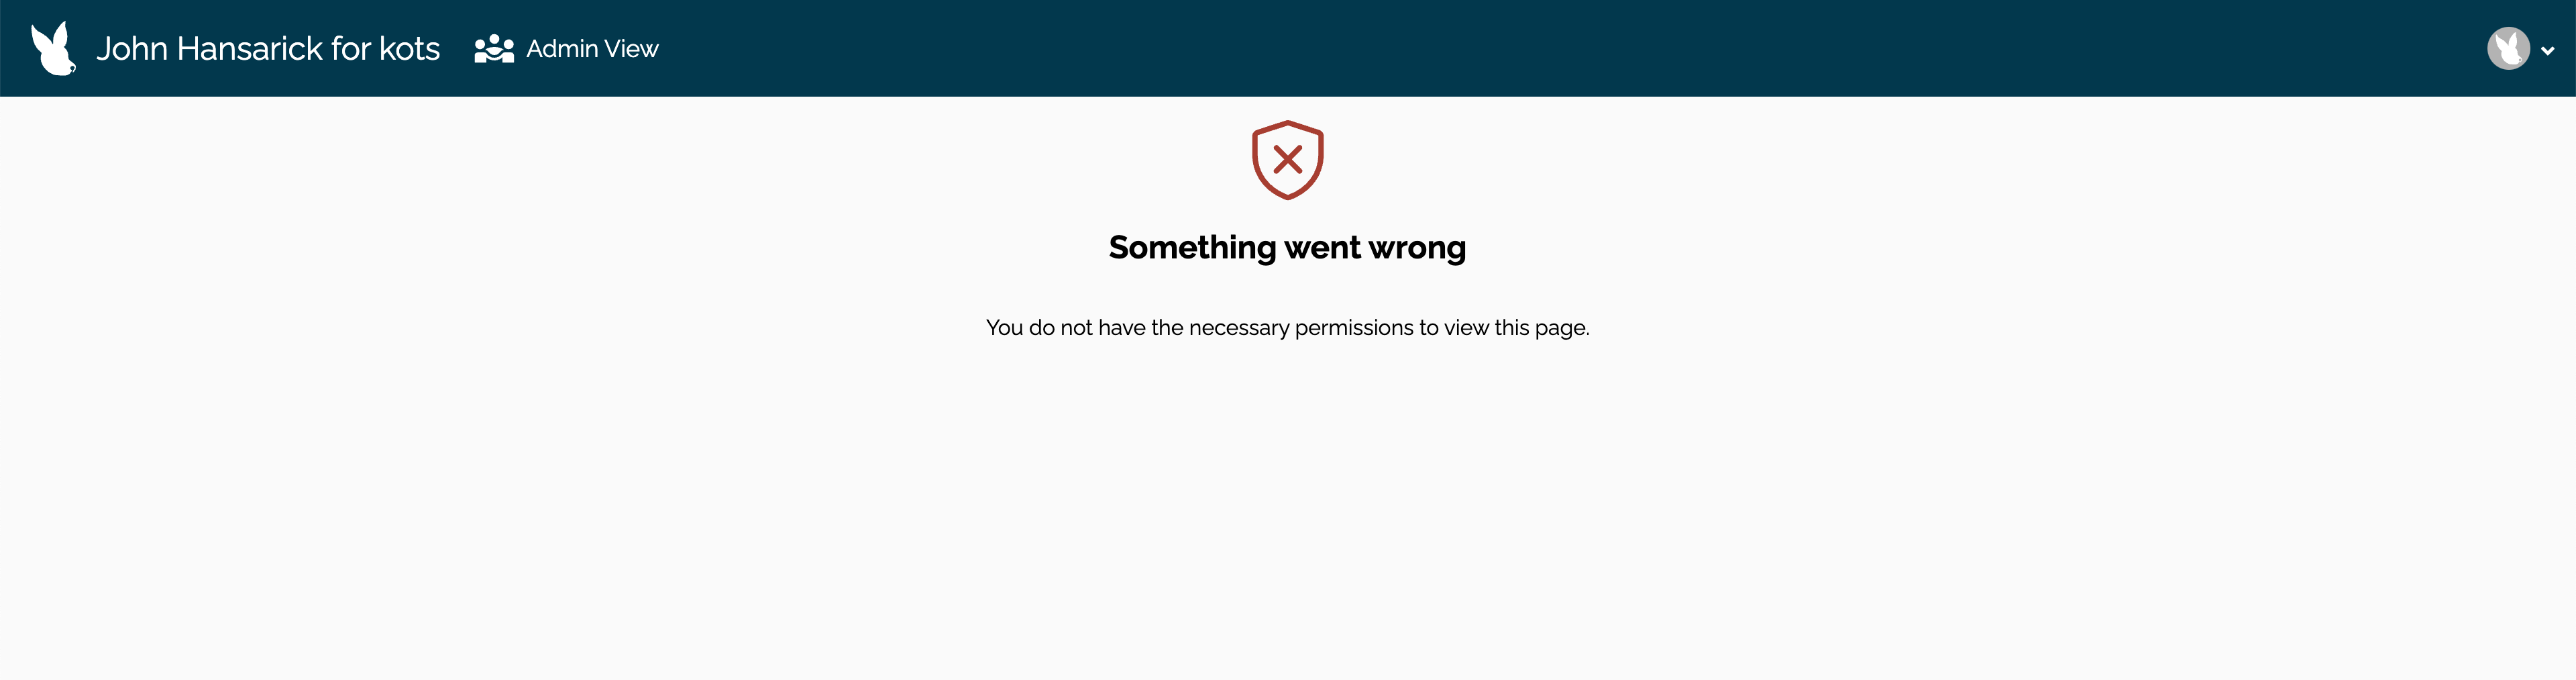
Something went wrong
You do not have the necessary permissions to view this page.
Users can return to the Platform Admin Dashboard to manage their workspace via the following process:
- From the Platform Admin Dashboard: From the upper right corner, select the Wallaroo icon drop down, and select Platform Admin Dashboard.
Platform Admin Dashboard List View
The Platform Admin Dashboard displays the following.
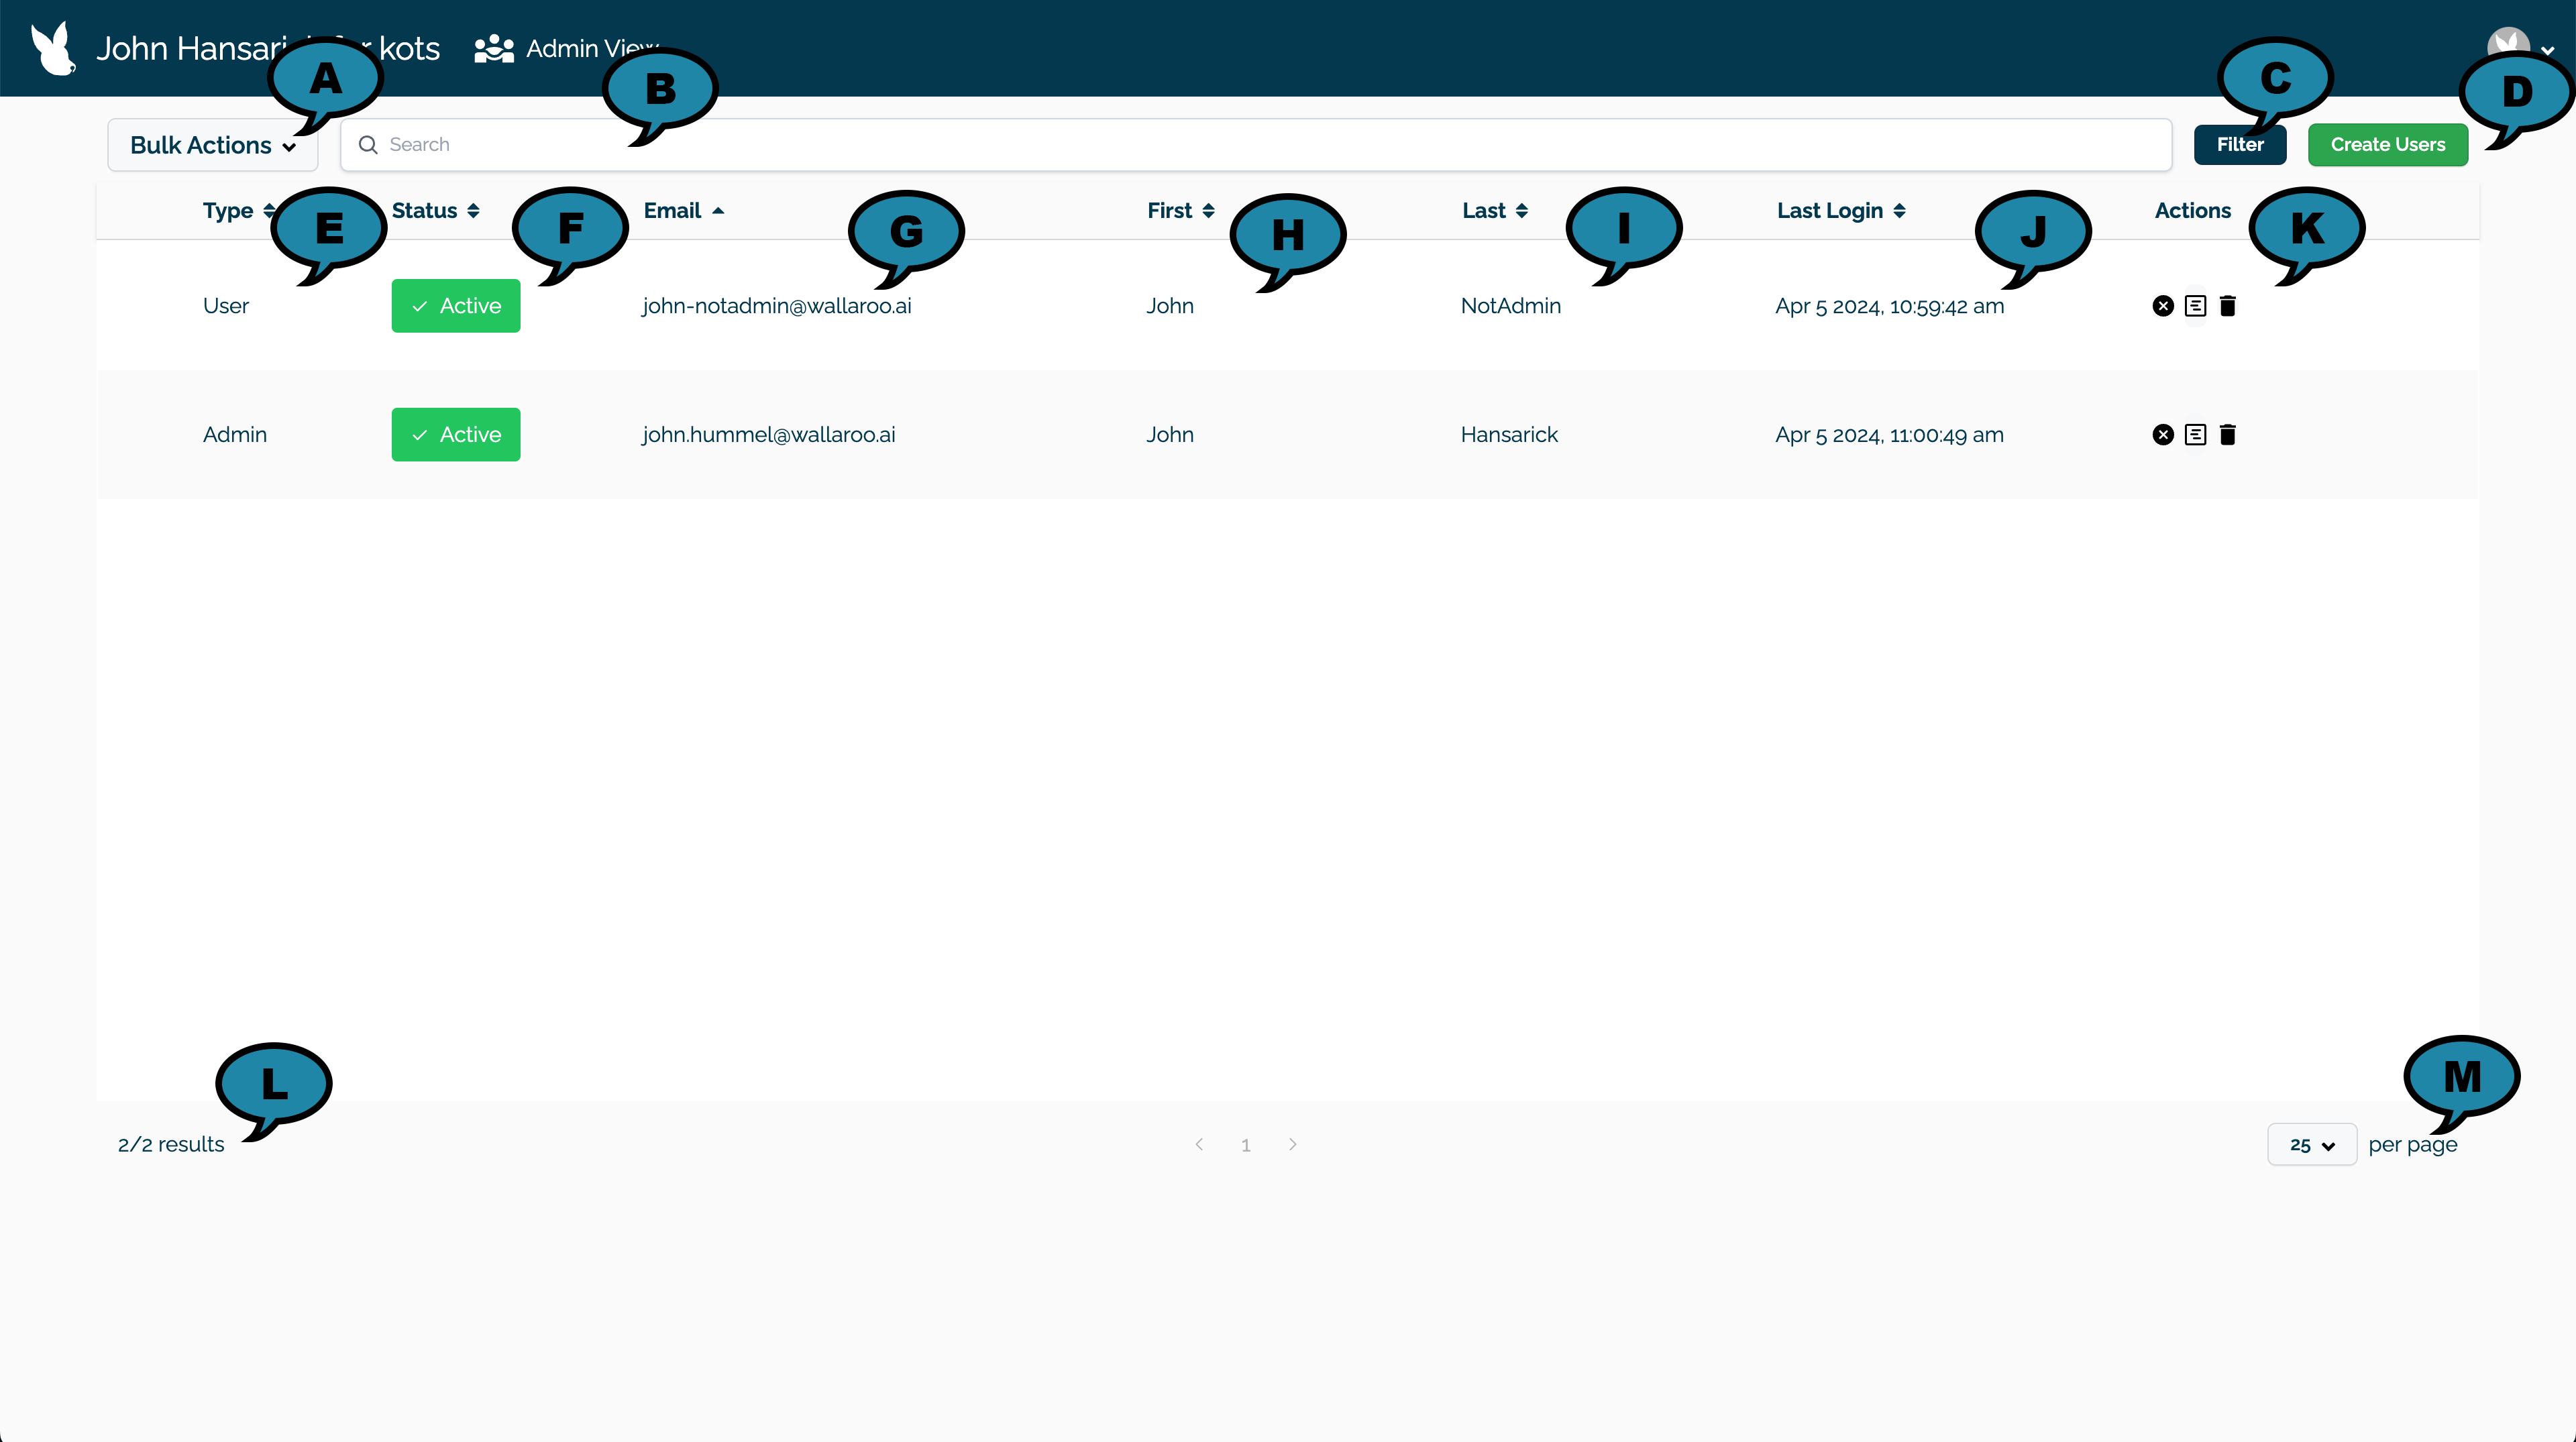
- View Selector (A): Select which Wallaroo element to manage:
- Users
- Pipelines
- Models
- Workloads
- For Users, the default view is users sorted by Email in alphabetical order, defaulting to 25 users displayed per page.
- Bulk Actions (A): Bulk actions provides the ability to update multiple users at once. See Bulk Actions for a list of bulk actions.
- Search (B): Search by Email, First, and Last.
- Filter (C): Filter users by:
- Type
- Status
- Create Users (D): Create new users
- A list of users with the following fields. Fields marked as Sortable can be sorted.
- Type (E) (Sortable): The type of user. See User Types.
- Status (F) (Sortable): The status of the user. Options are:
- Active: The user is able to authenticate and login to Wallaroo.
- Inactive: The user account exists but the user can not authenticate or login to Wallaroo.
- Email (G) (Sortable): The user’s email address.
- First (H) (Sortable): The user’s given name.
- Last (I) (Sortable): The user’s surname.
- Last Login (J) (Sortable): The date and time of the user’s last login.
- Actions (K): A list of available quick actions. The following actions are available:
- Activate or Deactivate a user. For more details see Activate or Deactivate a User.
- View active user sessions: View any active user sessions. For more details see View User Active Sessions.
- Delete a user. For more details, see Delete User.
- Results/Page (L): The number of total users displayed out of the total number of users.
- Number of Users Per Page (M): The number of users to display per page (Default: 25).
Actions
The following actions are available.
View User Active Sessions
The user active sessions shows the current connection sessions the user has with the Wallaroo Ops center. The following is available:

- Login Time: The date and time the user logged in.
- Duration: How long the user has been authenticated.
- Session Type: The following session types are available.
- Dashboard: The user is currently connected into Wallaroo through the Wallaroo Dashboard.
- SDK: The user is currently connected into Wallaroo through the Wallaroo SDK.
Create User
To create a new user:
- Select Create Users and enter the following:
- User Email: The email address for the user. This must be in the valid email address format.
- Assign Type: Select one of the following. See User Types for details of the different types and their authorizations and access.
- Password: Enter the user’s password. This must be sent to the user.
- Temporary or Permanent:
- Temporary: The user will be forced to change their login password upon their next login (Recommended).
- Permanent: The user will keep their password.
- When finished, select Save.
- Create any additional users as needed. When finished, select the Wallaroo icon drop down and select Logout.
At this point, users can log in to Wallaroo Dashboard with their provided identities. For guides on setting up Single Sign-On (SSO) and other features, see Wallaroo User Management for full guides on setting up users, identity providers, and other user configuration options.
Activate or Deactivate a User
The following allows for users to be set to:
- active: The user is able to login to Wallaroo services through the Wallaroo Dashboard, API, SDK, and other services. Only active users can be edited.
- inactive: These users are unable to login to any Wallaroo services that require authentication. Users that are deactivated will show (Inactive User) after their email address.
To deactivate a user:
- For the row for the specific user, select the Deactivate icon.

- From the Deactive User model, confirm by selecting Deactivate.
To activate a user:
- For the row for the specific user, select the Activate icon.
- The user will be active.
Edit User
Admins can update Active users. Note that for inactive users, the details will be blocked from edits. Users that are deactivated will show (Inactive User) after their email address. See Activate or Deactivate a User for details on updating the user’s status.
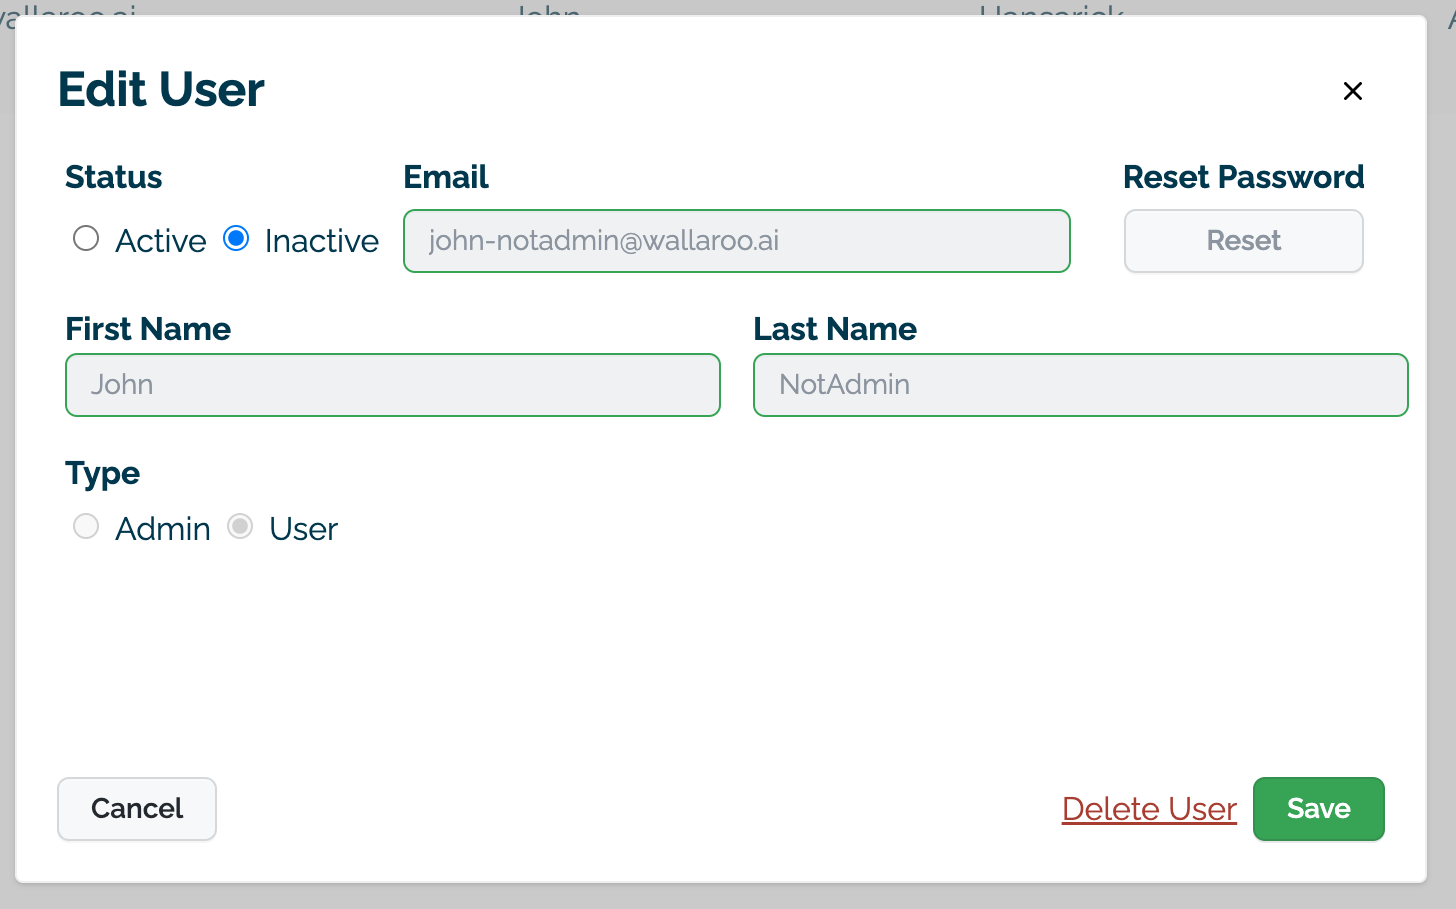
- Select the row for the user to update.
- Update any of the following.
- Email: The email address for the user. This must in the valid email address format.
- First Name: The user’s given name.
- Last Name: The user’s surname.
- Type: Select one of the following. See User Types for details of the different types and their authorizations and access.
- When finished, select Save.
Reset User Password
To change a user’s password:
- Select the row for the user to update.
- Under Reset Password, select Reset.
- In the Reset Password add the following:
- Password: Enter the user’s new password.
- Temporary or Permanent:
- Temporary: The user will be forced to change their login password upon their next login.
- Permanent: The user will not be prompted to change their login password on subsequent logins.
- When finished, select Save.
Change User Type
To change User Types:
- Select the row for the user to update.
- Under Type, select the user type.
- When finished, select Save.
Delete User
Deleting a user removes them from the Wallaroo Ops instance. Any workspaces, models, pipeline or other facts created by the user still exist. Deleting a user only removes that user from the list of users and prevents from from logging in with the same username and credentials.
Deleted users will have Deleted User displayed in place of their username.
IMPORTANT NOTE: Deleting a user with the same username will not restore access to their previous workspaces and artifacts. If a user intends to be used in the future, it is recommended to Deactivate the user and activate them when needed.
To delete a user, there are two options.
From the User Details view:
- Select Delete User.
- From the Delete User modal, confirm the user deletion by selecting Delete.
From the Platform Admin Dashboard List View:
- For the row for the specific user, select the delete icon.
- From the Delete User modal, confirm the user deletion by selecting Delete.
Bulk Actions
Bulk actions allow actions performed on multiple users instead of one at a time. The following bulk actions are available.
Bulk Delete Users
Deleting users removes them from the Wallaroo Ops instance. Any workspaces, models, pipeline or other facts created by the user still exist. Deleting users only removes those users from the list of users and prevents from from logging in with the same username and credentials.
Deleted users will have Deleted User displayed in place of their username.
IMPORTANT NOTE: Deleting a user with the same username will not restore access to their previous workspaces and artifacts. If a user intends to be used in the future, it is recommended to Deactivate the user and activate them when needed.
To bulk delete users:
- From the Platform Admin Dashboard, select Bulk Actions, then Delete.
- From the user list, select the users to delete.
- Select Apply.
- In the Delete Users model, select Delete to confirm the user deletion.
User Types
Wallaroo supports the following users types and their actions.
- User: Standard user. Able to login, create workspaces and access workspaces they have created or are members of. See the table below for more details.
- Admin: Administrative user. Able to access all workspaces and perform administrative actions. See the table below for more details.
The following table shows what actions the user type can perform.
| Action | Admin Type | User Type |
|---|---|---|
| Create workspace. | √ | √ |
| Access workspace and workspace artifacts the user are a member of. | √ | √ |
| Access all workspaces and their artifacts. | √ | √ |
| Create users. | √ | X |
| Reset user password. | √ | X |
| Activate or Deactivate Users | √ | X |
| Delete Users | √ | X |
How to Access the User Authentication Service
Most user administration features are performed by admins through the Platform Admin Dashboard.
Additional settings are available by directly access the Wallaroo Administrative Service. This requires the following:
A user credential with administrative access. If for some reason no user with administrative access is available, the default
adminuser and credentials are retrieved by a user withkubectland administrative access to the cluster with the following.Retrieve Admin Username
kubectl -n wallaroo \
get secret keycloak-admin-secret \
-o go-template='{{.data.KEYCLOAK_ADMIN_USER | base64decode }}'
Retrieve Admin Password
kubectl -n wallaroo \
get secret keycloak-admin-secret \
-o go-template='{{.data.KEYCLOAK_ADMIN_PASSWORD | base64decode }}'
Access the Platform Admin Dashboard by logging into the Wallaroo Dashboard. From the upper right corner, select the Wallaroo icon drop down, then select Platform Admin Dashboard. Add and update users as required.
When a new user logs in for the first time, they get an error when uploading a model or issues when they attempt to log in. How do I correct that?
When a new registered user attempts to upload a model, they may see the following error:
TransportQueryError:
{'extensions':
    {'path':
        '$.selectionSet.insert_workspace_one.args.object[0]', 'code': 'not-supported'
    },
    'message':
        'cannot proceed to insert array relations since insert to table "workspace" affects zero rows'
Or if they log into the Wallaroo Dashboard, they may see a Page not found error.
This is caused when a user has been registered without an appropriate email address. See the Wallaroo Enterprise User Management on adding and updating users.