This guide is targeted towards system administrators and data scientists who want to work with the easiest, fastest, and free method of running your own machine learning models.
A typical installation of Wallaroo Community Edition follows this process:
| Step | Description | Average Setup Time |
|---|---|---|
| Download License | Download or redownload the Wallaroo Community Edition license. | 5 minutes |
| Set Up Environment | Set up the cloud environment hosting the Wallaroo instance. | 15 minutes |
| Install Wallaroo | Install Wallaroo into a prepared environment | 15-20 minutes |
Download License
Completion Time
General completion time: 5 minutes
The first step to installing Wallaroo CE is to set up your Wallaroo Community Edition Account at the web site https://portal.wallaroo.community. This process typically takes about 5 minutes.
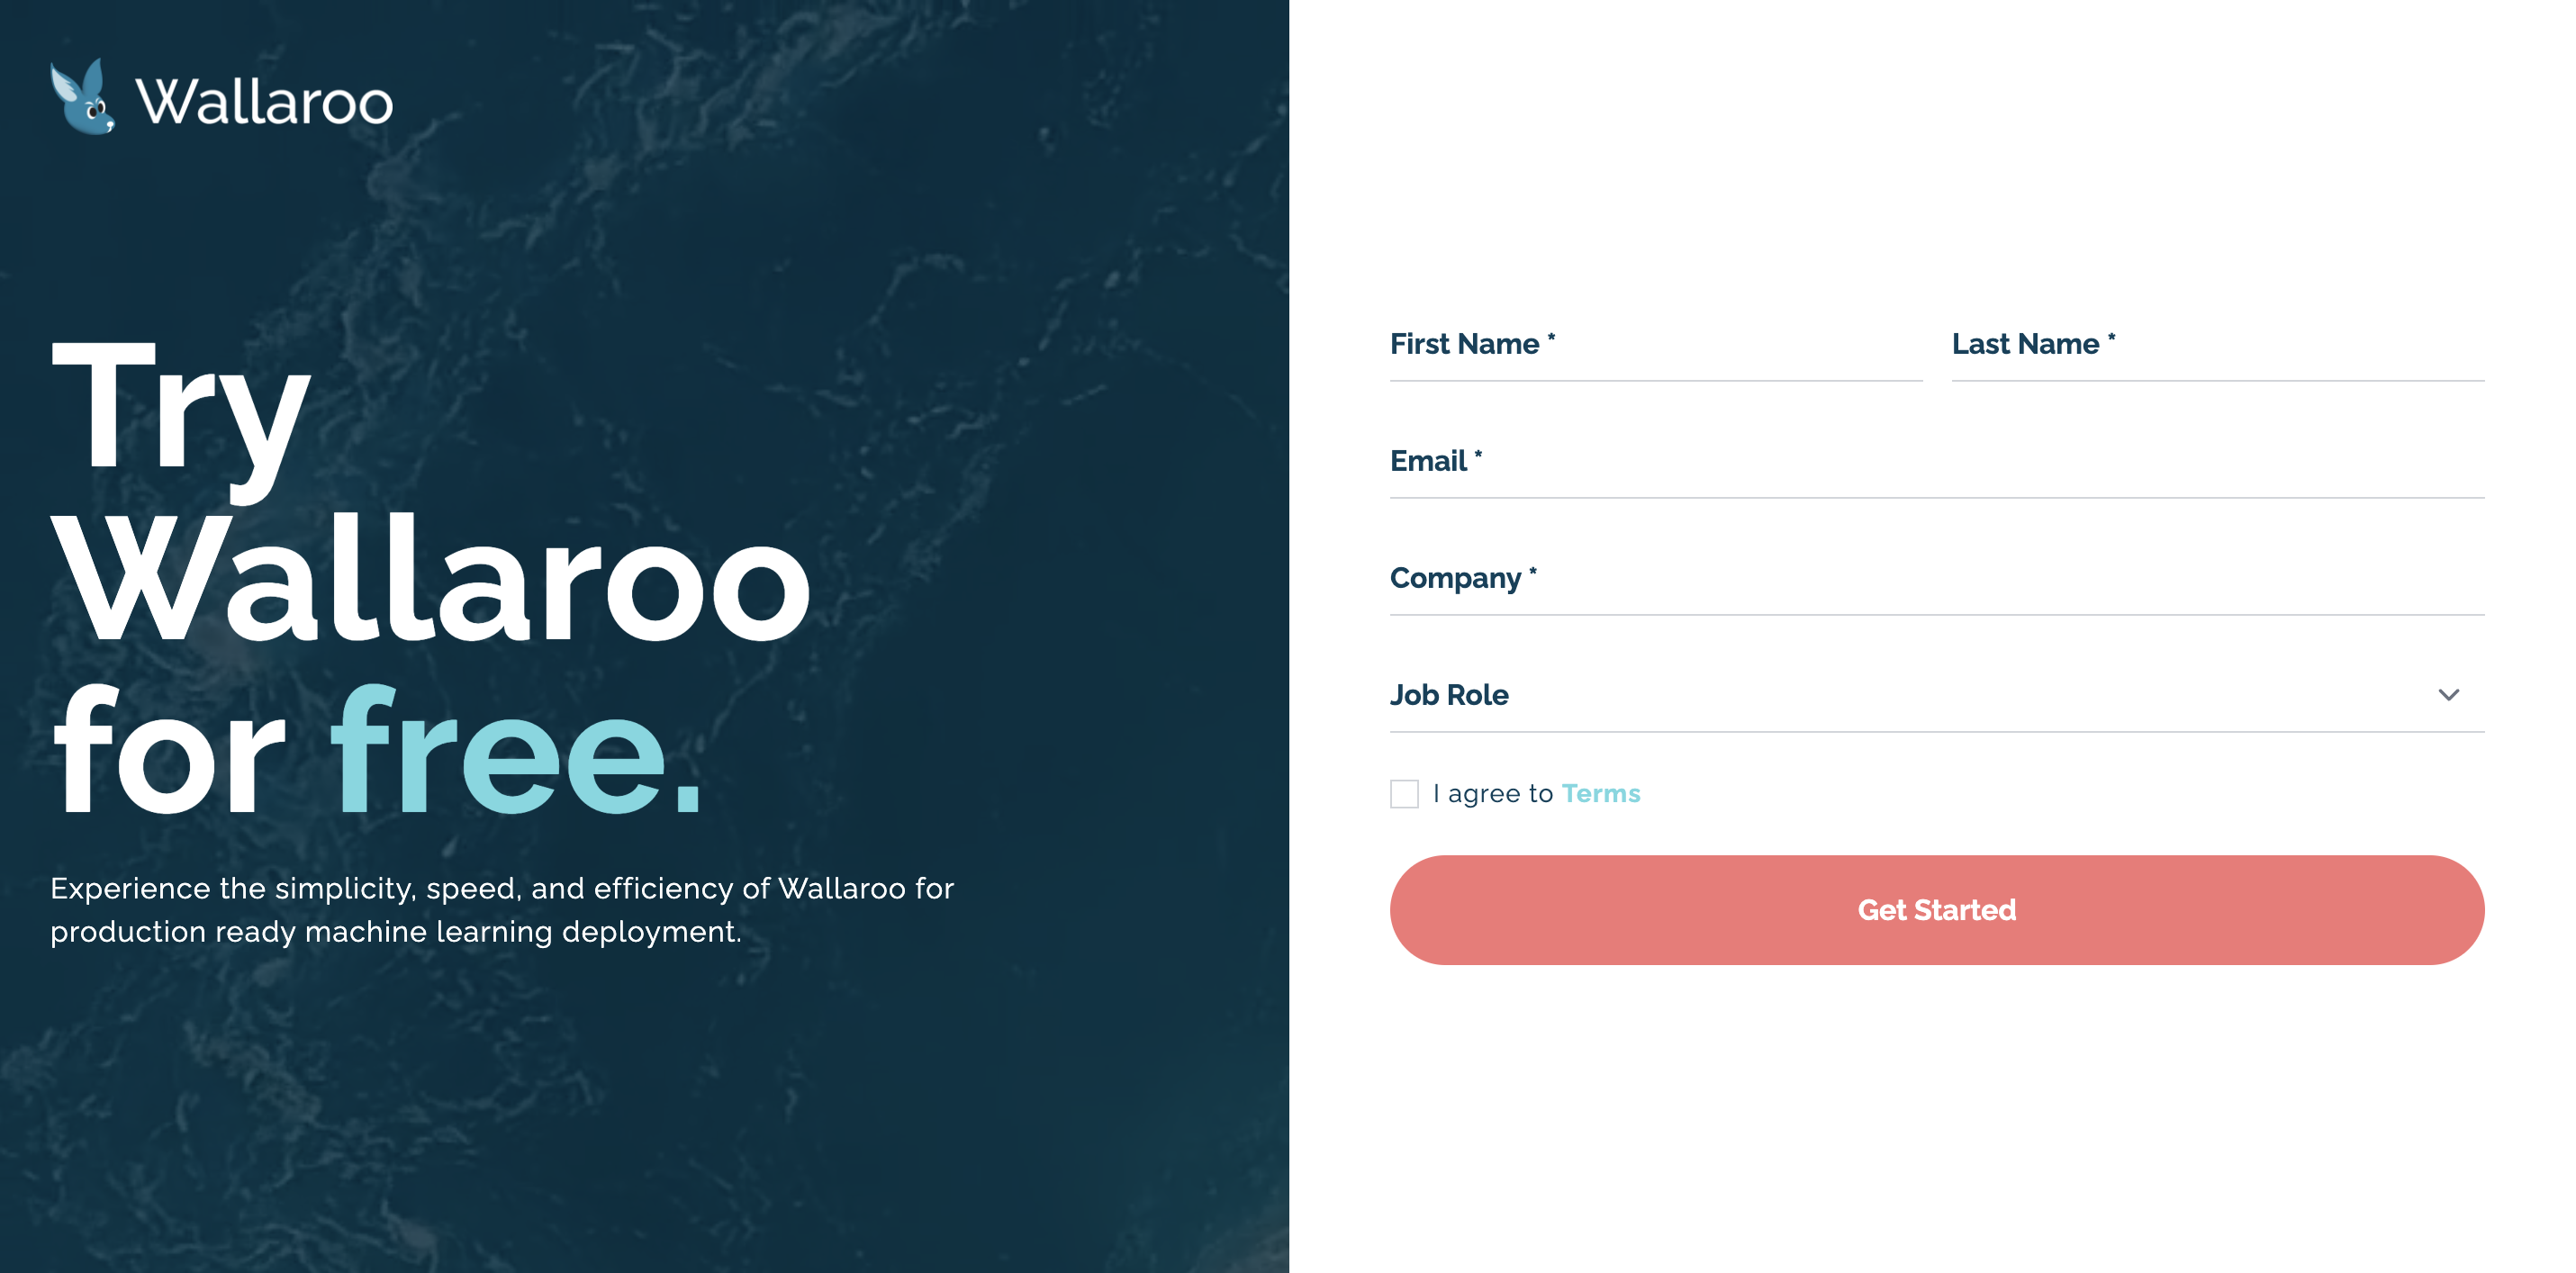
Once you’ve submitted your credentials, you’ll be sent an email with a link to your license file.
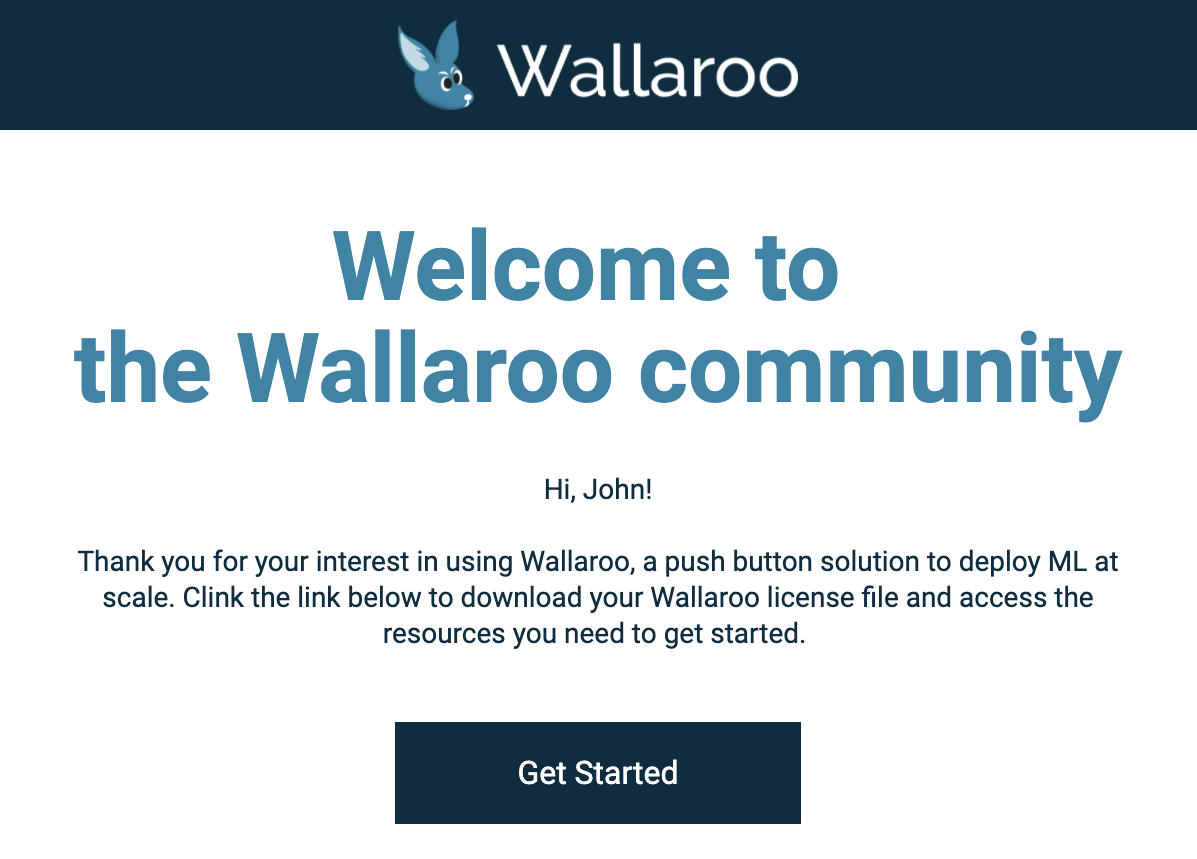
Follow the link and download your license file. Store it in a secure location.

Redownload License
If your license is misplaced or otherwise lost, it can be downloaded again later from the same link, or by following the registration steps again to be provided with a link to your license file.
Setup AWS EKS Environment for Wallaroo
The following instructions are made to assist users set up their Amazon Web Services (AWS) environment for running Wallaroo Community Edition using AWS Elastic Kubernetes Service (EKS).
These represent a recommended setup, but can be modified to fit your specific needs.
If the prerequisites are already met, skip ahead to Install Wallaroo.
The following video demonstrates this process:
To install Wallaroo in your AWS environment based on these instructions, the following prerequisites must be met:
- Register an AWS account: https://aws.amazon.com/ and assign the proper permissions according to your organization’s needs.
- The Kubernetes cluster must include the following minimum settings:
- Nodes must be OS type Linux with using the
containerddriver. - Role-based access control (RBAC) must be enabled.
- Minimum of 4 nodes, each node with a minimum of 8 CPU cores and 16 GB RAM. 50 GB will be allocated per node for a total of 625 GB for the entire cluster.
- RBAC is enabled.
- Recommended Aws Machine type:
c5.4xlarge. For more information, see the AWS Instance Types.
- Nodes must be OS type Linux with using the
- Installed eksctl version 0.101.0 and above.
AWS Cluster Recommendations
The following recommendations will assist in reducing the cost of a cloud based Kubernetes Wallaroo cluster.
Turn off the cluster when not in use. An AWS EKS (Elastic Kubernetes Services) cluster can be turn off when not in use, then turned back on again when needed. If organizations adopt this process, be aware of the following issues:
- IP Address Reassignment: The load balancer public IP address may be reassigned when the cluster is restarted by the cloud service unless a static IP address is assigned. For more information in Amazon Web Services see the Associate Elastic IP addresses with resources in your VPC user guide.
Assign to a Single Availability Zone: Clusters that span multiple availability zones may have issues accessing persistent volumes that were provisioned in another availability zone from the node when the node is restarted. The simple solution is to assign the entire cluster into a single availability zone. For more information in Amazon Web Services see the Regions and Zones guide.
The scripts and configuration files are set up to create the AWS environment for a Wallaroo instance are based on a single availability zone. Modify the script as required for your organization.
Community Cluster Setup Instructions
The following is based on the requirements for Wallaroo Community Edition. Note that Wallaroo Community Edition does not use adaptive nodepools. Adapt the settings as required for your organization’s needs, as long as they meet the prerequisites listed above.
This sample YAML file can be downloaded from here:
wallaroo_community_aws_install.yaml
apiVersion: eksctl.io/v1alpha5
kind: ClusterConfig

metadata:
  # replace with the name of your server
  name: wallarooAWS
  # replace with your location
  region: us-east-1
  version: "1.25"

addons:
  - name: aws-ebs-csi-driver

iam:
  withOIDC: true

nodeGroups:
  - name: general
    instanceType: m5.2xlarge
    desiredCapacity: 4
    containerRuntime: containerd
    amiFamily: AmazonLinux2
    availabilityZones:
      - us-east-1a
Install AWS Command Line Tools
The following steps require the installation of the following Amazon Web Services command line tools:
- AWS CLI: Complete both the AWS Command Line Installation Guide and the AWS CLI Quick Setup Guide to authenticate to your AWS account.
eksctl: A command line tool for managing Amazon EKS clusters from a configured YAML file. See the EKSCTL Install Guide for more details.
Kubectl and Kots Installation
The following software is required as part of the installation process.
- kubectl: This interfaces with the Kubernetes server created in the Wallaroo environment.
- kots Version: Used to manage software installed in a Kubernetes environment.
To install kubectl, see the kubectl Install Tools instructions.
Install kots with the following process. This assumes using an operating system like macOS or Linux; for other operating systems, see the kots documentation.
Run the following script and provide your password for the
sudobased commands when prompted.curl https://kots.io/install/1.107.2 | REPL_USE_SUDO=y bashVerify
kotswas installed with the following command:kubectl kots versionIt should return results similar to the following:
Replicated KOTS 1.107.2
For instructions on updating the kots version for the Wallaroo Community Edition installation, see Updating KOTS.
Create the Cluster
Create the cluster with the following command, which creates the environment and sets the correct Kubernetes version.
eksctl create cluster -f aws.yaml
During the process the Kuberntes credentials will be copied into the local environment. To verify the setup is complete, use the kubectl get nodes command to display the available nodes as in the following example:
kubectl get nodes
NAME                                           STATUS   ROLES    AGE     VERSION
ip-192-168-21-253.us-east-2.compute.internal   Ready    <none>   13m     v1.23.8-eks-9017834
ip-192-168-30-36.us-east-2.compute.internal    Ready    <none>   13m     v1.23.8-eks-9017834
ip-192-168-55-123.us-east-2.compute.internal   Ready    <none>   12m     v1.23.8-eks-9017834
ip-192-168-79-70.us-east-2.compute.internal    Ready    <none>   13m     v1.23.8-eks-9017834
Install Wallaroo Community
Wallaroo Community Edition can be installed into a Kubernetes cloud environment, or into a Kubernetes environment that meets the Wallaroo Prerequisites Guide. Organizations that use the Wallaroo Community Edition AWS EC2 Setup procedure do not have to set up a Kubernetes environment, as it is already configured for them.
If the prerequisites are already configured, jump to Install Wallaroo to start installing.
This video demonstrates that procedure:
The procedure assumes at least a basic knowledge of Kubernetes and how to use the kubectl and kots version 1.91.3 applications.
Prerequisites
Local Software Requirements
Before starting, verify that all local system requirements are complete as detailed in the Wallaroo Community Edition Local System Prerequisites guide:
kubectl: This interfaces with the Kubernetes server created in the Wallaroo environment.
- kots Version
1.107.2
- Cloud Kubernetes environment has been prepared.
- You have downloaded your Wallaroo Community Edition License file.
Kubectl and Kots Installation
The following software is required as part of the installation process.
- kubectl: This interfaces with the Kubernetes server created in the Wallaroo environment.
- kots Version: Used to manage software installed in a Kubernetes environment.
To install kubectl, see the kubectl Install Tools instructions.
Install kots with the following process. This assumes using an operating system like macOS or Linux; for other operating systems, see the kots documentation.
Run the following script and provide your password for the
sudobased commands when prompted.curl https://kots.io/install/1.107.2 | REPL_USE_SUDO=y bashVerify
kotswas installed with the following command:kubectl kots versionIt should return results similar to the following:
Replicated KOTS 1.107.2
For instructions on updating the kots version for the Wallaroo Community Edition installation, see Updating KOTS.
Install Wallaroo
The environment is ready, the tools are installed - let’s install Wallaroo! The following will use kubectl and kots through the following procedure:
Install the Wallaroo Community Edition using
kots install wallaroo/ce, specifying the namespace to install. For example, ifwallaroois the namespace, then the command is:kubectl kots install wallaroo/ce --namespace wallarooWallaroo Community Edition will be downloaded and installed into your Kubernetes environment in the namespace specified. When prompted, set the default password for the Wallaroo environment. When complete, Wallaroo Community Edition will display the URL for the Admin Console, and how to end the Admin Console from running.
• Deploying Admin Console
• Creating namespace ✓
• Waiting for datastore to be ready ✓
    Enter a new password to be used for the Admin Console: •••••••••••••
  • Waiting for Admin Console to be ready ✓

• Press Ctrl+C to exit
• Go to http://localhost:8800 to access the Admin Console
Wallaroo Community Edition will continue to run until terminated. To relaunch in the future, use the following command:
kubectl kots admin-console --namespace wallaroo
Initial Configuration and License Upload Procedure
Once Wallaroo Community Edition has been installed for the first time, we can perform initial configuration and load our Wallaroo Community Edition license file through the following process:
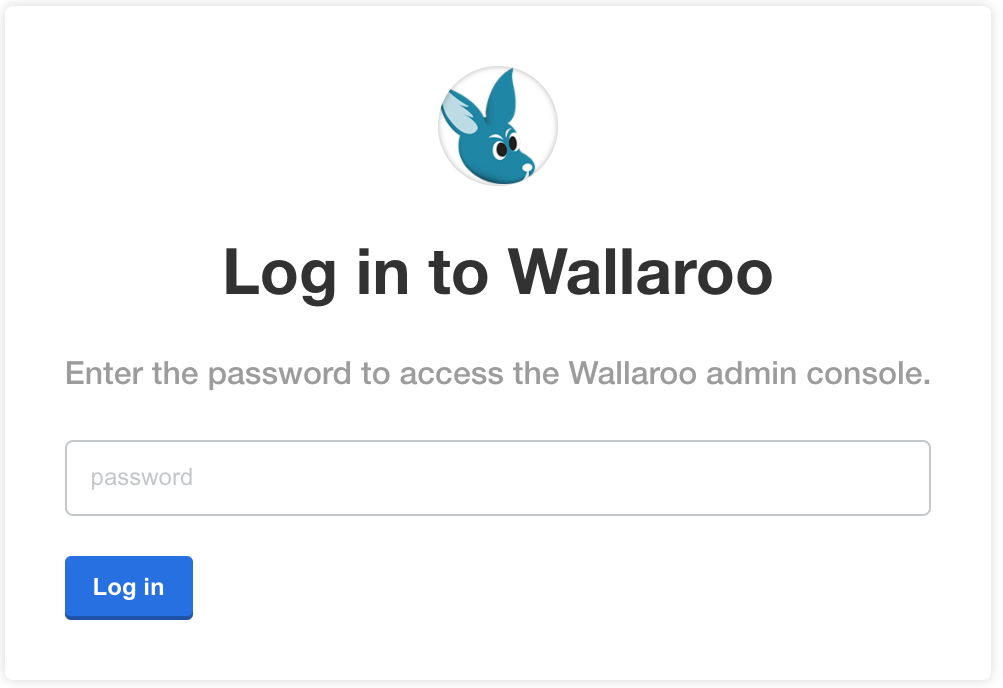
If Wallaroo Community Edition has not started, launch it with the following command:
❯ kubectl kots admin-console --namespace wallaroo
  • Press Ctrl+C to exit
  • Go to http://localhost:8800 to access the Admin Console
Enter the Wallaroo Community Edition Admin Console address into a browser. You will be prompted for the default password as set in the step above. Enter it and select Log in.
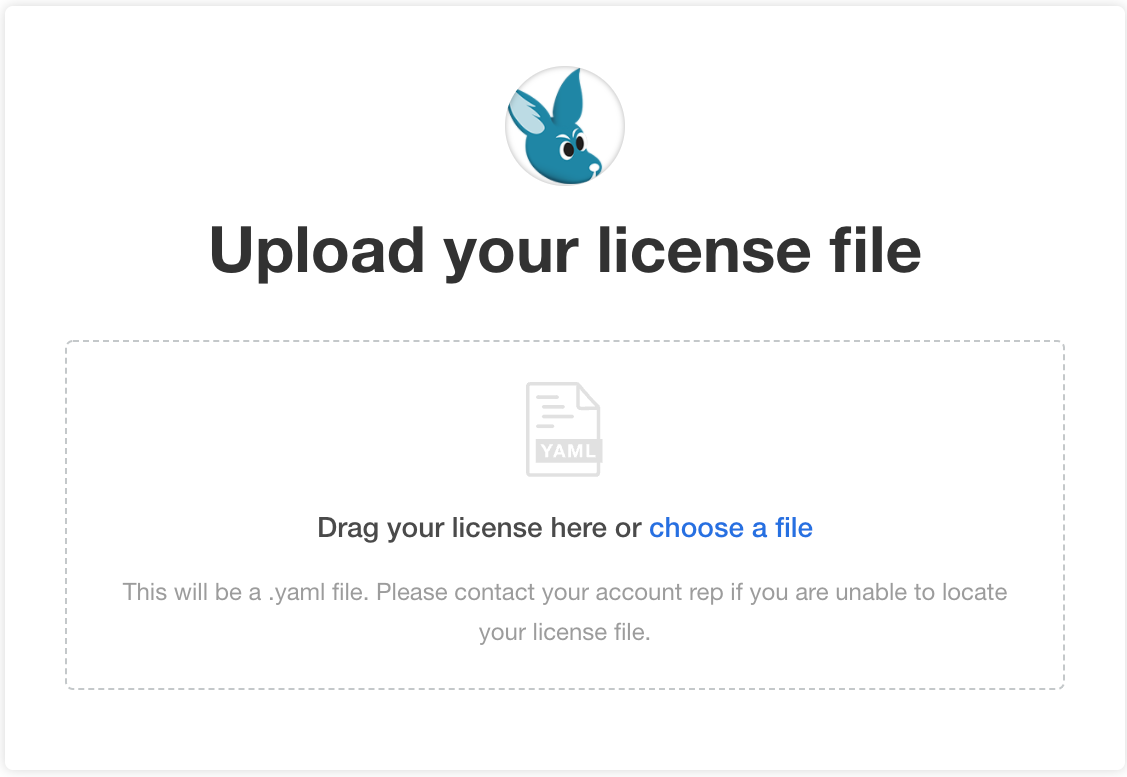
Upload your license file.
The Configure Wallaroo Community page will be displayed which allows you to customize your Wallaroo environment. For now, scroll to the bottom and select Continue. These settings can be customized at a later date.
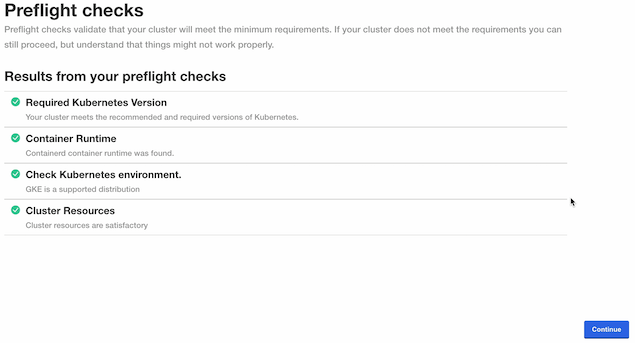
The Wallaroo Community Edition Admin Console will run the preflight checks to verify that all of the minimum requirements are met. This may take a few minutes. If there are any issues, Wallaroo can still be launched but may not function properly. When ready, select Continue.
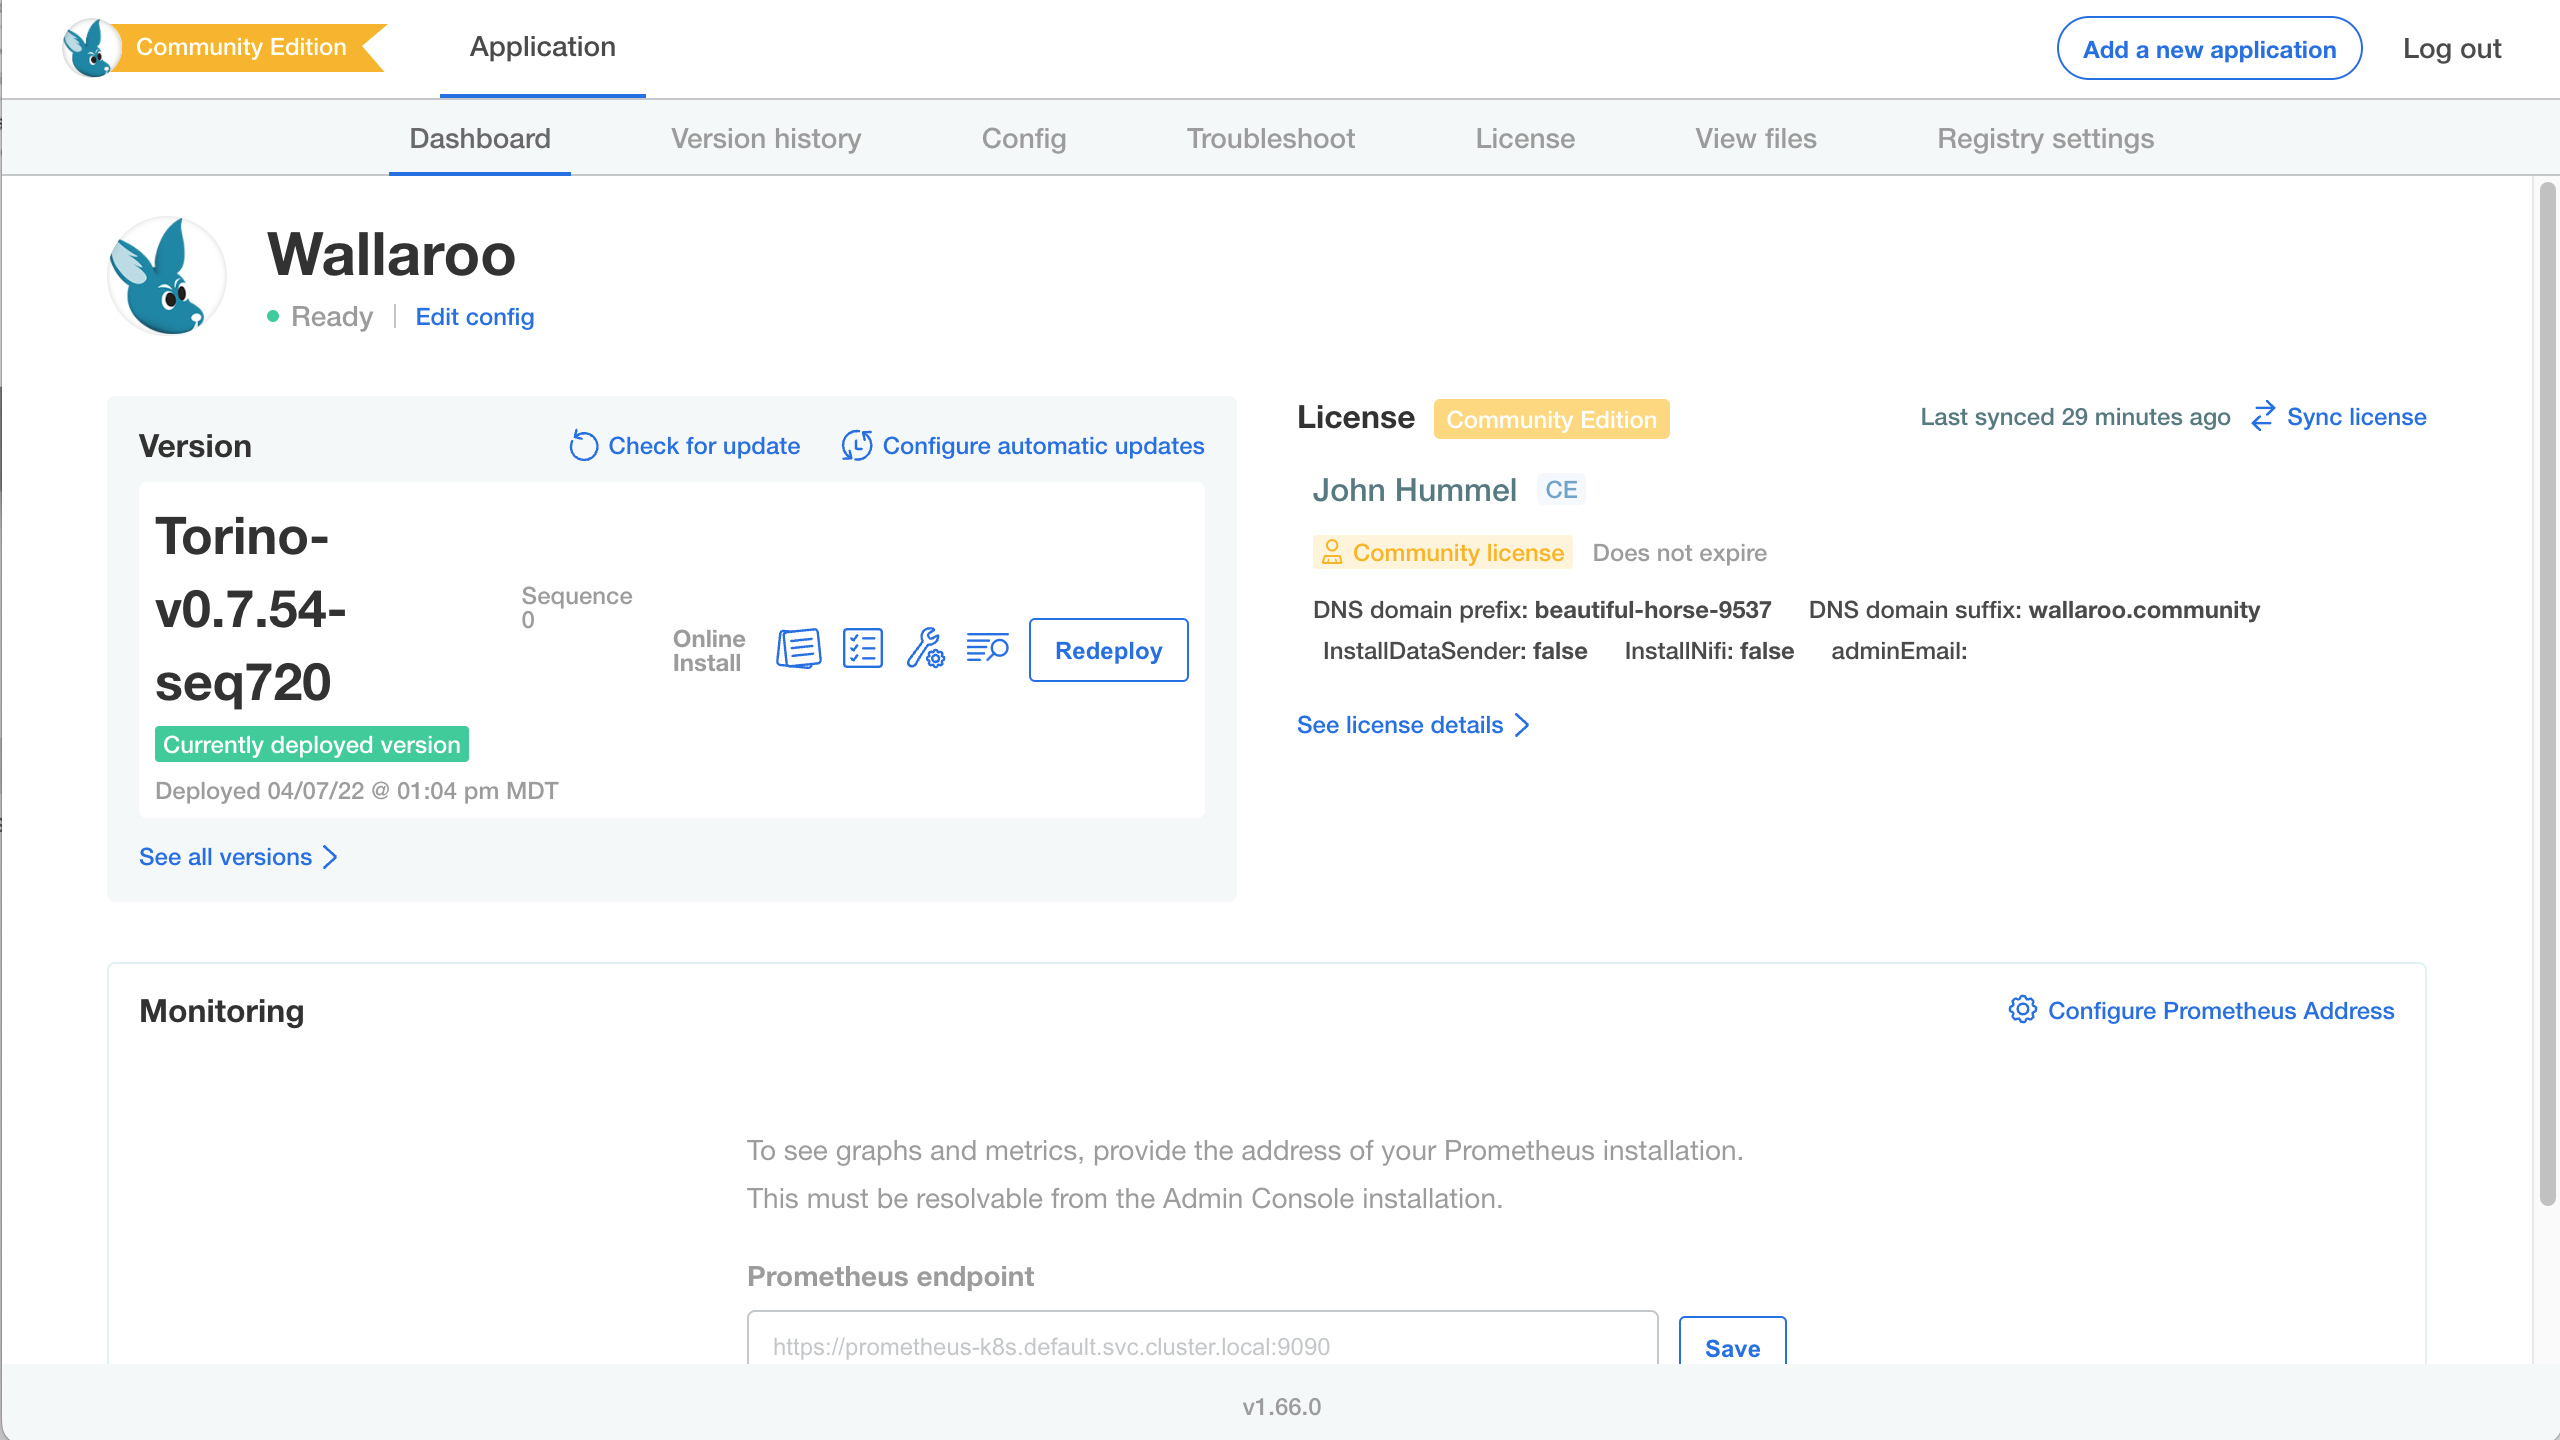
The Wallaroo Community Edition Dashboard will be displayed. There may be additional background processes that are completing their setup procedures, so there may be a few minute wait until those are complete. If everything is ready, then the Wallaroo Dashboard will show a green Ready.
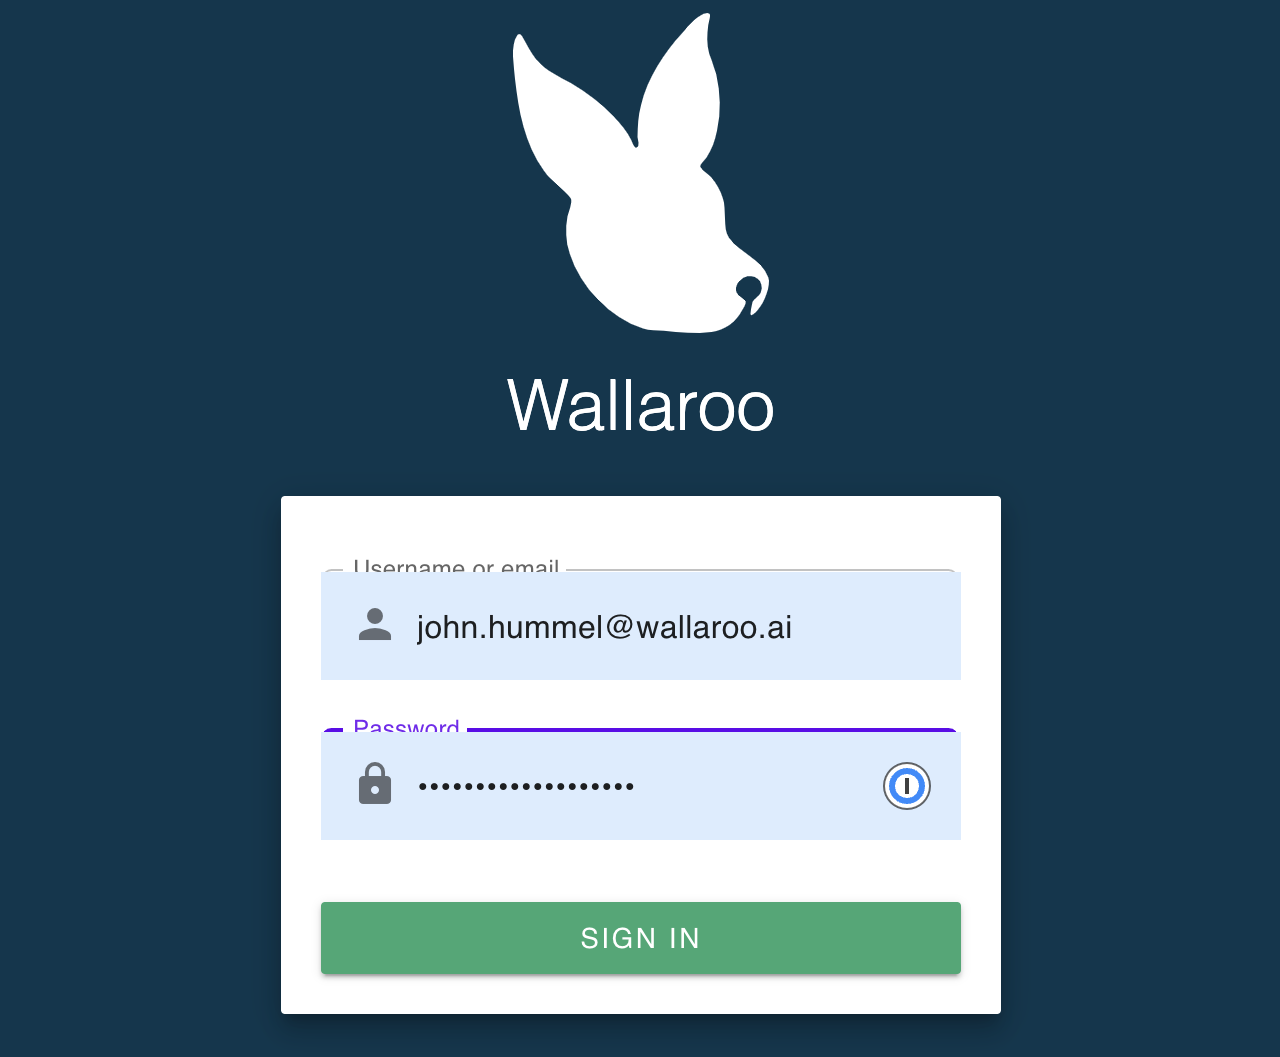
You will receive an email invitation for the email address connected to this URL with a temporary password and a link to this Wallaroo instance’s URL. Either enter the URL for your Wallaroo instance or use the link in the email.
To login to your new Wallaroo instance, enter the email address and temporary password associated with the license.
With that, Wallaroo Community Edition is launched and ready for use! You can end the Admin Console from your terminal session above. From this point on you can just use the Wallaroo instance URL.
Now that your Wallaroo Community Edition has been installed, let’s work with some sample models to show off what you can do. Check out either the Wallaroo 101 if this is your first time using Wallaroo, or for more examples of how to use Wallaroo see the Wallaroo Tutorials.
Troubleshooting
Issue
If you see an error similar to failed to deploy admin console: failed to wait for {some node}: timeout waiting for {some node}, it may be because the connection between your local system and the cloud service is slow, or related issues.
If this occurs, adding the option --wait-duration 5m give enough time for nodes to finish starting.