This tutorial and the assets can be downloaded as part of the Wallaroo Tutorials repository.
U-Net for Brain Segmentation Deployment in Wallaroo
The following example uses the U-Net for brain segmentation model trained to detect lower-grade gliomas to demonstrate how to:
- Deploy the model into a Wallaroo Ops server.
- Perform a sample inferences via the Wallaroo SDK and the API calls.
Prerequisites
- A Wallaroo Community Edition or Enterprise Edition server with Edge Deployment enabled.
Tutorial Steps
Import Libraries
The first step is to import the libraries we’ll be using. These are included by default in the Wallaroo instance’s JupyterHub service.
Verify that the following Python libraries are installed. The wallaroo library is included with the Wallaroo Ops JupyterHub instance.
pillowtorchvisionpandaspyarrowwallarooReferences
import wallaroo
from wallaroo.pipeline   import Pipeline
from wallaroo.deployment_config import DeploymentConfigBuilder
from wallaroo.framework import Framework

# used to convert the Image into a numpy array
from PIL import Image
from torchvision import transforms

import pyarrow as pa
import numpy as np
import pandas as pd

import requests

# used to display dataframe information without truncating
from IPython.display import display
pd.set_option('display.max_colwidth', None)
Connect to the Wallaroo Instance
The first step is to connect to Wallaroo through the Wallaroo client. The Python library is included in the Wallaroo install and available through the Jupyter Hub interface provided with your Wallaroo environment.
This is accomplished using the wallaroo.Client() command, which provides a URL to grant the SDK permission to your specific Wallaroo environment. When displayed, enter the URL into a browser and confirm permissions. Store the connection into a variable that can be referenced later.
If logging into the Wallaroo instance through the internal JupyterHub service, use wl = wallaroo.Client(). For more information on Wallaroo Client settings, see the Client Connection guide.
The option request_timeout provides additional time for the Wallaroo model upload process to complete.
wl = wallaroo.Client()
Create Workspace
We will create a workspace to manage our pipeline and models. The following variables will set the name of our sample workspace then set it as the current workspace.
Workspace names must be unique. The following helper function will either create a new workspace, or retrieve an existing one with the same name. Verify that a pre-existing workspace has been shared with the targeted user.
Set the variables workspace_name to ensure a unique workspace name if required.
The workspace will then be set as the Current Workspace. Model uploads and pipeline creation through the SDK are set in the current workspace.
def get_workspace(name, client):
    workspace = None
    for ws in client.list_workspaces():
        if ws.name() == name:
            workspace= ws
    if(workspace == None):
        workspace = client.create_workspace(name)
    return workspace

workspace_name = "unet-detection"
model_name = "pt-unet"
model_file_name = './models/unet.pt'
pipeline_name = "pt-unet"

workspace = get_workspace(workspace_name, wl)
wl.set_current_workspace(workspace)
{'name': 'unet-detection', 'id': 80, 'archived': False, 'created_by': '2ea98261-c84d-44b1-ac86-ff932e65b285', 'created_at': '2024-01-18T18:30:08.286449+00:00', 'models': [], 'pipelines': []}
Upload Model
The model is uploaded as a PyTorch model. This requires the input and output schemas for the model specified in Apache Arrow Schema format.
import pyarrow as pa

input_schema = pa.schema([
    pa.field('input', pa.list_(
        pa.list_(
            pa.list_(
                pa.float32(),
                list_size=256
            ),
            list_size=256
        ),
        list_size=3
    )),
])

output_schema = pa.schema([
    pa.field('output', pa.list_(
        pa.list_(
            pa.list_(
                pa.float32(),
                list_size=256
            ),
            list_size=256
        ),
        list_size=1
    )),
])
modelpath = 'models/unet.pt'

model = wl.upload_model(model_name,
                        model_file_name,
                        framework=Framework.PYTORCH,
                        input_schema=input_schema,
                        output_schema=output_schema)
model
Waiting for model loading - this will take up to 10.0min.
Model is pending loading to a native runtime......
Model is pending loading to a container runtime...
Model is attempting loading to a container runtime........................................................successful

Ready
| Name | pt-unet |
| Version | 5a0f70fc-e33b-487c-80c9-24e23e5621b5 |
| File Name | unet.pt |
| SHA | dfcd4b092e05564c36d28f1dfa7293f4233a384d81fe345c568b6bb68cafb0c8 |
| Status | ready |
| Image Path | proxy.replicated.com/proxy/wallaroo/ghcr.io/wallaroolabs/mlflow-deploy:v2023.4.0-4329 |
| Architecture | None |
| Updated At | 2024-18-Jan 18:37:44 |
model.config().runtime()
'flight'
Deploy Pipeline
We create the pipeline with the wallaroo.client.build_pipeline method, and assign our model as a model pipeline step. Once complete, we will deploy the pipeline to allocate resources from the Kuberntes cluster hosting the Wallaroo Ops to the pipeline.
pipeline = wl.build_pipeline(pipeline_name)
pipeline.add_model_step(model)
| name | pt-unet |
|---|---|
| created | 2024-01-18 18:38:16.925353+00:00 |
| last_updated | 2024-01-18 18:38:16.925353+00:00 |
| deployed | (none) |
| arch | None |
| tags | |
| versions | 4cbe7bae-2839-490f-b053-d164d2ec2fa4 |
| steps | |
| published | False |
Next we configure the hardware we want to use for deployment. If we plan on eventually deploying to edge, this is a good way to simulate edge hardware conditions.
The pipeline is then deployed with our deployment configuration, which allocates cluter resources to the pipeline.
deployment_config = DeploymentConfigBuilder() \
    .cpus(0.25).memory('1Gi') \
    .build()
pipeline.deploy(deployment_config=deployment_config)
pipeline.status()
{'status': 'Running',
 'details': [],
 'engines': [{'ip': '10.244.11.14',
   'name': 'engine-5474f857f5-2hf6l',
   'status': 'Running',
   'reason': None,
   'details': [],
   'pipeline_statuses': {'pipelines': [{'id': 'pt-unet',
      'status': 'Running'}]},
   'model_statuses': {'models': [{'name': 'pt-unet',
      'version': '5a0f70fc-e33b-487c-80c9-24e23e5621b5',
      'sha': 'dfcd4b092e05564c36d28f1dfa7293f4233a384d81fe345c568b6bb68cafb0c8',
      'status': 'Running'}]}}],
 'engine_lbs': [{'ip': '10.244.14.40',
   'name': 'engine-lb-584f54c899-rt426',
   'status': 'Running',
   'reason': None,
   'details': []}],
 'sidekicks': [{'ip': '10.244.11.13',
   'name': 'engine-sidekick-pt-unet-33-7656bfd59c-l94l8',
   'status': 'Running',
   'reason': None,
   'details': [],
   'statuses': '\n'}]}
Test Inference
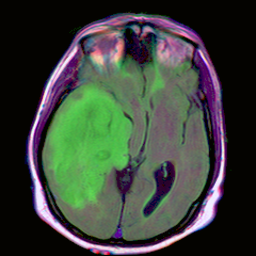
We will perform a test inference by converting the file TCGA_CS_4944.png into a numpy array, and setting that as a row in a DataFrame for our inference request.
input_image = Image.open(filename)
display(input_image)

# preprocess
m, s = np.mean(input_image, axis=(0, 1)), np.std(input_image, axis=(0, 1))
preprocess = transforms.Compose([
    transforms.ToTensor(),
    transforms.Normalize(mean=m, std=s),
])
input_tensor = preprocess(input_image)
input_batch = input_tensor.unsqueeze(0)

nimage = input_batch.detach().numpy()
nimage.shape
(1, 3, 256, 256)
nimage = input_tensor.detach().numpy()

input_data = {
        "input": [nimage]
}
dataframe = pd.DataFrame(input_data)
We can now perform an inference in two ways:
- Wallaroo SDK: The method
wallaroo.pipeline.inferaccepts a DataFrame or Apache Arrow table and returns an inference result. - Wallaroo Pipline Inference URL: Deployed pipelines provide an inference URL that accepts a DataFrame or Apache Arrow table through an API call.
For this demonstration and to save space in the notebook, only the first few elements are shown.
- References
# inference via the Wallaroo SDK
result = pipeline.infer(dataframe)
result['out.output'][0][0][0][0:5]
[1.471237e-05, 1.4594775e-05, 1.3948557e-05, 1.3920214e-05, 1.4539372e-05]
# inference via the Wallaroo Pipeline Inference URL

headers = wl.auth.auth_header()

headers['Content-Type'] = 'application/json; format=pandas-records'

deploy_url = pipeline._deployment._url()

response = requests.post(
                    deploy_url,
                    headers=headers,
                    data=dataframe.to_json(orient="records")
                )

display(pd.DataFrame(response.json()).loc[0, 'out']['output'][0][0][0:5])
[1.471237e-05, 1.4594775e-05, 1.3948557e-05, 1.3920214e-05, 1.4539372e-05]
Undeploy the Pipeline
With the inference tests complete, we can undeploy the pipeline and return the resources back to the cluster.
pipeline.undeploy()
| name | pt-unet |
|---|---|
| created | 2024-01-18 18:38:16.925353+00:00 |
| last_updated | 2024-01-18 18:38:22.401026+00:00 |
| deployed | False |
| arch | None |
| tags | |
| versions | eb58f095-c1a1-4a92-af7b-7b8305a5dd65, 4cbe7bae-2839-490f-b053-d164d2ec2fa4 |
| steps | pt-unet |
| published | False |