Wallaroo provides the Wallaroo Enterprise Edition through the Microsoft Azure marketplace:
Azure Marketplace Offering Install Instructions
The following describes how to set up Wallaroo.AI Enterprise Edition through the Microsoft Azure Marketplace.
VM Setup
- From the Wallaroo.AI Enterprise Edition Azure Marketplace entry, select the plan “Wallaroo.AI Enterprise Edition” and select Create.
- Under Create a virtual machine, set the following required options. Set other options based on the organization requirements.
Basic
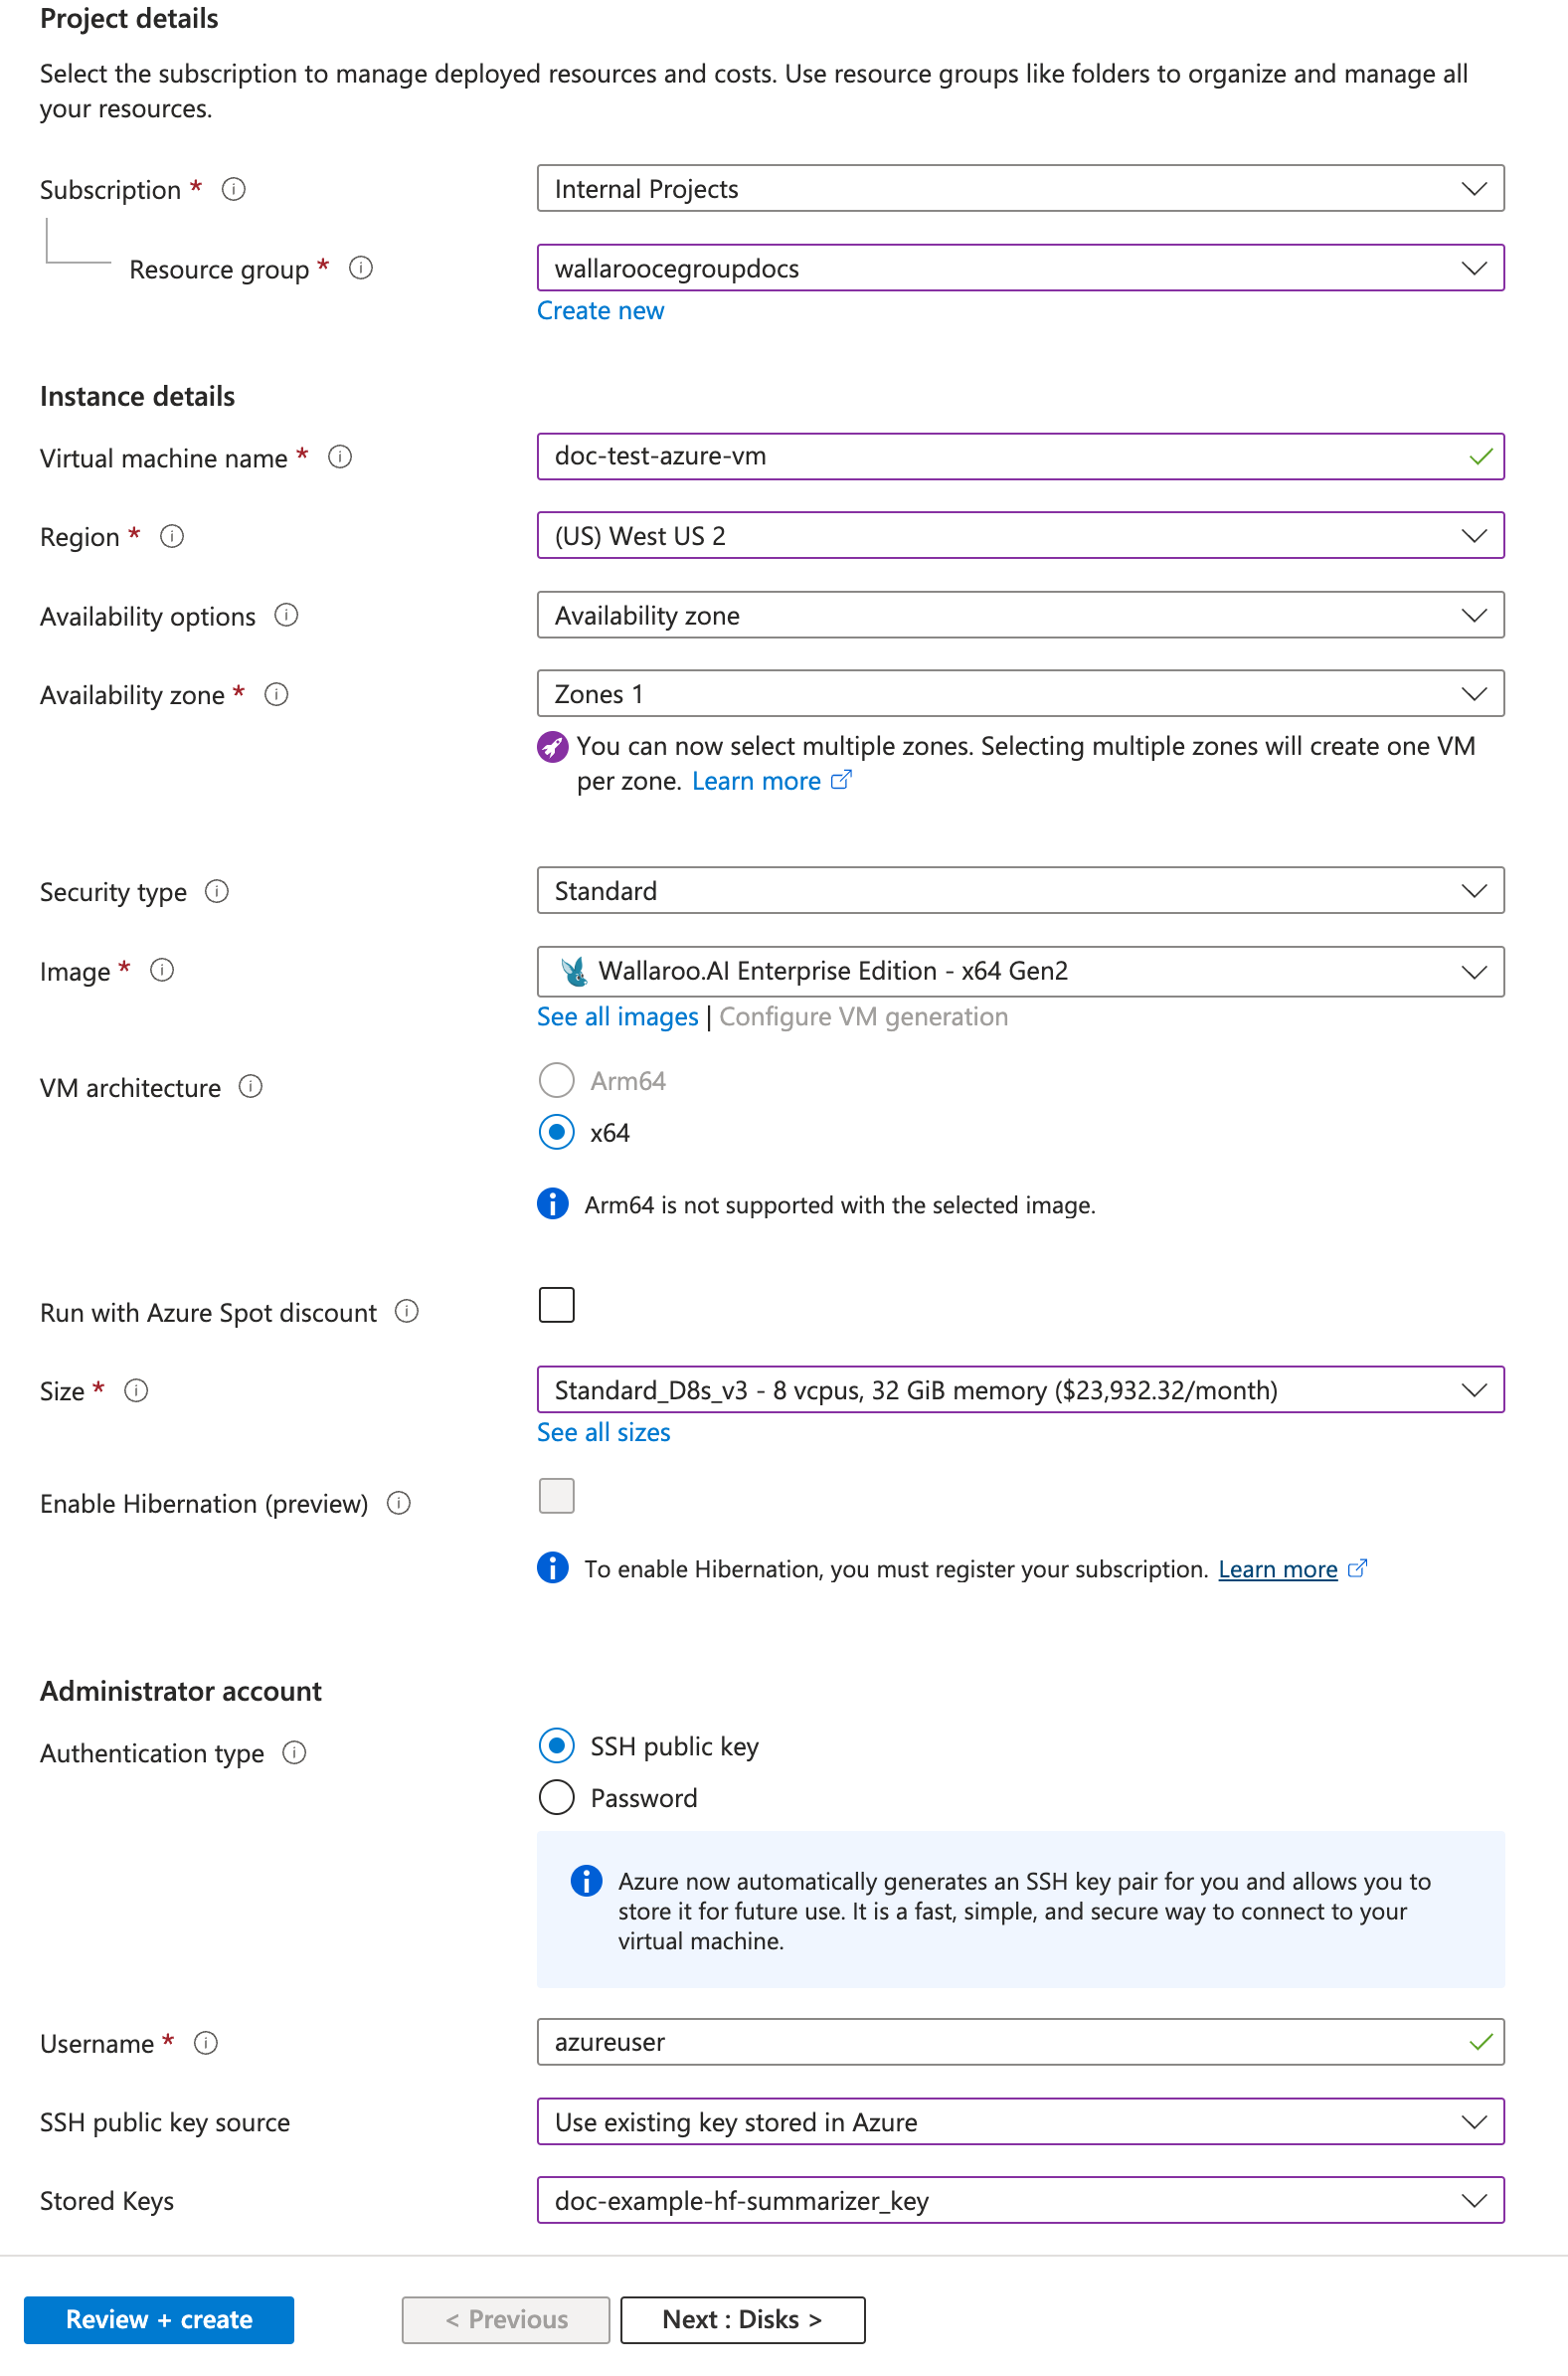
- Subscription: Select which project to assign the subscription to.
- Resource Group: Either create or assign a resource group to the project.
- Virtual Machine Name: Create a machine name. It is recommended that the virtual machine name by DNS compliant so the generated host name matches.
- Image: Select Wallaroo.AI Enterprise Edition - x64 Gen2.
- VM architecture: Set to
x64. - Size: The VM hosting the Wallaroo Enterprise instance must comply with the Wallaroo Prerequisites. VMs of this size that meet these requirements include the Standard_D32s_v5.
Networking
- Verify that the virtual network includes a public IP address with the following security group settings:
- Incoming ports are open:
- 22
- 443
- 30000
- Incoming ports are open:
- Verify that the virtual network includes a public IP address with the following security group settings:
- When finished, select Review and Create.
The initialization process will take approximately 15 minutes.
Configure Wallaroo
Once installed, Wallaroo will continue to run until terminated.
Setup DNS Addresses and SSL Certificates
To access Wallaroo from the public internet, the proper SSL certificates and DNS settings must be completed for users to access the Wallaroo instance.
The following is an abbreviated version of preparing DNS services with a Wallaroo instance. See the DNS Integration Guide for complete details.
- Create a CA-signed TLS certificate for your Wallaroo domain with the following settings:
- Certificate Authority Options:
- Use a public Certificate Authority such as Let’s Encrypt or Verisign. In general, you would send a Certificate Signing Request to your CA and they would respond with your certificates.
- Use a private Certificate Authority (CA) to provide the certificates. Your organization will have procedures for clients to verify the certificates from the private CA.
- Use a Wallaroo certificate and public name server. Contact our CSS team for details.
- Subject Domain:
- Set the certificate’s Subject CN to your Wallaroo domain.
- With Wildcards: To use wildcards, use the wildcard
*.{suffix domain}. For example, if the domain suffix iswallaroo.example.com, then the Subject CNs would be:- wallaroo.example.com
- *.wallaroo.example.com
- If wildcard domains are not desired, use a combination of Subject and Subject Alternative Names to set names as follows:
wallaroo.example.comapi.wallaroo.example.comjupyter.wallaroo.example.comkeycloak.wallaroo.example.com
- With Wildcards: To use wildcards, use the wildcard
- Set the certificate’s Subject CN to your Wallaroo domain.
- Save your certificates.
- You should have two files: the TLS Certificate (
.crt) and TLS private key (.key). Store these in a secure location - these will be installed into Wallaroo at a later step.
- You should have two files: the TLS Certificate (
- Certificate Authority Options:
- Create DNS the following entries based on the list above for the Wallaroo instance’s IP address.
- Suffix domain: A record, NS (Name Server) record, SOA (Start Of Authority) record.
- api, jupyter, keycloak: CName records that point to the suffix domain.
Access kubectl CLI through the VM
Some installation steps require the use of Kubernetes aka kubectl commands executed from within the VM.
To access Kubernetes aka kubectl commands for the Wallaroo instance:
SSH into the Azure hosted virtual machine based on the installation settings (ssh-key, password, etc). For example, if using a SSH key, to login and using the default user
azureuser, the command would be:ssh -i ssh-key.pem azureuser@IPADDRESSSwitch to the
rootuser withsudo su root.Run
wallaroo-cluster shellto access the Kubernetes commands throughkubectl. The Wallaroo instance is installed in the Kubernetes namespaceembedded-cluster.
Access the Wallaroo Administrative Dashboard
Once the VM is ready and has completed its setup, the Wallaroo Administrative Dashboard - aka the Kots Console - is available through port 30000 in a browser. This is requires to complete the installation process.
- Access the Wallaroo Administrative Dashboard at the public IP address port 30000 in a browser. For example:
https://IPADDRESS:30000. - Enter the initial console password of
Wa11y$. - Provide your Wallaroo Enterprise license file.
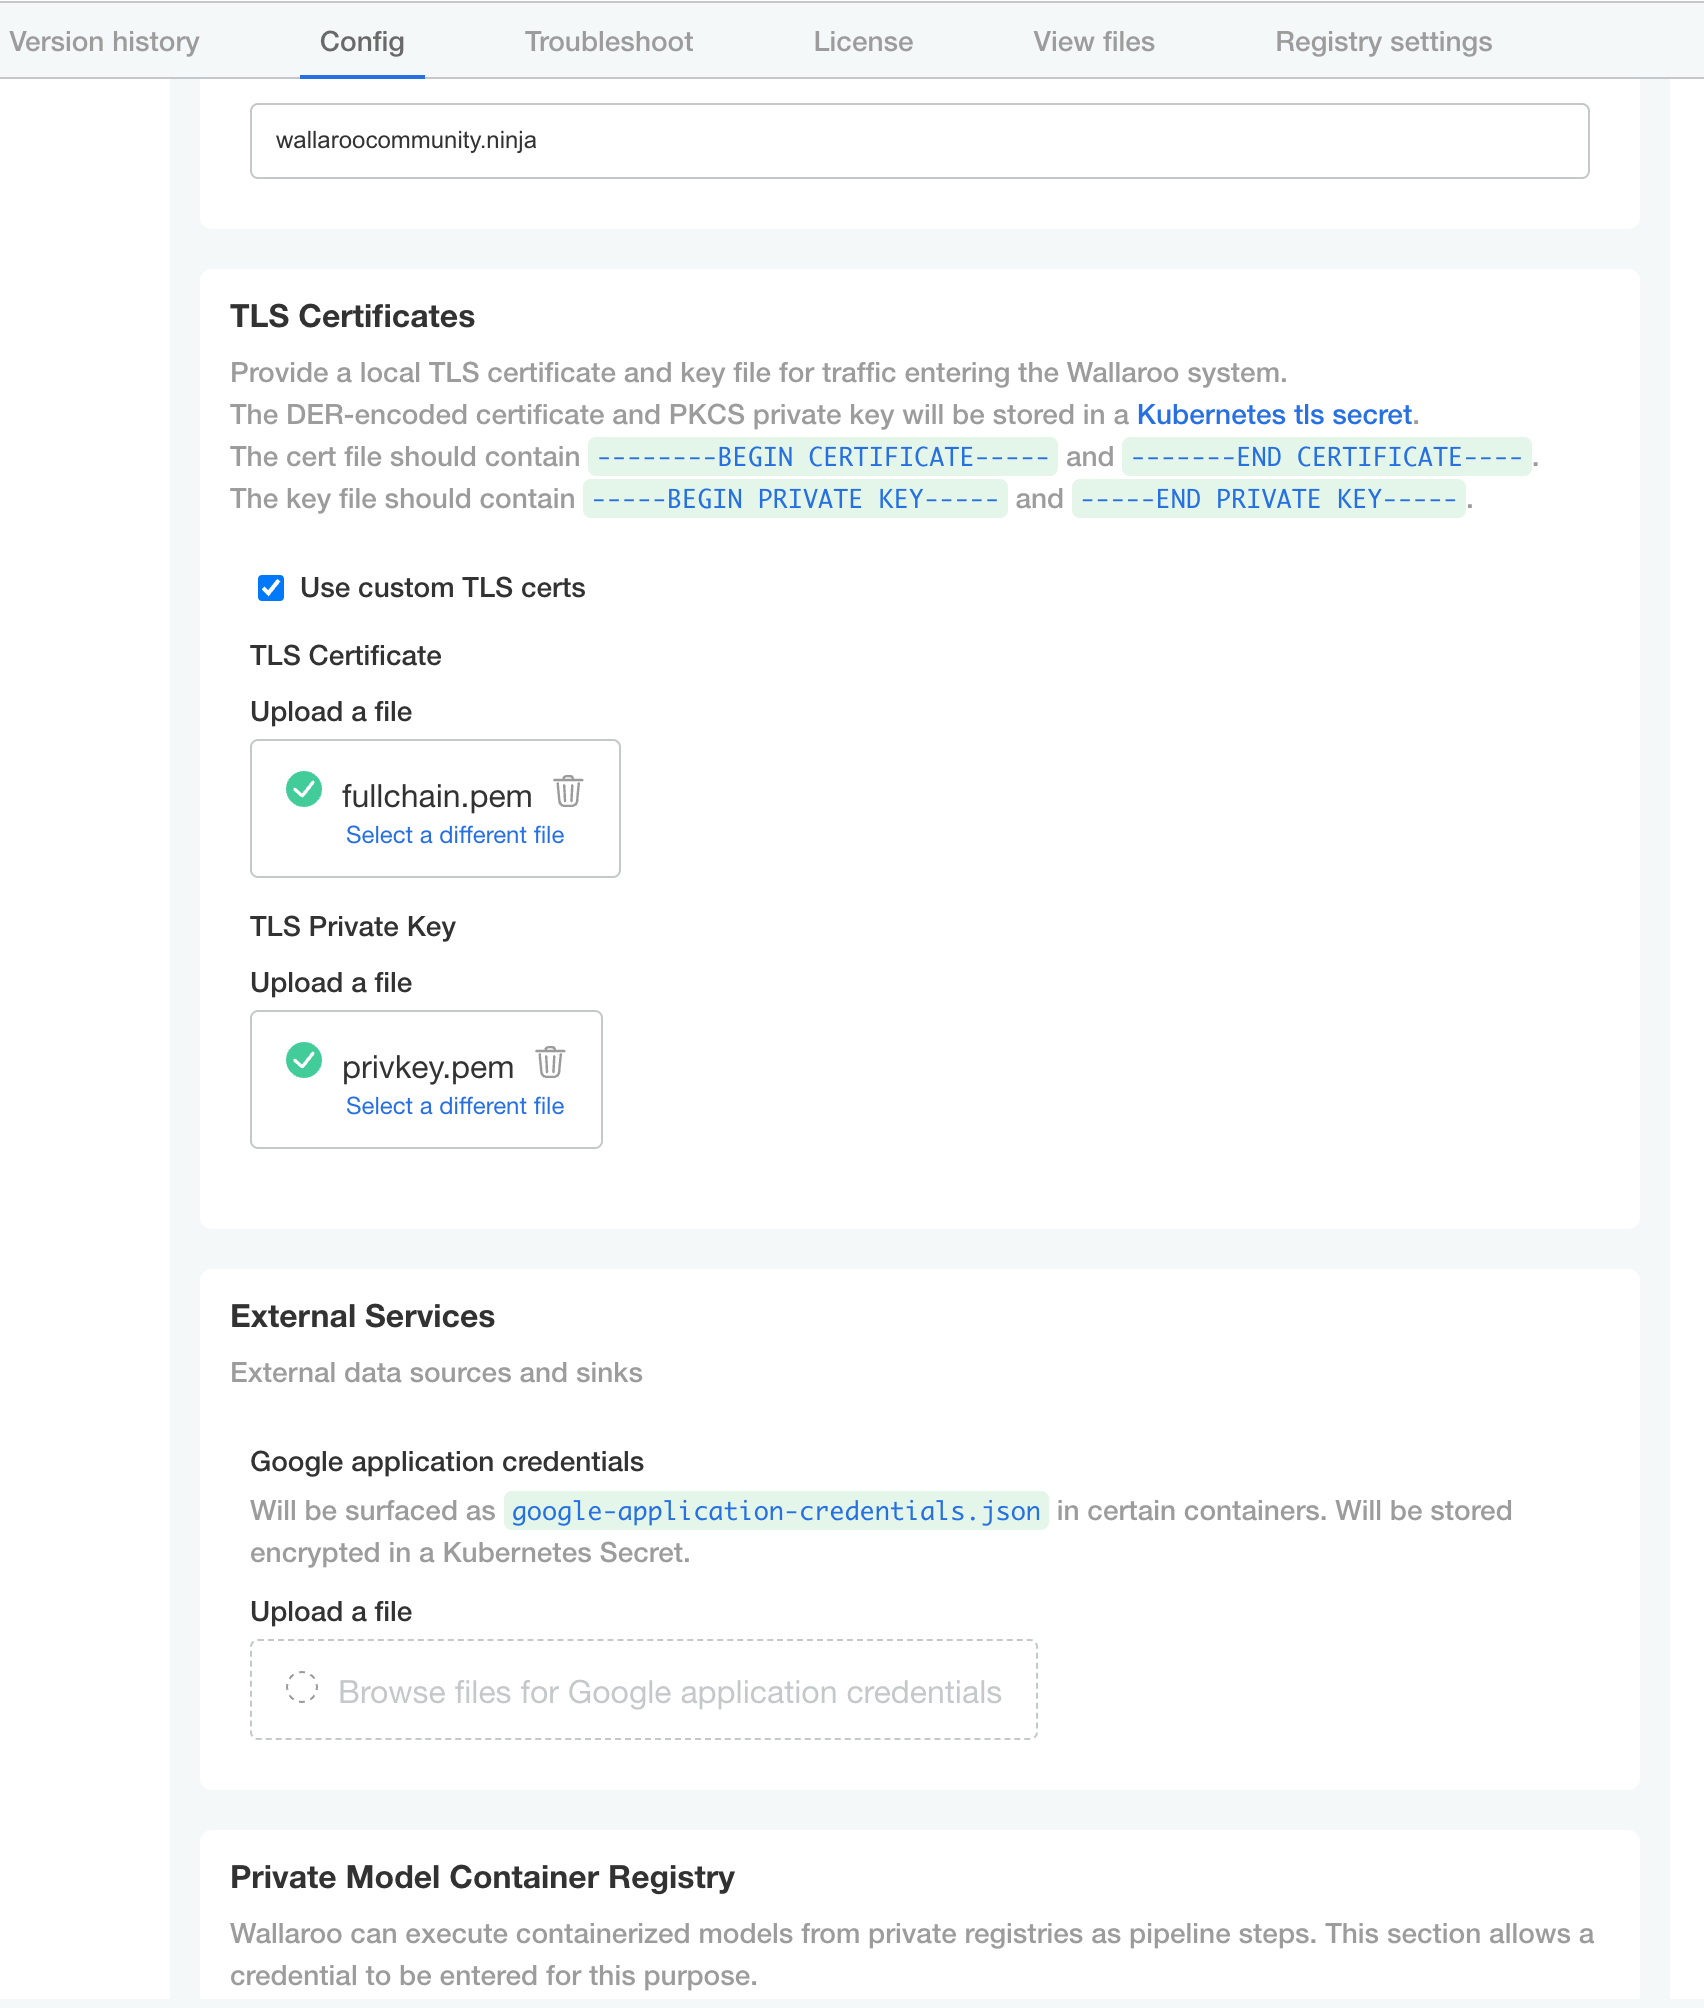
Configure Wallaroo DNS and Certificates Integration
Integrating the DNS services with Wallaroo instance is a required step before accessing Wallaroo services including user administration, JupyterHub, etc.
Wallaroo Enterprise requires integration into your organizations DNS services.
The DNS Integration Guide details adding the Wallaroo instance to an organizations DNS services. The following is an abbreviated guide that assumes that certificates were already generated.
To integrate the Wallaroo instance IP address with a DNS service:
From the Wallaroo Dashboard, select Config and set the following:
- Networking Configuration
- Ingress Mode for Wallaroo Endpoints:
- None: Port forwarding or other methods are used for access.
- Internal: For environments where only nodes within the same Kubernetes environment and no external connections are required.
- External: Connections from outside the Kubernetes environment is allowed.
- Enable external URL inference endpoints: Creates pipeline inference endpoints. For more information, see Model Endpoints Guide.
- Ingress Mode for Wallaroo Endpoints:
- DNS
- DNS Suffix (Mandatory): The domain name for your Wallaroo instance.
- TLS Certificates
- Use custom TLS Certs: Checked
- TLS Certificate: Enter your TLS Certificate (.crt file).
- TLS Private Key: Enter your TLS private key (.key file).
- Other settings as desired.
- Networking Configuration
Configure Other Wallaroo Options
For complete options, see the Wallaroo Configuration Guide. The only required configuration are DNS and certificate settings.
- Once complete, scroll to the bottom of the Config page and select Save config.
- A pop-up window will display The config for Wallaroo Enterprise has been updated.. Select Go to updated version to continue.
- From the Version History page, select Deploy. Once the new deployment is finished, you will be able to access your Wallaroo services via their DNS addresses.
To verify the configuration is complete, access the Wallaroo Dashboard through the suffix domain. For example if the suffix domain is wallaroo.example.com then access https://wallaroo.example.com in a browser and verify the connection and certificates.
Change Wallaroo Administrative Dashboard Password
To change the password to the Wallaroo Administrative Dashboard:
From the command line, use the command:
kubectl kots reset-password -n {namespace}For example, for default installations where the Kubernetes namespace is
wallaroo, the command would be:kubectl kots reset-password -n wallarooFrom here, enter the new password.
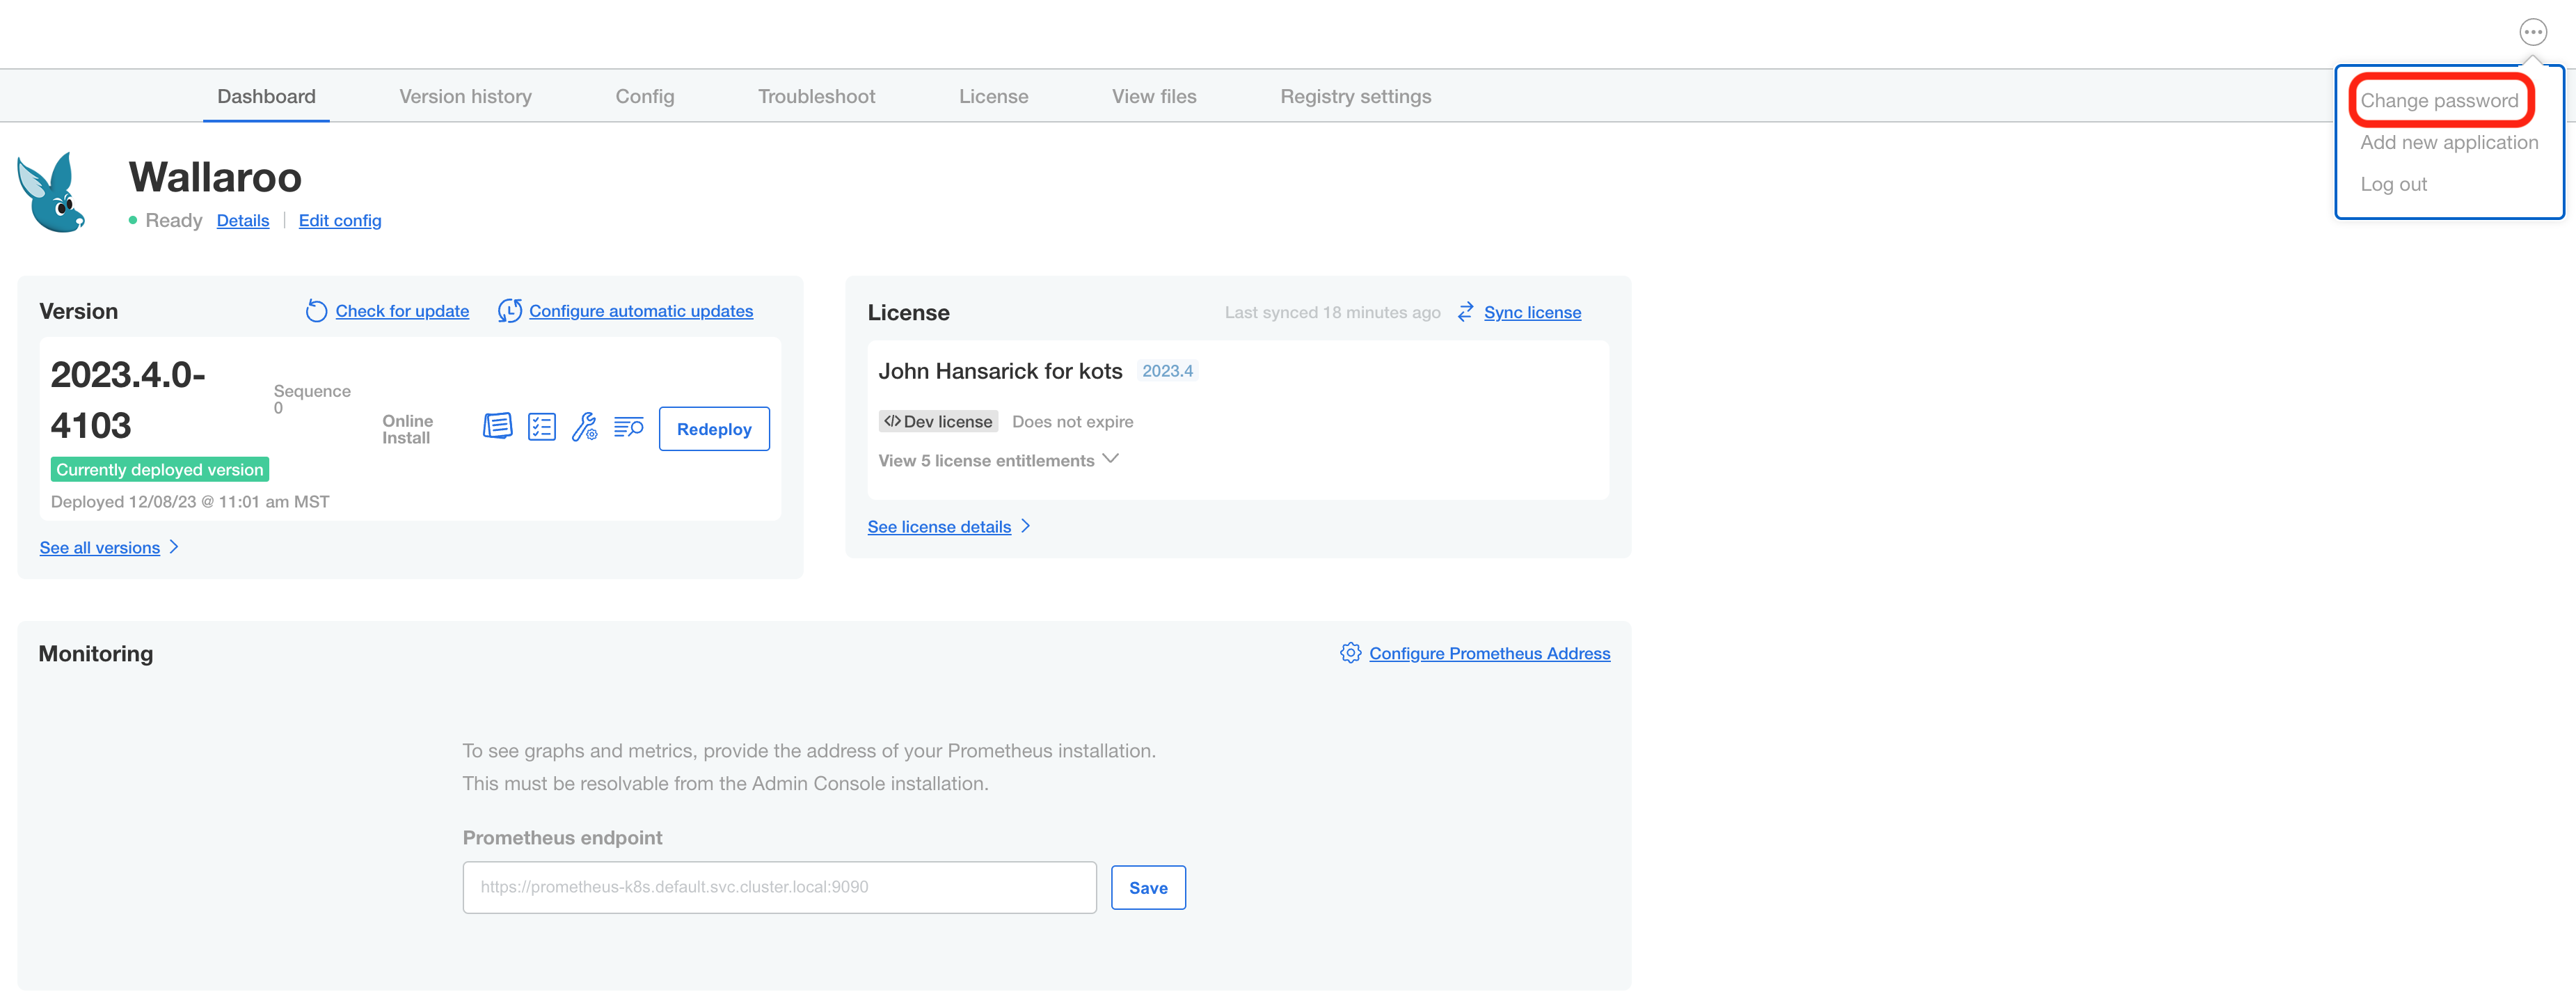
From the Wallaroo Administrative Dashboard:
Login and authenticate with the current password.
From the upper right hand corner, select … to access the menu and select Change password.
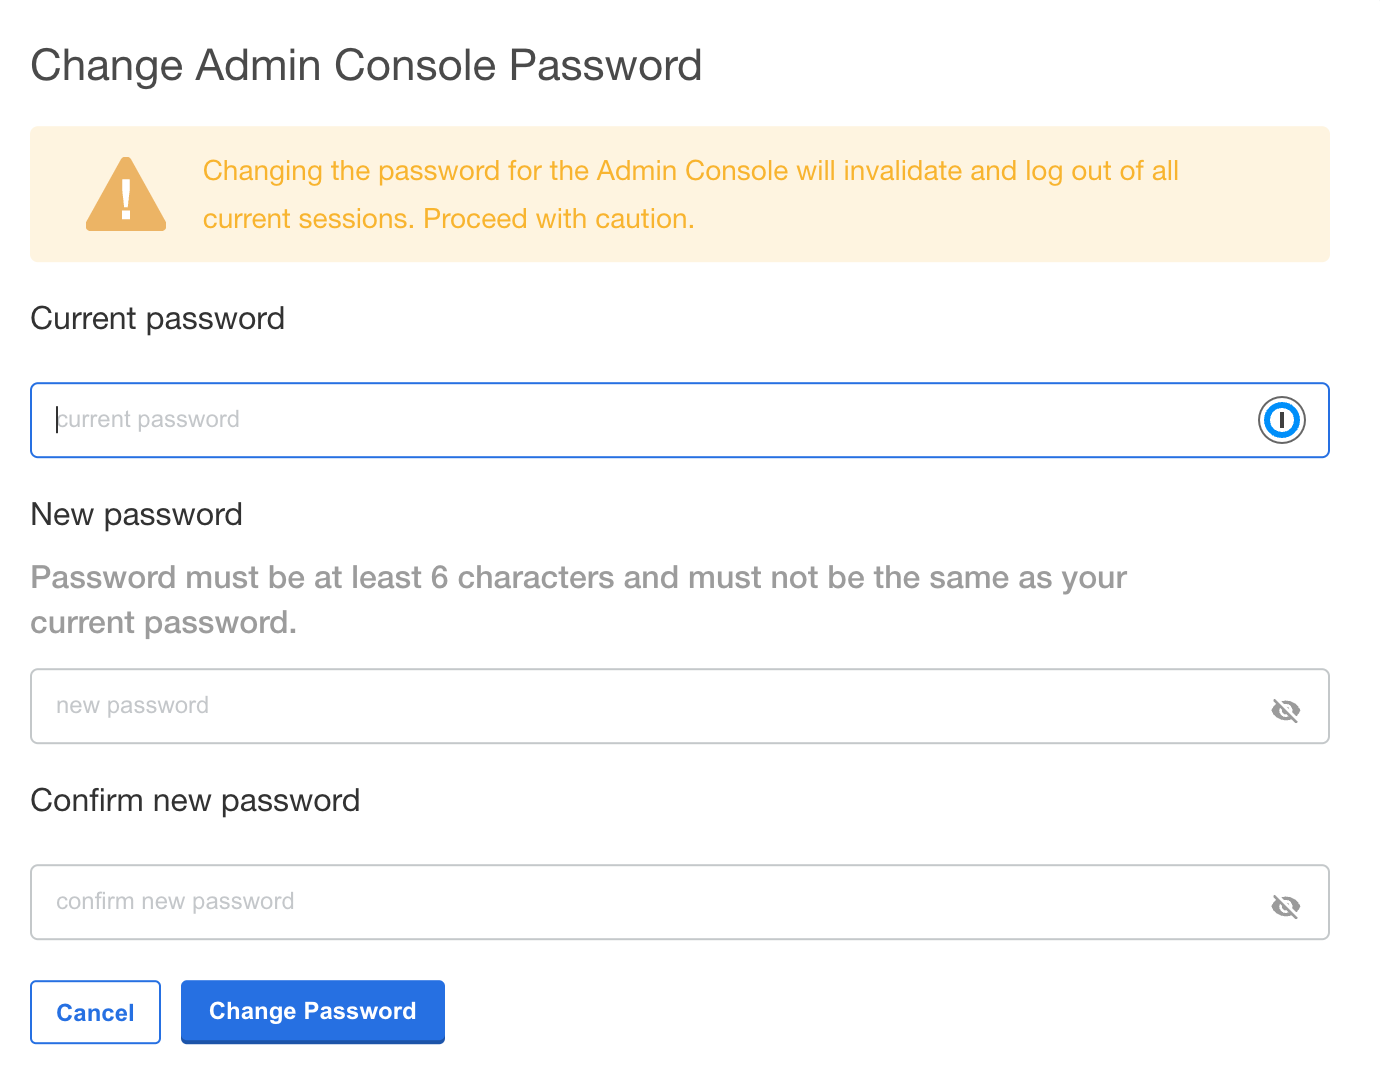
Enter the current password, then update and verify with the new password.
Setup Users
User management is handled through the Wallaroo instance Keycloak service. See the Wallaroo User Management for full guides on setting up users, identity providers, and other user configuration options. This step must be completed before using Wallaroo.
The following is an abbreviated guide on setting up new Wallaroo users.
IMPORTANT NOTE
At least one user must be created before using Wallaroo.Access The Wallaroo Keycloak Dashboard
Enterprise customers may access their Wallaroo Keycloak dashboard by navigating to https://keycloak.<suffix>, depending on their choice domain suffix supplied during installation.
Obtaining Administrator Credentials
The standard Wallaroo installation creates the user admin by default and assigns them a randomly generated password. The admin user credentials are obtained which may be obtained directly from Kubernetes with the following commands, assuming the Wallaroo instance namespace is wallaroo.
Retrieve Keycloak Admin Username
kubectl -n wallaroo \
get secret keycloak-admin-secret \
-o go-template='{{.data.KEYCLOAK_ADMIN_USER | base64decode }}'
Retrieve Keycloak Admin Password
kubectl -n wallaroo \
get secret keycloak-admin-secret \
-o go-template='{{.data.KEYCLOAK_ADMIN_PASSWORD | base64decode }}'
Access the User Management Panel
In the Keycloak Administration Console, click Manage -> Users in the left-hand side menu. Click the View all users button to see existing users. This will be under the host name keycloak.$WALLAROO_SUFFIX. For example, if the $WALLAROO_SUFFIX is wallaroo.example.com, the Keycloak Administration Console would be keycloak.wallaroo.example.com.
Add Users
To add a user through the Keycloak interface:
Click the Add user button in the top-right corner.
Enter the following:

- A unique username and email address.
- Ensure that the Email Verified checkbox is checked - Wallaroo does not perform email verification.
- Under Required User Actions, set Update Password so the user will update their password the next time they log in.
Click Save.
Once saved, select Credentials tab, then the Set Password section, enter the new user’s desired initial password in the Password and Password Confirmation fields.
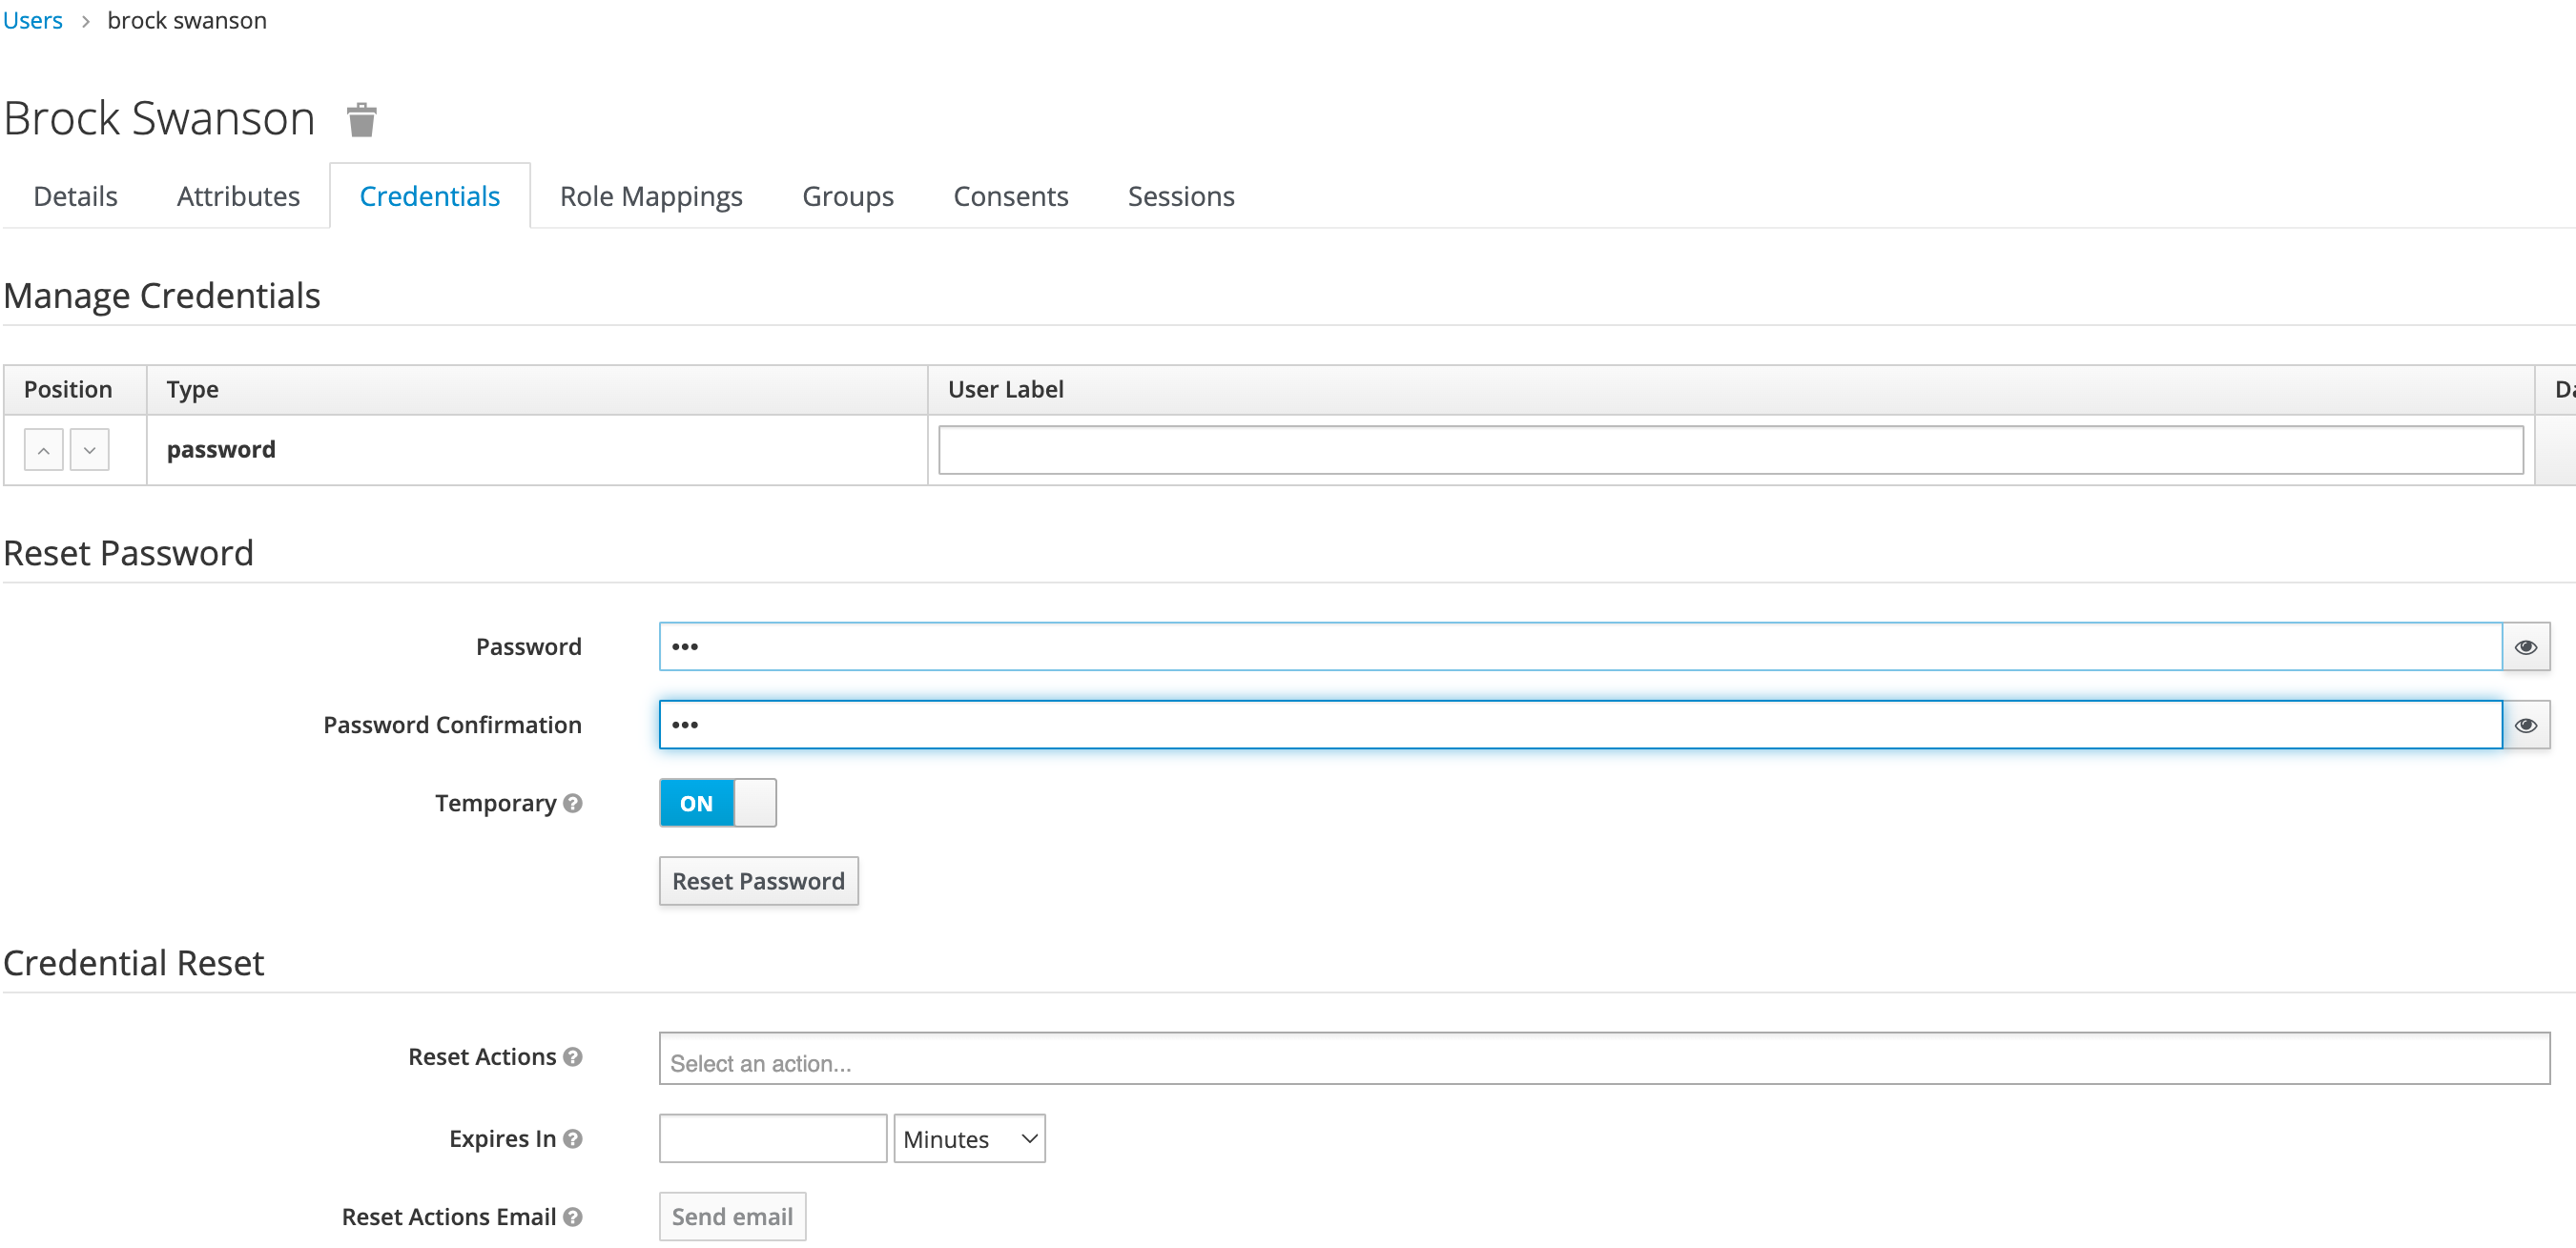
Click Set Password. Confirm the action when prompted. This will force the user to set their own password when they log in to Wallaroo.
To log into the Wallaroo dashboard, log out as the Admin user and login to the Wallaroo Dashboard as a preconfigured user or via SSO.