Wallaroo SSO Configuration for Seamless Redirect
Table of Contents
By default, when organizations add identity providers to Wallaroo users have to select which identity provider or at least provide their username and passwords to login through the default Keycloak service.
The following instructions show how to set an identity provider as the default and configure Wallaroo so users who are already authenticated through a identity provider can seamlessly login to their Wallaroo instance without having to select any other options.
This process has two major steps:
Prerequisites
These instructions assume that an identity provider has been created for the Wallaroo instance.
Set an Identity Provider as Default
To set a default identity provider for a Wallaroo instance for seamless access:
Access the Wallaroo Keycloak service through a browser as an administrator. The Keycloak service URL will be in the format
$WALLAROOPREFIX.keycloak.$WALLAROOSUFFIX. For example, if the Wallaroo prefix iswallarooand the suffixexample.com, then the Keycloak service URL would bewallaroo.keycloak.example.com. See the DNS Integration Guide for more details on Wallaroo services with DNS.Select Administration Console, then log in with an administrator account. See the Wallaroo User Management guides for more information.
From the left navigation panel, select Authentication.
For the Auth Type Identity Provider Redirector row, select Actions -> Config.
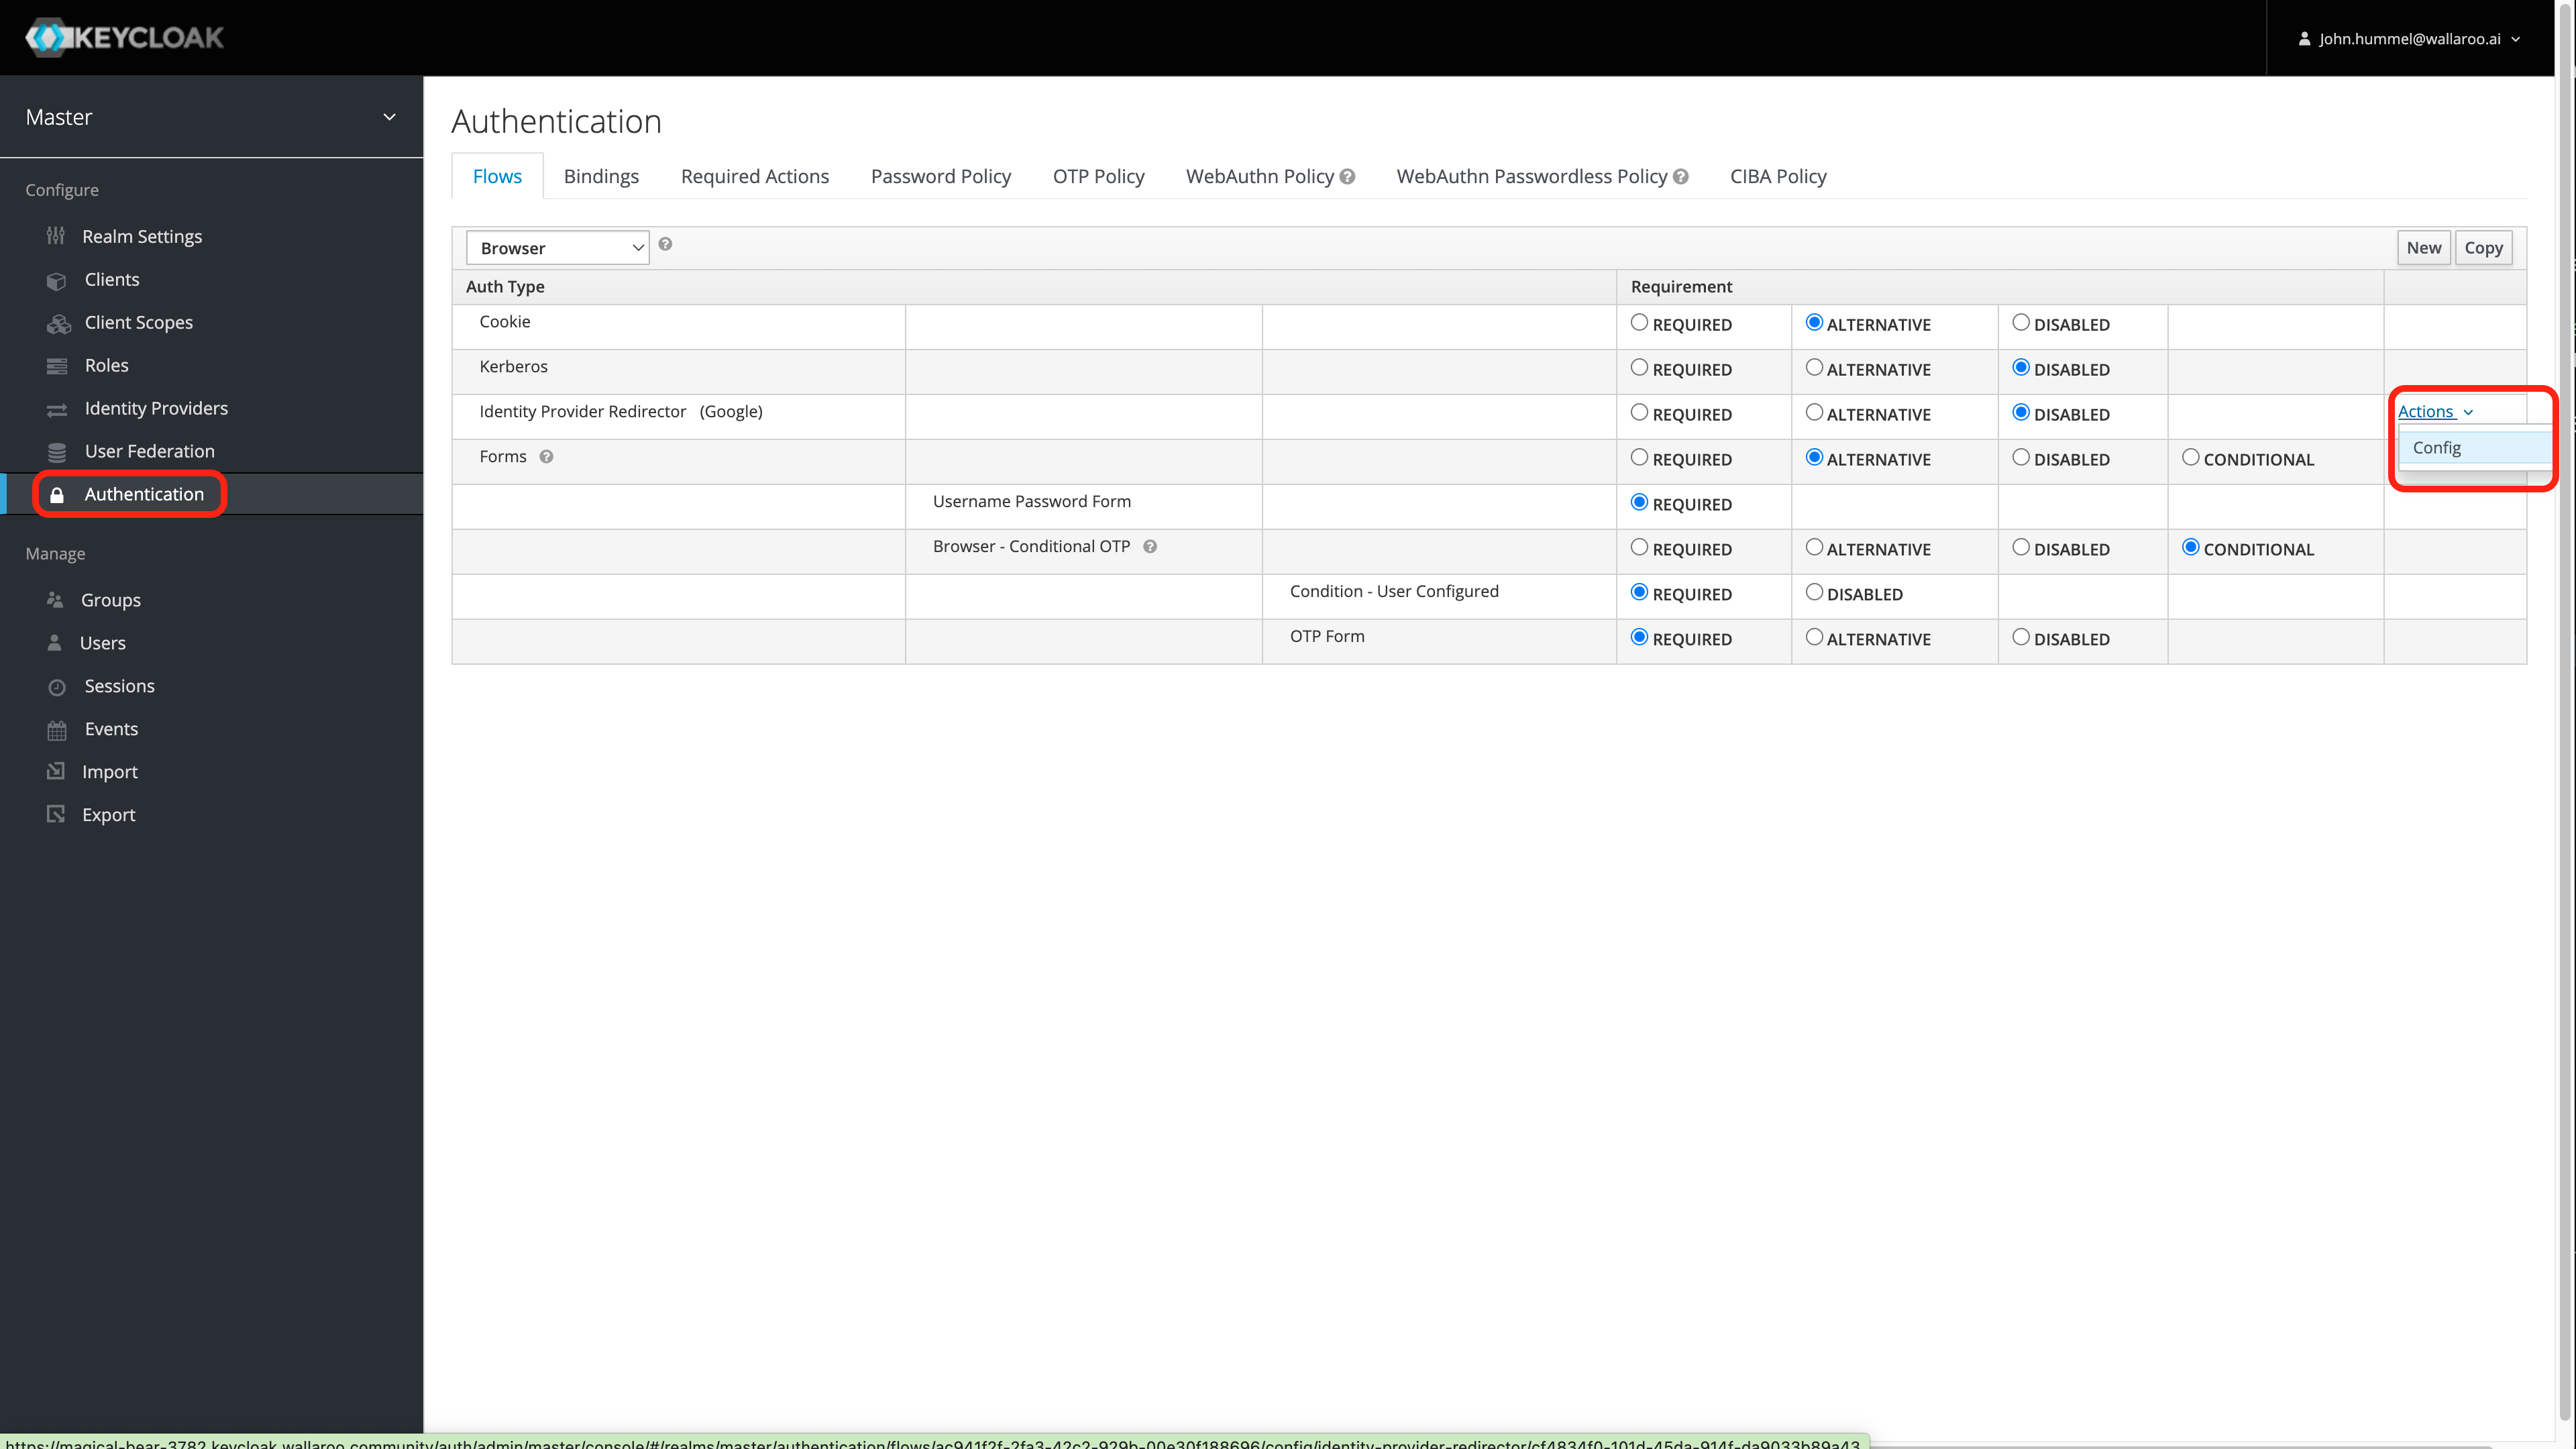
Enter the following:
- Alias: The name for this configuration.
- Default Identity Provider: The identity provider to use by default. A list is available from Configure->Identity Providers. For this example, it is
google. Verify that the name matches the name of the existing Identity Provider.
Select Save.
Save the ID! Save the Identity Provider Redirectory generated by Keycloak. This step is important in disabling the seamless redirect.

Set Update Profile on First Login to Off
This optional step prevents the Keycloak service from forcing the user to update an existing profile the first time they log in through a new identity provider. For more information, see the Keycloak Identity Broker First Login documentation.
To set the Identity Broker First Login to Off:
Access the Wallaroo Keycloak service through a browser as an administrator. The Keycloak service URL will be in the format
$WALLAROOPREFIX.keycloak.$WALLAROOSUFFIX. For example, if the Wallaroo prefix iswallarooand the suffixexample.com, then the Keycloak service URL would bewallaroo.keycloak.example.com. See the DNS Integration Guide for more details on Wallaroo services with DNS.Select Administration Console, then log in with an administrator account. See the Wallaroo User Management guides for more information.
From the left navigation panel, select Authentication.
From the top drop-down list, select First Broker Login, then for the row labeled Review Profile(review profile config), select Actions->Config.
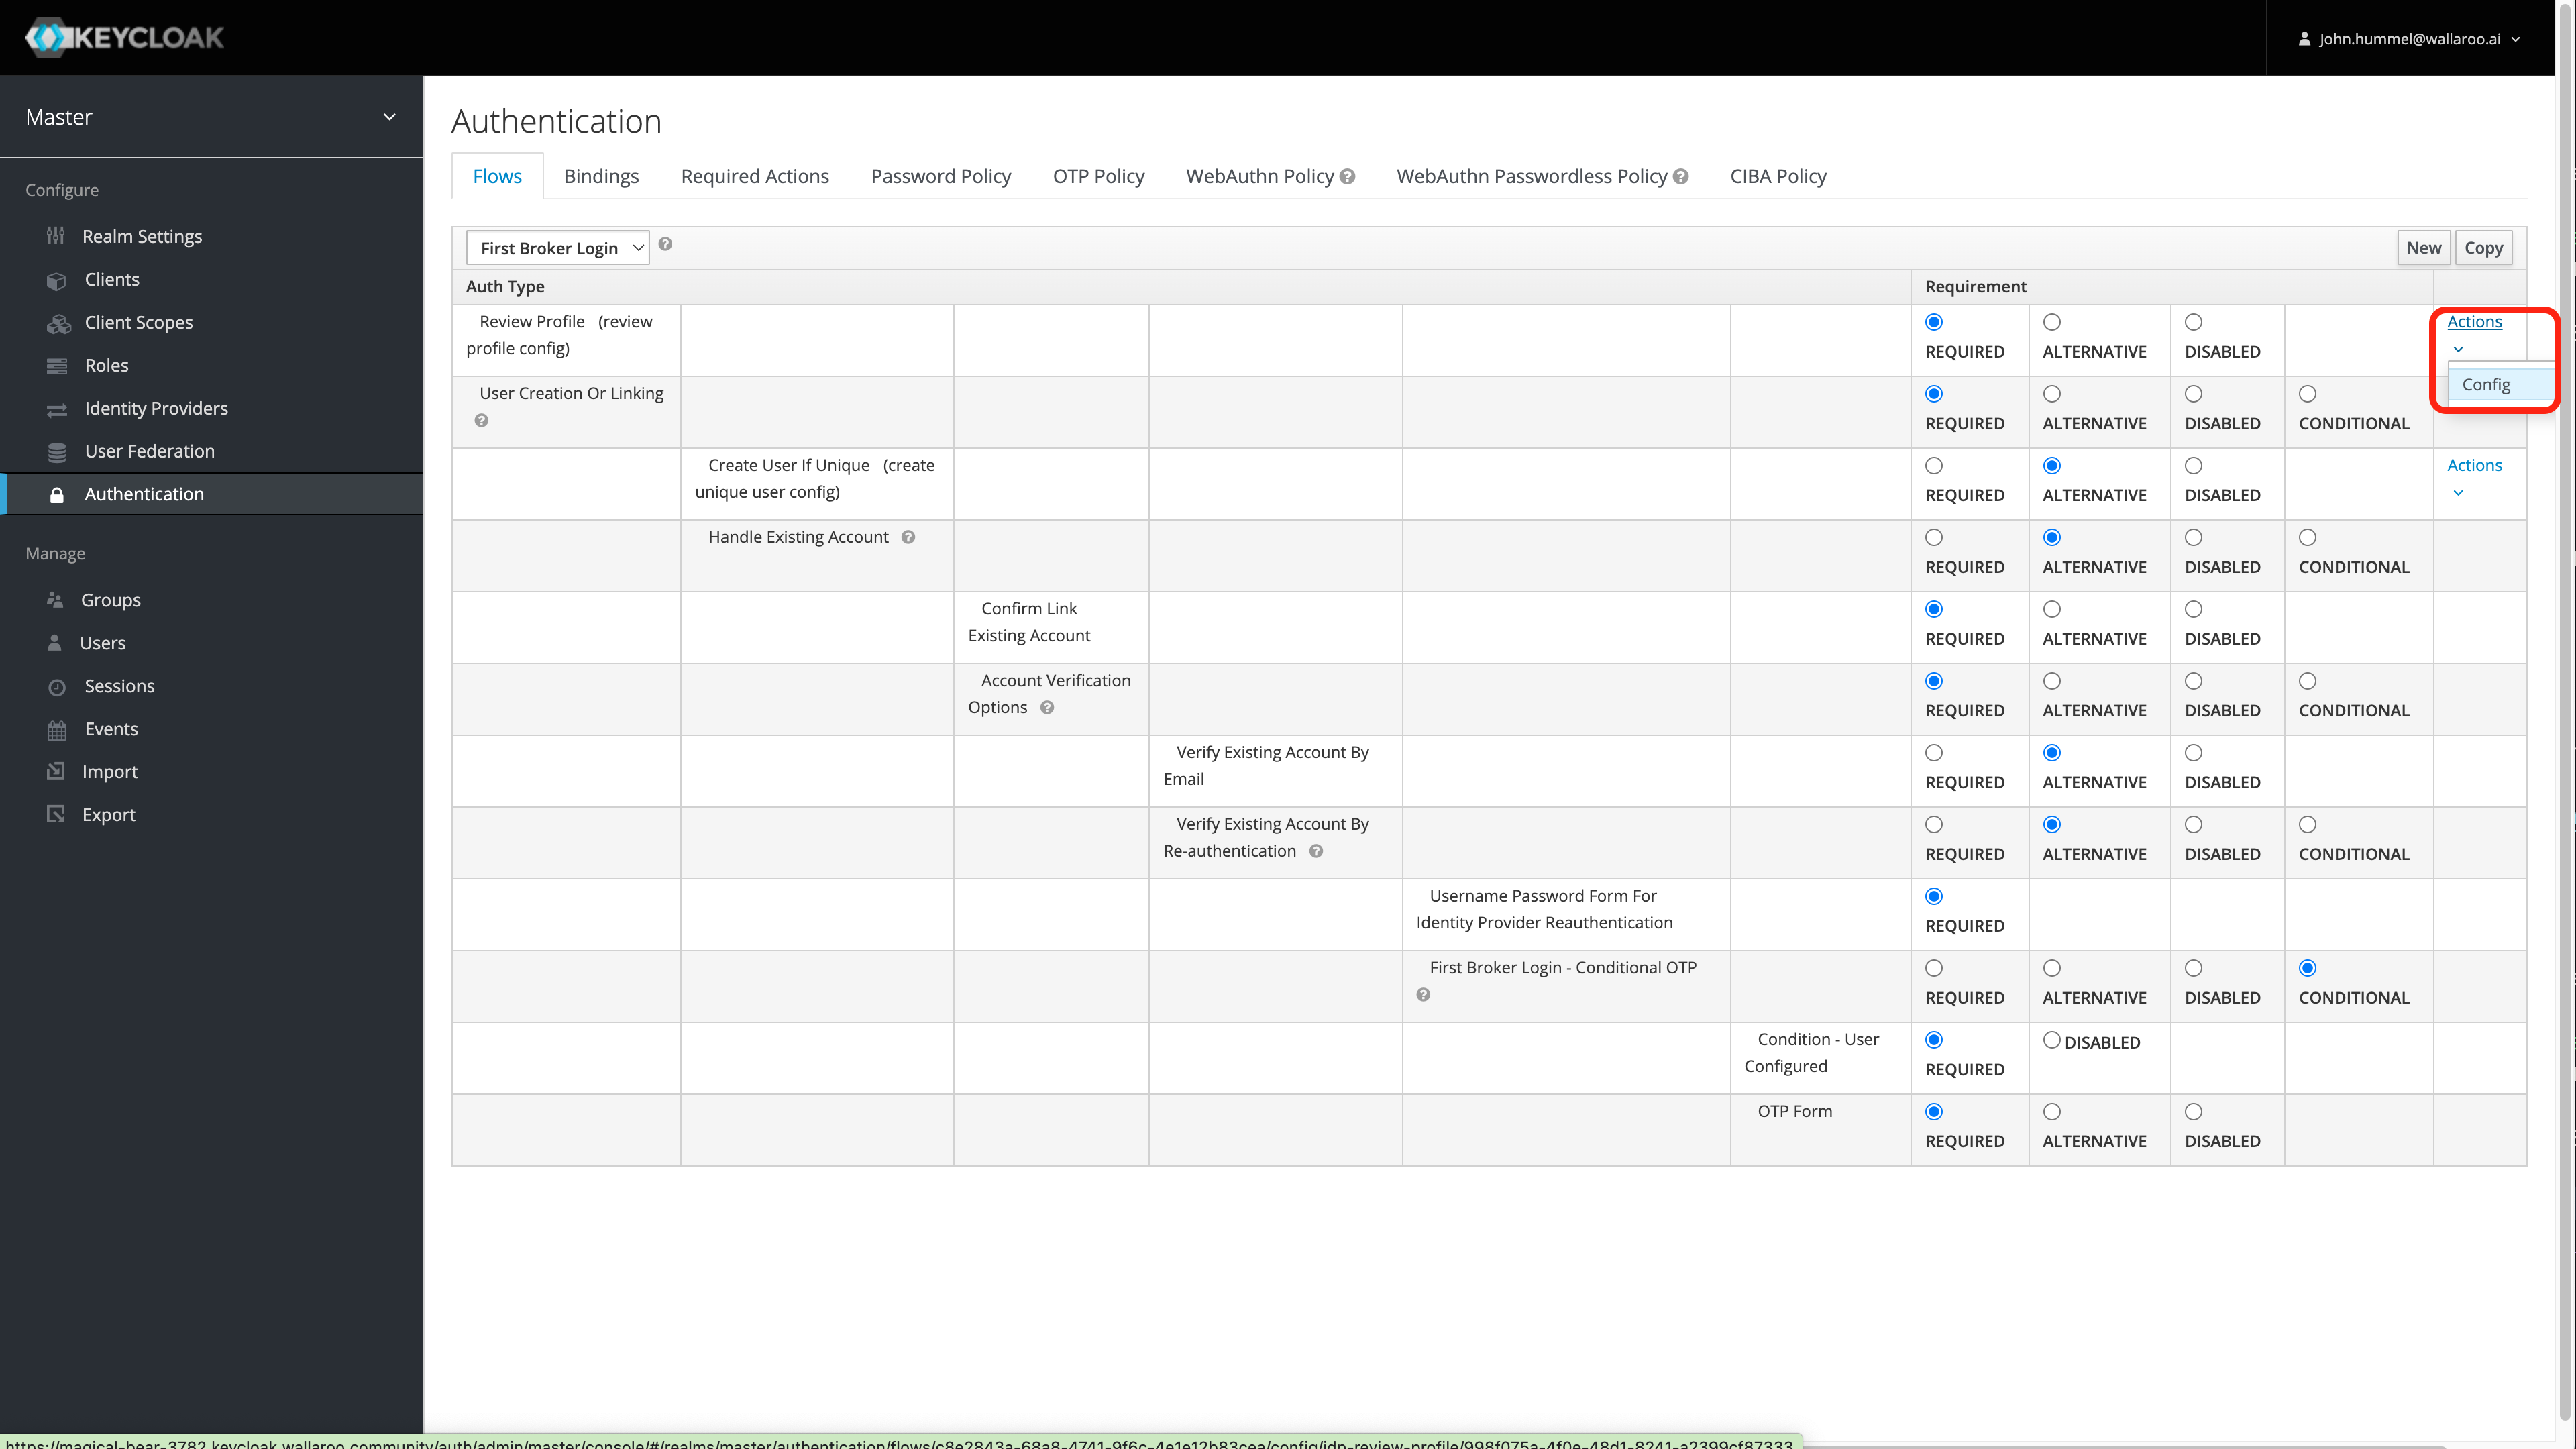
Set Update Profile on First Login to Off.
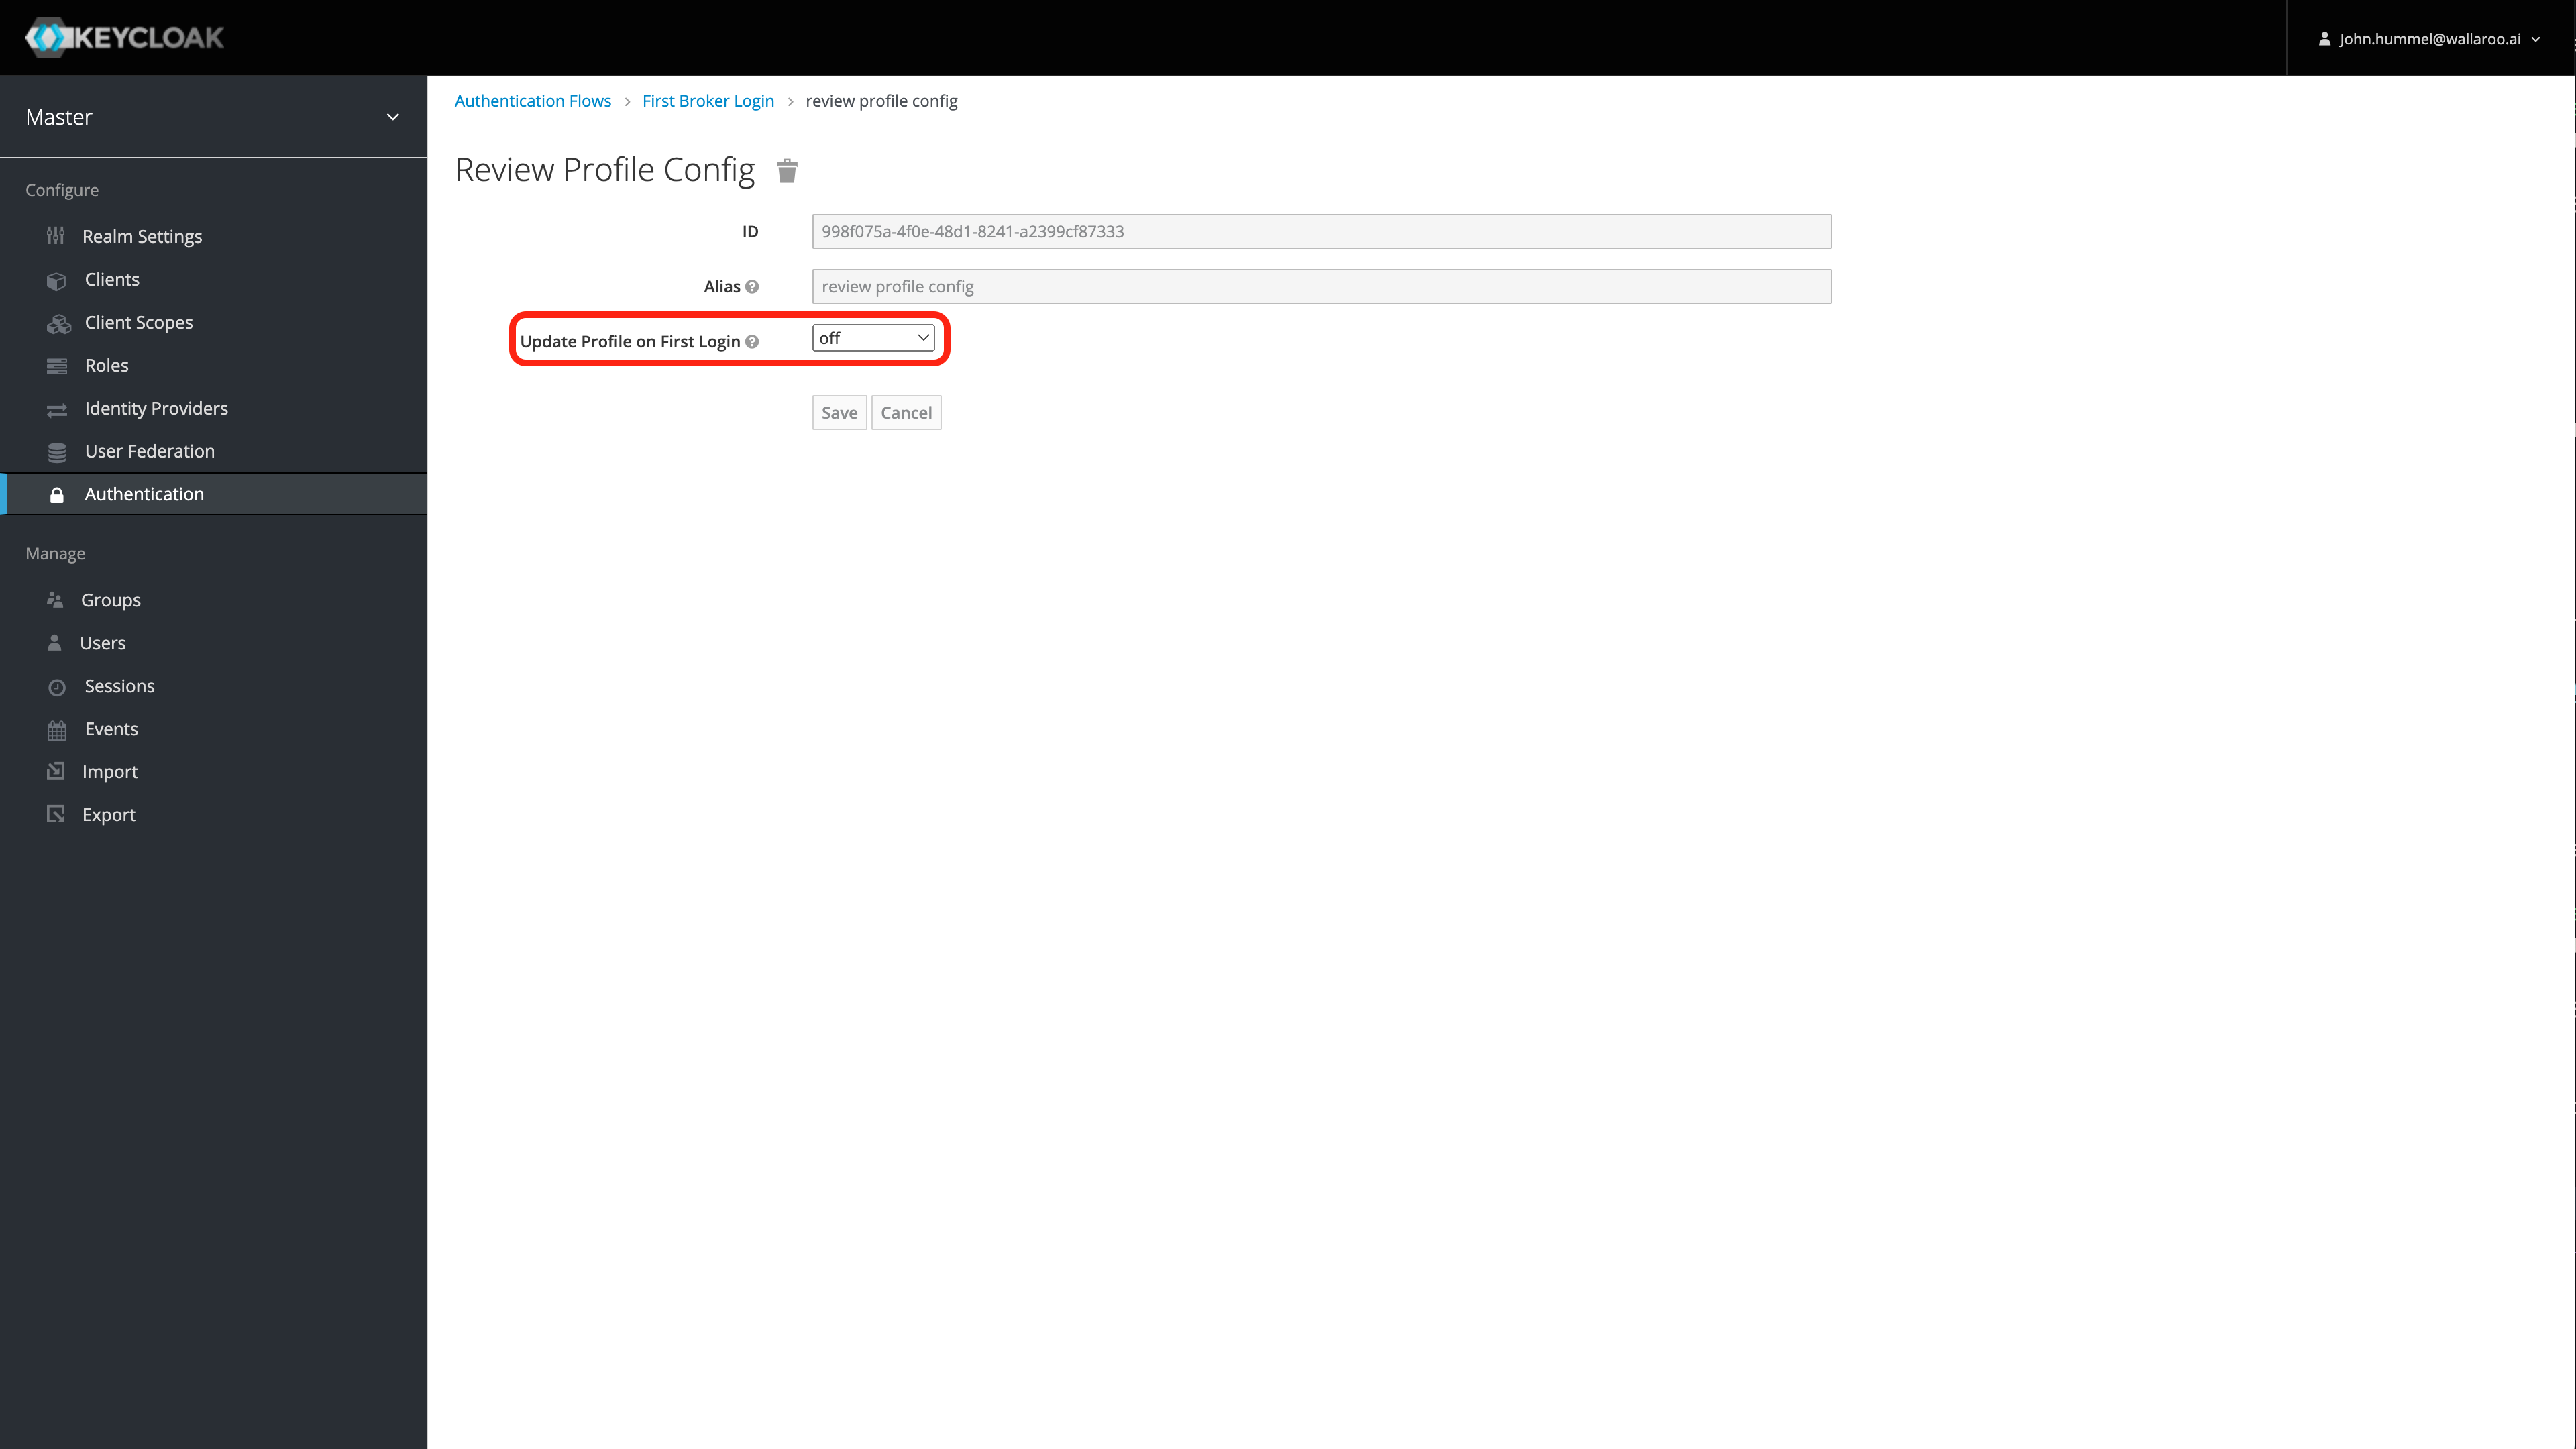
Select Save.
Disable Automatic Redirects
Disable Through Keycloak UI
To disable automatic redirects through the Keycloak UI:
- Access the Wallaroo Keycloak service through a browser as an administrator. The Keycloak service URL will be in the format
$WALLAROOPREFIX.keycloak.$WALLAROOSUFFIX. For example, if the Wallaroo prefix iswallarooand the suffixexample.com, then the Keycloak service URL would bewallaroo.keycloak.example.com. See the DNS Integration Guide for more details on Wallaroo services with DNS.
- Access the Wallaroo Keycloak service through a browser as an administrator. The Keycloak service URL will be in the format
Select Administration Console, then log in with an administrator account. See the Wallaroo User Management guides for more information.
From the left navigation panel, select Authentication.
For the Auth Type Identity Provider Redirector row, set the Requirement to Disabled.
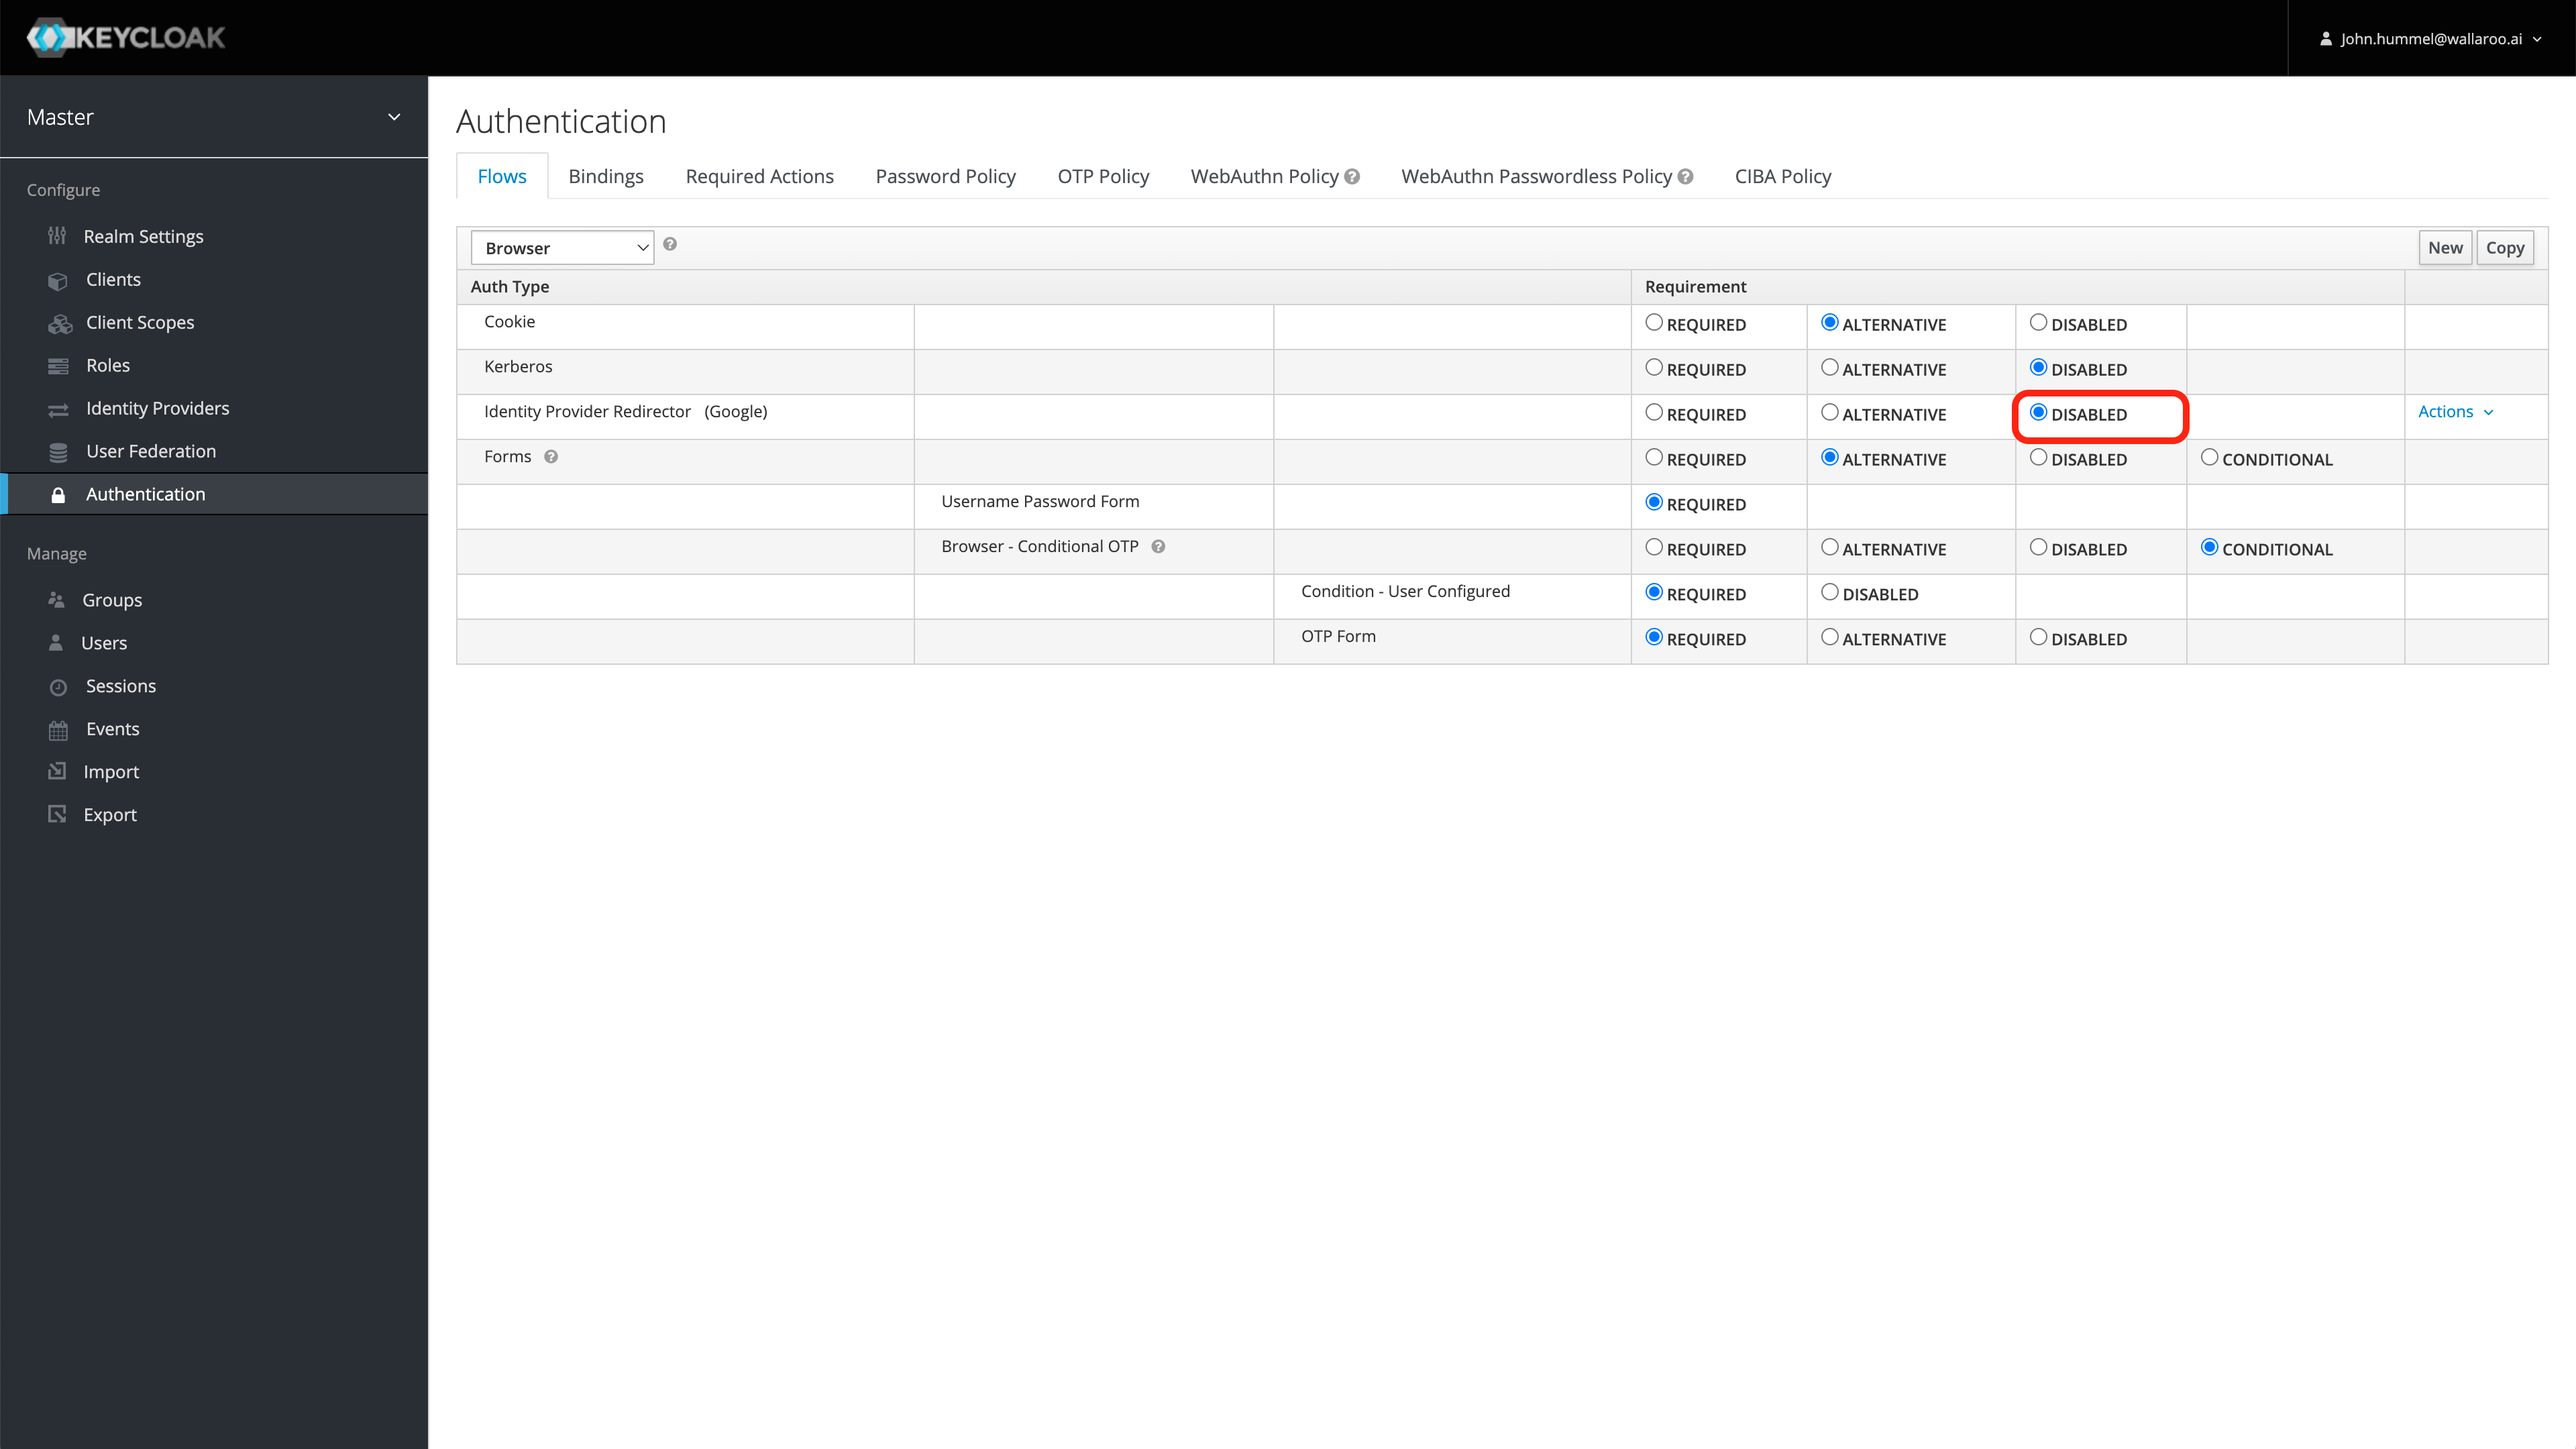
Seamless redirect is now disabled. Users will be able to either enter their username/password, or select the identity provider to use.
Disable through Kubernetes
This process allows users to disable the seamless redirect through through the Kubernetes administrative node. This process requires the following:
- The Identity Provider Redirector was saved from the step Set an Identity Provider as Default.
kubectlis installed on the node administrating the Kubernetes environment hosting the Wallaroo instance.curlis installed.
These steps assume the Wallaroo instance was installed into the namespace wallaroo.
The following code will retrieve the Wallaroo Keycloak admin password,then makes a connection to the Wallaroo Keycloak service through curl, then delete the identity provider set as the Identity Provider Redirector.
The Keycloak service URL will be in the format $WALLAROOPREFIX.keycloak.$WALLAROOSUFFIX. For example, if the Wallaroo prefix is wallaroo and the suffix example.com, then the Keycloak service URL would be wallaroo.keycloak.example.com. See the DNS Integration Guide for more details on Wallaroo services with DNS.
The variable IDENTITYUUID is the Identity Provider Redirector UUID.
Replace WALLAROOPREFIX, WALLAROOSUFFIX and IDENTITYUUID with the appropriate values for your Wallaroo instance.
WALLAROOPREFIX="wallaroo"
WALLAROOSUFFIX="example.com"
IDENTITYUUID="1234"
KEYCLOAK_PASSWORD=$(kubectl -n wallaroo get secret keycloak-admin-secret -o go-template='{{.data.KEYCLOAK_ADMIN_PASSWORD | base64decode }}')
TOKEN=$(curl -s "https://$WALLAROOPREFIX.keycloak.$WALLAROOSUFFIX/auth/realms/master/protocol/openid-connect/token" -d "username=admin" -d "password=$KEYCLOAK_PASSWORD" -d 'grant_type=password' -d 'client_id=admin-cli' | jq -r .access_token)
curl -H "Authorization: Bearer $TOKEN" "https://$WALLAROOPREFIX.keycloak.$WALLAROOSUFFIX/auth/admin/realms/master/authentication/config/$IDENTITYUUID" -X DELETE
Seamless redirect is now disabled. Users will be able to either enter their username/password, or select the identity provider to use.