DNS Integration Guide
Table of Contents
The following guide demonstrates how to integrate a Wallaroo Enterprise instance with an organization’s DNS. DNS services integration is required for Wallaroo Enterprise edition. It is not required for Wallaroo Community. This guide is indented to assist organizations complete their Wallaroo Enterprise installation, and can be used as a reference if changes to the DNS services are modified and updates to the Wallaroo Enterprise instance are required.
IMPORTANT NOTE
Changing either the DNS name or the security certificates will require the Wallaroo instance be reinstalled.DNS Services Integration Introduction
DNS services integration is required for Wallaroo Enterprise to provide access to the various supporting services that are part of the Wallaroo instance. These include:
- Simplified user authentication and management.
- Centralized services for accessing the Wallaroo Dashboard, Wallaroo SDK and Authentication.
- Collaboration features allowing teams to work together.
- Managed security, auditing and traceability.
This guide is not intended for Wallaroo Community, as those DNS entries are managed by Wallaroo during the installation. For more information on installing Wallaroo Community, see the Wallaroo Community Install Guides.
Once integrated, users can access the following services directly from a URL starting with the suffix domain - this is the domain name where other DNS entries are appended to. For example, if the suffix domain is sales.example.com, then the other services would be referenced by https://api.sales.sample.com, etc.
Note that even when accessing specific Wallaroo services directly that the user must still be authenticated through Wallaroo.
| Service | DNS Entry | Description |
|---|---|---|
| Wallaroo Dashboard | suffix domain | Provides access to a user interface for updating workspaces, pipelines, and models. Also provides access to the integrated JupyterHub service. |
| JupyterHub | jupyterhub | Allows the use of Jupyter Notebooks and access to the Wallaroo SDK. |
| API | api | Provides access to the Wallaroo API. |
| Keycloak | keycloak | Keycloak provides user management to the Wallaroo instance. |
Connections to Wallaroo services are provided as https://service.{suffix domain}. For example, if the domain suffix is wallaroo.example.com then the URLs to access the various Wallaroo services would be:
https://wallaroo.example.comhttps://jupyter.wallaroo.example.comhttps://api.wallaroo.example.comhttps://keycloak.wallaroo.example.com
Prerequisites
- Install Wallaroo Enterprise into a qualified environment. For more details, see the Wallaroo Install Guides and the Wallaroo Enterprise Install Guides.
- Determine whether your organization will use a prefix or not as detailed above.
- Have access to the Wallaroo Administrative Dashboard - this requires access to the Kubernetes environment that the Wallaroo instance is installed into.
- Have access to internal corporate DNS configurations that can be updated. A subdomain for the Wallaroo instance will be created through this process.
- Have the IP address for the Wallaroo instance.
- Install kubectl into the Kubernetes cluster administrative node.
Wallaroo IP Address Retrieval Methods
Retrieve LoadBalancer IP with kubectl
For most organizations that install Wallaroo into a cloud based Kubernetes cluster such as Microsoft Azure, AWS, etc the external IP address is tied to Wallaroo Loadbalancer service. This can be retrieved with the kubectl command as follows:
Retrieve the external IP address for your Wallaroo instance LoadBalancer. For example, this can be performed through the following
kubectlcommand:kubectl get svc -AExample Result:
NAMESPACE     NAME                           TYPE           CLUSTER-IP     EXTERNAL-IP    PORT(S)                                     AGE
default       kubernetes                     ClusterIP      10.64.16.1     <none>         443/TCP                                     3d19h
wallaroo      alertmanager                   ClusterIP      10.64.16.48    <none>         9093/TCP                                    2d22h
wallaroo      api-lb                         LoadBalancer   10.64.30.169   34.173.211.9   80:32176/TCP,443:32332/TCP,8080:30971/TCP   2d22h
In this example, the External-IP of the
wallarooLoadBalancer is34.173.211.9. A more specific command to retrieve just the LoadBalancer address would be:kubectl get svc api-lb -n wallaroo -o jsonpath='{.status.loadBalancer.ingress[0].ip}'34.173.211.9This procedure is appropriate for both clusters that are in external or internal mode.
Other Methods
For organizations install Wallaroo other methods, such as Air Gap or Single Node Linux may find the kubectl get svc api-lb command only returns the internal IP address.
Depending on the instance, there are different methods of acquiring that IP address. The links below reference difference sources.
- AWS: How do I get the ID and IP address of an Amazon EC2 instance for an AWS Batch job?
- GCP: Locating IP addresses for an instance
- Azure: IP addresses in Azure Functions
Refer to your Wallaroo support representative if further assistance is needed.
DNS Integration Steps
To integrate the Wallaroo instance IP address with a DNS service:
Create a CA-signed TLS certificate for your Wallaroo domain with the following settings:
- Certificate Authority Options:
- Use a public Certificate Authority such as Let’s Encrypt or Verisign. In general, you would send a Certificate Signing Request to your CA and they would respond with your certificates.
- Use a private Certificate Authority (CA) to provide the certificates. Your organization will have procedures for clients to verify the certificates from the private CA.
- Use a Wallaroo certificate and public name server. Contact our CSS team for details.
- Subject Domain:
- Set the certificate’s Subject CN to your Wallaroo domain.
- With Wildcards: To use wildcards, use the wildcard
*.{suffix domain}. For example, if the domain suffix iswallaroo.example.com, then the Subject CNs would be:- wallaroo.example.com
- *.wallaroo.example.com
- If wildcard domains are not desired, use a combination of Subject and Subject Alternative Names to set names as follows:
wallaroo.example.comapi.wallaroo.example.comjupyter.wallaroo.example.comkeycloak.wallaroo.example.com
- With Wildcards: To use wildcards, use the wildcard
- Set the certificate’s Subject CN to your Wallaroo domain.
- Save your certificates.
- You should have two files: the TLS Certificate (
.crt) and TLS private key (.key). Store these in a secure location - these will be installed into Wallaroo at a later step.
- You should have two files: the TLS Certificate (
- Certificate Authority Options:
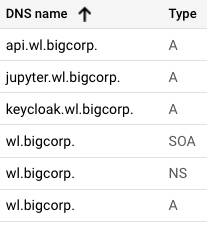
Create DNS the following entries based on the list above for the Wallaroo instance’s IP address, updating the domain name depending on whether there is a prefix or not:
- api: A (address) record
- jupyter: A (address) record
- keycloak: A (address) record
- Suffix domain: A record, NS (Name Server) record, SOA (Start Of Authority) record.
For example:
Access the Wallaroo Administrative Dashboard in your browser. This can be done either after installation, or through the following command (assuming your Wallaroo instance was installed into the namespace
wallaroo). By default this provides the Wallaroo Administrative Dashboard through the URLhttps://localhost:8080.kubectl-kots admin-console --namespace wallarooFrom the Wallaroo Dashboard, select Config and set the following:
- Networking Configuration
- Ingress Mode for Wallaroo Endpoints:
- None: Port forwarding or other methods are used for access.
- Internal: For environments where only nodes within the same Kubernetes environment and no external connections are required.
- External: Connections from outside the Kubernetes environment is allowed.
- Enable external URL inference endpoints: Creates pipeline inference endpoints. For more information, see Model Endpoints Guide.
- Ingress Mode for Wallaroo Endpoints:
- DNS
- DNS Suffix (Mandatory): The domain name for your Wallaroo instance.
- TLS Certificates
- Use custom TLS Certs: Checked
- TLS Certificate: Enter your TLS Certificate (.crt file).
- TLS Private Key: Enter your TLS private key (.key file).
- Other settings as desired.

- Networking Configuration
Once complete, scroll to the bottom of the Config page and select Save config.
A pop-up window will display The config for Wallaroo Enterprise has been updated.. Select Go to updated version to continue.
From the Version History page, select Deploy. Once the new deployment is finished, you will be able to access your Wallaroo services via their DNS addresses.
To verify the configuration is complete, access the Wallaroo Dashboard through the suffix domain. For example if the suffix domain is wallaroo.example.com then access https://wallaroo.example.com in a browser and verify the connection and certificates.