The Wallaroo Operations Guide is made to help users and system administrators with their Wallaroo instance. The guides are broken down into the following format:
Install Guides: How to install Wallaroo Community or Enterprise in different environments.
User Management: How to invite users into your Wallaroo instance and manage them.
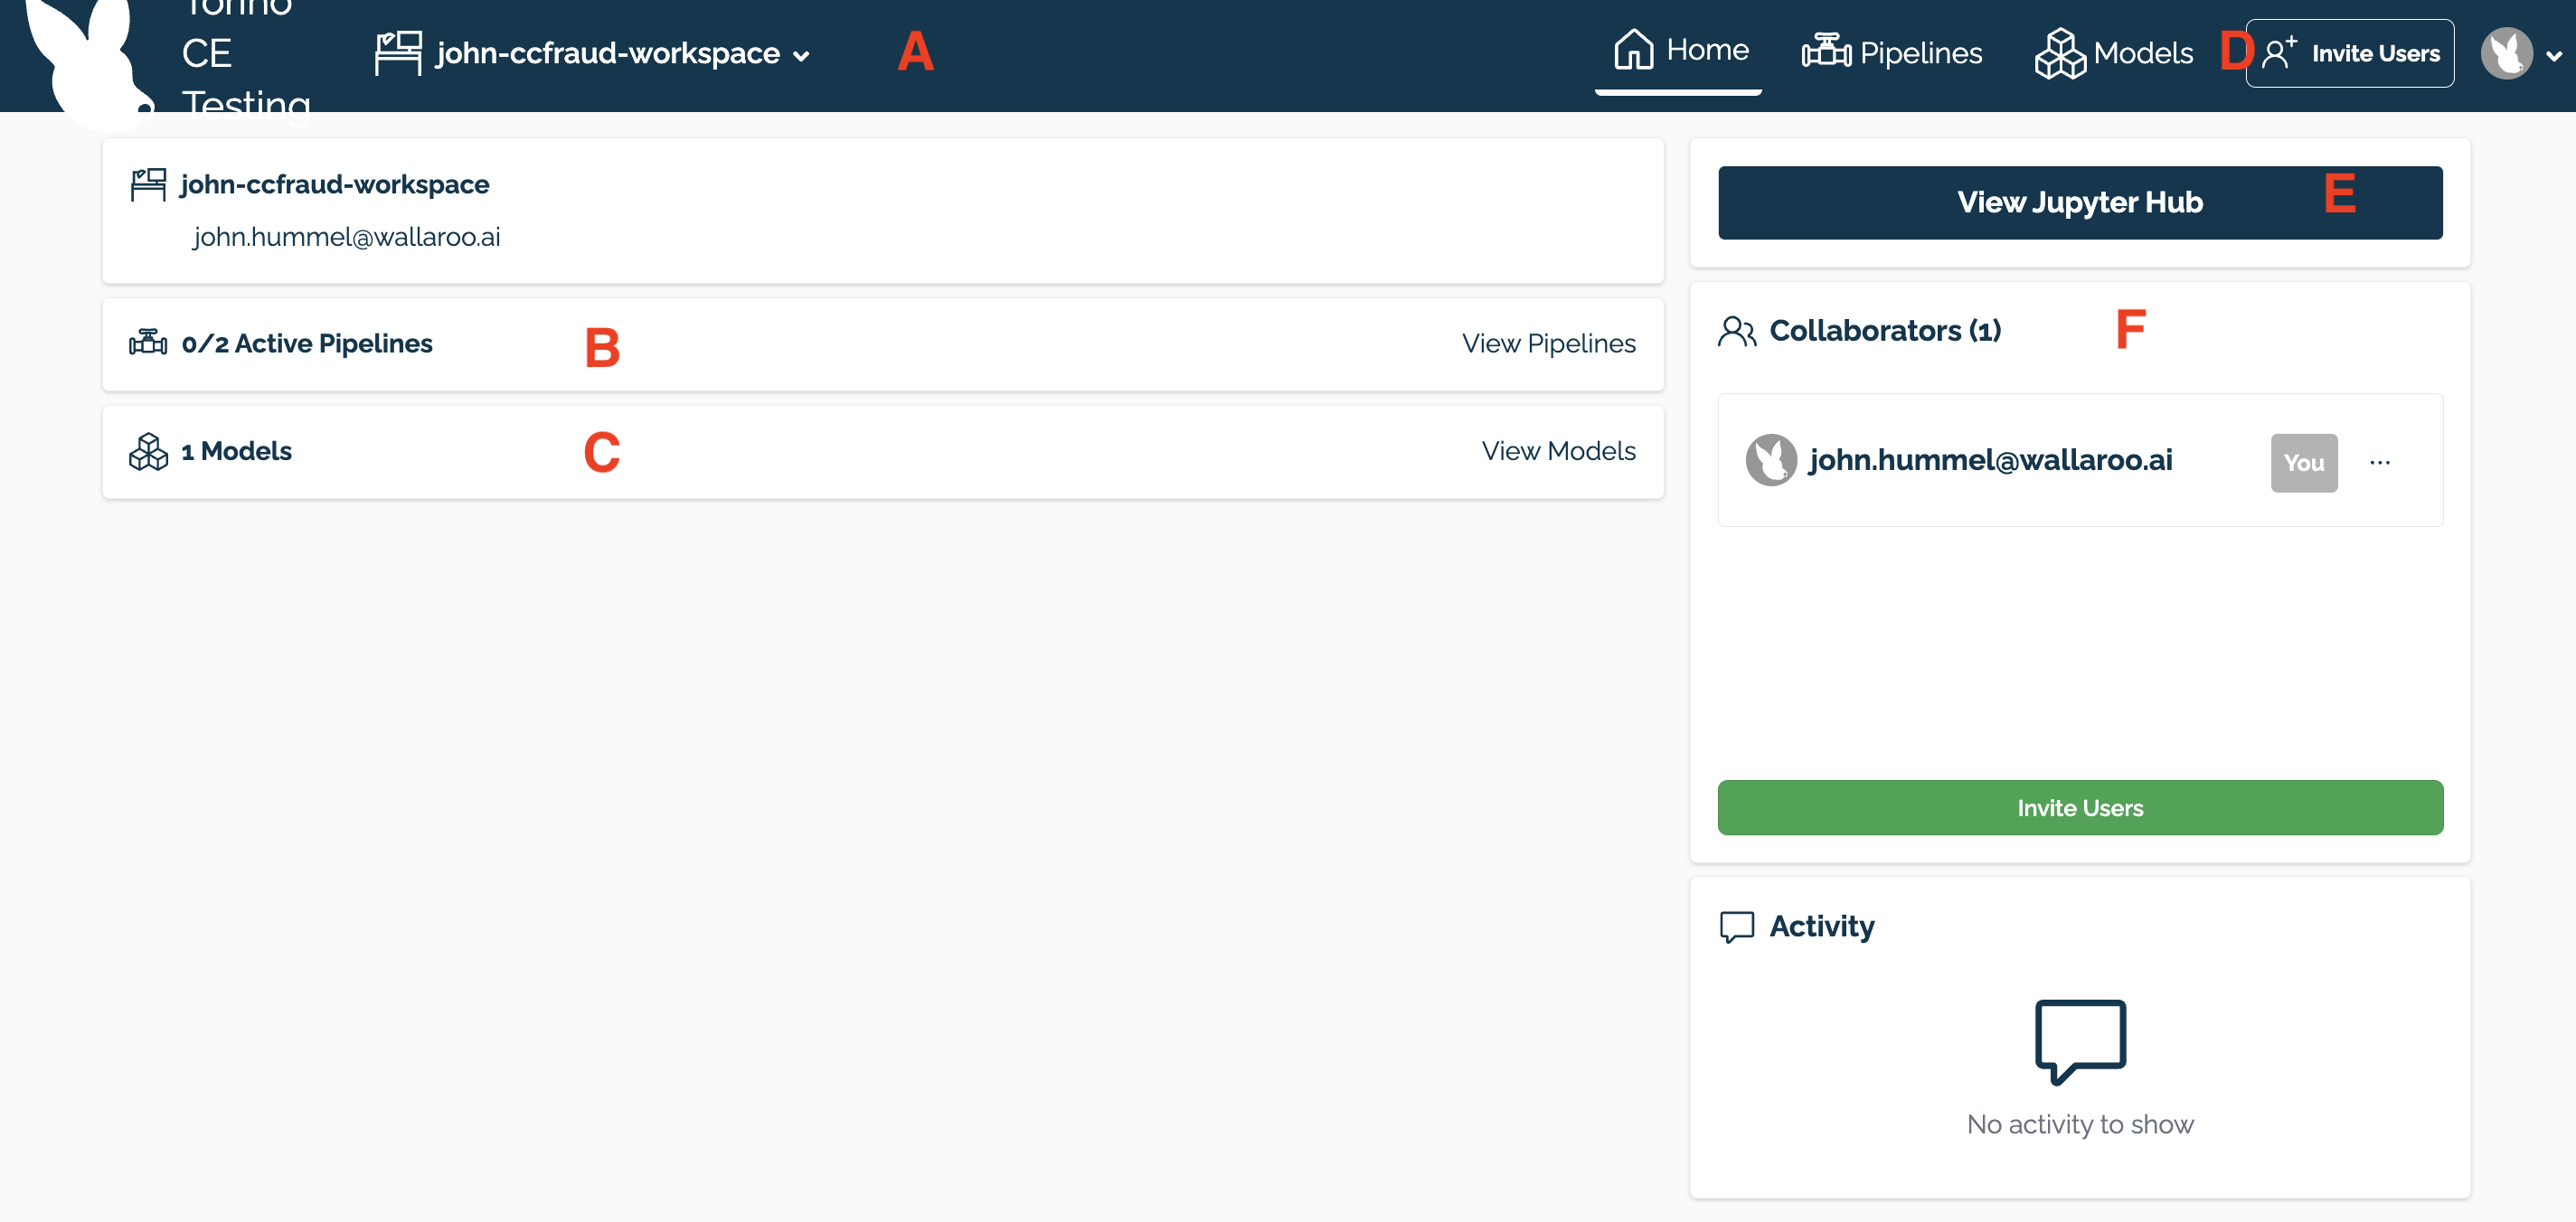
Workspace Management: How to create a Workspace and manage its users, models, and pipelines.
Model Management: How to convert, upload and replace ML Models into a Wallaroo workspace.
Wallaroo Developer Guides: The SDK commands that you’ll use to work with everything Wallaroo can do for you.
Wallaroo Tutorials: A set of tutorials that can be used directly with the Jupyter Hub service built into Wallaroo.
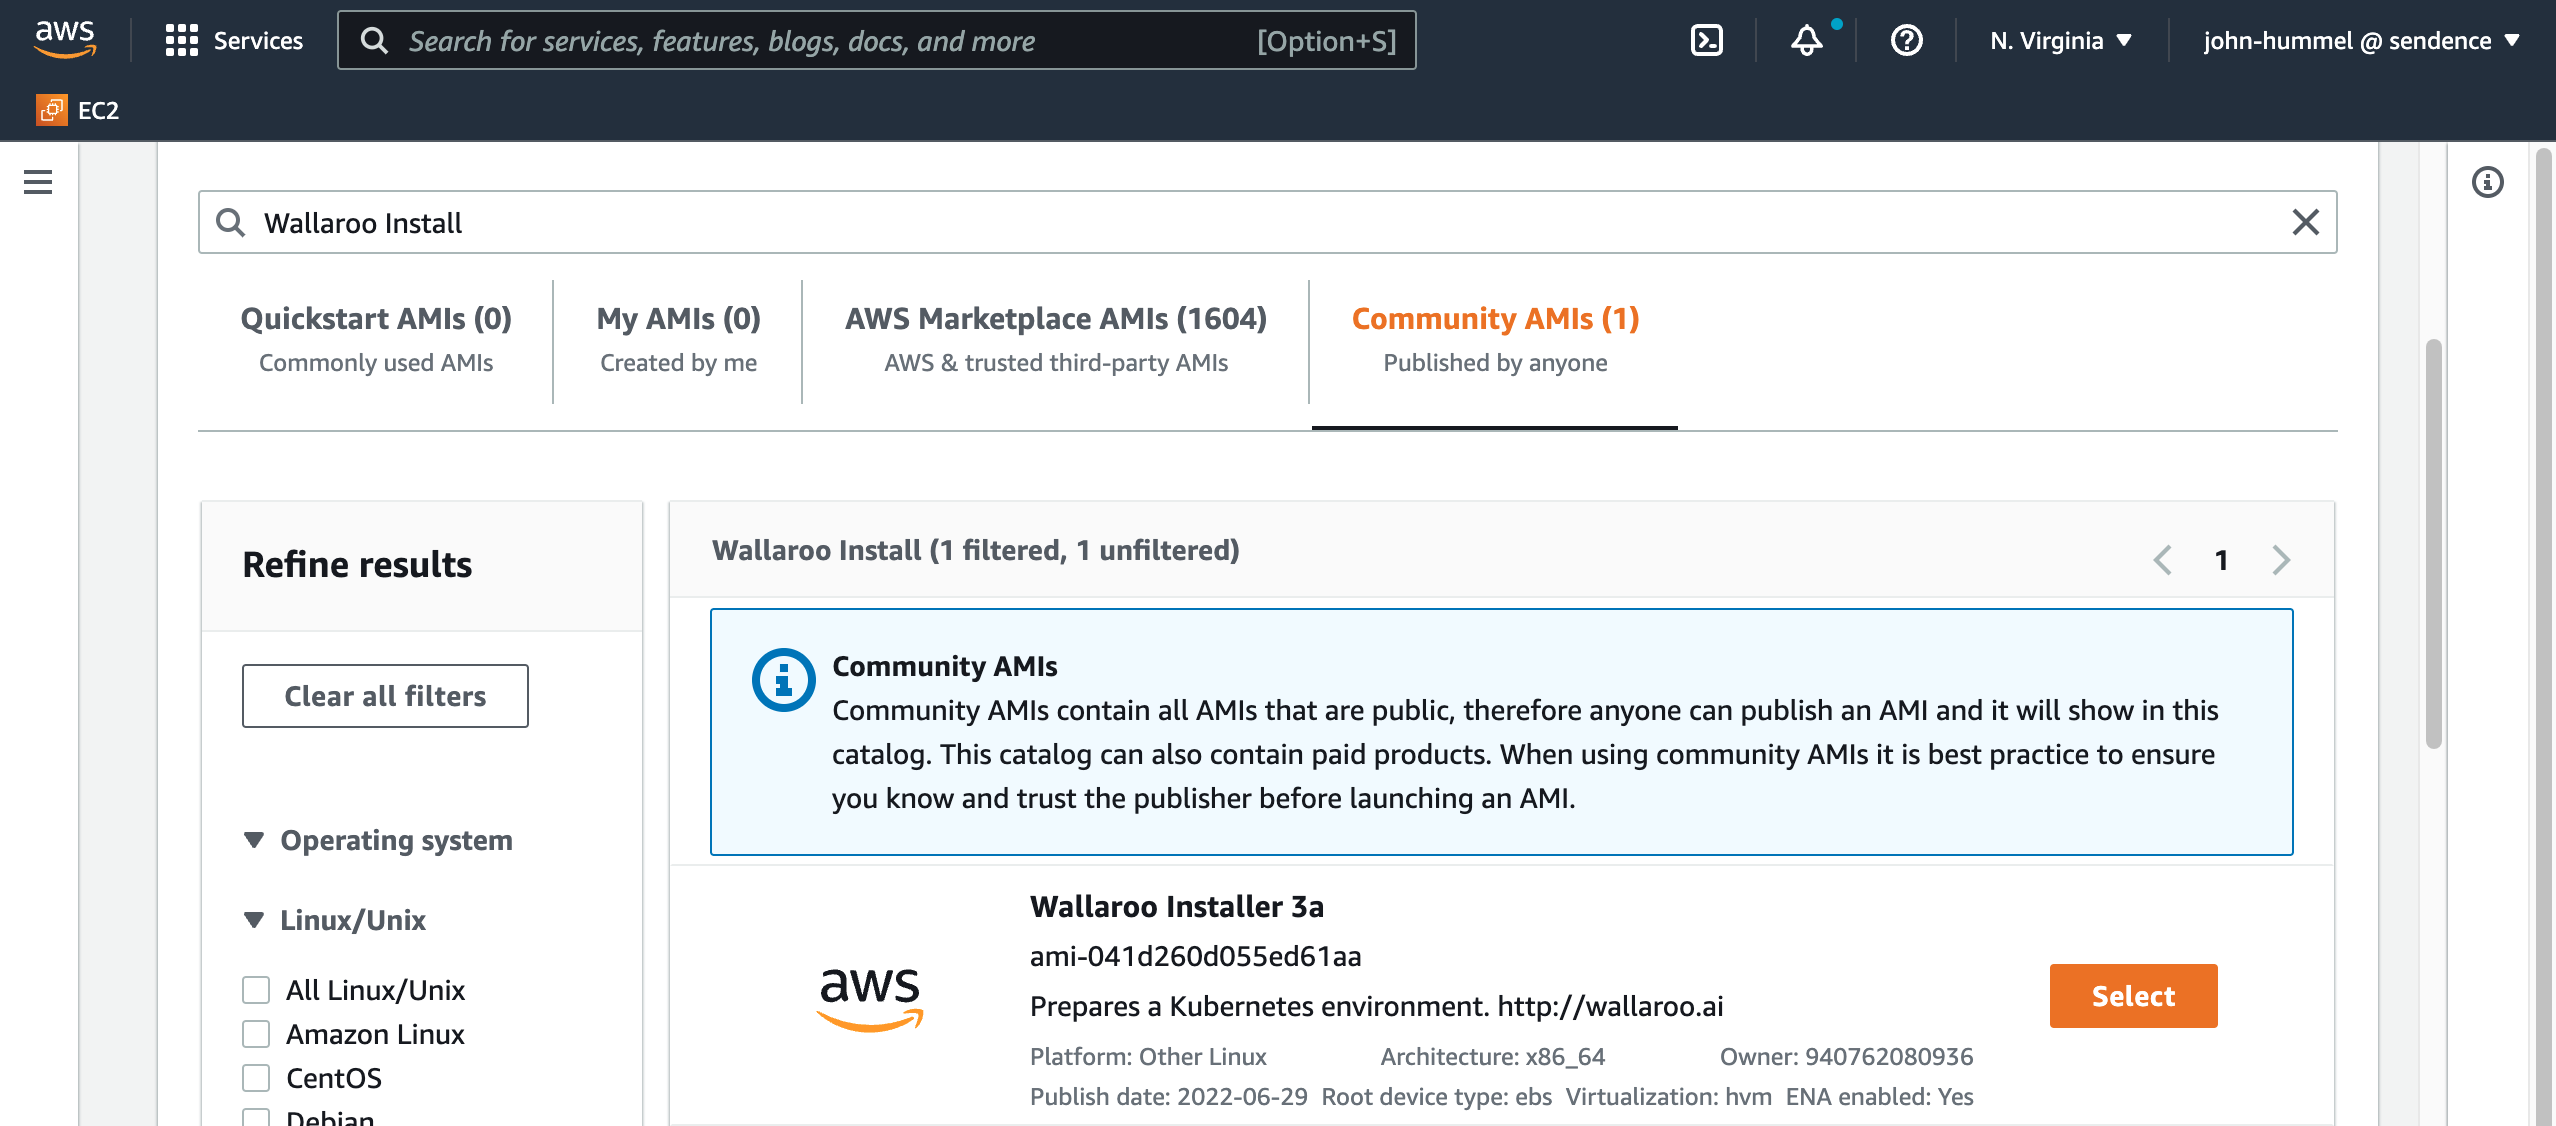
1 - Wallaroo Install Guides
How to set up Wallaroo in the minimum number of steps
This guide is targeted towards system administrators and data scientists who want to work with the easiest, fastest, and free method of running your own machine learning models. Some knowledge of the following will be useful in working with this guide:
Working knowledge of Linux distributions, particularly Ubuntu.
Either Google Cloud Platform (GCP), Amazon Web Services (AWS), or Microsoft Azure experience.
Working knowledge of Kubernetes, mainly kubectl and kots.
Desire to see your models working in the cloud.
Select either Wallaroo Community or Enterprise for the general steps on how to install Wallaroo. Organizations that already have a prepared environment can skip directly to the respective installation guide for their edition of Wallaroo.
Update Wallaroo post-install with DNS integration and user setup.
Variable
Note the differences between the Wallaroo Community and Wallaroo Enterprise. Wallaroo Community is limited to a maximum of 32 cores and 2 pipelines. For organizations that require more resources, the Wallaroo Enterprise Edition may be more appropriate.
For more information, Contact Us so we can help you find out which is better for your needs.
1.1 - Wallaroo Prerequisites Guide
Software and other local system requirements before installing Wallaroo
General Time to Completion: 30 minutes.
Before installing Wallaroo version, verify that the following hardware and software requirements are met.
Environment Requirements
Environment Hardware Requirements
The following system requirements are required for the minimum settings for running Wallaroo in a Kubernetes cloud cluster.
The following system requirements are required for the minimum settings for running Wallaroo in a Kubernetes cloud cluster.
Minimum number of nodes: 4
Minimum Number of CPU Cores: 8
Minimum RAM per node: 16 GB
Minimum Storage: A total of 625 GB of storage will be allocated for the entire cluster based on 5 users with up to four pipelines with five steps per pipeline, with 50 GB allocated per node, including 50 GB specifically for the Jupyter Hub service. Enterprise users who deploy additional pipelines will require an additional 50 GB of storage per lab node deployed.
Wallaroo recommends at least 16 cores total to enable all services. At less than 16 cores, services will have to be disabled to allow basic functionality as detailed in this table.
Note that even when disabling these services, Wallaroo performance may be impacted by the models, pipelines, and data used. The greater the size of the models and steps in a pipeline, the more resources will be required for Wallaroo to operate efficiently. Pipeline resources are set by the pipeline configuration to control how many resources are allocated from the cluster to maintain peak effectiveness for other Wallaroo services. See the following guides for more details.
The Wallaroo inference engine that performs inference requests from deployed pipelines.
Dashboard
✔
✔
✔
The graphics user interface for configuring workspaces, deploying pipelines, tracking metrics, and other uses.
Jupyter HUB/Lab
The JupyterHub service for running Python scripts, JupyterNotebooks, and other related tasks within the Wallaroo instance.
Single Lab
✔
✔
✔
Multiple Labs
✘
✔
✔
Prometheus
✔
✔
✔
Used for collecting and reporting on metrics. Typical metrics are values such as CPU utilization and memory usage.
Alerting
✘
✔
✔
Model Validation
✘
✔
✔
Dashboard Graphs
✔
✔
✔
Plateau
✘
✔
✔
A Wallaroo developed service for storing inference logs at high speed. This is not a long term service; organizations are encouraged to store logs in long term solutions if required.
Model Insights
✘
✔
✔
Python API
Model Conversion
✔
✔
✔
Converts models into a native runtime for use with the Wallaroo inference engine.
To install Wallaroo with minimum services, a configuration file will be used as parts of the kots based installation. For full details on the Wallaroo installation process, see the Wallaroo Install Guides.
Enterprise Network Requirements
The following network requirements are required for the minimum settings for running Wallaroo:
For Wallaroo Enterprise users: 200 IP addresses are required to be allocated per cloud environment.
For Wallaroo Community users: 98 IP addresses are required to be allocated per cloud environment.
DNS services integration is required for Wallaroo Enterprise edition. See the DNS Integration Guide for the instructions on configuring Wallaroo Enterprise with your DNS services.
DNS services integration is required to provide access to the various supporting services that are part of the Wallaroo instance. These include:
Simplified user authentication and management.
Centralized services for accessing the Wallaroo Dashboard, Wallaroo SDK and Authentication.
Collaboration features allowing teams to work together.
Managed security, auditing and traceability.
Environment Software Requirements
The following software or runtimes are required for Wallaroo 2023.2.1. Most are automatically available through the supported cloud providers.
Wallaroo uses different nodes for various services, which can be assigned to a different node pool to contain resources separate from other nodes. The following nodes selectors can be configured:
Organizations that intend to install Wallaroo into a Cloud environment can obtain an estimate of environment costs. The Wallaroo Install Guides list recommended virtual machine types and other settings that can be used to calculate costs for the environment.
For more information, see the pricing calculators for the following cloud services:
The following are quick guides on how to install kubectl and kots to install and perform updates to Wallaroo. For a helm based installation, see the How to Install Wallaroo Enterprise via Helm guides.
kubectl Quick Install Guide
The following are quick guides for installing kubectl for different operating systems. For more details, see the instructions for your specific environment.
kubectl Install For Deb Package based Linux Systems
For users running a deb based package system such as Ubuntu Linux, the following commands will install kubectl and kots into the local system. They assume the user has sudo level access to the system.
Update the apt-get repository:
sudo apt-get update
Install the prerequisite software apt-transport-https, ca-certificates, and curl.
Install the Google Cloud repository into the local repository configuration:
echo"deb [signed-by=/usr/share/keyrings/kubernetes-archive-keyring.gpg] https://apt.kubernetes.io/ kubernetes-xenial main"\
| sudo tee /etc/apt/sources.list.d/kubernetes.list
Update the apt-get repository, then install kubectl:
sudo apt-get update
sudo apt-get install -y kubectl
Verify the kubectl installation:
kubectl version --client
kubectl Install For macOS Using Homebrew
To install kubectl on a macOS system using Homebrew:
Issue the brew install command:
brew install kubectl
Verify the installation:
kubectl version --client
kots Quick Install Guide
The following are quick guides for installing kots for different operating systems. For more details, see the instructions for your specific environment.
IMPORTANT NOTE
As of this time, Wallaroo requireskots version 1.91.3. Please verify that version is installed before starting the Wallaroo installation process.
Install curl.
For deb based Linux systems, update the apt-get repository and install curl:
sudo apt-get update
sudo apt-get install curl
For macOS based systems curl is installed by default.
Install kots by downloading the script and piping it into the bash shell:
How to set up Wallaroo Enterprise, environments, and other configurations.
This guide is targeted towards system administrators and data scientists who want to work with the easiest, fastest, and comprehensive method of running your own machine learning models.
A typical installation of Wallaroo follows this process:
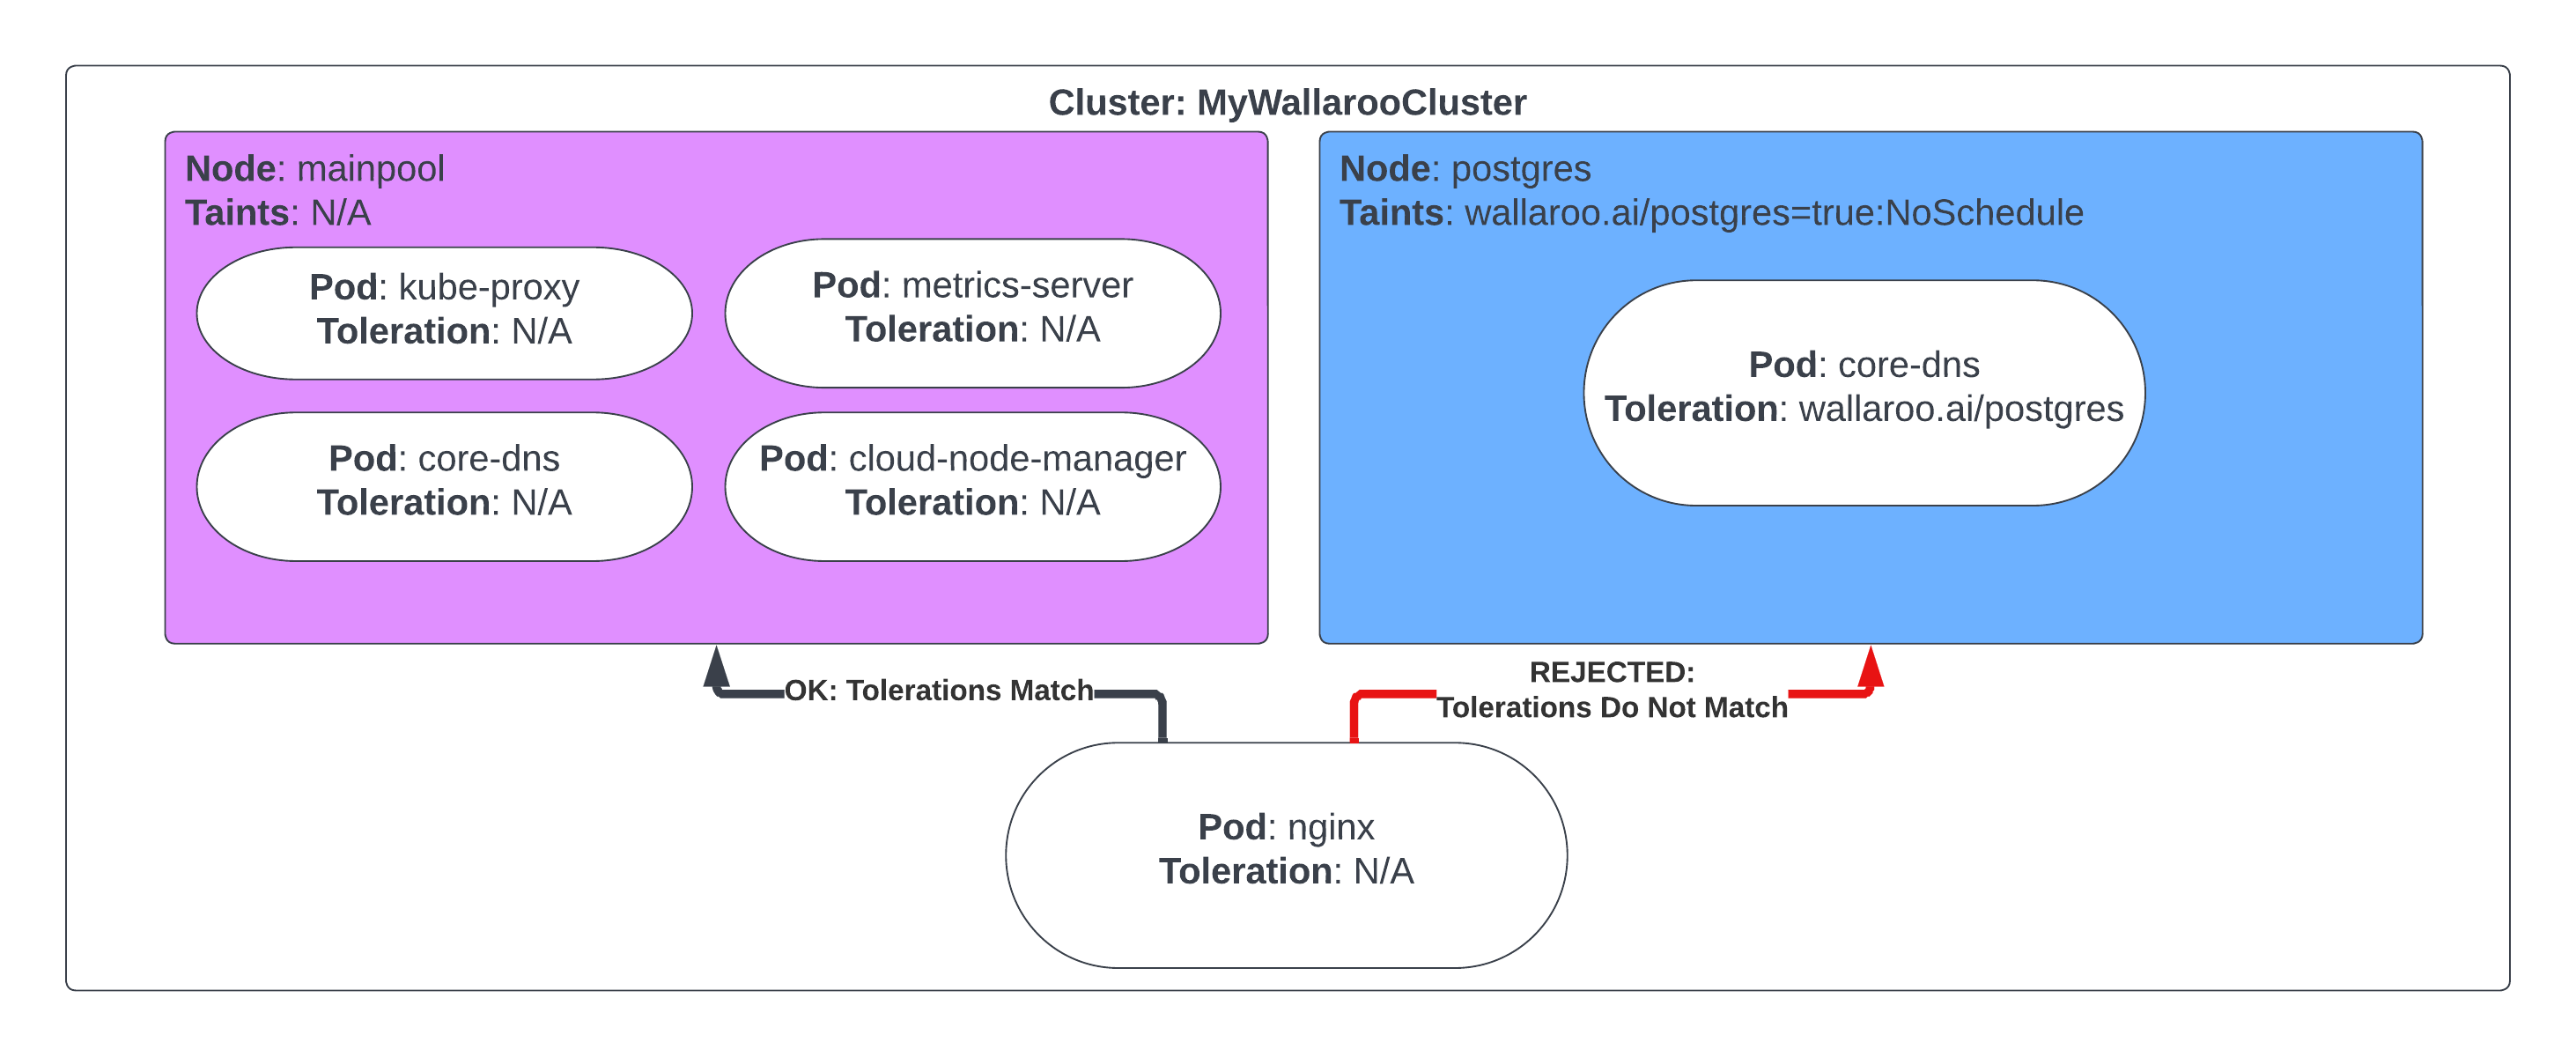
Taints and Tolerances Guide: How to configure Wallaroo for specific taints and tolerances so ensure that only Wallaroo services are running in specific nodes.
Environment Setup Guides
The following setup guides are used to set up the environment that will host the Wallaroo instance. Verify that the environment is prepared and meets the Wallaroo Prerequisites Guide.
Uninstall Guides
The following is a short version of the uninstallation procedure to remove a previously installed version of Wallaroo. For full details, see the How to Uninstall Wallaroo. These instructions assume administrative use of the Kubernetes command kubectl.
To uninstall a previously installed Wallaroo instance:
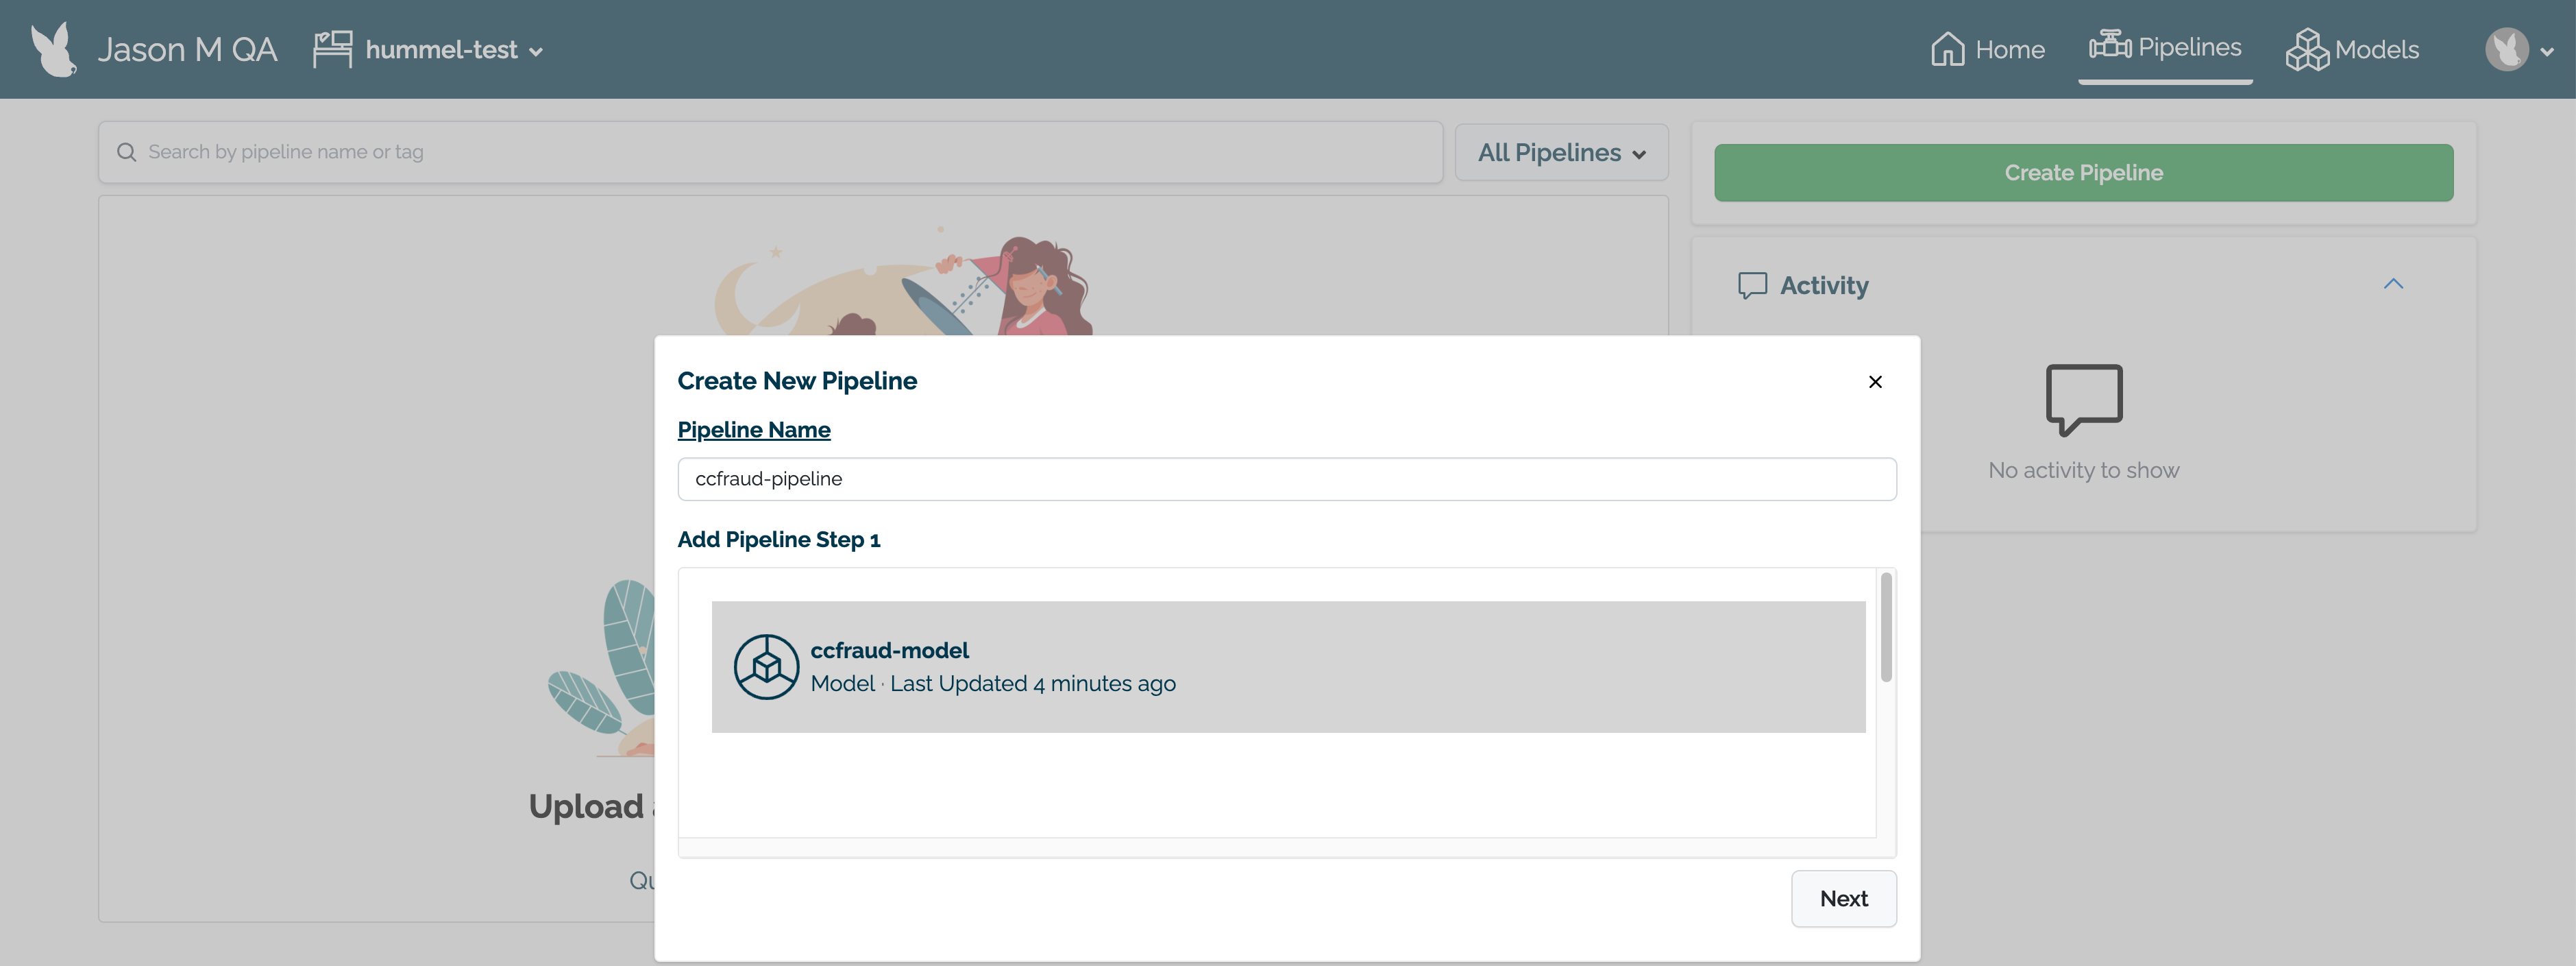
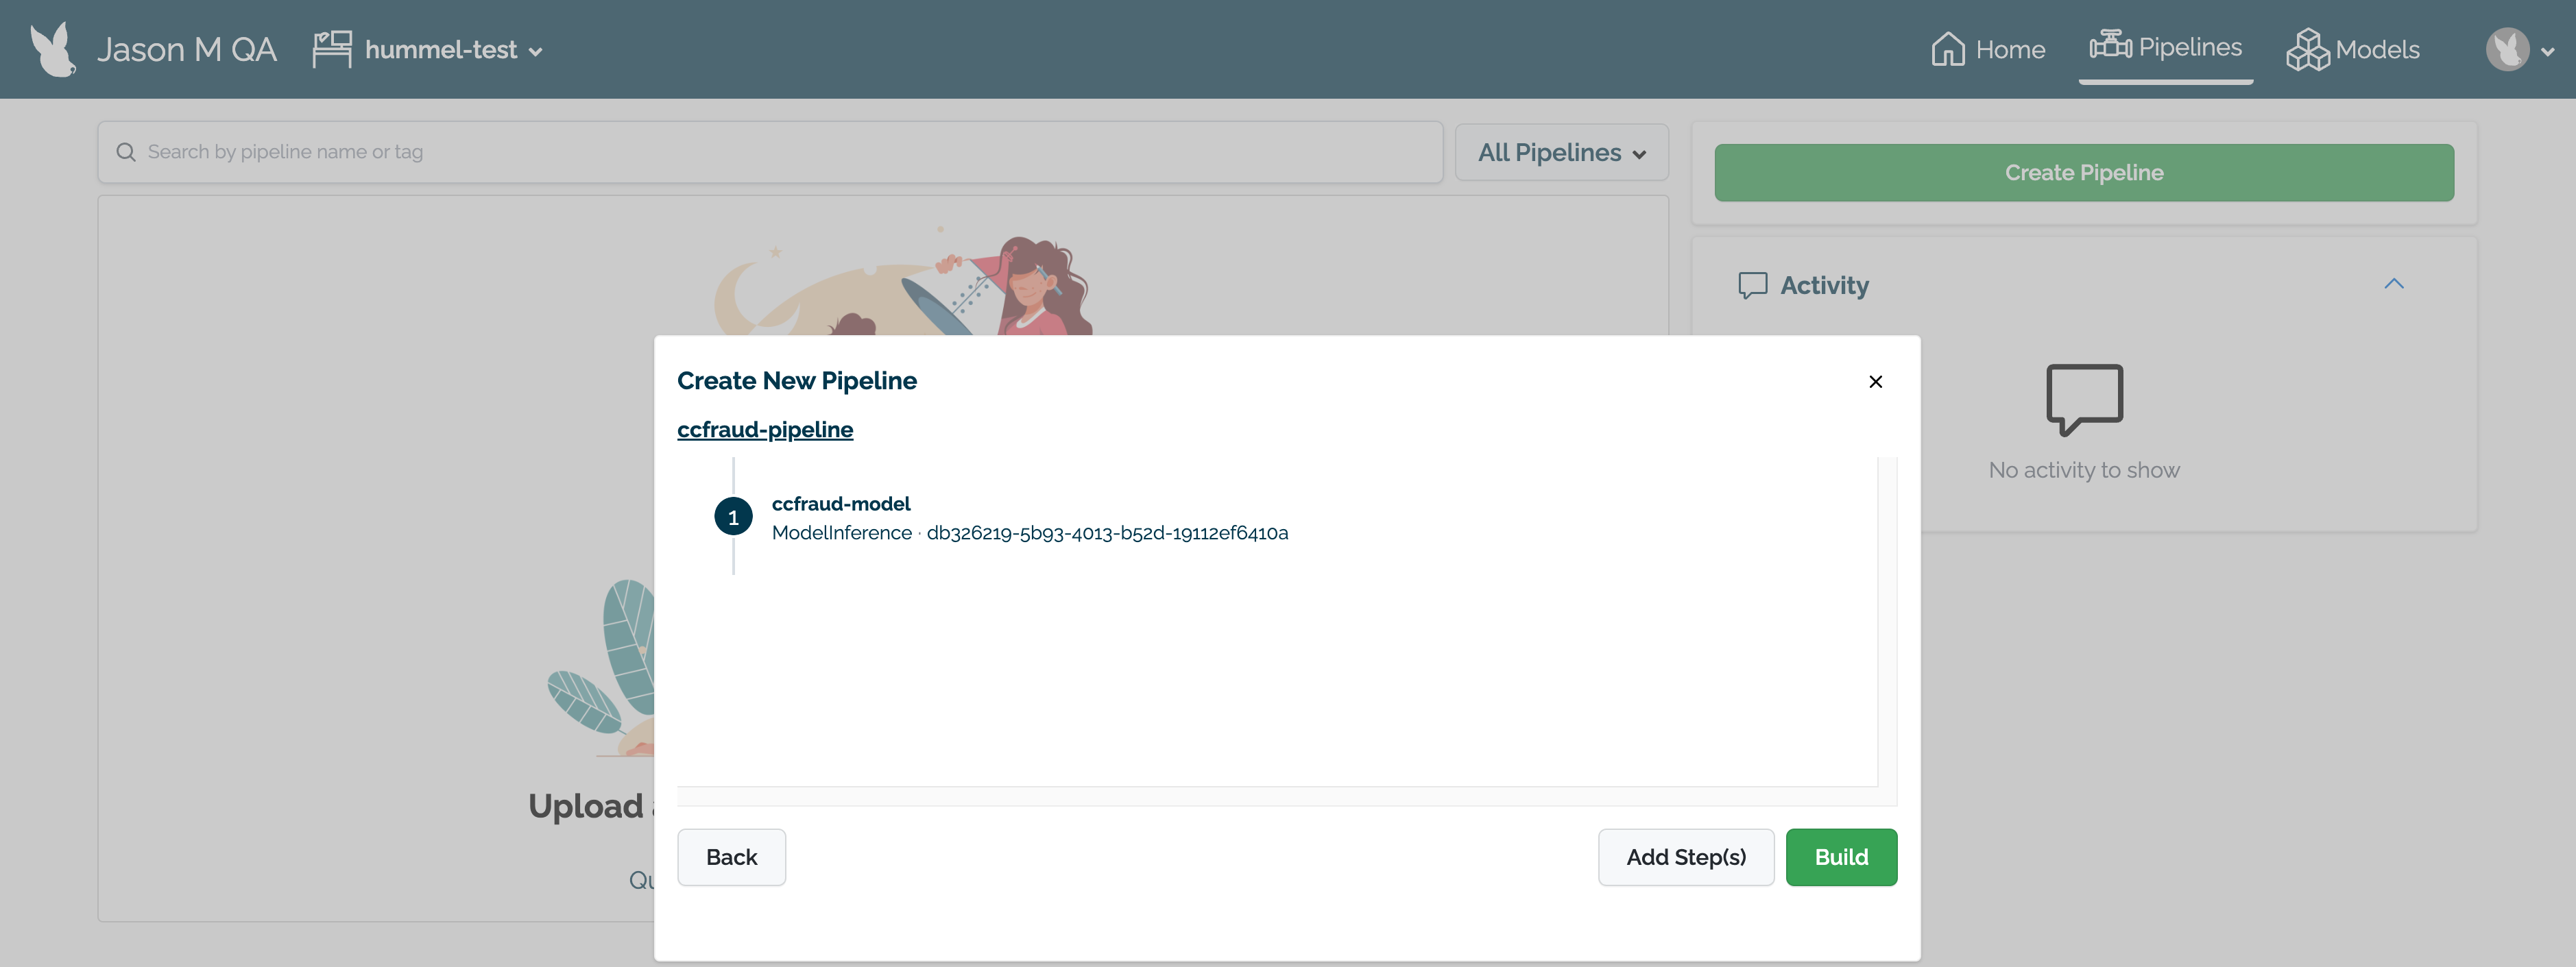
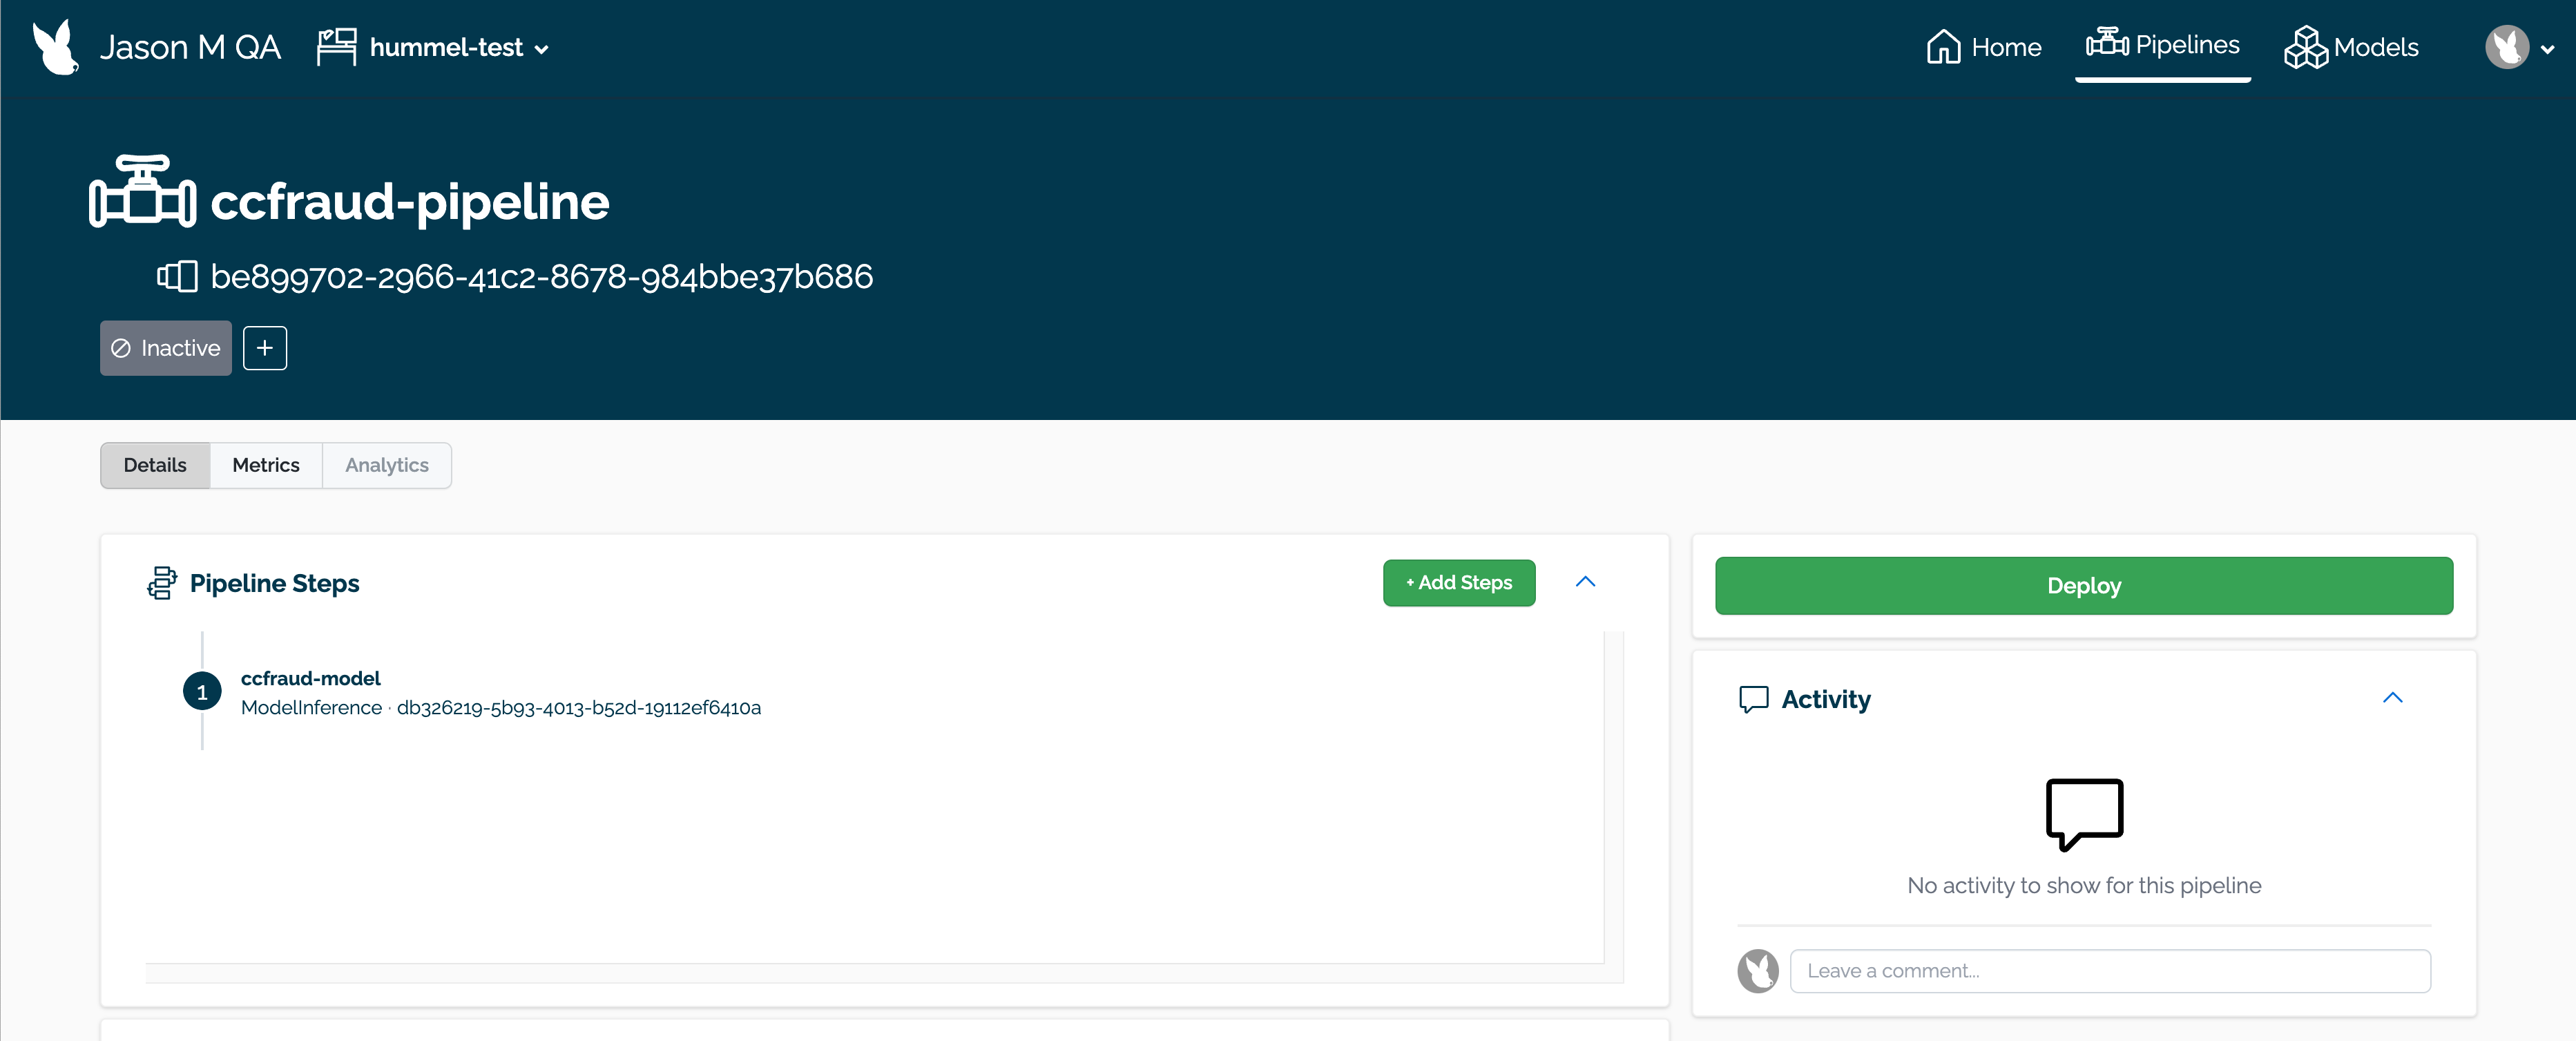
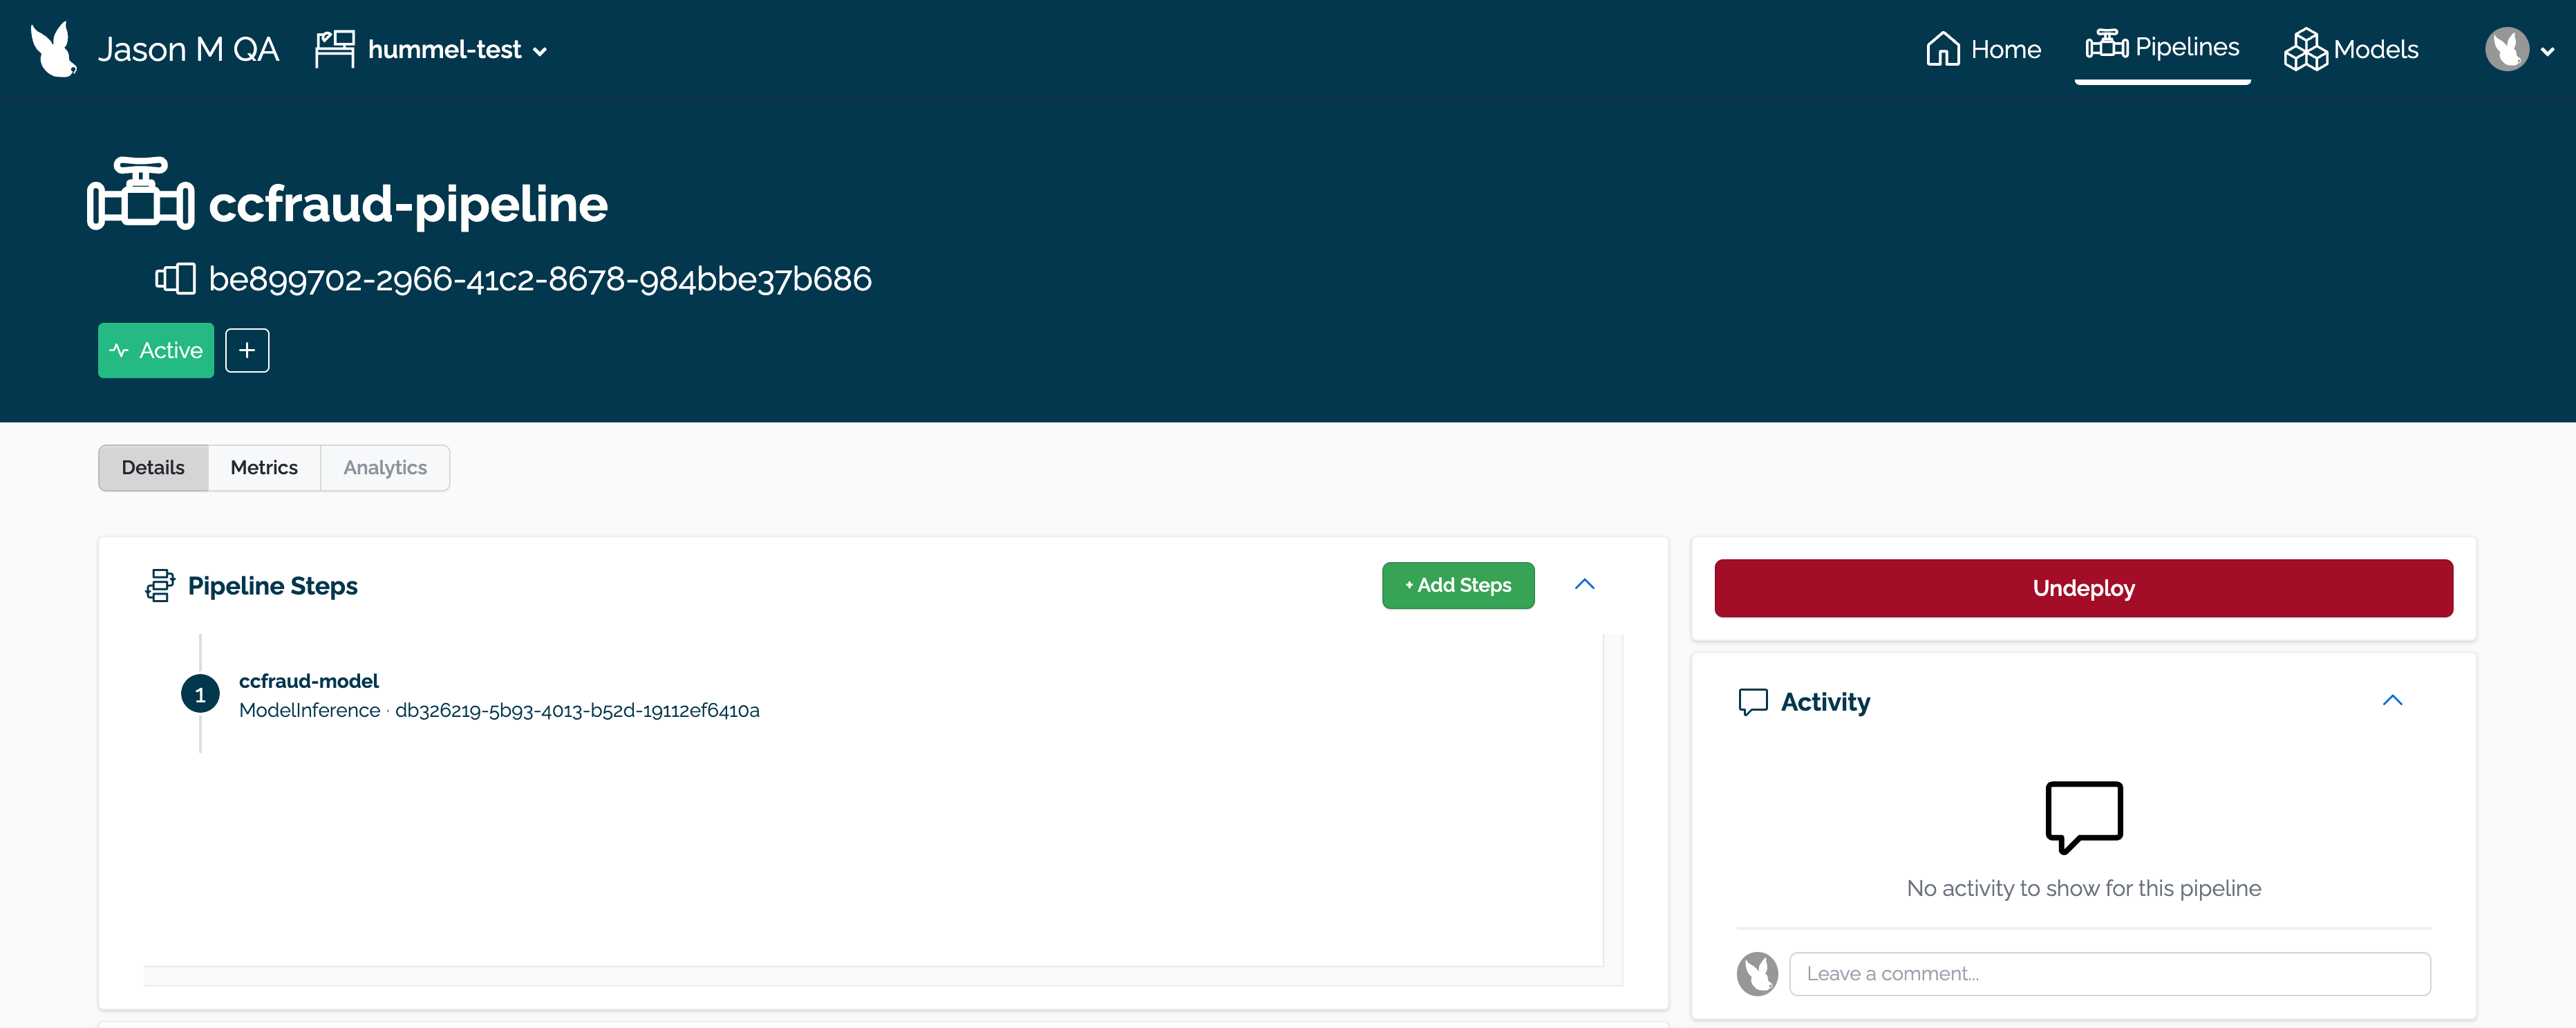
Delete any Wallaroo pipelines still deployed with the command kubectl delete namespace {namespace}. Typically these are the pipeline name with some numerical ID. For example, in the following list of namespaces the namespace ccfraud-pipeline-21 correspond to the Wallaroo pipeline ccfraud-pipeline. Verify these are Wallaroo pipelines before deleting.
  -> kubectl get namespaces
    NAME			    STATUS        AGE
    default		        Active        7d4h
    kube-node-lease	    Active		    7d4h
    kube-public		    Active		    7d4h
    ccfraud-pipeline-21    Active         4h23m
    wallaroo             Active         3d6h

  -> kubectl delete namespaces ccfraud-pipeline-21
Use the following bash script or run the commands individually. Warning: If the selector is incorrect or missing from the kubectl command, the cluster could be damaged beyond repair. For a default installation, the selector and namespace will be wallaroo.
Wallaroo can now be reinstalled into this environment.
Environment Setup Guides
AWS Cluster for Wallaroo Enterprise Instructions
The following instructions are made to assist users set up their Amazon Web Services (AWS) environment for running Wallaroo Enterprise using AWS Elastic Kubernetes Service (EKS).
These represent a recommended setup, but can be modified to fit your specific needs.
AWS Prerequisites
To install Wallaroo in your AWS environment based on these instructions, the following prerequisites must be met:
Register an AWS account: https://aws.amazon.com/ and assign the proper permissions according to your organization’s needs.
The Kubernetes cluster must include the following minimum settings:
Nodes must be OS type Linux with using the containerd driver.
Role-based access control (RBAC) must be enabled.
Minimum of 4 nodes, each node with a minimum of 8 CPU cores and 16 GB RAM. 50 GB will be allocated per node for a total of 625 GB for the entire cluster.
RBAC is enabled.
Recommended Aws Machine type: c5.4xlarge. For more information, see the AWS Instance Types.
Organizations that intend to stop and restart their Kubernetes environment on an intentional or regular basis are recommended to use a single availability zone for their nodes. This minimizes issues such as persistent volumes in different availability zones, etc.
Organizations that intend to use Wallaroo Enterprise in a high availability cluster are encouraged to follow best practices including using separate availability zones for redundancy, etc.
AWS Environment Setup Steps
The following steps are guidelines to assist new users in setting up their AWS environment for Wallaroo. Feel free to replace these with commands with ones that match your needs.
These commands make use of the command line tool eksctl which streamlines the process in creating Amazon Elastic Kubernetes Service clusters for our Wallaroo environment.
The following are used for the example commands below. Replace them with your specific environment settings:
AWS Cluster Name: wallarooAWS
Create an AWS EKS Cluster
The following eksctl configuration file is an example of setting up the AWS environment for a Wallaroo cluster, including the static and adaptive nodepools. Adjust these names and settings based on your organizations requirements.
During the process the Kubernetes credentials will be copied into the local environment. To verify the setup is complete, use the kubectl get nodes command to display the available nodes as in the following example:
kubectl get nodes
NAME                                           STATUS   ROLES    AGE     VERSION
ip-192-168-21-253.us-east-2.compute.internal   Ready    <none>   13m     v1.23.8-eks-9017834
ip-192-168-30-36.us-east-2.compute.internal    Ready    <none>   13m     v1.23.8-eks-9017834
ip-192-168-38-31.us-east-2.compute.internal    Ready    <none>   9m46s   v1.23.8-eks-9017834
ip-192-168-55-123.us-east-2.compute.internal   Ready    <none>   12m     v1.23.8-eks-9017834
ip-192-168-79-70.us-east-2.compute.internal    Ready    <none>   13m     v1.23.8-eks-9017834
ip-192-168-37-222.us-east-2.compute.internal   Ready    <none>   13m     v1.23.8-eks-9017834
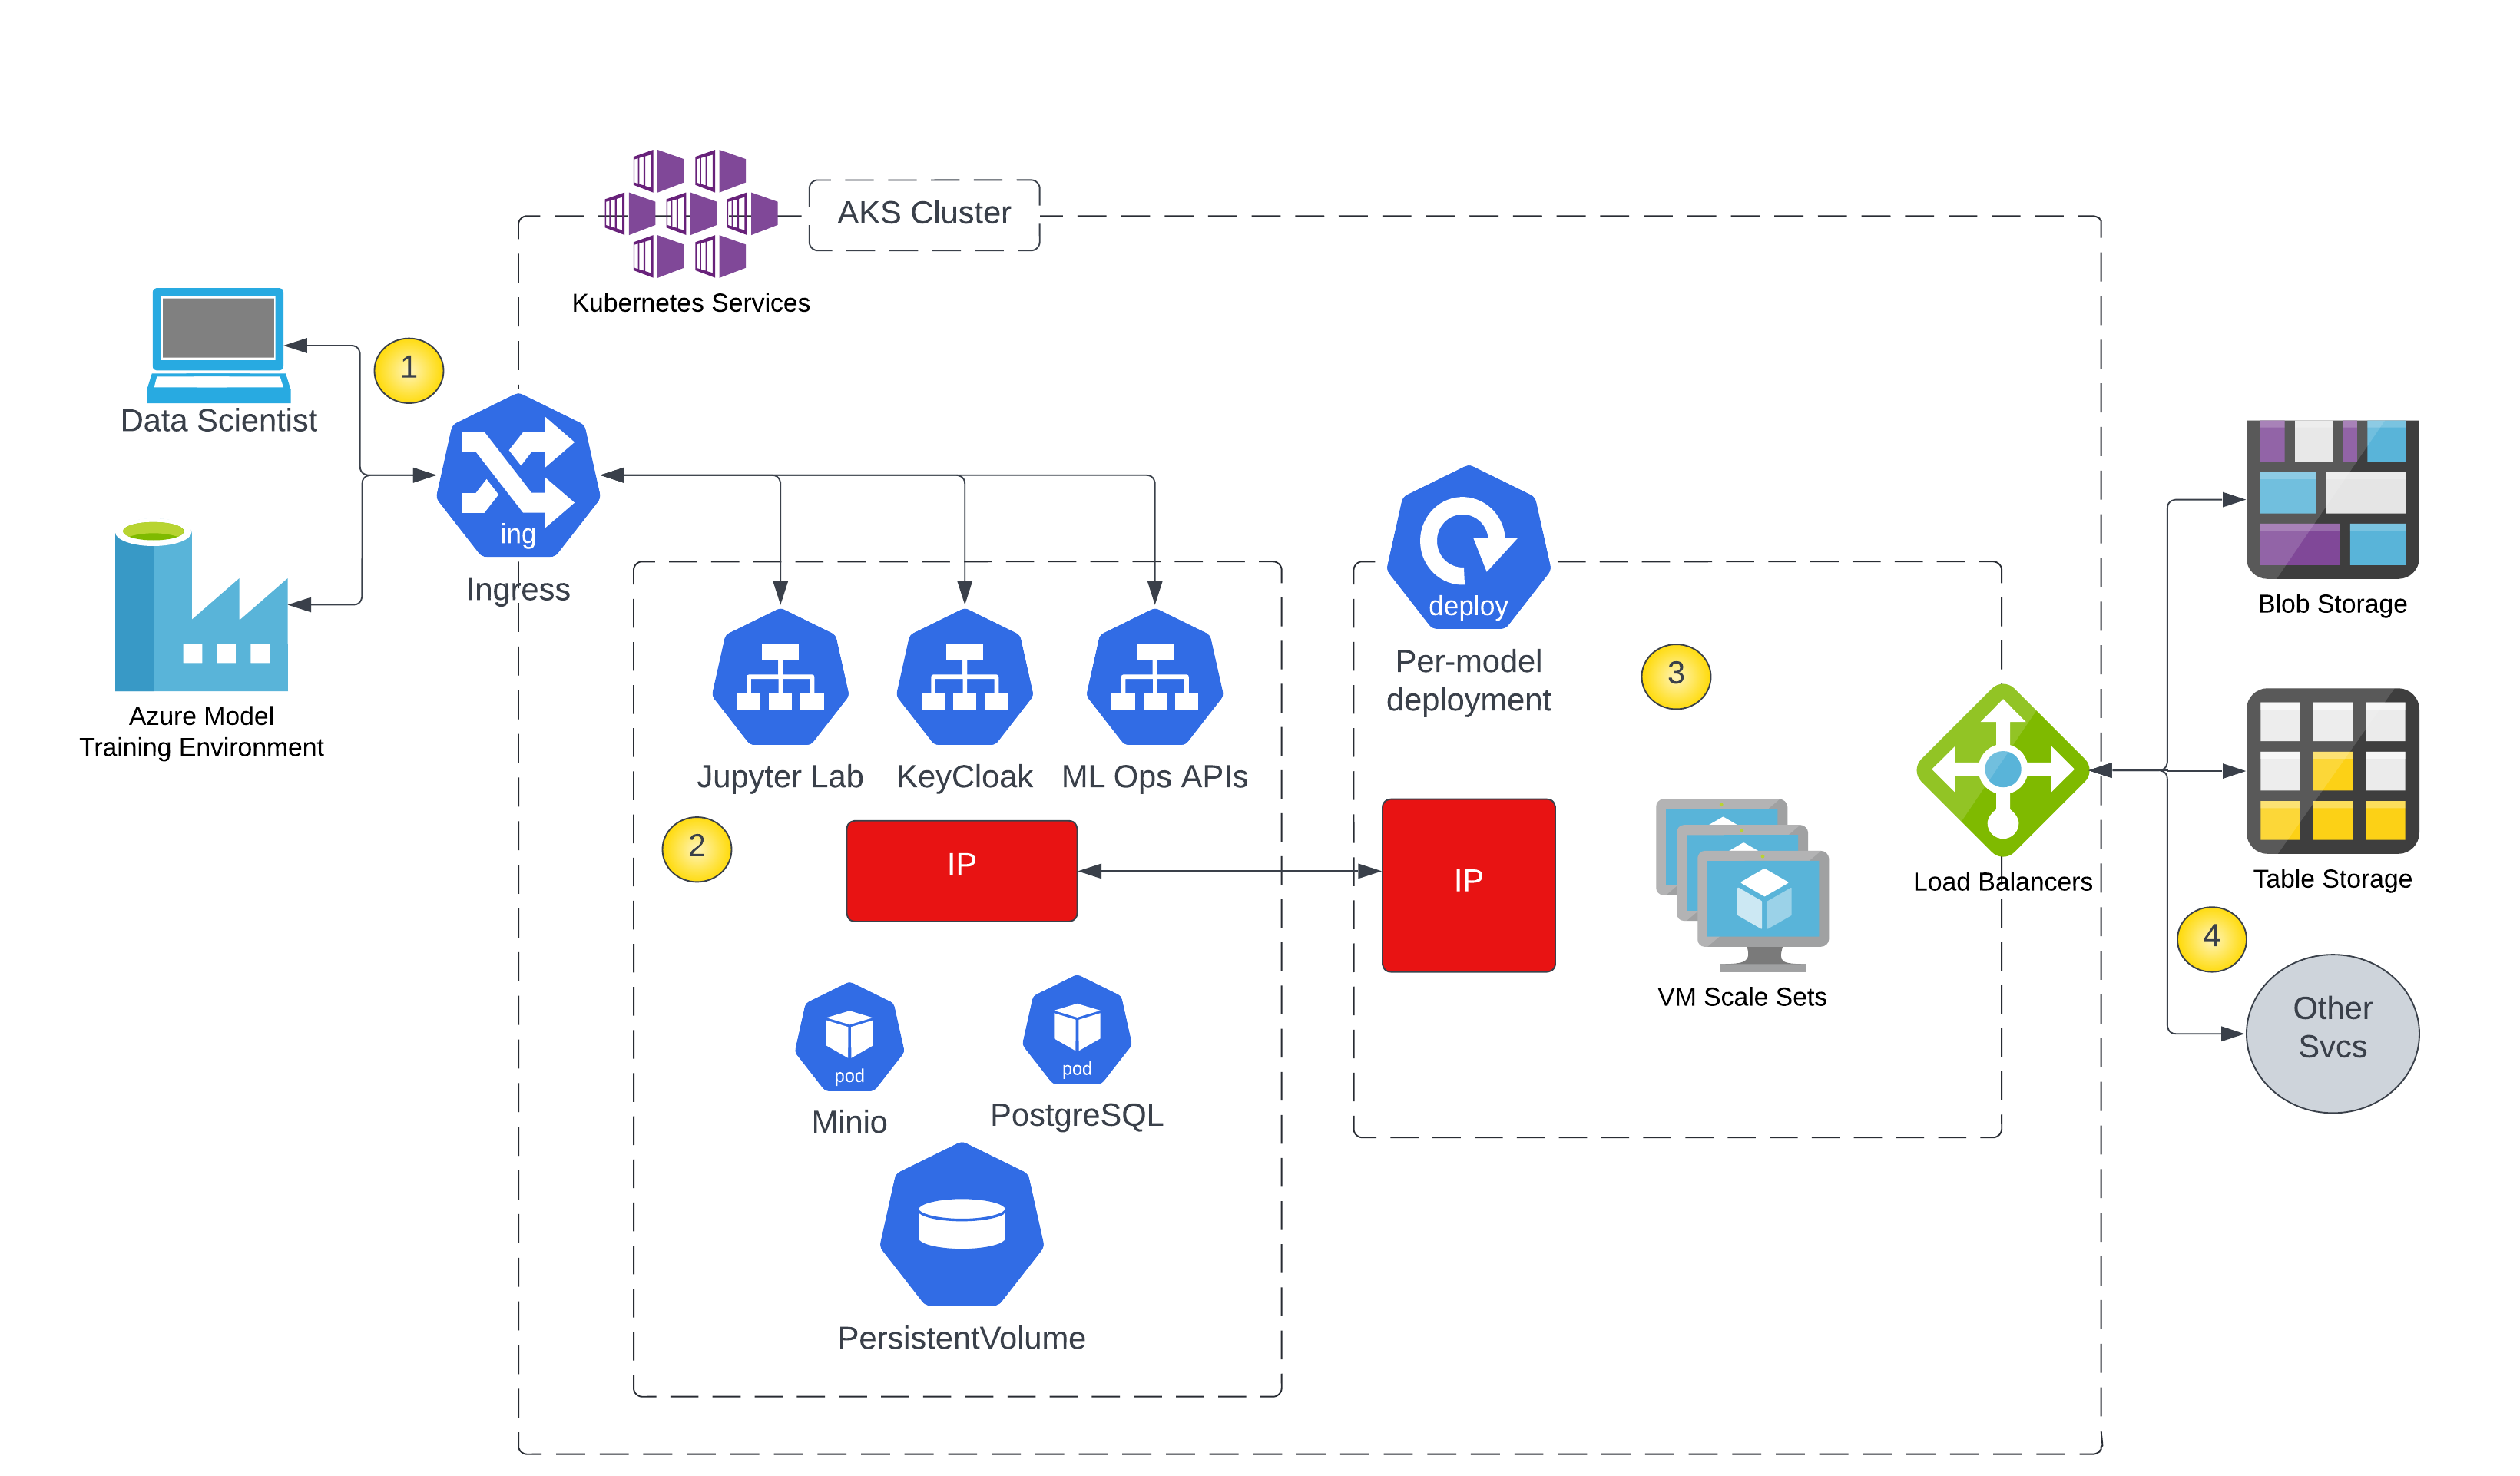
Azure Cluster for Wallaroo Enterprise Instructions
The following instructions are made to assist users set up their Microsoft Azure Kubernetes environment for running Wallaroo Enterprise. These represent a recommended setup, but can be modified to fit your specific needs.
The Kubernetes cluster must include the following minimum settings:
Nodes must be OS type Linux the containerd driver as the default.
Role-based access control (RBAC) must be enabled.
Minimum of 4 nodes, each node with a minimum of 8 CPU cores and 16 GB RAM. 50 GB will be allocated per node for a total of 625 GB for the entire cluster.
RBAC is enabled.
Minimum machine type is set to to Standard_D8s_v4.
IMPORTANT NOTE
Organizations that intend to stop and restart their Kubernetes environment on an intentional or regular basis are recommended to use a single availability zone for their nodes. This minimizes issues such as persistent volumes in different availability zones, etc.
Organizations that intend to use Wallaroo Enterprise in a high availability cluster are encouraged to follow best practices including using separate availability zones for redundancy, etc.
Standard Setup Variables
The following variables are used in the Quick Setup Script and the Manual Setup Guide detailed below. Modify them as best fits your organization.
Variable Name
Default Value
Description
WALLAROO_RESOURCE_GROUP
wallaroogroup
The Azure Resource Group used for the KUbernetes environment.
WALLAROO_GROUP_LOCATION
eastus
The region that the Kubernetes environment will be installed to.
WALLAROO_CONTAINER_REGISTRY
wallarooacr
The Azure Container Registry used for the Kubernetes environment.
WALLAROO_CLUSTER
wallarooaks
The name of the Kubernetes cluster that Wallaroo is installed to.
WALLAROO_SKU_TYPE
Base
The Azure Kubernetes Service SKU type.
WALLAROO_VM_SIZE
Standard_D8s_v4
The VM type used for the standard Wallaroo cluster nodes.
POSTGRES_VM_SIZE
Standard_D8s_v4
The VM type used for the postgres nodepool.
ENGINELB_VM_SIZE
Standard_D8s_v4
The VM type used for the engine-lb nodepool.
ENGINE_VM_SIZE
Standard_F8s_v2
The VM type used for the engine nodepool.
Setup Environment Steps
Quick Setup Script
A sample script is available here, and creates an Azure Kubernetes environment ready for use with Wallaroo Enterprise. This script requires the following prerequisites listed above and uses the variables listed in Standard Setup Variables. Modify them as best fits your organization’s needs.
The following steps are geared towards a standard Linux or macOS system that supports the prerequisites listed above. Modify these steps based on your local environment.
Download the script above.
In a terminal window set the script status as execute with the command chmod +x wallaroo_enterprise_install_azure_expandable.bash.
Modify the script variables listed above based on your requirements.
Run the script with either bash wallaroo_enterprise_install_azure_expandable.bash or ./wallaroo_enterprise_install_azure_expandable.bash from the same directory as the script.
Manual Setup Guide
The following steps are guidelines to assist new users in setting up their Azure environment for Wallaroo. The process uses the variables listed in Standard Setup Variables. Modify them as best fits your organization’s needs.
Setting up an Azure AKS environment is based on the Azure Kubernetes Service tutorial, streamlined to show the minimum steps in setting up your own Wallaroo environment in Azure.
This follows these major steps:
Set Variables
The following are the variables used for the rest of the commands. Modify them as fits your organization’s needs.
To create an Azure Resource Group for Wallaroo in Microsoft Azure, use the following template:
az group create --name $WALLAROO_RESOURCE_GROUP --location $WALLAROO_GROUP_LOCATION
(Optional): Set the default Resource Group to the one recently created. This allows other Azure commands to automatically select this group for commands such as az aks list, etc.
az configure --defaults group={Resource Group Name}
For example:
az configure --defaults group=wallarooGroup
Create an Azure Container Registry
An Azure Container Registry(ACR) manages the container images for services includes Kubernetes. The template for setting up an Azure ACR that supports Wallaroo is the following:
Wallaroo Enterprise supports autoscaling and static nodepools. The following commands are used to create both to support the Wallaroo Enterprise cluster.
The following static nodepools are set up to support the Wallaroo cluster for postgres. Update the VM_SIZE based on your requirements.
For additional settings such as customizing the node pools for your Wallaroo Kubernetes cluster to customize the type of virtual machines used and other settings, see the Microsoft Azure documentation on using system node pools.
Download Wallaroo Kubernetes Configuration
Once the Kubernetes environment is complete, associate it with the local Kubernetes configuration by importing the credentials through the following template command:
az aks get-credentials --resource-group $WALLAROO_RESOURCE_GROUP --name $WALLAROO_CLUSTER
Verify the cluster is available through the kubectl get nodes command.
kubectl get nodes

NAME                               STATUS   ROLES   AGE   VERSION
aks-engine-99896855-vmss000000     Ready    agent   40m   v1.23.8
aks-enginelb-54433467-vmss000000   Ready    agent   48m   v1.23.8
aks-mainpool-37402055-vmss000000   Ready    agent   81m   v1.23.8
aks-mainpool-37402055-vmss000001   Ready    agent   81m   v1.23.8
aks-mainpool-37402055-vmss000002   Ready    agent   81m   v1.23.8
aks-postgres-40215394-vmss000000   Ready    agent   52m   v1.23.8
The following instructions are made to assist users set up their Google Cloud Platform (GCP) Kubernetes environment for running Wallaroo. These represent a recommended setup, but can be modified to fit your specific needs. In particular, these instructions will provision a GKE cluster with 56 CPUs in total. Please ensure that your project’s resource limits support that.
Quick Setup Script: Download a bash script to automatically set up the GCP environment through the Google Cloud Platform command line interface gcloud.
Manual Setup Guide: A list of the gcloud commands used to create the environment through manual commands.
GCP Prerequisites
Organizations that wish to run Wallaroo in their Google Cloud Platform environment must complete the following prerequisites:
Organizations that intend to stop and restart their Kubernetes environment on an intentional or regular basis are recommended to use a single availability zone for their nodes. This minimizes issues such as persistent volumes in different availability zones, etc.
Organizations that intend to use Wallaroo Enterprise in a high availability cluster are encouraged to follow best practices including using separate availability zones for redundancy, etc.
Standard Setup Variables
The following variables are used in the Quick Setup Script and the Manual Setup Guide. Modify them as best fits your organization.
Variable Name
Default Value
Description
WALLAROO_GCP_PROJECT
wallaroo
The name of the Google Project used for the Wallaroo instance.
WALLAROO_CLUSTER
wallaroo
The name of the Kubernetes cluster for the Wallaroo instance.
WALLAROO_GCP_REGION
us-central1
The region the Kubernetes environment is installed to. Update this to your GCP Computer Engine region.
WALLAROO_NODE_LOCATION
us-central1-f
The location the Kubernetes nodes are installed to. Update this to your GCP Compute Engine Zone.
WALLAROO_GCP_NETWORK_NAME
wallaroo-network
The Google network used with the Kubernetes environment.
WALLAROO_GCP_SUBNETWORK_NAME
wallaroo-subnet-1
The Google network subnet used with the Kubernets environment.
DEFAULT_VM_SIZE
e2-standard-8
The VM type used for the default nodepool.
POSTGRES_VM_SIZE
n2-standard-8
The VM type used for the postgres nodepool.
ENGINELB_VM_SIZE
c2-standard-8
The VM type used for the engine-lb nodepool.
ENGINE_VM_SIZE
c2-standard-8
The VM type used for the engine nodepool.
Quick Setup Script
A sample script is available here, and creates a Google Kubernetes Engine cluster ready for use with Wallaroo Enterprise. This script requires the prerequisites listed above and uses the variables as listed in Standard Setup Variables
The following steps are geared towards a standard Linux or macOS system that supports the prerequisites listed above. Modify these steps based on your local environment.
Download the script above.
In a terminal window set the script status as execute with the command chmod +x bash wallaroo_enterprise_gcp_expandable.bash.
Modify the script variables listed above based on your requirements.
Run the script with either bash wallaroo_enterprise_gcp_expandable.bash or ./wallaroo_enterprise_gcp_expandable.bash from the same directory as the script.
Set Variables
The following are the variables used in the environment setup process. Modify them as best fits your organization’s needs.
The following steps are guidelines to assist new users in setting up their GCP environment for Wallaroo. The variables used in the commands are as listed in Standard Setup Variables listed above. Feel free to replace these with ones that match your needs.
See the Google Cloud SDK for full details on commands and settings.
Create a GCP Network
First create a GCP network that is used to connect to the cluster with the gcloud compute networks create command. For more information, see the gcloud compute networks create page.
Once the network is created, the gcloud container clusters create command is used to create a cluster. For more information see the gcloud container clusters create page.
The following is a recommended format, replacing the {} listed variables based on your setup. For Google GKE containerd is enabled by default.
The command can take several minutes to complete based on the size and complexity of the clusters. Verify the process is complete with the clusters list command:
gcloud container clusters list
Wallaroo Enterprise Nodepools
The following static nodepools can be set based on your organizations requirements. Adjust the settings or names based on your requirements.
The following autoscaling nodepools are used for the engine load balancers and Wallaroo engine. Again, replace names and virtual machine types based on your organizations requirements.
To verify the Kubernetes credentials for your cluster have been installed locally, use the kubectl get nodes command. This will display the nodes in the cluster as demonstrated below:
kubectl get nodes
NAME                                         STATUS   ROLES    AGE   VERSION
gke-wallaroo-default-pool-863f02db-7xd4   Ready    <none>   39m   v1.21.6-gke.1503
gke-wallaroo-default-pool-863f02db-8j2d   Ready    <none>   39m   v1.21.6-gke.1503
gke-wallaroo-default-pool-863f02db-hn06   Ready    <none>   39m   v1.21.6-gke.1503
gke-wallaroo-engine-3946eaca-4l3s         Ready    <none>   89s   v1.21.6-gke.1503
gke-wallaroo-engine-lb-2e33a27f-64wb      Ready    <none>   26m   v1.21.6-gke.1503
gke-wallaroo-postgres-d22d73d3-5qp5       Ready    <none>   28m   v1.21.6-gke.1503
Troubleshooting
What does the error ‘Insufficient project quota to satisfy request: resource “CPUS_ALL_REGIONS”’ mean?
Make sure that the Compute Engine Zone and Region are properly set based on your organization’s requirements. The instructions above default to us-central1, so change that zone to install your Wallaroo instance in the correct location.
Single Node Linux
Organizations can run Wallaroo within a single node Linux environment that meet the prerequisites.
The following guide is based on installing Wallaroo Enterprise into virtual machines based on Ubuntu 22.04 hosted in Google Cloud Platform (GCP), Amazon Web Services (AWS) and Microsoft Azure. For other environments and configurations, consult your Wallaroo support representative.
Prerequisites
Before starting the bare Linux installation, the following conditions must be met:
Have a Wallaroo Enterprise license file. For more information, you can request a demonstration.
A Linux bare-metal system or virtual machine with at least 32 cores and 64 GB RAM with Ubuntu 20.04 installed.
650 GB allocated for the root partition, plus 50 GB allocated per node and another 50 GB for the JupyterHub service. Enterprise users who deploy additional pipelines will require an additional 50 GB of storage per lab node deployed.
Ensure memory swapping is disabled by removing it from /etc/fstab if needed.
DNS services for integrating your Wallaroo Enterprise instance. See the DNS Integration Guide for the instructions on configuring Wallaroo Enterprise with your DNS services.
IMPORTANT NOTE
Wallaroo requires out-bound network connections to download the required container images and other tasks. For situations that require limiting out-bound access, refer to the air-gap installation instructions or contact your Wallaroo support representative. Also note that if Wallaroo is being installed into a cloud environment such as Google Cloud Platform, Microsoft Azure, Amazon Web Services, etc, then additional considerations such as networking, DNS, certificates, and other considerations must be accounted for. For IP address restricted environments, see the Air Gap Installation Guide.
The steps below are based on minimum requirements for install Wallaroo in a single node environment.
For situations that require limiting external IP access or other questions, refer to your Wallaroo support representative.
Template Single Node Scripts
The following template scripts are provided as examples on how to create single node virtual machines that meet the requirements listed above in AWS, GCP, and Microsoft Azure environments.
# Variables# The name of the virtual machineNAME=$USER-demo-vm # eg bob-demo-vm# The image used : ubuntu/images/2023.2.1/hvm-ssd/ubuntu-jammy-22.04-amd64-server-20230208IMAGE_ID=ami-0557a15b87f6559cf
# Instance type meeting the Wallaroo requirements.INSTANCE_TYPE=c6i.8xlarge # c6a.8xlarge is also acceptable# key name - generate keys using Amazon EC2 Key Pairs# https://docs.aws.amazon.com/AWSEC2/latest/UserGuide/ec2-key-pairs.html# Wallaroo people: https://us-east-1.console.aws.amazon.com/ec2/home?region=us-east-1#KeyPairs:v=3 - MYKEY=DocNode
# We will whitelist the our source IP for maximum security -- just use 0.0.0.0/0 if you don't care.MY_IP=$(curl -s https://checkip.amazonaws.com)/32
# Create security group in the Default VPCaws ec2 create-security-group --group-name $NAME --description "$USER demo" --no-cli-pager
# Open port 22 and 443aws ec2 authorize-security-group-ingress --group-name $NAME --protocol tcp --port 22 --cidr $MY_IP --no-cli-pager
aws ec2 authorize-security-group-ingress --group-name $NAME --protocol tcp --port 443 --cidr $MY_IP --no-cli-pager
# increase Boot device size to 650 GB# Change the location from `/tmp/device.json` as required.# cat <<EOF > /tmp/device.json # [{# "DeviceName": "/dev/sda1",# "Ebs": { # "VolumeSize": 650,# "VolumeType": "gp2"# }# }]# EOF# Launch instance with a 650 GB Boot device.aws ec2 run-instances --image-id $IMAGE_ID --count 1 --instance-type $INSTANCE_TYPE\
--no-cli-pager \
--key-name $MYKEY\
--block-device-mappings '[{"DeviceName":"/dev/sda1","Ebs":{"VolumeSize":650,"VolumeType":"gp2"}}]'\
--tag-specifications "ResourceType=instance,Tags=[{Key=Name,Value=$NAME}]"\
--security-groups $NAME# Sample output:# {# "Instances": [# {# ...# "InstanceId": "i-0123456789abcdef", # Keep this instance-id for later# ...# }# ]# }#INSTANCEID=YOURINSTANCE# After several minutes, a public IP will be known. This command will retrieve it.# aws ec2 describe-instances --output text --instance-id $INSTANCEID \# --query 'Reservations[*].Instances[*].{ip:PublicIpAddress}'# Sample Output# 12.23.34.56# KEYFILE=KEYFILELOCATION #usually ~/.ssh/key.pem - verify this is the same as the key above.# SSH to the VM - replace $INSTANCEIP#ssh -i $KEYFILE ubuntu@$INSTANCEIP# Stop the VM - replace the $INSTANCEID#aws ec2 stop-instances --instance-id $INSTANCEID# Restart the VM#aws ec2 start-instances --instance-id $INSTANCEID# Clean up - destroy VM#aws ec2 terminate-instances --instance-id $INSTANCEID
#!/bin/bash
# Variables list. Update as per your organization's settingsNAME=$USER-demo-vm # eg bob-demo-vmRESOURCEGROUP=YOURRESOURCEGROUP
LOCATION=eastus
IMAGE=Canonical:0001-com-ubuntu-server-jammy:22_04-lts:22.04.202301140
# Pick a locationaz account list-locations -o table |egrep 'US|----|Name'# Create resource groupaz group create -l $LOCATION --name $USER-demo-$(date +%y%m%d)# Create VM. This will create ~/.ssh/id_rsa and id_rsa.pub - store these for later use.az vm create --resource-group $RESOURCEGROUP --name $NAME --image $IMAGE --generate-ssh-keys \
--size Standard_D32s_v4 --os-disk-size-gb 500 --public-ip-sku Standard
# Sample output# {# "location": "eastus",# "privateIpAddress": "10.0.0.4",# "publicIpAddress": "20.127.249.196", <-- Write this down as MYPUBIP# "resourceGroup": "mnp-demo-230213",# ...# }# SSH port is open by default. This adds an application port.az vm open-port --resource-group $RESOURCEGROUP --name $NAME --port 443# SSH to the VM - assumes that ~/.ssh/id_rsa and ~/.ssh/id_rsa.pub from above are availble.# ssh $MYPUBIP# Use this Stop the VM ("deallocate" frees resources and billing; "stop" does not)# az vm deallocate --resource-group $RESOURCEGROUP --name $NAME# Restart the VM# az vm start --resource-group $RESOURCEGROUP --name $NAME
# SettingsNAME=$USER-demo-$(date +%y%m%d)# eg bob-demo-230210ZONE=us-west1-a # For a complete list, use `gcloud compute zones list | egrep ^us-`PROJECT=wallaroo-dev-253816 # Insert the GCP Project ID here. This is the one for Wallaroo.# Create VMIMAGE=projects/ubuntu-os-cloud/global/images/2023.2.1/ubuntu-2204-jammy-v20230114
# Port 22 and 443 open by defaultgcloud compute instances create $NAME\
--project=$PROJECT\
--zone=$ZONE\
--machine-type=e2-standard-32 \
--network-interface=network-tier=STANDARD,subnet=default \
--maintenance-policy=MIGRATE \
--provisioning-model=STANDARD \
--no-service-account \
--no-scopes \
--tags=https-server \
--create-disk=boot=yes,image=${IMAGE},size=500,type=pd-standard \
--no-shielded-secure-boot \
--no-shielded-vtpm \
--no-shielded-integrity-monitoring \
--reservation-affinity=any
# Get the external IP addressgcloud compute instances describe $NAME --zone $ZONE --format='get(networkInterfaces[0].accessConfigs[0].natIP)'# SSH to the VM#gcloud compute ssh $NAME --zone $ZONE# SCP file to the instance - replace $FILE with the file path. Useful for copying up the license file up to the instance.#gcloud compute scp --zone $ZONE $FILE $NAME:~/# SSH port forward to the VM#gcloud compute ssh $NAME --zone $ZONE -- -NL 8800:localhost:8800# Suspend the VM#gcloud compute instances stop $NAME --zone $ZONE# Restart the VM#gcloud compute instances start $NAME --zone $ZONE
Kubernetes Installation Steps
The following script and steps will install the Kubernetes version and requirements into the Linux node that supports a Wallaroo single node installation.
The process includes these major steps:
Install Kubernetes
Install Kots Version
Install Kubernetes
curl is installed in the default scripts provided above. Verify that it is installed if using some other platform.
Verify that the Ubuntu distribution is up to date, and reboot if necessary after updating.
sudo apt update
sudo apt upgrade
Start the Kubernetes installation with the following script, substituting the URL path as appropriate for your license.
For Wallaroo versions 2022.4 and below:
curl https://kurl.sh/9398a3a | sudo bash
For Wallaroo versions 2023.1 and later, the install is based on the license channel. For example, if your license uses the EE channel, then the path is /wallaroo-ee; that is, /wallaroo- plus the lower-case channel name. Note that the Kubernetes install channel must match the License version. Check with your Wallaroo support representative with any questions about your version.
curl https://kurl.sh/wallaroo-ee | sudo bash
If prompted with This application is incompatible with memory swapping enabled. Disable swap to continue? (Y/n), reply Y.
Set up the Kubernetes configuration with the following commands:
Verify kots was installed with the following command:
kubectl kots version
It should return results similar to the following:
Replicated KOTS 1.91.3
Connection Options
Once Kubernetes has been set up on the Linux node, users can opt to copy the Kubernetes configuration to a local system, updating the IP address and other information as required. See the Configure Access to Multiple Clusters.
The easiest method is to create a SSH tunnel to the Linux node. Usually this will be in the format:
ssh $IP -L8800:localhost:8800
For example, in an AWS instance that may be as follows, replaying $KEYFILE with the link to the keyfile and $IP with the IP address of the Linux node.
ssh -i $KEYFILE ubuntu@$IP -L8800:localhost:8800
In a GCP instance, gcloud can be used as follows, replacing $NAME with the name of the GCP instance, $ZONE with the zone it was installed into.
Port forwarding port 8800 is used for kots based installation to access the Wallaroo Administrative Dashboard.
Install Wallaroo
Organizations that use cloud services such as Google Cloud Platform (GCP), Amazon Web Services (AWS), or Microsoft Azure can install Wallaroo Enterprise through the following process. These instructions also work with Single Node Linux based installations.
Before installation, the following prerequisites must be met:
Have a Wallaroo Enterprise license file. For more information, you can request a demonstration.
Set up a cloud Kubernetes environment that meets the requirements. Clusters must meet the following minimum specifications:
Minimum number of nodes: 4
Minimum Number of CPU Cores: 8
Minimum RAM: 16 GB
A total of 625 GB of storage will be allocated for the entire cluster based on 5 users with up to four pipelines with five steps per pipeline, with 50 GB allocated per node, including 50 GB specifically for the Jupyter Hub service. Enterprise users who deploy additional pipelines will require an additional 50 GB of storage per lab node deployed.
Runtime: containerd is required.
DNS services for integrating your Wallaroo Enterprise instance. See the DNS Integration Guide for the instructions on configuring Wallaroo Enterprise with your DNS services.
IMPORTANT NOTE
Wallaroo requires out-bound network connections to download the required container images and other tasks. For situations that require limiting out-bound access, refer to the air-gap installation instructions or contact your Wallaroo support representative.
Wallaroo Enterprise can be installed either interactively or automatically through the kubectl and kots applications.
Automated Install
To automatically install Wallaroo into the namespace wallaroo, specify the administrative password and the license file during the installation as in the following format with the following variables:
NAMESPACE: The namespace for the Wallaroo Enterprise install, typically wallaroo.
LICENSEFILE: The location of the Wallaroo Enterprise license file.
SHAREDPASSWORD: The password of for the Wallaroo Administrative Dashboard.
The Interactive Install process allows users to adjust the configuration settings before Wallaroo is deployed. It requires users be able to access the Wallaroo Administrative Dashboard through a browser, typically on port 8080.
IMPORTANT NOTE: Users who install Wallaroo through another node such as in the single node installation can port use SSH tunneling to access the Wallaroo Administrative Dashboard. For example:
ssh IP -L8800:localhost:8800
Install the Wallaroo Enterprise Edition using kots install wallaroo/ee, specifying the namespace to install Wallaroo into. For example, if wallaroo is the namespace, then the command is:
Wallaroo Enterprise Edition will be downloaded and installed into your Kubernetes environment in the namespace specified. When prompted, set the default password for the Wallaroo environment. When complete, Wallaroo Enterprise Edition will display the URL for the Admin Console, and how to end the Admin Console from running.
• Deploying Admin Console
• Creating namespace ✓
• Waiting for datastore to be ready ✓
Enter a new password to be used for the Admin Console: •••••••••••••
• Waiting for Admin Console to be ready ✓
• Press Ctrl+C to exit• Go to http://localhost:8800 to access the Admin Console
Configure Wallaroo
Once installed, Wallaroo will continue to run until terminated.
To relaunch the Wallaroo Administrative Dashboard and make changes or updates, use the following command:
kubectl-kots admin-console --namespace wallaroo
DNS Services
Wallaroo Enterprise requires integration into your organizations DNS services.
The DNS Integration Guide details adding the Wallaroo instance to an organizations DNS services.
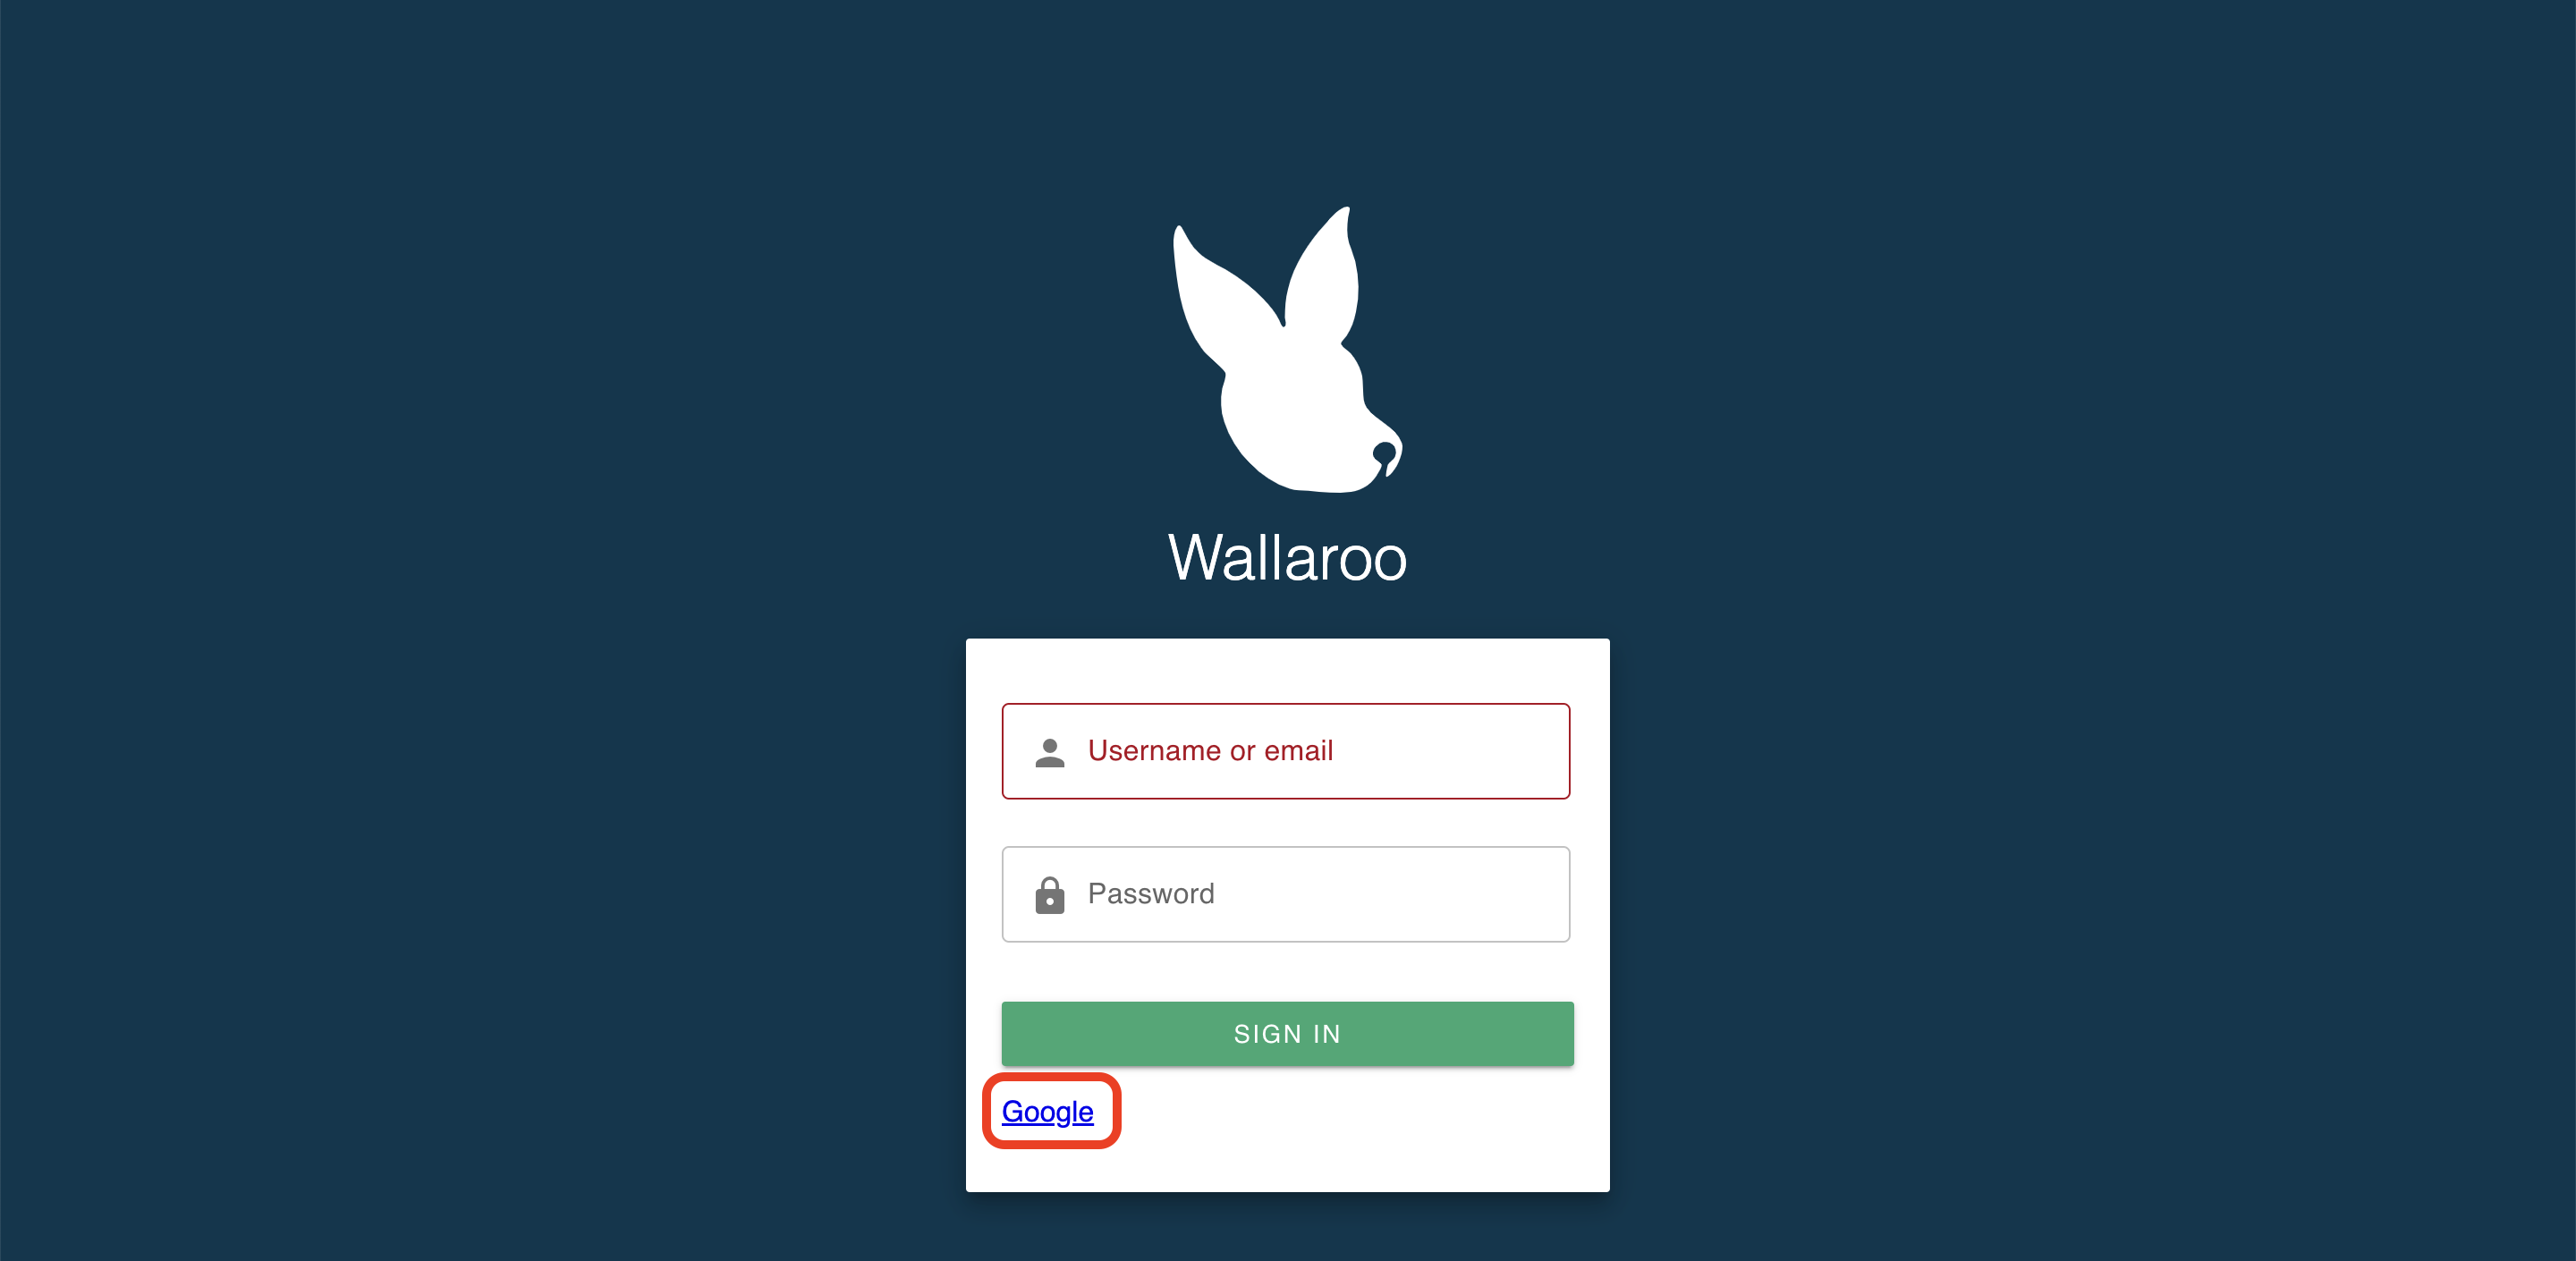
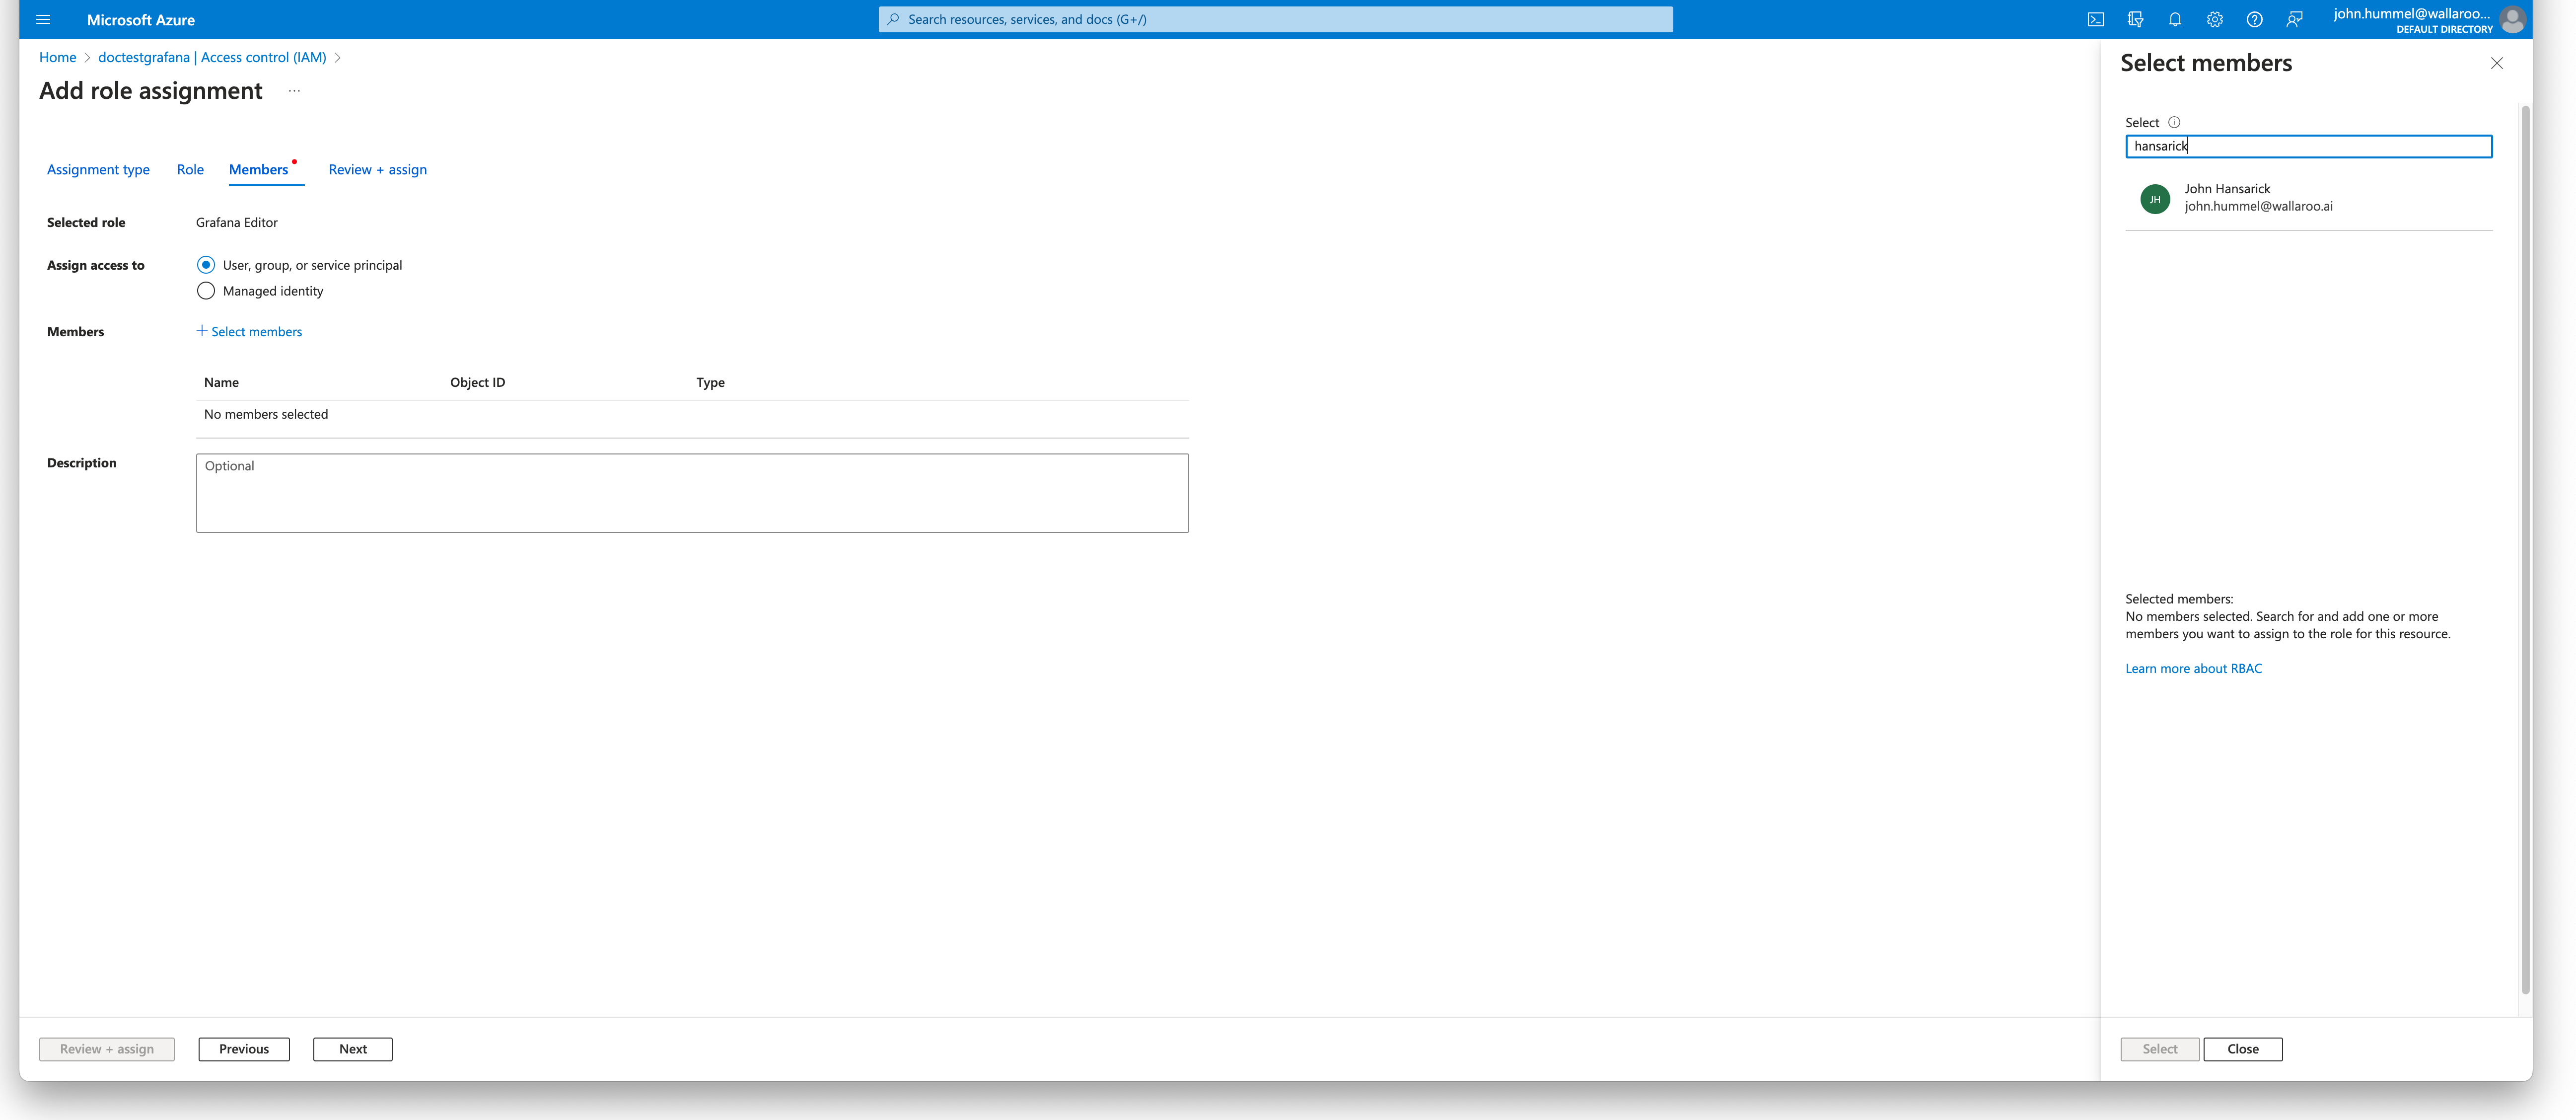
User Management
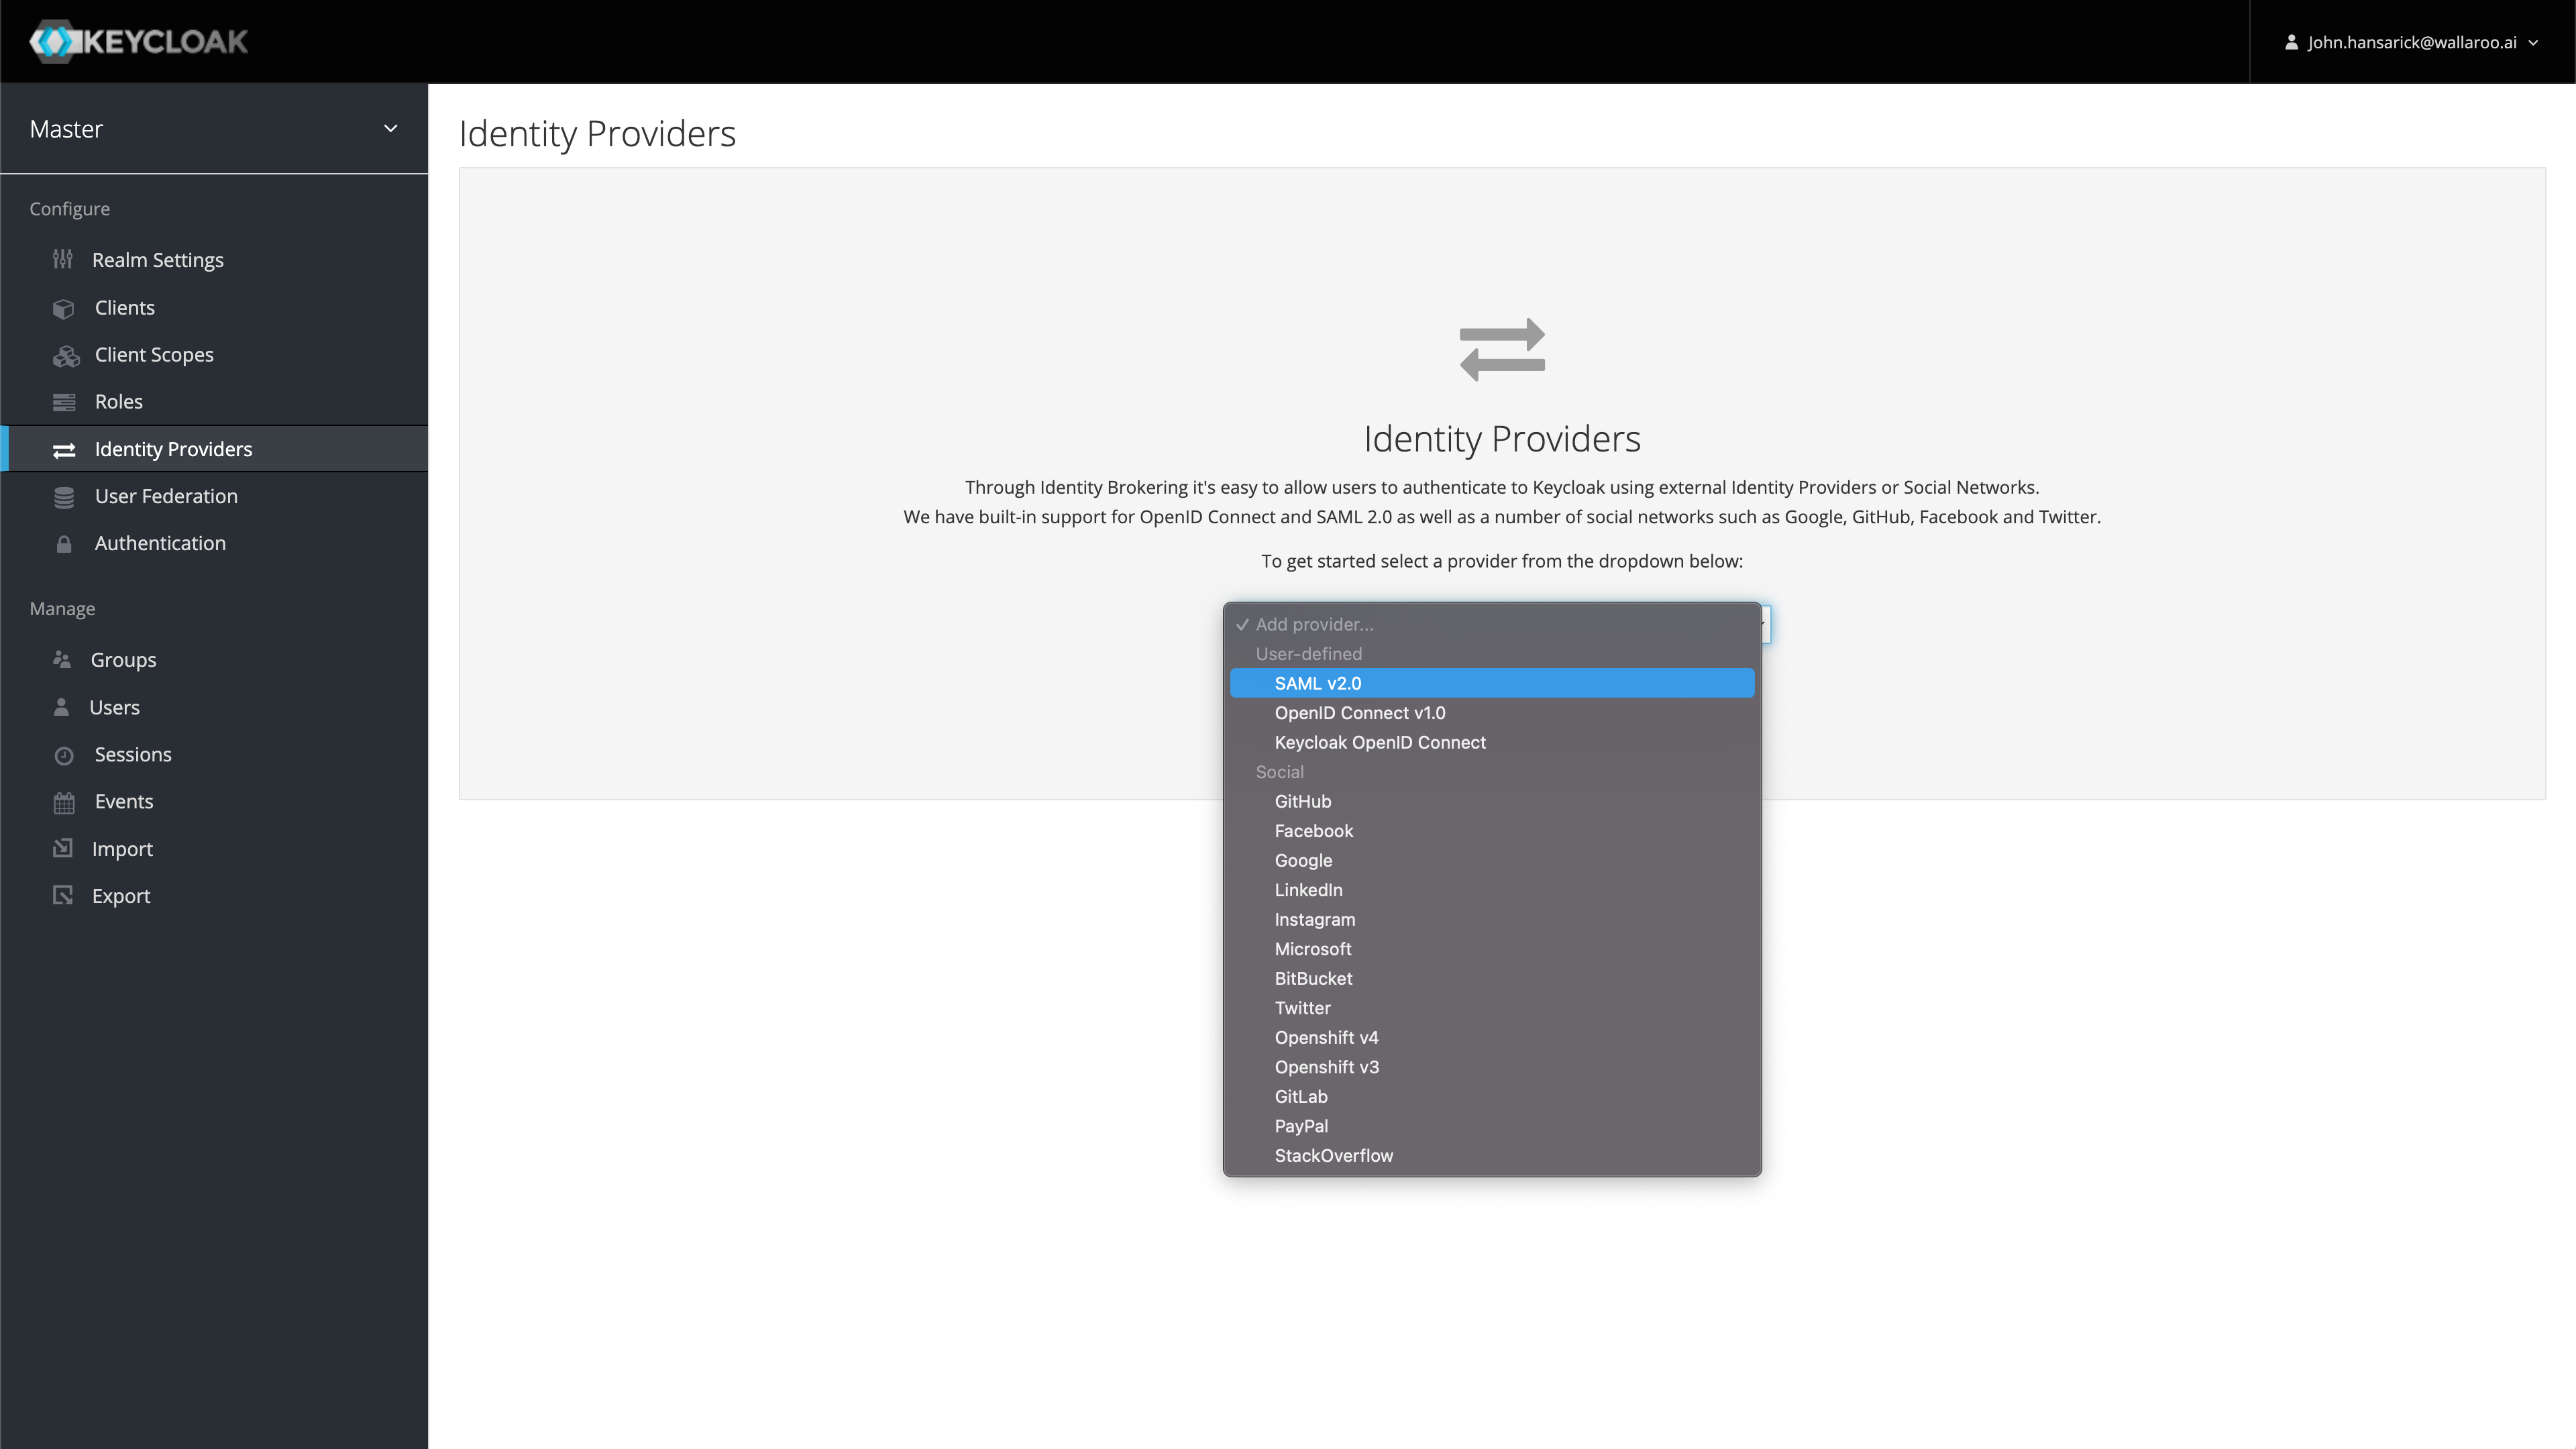
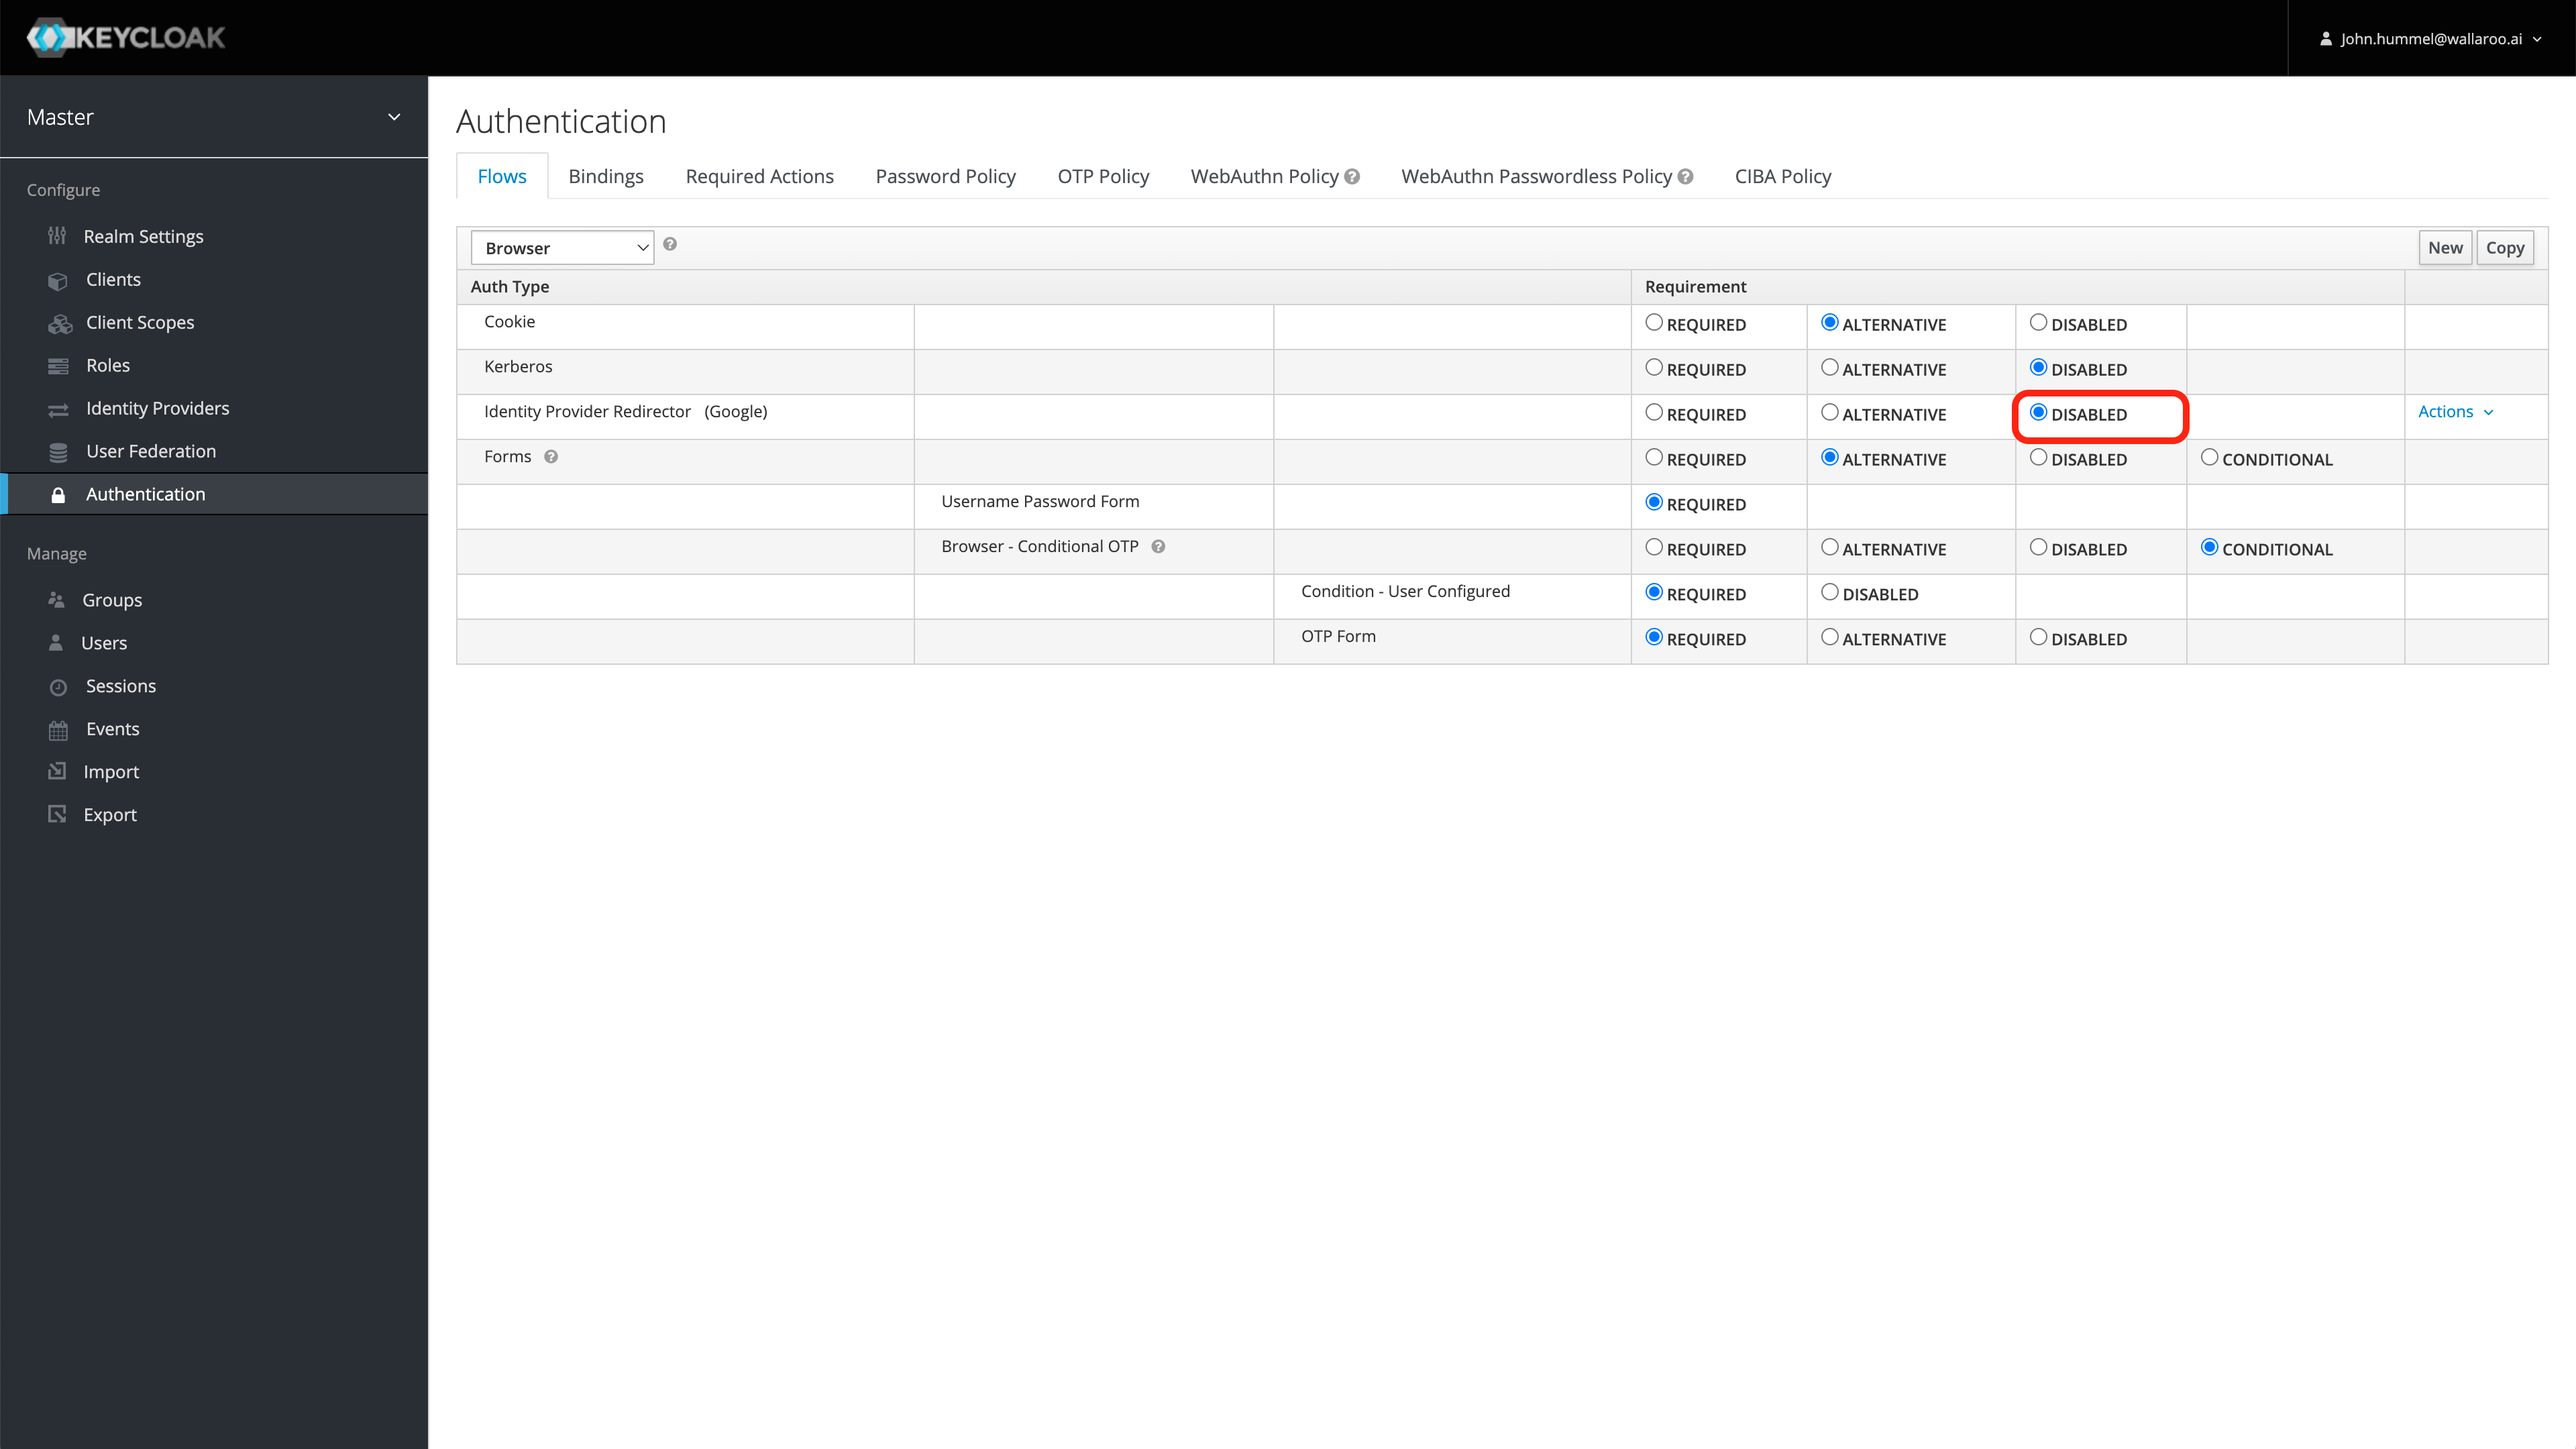
User management is handled through the Wallaroo instance Keycloak service. See the Wallaroo User Management for full guides on setting up users, identity providers, and other user configuration options.
1.2.2 - Wallaroo Enterprise Simple Install Guide
How to set up Wallaroo Enterprise for prepared environments.
The following guide is prepared for organizations that have an environment that meets the prerequisites for installing Wallaroo, and want to jump directly to the installation process.
Install the Wallaroo Enterprise Edition using kots install wallaroo/ee, specifying the namespace to install Wallaroo into. For example, if wallaroo is the namespace, then the command is:
Wallaroo Enterprise Edition will be downloaded and installed into your Kubernetes environment in the namespace specified. When prompted, set the default password for the Wallaroo environment. When complete, Wallaroo Enterprise Edition will display the URL for the Admin Console, and how to end the Admin Console from running.
• Deploying Admin Console
• Creating namespace ✓
• Waiting for datastore to be ready ✓
Enter a new password to be used for the Admin Console: •••••••••••••
• Waiting for Admin Console to be ready ✓
• Press Ctrl+C to exit• Go to http://localhost:8800 to access the Admin Console
Configure Wallaroo
Once installed, Wallaroo will continue to run until terminated.
To relaunch the Wallaroo Administrative Dashboard and make changes or updates, use the following command:
kubectl-kots admin-console --namespace wallaroo
DNS Services
Wallaroo Enterprise requires integration into your organizations DNS services.
The DNS Integration Guide details adding the Wallaroo instance to an organizations DNS services.
User Management
User management is handled through the Wallaroo instance Keycloak service. See the Wallaroo User Management for full guides on setting up users, identity providers, and other user configuration options.
1.2.3 - Wallaroo Enterprise Air Gap Install Guide
Average Install Time
45 minutes depending on system performance and network connections.
Organizations that require Wallaroo be installed into an “air gap” environment - where the Wallaroo instance does not connect to the public Internet - can use these instructions to install Wallaroo into an existing Kubernetes cluster.
This guide assumes knowledge of how to use Kubernetes and work with internal clusters. The following conditions must be completed before starting an air gap installation of Wallaroo:
A Kubernetes cluster is installed and meets the prerequisites listed below.
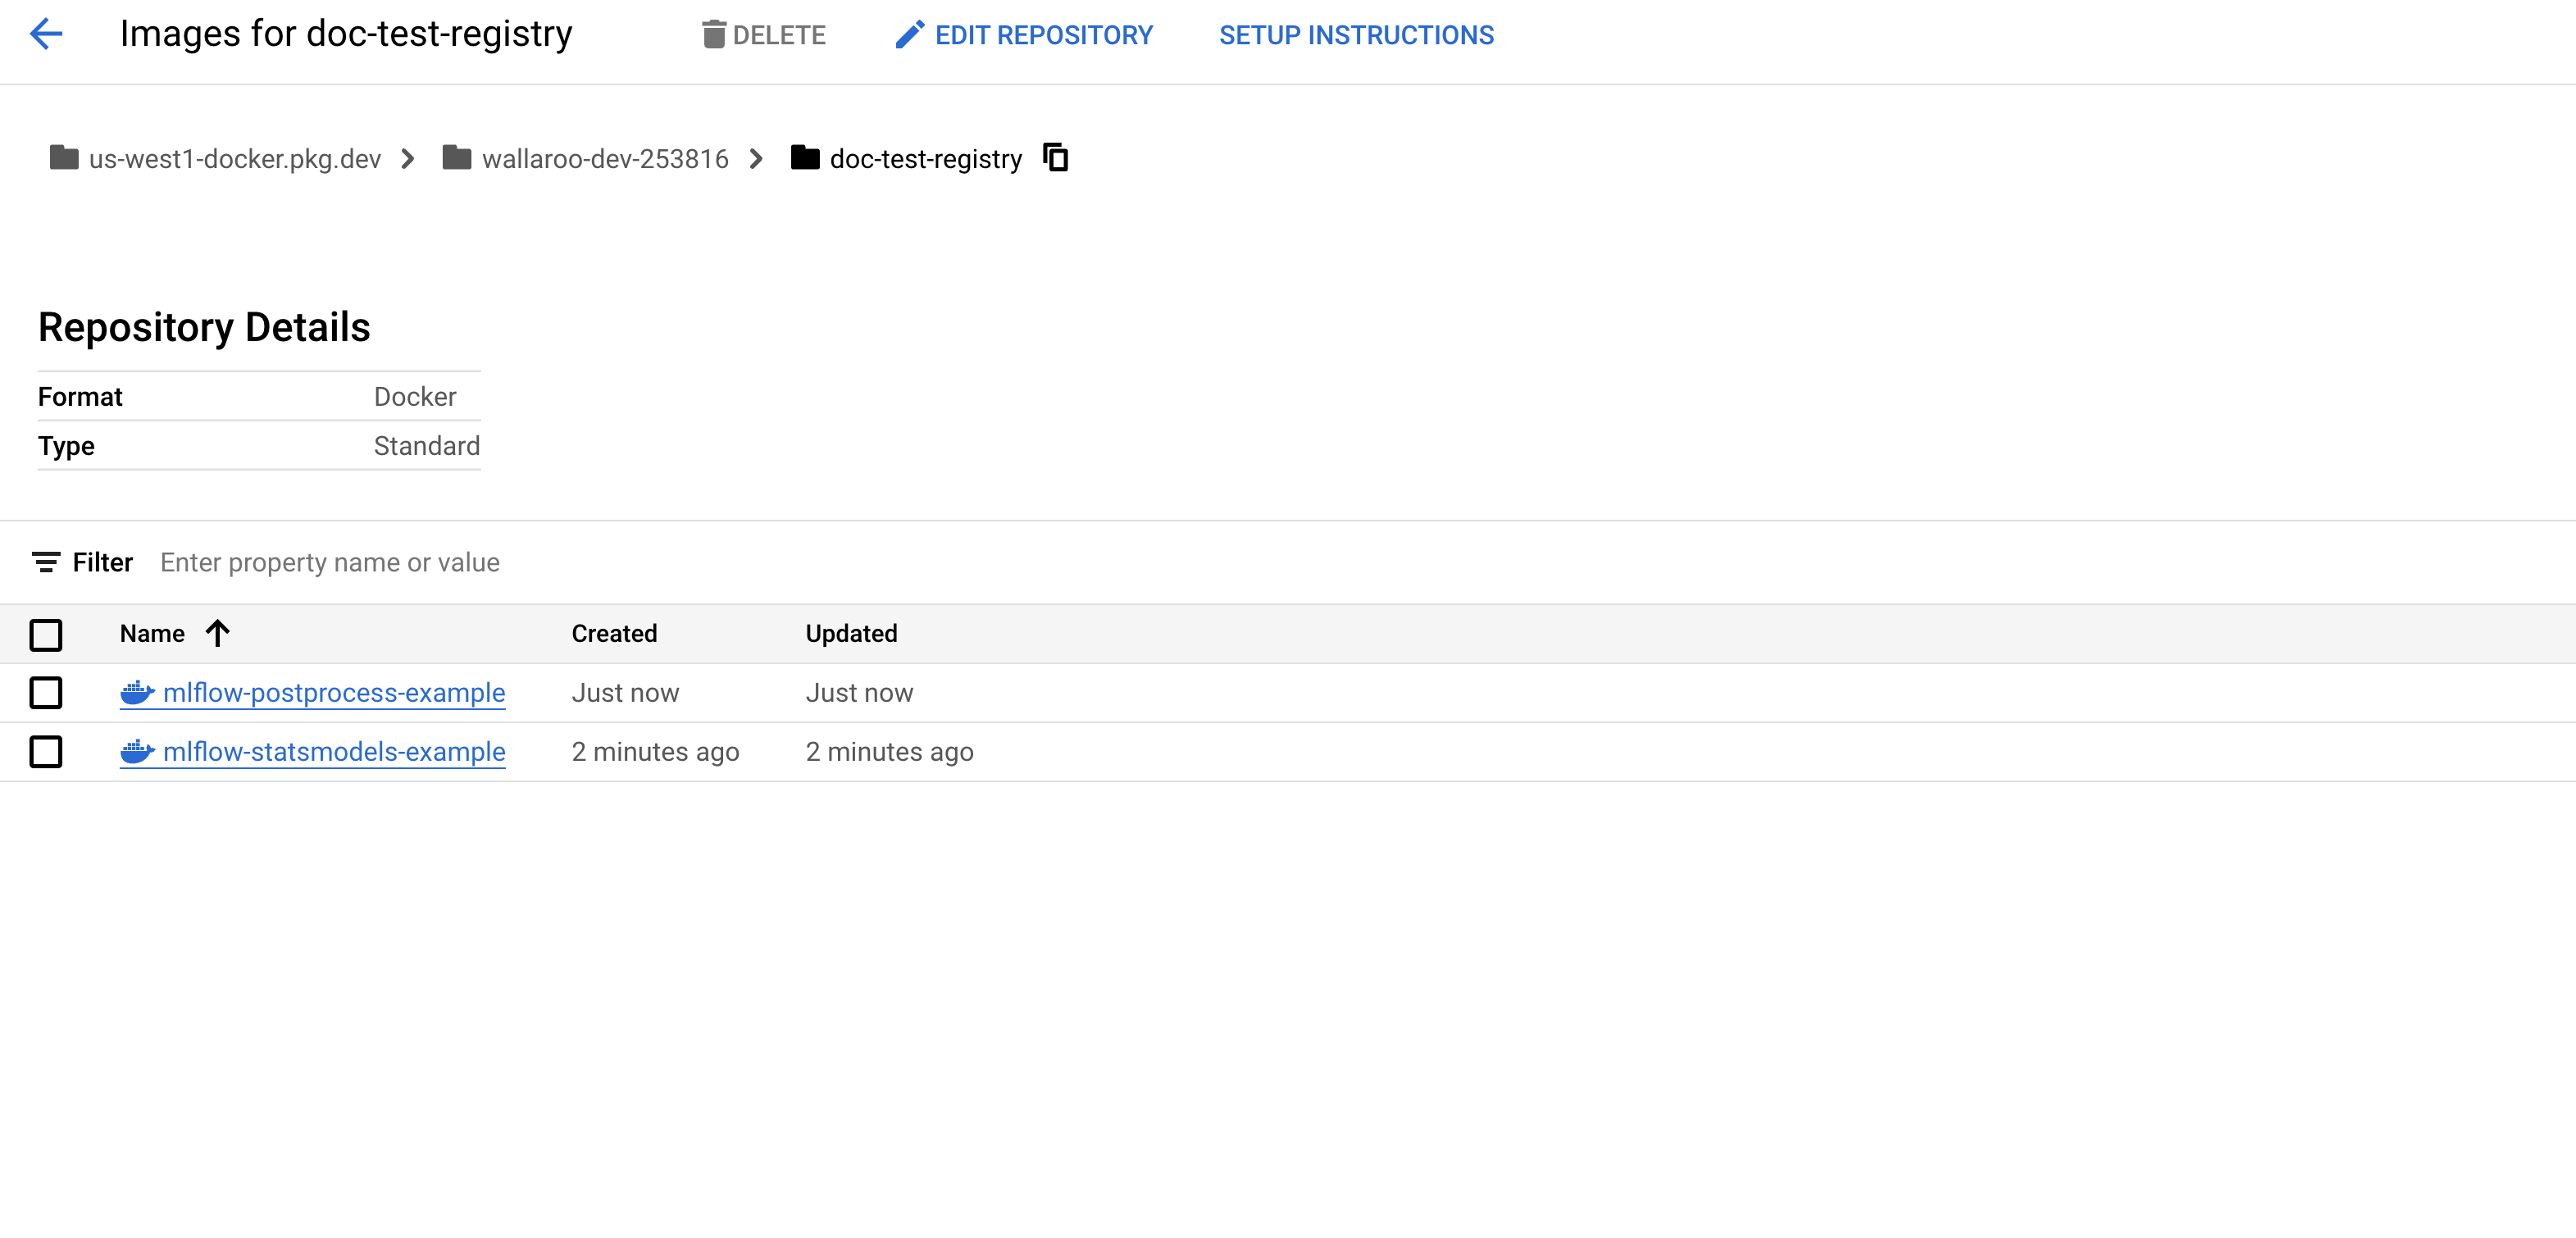
A private container registry is available to the cluster, along with push and read credentials for that registry. This service is required for the air gap installation process to have images pushed and pulled for the installation. For examples on setting up a private container registry service, see the Docker Documentation “Deploy a registry server”. See Example Registry Service Install for an example of installing an unsecure private registry for testing purposes. For more details on setting up a container registry in a cloud environment, see the related documentation for your preferred cloud provider:
Before installing Wallaroo version, verify that the following hardware and software requirements are met.
Environment Requirements
Environment Hardware Requirements
The following system requirements are required for the minimum settings for running Wallaroo in a Kubernetes cloud cluster.
The following system requirements are required for the minimum settings for running Wallaroo in a Kubernetes cloud cluster.
Minimum number of nodes: 4
Minimum Number of CPU Cores: 8
Minimum RAM per node: 16 GB
Minimum Storage: A total of 625 GB of storage will be allocated for the entire cluster based on 5 users with up to four pipelines with five steps per pipeline, with 50 GB allocated per node, including 50 GB specifically for the Jupyter Hub service. Enterprise users who deploy additional pipelines will require an additional 50 GB of storage per lab node deployed.
Wallaroo recommends at least 16 cores total to enable all services. At less than 16 cores, services will have to be disabled to allow basic functionality as detailed in this table.
Note that even when disabling these services, Wallaroo performance may be impacted by the models, pipelines, and data used. The greater the size of the models and steps in a pipeline, the more resources will be required for Wallaroo to operate efficiently. Pipeline resources are set by the pipeline configuration to control how many resources are allocated from the cluster to maintain peak effectiveness for other Wallaroo services. See the following guides for more details.
The Wallaroo inference engine that performs inference requests from deployed pipelines.
Dashboard
✔
✔
✔
The graphics user interface for configuring workspaces, deploying pipelines, tracking metrics, and other uses.
Jupyter HUB/Lab
The JupyterHub service for running Python scripts, JupyterNotebooks, and other related tasks within the Wallaroo instance.
Single Lab
✔
✔
✔
Multiple Labs
✘
✔
✔
Prometheus
✔
✔
✔
Used for collecting and reporting on metrics. Typical metrics are values such as CPU utilization and memory usage.
Alerting
✘
✔
✔
Model Validation
✘
✔
✔
Dashboard Graphs
✔
✔
✔
Plateau
✘
✔
✔
A Wallaroo developed service for storing inference logs at high speed. This is not a long term service; organizations are encouraged to store logs in long term solutions if required.
Model Insights
✘
✔
✔
Python API
Model Conversion
✔
✔
✔
Converts models into a native runtime for use with the Wallaroo inference engine.
To install Wallaroo with minimum services, a configuration file will be used as parts of the kots based installation. For full details on the Wallaroo installation process, see the Wallaroo Install Guides.
Enterprise Network Requirements
The following network requirements are required for the minimum settings for running Wallaroo:
For Wallaroo Enterprise users: 200 IP addresses are required to be allocated per cloud environment.
For Wallaroo Community users: 98 IP addresses are required to be allocated per cloud environment.
DNS services integration is required for Wallaroo Enterprise edition. See the DNS Integration Guide for the instructions on configuring Wallaroo Enterprise with your DNS services.
DNS services integration is required to provide access to the various supporting services that are part of the Wallaroo instance. These include:
Simplified user authentication and management.
Centralized services for accessing the Wallaroo Dashboard, Wallaroo SDK and Authentication.
Collaboration features allowing teams to work together.
Managed security, auditing and traceability.
Environment Software Requirements
The following software or runtimes are required for Wallaroo 2023.2.1. Most are automatically available through the supported cloud providers.
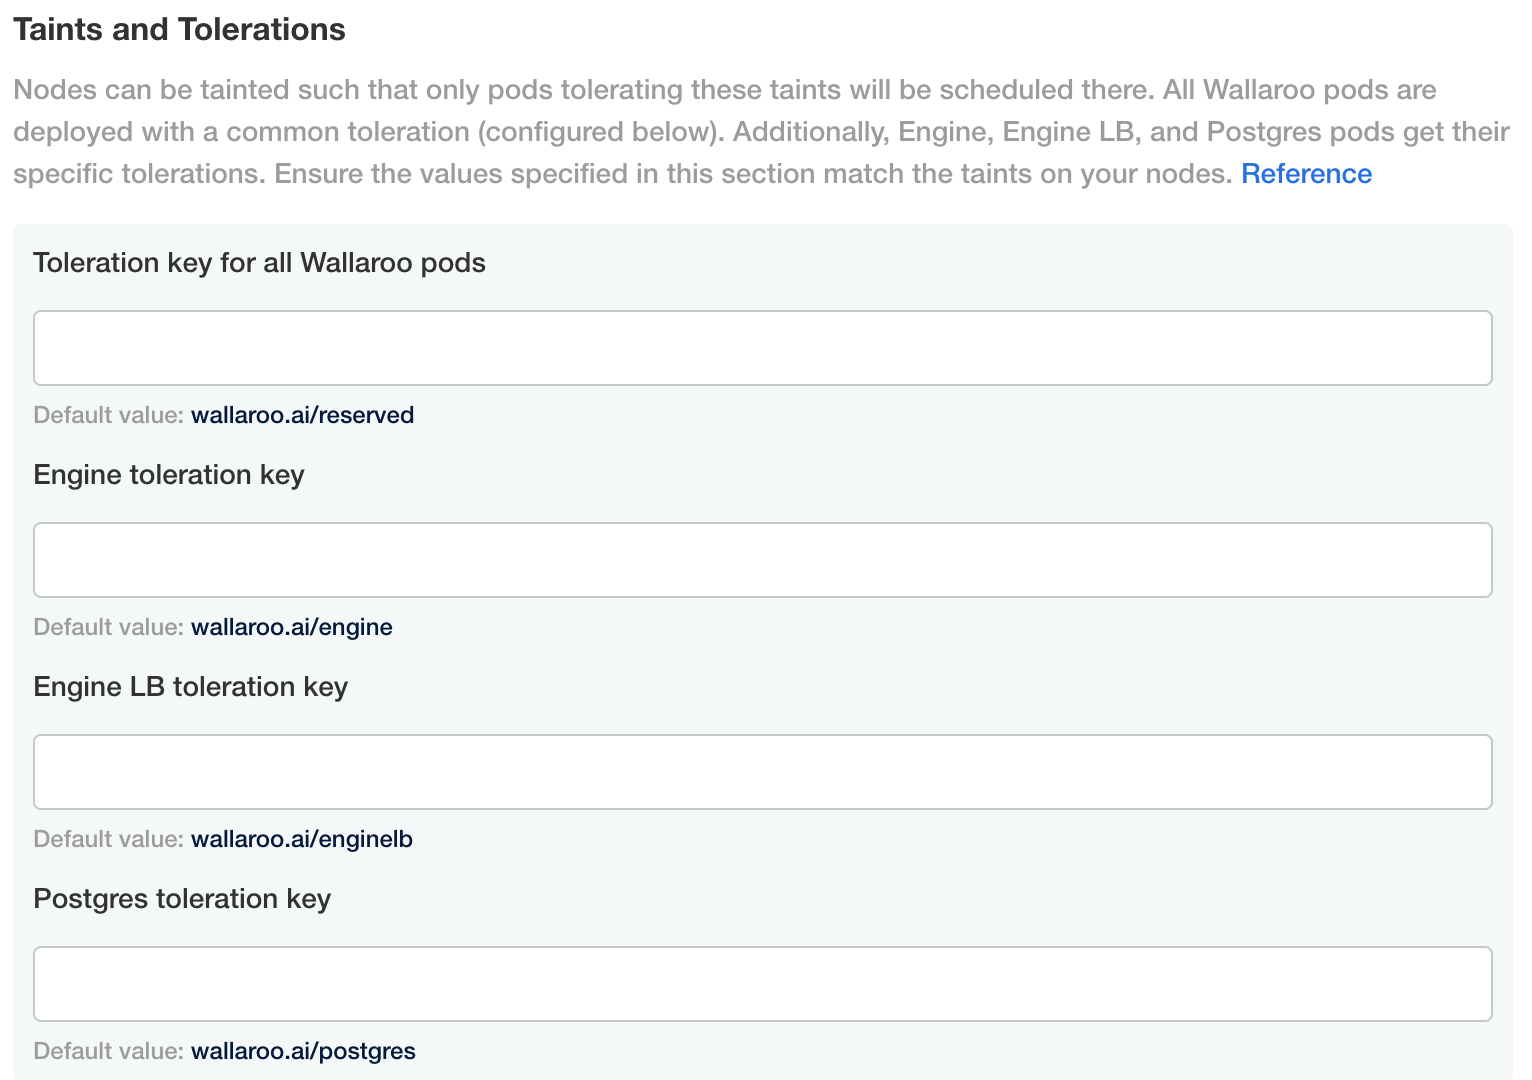
Wallaroo uses different nodes for various services, which can be assigned to a different node pool to contain resources separate from other nodes. The following nodes selectors can be configured:
ML Engine node selector
ML Engine Load Balance node selector
Database Node Selector
Grafana node selector
Prometheus node selector
Each Lab * Node Selector
Install Instructions
The installation is broken into the following major processes:
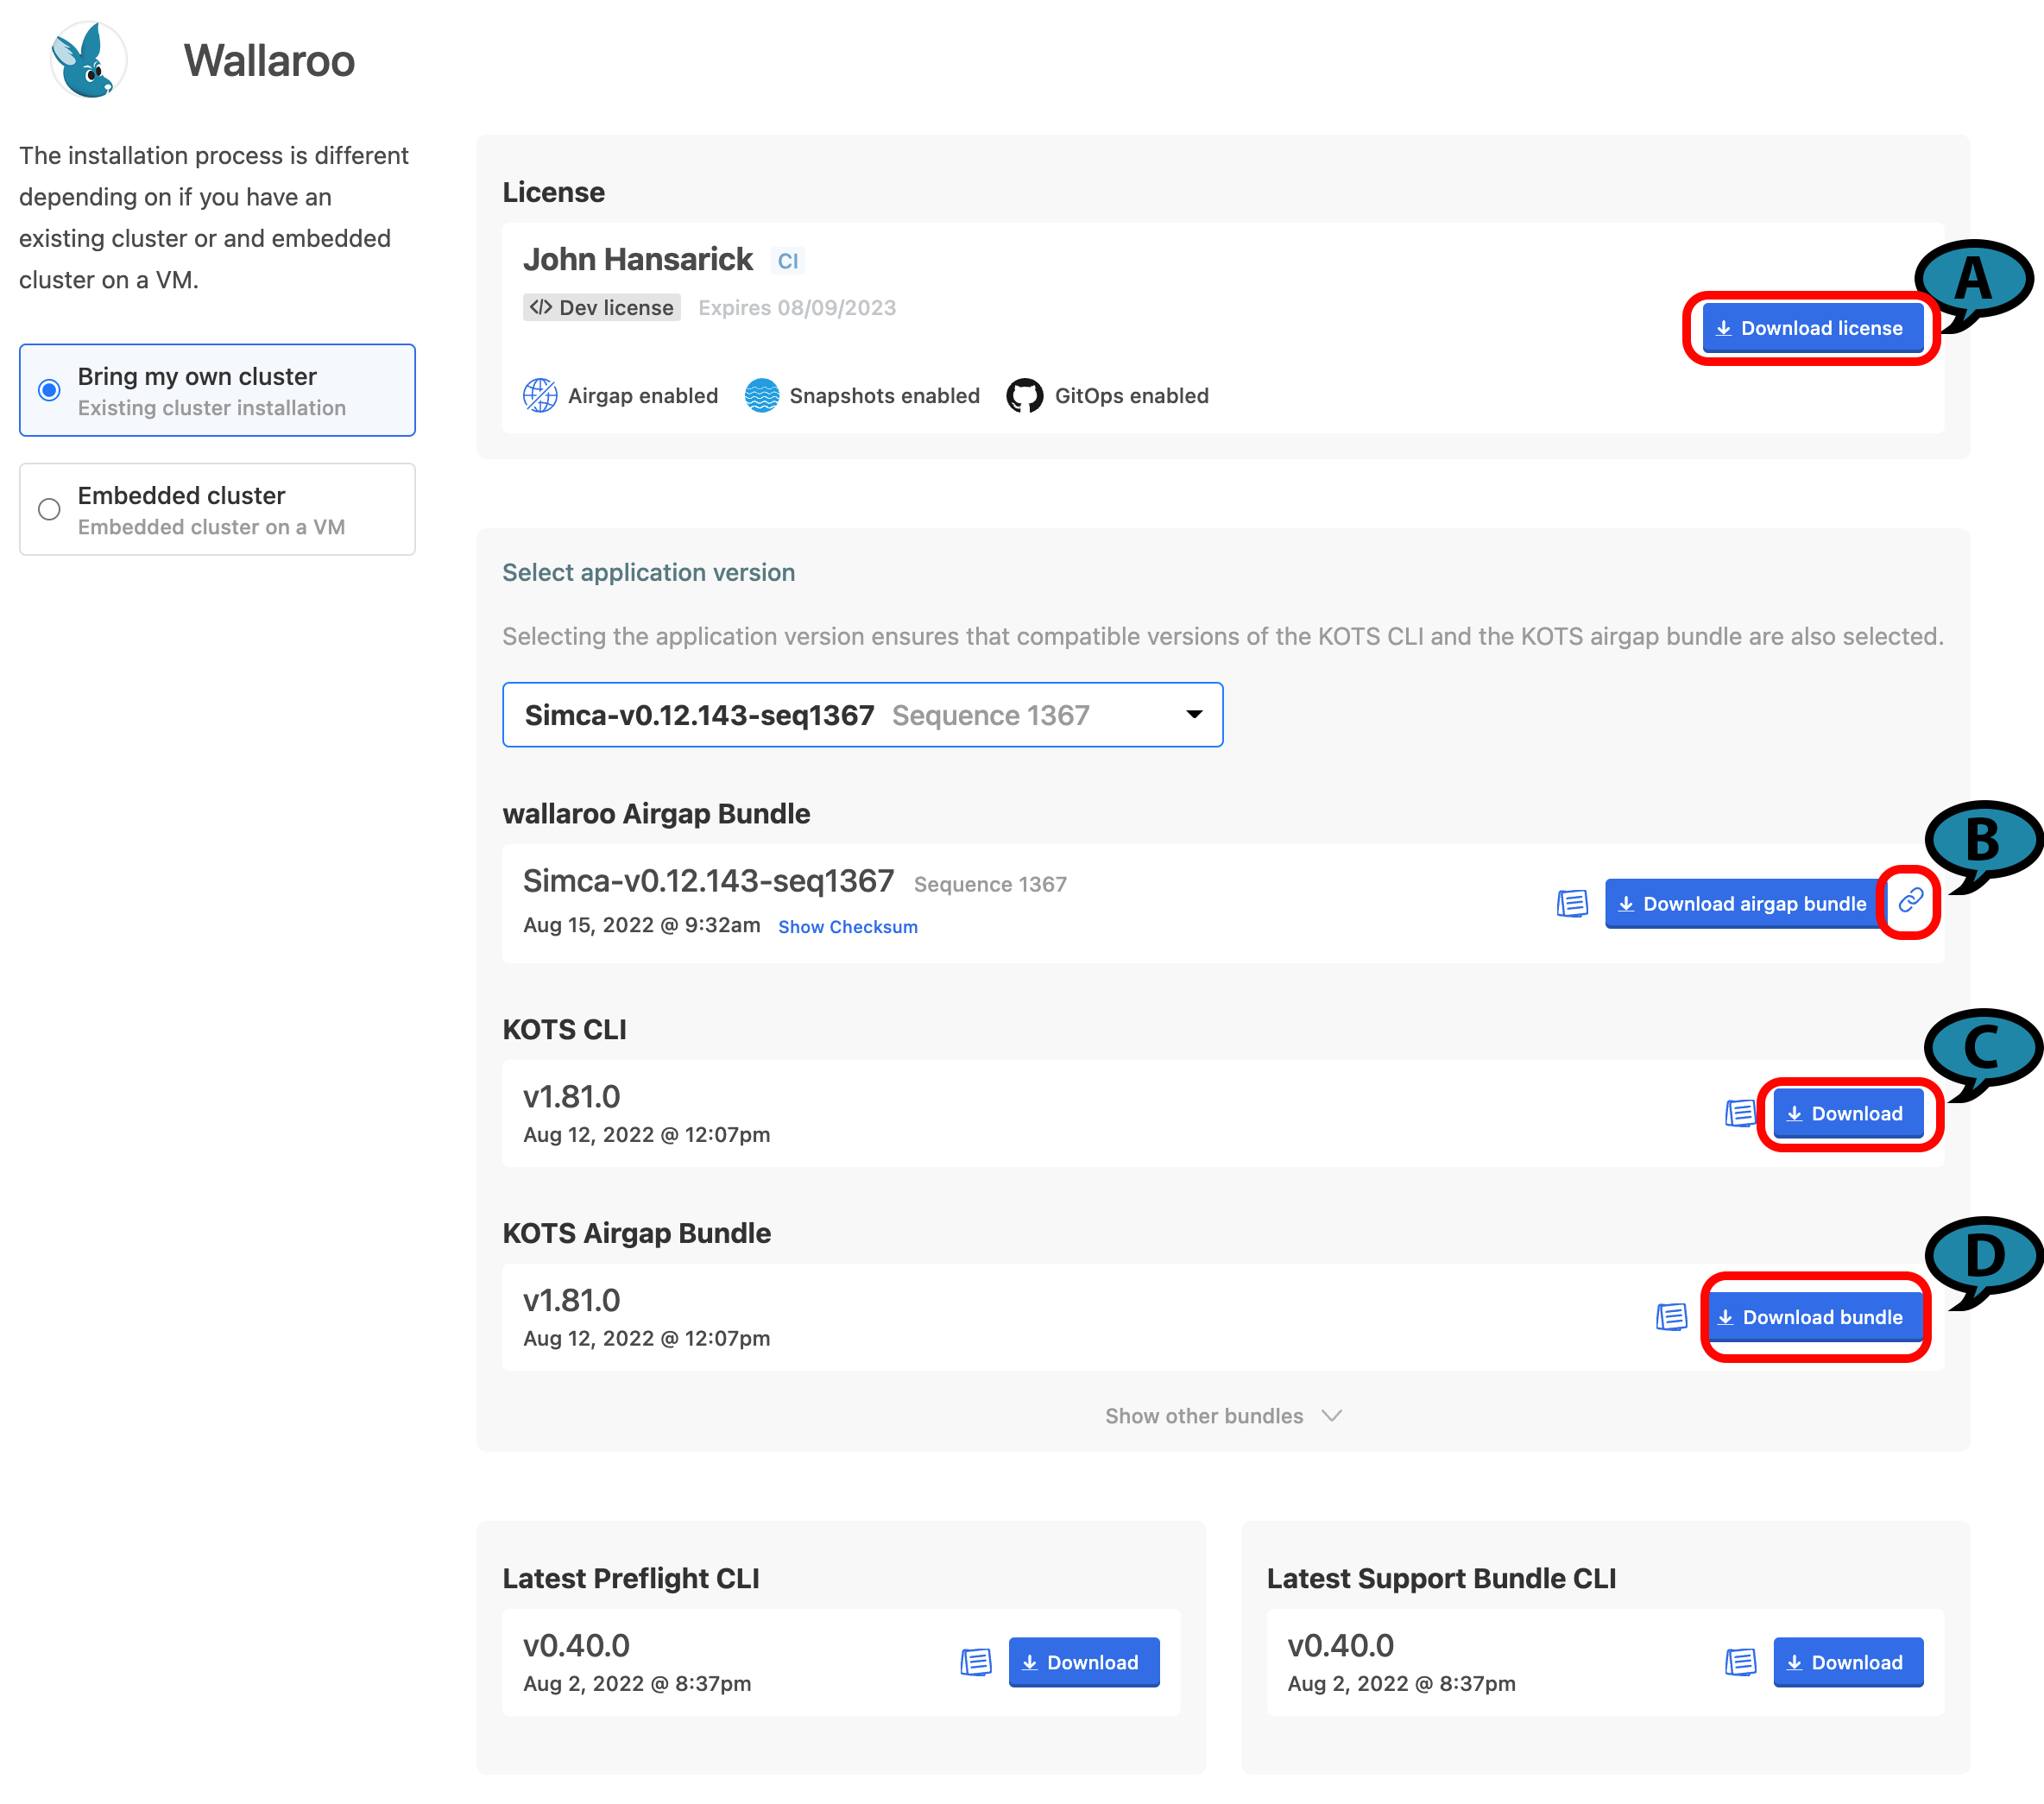
The Wallaroo delivery team the URL and password to your organization’s License and Air Gap Download page. The following links are provided:
(A)Wallaroo Enterprise License File: The Wallaroo enterprise license file for this account. This is downloaded as a yaml file.
(B)Wallaroo Airgap Installation File: The air gap installation file that includes the necessary containers for the Wallaroo installation. This is typically about 6 GB in size. By selecting the link icon, the Wallaroo Airgap Installation File URL will be copied to the clipboard that can be used for curl or similar download commands. This file is typically downloaded as wallaroo.airgap.
IMPORTANT NOTE
If the Wallaroo Air Gap Bundle link is not available, contact your Wallaroo support representative.
(C)KOTS CLI: The installation files to install kots into the node that manages the Kubernetes cluster. This file is typically downloaded as kots_linux_amd64.tar.gz.
(D)KOTS Airgap Bundle: A set of files required by the Kubernetes environment to install Wallaroo via the air gap method. This file is typically downloaded as kotsadm.tar.gz.
Download these files either through the provided License and Airgap Download page, or by copying the links from the page and using the following command line commands into node performing the air gap installation with curl as follows:
Wallaroo Enterprise License File:
curl -LO {Link to Wallaroo Enterprise License File}
Airgap Installation File. Note the use of the -Lo option to download the Wallaroo air gap file as wallaroo.airgap, and the use of the single quotes around the Wallaroo Air Gap Installation File URL.
Place these files onto the air gap server or node that administrates the Kubernetes cluster. Once these files are on the node, the cluster can be air gapped and the required software installed through the next steps.
Install Kots
Install kots into the node managing the Kubernetes cluster with the following commands:
Extract the archive:
tar zxvf kots_linux_amd64.tar.gz kots
Install kots to the /usr/local/bin directory. Adjust this directory to match the location of the kubectl command.
sudo mv kots /usr/local/bin/kubectl-kots
Verify the kots installation by checking the version. The result should be similar to the following:
kubectl kots version
Replicated KOTS 1.91.3
Install the Kots Admin Console
This step will Extract the KOTS Admin Console container images and push them into a private registry. Registry credentials provided in this step must have push access. These credentials will not be stored anywhere or reused later.
This requires the following:
Private Registry Host: The URL of the private registry host used by the Kubernetes cluster.
Private Registry Port: The port of the private registry used by the Kubernetes cluster (5000 by default).
KOTS Airgap Bundle (default: kotsadm.tar.gz): Downloaded as part of Download Assets step.
Registry Push Username: The username with push access to the private registry.
Registry Push Password: The password of the registry user with push access to the private registry.
Adjust the command based on your organizations registry setup.
Install Wallaroo Airgap
This step will install the Wallaroo air gap file into the Kubernetes cluster through the Kots Admin images.
Registry credentials provided in this step only need to have read access, and they will be stored in a Kubernetes secret in the same namespace where Admin Console will be installed. These credentials will be used to pull the images, and will be automatically created as an imagePullSecret on all of the Admin Console pods.
This requires the following:
Private Registry Host: The URL of the private registry host used by the Kubernetes cluster.
Private Registry Port: The port of the private registry used by the Kubernetes cluster (5000 by default).
Wallaroo Namespace (default: wallaroo): The kubernetes namespace used to install the Wallaroo isntance.
Wallaroo Airgap Installation File (default: wallaroo.airgap): Downloaded as part of Download Assets step.
Wallaroo License File: Downloaded as part of Download Assets step.
Registry Read Username: The username with read access to the private registry.
Registry Read Password: The password of the registry user with read access to the private registry.
The command will take the following format. Note that the option --license-file {Wallaroo License File} is required. This will point to the license REQUIRED for an air gap installation.
The following flags can be added to speed up the configuration process:
--shared-password {Wallaroo Admin Dashboard Password}: The password used to access the Wallaroo Admin Dashboard.
--config-values config.yaml: Sets up the Wallaroo instance configuration based on the supplied yaml file.
--no-port-forward: Does not forward port 8800 for use.
--skip-preflights: Skip the standard preflight checks and launch the Wallaroo instance.
For example, the following will install Wallaroo Enterprise into the namespace wallaroo using the provided license file, using the shared password wallaroo and skipping the preflight checks:
Preflight checks will verify that the Wallaroo instance meets the prerequisites. If any fail, check your Kubernetes environment and verify they are in alignment.
Preflight checks will be skipped if Wallaroo was installed with the --skip-preflights option.
Wallaroo Admin Console
If no license file was provided through the command line, it can be provided through the Wallaroo Admin Console on port 8800. To access the Wallaroo Admin Console, some method of port forwarding through the jump box will have to be configured to the air gapped cluster.
Status Checks
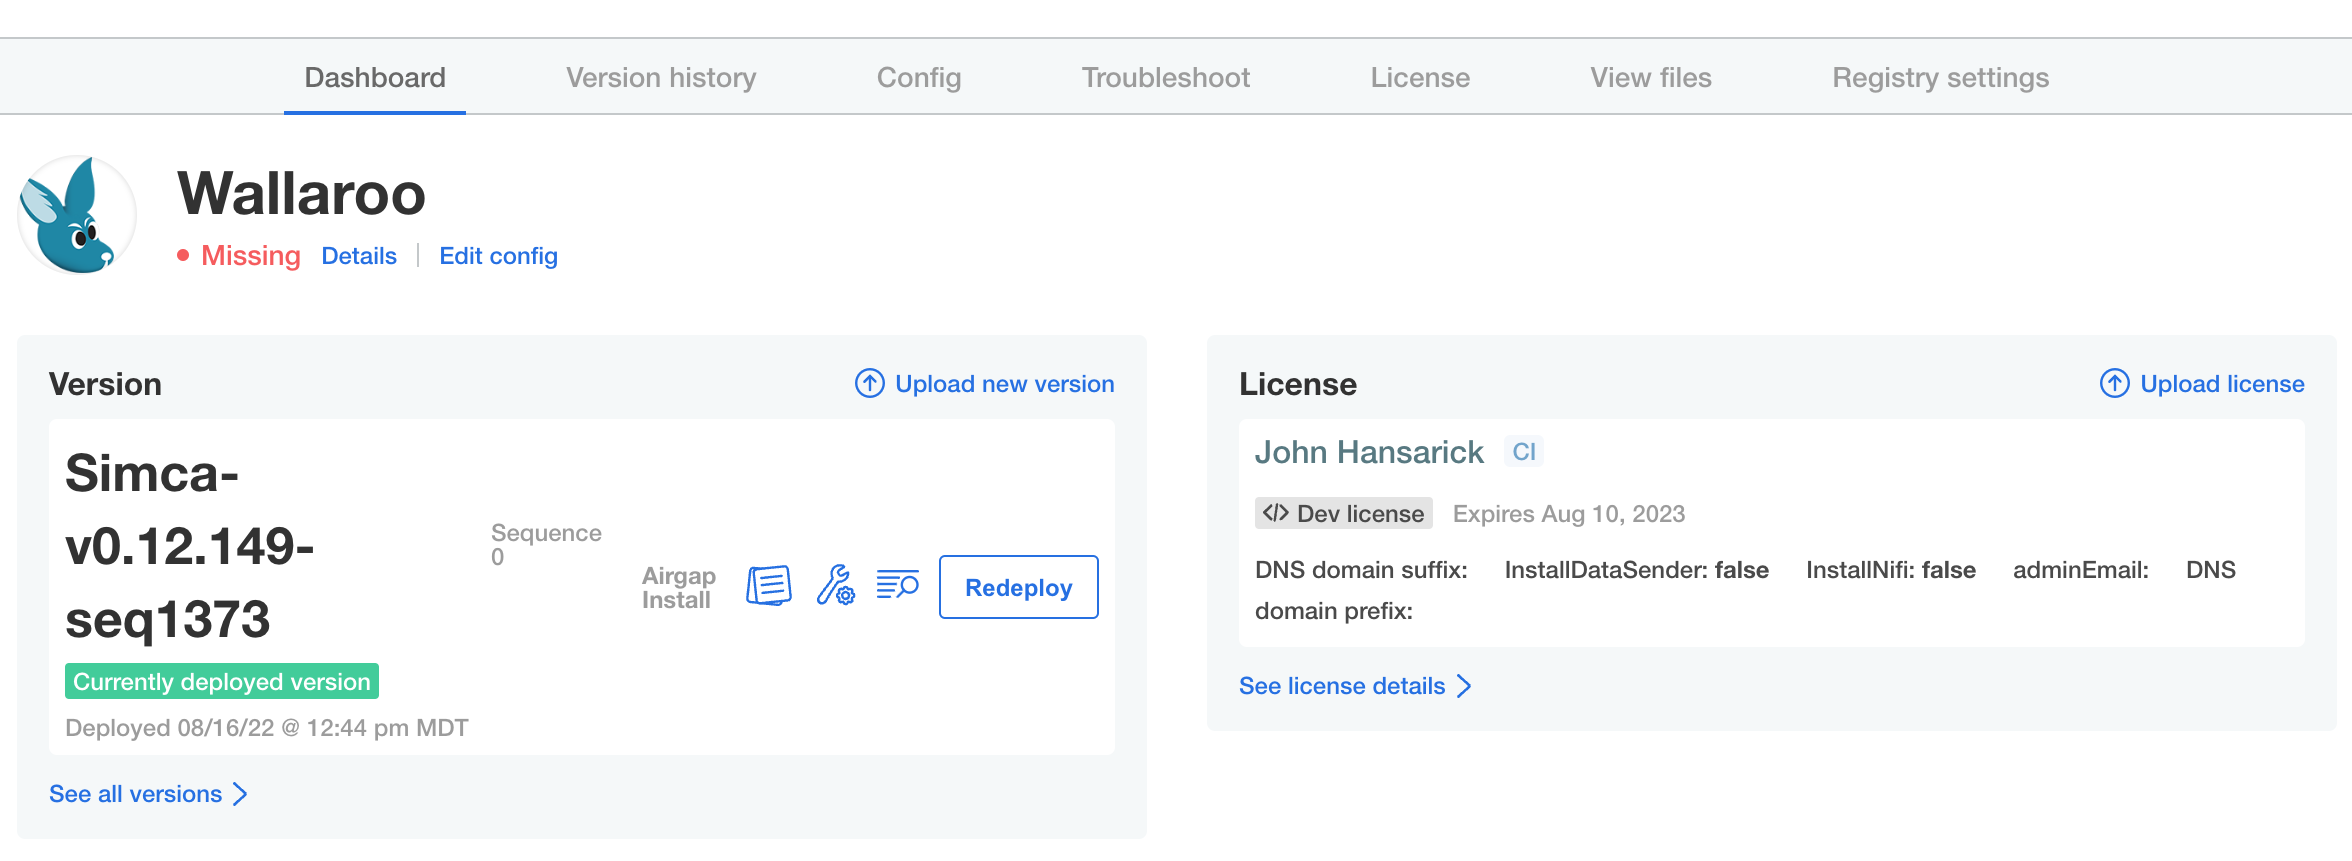
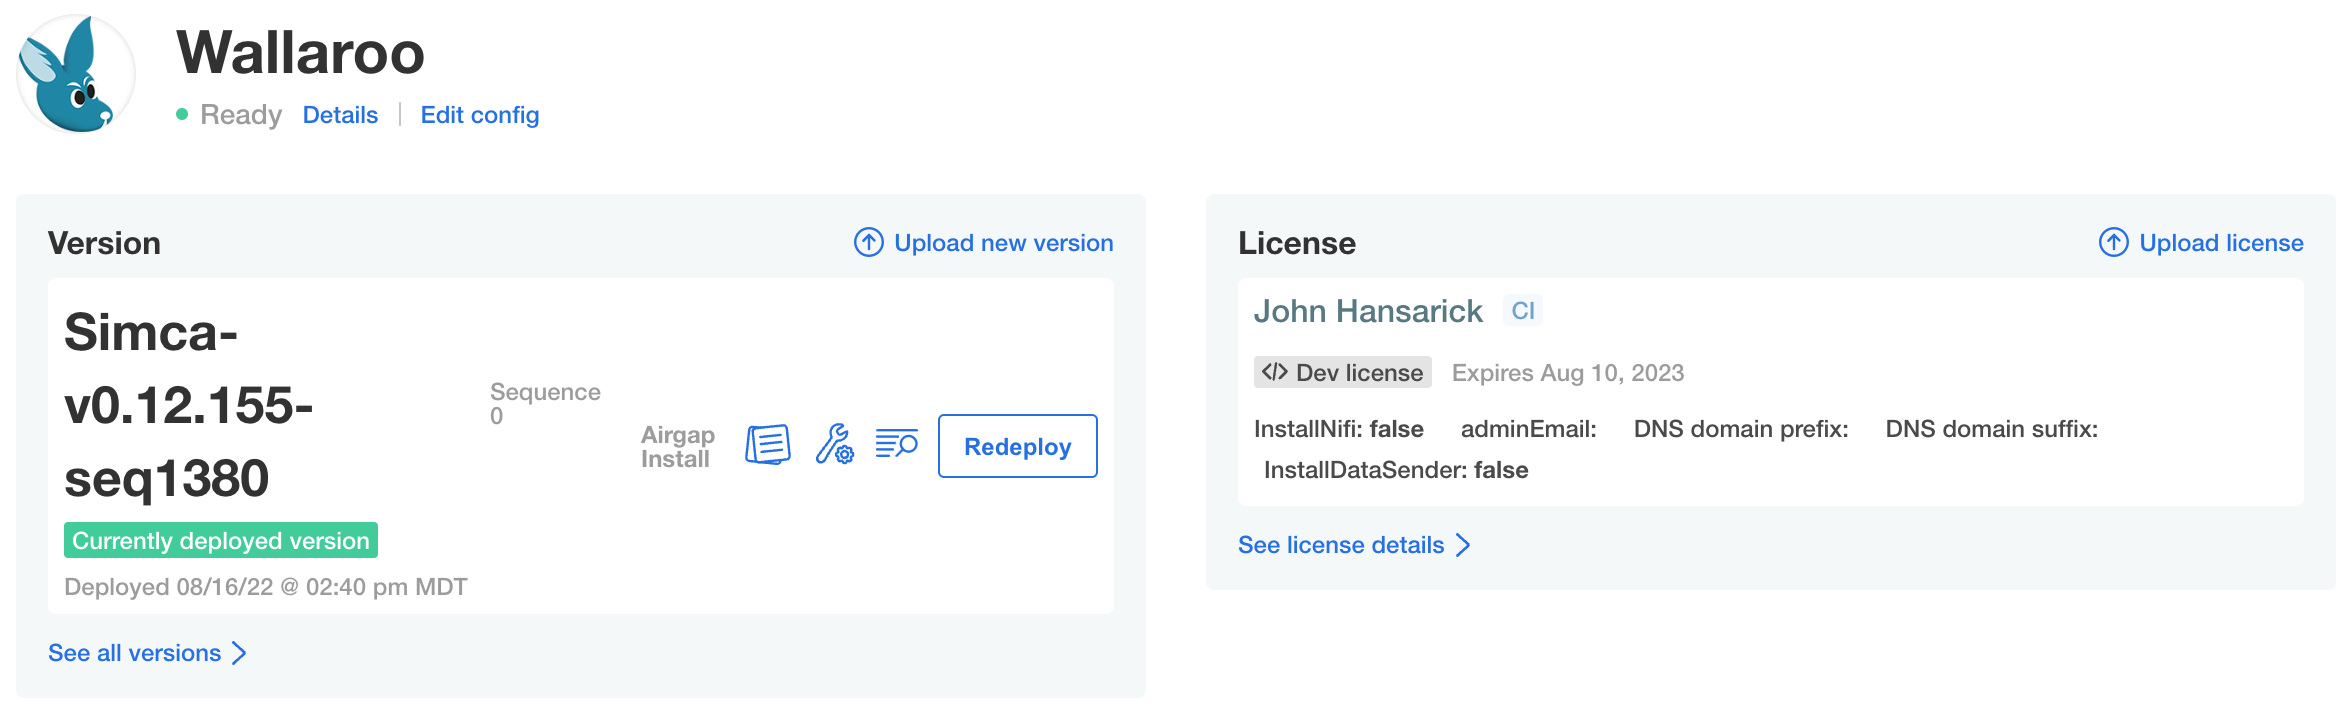
While the installer allocates resources and deploys workloads, the status page will show as Missing or Unavailable. If it stays in this state for more than twenty minutes, proceed to troubleshooting or contact Wallaroo technical support.
Once the application has become ready, the status indication will turn green and ready Ready.
Troubleshooting
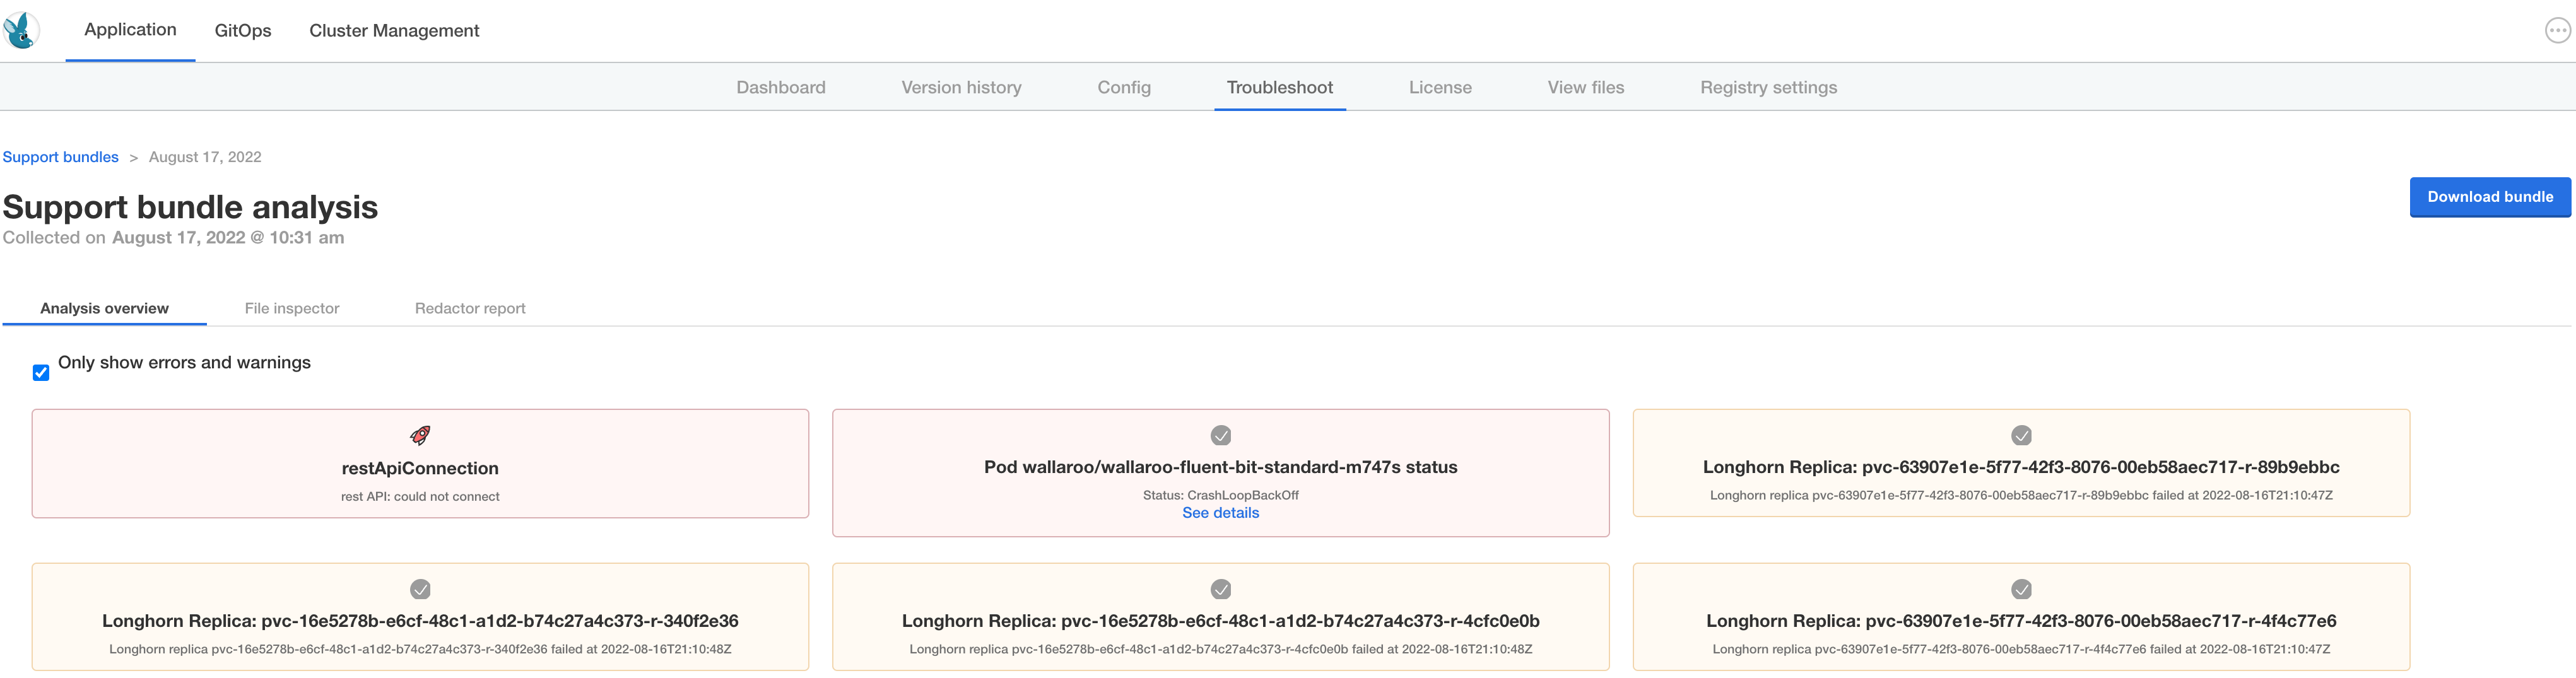
At any time, the administration console can create troubleshooting bundles for Wallaroo technical support to assess product health and help with problems. Support bundles contain logs and configuration files which can be examined before downloading and transmitting to Wallaroo. The console also has a configurable redaction mechanism in cases where sensitive information such as passwords, tokens, or PII (Personally Identifiable Information) need to be removed from logs in the bundle.
To manage support bundles:
Log into the administration console.
Select the Troubleshoot tab.
Select Analyze Wallaroo.
Select Download bundle to save the bundle file as a compressed archive. Depending on your browser settings the file download location can be specified.
Send the file to Wallaroo technical support.
At any time, any existing bundle can be examined and downloaded from the Troubleshoot tab.
Example Registry Service Install
The following example demonstrates how to set up an unsecure local registry service that can be used for testing. This process is not advised for production systems, and it only provided as an example for testing the air gap install process. This example uses an Ubuntu 20.04 instance as the installation environment.
This example assumes that the containerd service is installed and used by the Kubernetes cluster.
Private Container Registry Service Install Process
To install a demo container registry service on an Ubuntu 20.04 instance:
Update the containerd service as follows, replacing YOUR-HOST-HERE with the hostname of the registry service configured above. Comment out any existing registry entries and replace with the new insecure registry service:
1.2.4 - Wallaroo Enterprise Helm Setup and Install Guides
Organizations that prefer to use the Helm package manager for Kubernetes can install Wallaroo versions 2022.4 and above via Helm.
The following procedures demonstrates how to install Wallaroo using Helm. For more information on settings and options for a Helm based install, see the Wallaroo Helm Reference Guides.
1.2.4.1 - Wallaroo Helm Standard Cloud Install Procedures
General Time to Completion: 30 minutes.
Before installing Wallaroo version, verify that the following hardware and software requirements are met.
Environment Requirements
Environment Hardware Requirements
The following system requirements are required for the minimum settings for running Wallaroo in a Kubernetes cloud cluster.
The following system requirements are required for the minimum settings for running Wallaroo in a Kubernetes cloud cluster.
Minimum number of nodes: 4
Minimum Number of CPU Cores: 8
Minimum RAM per node: 16 GB
Minimum Storage: A total of 625 GB of storage will be allocated for the entire cluster based on 5 users with up to four pipelines with five steps per pipeline, with 50 GB allocated per node, including 50 GB specifically for the Jupyter Hub service. Enterprise users who deploy additional pipelines will require an additional 50 GB of storage per lab node deployed.
Wallaroo recommends at least 16 cores total to enable all services. At less than 16 cores, services will have to be disabled to allow basic functionality as detailed in this table.
Note that even when disabling these services, Wallaroo performance may be impacted by the models, pipelines, and data used. The greater the size of the models and steps in a pipeline, the more resources will be required for Wallaroo to operate efficiently. Pipeline resources are set by the pipeline configuration to control how many resources are allocated from the cluster to maintain peak effectiveness for other Wallaroo services. See the following guides for more details.
The Wallaroo inference engine that performs inference requests from deployed pipelines.
Dashboard
✔
✔
✔
The graphics user interface for configuring workspaces, deploying pipelines, tracking metrics, and other uses.
Jupyter HUB/Lab
The JupyterHub service for running Python scripts, JupyterNotebooks, and other related tasks within the Wallaroo instance.
Single Lab
✔
✔
✔
Multiple Labs
✘
✔
✔
Prometheus
✔
✔
✔
Used for collecting and reporting on metrics. Typical metrics are values such as CPU utilization and memory usage.
Alerting
✘
✔
✔
Model Validation
✘
✔
✔
Dashboard Graphs
✔
✔
✔
Plateau
✘
✔
✔
A Wallaroo developed service for storing inference logs at high speed. This is not a long term service; organizations are encouraged to store logs in long term solutions if required.
Model Insights
✘
✔
✔
Python API
Model Conversion
✔
✔
✔
Converts models into a native runtime for use with the Wallaroo inference engine.
To install Wallaroo with minimum services, a configuration file will be used as parts of the kots based installation. For full details on the Wallaroo installation process, see the Wallaroo Install Guides.
Enterprise Network Requirements
The following network requirements are required for the minimum settings for running Wallaroo:
For Wallaroo Enterprise users: 200 IP addresses are required to be allocated per cloud environment.
For Wallaroo Community users: 98 IP addresses are required to be allocated per cloud environment.
DNS services integration is required for Wallaroo Enterprise edition. See the DNS Integration Guide for the instructions on configuring Wallaroo Enterprise with your DNS services.
DNS services integration is required to provide access to the various supporting services that are part of the Wallaroo instance. These include:
Simplified user authentication and management.
Centralized services for accessing the Wallaroo Dashboard, Wallaroo SDK and Authentication.
Collaboration features allowing teams to work together.
Managed security, auditing and traceability.
Environment Software Requirements
The following software or runtimes are required for Wallaroo 2023.2.1. Most are automatically available through the supported cloud providers.
Wallaroo uses different nodes for various services, which can be assigned to a different node pool to contain resources separate from other nodes. The following nodes selectors can be configured:
Preflight and Support Bundle configuration files: The files preflight.yaml and support-bundle.yaml are used in the commands below to complete the preflight process and generate the support bundle package as needed for troubleshooting needs.
Preflight verification command: The commands to verify that the Kubernetes environment meets the requirements for the Wallaroo install.
Install Wallaroo Command: Instructions on installations into the Kubernetes environment using Helm through the Wallaroo container registry.
The following steps are used with these command and configuration files to install Wallaroo Enterprise via Helm.
Registration Login
The first step in the Wallaroo installation process via Helm is to connect to the Kubernetes environment that will host the Wallaroo Enterprise instance and login into the Wallaroo container registry through the command provided by the Wallaroo support staff. The command will take the following format, replacing $YOURUSERNAME and $YOURPASSWORD with the respective username and password provided.
The preflight test is not programmatically enforced during installation via Helm and should be performed manually before installation. If the Kubernetes environment does not meet the requirements the Wallaroo installation may fail or perform erratically. Please verify that all preflight test run successfully before proceeding to install Wallaroo.
Preflight verification is performed with the following command, using the preflight.yaml configuration file provided by the Wallaroo support representative as listed above.
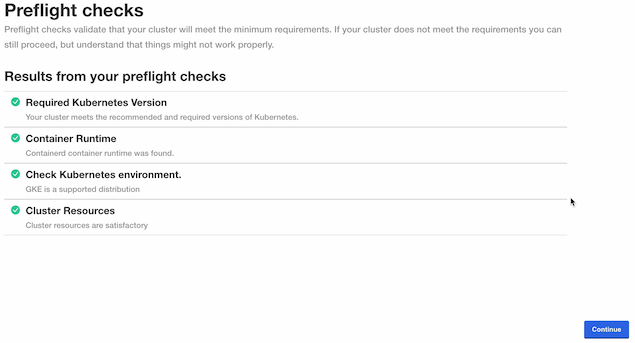
If successful, the tests will show PASS for each preflight requirement as in the following example:
name: cluster-resources status: running completed: 0 total: 2name: cluster-resources status: completed completed: 1 total: 2name: cluster-info status: running completed: 1 total: 2name: cluster-info status: completed completed: 2 total: 2 --- PASS Required Kubernetes Version
--- Your cluster meets the recommended and required versions of Kubernetes.
--- PASS Container Runtime
--- Containerd container runtime was found.
--- PASS Check Kubernetes environment.
--- KURL is a supported distribution
--- PASS Cluster Resources
--- Cluster resources are satisfactory
--- PASS Every node in the cluster must have at least 12Gi of memory
--- All nodes have at least 12 GB of memory capacity
--- PASS Every node in the cluster must have at least 8 cpus allocatable.
--- All nodes have at least 8 CPU capacity
--- PASS wallaroo
PASS
The following instructions detail how to install Wallaroo Enterprise via Helm for Kubernetes cloud environments such as Microsoft Azure, Amazon Web Service, and Google Cloud Platform.
IMPORTANT NOTE
These instructions are for Wallaroo Enterprise only.
Install Wallaroo
With the preflight checks and prerequisites met, Wallaroo can be installed via Helm through the following process:
Create namespace. By default, the namespace wallaroo is used:
Set the TLS certificate secret in the Kubernetes environment:
Create the certificate and private key. It is recommended to name it after the domain name of your Wallaroo instance. For example: wallaroo.example.com. For production environments, organizations are recommended to use certificates from their certificate authority. Note that the Wallaroo SDK will not connect from an external connection without valid certificates. For more information on using DNS settings and certificates, see the Wallaroo DNS Integration Guide.
Create the Kubernetes secret from the certificates created in the previous step, replacing $TLSCONFIG with the name of the Kubernetes secret. Store the secret name for a the step Configure local values file.
Configure local values file: The default Helm install of Wallaroo contains various default settings. The local values file overwrites values based on the organization needs. The following represents the minimum mandatory values for a Wallaroo installation using certificates and the default LoadBalancer for a cloud Kubernetes cluster. The configuration details below is saved as local-values.yaml for these examples.
domainPrefix and domainSuffix: Used to set the DNS settings for the Wallaroo instance. For more information, see the Wallaroo DNS Integration Guide.
replImagePrefix: proxy.replicated.com/proxy/wallaroo/ghcr.io/wallaroolabs: Sets the Replicated installation containe proxy. Set to proxy.replicated.com/proxy/wallaroo/ghcr.io/wallaroolabs unless using a private container registry. Contact a Wallaroo Support representative for details.
deploymentStage and custTlsSecretName: These are set for use with the Kubernetes secret created in the previous step. External connections through the Wallaroo SDK require valid certificates.
generate_secrets: Secrets for administrative and other users can be generated by the Helm install process, or set manually. This setting scrambles the passwords during installation.
apilb: Sets the apilb service options including the following:
serviceType: LoadBalancer: Uses the default LoadBalancer setting for the Kubernetes cloud service the Wallaroo instance is installed into. Replace with the specific service connection settings as required.
external_inference_endpoints_enabled: true: This setting is required for performing external SDK inferences to a Wallaroo instance. For more information, see the Wallaroo Model Endpoints Guide
domainPrefix: ""# optional if using a DNS PrefixdomainSuffix: {Your Wallaroo DNS Suffix}
deploymentStage: cust
custTlsSecretName: cust-cert-secret
generate_secrets: trueapilb:
serviceType: LoadBalancer
external_inference_endpoints_enabled: truedashboard:
clientName: "xx"# Insert the name displayed in the Wallaroo DashboardarbEx:
enabled: truenats:
enabled: trueorchestration:
enabled: truepipelines:
enabled: falseimageRegistry: proxy.replicated.com/proxy/wallaroo/ghcr.io/wallaroolabs
replImagePrefix: proxy.replicated.com/proxy/wallaroo/ghcr.io/wallaroolabs
minio:
persistence:
size: 25Gi # Minio model storage disk size. Smaller than 10Gi is not recommended.models:
enabled: truepythonAPIServer:
enabled: true
Install Wallaroo: The Wallaroo support representative will provide the installation command for the Helm install that will use the Wallaroo container registry. This assumes that the preflight checks were successful. This command uses the following format:
Verify the Installation: Once the installation is complete, verify the installation with the helm test $RELEASE command. With the settings above, this would be:
helm test wallaroo
A successful installation will resemble the following:
NAME: wallaroo
LAST DEPLOYED: Wed Dec 21 09:15:23 2022NAMESPACE: wallaroo
STATUS: deployed
REVISION: 1TEST SUITE: wallaroo-fluent-bit-test-connection
Last Started: Wed Dec 21 11:58:34 2022Last Completed: Wed Dec 21 11:58:37 2022Phase: Succeeded
TEST SUITE: wallaroo-test-connections-hook
Last Started: Wed Dec 21 11:58:37 2022Last Completed: Wed Dec 21 11:58:41 2022Phase: Succeeded
TEST SUITE: wallaroo-test-objects-hook
Last Started: Wed Dec 21 11:58:41 2022Last Completed: Wed Dec 21 11:58:53 2022Phase: Succeeded
At this point, the installation is complete and can be accessed through the fully qualified domain names set in the installation process above. Verify that the DNS settings are accurate before attempting to connect to the Wallaroo instance. For more information, see the Wallaroo DNS Integration Guide.
If issues are detected in the Wallaroo instance, a support bundle file is generated using the support-bundle.yaml file provided by the Wallaroo support representative.
This creates a collection of log files, configuration files and other details into a .tar.gz file in the same directory as the command is run from in the format support-bundle-YYYY-MM-DDTHH-MM-SS.tar.gz. This file is submitted to the Wallaroo support team for review.
This support bundle is generated through the following command:
To uninstall Wallaroo via Helm, use the following command replacing the $RELEASE with the name of the release used to install Wallaroo. By default, this is wallaroo:
helm uninstall wallaroo
It is also recommended to remove the wallaroo namespace after the helm uninstall is complete.
IMPORTANT NOTE
Do not remove the Wallaroo namespace until after the helm uninstall is complete. Removing the namespace first can leave resources hanging and can cause issues when trying to reinstall Wallaroo via Helm.
kubectl delete namespace wallaroo
1.2.4.2 - Wallaroo Helm Reference Guides
The following guides include reference details related to installing Wallaroo via Helm.
1.2.4.2.1 - Wallaroo Helm Reference Table
A Helm chart for the control plane for Wallaroo
Configuration
The following table lists the configurable parameters of the Wallaroo chart and their default values.
Parameter
Description
Default
kubernetes_distribution
One of: aks, eks, gke, or kurl. May be safe to leave defaulted.
""
imageRegistry
imageRegistry where images are pulled from
"ghcr.io/wallaroolabs"
imageTag
imageTag that images default to - can be overridden for each component
"main"
replImagePrefix
imageRegistry where images are pulled from, as overridden by Kots
"ghcr.io/wallaroolabs"
assays.enabled
Controls the display of Assay data in the Dashboard
true
custTlsSecretName
Name of existing Kubernetes TLS type secret
""
deploymentStage
Deployment stage, must be set to “cust” when deployed
"dev"
custTlsCert
Customer provided certificate chain when deploymentStage is “cust”.
""
custTlsKey
Customer provided private key when deploymentStage is “cust”.
DNS prefix of Wallaroo endpoints, can be empty for none
"xxx"
domainSuffix
DNS suffix of Wallaroo endpoints, MUST be provided
"yyy"
externalIpOverride
Used in cases where we can’t accurately determine our external, inbound IP address. Normally “”.
""
imagePullPolicy
Global policy saying when K8s pulls images: Always, Never, or IfNotPresent.
"Always"
wallarooSecretName
Secret name for pulling Wallaroo images
"regcred"
apilb.nodeSelector
standard node selector for API-LB
{}
apilb.annotations
Annotations for api-lb service
{}
apilb.serviceType
Service type of api-lb service
"ClusterIP"
apilb.external_inference_endpoints_enabled
Enable external URL inference endpoints: pipeline inference endpoints that are accessible outside of the Wallaroo cluster.
true
jupyter.enabled
If true, a jupyer hub was deployed which components can point to.
false
keycloak.user
administrative username
"admin"
keycloak.password
default admin password: overridden if generate_secrets is true
"admin"
keycloak.provider.clientId
upstream client id
""
keycloak.provider.clientSecret
upstream client secret
""
keycloak.provider.name
human name for provider
""
keycloak.provider.id
Type of provider, one of: “github”, “google”, or “OIDC”
""
keycloak.provider.authorizationUrl
URL to contact the upstream client for auth requests
null
keycloak.provider.clientAuthMethod
client auth method - Must be client_secret_post for OIDC provider type, leave blank otherwise.
null
keycloak.provider.displayName
human name for provider, displayed to end user in login dialogs
null
keycloak.provider.tokenUrl
Used only for ODIC, see token endpoint under Azure endpoints.
null
dbcleaner.schedule
when the cleaner runs, default is every eight hours
"* */8 * * *"
dbcleaner.maxAgeDays
delete older than this many days
"30"
plateau.enabled
Enable Plateau deployment
true
plateau.diskSize
Disk space to allocate. Smaller than 100Gi is not recommended.
"100Gi"
telemetry.enabled
Used only for our CE product. Leave disabled for EE/Helm installs.
false
dashboard.enabled
Enable dashboard service
true
dashboard.clientName
Customer display name which appears at the top of the dashboard window.
"Fitzroy Macropods, LLC"
minio.imagePullSecrets
Must override for helm + private registry; eg -name: "some-secret"
[]
minio.image.repository
Must override for helm + private registry
"quay.io/minio/minio"
minio.mcImage.repository
Must override for helm + private registry
"quay.io/minio/mc"
minio.persistence.size
Minio model storage disk size. Smaller than 10Gi is not recommended.
"10Gi"
fluent-bit.imagePullSecrets
Must override for helm + private registry; eg -name: "some-secret"
[]
fluent-bit.image.repository
Must override for helm + private registry
"cr.fluentbit.io/fluent/fluent-bit"
helmTests.enabled
When enabled, create “helm test” resources.
true
helmTests.nodeSelector
When helm test is run, this selector places the test pods.
{}
pythonAPIServer.enabled
This service is used for model conversion.
false
explainabilityServer.enabled
Enable the model explainability service
false
replImagePrefix
Sets the replicated image prefix for installation containers. Set to replImagePrefix: proxy.replicated.com/proxy/wallaroo/ghcr.io/wallaroolabs unless otherwise instructed.
1.2.4.2.2 - Wallaroo Helm Reference Details
post_delete_hook
This hook runs when you do helm uninstall unless …
you give –no-hooks to helm
you set the enable flag to False at INSTALL time.
imageRegistry
Registry and Tag portion of Wallaroo images. Third party images are not included. Tag is computed at runtime and overridden. In online Helm installs, these should not be touched; in airgap Helm installs imageRegistry must be overridden to local registry.
generate_secrets
If true, generate random secrets for several services at install time. If false, use the generic defaults listed here, which can also be overridden by caller.
assays
This is a (currently) Dashboard-specific feature flag to control the display of Assays.
custTlsSecretName
To provide TLS certificates, (1) set deploymentStage to “cust”, then (2) provide EITHER the name of an existing Kubernetes TLS secret in custTlsSecret OR provide base64 encoded secrets in custTlsCert and custTlsKey.
domainPrefix
DNS specification for our named external service endpoints.
To form URLs, we concatenate the optional domainPrefix, the service name in question, and then the domainSuffix. Their values are based on license, type, and customer config inputs. They MUST be overriden per install via helm values, or by Replicated.
Community – prefix/suffix in license
domainPrefix
domainSuffix
dashboard_fqdn
thing_fqdn (thing = jup, kc, etc)
""
wallaroo.community
(never)
(never)
cust123
wallaroo.community
cust123.wallaroo.community
cust123.thing.wallaroo.community
Enterprise et al – prefix/suffix from config
domainPrefix
domainSuffix
dashboard_fqdn
thing_fqdn (thing = jup, kc, etc)
""
wl.bigco
wl.bigco
thing.wl.
cust123
wl.bigco
cust123.wl.bigco
cust123.thing.wl.bigco
wallarooSecretName
In online Helm installs, an image pull secret is created and this is its name. The secret allows the Kubernetes node to pull images from proxy.replicated.com. In airgap Helm installs, a local Secret of type docker-registry must be created and this value set to its name.
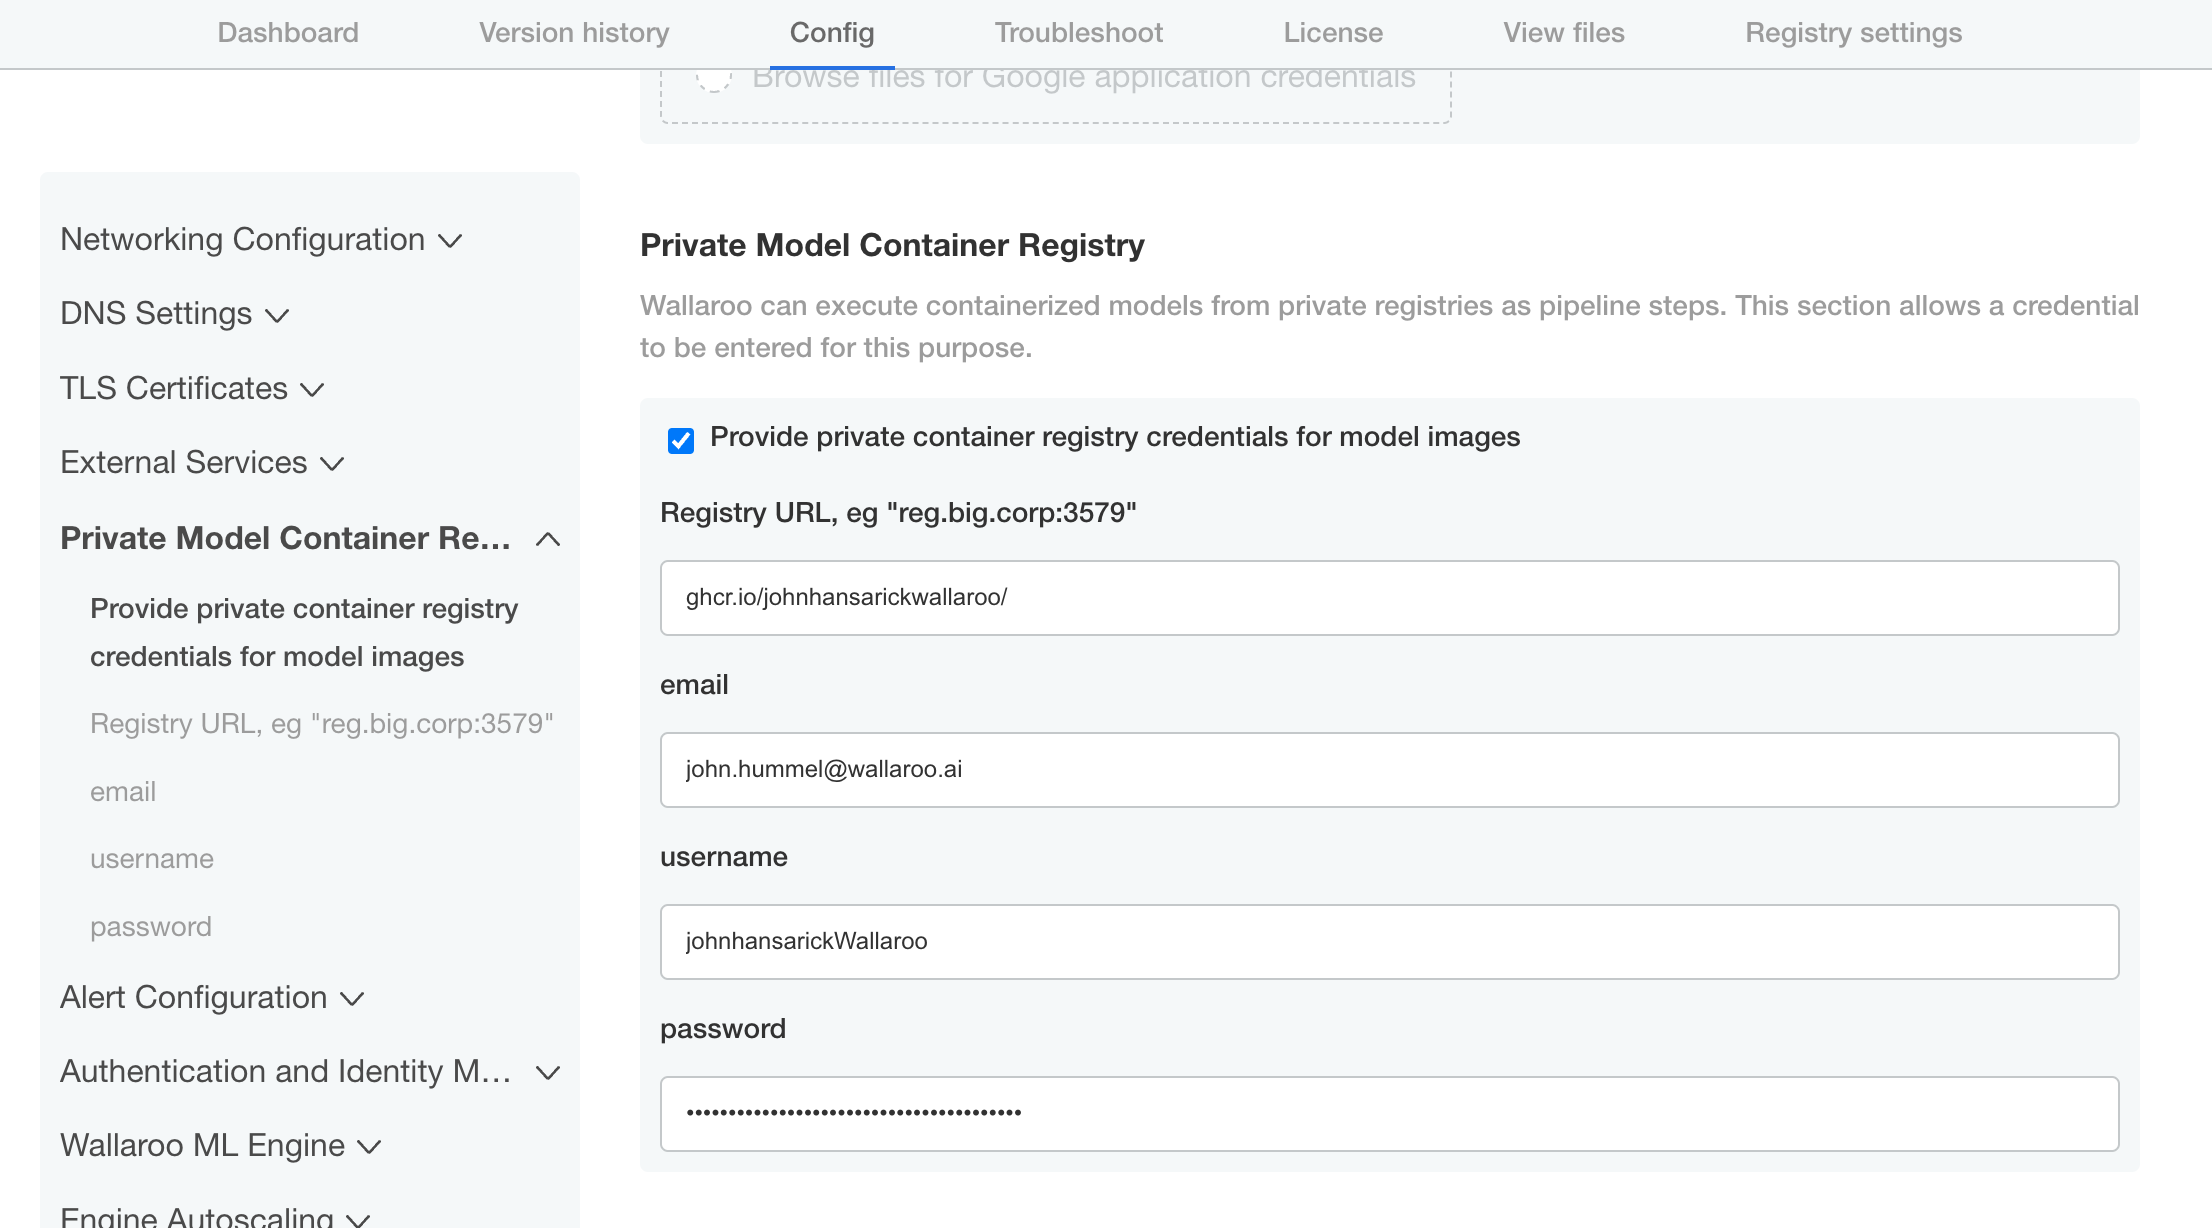
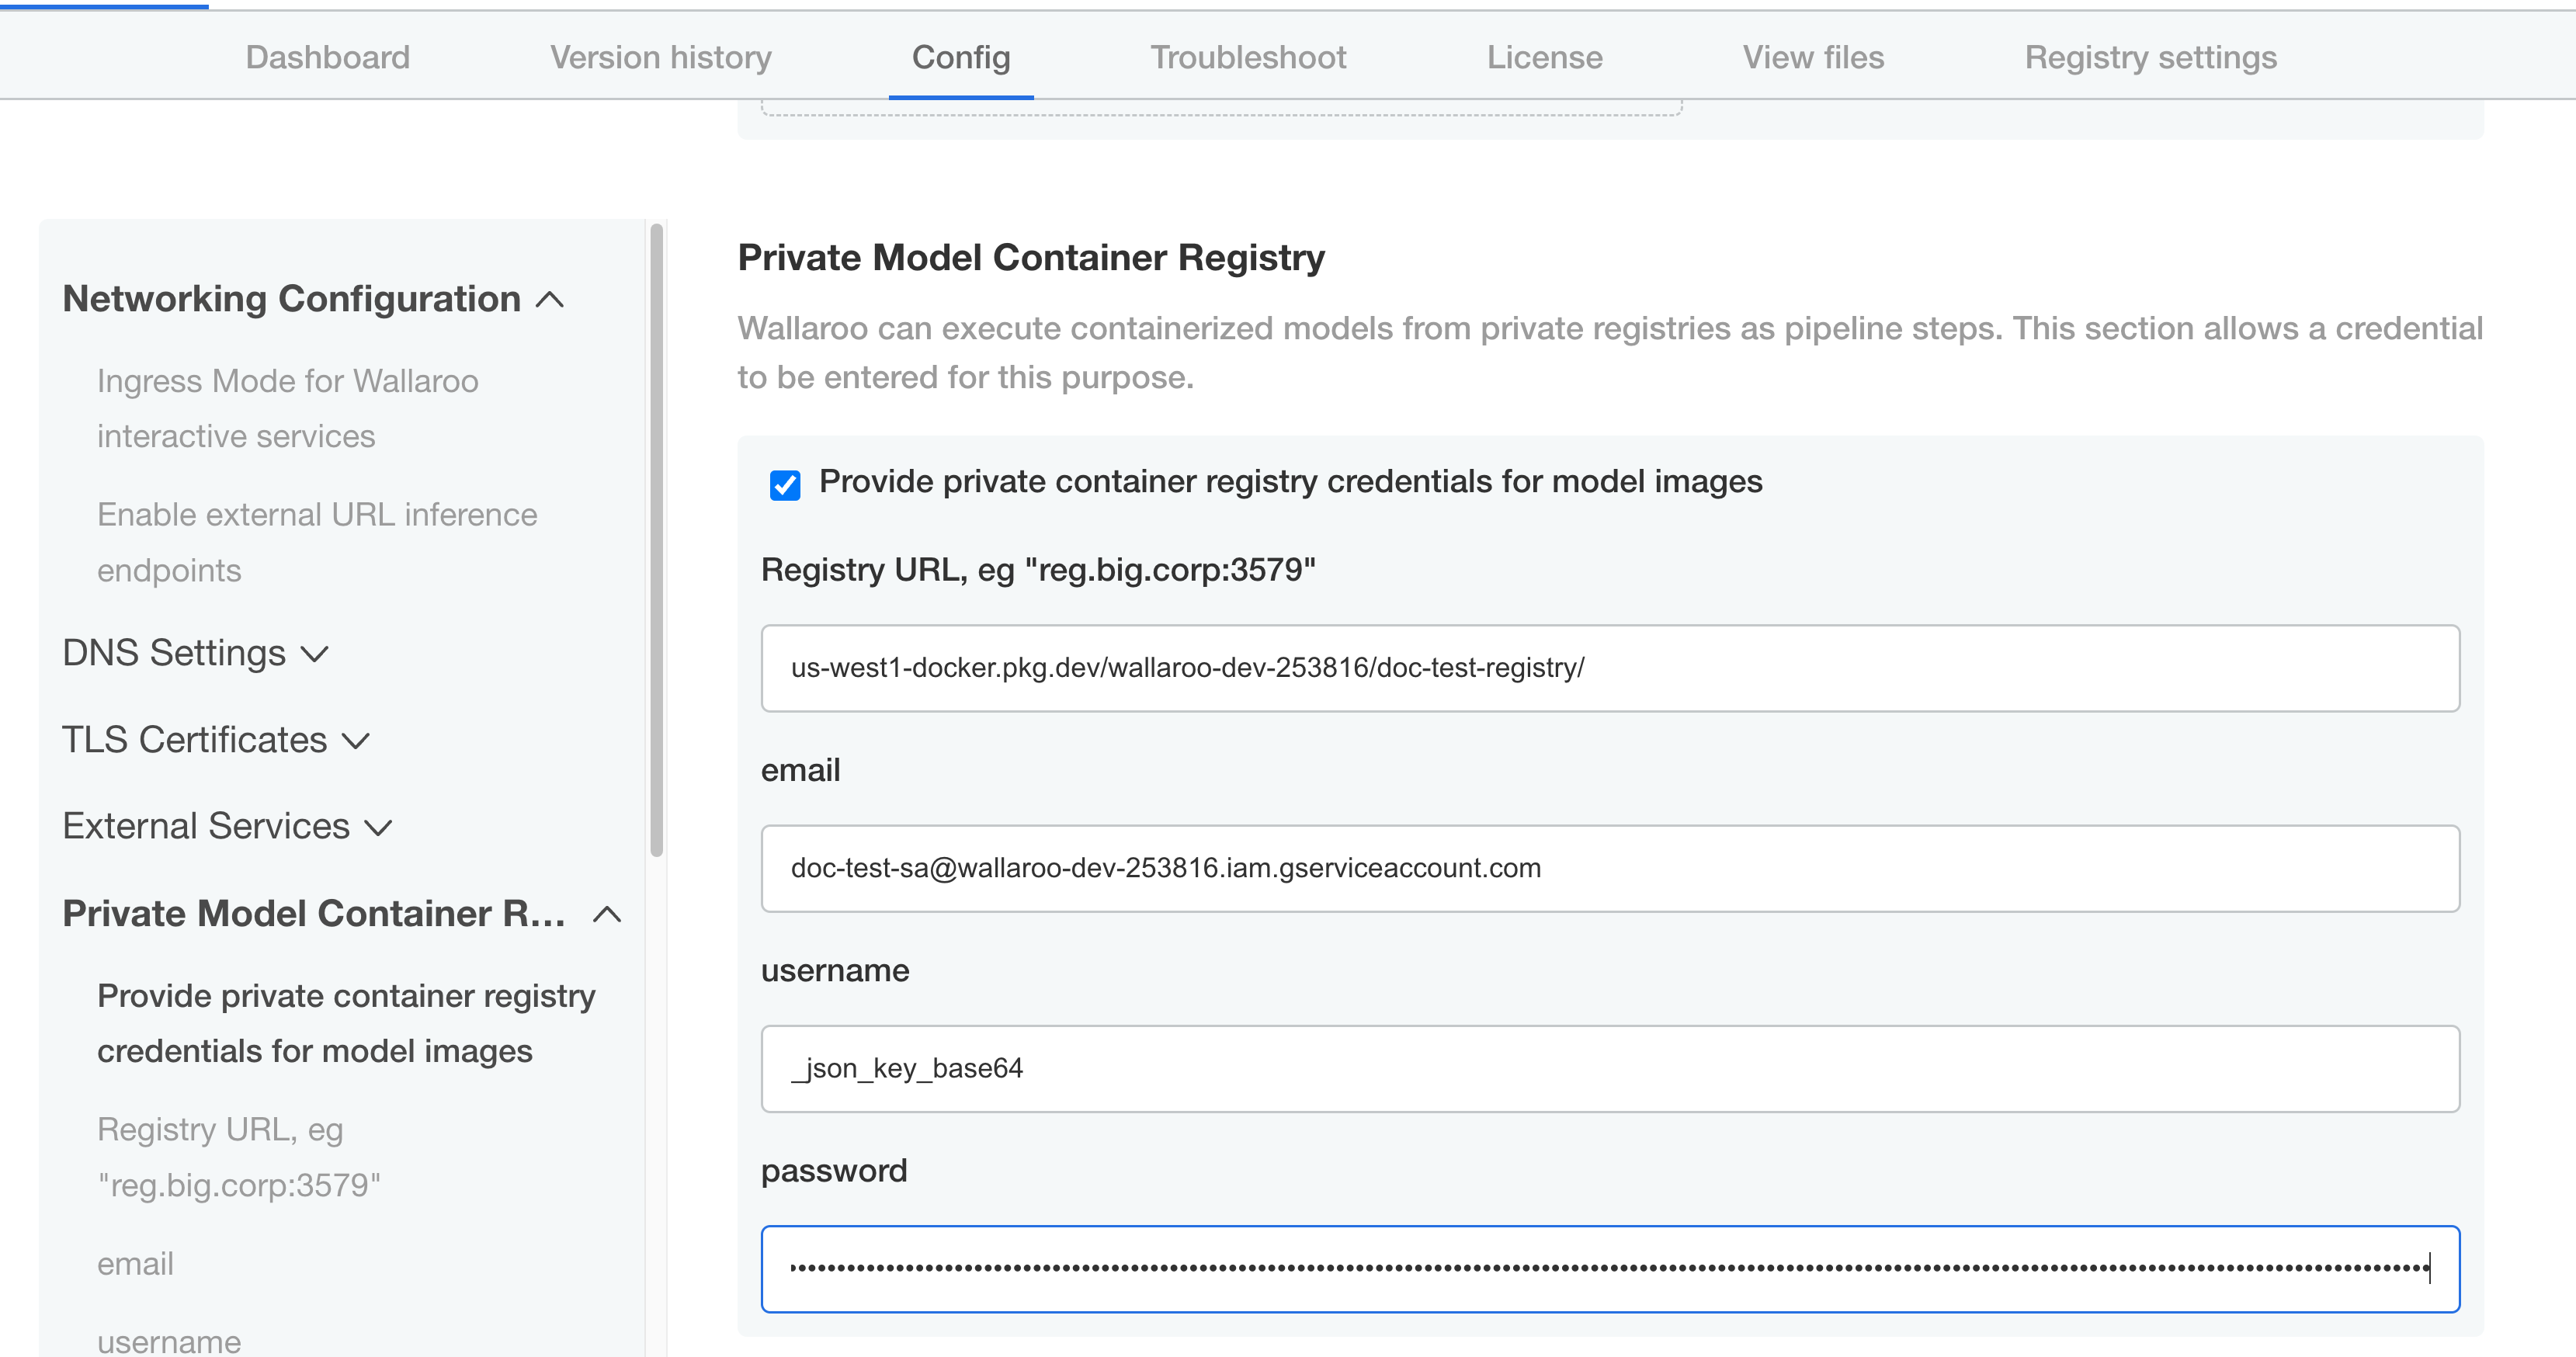
privateModelRegistry
If the customer has specified a private model container registry, the enable flag will reflect and the secret will be populated. registry, username, and password are mandatory. email is optional. registry is of the form “hostname:port”.
apilb
Main ingress LB for Wallaroo services.
The Kubernetes Ingress object is not used, instead we deploy a single Envoy load balancer with a single IP in all cases, which serves: TLS termination, authentication (JWT) checking, and both host based and path based application routing. Customer should be aware of two values in particular.
api.serviceType defaults to ClusterIP. If api.serviceType is set to LoadBalancer, cloud services will allocate a hosted LB service, in which case the apilb.annotations should be provided, in order to pass configuration such as “internal” or “external” to the cloud service.
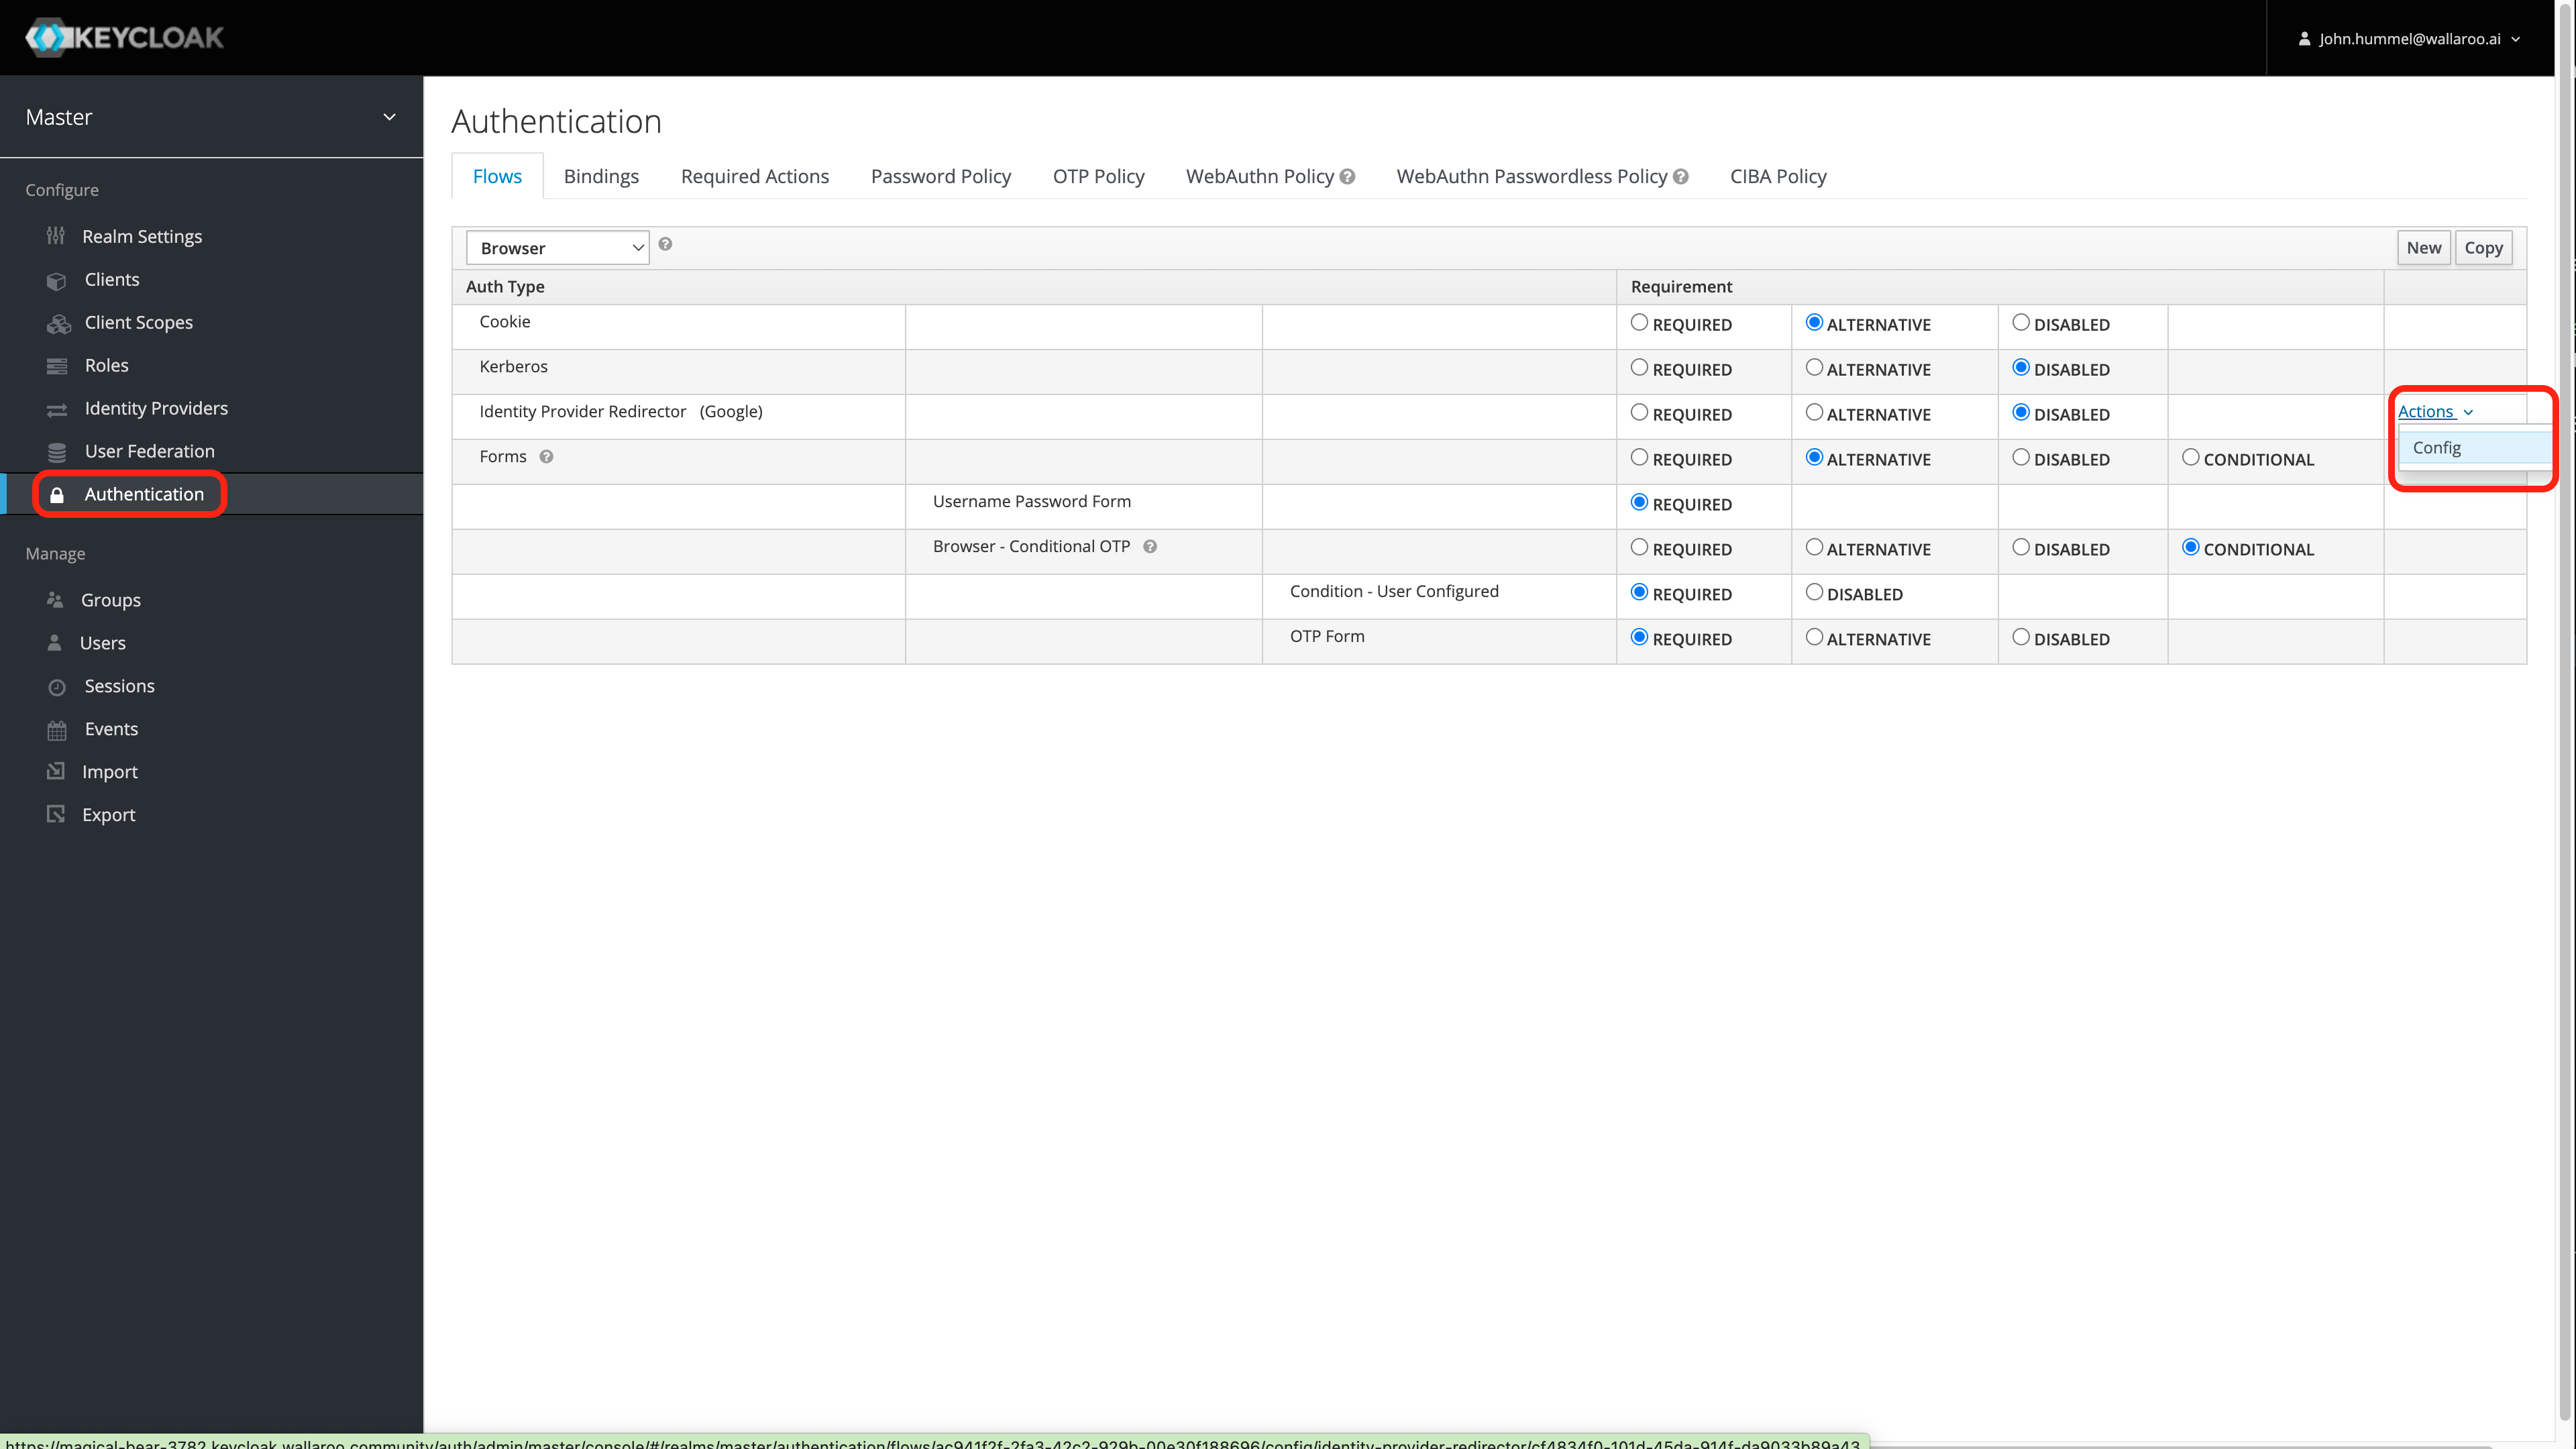
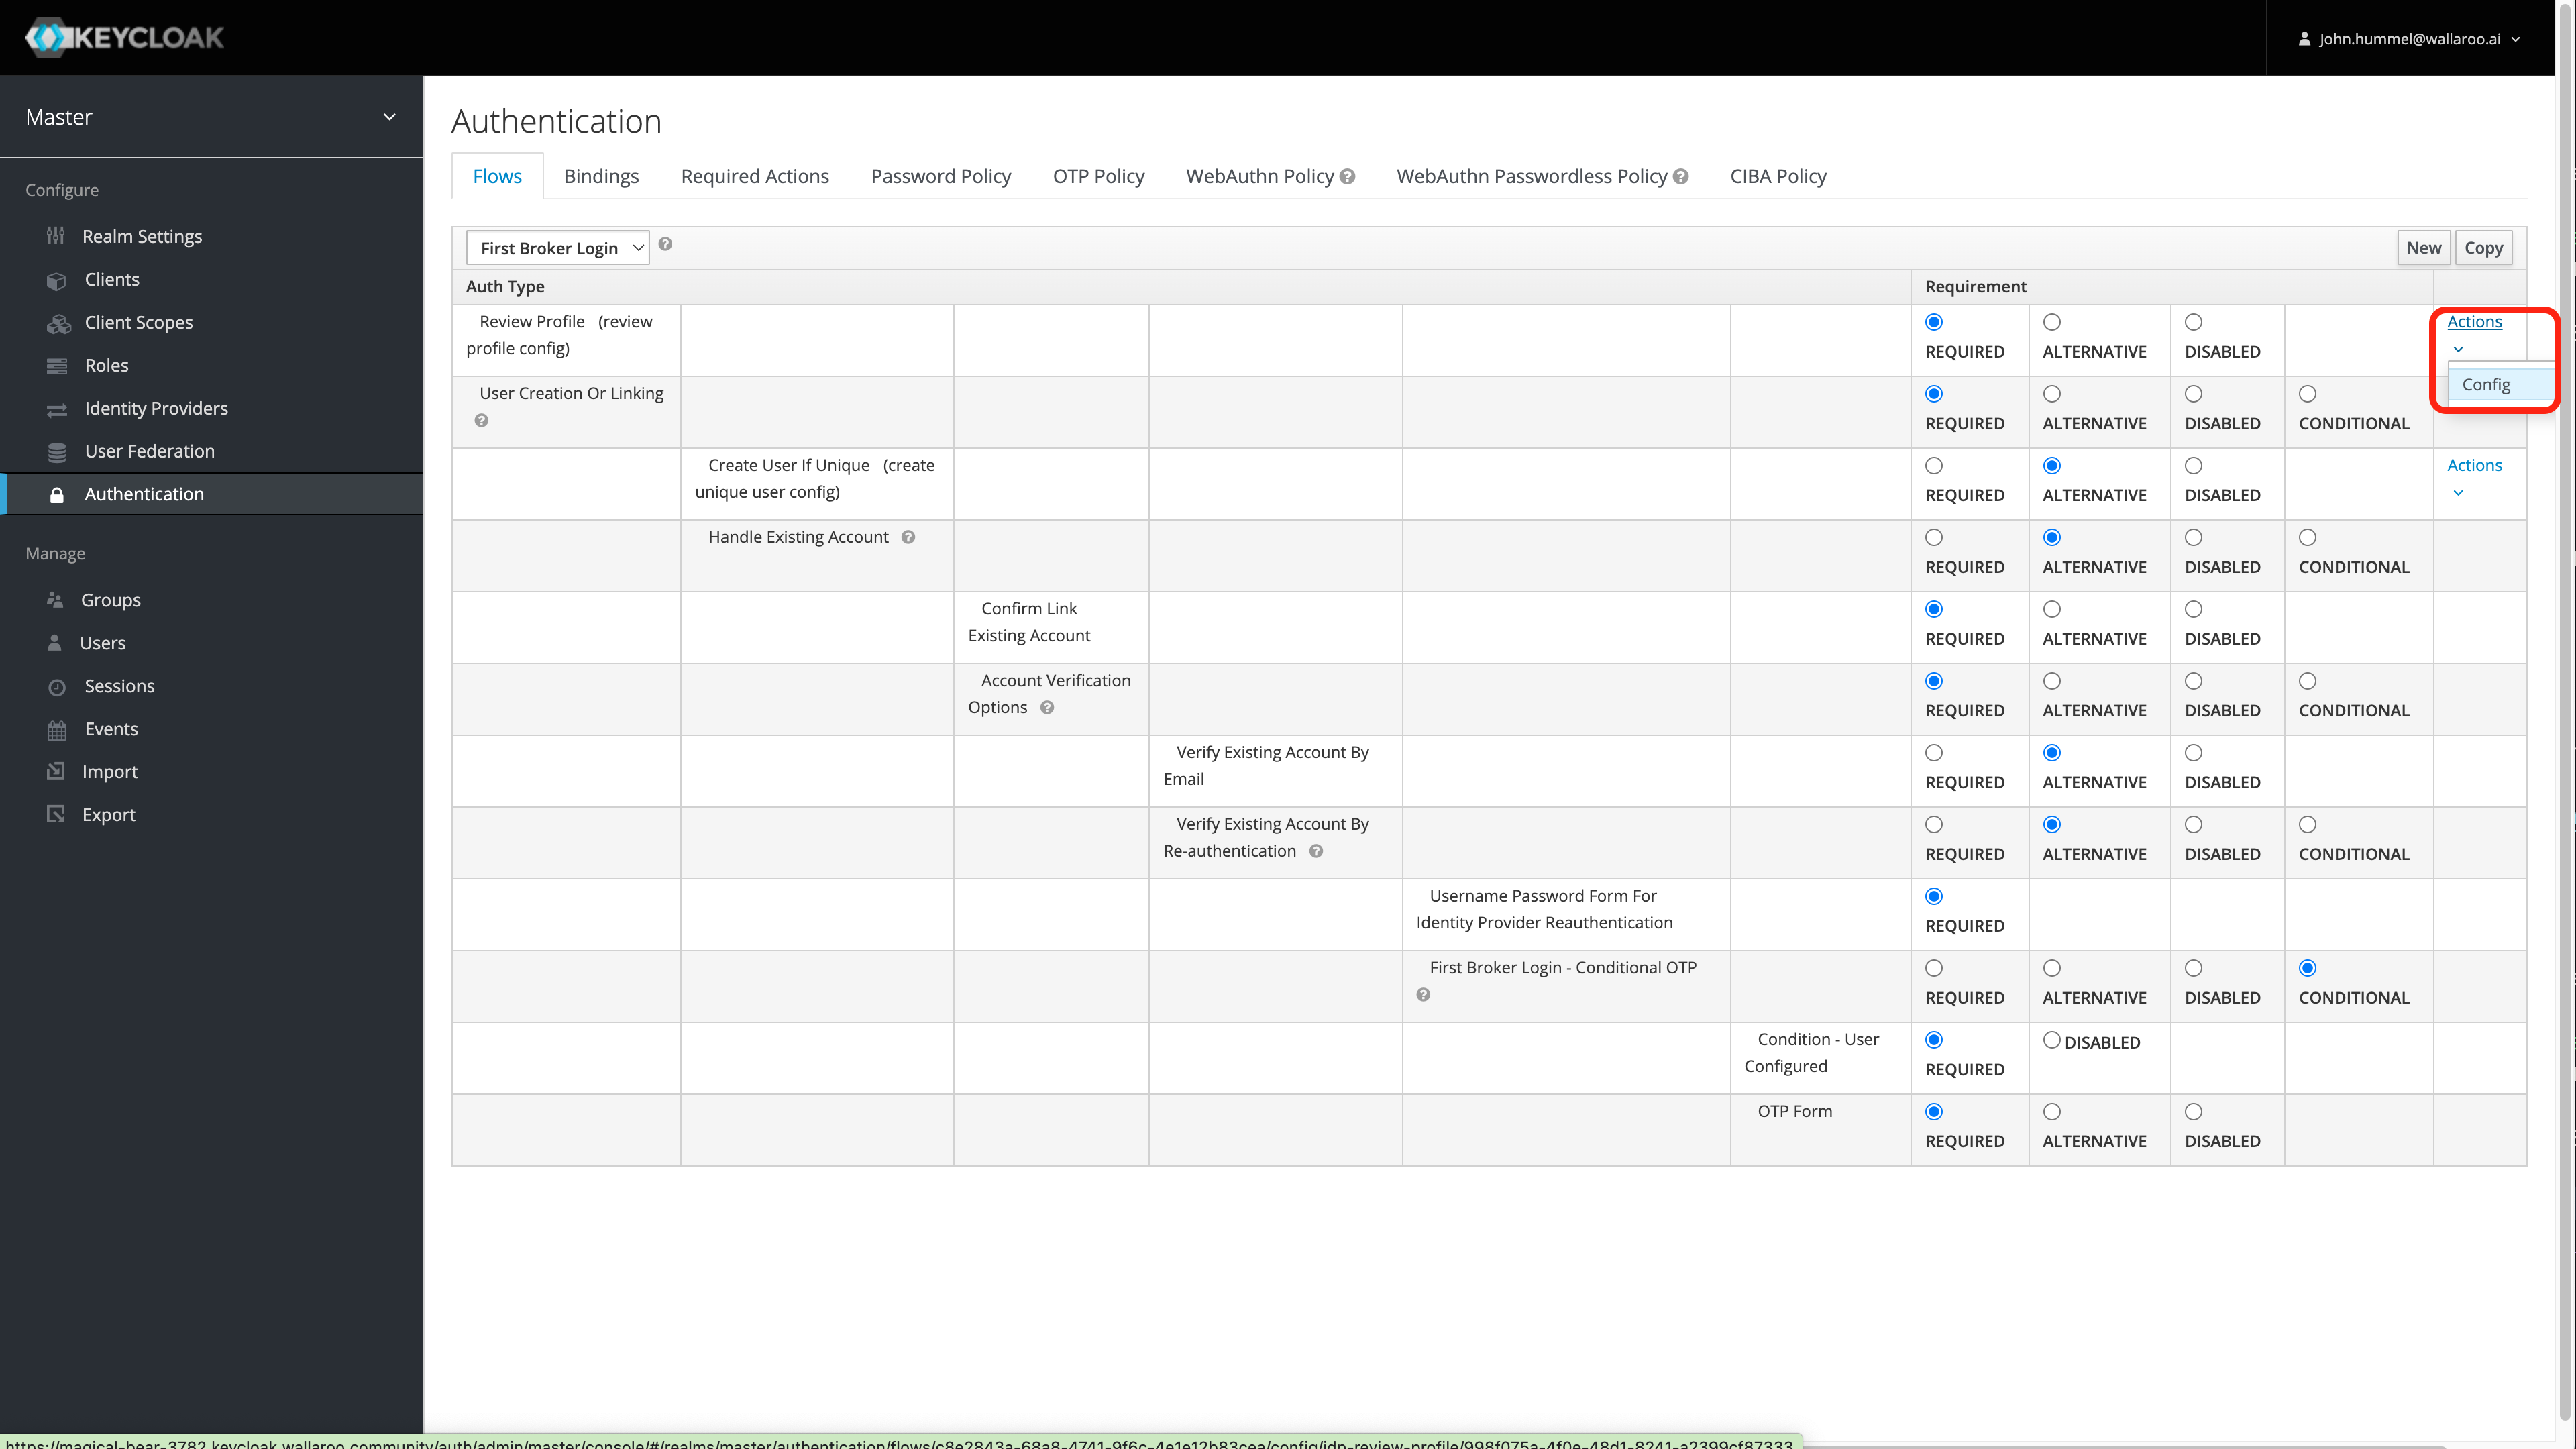
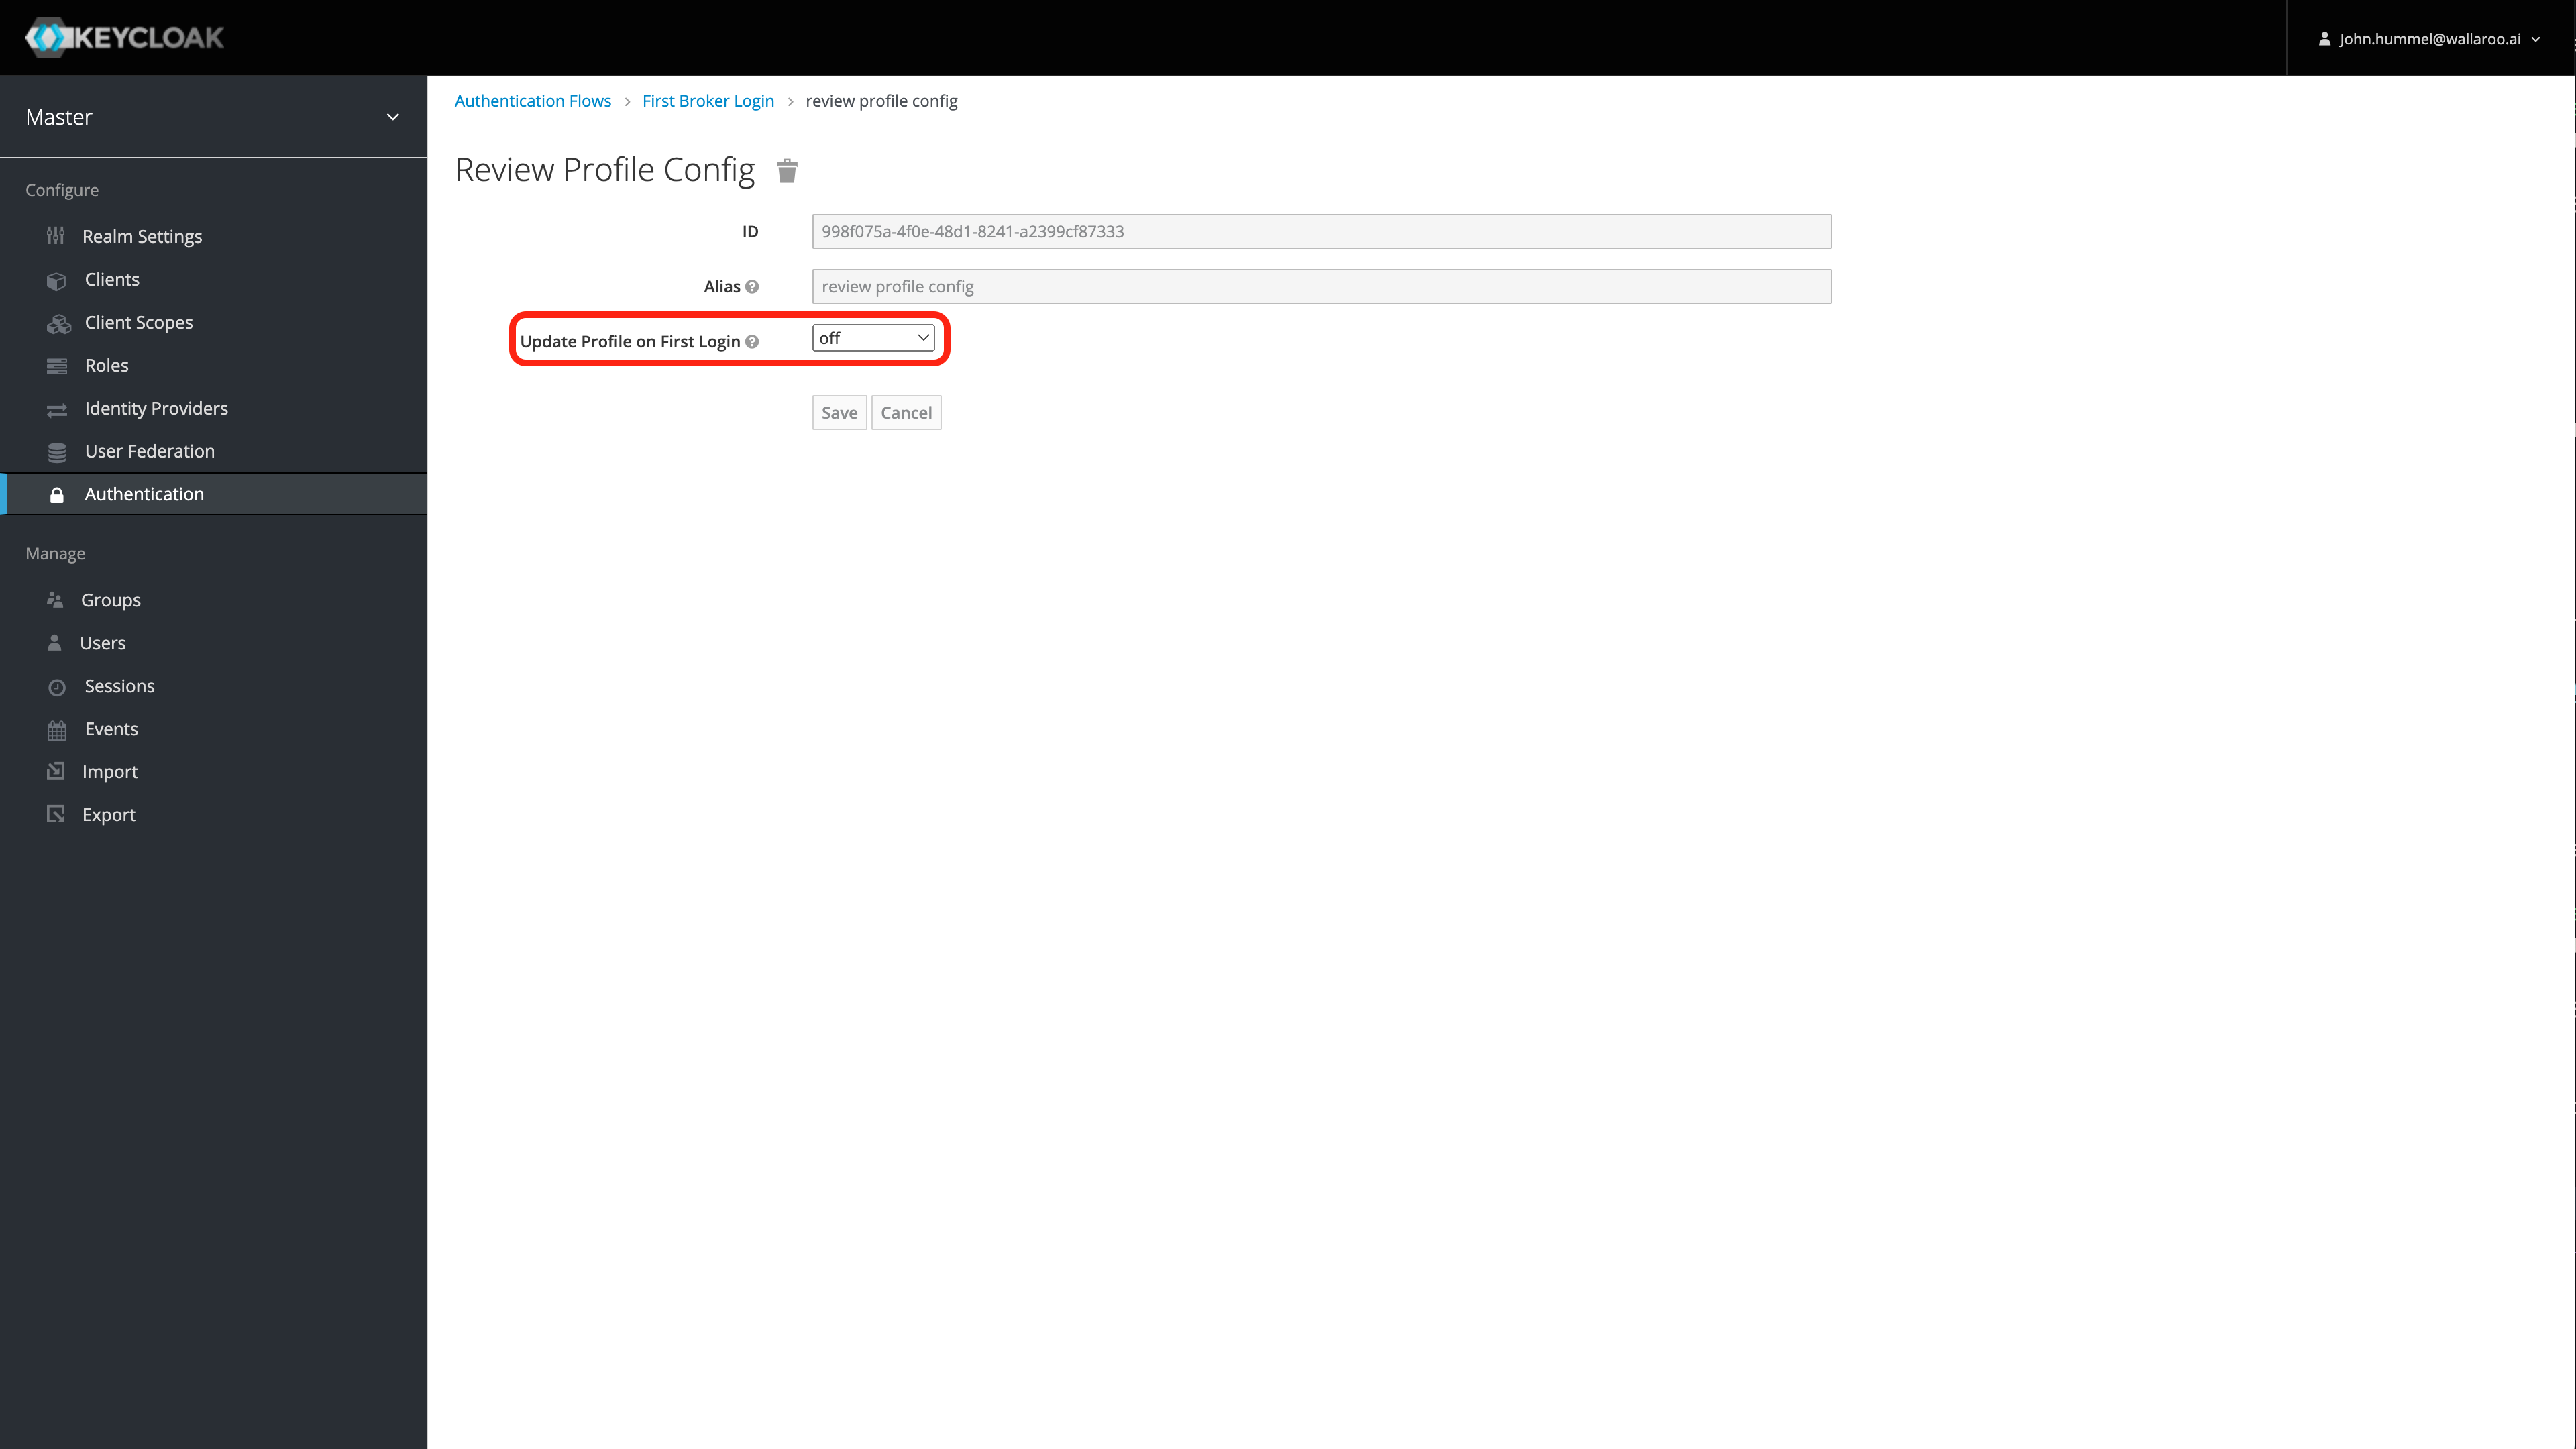
Wallaroo can connect to a variety of identity providers, broker OpenID Connect authentication requests, and then limit access to endpoints. This section configures a https://www.keycloak.org installation. If a provider is specified here, Keycloak will configure itself to use that on install. If no providers are specified here, the administrator must login to the Keycloak service as the administrative user and either add users by hand or create an auth provider. In general, a client must be created upstream and a URL, client ID, and secret (token) for that client is entered here.
dbcleaner
Manage retention for fluentbit table. This contains log message outputs from orchestration tasks.
plateau
Plateau is a low-profile fixed-footprint log processor / event store for fast storage of inference results. The amount of disk space provisioned is adjustable. Smaller than “100Gi” is not recommended for performance reasons.
pythonAPIServer
Model conversion is an optional service that allows converting non-onnx models (keras, sklearn, and xgboost) to onnx and adding them to your pipeline, without extensive manual conversion or processing steps. This allows more rapid iteration over models or experiments.
wsProxy
This controls the wsProxy, and should only be enabled if nats (ArbEx) is also enabled. wsProxy is required for the Dashboard to subscribe to events and show notifications.
orchestration
Pipeline orchestration is general task execution service that allows users to upload arbitrary code and have it executed on their behalf by the system. nats and arbex must be enabled.
models
The model server supports model autoconversion and requires nats and arbitrary execution to be enabled.
The following setup guides are used to set up the environment that will host the Wallaroo instance. Verify that the environment is prepared and meets the Wallaroo Prerequisites Guide.
Uninstall Guides
The following is a short version of the uninstallation procedure to remove a previously installed version of Wallaroo. For full details, see the How to Uninstall Wallaroo. These instructions assume administrative use of the Kubernetes command kubectl.
To uninstall a previously installed Wallaroo instance:
Delete any Wallaroo pipelines still deployed with the command kubectl delete namespace {namespace}. Typically these are the pipeline name with some numerical ID. For example, in the following list of namespaces the namespace ccfraud-pipeline-21 correspond to the Wallaroo pipeline ccfraud-pipeline. Verify these are Wallaroo pipelines before deleting.
-> kubectl get namespaces
NAME STATUS AGE
default Active 7d4h
kube-node-lease Active 7d4h
kube-public Active 7d4h
ccfraud-pipeline-21 Active 4h23m
wallaroo Active 3d6h
-> kubectl delete namespaces ccfraud-pipeline-21
Use the following bash script or run the commands individually. Warning: If the selector is incorrect or missing from the kubectl command, the cluster could be damaged beyond repair. For a default installation, the selector and namespace will be wallaroo.
Wallaroo can now be reinstalled into this environment.
Environment Setup Guides
AWS Cluster for Wallaroo Enterprise Instructions
The following instructions are made to assist users set up their Amazon Web Services (AWS) environment for running Wallaroo Enterprise using AWS Elastic Kubernetes Service (EKS).
These represent a recommended setup, but can be modified to fit your specific needs.
AWS Prerequisites
To install Wallaroo in your AWS environment based on these instructions, the following prerequisites must be met:
Register an AWS account: https://aws.amazon.com/ and assign the proper permissions according to your organization’s needs.
The Kubernetes cluster must include the following minimum settings:
Nodes must be OS type Linux with using the containerd driver.
Role-based access control (RBAC) must be enabled.
Minimum of 4 nodes, each node with a minimum of 8 CPU cores and 16 GB RAM. 50 GB will be allocated per node for a total of 625 GB for the entire cluster.
RBAC is enabled.
Recommended Aws Machine type: c5.4xlarge. For more information, see the AWS Instance Types.
Organizations that intend to stop and restart their Kubernetes environment on an intentional or regular basis are recommended to use a single availability zone for their nodes. This minimizes issues such as persistent volumes in different availability zones, etc.
Organizations that intend to use Wallaroo Enterprise in a high availability cluster are encouraged to follow best practices including using separate availability zones for redundancy, etc.
AWS Environment Setup Steps
The following steps are guidelines to assist new users in setting up their AWS environment for Wallaroo. Feel free to replace these with commands with ones that match your needs.
These commands make use of the command line tool eksctl which streamlines the process in creating Amazon Elastic Kubernetes Service clusters for our Wallaroo environment.
The following are used for the example commands below. Replace them with your specific environment settings:
AWS Cluster Name: wallarooAWS
Create an AWS EKS Cluster
The following eksctl configuration file is an example of setting up the AWS environment for a Wallaroo cluster, including the static and adaptive nodepools. Adjust these names and settings based on your organizations requirements.
During the process the Kubernetes credentials will be copied into the local environment. To verify the setup is complete, use the kubectl get nodes command to display the available nodes as in the following example:
kubectl get nodes
NAME STATUS ROLES AGE VERSION
ip-192-168-21-253.us-east-2.compute.internal Ready <none> 13m v1.23.8-eks-9017834
ip-192-168-30-36.us-east-2.compute.internal Ready <none> 13m v1.23.8-eks-9017834
ip-192-168-38-31.us-east-2.compute.internal Ready <none> 9m46s v1.23.8-eks-9017834
ip-192-168-55-123.us-east-2.compute.internal Ready <none> 12m v1.23.8-eks-9017834
ip-192-168-79-70.us-east-2.compute.internal Ready <none> 13m v1.23.8-eks-9017834
ip-192-168-37-222.us-east-2.compute.internal Ready <none> 13m v1.23.8-eks-9017834
Azure Cluster for Wallaroo Enterprise Instructions
The following instructions are made to assist users set up their Microsoft Azure Kubernetes environment for running Wallaroo Enterprise. These represent a recommended setup, but can be modified to fit your specific needs.
The Kubernetes cluster must include the following minimum settings:
Nodes must be OS type Linux the containerd driver as the default.
Role-based access control (RBAC) must be enabled.
Minimum of 4 nodes, each node with a minimum of 8 CPU cores and 16 GB RAM. 50 GB will be allocated per node for a total of 625 GB for the entire cluster.
RBAC is enabled.
Minimum machine type is set to to Standard_D8s_v4.
IMPORTANT NOTE
Organizations that intend to stop and restart their Kubernetes environment on an intentional or regular basis are recommended to use a single availability zone for their nodes. This minimizes issues such as persistent volumes in different availability zones, etc.
Organizations that intend to use Wallaroo Enterprise in a high availability cluster are encouraged to follow best practices including using separate availability zones for redundancy, etc.
Standard Setup Variables
The following variables are used in the Quick Setup Script and the Manual Setup Guide detailed below. Modify them as best fits your organization.
Variable Name
Default Value
Description
WALLAROO_RESOURCE_GROUP
wallaroogroup
The Azure Resource Group used for the KUbernetes environment.
WALLAROO_GROUP_LOCATION
eastus
The region that the Kubernetes environment will be installed to.
WALLAROO_CONTAINER_REGISTRY
wallarooacr
The Azure Container Registry used for the Kubernetes environment.
WALLAROO_CLUSTER
wallarooaks
The name of the Kubernetes cluster that Wallaroo is installed to.
WALLAROO_SKU_TYPE
Base
The Azure Kubernetes Service SKU type.
WALLAROO_VM_SIZE
Standard_D8s_v4
The VM type used for the standard Wallaroo cluster nodes.
POSTGRES_VM_SIZE
Standard_D8s_v4
The VM type used for the postgres nodepool.
ENGINELB_VM_SIZE
Standard_D8s_v4
The VM type used for the engine-lb nodepool.
ENGINE_VM_SIZE
Standard_F8s_v2
The VM type used for the engine nodepool.
Setup Environment Steps
Quick Setup Script
A sample script is available here, and creates an Azure Kubernetes environment ready for use with Wallaroo Enterprise. This script requires the following prerequisites listed above and uses the variables listed in Standard Setup Variables. Modify them as best fits your organization’s needs.
The following steps are geared towards a standard Linux or macOS system that supports the prerequisites listed above. Modify these steps based on your local environment.
Download the script above.
In a terminal window set the script status as execute with the command chmod +x wallaroo_enterprise_install_azure_expandable.bash.
Modify the script variables listed above based on your requirements.
Run the script with either bash wallaroo_enterprise_install_azure_expandable.bash or ./wallaroo_enterprise_install_azure_expandable.bash from the same directory as the script.
Manual Setup Guide
The following steps are guidelines to assist new users in setting up their Azure environment for Wallaroo. The process uses the variables listed in Standard Setup Variables. Modify them as best fits your organization’s needs.
Setting up an Azure AKS environment is based on the Azure Kubernetes Service tutorial, streamlined to show the minimum steps in setting up your own Wallaroo environment in Azure.
This follows these major steps:
Set Variables
The following are the variables used for the rest of the commands. Modify them as fits your organization’s needs.
To create an Azure Resource Group for Wallaroo in Microsoft Azure, use the following template:
az group create --name $WALLAROO_RESOURCE_GROUP --location $WALLAROO_GROUP_LOCATION
(Optional): Set the default Resource Group to the one recently created. This allows other Azure commands to automatically select this group for commands such as az aks list, etc.
az configure --defaults group={Resource Group Name}
For example:
az configure --defaults group=wallarooGroup
Create an Azure Container Registry
An Azure Container Registry(ACR) manages the container images for services includes Kubernetes. The template for setting up an Azure ACR that supports Wallaroo is the following:
Wallaroo Enterprise supports autoscaling and static nodepools. The following commands are used to create both to support the Wallaroo Enterprise cluster.
The following static nodepools are set up to support the Wallaroo cluster for postgres. Update the VM_SIZE based on your requirements.
For additional settings such as customizing the node pools for your Wallaroo Kubernetes cluster to customize the type of virtual machines used and other settings, see the Microsoft Azure documentation on using system node pools.
Download Wallaroo Kubernetes Configuration
Once the Kubernetes environment is complete, associate it with the local Kubernetes configuration by importing the credentials through the following template command:
az aks get-credentials --resource-group $WALLAROO_RESOURCE_GROUP --name $WALLAROO_CLUSTER
Verify the cluster is available through the kubectl get nodes command.
kubectl get nodes
NAME STATUS ROLES AGE VERSION
aks-engine-99896855-vmss000000 Ready agent 40m v1.23.8
aks-enginelb-54433467-vmss000000 Ready agent 48m v1.23.8
aks-mainpool-37402055-vmss000000 Ready agent 81m v1.23.8
aks-mainpool-37402055-vmss000001 Ready agent 81m v1.23.8
aks-mainpool-37402055-vmss000002 Ready agent 81m v1.23.8
aks-postgres-40215394-vmss000000 Ready agent 52m v1.23.8
The following instructions are made to assist users set up their Google Cloud Platform (GCP) Kubernetes environment for running Wallaroo. These represent a recommended setup, but can be modified to fit your specific needs. In particular, these instructions will provision a GKE cluster with 56 CPUs in total. Please ensure that your project’s resource limits support that.
Quick Setup Script: Download a bash script to automatically set up the GCP environment through the Google Cloud Platform command line interface gcloud.
Manual Setup Guide: A list of the gcloud commands used to create the environment through manual commands.
GCP Prerequisites
Organizations that wish to run Wallaroo in their Google Cloud Platform environment must complete the following prerequisites:
Organizations that intend to stop and restart their Kubernetes environment on an intentional or regular basis are recommended to use a single availability zone for their nodes. This minimizes issues such as persistent volumes in different availability zones, etc.
Organizations that intend to use Wallaroo Enterprise in a high availability cluster are encouraged to follow best practices including using separate availability zones for redundancy, etc.
Standard Setup Variables
The following variables are used in the Quick Setup Script and the Manual Setup Guide. Modify them as best fits your organization.
Variable Name
Default Value
Description
WALLAROO_GCP_PROJECT
wallaroo
The name of the Google Project used for the Wallaroo instance.
WALLAROO_CLUSTER
wallaroo
The name of the Kubernetes cluster for the Wallaroo instance.
WALLAROO_GCP_REGION
us-central1
The region the Kubernetes environment is installed to. Update this to your GCP Computer Engine region.
WALLAROO_NODE_LOCATION
us-central1-f
The location the Kubernetes nodes are installed to. Update this to your GCP Compute Engine Zone.
WALLAROO_GCP_NETWORK_NAME
wallaroo-network
The Google network used with the Kubernetes environment.
WALLAROO_GCP_SUBNETWORK_NAME
wallaroo-subnet-1
The Google network subnet used with the Kubernets environment.
DEFAULT_VM_SIZE
e2-standard-8
The VM type used for the default nodepool.
POSTGRES_VM_SIZE
n2-standard-8
The VM type used for the postgres nodepool.
ENGINELB_VM_SIZE
c2-standard-8
The VM type used for the engine-lb nodepool.
ENGINE_VM_SIZE
c2-standard-8
The VM type used for the engine nodepool.
Quick Setup Script
A sample script is available here, and creates a Google Kubernetes Engine cluster ready for use with Wallaroo Enterprise. This script requires the prerequisites listed above and uses the variables as listed in Standard Setup Variables
The following steps are geared towards a standard Linux or macOS system that supports the prerequisites listed above. Modify these steps based on your local environment.
Download the script above.
In a terminal window set the script status as execute with the command chmod +x bash wallaroo_enterprise_gcp_expandable.bash.
Modify the script variables listed above based on your requirements.
Run the script with either bash wallaroo_enterprise_gcp_expandable.bash or ./wallaroo_enterprise_gcp_expandable.bash from the same directory as the script.
Set Variables
The following are the variables used in the environment setup process. Modify them as best fits your organization’s needs.
The following steps are guidelines to assist new users in setting up their GCP environment for Wallaroo. The variables used in the commands are as listed in Standard Setup Variables listed above. Feel free to replace these with ones that match your needs.
See the Google Cloud SDK for full details on commands and settings.
Create a GCP Network
First create a GCP network that is used to connect to the cluster with the gcloud compute networks create command. For more information, see the gcloud compute networks create page.
Once the network is created, the gcloud container clusters create command is used to create a cluster. For more information see the gcloud container clusters create page.
The following is a recommended format, replacing the {} listed variables based on your setup. For Google GKE containerd is enabled by default.
The command can take several minutes to complete based on the size and complexity of the clusters. Verify the process is complete with the clusters list command:
gcloud container clusters list
Wallaroo Enterprise Nodepools
The following static nodepools can be set based on your organizations requirements. Adjust the settings or names based on your requirements.
The following autoscaling nodepools are used for the engine load balancers and Wallaroo engine. Again, replace names and virtual machine types based on your organizations requirements.
To verify the Kubernetes credentials for your cluster have been installed locally, use the kubectl get nodes command. This will display the nodes in the cluster as demonstrated below:
kubectl get nodes
NAME STATUS ROLES AGE VERSION
gke-wallaroo-default-pool-863f02db-7xd4 Ready <none> 39m v1.21.6-gke.1503
gke-wallaroo-default-pool-863f02db-8j2d Ready <none> 39m v1.21.6-gke.1503
gke-wallaroo-default-pool-863f02db-hn06 Ready <none> 39m v1.21.6-gke.1503
gke-wallaroo-engine-3946eaca-4l3s Ready <none> 89s v1.21.6-gke.1503
gke-wallaroo-engine-lb-2e33a27f-64wb Ready <none> 26m v1.21.6-gke.1503
gke-wallaroo-postgres-d22d73d3-5qp5 Ready <none> 28m v1.21.6-gke.1503
Troubleshooting
What does the error ‘Insufficient project quota to satisfy request: resource “CPUS_ALL_REGIONS”’ mean?
Make sure that the Compute Engine Zone and Region are properly set based on your organization’s requirements. The instructions above default to us-central1, so change that zone to install your Wallaroo instance in the correct location.
Single Node Linux
Organizations can run Wallaroo within a single node Linux environment that meet the prerequisites.
The following guide is based on installing Wallaroo Enterprise into virtual machines based on Ubuntu 22.04 hosted in Google Cloud Platform (GCP), Amazon Web Services (AWS) and Microsoft Azure. For other environments and configurations, consult your Wallaroo support representative.
Prerequisites
Before starting the bare Linux installation, the following conditions must be met:
Have a Wallaroo Enterprise license file. For more information, you can request a demonstration.
A Linux bare-metal system or virtual machine with at least 32 cores and 64 GB RAM with Ubuntu 20.04 installed.
650 GB allocated for the root partition, plus 50 GB allocated per node and another 50 GB for the JupyterHub service. Enterprise users who deploy additional pipelines will require an additional 50 GB of storage per lab node deployed.
Ensure memory swapping is disabled by removing it from /etc/fstab if needed.
DNS services for integrating your Wallaroo Enterprise instance. See the DNS Integration Guide for the instructions on configuring Wallaroo Enterprise with your DNS services.
IMPORTANT NOTE
Wallaroo requires out-bound network connections to download the required container images and other tasks. For situations that require limiting out-bound access, refer to the air-gap installation instructions or contact your Wallaroo support representative. Also note that if Wallaroo is being installed into a cloud environment such as Google Cloud Platform, Microsoft Azure, Amazon Web Services, etc, then additional considerations such as networking, DNS, certificates, and other considerations must be accounted for. For IP address restricted environments, see the Air Gap Installation Guide.
The steps below are based on minimum requirements for install Wallaroo in a single node environment.
For situations that require limiting external IP access or other questions, refer to your Wallaroo support representative.
Template Single Node Scripts
The following template scripts are provided as examples on how to create single node virtual machines that meet the requirements listed above in AWS, GCP, and Microsoft Azure environments.
# Variables# The name of the virtual machineNAME=$USER-demo-vm # eg bob-demo-vm# The image used : ubuntu/images/2023.2.1/hvm-ssd/ubuntu-jammy-22.04-amd64-server-20230208IMAGE_ID=ami-0557a15b87f6559cf
# Instance type meeting the Wallaroo requirements.INSTANCE_TYPE=c6i.8xlarge # c6a.8xlarge is also acceptable# key name - generate keys using Amazon EC2 Key Pairs# https://docs.aws.amazon.com/AWSEC2/latest/UserGuide/ec2-key-pairs.html# Wallaroo people: https://us-east-1.console.aws.amazon.com/ec2/home?region=us-east-1#KeyPairs:v=3 - MYKEY=DocNode
# We will whitelist the our source IP for maximum security -- just use 0.0.0.0/0 if you don't care.MY_IP=$(curl -s https://checkip.amazonaws.com)/32
# Create security group in the Default VPCaws ec2 create-security-group --group-name $NAME --description "$USER demo" --no-cli-pager
# Open port 22 and 443aws ec2 authorize-security-group-ingress --group-name $NAME --protocol tcp --port 22 --cidr $MY_IP --no-cli-pager
aws ec2 authorize-security-group-ingress --group-name $NAME --protocol tcp --port 443 --cidr $MY_IP --no-cli-pager
# increase Boot device size to 650 GB# Change the location from `/tmp/device.json` as required.# cat <<EOF > /tmp/device.json # [{# "DeviceName": "/dev/sda1",# "Ebs": { # "VolumeSize": 650,# "VolumeType": "gp2"# }# }]# EOF# Launch instance with a 650 GB Boot device.aws ec2 run-instances --image-id $IMAGE_ID --count 1 --instance-type $INSTANCE_TYPE\
--no-cli-pager \
--key-name $MYKEY\
--block-device-mappings '[{"DeviceName":"/dev/sda1","Ebs":{"VolumeSize":650,"VolumeType":"gp2"}}]'\
--tag-specifications "ResourceType=instance,Tags=[{Key=Name,Value=$NAME}]"\
--security-groups $NAME# Sample output:# {# "Instances": [# {# ...# "InstanceId": "i-0123456789abcdef", # Keep this instance-id for later# ...# }# ]# }#INSTANCEID=YOURINSTANCE# After several minutes, a public IP will be known. This command will retrieve it.# aws ec2 describe-instances --output text --instance-id $INSTANCEID \# --query 'Reservations[*].Instances[*].{ip:PublicIpAddress}'# Sample Output# 12.23.34.56# KEYFILE=KEYFILELOCATION #usually ~/.ssh/key.pem - verify this is the same as the key above.# SSH to the VM - replace $INSTANCEIP#ssh -i $KEYFILE ubuntu@$INSTANCEIP# Stop the VM - replace the $INSTANCEID#aws ec2 stop-instances --instance-id $INSTANCEID# Restart the VM#aws ec2 start-instances --instance-id $INSTANCEID# Clean up - destroy VM#aws ec2 terminate-instances --instance-id $INSTANCEID
#!/bin/bash
# Variables list. Update as per your organization's settingsNAME=$USER-demo-vm # eg bob-demo-vmRESOURCEGROUP=YOURRESOURCEGROUP
LOCATION=eastus
IMAGE=Canonical:0001-com-ubuntu-server-jammy:22_04-lts:22.04.202301140
# Pick a locationaz account list-locations -o table |egrep 'US|----|Name'# Create resource groupaz group create -l $LOCATION --name $USER-demo-$(date +%y%m%d)# Create VM. This will create ~/.ssh/id_rsa and id_rsa.pub - store these for later use.az vm create --resource-group $RESOURCEGROUP --name $NAME --image $IMAGE --generate-ssh-keys \
--size Standard_D32s_v4 --os-disk-size-gb 500 --public-ip-sku Standard
# Sample output# {# "location": "eastus",# "privateIpAddress": "10.0.0.4",# "publicIpAddress": "20.127.249.196", <-- Write this down as MYPUBIP# "resourceGroup": "mnp-demo-230213",# ...# }# SSH port is open by default. This adds an application port.az vm open-port --resource-group $RESOURCEGROUP --name $NAME --port 443# SSH to the VM - assumes that ~/.ssh/id_rsa and ~/.ssh/id_rsa.pub from above are availble.# ssh $MYPUBIP# Use this Stop the VM ("deallocate" frees resources and billing; "stop" does not)# az vm deallocate --resource-group $RESOURCEGROUP --name $NAME# Restart the VM# az vm start --resource-group $RESOURCEGROUP --name $NAME
# SettingsNAME=$USER-demo-$(date +%y%m%d)# eg bob-demo-230210ZONE=us-west1-a # For a complete list, use `gcloud compute zones list | egrep ^us-`PROJECT=wallaroo-dev-253816 # Insert the GCP Project ID here. This is the one for Wallaroo.# Create VMIMAGE=projects/ubuntu-os-cloud/global/images/2023.2.1/ubuntu-2204-jammy-v20230114
# Port 22 and 443 open by defaultgcloud compute instances create $NAME\
--project=$PROJECT\
--zone=$ZONE\
--machine-type=e2-standard-32 \
--network-interface=network-tier=STANDARD,subnet=default \
--maintenance-policy=MIGRATE \
--provisioning-model=STANDARD \
--no-service-account \
--no-scopes \
--tags=https-server \
--create-disk=boot=yes,image=${IMAGE},size=500,type=pd-standard \
--no-shielded-secure-boot \
--no-shielded-vtpm \
--no-shielded-integrity-monitoring \
--reservation-affinity=any
# Get the external IP addressgcloud compute instances describe $NAME --zone $ZONE --format='get(networkInterfaces[0].accessConfigs[0].natIP)'# SSH to the VM#gcloud compute ssh $NAME --zone $ZONE# SCP file to the instance - replace $FILE with the file path. Useful for copying up the license file up to the instance.#gcloud compute scp --zone $ZONE $FILE $NAME:~/# SSH port forward to the VM#gcloud compute ssh $NAME --zone $ZONE -- -NL 8800:localhost:8800# Suspend the VM#gcloud compute instances stop $NAME --zone $ZONE# Restart the VM#gcloud compute instances start $NAME --zone $ZONE
Kubernetes Installation Steps
The following script and steps will install the Kubernetes version and requirements into the Linux node that supports a Wallaroo single node installation.
The process includes these major steps:
Install Kubernetes
Install Kots Version
Install Kubernetes
curl is installed in the default scripts provided above. Verify that it is installed if using some other platform.
Verify that the Ubuntu distribution is up to date, and reboot if necessary after updating.
sudo apt update
sudo apt upgrade
Start the Kubernetes installation with the following script, substituting the URL path as appropriate for your license.
For Wallaroo versions 2022.4 and below:
curl https://kurl.sh/9398a3a | sudo bash
For Wallaroo versions 2023.1 and later, the install is based on the license channel. For example, if your license uses the EE channel, then the path is /wallaroo-ee; that is, /wallaroo- plus the lower-case channel name. Note that the Kubernetes install channel must match the License version. Check with your Wallaroo support representative with any questions about your version.
curl https://kurl.sh/wallaroo-ee | sudo bash
If prompted with This application is incompatible with memory swapping enabled. Disable swap to continue? (Y/n), reply Y.
Set up the Kubernetes configuration with the following commands:
Verify kots was installed with the following command:
kubectl kots version
It should return results similar to the following:
Replicated KOTS 1.91.3
Connection Options
Once Kubernetes has been set up on the Linux node, users can opt to copy the Kubernetes configuration to a local system, updating the IP address and other information as required. See the Configure Access to Multiple Clusters.
The easiest method is to create a SSH tunnel to the Linux node. Usually this will be in the format:
ssh $IP -L8800:localhost:8800
For example, in an AWS instance that may be as follows, replaying $KEYFILE with the link to the keyfile and $IP with the IP address of the Linux node.
ssh -i $KEYFILE ubuntu@$IP -L8800:localhost:8800
In a GCP instance, gcloud can be used as follows, replacing $NAME with the name of the GCP instance, $ZONE with the zone it was installed into.
Port forwarding port 8800 is used for kots based installation to access the Wallaroo Administrative Dashboard.
1.3 - Wallaroo Community Install Guides
1.3.1 - Wallaroo Community Simple Install Guide
How to set up Wallaroo Community in a prepared environment.
The following guide details how to set up Wallaroo Community in a prepared environment. For a comprehensive guide for the entire process including sample scripts for setting up a cloud environment, see the Wallaroo Community Comprehensive Install Guide
Install Wallaroo Community
Wallaroo Community can be installed into a Kubernetes cloud environment, or into a Kubernetes environment that meets the Wallaroo Prerequisites Guide. Organizations that use the Wallaroo Community AWS EC2 Setup procedure do not have to set up a Kubernetes environment, as it is already configured for them.
This video demonstrates that procedure:
The procedure assumes at least a basic knowledge of Kubernetes and how to use the kubectl and kots version 1.91.3 applications.
You have downloaded your Wallaroo Community License file.
Install Wallaroo
The environment is ready, the tools are installed - let’s install Wallaroo! The following will use kubectl and kots through the following procedure:
Install the Wallaroo Community Edition using kots install wallaroo/ce, specifying the namespace to install. For example, if wallaroo is the namespace, then the command is:
Wallaroo Community Edition will be downloaded and installed into your Kubernetes environment in the namespace specified. When prompted, set the default password for the Wallaroo environment. When complete, Wallaroo Community Edition will display the URL for the Admin Console, and how to end the Admin Console from running.
• Deploying Admin Console
• Creating namespace ✓
• Waiting for datastore to be ready ✓
Enter a new password to be used for the Admin Console: •••••••••••••
• Waiting for Admin Console to be ready ✓
• Press Ctrl+C to exit• Go to http://localhost:8800 to access the Admin Console
Wallaroo Community edition will continue to run until terminated. To relaunch in the future, use the following command:
kubectl-kots admin-console --namespace wallaroo
Initial Configuration and License Upload Procedure
Once Wallaroo Community edition has been installed for the first time, we can perform initial configuration and load our Wallaroo Community license file through the following process:
If Wallaroo Community Edition has not started, launch it with the following command:
❯ kubectl-kots admin-console --namespace wallaroo
  • Press Ctrl+C to exit
  • Go to http://localhost:8800 to access the Admin Console
Enter the Wallaroo Community Admin Console address into a browser. You will be prompted for the default password as set in the step above. Enter it and select Log in.
Upload your license file.
The Configure Wallaroo Community page will be displayed which allows you to customize your Wallaroo environment. For now, scroll to the bottom and select Continue. These settings can be customized at a later date.
The Wallaroo Community Admin Console will run the preflight checks to verify that all of the minimum requirements are not met. This may take a few minutes. If there are any issues, Wallaroo can still be launched but may not function properly. When ready, select Continue.
The Wallaroo Community Dashboard will be displayed. There may be additional background processes that are completing their setup procedures, so there may be a few minute wait until those are complete. If everything is ready, then the Wallaroo Dashboard will show a green Ready.
Under the license information is the DNS entry for your Wallaroo instance. This is where you and other users of your Wallaroo instance can log in. In this example, the URL will be https://beautiful-horse-9537.wallaroo.community. Note that it may take a few minutes for the DNS entries to propagate and this URL to be available.
You will receive an email invitation for the email address connected to this URL with a temporary password and a link to this Wallaroo instance’s URL. Either enter the URL for your Wallaroo instance or use the link in the email.
To login to your new Wallaroo instance, enter the email address and temporary password associated with the license.
With that, Wallaroo Community edition is launched and ready for use! You can end the Admin Console from your terminal session above. From this point on you can just use the Wallaroo instance URL.
1.3.2 - Wallaroo Community Comprehensive Install Guide
How to set up Wallaroo Community in various environments.
This guide is targeted towards system administrators and data scientists who want to work with the easiest, fastest, and free method of running your own machine learning models.
A typical installation of Wallaroo Community follows this process:
The first step to installing Wallaroo CE is to set up your Wallaroo Community Account at the web site https://portal.wallaroo.community. This process typically takes about 5 minutes.
Once you’ve submitted your credentials, you’ll be sent an email with a link to your license file.
Follow the link and download your license file. Store it in a secure location.
Redownload License
If your license is misplaced or otherwise lost, it can be downloaded again later from the same link, or by following the registration steps again to be provided with a link to your license file.
Setup Environments
The following setup guides are used to set up the environment that will host the Wallaroo instance. Verify that the environment is prepared and meets the Wallaroo Prerequisites Guide.
Wallaroo Community AWS EC2 Setup Instructions
The following instructions are made to assist users set up their Amazon Web Services (AWS) environment for running Wallaroo using AWS virtual servers with EC2. This allows organizations to stand a single virtual machine and used a pre-made Amazon Machine Images (AMIs) to quickly stand up an environment that can be used to install Wallaroo.
AWS Prerequisites
To install Wallaroo in your AWS environment based on these instructions, the following prerequisites must be met:
Register an AWS account: https://aws.amazon.com/ and assign the proper permissions according to your organization’s needs. This must be a paid AWS account - Wallaroo will not operate on the free tier level of virtual machines.
Steps
Create the EC2 VM
To create your Wallaroo instance using a pre-made AMI:
Log into AWS cloud console.
Set the region to N. Virginia. Other regions will be added over time.
Select Services -> EC2.
Select Instances, then from the upper right hand section Launch Instances->Launch Instances.
Set the Name and any additional tags.
In Application and OS Images, enter Wallaroo Install and press Enter.
From the search results, select Community AMIs and select Wallaroo Installer 3a.
Set the Instance Type as c6i.8xlarge or c6a.8xlarge as the minimum machine type. This provides 32 cores with 60 GB memory.
For Key pair (login) select one of the following:
Select an existing Key pair name
Select Create new key pair and set the following:
Name: The name of the new key pair.
Key pair type: Select either RSA or ED25519.
Private key file format: Select either .pem or .ppk. These instructions are based on the .pem file.
Select Create key pair when complete.
Set the following for Network settings:
Firewall: Select Create security group or select from an existing one that best fits your organization.
Allow SSH traffic from: Set to Enabled and Anywhere 0.0.0.0/0.
Allow HTTPs traffic from the internet: Set to Enabled.
Set the following for Configure Storage:
Set Root volume to at least 400 GiB, type standard.
Review the Summary and verify the following:
Number of instances: 1
Virtual server type: Matches the minimum requirement listed above.
Verify the other settings are accurate.
Select Launch Instance.
It is recommended to give the instance time to complete its setup process. This typically takes 20 minutes.
Verify the Setup
To verify the environment is setup for Wallaroo:
From the EC2 Dashboard, select the virtual machine created for your Wallaroo instance.
Note the Public IPv4 DNS address.
From a terminal, run ssh to connect to your virtual machine. The installation requires access to port 8800 and the private key selected or created in the instructions above.
The ssh command format for connecting to your virtual machine uses the following format, replacing the $keyfile, $VM_DNS with your private key file and the DNS address to your Amazon VM:
If the Kubernetes setup is still installing, wait until complete and when prompted select EXIT to complete the process. This process may take up to 20 to 30 minutes.
Cost Saving Tips The following tips can be used to save costs on your AWS EC2 instance.
Stop Instances When Not In Use
One cost saving measure is to stop instances when not in use. If you intend to stop an instance, register it with static IP address so when it is turned back on your services will continue to function without interruption.
I keep seeing the errors such as connect failed. Is this a problem?
Sometimes you may see an error such as channel 3: open failed: connect failed: Connection refused. This is the ssh port forwarding attempting to connect to port 8800 during the installation, and can be ignored.
When Launching JupyterHub, I get a Server 500 error.
If you shut down and restart a Wallaroo instance in a new environment or change the IP address, some settings may not be updated. Run the following command to restart the deployment process and update the settings to match the current environment:
kubectl rollout restart deployment hub
Setup AWS EKS Environment for Wallaroo
The following instructions are made to assist users set up their Amazon Web Services (AWS) environment for running Wallaroo using AWS Elastic Kubernetes Service (EKS).
These represent a recommended setup, but can be modified to fit your specific needs.
If the prerequisites are already met, skip ahead to Install Wallaroo.
The following video demonstrates this process:
AWS Prerequisites
To install Wallaroo in your AWS environment based on these instructions, the following prerequisites must be met:
Register an AWS account: https://aws.amazon.com/ and assign the proper permissions according to your organization’s needs.
The Kubernetes cluster must include the following minimum settings:
Nodes must be OS type Linux with using the containerd driver.
Role-based access control (RBAC) must be enabled.
Minimum of 4 nodes, each node with a minimum of 8 CPU cores and 16 GB RAM. 50 GB will be allocated per node for a total of 625 GB for the entire cluster.
RBAC is enabled.
Recommended Aws Machine type: c5.4xlarge. For more information, see the AWS Instance Types.
The following recommendations will assist in reducing the cost of a cloud based Kubernetes Wallaroo cluster.
Turn off the cluster when not in use. An AWS EKS (Elastic Kubernetes Services) cluster can be turn off when not in use, then turned back on again when needed. If organizations adopt this process, be aware of the following issues:
IP Address Reassignment: The load balancer public IP address may be reassigned when the cluster is restarted by the cloud service unless a static IP address is assigned. For more information in Amazon Web Services see the Associate Elastic IP addresses with resources in your VPC user guide.
Assign to a Single Availability Zone: Clusters that span multiple availability zones may have issues accessing persistent volumes that were provisioned in another availability zone from the node when the node is restarted. The simple solution is to assign the entire cluster into a single availability zone. For more information in Amazon Web Services see the Regions and Zones guide.
The scripts and configuration files are set up to create the AWS environment for a Wallaroo instance are based on a single availability zone. Modify the script as required for your organization.
Community Cluster Setup Instructions
The following is based on the requirements for Wallaroo Community. Note that Wallaroo Community does not use adaptive nodepools. Adapt the settings as required for your organization’s needs, as long as they meet the prerequisites listed above.
This sample YAML file can be downloaded from here:
eksctl: A command line tool for managing Amazon EKS clusters from a configured YAML file. See the EKSCTL Install Guide for more details.
kubectl: This interfaces with the Kubernetes server created in the Wallaroo environment.
kots Version: Used to manage software installed in a Kubernetes environment.
Create the Cluster
Create the cluster with the following command, which creates the environment and sets the correct Kubernetes version.
eksctl create cluster -f aws.yaml
During the process the Kuberntes credentials will be copied into the local environment. To verify the setup is complete, use the kubectl get nodes command to display the available nodes as in the following example:
kubectl get nodes
NAME STATUS ROLES AGE VERSION
ip-192-168-21-253.us-east-2.compute.internal Ready <none> 13m v1.23.8-eks-9017834
ip-192-168-30-36.us-east-2.compute.internal Ready <none> 13m v1.23.8-eks-9017834
ip-192-168-55-123.us-east-2.compute.internal Ready <none> 12m v1.23.8-eks-9017834
ip-192-168-79-70.us-east-2.compute.internal Ready <none> 13m v1.23.8-eks-9017834
Setup Azure Environment for Wallaroo
The following instructions are made to assist users set up their Microsoft Azure Kubernetes environment for running Wallaroo Community. These represent a recommended setup, but can be modified to fit your specific needs.
The Kubernetes cluster must include the following minimum settings:
Nodes must be OS type Linux the containerd driver as the default.
Role-based access control (RBAC) must be enabled.
Minimum of 4 nodes, each node with a minimum of 8 CPU cores and 16 GB RAM. 50 GB will be allocated per node for a total of 625 GB for the entire cluster.
RBAC is enabled.
Minimum machine type is set to to Standard_D8s_v4.
Azure Cluster Recommendations
The following recommendations will assist in reducing the cost of a cloud based Kubernetes Wallaroo cluster.
Turn off the cluster when not in use. An Azure Kubernetes Service (AKS) cluster can be turn off when not in use, then turned back on again when needed to save on costs. For more information on starting and stopping an AKS cluster, see the Stop and Start an Azure Kubernetes Service (AKS) cluster guide.
If organizations adopt this process, be aware of the following issues:
Assign to a Single Availability Zone: Clusters that span multiple availability zones may have issues accessing persistent volumes that were provisioned in another availability zone from the node when the cluster is restarted. The simple solution is to assign the entire cluster into a single availability zone. For more information in Microsoft Azure see the Create an Azure Kubernetes Service (AKS) cluster that uses availability zones guide.
The scripts and configuration files are set up to create the Azure environment for a Wallaroo instance are based on a single availability zone. Modify the script as required for your organization.
The Azure Resource Group used for the Kubernetes environment.
WALLAROO_GROUP_LOCATION
eastus
The region that the Kubernetes environment will be installed to.
WALLAROO_CONTAINER_REGISTRY
wallarooceacr
The Azure Container Registry used for the Kubernetes environment.
WALLAROO_CLUSTER
wallarooceaks
The name of the Kubernetes cluster that Wallaroo is installed to.
WALLAROO_SKU_TYPE
Base
The Azure Kubernetes Service SKU type.
WALLAROO_NODEPOOL
wallaroocepool
The main nodepool for the Kubernetes cluster.
WALLAROO_VM_SIZE
Standard_D8s_v4
The VM type used for the standard Wallaroo cluster nodes.
WALLAROO_CLUSTER_SIZE
4
The number of nodes in the cluster.
Quick Setup Script
The following sample script creates an Azure Kubernetes environment ready for use with Wallaroo Community. This script requires the following prerequisites listed above.
Modify the installation file to fit for your organization. The only parts that require modification are the variables listed in the beginning as follows:
The following steps are geared towards a standard Linux or macOS system that supports the prerequisites listed above. Modify these steps based on your local environment.
Download the script above.
In a terminal window set the script status as execute with the command chmod +x wallaroo_community_azure_install.bash.
Modify the script variables listed above based on your requirements.
Run the script with either bash wallaroo_community_azure_install.bash or ./wallaroo_community_azure_install.bash from the same directory as the script.
Manual Setup Guide
The following steps are guidelines to assist new users in setting up their Azure environment for Wallaroo. Feel free to replace these with commands with ones that match your needs.
The following are used for the example commands below. Replace them with your specific environment settings:
Azure Resource Group: wallarooCEGroup
Azure Resource Group Location: eastus
Azure Container Registry: wallarooCEAcr
Azure Kubernetes Cluster: wallarooCEAKS
Azure Container SKU type: Base
Azure Nodepool Name: wallarooCEPool
Setting up an Azure AKS environment is based on the Azure Kubernetes Service tutorial, streamlined to show the minimum steps in setting up your own Wallaroo environment in Azure.
This follows these major steps:
Create an Azure Resource Group
Create an Azure Container Registry
Create the Azure Kubernetes Environment
Set Variables
The following are the variables used in the environment setup process. Modify them as best fits your organization’s needs.
To create an Azure Resource Group for Wallaroo in Microsoft Azure, use the following template:
az group create --name $WALLAROO_RESOURCE_GROUP --location $WALLAROO_GROUP_LOCATION
(Optional): Set the default Resource Group to the one recently created. This allows other Azure commands to automatically select this group for commands such as az aks list, etc.
az configure --defaults group=$WALLAROO_RESOURCE_GROUP
Create an Azure Container Registry
An Azure Container Registry(ACR) manages the container images for services includes Kubernetes. The template for setting up an Azure ACR that supports Wallaroo is the following:
And now we can create our Kubernetes service in Azure that will host our Wallaroo that meet the prerequisites. Modify the settings to meet your organization’s needs. This creates a 4 node cluster with a total of 32 cores.
Once the Kubernetes environment is complete, associate it with the local Kubernetes configuration by importing the credentials through the following template command:
az aks get-credentials --resource-group $WALLAROO_RESOURCE_GROUP --name $WALLAROO_CLUSTER
Verify the cluster is available through the kubectl get nodes command.
kubectl get nodes
NAME STATUS ROLES AGE VERSION
aks-mainpool-37402055-vmss000000 Ready agent 81m v1.23.8
aks-mainpool-37402055-vmss000001 Ready agent 81m v1.23.8
aks-mainpool-37402055-vmss000002 Ready agent 81m v1.23.8
aks-mainpool-37402055-vmss000003 Ready agent 81m v1.23.8
Setup GCP Environment for Wallaroo
The following instructions are made to assist users set up their Google Cloud Platform (GCP) Kubernetes environment for running Wallaroo. These represent a recommended setup, but can be modified to fit your specific needs. In particular, these instructions will provision a GKE cluster with 32 CPUs in total. Please ensure that your project’s resource limits support that.
Quick Setup Guide: Download a bash script to automatically set up the GCP environment through the Google Cloud Platform command line interface gcloud.
Manual Setup Guide: A list of the gcloud commands used to create the environment through manual commands.
The following video demonstrates the manual guide:
GCP Prerequisites
Organizations that wish to run Wallaroo in their Google Cloud Platform environment must complete the following prerequisites:
The following recommendations will assist in reducing the cost of a cloud based Kubernetes Wallaroo cluster.
Turn off the cluster when not in use. A GCP Google Kubernetes Engine (GKE) cluster can be turn off when not in use, then turned back on again when needed. If organizations adopt this process, be aware of the following issues:
IP Address Reassignment: The load balancer public IP address may be reassigned when the cluster is restarted by the cloud service unless a static IP address is assigned. For more information in Google Cloud Platform see the Configuring domain names with static IP addresses user guide.
Assign to a Single Availability Zone: Clusters that span multiple availability zones may have issues accessing persistent volumes that were provisioned in another availability zone from the node when the cluster is restarted. The simple solution is to assign the entire cluster into a single availability zone. For more information in Google Cloud Platform see the Regions and zones guide.
The scripts and configuration files are set up to create the GCP environment for a Wallaroo instance are based on a single availability zone. Modify the script as required for your organization.
The name of the Google Project used for the Wallaroo instance.
WALLAROO_CLUSTER
wallaroo-ce
The name of the Kubernetes cluster for the Wallaroo instance.
WALLAROO_GCP_REGION
us-central1
The region the Kubernetes environment is installed to. Update this to your GCP Computer Engine region.
WALLAROO_NODE_LOCATION
us-central1-f
The location the Kubernetes nodes are installed to. Update this to your GCP Compute Engine Zone.
WALLAROO_GCP_NETWORK_NAME
wallaroo-network
The Google network used with the Kubernetes environment.
WALLAROO_GCP_SUBNETWORK_NAME
wallaroo-subnet-1
The Google network subnet used with the Kubernetes environment.
WALLAROO_GCP_MACHINE_TYPE
e2-standard-8
Recommended VM size per GCP node.
WALLAROO_CLUSTER_SIZE
4
Number of nodes installed into the cluster. 4 nodes will create a 32 core cluster.
Quick Setup Script
A sample script is available here, and creates a Google Kubernetes Engine cluster ready for use with Wallaroo Community. This script requires the prerequisites listed above, and uses the variables as listed in Standard Setup Variables.
The following steps are geared towards a standard Linux or macOS system that supports the prerequisites listed above. Modify these steps based on your local environment.
Download the script above.
In a terminal window set the script status as execute with the command chmod +x bash wallaroo_community_gcp_install.bash.
Modify the script variables listed above based on your requirements.
Run the script with either bash wallaroo_community_gcp_install.bash or ./wallaroo_community_gcp_install.bash from the same directory as the script.
Manual Setup Guide
The following steps are guidelines to assist new users in setting up their GCP environment for Wallaroo. Feel free to replace these with commands with ones that match your needs.
See the Google Cloud SDK for full details on commands and settings.
The commands below are set to meet the prerequisites listed above, and uses the variables as listed in Standard Setup Variables. Modify them as best fits your organization’s needs.
Set Variables
The following are the variables used in the environment setup process. Modify them as best fits your organization’s needs.
First create a GCP network that is used to connect to the cluster with the gcloud compute networks create command. For more information, see the gcloud compute networks create page.
Once the network is created, the gcloud container clusters create command is used to create a cluster. For more information see the gcloud container clusters create page.
The command can take several minutes to complete based on the size and complexity of the clusters. Verify the process is complete with the clusters list command:
To verify the Kubernetes credentials for your cluster have been installed locally, use the kubectl get nodes command. This will display the nodes in the cluster as demonstrated below:
kubectl get nodes
NAME STATUS ROLES AGE VERSION
gke-wallaroo-ce-default-pool-863f02db-7xd4 Ready <none> 39m v1.21.6-gke.1503
gke-wallaroo-ce-default-pool-863f02db-8j2d Ready <none> 39m v1.21.6-gke.1503
gke-wallaroo-ce-default-pool-863f02db-hn06 Ready <none> 39m v1.21.6-gke.1503
gke-wallaroo-ce-default-pool-3946eaca-4l3s Ready <none> 39m v1.21.6-gke.1503
Troubleshooting
What does the error ‘Insufficient project quota to satisfy request: resource “CPUS_ALL_REGIONS”’ mean?
Make sure that the Compute Engine Zone and Region are properly set based on your organization’s requirements. The instructions above default to us-central1, so change that zone to install your Wallaroo instance in the correct location.
In the case of the script, this would mean changing the region and location from:
Wallaroo Community can be installed into a Kubernetes cloud environment, or into a Kubernetes environment that meets the Wallaroo Prerequisites Guide. Organizations that use the Wallaroo Community AWS EC2 Setup procedure do not have to set up a Kubernetes environment, as it is already configured for them.
If the prerequisites are already configured, jump to Install Wallaroo to start installing.
This video demonstrates that procedure:
The procedure assumes at least a basic knowledge of Kubernetes and how to use the kubectl and kots version 1.91.3 applications.
You have downloaded your Wallaroo Community License file.
Install Wallaroo
The environment is ready, the tools are installed - let’s install Wallaroo! The following will use kubectl and kots through the following procedure:
Install the Wallaroo Community Edition using kots install wallaroo/ce, specifying the namespace to install. For example, if wallaroo is the namespace, then the command is:
Wallaroo Community Edition will be downloaded and installed into your Kubernetes environment in the namespace specified. When prompted, set the default password for the Wallaroo environment. When complete, Wallaroo Community Edition will display the URL for the Admin Console, and how to end the Admin Console from running.
• Deploying Admin Console
• Creating namespace ✓
• Waiting for datastore to be ready ✓
Enter a new password to be used for the Admin Console: •••••••••••••
• Waiting for Admin Console to be ready ✓
• Press Ctrl+C to exit• Go to http://localhost:8800 to access the Admin Console
Wallaroo Community edition will continue to run until terminated. To relaunch in the future, use the following command:
kubectl-kots admin-console --namespace wallaroo
Initial Configuration and License Upload Procedure
Once Wallaroo Community edition has been installed for the first time, we can perform initial configuration and load our Wallaroo Community license file through the following process:
If Wallaroo Community Edition has not started, launch it with the following command:
❯ kubectl-kots admin-console --namespace wallaroo
  • Press Ctrl+C to exit
  • Go to http://localhost:8800 to access the Admin Console
Enter the Wallaroo Community Admin Console address into a browser. You will be prompted for the default password as set in the step above. Enter it and select Log in.
Upload your license file.
The Configure Wallaroo Community page will be displayed which allows you to customize your Wallaroo environment. For now, scroll to the bottom and select Continue. These settings can be customized at a later date.
The Wallaroo Community Admin Console will run the preflight checks to verify that all of the minimum requirements are not met. This may take a few minutes. If there are any issues, Wallaroo can still be launched but may not function properly. When ready, select Continue.
The Wallaroo Community Dashboard will be displayed. There may be additional background processes that are completing their setup procedures, so there may be a few minute wait until those are complete. If everything is ready, then the Wallaroo Dashboard will show a green Ready.
Under the license information is the DNS entry for your Wallaroo instance. This is where you and other users of your Wallaroo instance can log in. In this example, the URL will be https://beautiful-horse-9537.wallaroo.community. Note that it may take a few minutes for the DNS entries to propagate and this URL to be available.
You will receive an email invitation for the email address connected to this URL with a temporary password and a link to this Wallaroo instance’s URL. Either enter the URL for your Wallaroo instance or use the link in the email.
To login to your new Wallaroo instance, enter the email address and temporary password associated with the license.
With that, Wallaroo Community edition is launched and ready for use! You can end the Admin Console from your terminal session above. From this point on you can just use the Wallaroo instance URL.
Now that your Wallaroo Community edition has been installed, let’s work with some sample models to show off what you can do. Check out either the Wallaroo 101 if this is your first time using Wallaroo, or for more examples of how to use Wallaroo see the Wallaroo Tutorials.
Troubleshooting
Issue
If you see an error similar to failed to deploy admin console: failed to wait for {some node}: timeout waiting for {some node}, it may be because the connection between your local system and the cloud service is slow, or related issues.
If this occurs, adding the option --wait-duration 5m give enough time for nodes to finish starting.
1.4 - Installation Configurations
Guides for different install options for Wallaroo
The following guides demonstrate how to install Wallaroo with different options to best fit your organizations needs, and are meant to supplement the standard install guides.
The following diagram displays the architecture for this service.
Users and application integrations connect to Jupyter Lab and the Wallaroo ML Ops APIs hosted in an AKS cluster.
Wallaroo cluster services are hosted in a Kubernetes namespace and manage deployments of ML models.
ML models are deployed in AKS to scale across as many VMs as needed to handle the load.
ML inference services are provided via a web API to allow integration with data storage systems or other services.
1.4.2 - Create GPU Nodepools for Kubernetes Clusters
How to create GPU nodepools for Kubernetes clusters.
Wallaroo provides support for ML models that use GPUs. The following templates demonstrate how to create a nodepool in different cloud providers, then assign that nodepool to an existing cluster. These steps can be used in conjunction with Wallaroo Enterprise Install Guides.
Note that deploying pipelines with GPU support is only available for Wallaroo Enterprise.
The following script creates a nodepool with NVidia Tesla K80 gpu using the Standard_NC6 machine type and autoscales from 0-3 nodes. Each node has one GPU in this example so the max .gpu() that can be requested by a pipeline step is 1.
The following script creates a nodepool uses NVidia T4 GPUs and autoscales from 0-3 nodes. Each node has one GPU in this example so the max .gpu() that can be requested by a pipeline step is 1.
Google GKE automatically adds the following taint to the created nodepool.
# aws-gpu-nodepool.yamlapiVersion: eksctl.io/v1alpha5
kind: ClusterConfig
metadata:
name: YOUR CLUSTER NAME HERE # This must match the name of the existing clusterregion: YOUR REGION HERE
managedNodeGroups:
- name: YOUR NODEPOOL NAME HERE
instanceType: g5.2xlarge
minSize: 1maxSize: 3labels:
wallaroo.ai/gpu: "true"doc-gpu-label: "true"taints:
- key: wallaroo.ai/engine
value: "true"effect: NoSchedule
tags:
k8s.io/cluster-autoscaler/node-template/label/k8s.dask.org/node-purpose: engine
k8s.io/cluster-autoscaler/node-template/taint/k8s.dask.org/dedicated: "true:NoSchedule"iam:
withAddonPolicies:
autoScaler: truecontainerRuntime: containerd
amiFamily: AmazonLinux2
availabilityZones:
- INSERT YOUR ZONE HERE
volumeSize: 100
How to install Wallaroo with disabled services for lower core environments
The following system requirements are required for the minimum settings for running Wallaroo in a Kubernetes cloud cluster.
The following system requirements are required for the minimum settings for running Wallaroo in a Kubernetes cloud cluster.
Minimum number of nodes: 4
Minimum Number of CPU Cores: 8
Minimum RAM per node: 16 GB
Minimum Storage: A total of 625 GB of storage will be allocated for the entire cluster based on 5 users with up to four pipelines with five steps per pipeline, with 50 GB allocated per node, including 50 GB specifically for the Jupyter Hub service. Enterprise users who deploy additional pipelines will require an additional 50 GB of storage per lab node deployed.
Wallaroo recommends at least 16 cores total to enable all services. At less than 16 cores, services will have to be disabled to allow basic functionality as detailed in this table.
Note that even when disabling these services, Wallaroo performance may be impacted by the models, pipelines, and data used. The greater the size of the models and steps in a pipeline, the more resources will be required for Wallaroo to operate efficiently. Pipeline resources are set by the pipeline configuration to control how many resources are allocated from the cluster to maintain peak effectiveness for other Wallaroo services. See the following guides for more details.
The Wallaroo inference engine that performs inference requests from deployed pipelines.
Dashboard
✔
✔
✔
The graphics user interface for configuring workspaces, deploying pipelines, tracking metrics, and other uses.
Jupyter HUB/Lab
The JupyterHub service for running Python scripts, JupyterNotebooks, and other related tasks within the Wallaroo instance.
Single Lab
✔
✔
✔
Multiple Labs
✘
✔
✔
Prometheus
✔
✔
✔
Used for collecting and reporting on metrics. Typical metrics are values such as CPU utilization and memory usage.
Alerting
✘
✔
✔
Model Validation
✘
✔
✔
Dashboard Graphs
✔
✔
✔
Plateau
✘
✔
✔
A Wallaroo developed service for storing inference logs at high speed. This is not a long term service; organizations are encouraged to store logs in long term solutions if required.
Model Insights
✘
✔
✔
Python API
Model Conversion
✔
✔
✔
Converts models into a native runtime for use with the Wallaroo inference engine.
To install Wallaroo with minimum services, a configuration file will be used as parts of the kots based installation. For full details on the Wallaroo installation process, see the Wallaroo Install Guides.
Wallaroo Installation with less than 16 Cores
To install Wallaroo with less than 16 cores and 8 cores or greater, the following services must be disabled:
Model Conversion
Model Insights
Plateau
The following configuration settings can be used at the installation procedure to disable these services.
Download
A sample file wallaroo-install-8-cores.yaml is available from the following link:
Organizations that share their Kubernetes environment with other applications may want to install Wallaroo to specific nodes in their cluster. The following guide demonstrates how to install a Wallaroo instance into specific nodes in the Kubernetes cluster.
Users who are familiar with Kubernetes clusters can skip ahead directly to the Install Steps.
Description
When installed into a Kubernetes cluster, Wallaroo will use available nodes to maximize its performance. Some organizations may use specific nodepools or nodes for specific applications.
One option is to use Kubernetes metadata to assign Node labels to nodes, then specify that Wallaroo can be installed into specific nodes that match that label. This can be done with specifying configuration options during the install process using the kots option --config-values={CONFIG YAML FILE}. For more information, see the kots set config documentation.
Install Steps
In this example, an instance of Wallaroo Community will be installed into a Kubernetes cluster that has four nodes assigned with the label wallaroo.ai/node=true;
kubectl get nodes
NAME STATUS ROLES AGE VERSION
aks-mainpool-18670167-vmss000000 Ready agent 84m v1.23.8
aks-wallarooai-12293194-vmss000000 Ready agent 75m v1.23.8
aks-wallarooai-12293194-vmss000001 Ready agent 75m v1.23.8
aks-wallarooai-12293194-vmss000002 Ready agent 75m v1.23.8
aks-wallarooai-12293194-vmss000003 Ready agent 75m v1.23.8
kubectl get nodes -l wallaroo.ai/node=trueNAME STATUS ROLES AGE VERSION
aks-wallarooai-12293194-vmss000000 Ready agent 75m v1.23.8
aks-wallarooai-12293194-vmss000001 Ready agent 75m v1.23.8
aks-wallarooai-12293194-vmss000002 Ready agent 75m v1.23.8
aks-wallarooai-12293194-vmss000003 Ready agent 75m v1.23.8
Create a kots configuration file and specify the label to use for installing nodes. For this example, we will use wallaroo.ai/node: "true" as the label. Any nodes with that label will be used by Wallaroo during the installation. For this example, this configuration is saved to the file test-node.yaml.
• Deploying Admin Console
• Creating namespace ✓
• Waiting for datastore to be ready ✓
• Waiting for Admin Console to be ready ✓
• Press Ctrl+C to exit• Go to http://localhost:8800 to access the Admin Console
Proceed with the installation as normal, including uploading the required license file, etc.
Once complete, verify Wallaroo was installed to specific nodes with the kubectl get pods command. The following shows the pods in the wallaroo namespace where the Wallaroo Community instance was installed, and the pods used for the deployed pipeline ccfraudpipeline.
kubectl get pods --all-namespaces -o=custom-columns=NAME:.metadata.name,Namespace:.metadata.namespace,Node:.spec.nodeName
For other instructions on how to deploy or configure a Wallaroo instance, see the Wallaroo Operations Guides.
1.4.5 - Taints and Tolerations Guide
Configure custom taints and toleration for a cluster for Wallaroo
Organizations can customize the taints and tolerances for their Kubernetes cluster running Wallaroo. Nodes in a Kubernetes cluster can have a taint applied to them. Any pod that does not have a toleration matching the taint can be rejected and will not be applied to that node.
This allows organizations to determine which pods can be accepted or rejected into specific nodes, reserving their Kubernetes resources for other services. Combined with the Install Wallaroo to Specific Nodes guide this ensures that Wallaroo pods are contained to specific cluster nodes, and prevents non-Wallaroo pods from being scheduled into the same nodes to reserve those resources for the Wallaroo instance.
In this example, the node Postgres has the taint wallaroo.ai/postgres=true:NoSchedule. The pod postgres has the tolerance wallaroo.ai/postgres:NoSchedule op=Exists, so it is scheduled into the node Postgres. The pod nginx has no tolerations, so it is not scheduled into the node Postgres.
The Wallaroo Enterprise Install Guides specify default taints applied to nodepools. These can be used to contain pod scheduling only to specific nodes where the pod tolerations match the nodes taints. By default, the following nodepools and their associated taints are created
After Wallaroo release September 2022 (Codename Cobra):
Nodepool
Taints
postgres
wallaroo.ai/postgres=true:NoSchedule
enginelb
wallaroo.ai/enginelb=true:NoSchedule
engine
wallaroo.ai/engine=true:NoSchedule
mainpool
N/A
Before Wallaroo release September 2022 (Code name Mustang and before)
Nodepool
Taints
postgres
wallaroo-postgres=true:NoSchedule
enginelb
wallaroo-enginelb=true:NoSchedule
engine
wallaroo-engine=true:NoSchedule
mainpool
N/A
The nodepool mainpool is not assigned any taints to allow other Kubernetes services to run as part of the cluster.
The taint wallaroo.ai/reserved=true:NoSchedule can be applied to other nodepools. This allows additional Wallaroo resources to be scheduled in those nodes while rejecting other pods that do not have a matching toleration.
Default Tolerations
By default, the following tolerations are applied for Wallaroo pods. Organizations can add a corresponding Any pod that does not contain a taint to match these tolerances will have the condition effect:NoSchedule for the specified node.
Toleration key for all Wallaroo pods
wallaroo.ai/reserved
Engine toleration key
wallaroo.ai/engine
Engine LB toleration key
wallaroo.ai/enginelb
Postgres toleration key
wallaroo.ai/postgres
Note that these taint values are applied to the nodepools as part of the Wallaroo Enterprise Setup guides. They are not typically set up or required for Wallaroo Community instances.
Custom Tolerations
To customize the tolerations applied to Wallaroo nodes, the following prerequisites must be met:
Access to the Kubernetes environment running the Wallaroo instances.
Have kubectl and kots installed and connected to the Kubernetes environment.
From a terminal with kubectl and kots installed and connected to the Kubernetes environment, run:
kubectl kots admin-console --namespace wallaroo
This will provide access to the Wallaroo Administrative Dashboard through http://localhost:8800:
  • Press Ctrl+C to exit
  • Go to http://localhost:8800 to access the Admin Console
Launch a browser and connect to http://localhost:8800.
Enter the password created during the Wallaroo Install process. The Wallaroo Administrative Dashboard will now be available.
From the Wallaroo Administrative Dashboard, select Config -> Taints and Tolerations.
Set the custom tolerations as required by your organization. The following nodes and tolerations can be changed:
Toleration key for all Wallaroo pods
Default value: wallaroo.ai/reserved
Engine toleration key
Default value: wallaroo.ai/engine
Engine LB toleration key
Default value: wallaroo.ai/enginelb
Postgres toleration key
Default value: wallaroo.ai/postgres
1.5 - Installation Troubleshooting Guide
Troubleshooting
I’m Getting a Timeout Error
Depending on the connection and resources, the installation process may time out. If that occurs, use the --wait-duration flag to provide additional time. The time must be provided in Go duration format (for example: 60s, 1m, etc). The following example extends the wait duration to 10 minutes:
If your system does not meet all of the preflight requirements, the installation process may fail when performing an automated installation. It is highly recommended to install Wallaroo on a system that meets all requirements or else performance will be degraded.
Before continuing, use the following command and note down any and all pre-flight checks that are listed as a failure. The license will be installed in later steps through the browser.
install wallaroo/ea -n wallaroo
To ignore preflight checks, use the --skip-preflights flag, as in the following example (Note: This is not recommended, only provided as an example.):
When Launching JupyterHb, I get a Server 500 error
If you shut down and restart a Wallaroo instance in a new environment or change the IP address, some settings may not be updated. Run the following command to restart the deployment process and update the settings to match the current environment. Note that the namespace wallaroo is used - modify this to match the environment where Wallaroo is installed.
If the install procedure for Wallaroo goes awry, one option is to uninstall the incomplete Wallaroo installation and start again. The following procedure will remove Wallaroo from a Kubernetes cluster.
WARNING
This procedure will delete all Wallaroo data from the Kubernetes environment. Make sure that all data is backed up before proceeding with the uninstall process.
Remove all Kubernetes namespaces that correlate to a Wallaroo pipeline with the kubectl delete namespaces {list of namespaces}command except the following : default, kube* (any namespaces with kube before it), and wallaroo. wallaroo will be removed in the next step.
For example, in the following environment model1 and model2 would be deleted with the following:
  -> kubectl get namespaces
    NAME			    STATUS        AGE
    default		        Active        7d4h
    kube-node-lease	    Active		    7d4h
    kube-public		    Active		    7d4h
    model1               Active         4h23m
    model2               Active         4h23m
    wallaroo             Active         3d6h

    kubectl delete namespaces model1 model2
Use the following bash script or run the commands individually. Warning: If the selector is incorrect or missing from the kubectl command, the cluster could be damaged beyond repair.
Once complete, the kubectl get namespaces will return only the default namespaces:
❯ kubectl get namespaces
NAME              STATUS   AGE
default           Active   3h47m
kube-node-lease   Active   3h47m
kube-public       Active   3h47m
kube-system       Active   3h47m
Wallaroo can now be reinstalled into this environment.
2 - Wallaroo General Guide
How to perform the most common tasks in Wallaroo
The Wallaroo General Guide details how to perform the most common tasks in Wallaroo.
Install Wallaroo
For devops or system administrators who will be installing Wallaroo, see the following guides:
Wallaroo Install Guides: How to prepare your environment for Wallaroo and install Wallaroo into your Kubernetes cloud environment, along with tips on other local software requirements.
How to Login The First Time to Wallaroo Community
Before logging into to Wallaroo for the first time, you’ll have received an email inviting you to your new Wallaroo instance and a temporary email to use.
To login to Wallaroo Community for the first time:
The Wallaroo Invitation email will contain:
Your temporary password.
A link to your Wallaroo instance.
Select the link to your Wallaroo instance.
Select Sign In.
Login using your email address and the temporary password from the Invitation email.
Once you have successfully authenticated, you will be prompted to create your own password.
When finished, you will be able to login to your Wallaroo instance in the future using your registered email address and new password.
How to Login the First Time to Wallaroo Enterprise
Wallaroo Enterprise users are created either as local users, or through other authentication services such as GitHub or Google Cloud Platform. For more information, see the Wallaroo Enterprise User Management Guide. Local users will be provided a temporary password by their devops team.
To log into Wallaroo Enterprise for the first time as a local user:
Access the Wallaroo Dashboard provided by your devops team.
Select Sign In.
Login using your email address and the temporary password provided by your devops team.
Once you have successfully authenticated, you will be prompted to create your own password.
When finished, you will be able to login to your Wallaroo instance in the future using your registered email address and new password.
How to Login to Your Wallaroo Instance
To login to your Wallaroo instance with an existing username and password:
From your browser, enter the URL for your Wallaroo instance. This is provided either during the installation process or when you are invited to a Wallaroo environment.
Select Sign In.
Enter your username and password.
Exploring the Wallaroo Dashboard
Once you have logged into your Wallaroo instance, you will be presented with the Wallaroo dashboard. From here, you can perform the following actions:
A Change Current Workspace and Workspace Management: Select the workspace to work in. Each workspace has it’s own Models and Pipelines. For more information, see Workspace Management.
B Pipeline Management: View information on this workspace’s pipelines. For more information, see Pipeline Management.
C Model Management: View information on this workspace’s models. For more information, see Model Management.
D User Management: Add users to your instance, or to your current workspace. For more information, see either User Management or Workspace Management.
E Access Jupyter Hub: Access the Jupyter Hub to run Jupyter Notebooks and shell access to your Wallaroo Instance. For more information, see either the Quick Start Guides for sample Jupyter Notebooks, data and models to learn how to use Wallaroo, or the Wallaroo Developer Guides for developers.
F View Collaborators: Displays a list of users who have been granted to this workspace.
How to Connect to Jupyter Hub
Jupyter Hub has been integrated as a service for Wallaroo. To access your Wallaroo instance’s Jupyter Hub service:
Login to your Wallaroo instance.
From the right navigation panel, select View Jupyter Hub.
A new tab will connect you to your Jupyter Hub service.
How to Log Out of Wallaroo
To log out of your Wallaroo instance:
Select the Wallaroo icon in the upper right hand corner.
Select Logout.
3 - Wallaroo User Management
How to manage new and existing users in your Wallaroo environment.
The following shows Wallaroo users in adding other participants to their Wallaroo environment. Some user management tasks are allocated to the Workspace Management, such as adding or removing users from a specific workspace.
This guide is split into two segments: Wallaroo Community Edition and Wallaroo Enterprise Edition. The critical differences in user management between the Wallaroo Community and Wallaroo Enterprise edition are:
Wallaroo Community allows up to 5 users to be active in a single Wallaroo instance, while Enterprise has no such restrictions.
Wallaroo Community users are administrated locally while Wallaroo Enterprise allows for other administrative services including GitHub, Google Cloud Platform, and other services.
3.1 - Wallaroo Community User Management
How to manage new and existing users in your Wallaroo Community environment.
Wallaroo Community User Management
How to Invite a User to a Wallaroo Instance
Note: Up to two users can work together in the same Wallaroo Community instance, while the Wallaroo Enterprise version has no user restrictions.
To invite another user to your Wallaroo instance:
Login to your Wallaroo instance.
Select Invite Users from the upper right hand corner of the Wallaroo Dashboard.
Under the Invite Users module, enter the email address for each user to invite.
When finished, select Send Invitations.
Each user will be sent a link to login to your Wallaroo instance. See the General Guide for more information on the initial login process.
3.2 - Wallaroo Enterprise User Management
How to manage new and existing users in your Wallaroo Enterprise environment.
Wallaroo Enterprise User Management
Wallaroo uses Keycloak for user authentication, authorization, and management. Enterprise customers can manage their users in Keycloak through its web-based UI, or programmatically through Keycloak’s REST API.
In enterprise deployments customers store their Wallaroo user accounts either directly in Keycloak or utilize its User Federation feature. Integration with external/public Identity Providers (such as popular social networks) is not expected at this time.
The Keycloak instance deployed in the wallaroo Kubernetes namespace comes pre-configured with a single administrator user in the Master realm. All users must be managed within that realm.
Accessing The Wallaroo Keycloak Dashboard
Enterprise customers may access their Wallaroo Keycloak dashboard by navigating to https://<prefix>.keycloak.<suffix>, depending on their choice domain prefix and suffix supplied during installation.
Obtaining Administrator Credentials
The standard Wallaroo installation creates the user admin by default and assigns them a randomly generated password. The admin user credentials are obtained which may be obtained directly from Kubernetes with the following commands, assuming the Wallaroo instance namespace is wallaroo.
In the Keycloak Administration Console, click Manage -> Users in the left-hand side menu. Click the View all users button to see existing users.
Adding Users
To add a user through the Keycloak interface:
Click the Add user button in the top-right corner.
Enter the following:
A unique username and email address.
Ensure that the Email Verified checkbox is checked - Wallaroo does not perform email verification.
Under Required User Actions, set Update Password so the user will update their password the next time they log in.
Click Save.
Once saved, select Credentials tab, then the Set Password section, enter the new user’s desired initial password in the Password and Password Confirmation fields.
Click Set Password. Confirm the action when prompted. This will force the user to set their own password when they log in to Wallaroo.
Wallaroo simplifies this task with a small Python script, which can be utilized in a Jupyter notebook running in the wallaroo namespace through the following process:
Create a new Python file: In your JupyterHub workspace, create a new Python file named keycloak.py and populate it with the following:
Obtain an authentication token: Before invoking any methods, you must obtain a fresh authentication token by calling get_token() method. This will obtain a new token, which is valid for 60 seconds, and cache it in the client.
kc.get_token()
Listing existing users
To list existing users, use the Keycloak list_users method:
resp=kc.list_users()
resp.json()
Creating new users
To create a new user, use the Keycloak create_user() and supply their unique username, password, as well as a unique email address:
If successful, the return value will be the new user’s unique identifier generated by Keycloak.
3.3 - Wallaroo Enterprise User Management Troubleshooting
How to manage correct common user issues.
When a new user logs in for the first time, they get an error when uploading a model or issues when they attempt to log in. How do I correct that?
When a new registered user attempts to upload a model, they may see the following error:
TransportQueryError:
{'extensions':
    {'path':
        '$.selectionSet.insert_workspace_one.args.object[0]', 'code': 'not-supported'
    },
    'message':
        'cannot proceed to insert array relations since insert to table "workspace" affects zero rows'
Or if they log into the Wallaroo Dashboard, they may see a Page not found error.
This is caused when a user has been registered without an appropriate email address. See the user guides here on inviting a user, or the Wallaroo Enterprise User Management on how to log into the Keycloak service and update users. Verify that the username and email address are both the same, and they are valid confirmed email addresses for the user.
Wallaroo supports Single Sign-On (SSO) authentication through multiple providers. The following guides demonstrate how to enable SSO for different services.
3.4.1 - Wallaroo SSO for Amazon Web Services
Enable SSO authentication to Wallaroo from AWS
Organizations can use Amazon Web Services (AWS) as an identity provider for single sign-on (SSO) logins for users with Wallaroo Enterprise.
IMPORTANT NOTE
These instructions are for Wallaroo Enterprise edition only.
To enable AWS as an authentication provider to a Wallaroo instance:
Using AWS as a single sign-on identity provider within Wallaroo requires access to the Wallaroo instance’s Keycloak service. This process will require both the IAM Identity Center and Wallaroo Keycloak service be available at the same time to copy information between the two. When starting this process, do not close the Wallaroo Keycloak browser window or the AWS IAM Identity Center without completing all of the steps until Verify the Login.
From the Wallaroo instance, login to the Keycloak service. This will commonly be $PREFIX.keycloak.$SUFFIX. For example, playful-wombat-5555.keycloak.wallaroo.example.
Select Administration Console.
From the left navigation panel, select Identity Providers.
Select Add provider and select SAML v2.0.
Enter the following:
Alias ID: This will be the internal ID of the identity provider. It also sets the Redirect URI used in later steps.
Display Name: The name displayed for users to use in authenticating.
Save the following information:
Redirect URI: This is determined by the Wallaroo DNS Prefix, Wallaroo DNS Suffix, and the Alias ID in the format $PREFIX.keycloak.$SUFFIX/auth/realms/master/broker/$ALIASID/endpoint. For example, playful-wombat-5555.keycloak.wallaroo.example/auth/realms/master/broker/aws/endpoint.
Service Provider Entry ID: This is in the format $PREFIX.keycloak.$SUFFIX/auth/realms/master. For example: playful-wombat-5555.keycloak.wallaroo.example/auth/realms/master.
Create the AWS Credentials
The next step is creating the AWS credentials, and requires access to the organization’s Amazon IAM Identity Center.
From the AWS console, select the IAM Identity Center.
From the IAM Identity Center Dashboard, select Applications then Add application.
Select Custom application->Add custom SAML 2.0 application, then select Next.
Enter the following:
Display name: AWS or something similar depending on your organization’s requirements.
Application metadata:
Application ACS URL: Enter the Redirect URI from [Create the Wallaroo AWS SAML Identity Provider].(#create-the-wallaroo-aws-saml-identity-provider).
Application SAML audience: Enter the Service Provider Entry ID from [Create the Wallaroo AWS SAML Identity Provider].
Select the IAM Identity Center SAML metadata file and copy the URL. Store this for the step [Add AWS Credentials to Wallaroo](#add-aws-credentials-to-wallaroo(#add-aws-credentials-to-wallaroo).
Select Submit.
From the new application, select Actions->Edit attribute mappings.
Enter the following:
Subject (default entry): Set to ${user:email}, with the FormatemailAddress.
Select Add new attribute mapping and set it to email, mapped to ${user:email}, with the FormatemailAddress.
Select Save Changes to complete mapping the attributes.
From the IAM Identity Center Dashboard, select Users. From here, add or select the users or groups that will have access to the Wallaroo instance then select Assign Users.
In Import External IDP Config->Import from URL, enter the IAM Identity Center SAML metadata file saved from Create the AWS Credentials in the field Service Provider Entity ID.
Select Import.
Once the AWS SAMl settings are imported, select Save to store the identity provider.
Verify the Login
Once complete, log out of the Wallaroo instance and go back into the login screen. With the usual username and password screen should also be a AWS link at the bottom or whatever name was set for the identity provider. Select that link to login.
Login to the IAM Application created in Create the AWS Credentials. The first time a user logs in they will be required to add their first and last name. After this, logins will happen as long as the user is logged into the AWS IAM application without submitting any further information.
3.4.2 - Wallaroo SSO for Microsoft Azure
Enable SSO authentication to Wallaroo from Microsoft Azure
Organizations can use Microsoft Azure as an identity provider for single sign-on (SSO) logins for users with Wallaroo Enterprise.
IMPORTANT NOTE
These instructions are for Wallaroo Enterprise edition only.
To enable Microsoft Azure as an authentication provider to a Wallaroo Enterprise instance:
Login into the Microsoft Azure account with an account with permissions to create application registrations.
Select App registrations from the Azure Services menu, or search for App Registrations from the search bar.
From the App registrations screen, select either an existing application, or select + New registration. This example will show creating a new registration.
From the Register an application screen, set the following:
Name: The name of the application.
Supported account types: To restrict only to accounts in the organization directory, select Accounts in this organizational directory only.
Redirect URI: Set the type to Web and the URI. The URI will be based on the Wallaroo instance and the name of the Keycloak Identity Provider set in the step Add Azure Credentials to Wallaroo. This will be a link back to the Keycloak endpoint URL in your Wallaroo instance in the format https://$PREFIX.keycloak.$SUFFIX/auth/realms/master/broker/$IDENTITYNAME/endpoint.
For example, if the Wallaroo prefix is silky-lions-3657, the name of the Wallaroo Keycloak Identity Provider is azure, and the suffix is wallaroo.ai, then the Keycloak endpoint URL would be silky-lions-3657.keycloak.wallaroo.ai/auth/realms/master/broker/azure/endpoint. For more information see the DNS Integration Guide.
Once complete, select Register.
Store the Application ID
From the Overview screen, store the following in a secure location:
With the Azure credentials saved from the Create the Azure Credentials step, they can now be added into the Wallaroo Keycloak service.
Login to the Wallaroo Keycloak service with a Wallaroo admin account from the URL in the format https://$PREFIX.keycloak.$SUFFIX.
For example, if the Wallaroo prefix is silky-lions-3657, the name of the Wallaroo Keycloak Identity Provider is azure, and the suffix is wallaroo.ai, then the Keycloak endpoint URL would be silky-lions-3657.keycloak.wallaroo.ai. For more information see the DNS Integration Guide.
Select Administration Console, then from the left navigation panel select Identity Providers.
From the right Add provider… drop down menu select OpenID Connect v1.0.
From the Add identity provider screen, add the following:
alias: The name of the the Identity Provider. IMPORTANT NOTE: This will determine the Redirect URI value that is used in the Create the Azure Credentials step. Verify that the Redirect URI in both steps are the same.
Display Name: The name that will be shown on the Wallaroo instance login screen.
Client Authentication: Set to Client secret sent as post.
Default Scopes: Set to openid email profile - one space between each word.
Scroll to the bottom of the page and in Import from URL, add the OpenID Connect metadata document created in the Create the Azure Credentials step. Select Import to set the Identity Provider settings.
Once complete, select Save to store the identity provider settings.
Once the Azure Identity Provider settings are complete, log out of the Keycloak service.
Verify the Login
After completing Add Azure Credentials to Wallaroo, the login can be verified through the following steps. This process will need to be completed the first time a user logs into the Wallaroo instance after the Azure Identity Provider settings are added.
Go to the Wallaroo instance login page. The Azure Identity Provider will be displayed under the username and password request based on the Displey Name set in the Add Azure Credentials to Wallaroo step.
Select the Azure Identity Provider to login.
For the first login, grant permission to the application. You may be required to select which Microsoft Azure account is being used to authenticate.
Once complete, the new user will be added to the Wallaroo instance.
3.4.3 - Wallaroo SSO for Google Cloud Platform
Enable SSO authentication to Wallaroo from Google Cloud Platform (GCP)
Organizations can use Google Cloud Platform (GCP) as an identity provider for single sign-on (SSO) logins for users with Wallaroo Enterprise.
IMPORTANT NOTE
These instructions are for Wallaroo Enterprise edition only.
To enable Google Cloud Platform (GCP) as an authentication provider to a Wallaroo instance:
To create the GCP credentials a Wallaroo instance uses to authenticate users:
Log into Google Cloud Platform (GCP) console.
From the left side menu, select APIs and Services -> Credentials.
Select + CREATE CREDENTIALS->Oauth client ID.
Set Application type to Web application.
Set the following options:
Name: The name for this OAuth Client ID.
Authorized redirect URIs: This will be a link back to the Keycloak endpoint URL in your Wallaroo instance in the format https://$PREFIX.keycloak.$SUFFIX/auth/realms/master/broker/google/endpoint.
For example, if the Wallaroo prefix is silky-lions-3657 and the suffix is wallaroo.ai, then the Keycloak endpoint URL would be silky-lions-3657.keycloak.wallaroo.ai/auth/realms/master/broker/google/endpoint. For more information see the DNS Integration Guide.
When the Oauth client is created, the Client ID and the Client Secret will be displayed. Store these for the next steps.
Add GCP Credentials to Wallaroo
With the Client ID and Client Secret from Google, we can now add this to the Wallaroo instance Keycloak service.
IMPORTANT NOTE
Leaving the Hosted Domain value unset will allow any valid Google user to access the system. Set the Hosted Domain to restrict access to the desired Google domain such as wallaroo.ai. This must be a domain that is managed by Google. For more information, see the Keycloak Social Identity Providers documentation.
From the Wallaroo instance, login to the Keycloak service. This will commonly be $PREFIX.keycloak.$SUFFIX. For example, playful-wombat-5555.keycloak.wallaroo.ai.
Select Administration Console.
From the left navigation panel, select Identity Providers.
Once complete, log out of the Wallaroo instance and go back into the login screen. With the usual username and password screen should also be a google link at the bottom or whatever name was set for the identity provider.
Select it, then select which Google user account to use. As long the domain matches the one listed in Add Google Credentials to Keycloak, the login will succeed. The first time a user logs in through Google, Keycloak will create a new local user account based on the Google credentials.
Troubleshooting
I get the error “This app’s request is invalid”
Double check the Google credentials from Get GCP Credentials and verify that the Authorized redirect URIs matches the one in Keycloak. This can be verified from logging into Keycloak, selecting Identity Providers, selecting the Google identity provider and Redirect URI from the top line.
3.4.4 - Wallaroo SSO Configuration for Seamless Redirect
Instructions on updating the Wallaroo SSO configuration for a seamless redirect experience.
By default, when organizations add identity providers to Wallaroo users have to select which identity provider or at least provide their username and passwords to login through the default Keycloak service.
The following instructions show how to set an identity provider as the default and configure Wallaroo so users who are already authenticated through a identity provider can seamlessly login to their Wallaroo instance without having to select any other options.
These instructions assume that an identity provider has been created for the Wallaroo instance.
Set an Identity Provider as Default
To set a default identity provider for a Wallaroo instance for seamless access:
Access the Wallaroo Keycloak service through a browser as an administrator. The Keycloak service URL will be in the format $WALLAROOPREFIX.keycloak.$WALLAROOSUFFIX. For example, if the Wallaroo prefix is wallaroo and the suffix example.com, then the Keycloak service URL would be wallaroo.keycloak.example.com. See the DNS Integration Guide for more details on Wallaroo services with DNS.
Select Administration Console, then log in with an administrator account. See the Wallaroo User Management guides for more information.
From the left navigation panel, select Authentication.
For the Auth TypeIdentity Provider Redirector row, select Actions -> Config.
Enter the following:
Alias: The name for this configuration.
Default Identity Provider: The identity provider to use by default. A list is available from Configure->Identity Providers. For this example, it is google. Verify that the name matches the name of the existing Identity Provider.
Select Save.
Save the ID! Save the Identity Provider Redirectory generated by Keycloak. This step is important in disabling the seamless redirect.
Set Update Profile on First Login to Off
This optional step prevents the Keycloak service from forcing the user to update an existing profile the first time they log in through a new identity provider. For more information, see the Keycloak Identity Broker First Login documentation.
To set the Identity Broker First Login to Off:
Access the Wallaroo Keycloak service through a browser as an administrator. The Keycloak service URL will be in the format $WALLAROOPREFIX.keycloak.$WALLAROOSUFFIX. For example, if the Wallaroo prefix is wallaroo and the suffix example.com, then the Keycloak service URL would be wallaroo.keycloak.example.com. See the DNS Integration Guide for more details on Wallaroo services with DNS.
Select Administration Console, then log in with an administrator account. See the Wallaroo User Management guides for more information.
From the left navigation panel, select Authentication.
From the top drop-down list, select First Broker Login, then for the row labeled Review Profile(review profile config), select Actions->Config.
Set Update Profile on First Login to Off.
Select Save.
Disable Automatic Redirects
Disable Through Keycloak UI
To disable automatic redirects through the Keycloak UI:
Access the Wallaroo Keycloak service through a browser as an administrator. The Keycloak service URL will be in the format $WALLAROOPREFIX.keycloak.$WALLAROOSUFFIX. For example, if the Wallaroo prefix is wallaroo and the suffix example.com, then the Keycloak service URL would be wallaroo.keycloak.example.com. See the DNS Integration Guide for more details on Wallaroo services with DNS.
Select Administration Console, then log in with an administrator account. See the Wallaroo User Management guides for more information.
From the left navigation panel, select Authentication.
For the Auth TypeIdentity Provider Redirector row, set the Requirement to Disabled.
Seamless redirect is now disabled. Users will be able to either enter their username/password, or select the identity provider to use.
Disable through Kubernetes
This process allows users to disable the seamless redirect through through the Kubernetes administrative node. This process requires the following:
kubectl is installed on the node administrating the Kubernetes environment hosting the Wallaroo instance.
curl is installed.
These steps assume the Wallaroo instance was installed into the namespace wallaroo.
The following code will retrieve the Wallaroo Keycloak admin password,then makes a connection to the Wallaroo Keycloak service through curl, then delete the identity provider set as the Identity Provider Redirector.
The Keycloak service URL will be in the format $WALLAROOPREFIX.keycloak.$WALLAROOSUFFIX. For example, if the Wallaroo prefix is wallaroo and the suffix example.com, then the Keycloak service URL would be wallaroo.keycloak.example.com. See the DNS Integration Guide for more details on Wallaroo services with DNS.
The variable IDENTITYUUID is the Identity Provider Redirector UUID.
Replace WALLAROOPREFIX, WALLAROOSUFFIX and IDENTITYUUID with the appropriate values for your Wallaroo instance.
Seamless redirect is now disabled. Users will be able to either enter their username/password, or select the identity provider to use.
4 - Wallaroo Workspace Management Guide
How to manage your Wallaroo Workspaces
This following guide is created to help users manage their Wallaroo Community Edition (CE) workspaces. Workspaces are used to manage Machine Learning (ML) models and pipelines.
Workspace Naming Requirements
Workspace names map onto Kubernetes objects, and must be DNS compliant. Workspace names must be ASCII alpha-numeric characters or dash (-) only. . and _ are not allowed.
How to Set the Current Workspace
The Current Workspace shows the selected workspace and its pipelines and models that are contained in the workspace.
To set the current workspace in your Wallaroo session:
From the top left navigation panel, select the workspace. By default, this is My Workspace.
Select the workspace to set as the current workspace.
How to View All Workspaces
To view all workspaces:
From the top left navigation panel, select the Workspace icon (resembles an office desk with monitor).
Select View Workspaces from the bottom of the list.
A list of current workspaces and their owners will be displayed.
Workspace names are not forced to be unique. You can have 50 workspaces all named my-amazing-workspace, which can cause confusion in determining which workspace to use.
It is recommended that organizations agree on a naming convention and select the workspace to use rather than creating a new one each time.
To create a new workspace from the Wallaroo interface:
From the top left navigation panel, select the Workspace icon (resembles an office desk with monitor).
Select View Workspaces from the bottom of the list.
Select the text box marked Workspace name and enter the name of the new workspace. It is recommended to make workspace names unique.
Select Create Workspace.
Manage Collaborators
Workspace collaborators are other users in your Wallaroo instance that can access the workspace either as a collaborator or as a co-owner.
How to Add a Workspace Collaborator
To add a collaborator to the workspace:
From the top left navigation panel, select the workspace. By default, this is My Workspace.
Select the workspace to set as the current workspace.
Select Invite Users from the Collaborators list.
Select from the users listed. Note that only users in your Wallaroo instance can be invited.
To add the user as a co-owner, select the checkbox “Add as Co-Owner?” next to their name.
Select Send Invitations.
Each invited collaborator will receive an email inviting them to use the workspace, and a link to the Wallaroo instance and the workspace in question.
How to Promote or Demote a Collaborator
To promote or demote a collaborator in a workspace:
From the top left navigation panel, select the workspace. By default, this is My Workspace.
Select the workspace to set as the current workspace.
From the Collaborators list, select the user ... to the right of the user to promote or demote.
If the user is a co-owner, select Demote to Collaborator.
If the user is a collaborator, select Promote to Owner.
How to Remove a Collaborator from a Workspace
To promote or demote a collaborator:
From the top left navigation panel, select the workspace. By default, this is My Workspace.
Select the workspace to set as the current workspace.
From the Collaborators list, select the user ... to the right of the user remove.
Select Remove from Workspace.
Confirm the removal of the user from the workspace.
5 - Wallaroo Model Management
How to manage your Wallaroo models
Models are the Machine Learning (ML) models that are uploaded to your Wallaroo workspace and used to solve problems based on data submitted to them in a pipeline.
Model Naming Requirements
Model names map onto Kubernetes objects, and must be DNS compliant. The strings for model names must be ASCII alpha-numeric characters or dash (-) only. . and _ are not allowed.
Supported Models and Libraries
Supported Models
The following frameworks are supported. Frameworks fall under either Native or Containerized runtimes in the Wallaroo engine. For more details, see the specific framework what runtime a specific model framework runs in.
The supported frameworks include the specific version of the model framework supported by Wallaroo. It is highly recommended to verify that models uploaded to Wallaroo meet the library and version requirements to ensure proper functioning.
After April 2022 until release 2022.4 (December 2022)
1.10.*
7
15
2
Before April 2022
1.6.*
7
13
2
For the most recent release of Wallaroo 2023.2.1, the following native runtimes are supported:
If converting another ML Model to ONNX (PyTorch, XGBoost, etc) using the onnxconverter-common library, the supported DEFAULT_OPSET_NUMBER is 17.
Using different versions or settings outside of these specifications may result in inference issues and other unexpected behavior.
ONNX models always run in the native runtime space.
Data Schemas
ONNX models deployed to Wallaroo have the following data requirements.
Equal rows constraint: The number of input rows and output rows must match.
All inputs are tensors: The inputs are tensor arrays with the same shape.
Data Type Consistency: Data types within each tensor are of the same type.
Equal Rows Constraint
Inference performed through ONNX models are assumed to be in batch format, where each input row corresponds to an output row. This is reflected in the in fields returned for an inference. In the following example, each input row for an inference is related directly to the inference output.
For models that require ragged tensor or other shapes, see other data formatting options such as Bring Your Own Predict models.
Data Type Consistency
All inputs into an ONNX model must have the same internal data type. For example, the following is valid because all of the data types within each element are float32.
t= [
[2.35, 5.75],
[3.72, 8.55],
[5.55, 97.2]
]
The following is invalid, as it mixes floats and strings in each element:
These requirements are <strong>not</strong> for Tensorflow Keras models, only for non-Keras Tensorflow models in the SavedModel format. For Tensorflow Keras deployment in Wallaroo, see the Tensorflow Keras requirements.
TensorFlow File Format
TensorFlow models are .zip file of the SavedModel format. For example, the Aloha sample TensorFlow model is stored in the directory alohacnnlstm:
Python models uploaded to Wallaroo are executed as a native runtime.
Note that Python models - aka “Python steps” - are standalone python scripts that use the python libraries natively supported by the Wallaroo platform. These are used for either simple model deployment (such as ARIMA Statsmodels), or data formatting such as the postprocessing steps. A Wallaroo Python model will be composed of one Python script that matches the Wallaroo requirements.
This is contrasted with Arbitrary Python models, also known as Bring Your Own Predict (BYOP) allow for custom model deployments with supporting scripts and artifacts. These are used with pre-trained models (PyTorch, Tensorflow, etc) along with whatever supporting artifacts they require. Supporting artifacts can include other Python modules, model files, etc. These are zipped with all scripts, artifacts, and a requirements.txt file that indicates what other Python models need to be imported that are outside of the typical Wallaroo platform.
Python Models Requirements
Python models uploaded to Wallaroo are Python scripts that must include the wallaroo_json method as the entry point for the Wallaroo engine to use it as a Pipeline step.
This method receives the results of the previous Pipeline step, and its return value will be used in the next Pipeline step.
If the Python model is the first step in the pipeline, then it will be receiving the inference request data (for example: a preprocessing step). If it is the last step in the pipeline, then it will be the data returned from the inference request.
In the example below, the Python model is used as a post processing step for another ML model. The Python model expects to receive data from a ML Model who’s output is a DataFrame with the column dense_2. It then extracts the values of that column as a list, selects the first element, and returns a DataFrame with that element as the value of the column output.
In line with other Wallaroo inference results, the outputs of a Python step that returns a pandas DataFrame or Arrow Table will be listed in the out. metadata, with all inference outputs listed as out.{variable 1}, out.{variable 2}, etc. In the example above, this results the output field as the out.output field in the Wallaroo inference result.
Input and output schemas for each Hugging Face pipeline are defined below. Note that adding additional inputs not specified below will raise errors, except for the following:
Framework.HUGGING-FACE-IMAGE-TO-TEXT
Framework.HUGGING-FACE-TEXT-CLASSIFICATION
Framework.HUGGING-FACE-SUMMARIZATION
Framework.HUGGING-FACE-TRANSLATION
Additional inputs added to these Hugging Face pipelines will be added as key/pair value arguments to the model’s generate method. If the argument is not required, then the model will default to the values coded in the original Hugging Face model’s source code.
Any parameter that is not part of the required inputs list will be forwarded to the model as a key/pair value to the underlying models generate method. If the additional input is not supported by the model, an error will be returned.
Any parameter that is not part of the required inputs list will be forwarded to the model as a key/pair value to the underlying models generate method. If the additional input is not supported by the model, an error will be returned.
Schemas:
input_schema=pa.schema([
pa.field('inputs', pa.string()),
pa.field('return_text', pa.bool_()),
pa.field('return_tensors', pa.bool_()),
pa.field('clean_up_tokenization_spaces', pa.bool_()),
# pa.field('extra_field', pa.int64()), # every extra field you specify will be forwarded as a key/value pair])
output_schema=pa.schema([
pa.field('summary_text', pa.string()),
])
input_schema=pa.schema([
pa.field('inputs', pa.string()), # requiredpa.field('top_k', pa.int64()), # optionalpa.field('function_to_apply', pa.string()), # optional])
output_schema=pa.schema([
pa.field('label', pa.list_(pa.string(), list_size=2)), # list with a number of items same as top_k, list_size can be skipped but may lead in worse performancepa.field('score', pa.list_(pa.float64(), list_size=2)), # list with a number of items same as top_k, list_size can be skipped but may lead in worse performance])
Any parameter that is not part of the required inputs list will be forwarded to the model as a key/pair value to the underlying models generate method. If the additional input is not supported by the model, an error will be returned.
Schemas:
input_schema=pa.schema([
pa.field('inputs', pa.string()), # requiredpa.field('return_tensors', pa.bool_()), # optionalpa.field('return_text', pa.bool_()), # optionalpa.field('clean_up_tokenization_spaces', pa.bool_()), # optionalpa.field('src_lang', pa.string()), # optionalpa.field('tgt_lang', pa.string()), # optional# pa.field('extra_field', pa.int64()), # every extra field you specify will be forwarded as a key/value pair])
output_schema=pa.schema([
pa.field('translation_text', pa.string()),
])
input_schema=pa.schema([
pa.field('inputs', pa.string()), # requiredpa.field('candidate_labels', pa.list_(pa.string(), list_size=2)), # requiredpa.field('hypothesis_template', pa.string()), # optionalpa.field('multi_label', pa.bool_()), # optional])
output_schema=pa.schema([
pa.field('sequence', pa.string()),
pa.field('scores', pa.list_(pa.float64(), list_size=2)), # same as number of candidate labels, list_size can be skipped by may result in slightly worse performancepa.field('labels', pa.list_(pa.string(), list_size=2)), # same as number of candidate labels, list_size can be skipped by may result in slightly worse performance])
input_schema=pa.schema([
pa.field('images',
pa.list_(
pa.list_(
pa.list_(
pa.int64(),
list_size=3 ),
list_size=640 ),
list_size=480 )),
pa.field('candidate_labels', pa.list_(pa.string(), list_size=3)),
pa.field('threshold', pa.float64()),
# pa.field('top_k', pa.int64()), # we want the model to return exactly the number of predictions, we shouldn't specify this])
output_schema=pa.schema([
pa.field('score', pa.list_(pa.float64())), # variable output, depending on detected objectspa.field('label', pa.list_(pa.string())), # variable output, depending on detected objectspa.field('box',
pa.list_( # dynamic output, i.e. dynamic number of boxes per input image, each sublist contains the 4 box coordinates pa.list_(
pa.int64(),
list_size=4 ),
),
),
])
Any parameter that is not part of the required inputs list will be forwarded to the model as a key/pair value to the underlying models generate method. If the additional input is not supported by the model, an error will be returned.
input_schema=pa.schema([
pa.field('inputs', pa.string()),
pa.field('return_tensors', pa.bool_()), # optionalpa.field('return_text', pa.bool_()), # optionalpa.field('return_full_text', pa.bool_()), # optionalpa.field('clean_up_tokenization_spaces', pa.bool_()), # optionalpa.field('prefix', pa.string()), # optionalpa.field('handle_long_generation', pa.string()), # optional# pa.field('extra_field', pa.int64()), # every extra field you specify will be forwarded as a key/value pair])
output_schema=pa.schema([
pa.field('generated_text', pa.list_(pa.string(), list_size=1))
])
SKLearn schema follows a different format than other models. To prevent inputs from being out of order, the inputs should be submitted in a single row in the order the model is trained to accept, with all of the data types being the same. For example, the following DataFrame has 4 columns, each column a float.
sepal length (cm)
sepal width (cm)
petal length (cm)
petal width (cm)
0
5.1
3.5
1.4
0.2
1
4.9
3.0
1.4
0.2
For submission to an SKLearn model, the data input schema will be a single array with 4 float values.
When submitting as an inference, the DataFrame is converted to rows with the column data expressed as a single array. The data must be in the same order as the model expects, which is why the data is submitted as a single array rather than JSON labeled columns: this insures that the data is submitted in the exact order as the model is trained to accept.
Original DataFrame:
sepal length (cm)
sepal width (cm)
petal length (cm)
petal width (cm)
0
5.1
3.5
1.4
0.2
1
4.9
3.0
1.4
0.2
Converted DataFrame:
inputs
0
[5.1, 3.5, 1.4, 0.2]
1
[4.9, 3.0, 1.4, 0.2]
SKLearn Schema Outputs
Outputs for SKLearn that are meant to be predictions or probabilities when output by the model are labeled in the output schema for the model when uploaded to Wallaroo. For example, a model that outputs either 1 or 0 as its output would have the output schema as follows:
TensorFlow Keras SavedModel models are .zip file of the SavedModel format. For example, the Aloha sample TensorFlow model is stored in the directory alohacnnlstm:
XGBoost schema follows a different format than other models. To prevent inputs from being out of order, the inputs should be submitted in a single row in the order the model is trained to accept, with all of the data types being the same. If a model is originally trained to accept inputs of different data types, it will need to be retrained to only accept one data type for each column - typically pa.float64() is a good choice.
For example, the following DataFrame has 4 columns, each column a float.
sepal length (cm)
sepal width (cm)
petal length (cm)
petal width (cm)
0
5.1
3.5
1.4
0.2
1
4.9
3.0
1.4
0.2
For submission to an XGBoost model, the data input schema will be a single array with 4 float values.
When submitting as an inference, the DataFrame is converted to rows with the column data expressed as a single array. The data must be in the same order as the model expects, which is why the data is submitted as a single array rather than JSON labeled columns: this insures that the data is submitted in the exact order as the model is trained to accept.
Original DataFrame:
sepal length (cm)
sepal width (cm)
petal length (cm)
petal width (cm)
0
5.1
3.5
1.4
0.2
1
4.9
3.0
1.4
0.2
Converted DataFrame:
inputs
0
[5.1, 3.5, 1.4, 0.2]
1
[4.9, 3.0, 1.4, 0.2]
XGBoost Schema Outputs
Outputs for XGBoost are labeled based on the trained model outputs. For this example, the output is simply a single output listed as output. In the Wallaroo inference result, it is grouped with the metadata out as out.output.
Arbitrary Python models, also known as Bring Your Own Predict (BYOP) allow for custom model deployments with supporting scripts and artifacts. These are used with pre-trained models (PyTorch, Tensorflow, etc) along with whatever supporting artifacts they require. Supporting artifacts can include other Python modules, model files, etc. These are zipped with all scripts, artifacts, and a requirements.txt file that indicates what other Python models need to be imported that are outside of the typical Wallaroo platform.
Contrast this with Wallaroo Python models - aka “Python steps”. These are standalone python scripts that use the python libraries natively supported by the Wallaroo platform. These are used for either simple model deployment (such as ARIMA Statsmodels), or data formatting such as the postprocessing steps. A Wallaroo Python model will be composed of one Python script that matches the Wallaroo requirements.
Arbitrary Python File Requirements
Arbitrary Python (BYOP) models are uploaded to Wallaroo via a ZIP file with the following components:
Artifact
Type
Description
Python scripts aka .py files with classes that extend mac.inference.Inference and mac.inference.creation.InferenceBuilder
Python Script
Extend the classes mac.inference.Inference and mac.inference.creation.InferenceBuilder. These are included with the Wallaroo SDK. Further details are in Arbitrary Python Script Requirements. Note that there is no specified naming requirements for the classes that extend mac.inference.Inference and mac.inference.creation.InferenceBuilder - any qualified class name is sufficient as long as these two classes are extended as defined below.
requirements.txt
Python requirements file
This sets the Python libraries used for the arbitrary python model. These libraries should be targeted for Python 3.8 compliance. These requirements and the versions of libraries should be exactly the same between creating the model and deploying it in Wallaroo. This insures that the script and methods will function exactly the same as during the model creation process.
Other artifacts
Files
Other models, files, and other artifacts used in support of this model.
For example, the if the arbitrary python model will be known as vgg_clustering, the contents may be in the following structure, with vgg_clustering as the storage directory:
Note the inclusion of the custom_inference.py file. This file name is not required - any Python script or scripts that extend the classes listed above are sufficient. This Python script could have been named vgg_custom_model.py or any other name as long as it includes the extension of the classes listed above.
The sample arbitrary python model file is created with the command zip -r vgg_clustering.zip vgg_clustering/.
Wallaroo Arbitrary Python uses the Wallaroo SDK mac module, included in the Wallaroo SDK 2023.2.1 and above. See the Wallaroo SDK Install Guides for instructions on installing the Wallaroo SDK.
Arbitrary Python Script Requirements
The entry point of the arbitrary python model is any python script that extends the following classes. These are included with the Wallaroo SDK. The required methods that must be overridden are specified in each section below.
mac.inference.Inference interface serves model inferences based on submitted input some input. Its purpose is to serve inferences for any supported arbitrary model framework (e.g. scikit, keras etc.).
classDiagram
    class Inference {
        <<Abstract>>
        +model Optional[Any]
        +expected_model_types()* Set
        +predict(input_data: InferenceData)*  InferenceData
        -raise_error_if_model_is_not_assigned() None
        -raise_error_if_model_is_wrong_type() None
    }
mac.inference.creation.InferenceBuilder builds a concrete Inference, i.e. instantiates an Inference object, loads the appropriate model and assigns the model to to the Inference object.
classDiagram
    class InferenceBuilder {
        +create(config InferenceConfig) * Inference
        -inference()* Any
    }
mac.inference.Inference
mac.inference.Inference Objects
Object
Type
Description
model Optional[Any]
An optional list of models that match the supported frameworks from wallaroo.framework.Framework included in the arbitrary python script. Note that this is optional - no models are actually required. A BYOP can refer to a specific model(s) used, be used for data processing and reshaping for later pipeline steps, or other needs.
mac.inference.Inference Methods
Method
Returns
Description
expected_model_types (Required)
Set
Returns a Set of models expected for the inference as defined by the developer. Typically this is a set of one. Wallaroo checks the expected model types to verify that the model submitted through the InferenceBuilder method matches what this Inference class expects.
The entry point for the Wallaroo inference with the following input and output parameters that are defined when the model is updated.
mac.types.InferenceData: The inputInferenceData is a dictionary of numpy arrays derived from the input_schema detailed when the model is uploaded, defined in PyArrow.Schema format.
mac.types.InferenceData: The output is a dictionary of numpy arrays as defined by the output parameters defined in PyArrow.Schema format.
The InferenceDataValidationError exception is raised when the input data does not match mac.types.InferenceData.
raise_error_if_model_is_not_assigned
N/A
Error when expected_model_types is not set.
raise_error_if_model_is_wrong_type
N/A
Error when the model does not match the expected_model_types.
mac.inference.creation.InferenceBuilder
InferenceBuilder builds a concrete Inference, i.e. instantiates an Inference object, loads the appropriate model and assigns the model to the Inference.
classDiagram
    class InferenceBuilder {
        +create(config InferenceConfig) * Inference
        -inference()* Any
    }
Each model that is included requires its own InferenceBuilder. InferenceBuilder loads one model, then submits it to the Inference class when created. The Inference class checks this class against its expected_model_types() Set.
Creates an Inference subclass, then assigns a model and attributes. The CustomInferenceConfig is used to retrieve the config.model_path, which is a pathlib.Path object pointing to the folder where the model artifacts are saved. Every artifact loaded must be relative to config.model_path. This is set when the arbitrary python .zip file is uploaded and the environment for running it in Wallaroo is set. For example: loading the artifact vgg_clustering\feature_extractor.h5 would be set with config.model_path \ feature_extractor.h5. The model loaded must match an existing module. For our example, this is from sklearn.cluster import KMeans, and this must match the Inferenceexpected_model_types.
inference
custom Inference instance.
Returns the instantiated custom Inference object created from the create method.
Arbitrary Python Runtime
Arbitrary Python always run in the containerized model runtime.
Wallaroo users can register their trained MLFlow ML Models from a containerized model container registry into their Wallaroo instance and perform inferences with it through a Wallaroo pipeline.
As of this time, Wallaroo only supports MLFlow 1.30.0 containerized models. For information on how to containerize an MLFlow model, see the MLFlow Documentation.
Uploading models is managed through the Wallaroo SDK and Wallaroo MLOps API. As of this time, models can not be uploaded through the Wallaroo Dashboard
To upload a model to Wallaroo, see the following guides:
Models uploaded to the current workspace can be seen through the following process:
From the Wallaroo Dashboard, select the workspace to set as the current workspace from the navigation panel above. The number of models for the workspace will be displayed.
Select View Models. A list of the models in the workspace will be displayed.
To view details on the model, select the model name from the list.
Model Details
From the Model Details page the following is displayed:
The name of the model.
The unique ID of the model represented as a UUID.
The file name of the model
The version history of the model.
5.1 - Wallaroo Model Tag Management
How to manage tags and models.
Tags can be used to label, search, and track models across different versions. The following guide will demonstrate how to:
Create a tag for a specific model version.
Remove a tag for a specific model version.
The example shown uses the model ccfraudmodel.
Steps
Add a New Tag to a Model Version
To set a tag for a specific version of a model uploaded to Wallaroo using the Wallaroo Dashboard:
Log into your Wallaroo instance.
Select the workspace the models were uploaded into.
Select View Models.
From the Model Select Dashboard page, select the model to update.
From the Model Dashboard page, select the version of the model. By default, the latest version will be selected.
Select the + icon under the name of the model and it’s hash value.
Enter the name of the new tag. When complete, select Enter. The tag will be set to this version of the model selected.
Remove a Tag from a Model Version
To remove a tag from a version of an uploaded model:
IMPORTANT NOTE
Once a tag is deleted from a model version, it can not be undeleted.
Log into your Wallaroo instance.
Select the workspace the models were uploaded into.
Select View Models.
From the Model Select Dashboard page, select the model to update.
From the Model Dashboard page, select the version of the model. By default, the latest version will be selected.
Select the X for the tag to delete. The tag will be removed from the model version.
Wallaroo SDK Tag Management
Tags are applied to either model versions or pipelines. This allows organizations to track different versions of models, and search for what pipelines have been used for specific purposes such as testing versus production use.
Create Tag
Tags are created with the Wallaroo client command create_tag(String tagname). This creates the tag and makes it available for use.
The tag will be saved to the variable currentTag to be used in the rest of these examples.
# Now we create our tagcurrentTag=wl.create_tag("My Great Tag")
List Tags
Tags are listed with the Wallaroo client command list_tags(), which shows all tags and what models and pipelines they have been assigned to.
Tags are used with models to track differences in model versions.
Assign Tag to a Model
Tags are assigned to a model through the Wallaroo Tag add_to_model(model_id) command, where model_id is the model’s numerical ID number. The tag is applied to the most current version of the model.
For this example, the currentTag will be applied to the tagtest_model. All tags will then be listed to show it has been assigned to this model.
# add tag to modelcurrentTag.add_to_model(tagtest_model.id())
{'model_id': 1, 'tag_id': 1}
Search Models by Tag
Model versions can be searched via tags using the Wallaroo Client method search_models(search_term), where search_term is a string value. All models versions containing the tag will be displayed. In this example, we will be using the text from our tag to list all models that have the text from currentTag in them.
# Search models by tagwl.search_models('My Great Tag')
name
version
file_name
image_path
last_update_time
tagtestmodel
70169e97-fb7e-4922-82ba-4f5d37e75253
ccfraud.onnx
None
2022-11-29 17:15:21.703465+00:00
Remove Tag from Model
Tags are removed from models using the Wallaroo Tag remove_from_model(model_id) command.
In this example, the currentTag will be removed from tagtest_model. A list of all tags will be shown with the list_tags command, followed by searching the models for the tag to verify it has been removed.
### remove tag from modelcurrentTag.remove_from_model(tagtest_model.id())
{'model_id': 1, 'tag_id': 1}
6 - Wallaroo Pipeline Management
How to manage your Wallaroo pipelines
Pipelines represent how data is submitted to your uploaded Machine Learning (ML) models. Pipelines allow you to:
Submit information through an uploaded file or through the Pipeline’s Deployment URL.
Have the Pipeline submit the information to one or more models in sequence.
Once complete, output the result from the model(s).
Pipeline Naming Requirements
Pipeline names map onto Kubernetes objects, and must be DNS compliant. Pipeline names must be ASCII alpha-numeric characters or dash (-) only. . and _ are not allowed.
How to Create a Pipeline and Use a Pipeline
Pipelines can be created through the Wallaroo Dashboard and the Wallaroo SDK. For specifics on using the SDK, see the Wallaroo SDK Guide. For more detailed instructions and step-by-step examples with real models and data, see the Wallaroo Tutorials.
The following instructions are focused on how to use the Wallaroo Dashboard for creating, deploying, and undeploying pipelines.
How to Create a Pipeline using the Wallaroo Dashboard
Prerequisites
Before creating a pipeline through the Wallaroo Dashboard, a model must be uploaded into the workspace through the SDK. For more information, see the Wallaroo SDK Essentials Guide.
IMPORTANT NOTICE
Pipeline names are not forced to be unique. You can have 50 pipelines all named my-pipeline, which can cause confusion in determining which pipeline to use.
It is recommended that organizations agree on a naming convention and select pipeline to use rather than creating a new one each time. See the SDK guides for more information on how to select an existing pipeline.
To create a pipeline:
From the Wallaroo Dashboard, set the current workspace from the top left dropdown list.
Select View Pipelines from the pipeline’s row.
From the upper right hand corner, select Create Pipeline.
Enter the following:
Pipeline Name: The name of the new pipeline. Pipeline names should be unique across the Wallaroo instance.
Add Pipeline Step: Select the models to be used as the pipeline steps.
When finished, select Next.
Review the name of the pipeline and the steps. If any adjustments need to be made, select either Back to rename the pipeline or Add Step(s) to change the pipeline’s steps.
When finished, select Build to create the pipeline in this workspace. The pipeline will be built and be ready for deployment within a minute.
How to Deploy and Undeploy a Pipeline using the Wallaroo Dashboard
Deployed pipelines create new namespaces in the Kubernetes environment where the Wallaroo instance is deployed, and allocate resources from the Kubernetes environment to run the pipeline and its steps.
To deploy a pipeline:
From the Wallaroo Dashboard, set the current workspace from the top left dropdown list.
Select View Pipelines from the pipeline’s row.
Select the pipeline to deploy.
From the right navigation panel, select Deploy.
A popup module will request verification to deploy the pipeline. Select Deploy again to deploy the pipeline.
Undeploying a pipeline returns resources back to the Kubernetes environment and removes the namespaces created when the pipeline was deployed.
To undeploy a pipeline:
From the Wallaroo Dashboard, set the current workspace from the top left dropdown list.
Select View Pipelines from the pipeline’s row.
Select the pipeline to deploy.
From the right navigation panel, select Undeploy.
A popup module will request verification to undeploy the pipeline. Select Undeploy again to undeploy the pipeline.
How to View a Pipeline Details and Metrics
To view a pipeline’s details:
From the Wallaroo Dashboard, set the current workspace from the top left dropdown list.
Select View Pipelines from the pipeline’s row.
To view details on the pipeline, select the name of the pipeline.
A list of the pipeline’s details will be displayed.
To view a pipeline’s metrics:
From the Wallaroo Dashboard, set the current workspace from the top left dropdown list.
Select View Pipelines from the pipeline’s row.
To view details on the pipeline, select the name of the pipeline.
A list of the pipeline’s details will be displayed.
Select Metrics to view the following information. From here you can select the time period to display metrics from through the drop down to display the following:
Requests per second
Cluster inference rate
Inference latency
The Audit Log and Anomaly Log are available to view further details of the pipeline’s activities.
Pipeline Details
The following is available from the Pipeline Details page:
The name of the pipeline.
The pipeline ID: This is in UUID format.
Pipeline steps: The steps and the models in each pipeline step.
Version History: how the pipeline has been updated over time.
6.1 - Wallaroo Pipeline Tag Management
How to manage tags and pipelines.
Tags can be used to label, search, and track pipelines across a Wallaroo instance. The following guide will demonstrate how to:
Create a tag for a specific pipeline.
Remove a tag for a specific pipeline.
The example shown uses the pipeline ccfraudpipeline.
Steps
Add a New Tag to a Pipeline
To set a tag to pipeline using the Wallaroo Dashboard:
Log into your Wallaroo instance.
Select the workspace the pipelines are associated with.
Select View Pipelines.
From the Pipeline Select Dashboard page, select the pipeline to update.
From the Pipeline Dashboard page, select the + icon under the name of the pipeline and it’s hash value.
Enter the name of the new tag. When complete, select Enter. The tag will be set for this pipeline.
Remove a Tag from a Pipeline
To remove a tag from a pipeline:
IMPORTANT NOTE
Once a tag is deleted from a pipeline, it can not be undeleted.
Log into your Wallaroo instance.
Select the workspace the pipelines are associated with.
Select View Pipelines.
From the Pipeline Select Dashboard page, select the pipeline to update.
From the Pipeline Dashboard page, select the select the X for the tag to delete. The tag will be removed from the pipeline.
Wallaroo SDK Tag Management
Tags are applied to either model versions or pipelines. This allows organizations to track different versions of models, and search for what pipelines have been used for specific purposes such as testing versus production use.
Create Tag
Tags are created with the Wallaroo client command create_tag(String tagname). This creates the tag and makes it available for use.
The tag will be saved to the variable currentTag to be used in the rest of these examples.
# Now we create our tagcurrentTag=wl.create_tag("My Great Tag")
List Tags
Tags are listed with the Wallaroo client command list_tags(), which shows all tags and what models and pipelines they have been assigned to.
Tags are used with pipelines to track different pipelines that are built or deployed with different features or functions.
Add Tag to Pipeline
Tags are added to a pipeline through the Wallaroo Tag add_to_pipeline(pipeline_id) method, where pipeline_id is the pipeline’s integer id.
For this example, we will add currentTag to testtest_pipeline, then verify it has been added through the list_tags command and list_pipelines command.
# add this tag to the pipelinecurrentTag.add_to_pipeline(tagtest_pipeline.id())
{'pipeline_pk_id': 1, 'tag_pk_id': 1}
Search Pipelines by Tag
Pipelines can be searched through the Wallaroo Client search_pipelines(search_term) method, where search_term is a string value for tags assigned to the pipelines.
In this example, the text “My Great Tag” that corresponds to currentTag will be searched for and displayed.
wl.search_pipelines('My Great Tag')
name
version
creation_time
last_updated_time
deployed
tags
steps
tagtestpipeline
5a4ff3c7-1a2d-4b0a-ad9f-78941e6f5677
2022-29-Nov 17:15:21
2022-29-Nov 17:15:21
(unknown)
My Great Tag
Remove Tag from Pipeline
Tags are removed from a pipeline with the Wallaroo Tag remove_from_pipeline(pipeline_id) command, where pipeline_id is the integer value of the pipeline’s id.
For this example, currentTag will be removed from tagtest_pipeline. This will be verified through the list_tags and search_pipelines command.
## remove from pipelinecurrentTag.remove_from_pipeline(tagtest_pipeline.id())
{'pipeline_pk_id': 1, 'tag_pk_id': 1}
6.2 - Wallaroo Assays Management
How to create and use assays to monitor model inputs and outputs.
Model Insights and Interactive Analysis Introduction
Wallaroo provides the ability to perform interactive analysis so organizations can explore the data from a pipeline and learn how the data is behaving. With this information and the knowledge of your particular business use case you can then choose appropriate thresholds for persistent automatic assays as desired.
IMPORTANT NOTE
Model insights operates over time and is difficult to demo in a notebook without pre-canned data. We assume you have an active pipeline that has been running and making predictions over time and show you the code you may use to analyze your pipeline.
Monitoring tasks called assays monitors a model’s predictions or the data coming into the model against an established baseline. Changes in the distribution of this data can be an indication of model drift, or of a change in the environment that the model trained for. This can provide tips on whether a model needs to be retrained or the environment data analyzed for accuracy or other needs.
Assay Details
Assays contain the following attributes:
Attribute
Default
Description
Name
The name of the assay. Assay names must be unique.
Baseline Data
Data that is known to be “typical” (typically distributed) and can be used to determine whether the distribution of new data has changed.
Schedule
Every 24 hours at 1 AM
New assays are configured to run a new analysis for every 24 hours starting at the end of the baseline period. This period can be configured through the SDK.
Group Results
Daily
Groups assay results into groups based on either Daily (the default), Weekly, or Monthly.
Metric
PSI
Population Stability Index (PSI) is an entropy-based measure of the difference between distributions. Maximum Difference of Bins measures the maximum difference between the baseline and current distributions (as estimated using the bins). Sum of the difference of bins sums up the difference of occurrences in each bin between the baseline and current distributions.
Threshold
0.1
The threshold for deciding whether the difference between distributions, as evaluated by the above metric, is large (the distributions are different) or small (the distributions are similar). The default of 0.1 is generally a good threshold when using PSI as the metric.
Number of Bins
5
Sets the number of bins that will be used to partition the baseline data for comparison against how future data falls into these bins. By default, the binning scheme is percentile (quantile) based. The binning scheme can be configured (see Bin Mode, below). Note that the total number of bins will include the set number plus the left_outlier and the right_outlier, so the total number of bins will be the total set + 2.
Bin Mode
Quantile
Set the binning scheme. Quantile binning defines the bins using percentile ranges (each bin holds the same percentage of the baseline data). Equal binning defines the bins using equally spaced data value ranges, like a histogram. Custom allows users to set the range of values for each bin, with the Left Outlier always starting at Min (below the minimum values detected from the baseline) and the Right Outlier always ending at Max (above the maximum values detected from the baseline).
Bin Weight
Equally Weighted
The bin weights can be either set to Equally Weighted (the default) where each bin is weighted equally, or Custom where the bin weights can be adjusted depending on which are considered more important for detecting model drift.
Manage Assays via the Wallaroo Dashboard
Assays can be created and used via the Wallaroo Dashboard.
Accessing Assays Through the Pipeline Dashboard
Assays created through the Wallaroo Dashboard are accessed through the Pipeline Dashboard through the following process.
Log into the Wallaroo Dashboard.
Select the workspace containing the pipeline with the models being monitored from the Change Current Workspace and Workspace Management drop down.
Select View Pipelines.
Select the pipeline containing the models being monitored.
Select Insights.
The Wallaroo Assay Dashboard contains the following elements. For more details of each configuration type, see the Model Insights and Assays Introduction.
(A) Filter Assays: Filter assays by the following:
Name
Status:
Active: The assay is currently running.
Paused: The assay is paused until restarted.
Drift Detected: One or more drifts have been detected.
Sort By
Sort by Creation Date: Sort by the most recent Assays first.
Last Assay Run: Sort by the most recent Assay Last Run date.
(B) Create Assay: Create a new assay.
(C) Assay Controls:
Pause/Start Assay: Pause a running assay, or start one that was paused.
Show Assay Details: View assay details. See Assay Details View for more details.
(D) Collapse Assay: Collapse or Expand the assay for view.
(E) Time Period for Assay Data: Set the time period for data to be used in displaying the assay results.
(F) Assay Events: Select an individual assay event to see more details. See View Assay Alert Details for more information.
Assay Details View
The following details are visible by selecting the Assay View Details icon:
(A) Assay Name: The name of the assay displayed.
(B) Input / Output: The input or output and the index of the element being monitored.
(C) Baseline: The time period used to generate the baseline.
(D) Last Run: The date and time the assay was last run.
(E) Next Run: The future date and time the assay will be run again. NOTE: If the assay is paused, then it will not run at the scheduled time. When unpaused, the date will be updated to the next date and time that the assay will be run.
(F) Aggregation Type: The aggregation type used with the assay.
(G) Threshold: The threshold value used for the assay.
(H) Metric: The metric type used for the assay.
(I) Number of Bins: The number of bins used for the assay.
(J) Bin Weight: The weight applied to each bin.
(K) Bin Mode: The type of bin node applied to each bin.
View Assay Alert Details
To view details on an assay alert:
Select the data with available alert data.
Mouse hover of a specific Assay Event Alert to view the data and time of the event and the alert value.
Select the Assay Event Alert to view the Baseline and Window details of the alert including the left_outlier and right_outlier.
Hover over a bar chart graph to view additional details.
Select the ⊗ symbol to exit the Assay Event Alert details and return to the Assay View.
Build an Assay Through the Pipeline Dashboard
To create a new assay through the Wallaroo Pipeline Dashboard:
Log into the Wallaroo Dashboard.
Select the workspace containing the pipeline with the models being monitored from the Change Current Workspace and Workspace Management drop down.
Select View Pipelines.
Select the pipeline containing the models being monitored.
Select Insights.
Select +Create Assay.
On the Assay Name module, enter the following:
Assay Name: The name of the new assay.
Monitor output data or Monitor input data: Select whether to monitor input or output data.
Select an output/input to monitor: Select the input or output to monitor.
Named Field: The name of the field to monitor.
Index: The index of the monitored field.
Select Next to continue.
On the Specify Baseline Module:
(A) Select the data to use for the baseline. This can either be set with a preset recent time period (last 30 seconds, last 60 seconds, etc) or with a custom date range.
Once selected, a preview graph of the baseline values will be displayed (B). Note that this may take a few seconds to generate.
Select Next to continue.
On the Settings Module:
Set the date and time range to view values generated by the assay. This can either be set with a preset recent time period (last 30 seconds, last 60 seconds, etc) or with a custom date range.
New assays are configured to run a new analysis for every 24 hours starting at the end of the baseline period. For information on how to adjust the scheduling period and other settings for the assay scheduling window, see the SDK section on how to Schedule Assay.
Set the following Advanced Settings.
(A) Preview Date Range: The date and times to for the preview chart.
(B) Preview: A preview of the assay results will be displayed based on the settings below.
(C) Scheduling: Set the Frequency (Daily, Every Minute, Hourly, Weekly, Default: Daily) and the Time (increments of one hour Default: 1:00 AM).
(D) Group Results: How the results are grouped: Daily, Weekly, or Monthly.
(E) Aggregation Type: Density or Cumulative.
(F) Threshold:
Default: 0.1
(G) Metric:
Default: Population Stability Index
Maximum Difference of Bins
Sum of the Difference of Bins
(H) Number of Bins: From 5 to 14. Default: 5
(F) Bin Mode:
Equally Spaced
Default: Quantile
(I) Bin Weights: The bin weights:
Equally Weighted (Default)
Custom: Users can assign their own bin weights as required.
Review the preview chart to verify the settings are correct.
Select Build to complete the process and build the new assay.
Once created, it may take a few minutes for the assay to complete compiling data. If needed, reload the Pipeline Dashboard to view changes.
Manage Assays via the Wallaroo SDK
List Assays
Assays are listed through the Wallaroo Client list_assays method.
wl.list_assays()
name
active
status
warning_threshold
alert_threshold
pipeline_name
api_assay
True
created
0.0
0.1
housepricepipe
Interactive Baseline Runs
We can do an interactive run of just the baseline part to see how the baseline data will be put into bins. This assay uses quintiles so all 5 bins (not counting the outlier bins) have 20% of the predictions. We can see the bin boundaries along the x-axis.
baseline_run.chart()
baseline mean = 12.940910643273655
baseline median = 12.884286880493164
bin_mode = Quantile
aggregation = Density
metric = PSI
weighted = False
We can also get a dataframe with the bin/edge information.
baseline_run.baseline_bins()
b_edges
b_edge_names
b_aggregated_values
b_aggregation
0
12.00
left_outlier
0.00
Density
1
12.55
q_20
0.20
Density
2
12.81
q_40
0.20
Density
3
12.98
q_60
0.20
Density
4
13.33
q_80
0.20
Density
5
14.97
q_100
0.20
Density
6
inf
right_outlier
0.00
Density
The previous assay used quintiles so all of the bins had the same percentage/count of samples. To get bins that are divided equally along the range of values we can use BinMode.EQUAL.
baseline mean = 12.940910643273655
baseline median = 12.884286880493164
bin_mode = Equal
aggregation = Density
metric = PSI
weighted = False
We now see very different bin edges and sample percentages per bin.
equal_baseline.baseline_bins()
b_edges
b_edge_names
b_aggregated_values
b_aggregation
0
12.00
left_outlier
0.00
Density
1
12.60
p_1.26e1
0.24
Density
2
13.19
p_1.32e1
0.49
Density
3
13.78
p_1.38e1
0.22
Density
4
14.38
p_1.44e1
0.04
Density
5
14.97
p_1.50e1
0.01
Density
6
inf
right_outlier
0.00
Density
Interactive Assay Runs
By default the assay builder creates an assay with some good starting parameters. In particular the assay is configured to run a new analysis for every 24 hours starting at the end of the baseline period. Additionally, it sets the number of bins to 5 so creates quintiles, and sets the target iopath to "outputs 0 0" which means we want to monitor the first column of the first output/prediction.
We can do an interactive run of just the baseline part to see how the baseline data will be put into bins. This assay uses quintiles so all 5 bins (not counting the outlier bins) have 20% of the predictions. We can see the bin boundaries along the x-axis.
We then run it with interactive_run and convert it to a dataframe for easy analysis with to_dataframe.
Now lets do an interactive run of the first assay as it is configured. Interactive runs don’t save the assay to the database (so they won’t be scheduled in the future) nor do they save the assay results. Instead the results are returned after a short while for further analysis.
Basic functionality for creating quick charts is included.
assay_results.chart_scores()
We see that the difference scores are low for a while and then jump up to indicate there is an issue. We can examine that particular window to help us decide if that threshold is set correctly or not.
We can generate a quick chart of the results. This chart shows the 5 quantile bins (quintiles) derived from the baseline data plus one for left outliers and one for right outliers. We also see that the data from the window falls within the baseline quintiles but in a different proportion and is skewing higher. Whether this is an issue or not is specific to your use case.
First lets examine a day that is only slightly different than the baseline. We see that we do see some values that fall outside of the range from the baseline values, the left and right outliers, and that the bin values are different but similar.
assay_results[0].chart()
baseline mean = 12.940910643273655
window mean = 12.969964654406132
baseline median = 12.884286880493164
window median = 12.899214744567873
bin_mode = Quantile
aggregation = Density
metric = PSI
weighted = False
score = 0.0029273068646199748
scores = [0.0, 0.000514261205558409, 0.0002139202456922972, 0.0012617897456473992, 0.0002139202456922972, 0.0007234154220295724, 0.0]
index = None
Other days, however are significantly different.
assay_results[12].chart()
baseline mean = 12.940910643273655
window mean = 13.06380216891949
baseline median = 12.884286880493164
window median = 13.027600288391112
bin_mode = Quantile
aggregation = Density
metric = PSI
weighted = False
score = 0.15060511096978788
scores = [4.6637149189075455e-05, 0.05969428191167242, 0.00806617426854112, 0.008316273402678306, 0.07090885609902021, 0.003572888138686759, 0.0]
index = None
assay_results[13].chart()
baseline mean = 12.940910643273655
window mean = 14.004728427908038
baseline median = 12.884286880493164
window median = 14.009637832641602
bin_mode = Quantile
aggregation = Density
metric = PSI
weighted = False
score = 2.9220486095961196
scores = [0.0, 0.7090936334784107, 0.7130482300184766, 0.33500731896676245, 0.12171058214520876, 0.9038825518183468, 0.1393062931689142]
index = None
If we want to investigate further, we can run interactive assays on each of the inputs to see if any of them show anything abnormal. In this example we’ll provide the feature labels to create more understandable titles.
The current assay expects continuous data. Sometimes categorical data is encoded as 1 or 0 in a feature and sometimes in a limited number of values such as 1, 2, 3. If one value has high a percentage the analysis emits a warning so that we know the scores for that feature may not behave as we expect.
We can chart each of the iopaths and do a visual inspection. From the charts we see that if any of the input features had significant differences in the first two days which we can choose to inspect further. Here we choose to show 3 charts just to save space in this notebook.
When we are comfortable with what alert threshold should be for our specific purposes we can create and save an assay that will be automatically run on a daily basis.
In this example we’re create an assay that runs everyday against the baseline and has an alert threshold of 0.5.
Once we upload it it will be saved and scheduled for future data as well as run against past data.
After a short while, we can get the assay results for further analysis.
When we get the assay results, we see that the assays analysis is similar to the interactive run we started with though the analysis for the third day does not exceed the new alert threshold we set. And since we called upload instead of interactive_run the assay was saved to the system and will continue to run automatically on schedule from now on.
Scheduling Assays
By default assays are scheduled to run every 24 hours starting immediately after the baseline period ends.
However, you can control the start time by setting start and the frequency by setting interval on the window.
So to recap:
The window width is the size of the window. The default is 24 hours.
The interval is how often the analysis is run, how far the window is slid into the future based on the last run. The default is the window width.
The window start is when the analysis should start. The default is the end of the baseline period.
For example to run an analysis every 12 hours on the previous 24 hours of data you’d set the window width to 24 (the default) and the interval to 12.
To start a weekly analysis of the previous week on a specific day, set the start date (taking care to specify the desired timezone), and the width and interval to 1 week and of course an analysis won’t be generated till a window is complete.
The assay can be configured in a variety of ways to help customize it to your particular needs. Specifically you can:
change the BinMode to evenly spaced, quantile or user provided
change the number of bins to use
provide weights to use when scoring the bins
calculate the score using the sum of differences, maximum difference or population stability index
change the value aggregation for the bins to density, cumulative or edges
Lets take a look at these in turn.
Default configuration
First lets look at the default configuration. This is a lot of information but much of it is useful to know where it is available.
We see that the assay is broken up into 4 sections. A top level meta data section, a section for the baseline specification, a section for the window specification and a section that specifies the summarization configuration.
In the meta section we see the name of the assay, that it runs on the first column of the first output "outputs 0 0" and that there is a default threshold of 0.25.
The summarizer section shows us the defaults of Quantile, Density and PSI on 5 bins.
The baseline section shows us that it is configured as a fixed baseline with the specified start and end date times.
And the window tells us what model in the pipeline we are analyzing and how often.
We can run the assay interactively and review the first analysis. The method compare_basic_stats gives us a dataframe with basic stats for the baseline and window data.
The method compare_bins gives us a dataframe with the bin information. Such as the number of bins, the right edges, suggested bin/edge names and the values for each bin in the baseline and the window.
baseline mean = 12.940910643273655
window mean = 12.969964654406132
baseline median = 12.884286880493164
window median = 12.899214744567873
bin_mode = Equal
aggregation = Density
metric = PSI
weighted = False
score = 0.011074287819376092
scores = [0.0, 7.3591419975306595e-06, 0.000773779195360713, 8.538514991838585e-05, 0.010207597078872246, 1.6725322721660374e-07, 0.0]
index = None
User Provided Bin Edges
The values in this dataset run from ~11.6 to ~15.81. And lets say we had a business reason to use specific bin edges. We can specify them with the BinMode.PROVIDED and specifying a list of floats with the right hand / upper edge of each bin and optionally the lower edge of the smallest bin. If the lowest edge is not specified the threshold for left outliers is taken from the smallest value in the baseline dataset.
baseline mean = 12.940910643273655
window mean = 12.956829186961135
baseline median = 12.884286880493164
window median = 12.929338455200195
bin_mode = Quantile
aggregation = Density
metric = PSI
weighted = False
score = 0.16591076620684958
scores = [0.0, 0.0002571306027792045, 0.044058279699182114, 0.009441459631493015, 0.03381618572319047, 0.0027335446937028877, 0.0011792419836838435, 0.051023062424253904, 0.009441459631493015, 0.008662563542113508, 0.0052978382749576496, 0.0]
index = None
Bin Weights
Now lets say we only care about differences at the higher end of the range. We can use weights to specify that difference in the lower bins should not be counted in the score.
If we stick with 10 bins we can provide 10 a vector of 12 weights. One weight each for the original bins plus one at the front for the left outlier bin and one at the end for the right outlier bin.
Note we still show the values for the bins but the scores for the lower 5 and left outlier are 0 and only the right half is counted and reflected in the score.
baseline mean = 12.940910643273655
window mean = 12.956829186961135
baseline median = 12.884286880493164
window median = 12.929338455200195
bin_mode = Quantile
aggregation = Density
metric = PSI
weighted = True
score = 0.012600694309416988
scores = [0.0, 0.0, 0.0, 0.0, 0.0, 0.0, 0.00019654033061397393, 0.00850384373737565, 0.0015735766052488358, 0.0014437605903522511, 0.000882973045826275, 0.0]
index = None
Metrics
The score is a distance or dis-similarity measure. The larger it is the less similar the two distributions are. We currently support summing the differences of each individual bin, taking the maximum difference and a modified Population Stability Index (PSI).
The following three charts use each of the metrics. Note how the scores change. The best one will depend on your particular use case.
baseline mean = 12.940910643273655
window mean = 12.969964654406132
baseline median = 12.884286880493164
window median = 12.899214744567873
bin_mode = Quantile
aggregation = Density
metric = MaxDiff
weighted = False
score = 0.01548175581324751
scores = [0.0, 0.009956893934794486, 0.006648048084512165, 0.01548175581324751, 0.006648048084512165, 0.012142553579017668, 0.0]
index = 3
Aggregation Options
Also, bin aggregation can be done in histogram Aggregation.DENSITY style (the default) where we count the number/percentage of values that fall in each bin or Empirical Cumulative Density Function style Aggregation.CUMULATIVE where we keep a cumulative count of the values/percentages that fall in each bin.
How to integrate Azure Grafana to an Azure Kubernetes based installation of Wallaroo
Organizations that have installed Wallaroo using Microsoft Azure can integrate Azure Managed Grafana. This allows reports to be created tracking the performance of Wallaroo pipelines, overall cluster health, and other vital performance data benchmarks.
Create Azure Managed Grafana Workspace
To create a new Azure Managed Grafana Workspace:
Log into Microsoft Azure. From the Azure Services list, either select Azure Managed Grafana or search for Azure Managed Grafana in the search bar.
From the Azure Managed Grafana dashboard, select +Create.
Set the following minimum settings. Any other settings are up to the organization’s requirements.
Subscription: The subscription used for billing the Grafana workspace.
Resource Group Name: Select from an existing or use Create new to create a new Azure Resource Group for managing permissions to the Grafana workspace.
Instance Details
Location: Where the Grafana workspace is hosted. It is recommended it be in the same location as the Kubernetes cluster hosting the Wallaroo instance.
Name: The name of the Grafana workspace.
Select Review + create when finished. Review the settings, then select Create to complete the process.
Add Azure Managed Grafana Workspace to Microsoft Azure Kubernetes Cluster
To integrate an Azure Managed Grafana Workspace to a Microsoft Azure Kubernetes cluster for monitoring:
Log into Microsoft Azure. From the Azure Services list, either select Kubernetes Services or search for Kubernetes Services in the search bar.
From the Kubernetes services dashboard, select the cluster to monitor.
From the cluster dashboard, from the left navigation panel select Monitoring->Insights.
If Insights have not been configured before, select Configure.
Set the following:
Enable Prometheus metrics: Enable.
Azure Monitor workspace: Either select an existing Azure Monitor workspace, or create a new one.
Azure Managed Grafana: Select the Grafana workspace to use with this cluster.
When complete, select Configure.
The onboarding process will take approximately 10-15 minutes.
Run Wallaroo Performance Results in Grafana
The following are two methods for accessing an Azure Kubernetes Cluster insights with Grafana.
Access Via the Azure Kubernetes Cluster
To access the Azure managed Grafana insights from a Kubernetes cluster:
Log into Microsoft Azure. From the Azure Services list, either select Kubernetes Services or search for Kubernetes Services in the search bar.
Select the cluster.
From the left navigation panel, select Insights.
Select View Grafana.
Select the Grafana instance.
From the Grafana instance, select Overview->Endpoint.
Access Via the Azure Managed Grafana Dashboard
To access the Azure managed Grafana insights for a cluster from the Azure Managed Grafana Dashboard:
Log into Microsoft Azure. From the Azure Services list, either select Azure Managed Grafana or search for Azure Managed Grafana in the search bar.
From the Azure Managed Grafana dashboard, select the Grafana instance.
From the Grafana instance, select Overview->Endpoint.
Load Dashboards
Azure managed Grafana comes pre-packaged with several Dashboards. To view the available Dashboards, from the left navigation panel select Dashboards->Browser.
Recommended Dashboards
The following dashboards are recommended for checking on the performance of the overall Kubernetes cluster hosting the Wallaroo instance, and the performance of deployed Wallaroo pipelines. Each of the following are available in the Managed Prometheus folder.
Kubernetes Compute Resources Cluster
Displays the total load of the Kubernetes cluster. Select the Data Source, then the Cluster to monitor. From here, the CPU Usage, Memory Usage, Bandwidth, and other metrics can be viewed.
Kubernetes Compute Resources Namespace (Pods)
This dashboard breaks down the compute resources by Namespace. Deployed Wallaroo pipelines are associated with the Kubernetes namespace matching the format {WallarooPipelineName-WallarooPipelineID} the Wallaroo pipeline name. For example, the pipeline demandcurvepipeline with the the id 3 is associated with the namespace demandcurvepipeline-3.
To drill down even further, select a pod. engine-lb pods are LoadBalancer pods, while engine pods represent the deployed model.
Manage Grafana Permissions
To allow other Azure users or groups access to the managed Grafana instance:
Log into Microsoft Azure. From the Azure Services list, either select Azure Managed Grafana or search for Azure Managed Grafana in the search bar.
From the Azure Managed Grafana dashboard, select the Grafana instance.
From the Grafana instance, select Overview->Access control (IAM).
To add a new user or group access, select + Add->Add role assignment.
Select Job function roles, then select Next.
Select the role, then select Next.
Under Members, select +Select members and select from the user or group to assign to the Grafana role. Select Review + assign. Review the settings, then select Review + assign to save the settings.
8 - Wallaroo Configuration Guide
How to configure Wallaroo
Wallaroo comes with a plethora of options to enable different services, set performance options, and everything you need to run Wallaroo in the most efficient way.
The following guides are made to help organizations configure Wallaroo and provides integrate it into other services.
8.1 - DNS Integration Guide
Integrate Wallaroo Enterprise Into an Organization’s DNS.
The following guide demonstrates how to integrate a Wallaroo Enterprise instance with an organization’s DNS. DNS services integration is required for Wallaroo Enterprise edition. It is not required for Wallaroo Community. This guide is indented to assist organizations complete their Wallaroo Enterprise installation, and can be used as a reference if changes to the DNS services are modified and updates to the Wallaroo Enterprise instance are required.
IMPORTANT NOTE
Changing either the DNS name or the security certificates will require the Wallaroo instance be reinstalled.
DNS Services Integration Introduction
DNS services integration is required for Wallaroo Enterprise to provide access to the various supporting services that are part of the Wallaroo instance. These include:
Simplified user authentication and management.
Centralized services for accessing the Wallaroo Dashboard, Wallaroo SDK and Authentication.
Collaboration features allowing teams to work together.
Managed security, auditing and traceability.
This guide is not intended for Wallaroo Community, as those DNS entries are managed by Wallaroo during the installation. For more information on installing Wallaroo Community, see the Wallaroo Community Install Guides.
Once integrated, users can access the following services directly from a URL starting with the suffix domain - this is the domain name where other DNS entries are appended to. For example, if the suffix domain is sales.example.com, then the other services would be referenced by https://api.sales.sample.com, etc.
Note that even when accessing specific Wallaroo services directly that the user must still be authenticated through Wallaroo.
Service
DNS Entry
Description
Wallaroo Dashboard
suffix domain
Provides access to a user interface for updating workspaces, pipelines, and models. Also provides access to the integrated JupyterHub service.
JupyterHub
jupyterhub
Allows the use of Jupyter Notebooks and access to the Wallaroo SDK.
API
api
Provides access to the Wallaroo API.
Keycloak
keycloak
Keycloak provides user management to the Wallaroo instance.
Connections to Wallaroo services are provided as https://service.{suffix domain}. For example, if the domain suffix is wallaroo.example.com then the URLs to access the various Wallaroo services would be:
Determine whether your organization will use a prefix or not as detailed above.
Have access to the Wallaroo Administrative Dashboard - this requires access to the Kubernetes environment that the Wallaroo instance is installed into.
Have access to internal corporate DNS configurations that can be updated. A subdomain for the Wallaroo instance will be created through this process.
Have the IP address for the Wallaroo instance.
Install kubectl into the Kubernetes cluster administrative node.
Wallaroo IP Address Retrieval Methods
Retrieve LoadBalancer IP with kubectl
For most organizations that install Wallaroo into a cloud based Kubernetes cluster such as Micosoft Azure, AWS, etc the external IP address is tied to Wallaroo Loadbalancer service. This can be retrieved with the kubectl command as follows:
Retrieve the external IP address for your Wallaroo instance LoadBalancer. For example, this can be performed through the following kubectl command:
kubectl get svc -A
Example Result:
NAMESPACE     NAME                           TYPE           CLUSTER-IP     EXTERNAL-IP    PORT(S)                                     AGE
default       kubernetes                     ClusterIP      10.64.16.1     <none>         443/TCP                                     3d19h
wallaroo      alertmanager                   ClusterIP      10.64.16.48    <none>         9093/TCP                                    2d22h
wallaroo      api-lb                         LoadBalancer   10.64.30.169   34.173.211.9   80:32176/TCP,443:32332/TCP,8080:30971/TCP   2d22h
In this example, the External-IP of the wallarooLoadBalancer is 34.173.211.9. A more specific command to retrieve just the LoadBalancer address would be:
kubectl get svc api-lb -n wallaroo -o jsonpath='{.status.loadBalancer.ingress[0].ip}'
34.173.211.9
This procedure is appropriate for both clusters that are in external or internal mode.
Other Methods
For organizations install Wallaroo other methods, such as Air Gap or Single Node Linux may find the kubectl get svc api-lb command only returns the internal IP address.
Depending on the instance, there are different methods of acquiring that IP address. The links below reference difference sources.
Refer to your Wallaroo support representative if further assistance is needed.
DNS Integration Steps
To integrate the Wallaroo instance IP address with a DNS service:
Create a CA-signed TLS certificate for your Wallaroo domain with the following settings:
Certificate Authority Options:
Use a public Certificate Authority such as Let’s Encrypt or Verisign. In general, you would send a Certificate Signing Request to your CA and they would respond with your certificates.
Use a private Certificate Authority (CA) to provide the certificates. Your organization will have procedures for clients to verify the certificates from the private CA.
Use a Wallaroo certificate and public name server. Contact our CSS team for details.
Subject Domain:
Set the certificate’s Subject CN to your Wallaroo domain.
With Wildcards: To use wildcards, use the wildcard *.{suffix domain}. For example, if the domain suffix is wallaroo.example.com, then the Subject CNs would be:
wallaroo.example.com
*.wallaroo.example.com
If wildcard domains are not desired, use a combination of Subject and Subject Alternative Names to set names as follows:
wallaroo.example.com
api.wallaroo.example.com
jupyter.wallaroo.example.com
keycloak.wallaroo.example.com
Save your certificates.
You should have two files: the TLS Certificate (.crt) and TLS private key (.key). Store these in a secure location - these will be installed into Wallaroo at a later step.
Create DNS the following entries based on the list above for the Wallaroo instance’s IP address, updating the domain name depending on whether there is a prefix or not:
api: A (address) record
jupyter: A (address) record
keycloak: A (address) record
Suffix domain: A record, NS (Name Server) record, SOA (Start Of Authority) record.
For example:
Access the Wallaroo Administrative Dashboard in your browser. This can be done either after installation, or through the following command (assuming your Wallaroo instance was installed into the namespace wallaroo). By default this provides the Wallaroo Administrative Dashboard through the URL https://localhost:8080.
kubectl-kots admin-console --namespace wallaroo
From the Wallaroo Dashboard, select Config and set the following:
Networking Configuration
Ingress Mode for Wallaroo Endpoints:
None: Port forwarding or other methods are used for access.
Internal: For environments where only nodes within the same Kubernetes environment and no external connections are required.
External: Connections from outside the Kubernetes environment is allowed.
Enable external URL inference endpoints: Creates pipeline inference endpoints. For more information, see Model Endpoints Guide.
DNS
DNS Suffix (Mandatory): The domain name for your Wallaroo instance.
TLS Certificates
Use custom TLS Certs: Checked
TLS Certificate: Enter your TLS Certificate (.crt file).
TLS Private Key: Enter your TLS private key (.key file).
Other settings as desired.
Once complete, scroll to the bottom of the Config page and select Save config.
A pop-up window will display The config for Wallaroo Enterprise has been updated.. Select Go to updated version to continue.
From the Version History page, select Deploy. Once the new deployment is finished, you will be able to access your Wallaroo services via their DNS addresses.
To verify the configuration is complete, access the Wallaroo Dashboard through the suffix domain. For example if the suffix domain is wallaroo.example.com then access https://wallaroo.example.com in a browser and verify the connection and certificates.
8.2 - Model Endpoints Guide
Enable external deployment URLs to perform inferences through API calls.
Wallaroo provides the ability to perform inferences through deployed pipelines via both internal and external inferences URLs. These URLs allow inferences to be performed by submitting data to the internal or external inferences URL, with the inference results returned in the same format as the InferenceResult Object.
Internal URLs are available only through the internal Kubernetes environment hosting the Wallaroo instance. External URLs are available outside of the Kubernetes environment, such as the public internet. Authentication will be required to connect to these external deployment URLs.
The following process will enable external inference URLs
helm users can update the configuration and enable endpoints by setting the apilb\external_inference_endpoints_enabled to true as follows:
apilb:
# Required to perform remote inferences either through the SDK or the APIexternal_inference_endpoints_enabled: true
For kots users: To access the Wallaroo Administrative Dashboard:
From a terminal shell connected to the Kubernetes environment hosting the Wallaroo instance, run the following kots command:
kubectl kots admin-console --namespace wallaroo
This provides the following standard output:
  • Press Ctrl+C to exit
  • Go to http://localhost:8800 to access the Admin Console
This will host a http connection to the Wallaroo Administrative Dashboard, by default at http://localhost:8800.
Open a browser at the URL detailed in the step above and authenticate using the console password set as described in the as detailed in the Wallaroo Install Guides.
From the top menu, select Config then verify that Networking Configuration -> Ingress Mode for Wallaroo interactive services -> Enable external URL inference endpoints is enabled.
Save the updated configuration, then deploy it. Once complete, the external URL inference endpoints will be enabled.
8.3 - Manage Minio Storage for Models Storage
How to manage model storage in Wallaroo
Targeted Role
Dev Ops
Organizations can manage their ML Model storage in their Wallaroo instances through the MinIO interface included in the standard Wallaroo installation.
The following details how to access and the Wallaroo MinIO service. For full details on using the MinIO service, see the MinIO Documentation site.
All of the steps below require administrative access to the Kubernetes service hosting the Wallaroo instance.
IMPORTANT NOTE
Deleting a model from MinIO storage frees up storage by deleting the model artifacts, but does not remove the model objects from Wallaroo workspaces. Please ensure that pipeline deployments are not dependent on the model artifacts being deleted.
Wallaroo MinIO Model Storage
Wallaroo ML Models are stored in the MinIO bucket model-bucket.
Retrieving the Wallaroo MinIO Password
Access to the Wallaroo MinIO service is password protected. DevOps with administrative access to the Kubernetes cluster hosting the Wallaroo instance can retrieve this password with the following:
The kubectl command.
The namespace the Wallaroo instance is installed to.
Access to the MinIO service in a Wallaroo instance is performed either with the Command Line Interface (CLI), or through a browser based User Interface (UI).
Accessing the MinIO Service Through CLI
Access to the MinIO service included with the Wallaroo instance can be performed with the command line tool mc. For more details, see the MinIO Client documentation.
Installing Minio CLI
The following demonstrates installing the mc command for MacOS and Linux.
Installing for MacOS with Brew
MacOS users who have installed Homebrew can install mc with the following:
brew install minio/stable/mc
Installing for Linux
Linux users can install the MinIO CLI tool mc with the following:
wget https://dl.min.io/client/mc/release/linux-amd64/mc
chmod +x mc
sudo mv mc /usr/local/bin/mc
Port Forward for MinIO CLI Access
To access the Wallaroo MinIO service, use Kubernetes port-forward to connect. By default this is on port 9000. This command requires the following:
The kubectl command.
The namespace the Wallaroo instance is installed to.
Once the port forward command is running, the MinIO UI is access through a browser on port 9001 with the user minio and the MinIO administrative password retrieved through the step Retrieving the Minio Administrative Password.
Viewing General Storage
General disk usage is displayed through Monitoring->Metrics.
Viewing ML Model Storage
ML Models stored for Wallaroo are accessed through the bucket model-bucket.
Select Browse to view the contents of the model-bucket. To determine the specific file name, access the Name of the object and view the Tags. The file name is access via the Tag file-name.
Objects can be deleted from this bucket with the Delete option.
8.4 - Private Containerized Model Container Registry Guide
How to enable private Containerized Model Container Registry with Wallaroo.
Configure Wallaroo with a Private Containerized Model Container Registry
Organizations can configure Wallaroo to use private Containerized Model Container Registry. This allows for the use of containerized models such as MLFlow.
The following steps will provide sample instructions on setting up different private registry services from different providers. In each case, refer to the official documentation for the providers for any updates or more complex use cases.
The following process is used with a GitHub Container Registry to create the authentication tokens for use with a Wallaroo instance’s Private Model Registry configuration.
The following process is used register a GitHub Container Registry with Wallaroo.
Create a new token as per the instructions from the Creating a personal access token (classic) guide. Note that a classic token is recommended for this process. Store this token in a secure location as it will not be able to be retrieved later from GitHub. Verify the following permissions are set:
Select the write:packages scope to download and upload container images and read and write their metadata.
Select the read:packages scope to download container images and read their metadata (selected when write:packages is selected by default).
Select the delete:packages scope to delete container images.
Configure Wallaroo Via Kots
If Wallaroo was installed via kots, use the following procedure to add the private model registry information.
Launch the Wallaroo Administrative Dashboard through a terminal linked to the Kubernetes cluster. Replace the namespace with the one used in your installation.
kubectl kots admin-console --namespace wallaroo
Launch the dashboard, by default at http://localhost:8800.
From the admin dashboard, select Config -> Private Model Container Registry.
Enable Provide private container registry credentials for model images.
Provide the following:
Registry URL: The URL of the Containerized Model Container Registry. Typically in the format host:port. In this example, the registry for GitHub is used.
email: The email address of the Github user generating the token.
username: The username of the Github user authentication to the registry service.
password: The GitHub token generated in the previous steps.
Scroll down and select Save config.
Deploy the new version.
Once complete, the Wallaroo instance will be able to authenticate to the Containerized Model Container Registry and retrieve the images.
Configure Wallaroo Via Helm
During either the installation process or updates, set the following in the local-values.yaml file:
privateModelRegistry:
enabled: true
secretName: model-registry-secret
registry: The URL of the Containerized Model Container Registry. Typically in the format host:port.
email: The email address of the Github user generating the token.
username: The username of the Github user authentication to the registry service.
password: The GitHub token generated in the previous steps.
For example:
# Other settings - DNS entries, etc.# The private registry settingsprivateModelRegistry:
enabled: truesecretName: model-registry-secret
registry: "ghcr.io/johnhansarickwallaroo"email: "sample.user@wallaroo.ai"username: "johnhansarickwallaroo"password: "abcdefg"
Once complete, the Wallaroo instance will be able to authenticate to the registry service and retrieve the images.
The following process is an example of setting up an Artifact Registry Service with Google Cloud Platform (GCP) that is used to store containerized model images and retrieve them for use with Wallaroo.
Uploading and downloading containerized models to a Google Cloud Platform Registry follows these general steps.
Create the GCP registry.
Create a Service Account that will manage the registry service requests.
Assign appropriate Artifact Registry role to the Service Account
Retrieve the Service Account credentials.
Using either a specific user, or the Service Account credentials, upload the containerized model to the registry service.
Add the service account credentials to the Wallaroo instance’s containerized model private registry configuration.
Prerequisites
The commands below use the Google gcloud command line tool, and expect that a Google Cloud Platform account is created and the gcloud application is associated with the GCP Project for the organization.
For full details on the process and other methods, see the Google GCP documentation.
The GCP Registry Service Account is used to manage the GCP registry service. The steps are details from the Google Create a service account guide.
The gcloud process for these steps are:
Connect the gcloud application to the organization’s project.
$PROJECT_ID="YOUR PROJECT ID"gcloud config set project $PROJECT_ID
Create the service account with the following:
The name of the service account.
A description of its purpose.
The name to show when displayed.
SA_NAME="YOUR SERVICE ACCOUNT NAME"DESCRIPTION="Wallaroo container registry SA"DISPLAY_NAME="Wallaroo the Roo"gcloud iam service-accounts create $SA_NAME\
--description=$DESCRIPTION\
--display-name=$DISPLAY_NAME
Read, write, and delete artifacts. Create gcr.io repositories.
For this example, we will add the Artifact Registry Create-on-push Writer to the created Service Account from the previous step.
Add the role to the service account, specifying the member as the new service account, and the role as the selected role. For this example, a pkg.dev is assumed for the Artifact Registry type.
# for pkg.devROLE="roles/artifactregistry.writer"# for gcr.io #ROLE="roles/artifactregistry.createOnPushWritergcloud projects add-iam-policy-binding \
$PROJECT_ID\
--member="serviceAccount:$SA_NAME@$PROJECT_ID.iam.gserviceaccount.com"\
--role=$ROLE
Authenticate to Repository
To push and pull image from the new registry, we’ll use our new service account and authenticate through the local Docker application. See the GCP Push and pull images for details on using Docker and other methods to add artifacts to the GCP artifact registry.
Set up Service Account Key
To set up the Service Account key, we’ll use the Google Console IAM & ADMIN dashboard based on the Set up authentication for Docker, using the JSON key approach.
From GCP console, search for IAM & Admin.
Select Service Accounts.
Select the service account to generate keys for.
Select the Email address listed and store this for later steps with the key generated through this process.
Select Keys, then Add Key, then Create new key.
Select JSON, then Create.
Store the key in a safe location.
Convert SA Key to Base64
The key file downloaded in Set up Service Account Key needs to be converted to base64 with the following command, replacing the locations of KEY_FILE and KEYFILEBASE64:
Tag the statsmodel and postprocess containers based on the repository used for the container registry. The GCP Registry format is $LOCATION-docker.pkg.dev/$PROJECT_ID/$REPOSITORY/$IMAGE. In this example, it is us-west1-docker.pkg.dev/wallaroo-dev-253816/doc-test-registry/, with the images mlflow-postprocess-example and mlflow-statsmodels-example.
Get the internal name through docker images.
docker image list

REPOSITORY                                                           TAG       IMAGE ID       CREATED        SIZE
mlflow-postprocess-example                                           2023.1    ff121d335e24   5 months ago   3.28GB
mlflow-statsmodels-example                                           2023.1    4c23cac0a7b1   5 months ago   3.34GB
Tag the images with the repository address. Note the repository must be in lowercase.
docker tag mlflow-postprocess-example:2023.1 us-west1-docker.pkg.dev/wallaroo-dev-253816/doc-test-registry/mlflow-postprocess-example:2023.1
docker tag mlflow-statsmodels-example:2023.1 us-west1-docker.pkg.dev/wallaroo-dev-253816/doc-test-registry/mlflow-statsmodels-example:2023.1
Verify with docker images. Note that the new tags match the same Image ID as the original tags.
docker images

REPOSITORY                                                                                 TAG       IMAGE ID       CREATED        SIZE
mlflow-postprocess-example                                                                 2023.1    ff121d335e24   5 months ago   3.28GB
us-west1-docker.pkg.dev/wallaroo-dev-253816/doc-test-registry/mlflow-postprocess-example   2023.1    ff121d335e24   5 months ago   3.28GB
mlflow-statsmodels-example                                                                 2023.1    4c23cac0a7b1   5 months ago   3.34GB
us-west1-docker.pkg.dev/wallaroo-dev-253816/doc-test-registry/mlflow-statsmodels-example   2023.1    4c23cac0a7b1   5 months ago   3.34GB
Push the containers to the registry. This may take some time depending on the speed of your connection. Wait until both are complete.
The private registry service account email address. This is retrieved as described in the process Set up Service Account Key.
The private registry service account credentials in base64. These were created in the step Convert SA Key to Base64. These can be displayed directly from the base Service Account credentials file with:
cat $KEYFILEBASE64
Configure for Kots Installations
For kots based installations of Wallaroo, use the following procedure. These are based on the Wallaroo Install Guides.
Log into the Wallaroo Administrative Dashboard from a Kubernetes terminal with administrative access to the Wallaroo instance with the following command, replacing the namespace wallaroo with the one where the Wallaroo instance is installed.
kubectl kots admin-console --namespace wallaroo
Select Config, then Private Model Container Registry.
Enable Provide private container registry credentials for model images.
Update the following fields:
Registry URL: Insert the full path of your registry. The GCP Registry format is $LOCATION-docker.pkg.dev/$PROJECT_ID/$REPOSITORY/$IMAGE. In this example, it is us-west1-docker.pkg.dev/wallaroo-dev-253816/doc-test-registry/.
Email: The email address of the service account used with the registry service.
User: Set to _json_key_base64.
Password: Set to the private registry service account credentials in base64.
Scroll to the bottom and select Save Config.
When the update module appears, select Go to updated version.
Wait for the preflight checks to completed, then select Deploy.
Configure Wallaroo Via Helm
During either the installation process or updates, set the following in the local-values.yaml file:
privateModelRegistry:
enabled: true
secretName: model-registry-secret
registry: Insert the full path of your registry. The GCP Registry format is $LOCATION-docker.pkg.dev/$PROJECT_ID/$REPOSITORY/$IMAGE. In this example, it is us-west1-docker.pkg.dev/wallaroo-dev-253816/doc-test-registry/.
email: The email address of the service account used with the registry service.
username: Set to _json_key_base64.
password: Set to the private registry service account credentials in base64.
For example:
# Other settings - DNS entries, etc.# The private registry settingsprivateModelRegistry:
enabled: truesecretName: model-registry-secret
registry: "YOUR REGISTRY URL:YOUR REGISTRY PORT"email: "serviceAccount:doc-test@wallaroo-dev.iam.gserviceaccount.com"username: "_json_key_base64_"password: "abcde"
Once complete, the Wallaroo instance will be able to authenticate to the registry service and retrieve the images.
Setting Private Registry Configuration in Wallaroo
Configure Via Kots
If Wallaroo was installed via kots, use the following procedure to add the private model registry information.
Launch the Wallaroo Administrative Dashboard through a terminal linked to the Kubernetes cluster. Replace the namespace with the one used in your installation.
kubectl kots admin-console --namespace wallaroo
Launch the dashboard, by default at http://localhost:8800.
From the admin dashboard, select Config -> Private Model Container Registry.
Enable Provide private container registry credentials for model images.
Provide the following:
Registry URL: The URL of the Containerized Model Container Registry. Typically in the format host:port. In this example, the registry for GitHub is used. NOTE: When setting the URL for the Containerized Model Container Registry, only the actual service address is needed. For example: with the full URL of the model as ghcr.io/wallaroolabs/wallaroo_tutorials/mlflow-statsmodels-example:2022.4, the URL would be ghcr.io/wallaroolabs.
email: The email address of the user authenticating to the registry service.
username: The username of the user authentication to the registry service.
password: The password of the user authentication or token to the registry service.
Scroll down and select Save config.
Deploy the new version.
Once complete, the Wallaroo instance will be able to authenticate to the Containerized Model Container Registry and retrieve the images.
Configure via Helm
During either the installation process or updates, set the following in the local-values.yaml file:
privateModelRegistry:
enabled: true
secretName: model-registry-secret
registry: The URL of the private registry.
email: The email address of the user authenticating to the registry service.
username: The username of the user authentication to the registry service.
password: The password of the user authentication to the registry service.
For example:
# Other settings - DNS entries, etc.# The private registry settingsprivateModelRegistry:
enabled: truesecretName: model-registry-secret
registry: "YOUR REGISTRY URL:YOUR REGISTRY PORT"email: "YOUR EMAIL ADDRESS"username: "YOUR USERNAME"password: "Your Password here"
Once complete, the Wallaroo instance will be able to authenticate to the registry service and retrieve the images.
8.5 - Wallaroo Support Bundle Generation Guide
How to generate support bundles to troubleshoot Wallaroo
To track potential issues, Wallaroo provides a method to create a support bundle: a collection of logs, configurations, and other information that is submitted to Wallaroo support staff to determine where an issue may be and offer a correction.
Support bundles are generated depending on the method of installation:
kots: If Wallaroo was installed via kots, the support bundle is generated through the Wallaroo Administrative Dashboard.
helm: If Wallaroo was installed via helm, the support bundle is generated through a command line process.
Generating via Kots
At any time, the administration console can create troubleshooting bundles for Wallaroo technical support to assess product health and help with problems. Support bundles contain logs and configuration files which can be examined before downloading and transmitting to Wallaroo. The console also has a configurable redaction mechanism in cases where sensitive information such as passwords, tokens, or PII (Personally Identifiable Information) need to be removed from logs in the bundle.
To manage support bundles:
Log into the administration console.
Select the Troubleshoot tab.
Select Analyze Wallaroo.
Select Download bundle to save the bundle file as a compressed archive. Depending on your browser settings the file download location can be specified.
Send the file to Wallaroo technical support.
At any time, any existing bundle can be examined and downloaded from the Troubleshoot tab.
Generating via Helm
If issues are detected in the Wallaroo instance, a support bundle file is generated using the support-bundle.yaml file provided by the Wallaroo support representative.
This creates a collection of log files, configuration files and other details into a .tar.gz file in the same directory as the command is run from in the format support-bundle-YYYY-MM-DDTHH-MM-SS.tar.gz. This file is submitted to the Wallaroo support team for review.
This support bundle is generated through the following command:
The following guides are made to help organizations configure backup Wallaroo data and restore it when needed.
9.1 - Wallaroo Instance Backup and Restore with Velero
How to backup a Wallaroo instance and restore it using Velero
One method of Wallaroo backup and restores is through the Velero application. This application provides a method of storing snapshots of the Wallaroo installation, including deployed pipelines, user settings, log files, etc., which can be retrieved and restored at a later date.
For full details and setup procedures, see the Velero Documentation. The installation steps below are intended as short guides.
The following procedures are for Wallaroo Enterprise installed via kots or helm in the cloud services listed below. These procedures are not tested for other environments.
Prerequisites
A Wallaroo Enterprise instance
A client connected to the Kubernetes environment hosting the Wallaroo instance running the velero client.
Kubernetes cloud storage, such as:
Azure Storage Container
Google Cloud Storage (GCS) Bucket
AWS S3 Bucket
Velero contains both a client and a Kubernetes service that is used to manage backups and restores.
Client Install
The Velero client supports MacOS and Linux. Windows support is available but not officially supported. The following steps are based on the Velero CLI installation procedure.
MacOS Install
Velero is available on MacOS through the Homebrew project. With Homebrew installed, Velero is installed with the following command:
brew install velero
Linux Install
Velero is available through a tarball installation through the Velero releases page. Once downloaded, expand the tar.gz file and place the velero executable into an executable path directory.
Velero Kubernetes Install
The Velero service runs in the same Kubernetes environment where the Wallaroo instance is installed. Before installation, storage known as a bucket must be made available for the Velero service to place the backup files.
The following shows basic steps on creating the storage containers used for each major cloud service. Organizations are encourage to use these steps with the official Velero instructions, available from the links within each cloud provider section below.
9.1.1 - Velero AWS Cluster Installation
How to set up Velero with a AWS Kubernetes cluster
Create the S3 bucket used for Velero based backups and restores with the following command, replacing the variables AWS_BUCKET_NAME and AWS_REGION based on your organization’s requirements. In the command below, if the region is us-east-1, remove the --create-bucket-configuration option.
There are multiple options for setting permissions for the Velero service in an AWS Kubernetes cluster as detailed in the Velero plugins for AWS Set permissions for Velero. The following examples assume the IAM user method as follows.
Create the IAM user. In this example, the name is velero.
aws iam create-user --user-name velero
Attach the following AWS policies to the new velero AWS user.
Install the Velero Service into the AWS Wallaroo Cluster
The following procedure will install the Velero service into the AWS Kubernetes cluster hosting the Wallaroo instance.
Verify the connection to the GCP Kubernetes cluster hosting the Wallaroo instance.
kubectl get nodes
NAME STATUS ROLES AGE VERSION
aws-ce-default-pool-5dd3c344-fxs3 Ready <none> 31s v1.23.14-gke.1800
aws-ce-default-pool-5dd3c344-q95a Ready <none> 25d v1.23.14-gke.1800
aws-ce-default-pool-5dd3c344-scmc Ready <none> 31s v1.23.14-gke.1800
aws-ce-default-pool-5dd3c344-wnkn Ready <none> 31s v1.23.14-gke.1800
Install Velero into the AWS Kubernetes cluster. This assumes the $BUCKET_NAME and $REGION variables from earlier, and the AWS velero user credentials are stored in ~/.credentials-velero-aws
Once complete, verify the installation is complete by checking for the velero namespace in the Kubernetes cluster:
kubectl get namespaces
NAME STATUS AGE
default Active 222d
kube-node-lease Active 222d
kube-public Active 222d
kube-system Active 222d
velero Active 5m32s
wallaroo Active 7d23h
These steps assume the user has installed the Azure Command-Line Interface (CLI) and has the necessary permissions to perform the steps below.
The following items are required to create the Velero bucket via a Microsoft Azure Storage Container:
Resource Group: The resource group that the storage container belongs to. It is recommended to either use the same Resource Group as the Azure Kubernetes cluster hosting the Wallaroo instance, or create a Resource Group in the same Azure location.
Resource Group Location: The Azure location for the resource group.
Azure Storage Account ID: Used to manage the storage container settings.
Azure Storage Container Name: The name of the container being used.
Azure Kubernetes Cluster Name: The name of the Azure Kubernetes Cluster hosting the Wallaroo instance.
Create Azure Storage Account Access Key: This step sets a method for the Velero service to authenticate with Azure to create the backup and restore jobs. Velero recommends different options in its Velero Plugin for Microsoft Azure Set permissions for Velero documentation. The steps below will cover using a storage account access key.
From the Subscriptions Dashboard, select the Subscription ID to be used and store it for later use.
Create Azure Resource Group
To create the Azure Resource Group, use the following command, replacing the variables $AZURE_VELERO_RESOURCE_GROUP and $AZURE_LOCATION with your organization’s requirements.
IMPORTANT NOTE: This resource group must be in the same Azure Subscription ID as in the Get Azure Subscription ID above.
az group create -n $AZURE_VELERO_RESOURCE_GROUP --location $AZURE_LOCATION
Create Azure Storage Account
To create the Azure Storage Account, the Azure Storage Account ID must be composed of only lower case alphanumeric characters and - and ., with the ID beginning or ending in an alphanumeric character. So velero-backup-account is appropriate, while VELERO_BACKUP will not. Update the variables $AZURE_VELERO_RESOURCE_GROUP and $AZURE_STORAGE_ACCOUNT_ID with your organization’s requirements.
Use the following command to create the Azure Storage Container for use by the Velero service. Replace the BLOB_CONTAINER variable with your organization’s requirements. Note that this new container should have a unique name.
BLOB_CONTAINER=velero
az storage container create -n $BLOB_CONTAINER --public-access off --account-name $AZURE_STORAGE_ACCOUNT_ID
Create Azure Storage Account Access Key
This step sets a method for the Velero service to authenticate with Azure to create the backup and restore jobs. Velero recommends different options in its Velero Plugin for Microsoft Azure Set permissions for Velero documentation. Organizations are encouraged to use the method that aligns with their security requirements.
The steps below will cover using a storage account access key.
Set the default resource group to the same one used for the Valero Resource Group in the step Create Azure Resource Group.
az configure --defaults group=$AZURE_VELERO_RESOURCE_GROUP
Retrieve the Azure Storage Account Access Key using the $AZURE_STORAGE_ACCOUNT_ID created in the step Create Azure Storage Account. Store this key in a secure location.
Store the name of the Azure Kubernetes cluster hosting the Wallaroo instance as $AZURE_CLOUD_NAME and the $AZURE_STORAGE_ACCOUNT_ACCESS_KEY into a secret key file. The following command will store it in the location ~/.credentials-velero-azure:
Once complete, verify the installation is complete by checking for the velero namespace in the Kubernetes cluster:
kubectl get namespaces
NAME STATUS AGE
default Active 222d
kube-node-lease Active 222d
kube-public Active 222d
kube-system Active 222d
velero Active 5m32s
wallaroo Active 7d23h
To view the logs for the Velero service installation, use the command kubectl logs deployment/velero -n velero.
The following items are required to create the Velero bucket via a GCP Bucket:
Google Cloud Platform (GCP) Project ID: The project ID for where commands are performed from.
Google Cloud Storage (GCS) Bucket: The object storage bucket where backups are stored.
Google Service Account (GSA): A Velero specific Google Service Account to backup and restore the Wallaroo instance when required.
Either a Google Service Account Key or Workload Identity: Either of these methods are used by the Velero service to authenticate to GCP for its backup and restore tasks.
Create the GCS bucket for storing the Wallaroo backup and restores with the following command. Replace the variable $BUCKET_NAME based on your organization’s requirements.
Create the Google Service Account for the Velero service using the following commands:
Retrieve your organization’s GCP Project ID and store it in the PROJECT_ID variable. Note that this will retrieve the default project ID for the gcloud configuration. Replace with the actual GCP Project ID as required.
PROJECT_ID=$(gcloud config get-value project)
Create the service account. Update the $GSA_NAME variable based on the organization’s requirements.
GSA_NAME=velero
gcloud iam service-accounts create $GSA_NAME\
--display-name "Velero service account"
Use gcloud iam service-accounts list to list out the services.
gcloud iam service-accounts list
DISPLAY NAME EMAIL DISABLED
Velero service account veleroexample.iam.gserviceaccount.com False
Select the email address for the new Velero service account and set the variable SERVICE_ACCOUNT_EMAIL equal to the accounts email address:
Create a Custom Role with the following minimum positions, and bind it to the new Velero service account. The ROLE needs to be unique and DNS compliant.
To install the Velero service into the Kubernetes cluster hosting the Wallaroo service:
Verify the connection to the GCP Kubernetes cluster hosting the Wallaroo instance.
kubectl get nodes
NAME STATUS ROLES AGE VERSION
gke-wallaroodocs-ce-default-pool-5dd3c344-fxs3 Ready <none> 31s v1.23.14-gke.1800
gke-wallaroodocs-ce-default-pool-5dd3c344-q95a Ready <none> 25d v1.23.14-gke.1800
gke-wallaroodocs-ce-default-pool-5dd3c344-scmc Ready <none> 31s v1.23.14-gke.1800
gke-wallaroodocs-ce-default-pool-5dd3c344-wnkn Ready <none> 31s v1.23.14-gke.1800
Install Velero into the GCP Kubernetes cluster. This assumes the $BUCKET_NAME variable from earlier, and the Google Service Account Key are stored in ~/.credentials-velero-gcp
Once complete, verify the installation is complete by checking for the velero namespace in the Kubernetes cluster:
kubectl get namespaces
NAME STATUS AGE
default Active 222d
kube-node-lease Active 222d
kube-public Active 222d
kube-system Active 222d
velero Active 5m32s
wallaroo Active 7d23h
Set the $BACKUP_NAME. This must be all lowercase characters or numbers or -/. and must end in alphanumeric characters.
BACKUP_NAME={give it your own name}
Issue the following backup command. The --exclude-namespaces is used to exclude namespaces that are not required for the Wallaroo backup and restore. By default, these are the namespaces velero, default, kube-node-lease, kube-public, and kube-system.
This process will back up all namespaces that are not excluded, including deployed Wallaroo pipelines. Add any other namespaces that should not be part of the backup to the --exclude-namespaces option as per your organization’s requirements.
To list previous Wallaroo backups and their logs, use the following commands below:
List backups with velero backup get to list all backups and their progress:
velero backup get
NAME STATUS ERRORS WARNINGS CREATED EXPIRES STORAGE LOCATION SELECTOR
doctest-20230315a Completed 00 2023-03-15 10:52:27 -0600 MDT 28d default <none>
doctest-magicalbear-20230315 Completed 01 2023-03-15 11:52:17 -0600 MDT
Retrieve backup logs with velero backup logs $BACKUP_NAME:
velero backup logs $BACKUP_NAME
Wallaroo Restore Procedure
To restore a from a Wallaroo backup:
Set the backup name as the variable $BACKUP_NAME. Use the command velero backup get for a list of previous backups.
velero backup get
NAME STATUS ERRORS WARNINGS CREATED EXPIRES STORAGE LOCATION SELECTOR
doctest-20230315a Completed 00 2023-03-15 10:52:27 -0600 MDT 28d default <none>
doctest-magicalbear-20230315 Completed 01 2023-03-15 11:52:17 -0600 MDT
BACKUP_NAME={give it your own name}
Use the velero restore create command to create the restore job, using the $BACKUP_NAME variable set in the step above.
velero restore create --from-backup $BACKUP_NAMERestore request "doctest-20230315a-20230315105647" submitted successfully.
Run `velero restore describe doctest-20230315a-20230315105647` or `velero restore logs doctest-20230315a-20230315105647`for more details.
To check the restore status, use the velero restore describe command. The optional flag –details provides more information.
If the Kubernetes cluster does not have a static IP address assigned to the Wallaroo loadBalancer service, the DNS information may need to be updated if the IP address has changed. Check with the DNS Integration Guide for more information.
10 - Wallaroo ML Workload Orchestration Management
How to use Wallaroo ML Workload Orchestrations
Wallaroo provides ML Workload Orchestrations and Tasks to automate processes in a Wallaroo instance. For example:
Deploy a pipeline, retrieve data through a data connector, submit the data for inferences, undeploy the pipeline
Replace a model with a new version
Retrieve shadow deployed inference results and submit them to a database
Orchestration Flow
ML Workload Orchestration flow works within 3 tiers:
Tier
Description
ML Workload Orchestration
User created custom instructions that provide automated processes that follow the same steps every time without error. Orchestrations contain the instructions to be performed, uploaded as a .ZIP file with the instructions, requirements, and artifacts.
Task
Instructions on when to run an Orchestration as a scheduled Task. Tasks can be Run Once, where is creates a single Task Run, or Run Scheduled, where a Task Run is created on a regular schedule based on the Kubernetes cronjob specifications. If a Task is Run Scheduled, it will create a new Task Run every time the schedule parameters are met until the Task is killed.
Task Run
The execution of an task. These validate business operations are successful identify any unsuccessful task runs. If the Task is Run Once, then only one Task Run is generated. If the Task is a Run Scheduled task, then a new Task Run will be created each time the schedule parameters are met, with each Task Run having its own results and logs.
One example may be of making donuts.
The ML Workload Orchestration is the recipe.
The Task is the order to make the donuts. It might be Run Once, so only one set of donuts are made, or Run Scheduled, so donuts are made every 2nd Sunday at 6 AM. If Run Scheduled, the donuts are made every time the schedule hits until the order is cancelled (aka killed).
The Task Run are the donuts with their own receipt of creation (logs, etc).
10.1 - ML Workload Orchestration Configuration Guide
How to enable or disable Wallaroo ML Workload Orchestration
Wallaroo ML Workload Orchestration allows organizations to automate processes and run them either on demand or on a reoccurring schedule.
The following guide shows how to enable Wallaroo ML Workload Orchestration in a Wallaroo instance.
Enable Wallaroo ML Workload Orchestration for Kots Installations
Organizations that install Wallaroo using kots can enable or disable Wallaroo ML Workload Orchestration from the Wallaroo Administrative Dashboard through the following process.
From a terminal shell with access to the Kubernetes environment hosting the Wallaroo instance, run the following. Replace wallaroo with the namespace used for the Wallaroo installation.
kubectl kots admin-console --namespace wallaroo
Access the Wallaroo Administrative Dashboard through a browser. By default, http://localhost:8080. Enter the administrative password when requested.
From the top navigation menu, select Config.
From Pipeline Orchestration, either enable or disable Enable Pipeline Orchestration service.
Scroll to the bottom and select Save config.
From the The config for Wallaroo has been updated. module, select Go to updated version.
Select the most recent version with the updated configuration and select Deploy.
The update process will take 10-15 minutes depending on your Wallaroo instance and other changes made.
Enable Wallaroo ML Workload Orchestration for Helm Installations
To enable Wallaroo ML Workload Orchestration for Helm based installations of Wallaroo:
Set the local values YAML file - by default local-values.yaml with the following:
orchestration:
enabled: true
If installing Wallaroo, then format the helm install command as follows, setting the $RELEASE, $REGISTRYURL, $VERSION, and $LOCALVALUES.yaml as required for the installation settings.
If performing an update to the Wallaroo instance configuration, then use the helm upgrade, , setting the $RELEASE, $REGISTRYURL, $VERSION, and $LOCALVALUES.yaml as required for the installation settings.
For example, to upgrade the registration wallaroo from the EE channel the command would be:
10.2 - Wallaroo ML Workload Orchestrations User Interface
How to view uploaded ML Workload Orchestrations and their associates Tasks
Orchestrations and their Tasks and Task Runs are visible through the Wallaroo Dashboard through the following process.
IMPORTANT NOTE
If you do not see the Workloads link at the top of the Wallaroo Dashboard, check with your Wallaroo administrator to verify that ML Workloads are enabled. See the ML Workload Orchestration Configuration Guide for full details.
From the Wallaroo Dashboard, select the workspace where the workloads were uploaded to.
From the upper right corner, select Workloads.
The list of uploaded ML Workload Orchestrations are displayed with the following:
Search Bar (A): Filter the list by workload name.
Status Filter (B): Filter the list by:
Only Active: Only show Active workloads.
Only Inactive: Only show Inactive workloads.
Only Error: Only show workloads flagged with an Error.
Workload (C): The assigned name of the workload.
Status (D): Whether the workload orchestration status is Active, Inactive, or has an Error.
Created At (E): The date the Orchestration was uploaded.
ID (F): The unique workload orchestration ID in UUID format.
Select a workload orchestration to view Tasks generated from this workload. The Orchestration Page has the following details:
Orchestration Details:
Orchestration Name (A): The name assigned when the workload was created from the workload orchestration.
Orchestration ID (B): The ID of the workload in UUID format.
Created (C): The date the workload was uploaded.
File (D): The file the workload was uploaded from.
File Hash (E): The hash of the workload file.
Workload Log: Each Task generated from the Orchestration displays the following:
Type (F): Tasks are shown as either Run Once (a lightning bolt icon) or Run Scheduled (circular arrow icon).
Task Name (G): The name of the task.
Task ID (H): The ID of the task in UUID format.
Last Run Status (I): The status of the task’s last Task Run as either Success or Failure.
Run At (J): For Run Once tasks, shows the date and time the Task Run was started. For Run Scheduled tasks, shows the date and time the last Task Run was started, and the next scheduled run for the next Task Run. The actual Task Run start time may vary due to multiple factors.
10.3 - Wallaroo ML Workload Orchestration Requirements
Requirements for uploading a Wallaroo ML Workload Orchestration
Orchestration Requirements
Orchestrations are uploaded to the Wallaroo instance as a ZIP file with the following requirements:
Parameter
Type
Description
User Code
(Required) Python script as .py files
If main.py exists, then that will be used as the task entrypoint. Otherwise, the firstmain.py found in any subdirectory will be used as the entrypoint. If no main.py is found, the orchestration will not be accepted.
A standard Python requirements.txt for any dependencies to be provided in the task environment. The Wallaroo SDK will already be present and should not be included in the requirements.txt. Multiple requirements.txt files are not allowed.
Other artifacts
Other artifacts such as files, data, or code to support the orchestration.
Zip Instructions
In a terminal with the zip command, assemble artifacts as above and then create the archive. The zip command is included by default with the Wallaroo JupyterHub service.
zip commands take the following format, with {zipfilename}.zip as the zip file to save the artifacts to, and each file thereafter as the files to add to the archive.
zip {zipfilename}.zip file1, file2, file3....
For example, the following command will add the files main.py and requirements.txt into the file hello.zip.
The following recommendations will make using Wallaroo orchestrations.
The version of Python used should match the same version as in the Wallaroo JupyterHub service.
The same version of the Wallaroo SDK should match the server. For a 2023.2.1 Wallaroo instance, use the Wallaroo SDK version 2023.2.1.
Specify the version of pip dependencies.
The wallaroo.Client constructor auth_type argument is ignored. Using wallaroo.Client() is sufficient.
The following methods will assist with orchestrations:
wallaroo.in_task() : Returns True if the code is running within an orchestration task.
wallaroo.task_args(): Returns a Dict of invocation-specific arguments passed to the run_ calls.
Orchestrations will be run in the same way as running within the Wallaroo JupyterHub service, from the version of Python libraries (unless specifically overridden by the requirements.txt setting, which is not recommended), and running in the virtualized directory /home/jovyan/.
Orchestration Code Samples
The following demonstres using the wallaroo.in_task() and wallaroo.task_args() methods within an Orchestration. This sample code uses wallaroo.in_task() to verify whether or not the script is running as a Wallaroo Task. If true, it will gather the wallaroo.task_args() and use them to set the workspace and pipeline. If False, then it sets the pipeline and workspace manually.
# get the argumentswl=wallaroo.Client()
# if true, get the arguments passed to the taskifwl.in_task():
arguments=wl.task_args()
# arguments is a key/value pair, set the workspace and pipeline nameworkspace_name=arguments['workspace_name']
pipeline_name=arguments['pipeline_name']
# False: We're not in a Task, so set the pipeline manuallyelse:
workspace_name="bigqueryworkspace"pipeline_name="bigquerypipeline"